From Basic to Intermediate: Objects and Subwindows (II)
 75
 0

Introduction
In the previous article, “From Basic to Intermediate: Objects and Subwindows (I)”, we looked at how to direct objects created by an indicator to a subwindow. However, if you were paying attention, you probably noticed that I mentioned there was an error in that procedure. The problem arises precisely because of the mechanism used to determine the subwindow index on the chart. In addition, we have another problem that, in my opinion, deserves special attention and should be addressed first. This issue wasn't mentioned in the previous article because you might not have understood it until you tried what was shown there for yourself.
In this article, we'll look at a few ways to correct some of the errors that may arise when applying what we've learned so far. So I'd like you to set aside your everyday concerns for a moment and focus on what we're about to explain, since the origins of some errors can be quite difficult to understand.Objects and Subwindows (II)
If you've studied each of these articles and put what you've learned into practice, you've probably already realized that the purpose of the MQL5 language is precisely to allow programmers some degree of control over the behavior and operation of MetaTrader 5 so that the platform produces the expected results. This is the easy part, although few people actually realize it.
The tricky part is understanding that you won't always be able to do something without first getting a handle on some of the mechanisms and concepts used by MetaTrader 5. One of these concepts has already been explained: we CANNOT add two instances of the same indicator to a single chart. This is a fact, and it is guaranteed by MetaTrader 5's internal mechanisms. However, if we change any argument or input parameter of the indicator, we can add a second instance to the same chart, since in that case MetaTrader 5 will assume that this second—that is, new—instance is not yet present on the chart.
Okay, but why am I bringing this up again? So, dear reader, the fact is that the code we've looked at so far has some issues that could significantly complicate matters. And these problems arise precisely when we try to improve the code itself. That’s why I want you to clearly understand the following: although the code we’ve looked at so far works—which you can verify in each of the articles using animations that accurately show how the code works—changing it can lead to some rather confusing results. This is precisely because each of these code examples is missing certain details.
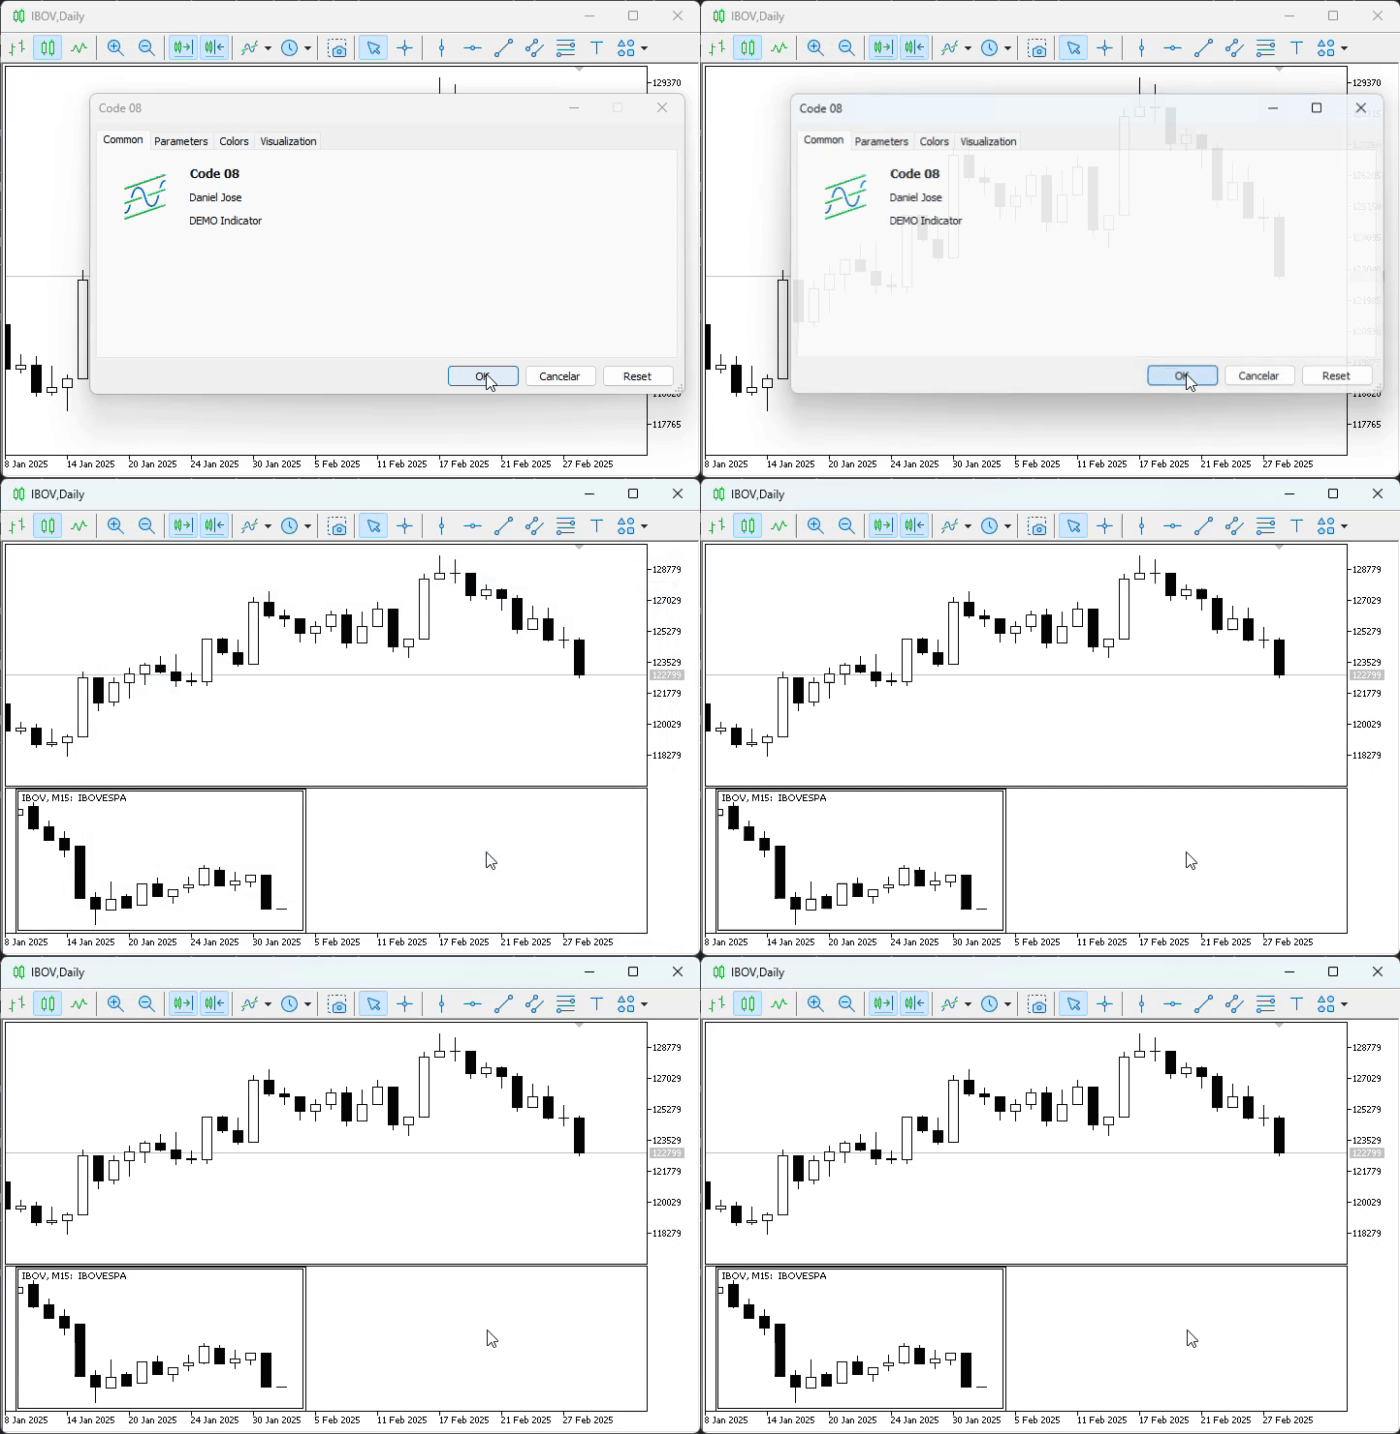
To make this clearer and easier to understand, let's use one of the code examples provided in the attachment to the previous article. If we use one of these code examples, we'll get the result shown in the following animation.
Animation 01
Up to this point, as shown in Animation 01, everything is working correctly, which indicates that the result obtained exactly matches the expected result. Now, if you open the list of indicators on the same chart shown in Animation 01, you'll see the following.
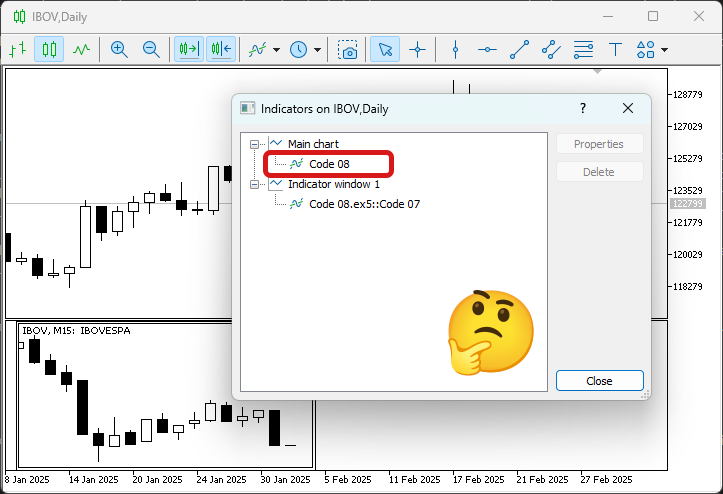
Image 01
Now, here's the crux of the matter: if you try to add the indicator shown in Animation 01 again, MetaTrader 5 won't let you run the code a second time. This will prevent a new subwindow from being created on the chart. This restriction is due specifically to the presence on the chart of the indicator highlighted in Image 01. However, if you remove this indicator, highlighted in Image 01, the situation will change.
To make this easier to understand, you need to adjust the indicator list shown in Image 01 so that it matches Image 02 below.
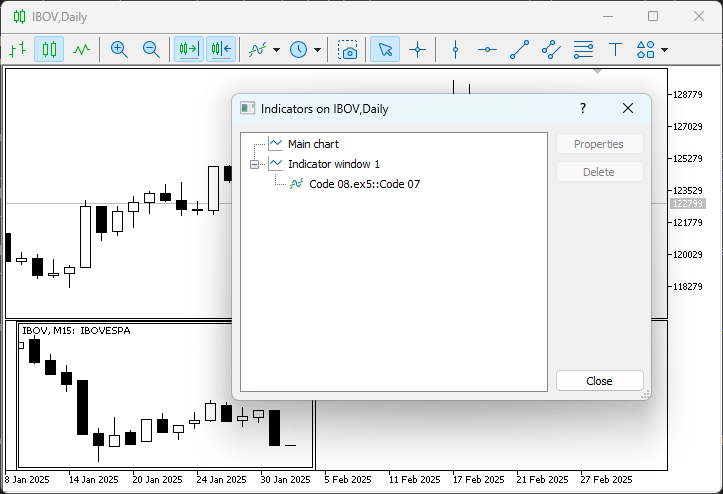
Image 02
Please note that MetaTrader 5 will no longer prevent us from adding the indicator shown in Animation 01 again. Naturally, you might think this has to do with what was discussed in the previous article: the new window might receive the object included in the code. However, as explained earlier, this will not happen precisely because the name of the object to be used indicates that it is already present on the chart. However, that's not the point right now. The question is: why, when we remove the indicator from the list, as shown in Image 02, does the subwindow it created not disappear as well?
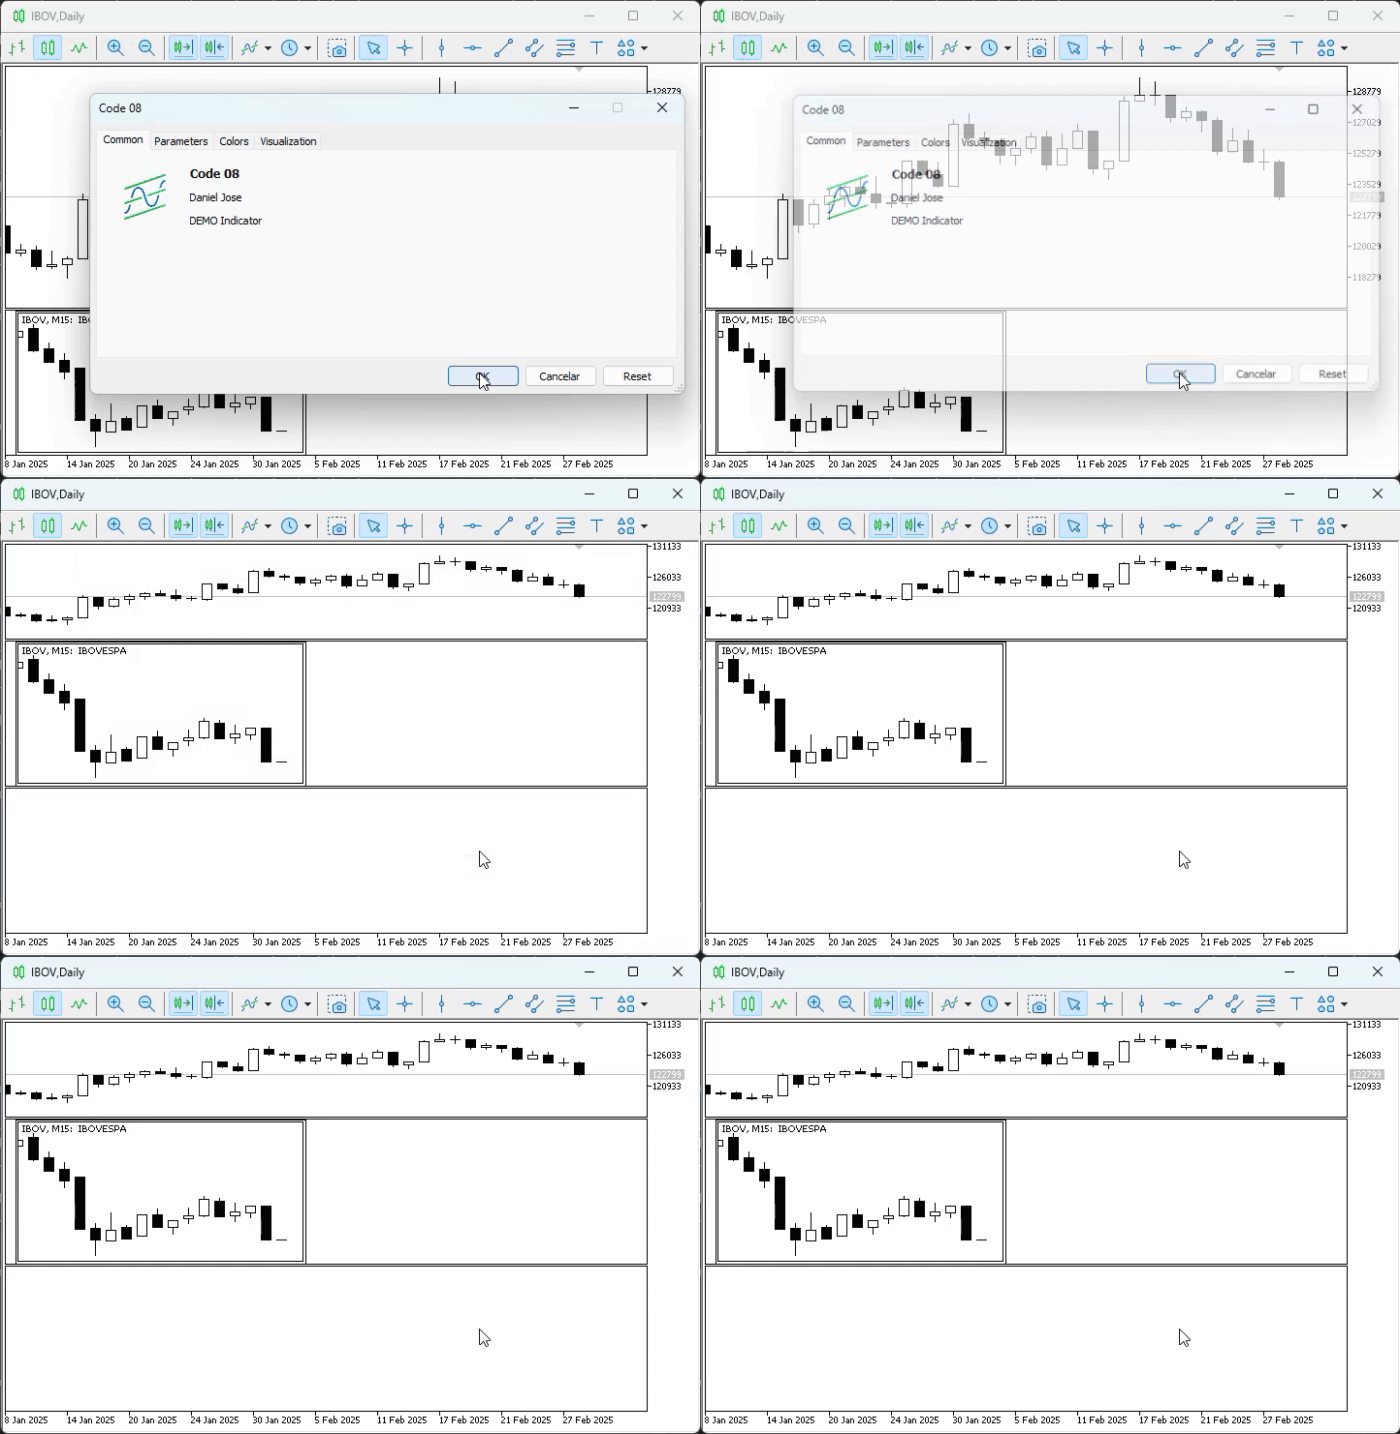
Precisely because the subwindow was not removed along with the indicator, we ended up introducing a potential error into our application. This happens simply because the various elements are not fully interconnected. Thus, the result may now look something like what is shown below.
Animation 02
Notice how one simple detail completely changed the outcome and, so to speak, made everything much more confusing, resulting in an extremely poor user experience with the application. So, how can we correct this kind of mistake and avoid this problem? Well, the best and easiest way to do this is to link all the code together. Thus, if any element is removed, the main code will be notified and can take appropriate action, ensuring that nothing is left on the chart and that nothing is removed incorrectly. Note that two types of situations are mentioned here.
The first is that something that should not be removed may be removed from the chart. The second concerns whether elements that should be removed remain on the chart when the main code is removed from it.
It is very important that you understand that these two situations exist, since each one requires a completely different approach. Now that we've made this distinction, we can move on to making the necessary corrections. Keep in mind that the approaches shown here can and should be adapted to each specific situation. To start, let's make it so that when the main indicator is removed from the chart, the indicator located in the subwindow created by that same main code is also removed. Although, in principle, removing an indicator might seem like a fairly simple task—since all you need to do is specify where it is located and what the indicator you want to remove is called—in some cases, this can turn out to be quite a challenge. But let's start with the simplest case. To do this, we first need to familiarize ourselves with the code we'll be using.
The first code snippet is shown below.
01. //+------------------------------------------------------------------+
02. #property copyright "Daniel Jose"
03. //+------------------------------------------------------------------+
04. #property description "DEMO Indicator"
05. //+------------------------------------------------------------------+
06. #property indicator_chart_window
07. #property indicator_height          150
08. #property indicator_plots           0
09. //+------------------------------------------------------------------+
10. #define def_ShortName "Test 123."
11. //+------------------------------------------------------------------+
12. class C_MiniChart
13. {
14.     private :
15. //+----------------+
16.         string  m_szNameObject;
17.         int     m_Sub;
18. //+----------------+
19.         void SetInteger(ENUM_OBJECT_PROPERTY_INTEGER prop, int value) { ObjectSetInteger(0, m_szNameObject, prop, value); }
20. //+----------------+
21.         int WhatSubWin(void)
22.         {
23.             for (int c0 = 0; c0 < (int)(ChartGetInteger(0, CHART_WINDOWS_TOTAL)); c0++)
24.                 for (int c1 = (ChartIndicatorsTotal(0, c0) - 1); c1 >= 0; c1--)
25.                     if (ChartIndicatorName(0, c0, c1) == def_ShortName)
26.                         return c0;
27.             return INVALID_HANDLE;
28.         }
29. //+----------------+
30.     public  :
31. //+----------------+
32.         C_MiniChart(string szName)
33.         {
34.             if ((m_Sub = WhatSubWin()) == INVALID_HANDLE) return;
35.             ObjectCreate(0, m_szNameObject = szName, OBJ_CHART, m_Sub, 0, 0);
36.             ObjectSetString(0, m_szNameObject, OBJPROP_SYMBOL, _Symbol);
37.             SetInteger(OBJPROP_XDISTANCE, 10);
38.             SetInteger(OBJPROP_YDISTANCE, 0);
39.             SetInteger(OBJPROP_XSIZE, 300);
40.             SetInteger(OBJPROP_YSIZE, indicator_height);
41.             SetInteger(OBJPROP_PERIOD, PERIOD_M15);
42.             SetInteger(OBJPROP_DATE_SCALE, false);
43.             SetInteger(OBJPROP_PRICE_SCALE, false);
44.             SetInteger(OBJPROP_SELECTABLE, true);
45.             SetInteger(OBJPROP_SELECTED, false);
46.         }
47. //+----------------+
48.         ~C_MiniChart()
49.         {
50.             ObjectDelete(0, m_szNameObject);
51.             ChartRedraw();
52.         }
53. //+----------------+
54. }*gl_MiniChart;
55. //+------------------------------------------------------------------+
56. int OnInit(void)
57. {
58.     IndicatorSetString(INDICATOR_SHORTNAME, def_ShortName);
59.
60.     gl_MiniChart = new C_MiniChart("Mini Chart");
61.
62.     return INIT_SUCCEEDED;
63. };
64. //+------------------------------------------------------------------+
65. int OnCalculate(const int rates_total, const int prev_calculated, const int begin, const double &price[])
66. {
67.     return rates_total;
68. };
69. //+------------------------------------------------------------------+
70. void OnDeinit(const int reason)
71. {
72.     delete gl_MiniChart;
73. };
74. //+------------------------------------------------------------------+
Code 01
The second code snippet is shown below.
01. //+------------------------------------------------------------------+
02. #property copyright "Daniel Jose"
03. //+------------------------------------------------------------------+
04. #property description "DEMO Indicator"
05. //+------------------------------------------------------------------+
06. #property indicator_chart_window
07. #property indicator_plots           0
08. //+------------------------------------------------------------------+
09. #define def_Resource "Code 01.ex5"
10. //+------------------------------------------------------------------+
11. #resource def_Resource
12. //+------------------------------------------------------------------+
13. int OnInit(void)
14. {
15.     ChartIndicatorAdd(0, (int)ChartGetInteger(0, CHART_WINDOWS_TOTAL), iCustom(NULL, NULL, "::" + def_Resource));
16.
17.     return INIT_SUCCEEDED;
18. };
19. //+------------------------------------------------------------------+
20. int OnCalculate(const int rates_total, const int prev_calculated, const int begin, const double &price[])
21. {
22.     return rates_total;
23. };
24. //+------------------------------------------------------------------+
Code 02
Now pay close attention, because what I'm about to explain is very important. To remove an indicator from the chart, we'll use the ChartIndicatorDelete function, which is very straightforward, since the documentation explains very clearly what data to use. It is important to note that the third parameter passed to the ChartIndicatorDelete function must be the name of the indicator we intend to delete. But which name exactly? Well, it depends on each specific case. That's why you need to be very careful about what you implement in your code. In our specific case, the name we need to use is specified in line 10 of Code 01. However, this function must be used in Code 02. Hmm, how is that possible? It doesn't seem to make sense.
However, since what we're implementing here is fairly simple and is intended specifically for educational purposes, it's very easy to do. All you need to do is change Code 02, as shown below.01. //+------------------------------------------------------------------+ 02. #property copyright "Daniel Jose" 03. //+------------------------------------------------------------------+ 04. #property description "DEMO Indicator" 05. //+------------------------------------------------------------------+ 06. #property indicator_chart_window 07. #property indicator_plots 0 08. //+------------------------------------------------------------------+ 09. #define def_Resource "Code 01.ex5" 10. //+------------------------------------------------------------------+ 11. #resource def_Resource 12. //+------------------------------------------------------------------+ 13. int gl_subWin; 14. //+------------------------------------------------------------------+ 15. int OnInit(void) 16. { 17. ChartIndicatorAdd(0, gl_subWin = (int)ChartGetInteger(0, CHART_WINDOWS_TOTAL), iCustom(NULL, NULL, "::" + def_Resource)); 18. 19. return INIT_SUCCEEDED; 20. }; 21. //+------------------------------------------------------------------+ 22. int OnCalculate(const int rates_total, const int prev_calculated, const int begin, const double &price[]) 23. { 24. return rates_total; 25. }; 26. //+------------------------------------------------------------------+ 27. void OnDeinit(const int reason) 28. { 29. ChartIndicatorDelete(0, gl_subWin, "Test 123."); 30. }; 31. //+------------------------------------------------------------------+
Code 03
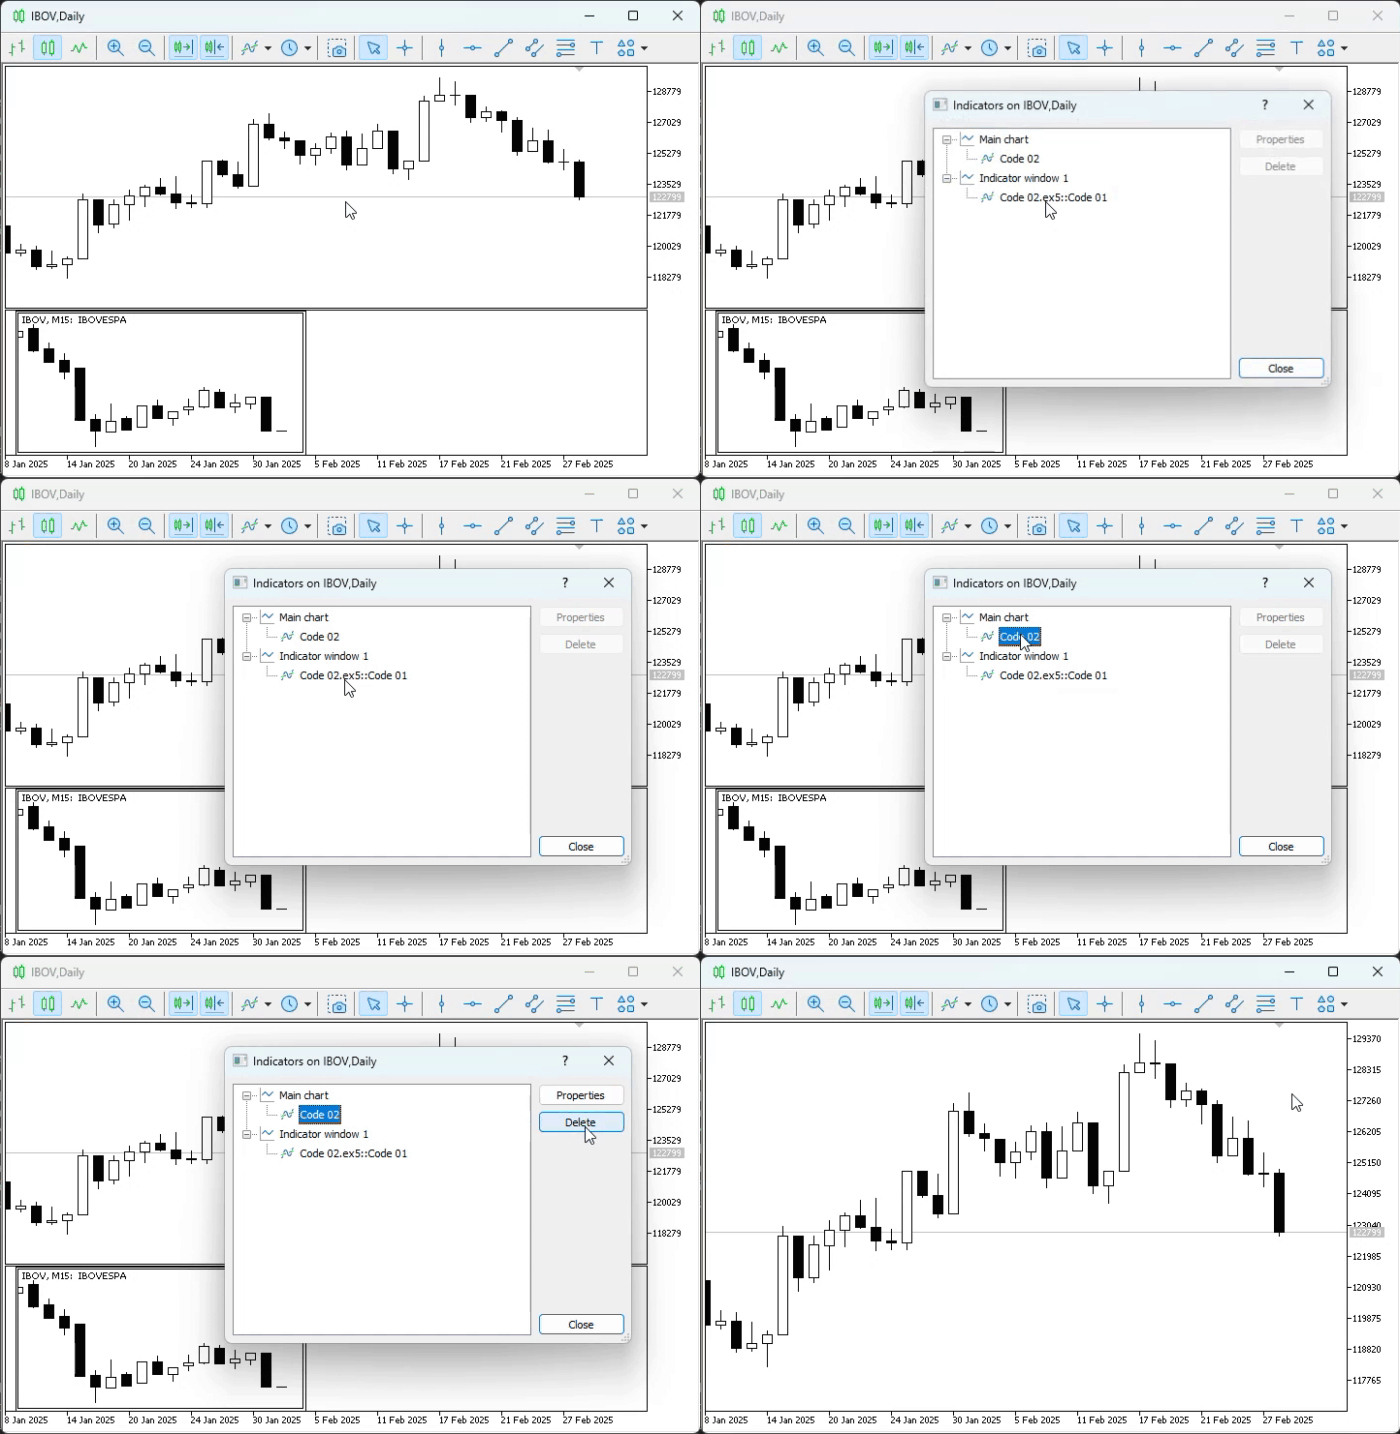
Note that in line 13 of Code 03, we declare a variable. It will be initialized in line 17, where we obtain the subwindow index for the indicator we are going to add to the chart. But note that in line 29 of Code 03, we are using data that is actually specified in line 10 of Code 01. This will create the connection we need. But—and there's always a "but"—while this approach to implementing the functionality does work, it makes everything much less convenient and complicates maintenance as the code base grows. Don't forget that what we're seeing here is just a demonstration. So don't be fooled by the apparent simplicity of what you see here. Before we delve deeper into this topic, let's take a look at the result we just obtained by implementing the code in a new way.
This is shown in the following animation.
Animation 03
Excellent. This simple demonstration in Animation 03 already gives us some peace of mind and greater control over our code. But, as has already been said, we cannot—or, more precisely, we should not—accept everything as it is, especially in code that is still under development. Therefore, the best approach would be to make some changes to improve the implementation. At least, if we're thinking about the code's future development.
To achieve this, we'll start by working with include files, also known as header files. That's the easy part. First, we create a file in a directory shared by all the code that makes up the final application. This file is usually located in the "include" directory within the root directory. However, in some cases, it is easier and more convenient to store this header file along with the application's source code files. To keep the project organized, however, we’ll place it in an include folder inside the main project folder. This may seem a little confusing and complicated. In some cases, it is easier to store the header file alongside the application’s source files. Basically, this is how we do it:
1. //+------------------------------------------------------------------+
2. #define def_Resource "Code 03.ex5"
3. //+------------------------------------------------------------------+
4. #define def_ShortName "Test 123."
5. //+------------------------------------------------------------------+
Code 04
Code 04 will serve as our header file. Now we'll focus on the code for the indicators and modify it as shown below.01. //+------------------------------------------------------------------+ 02. #property copyright "Daniel Jose" 03. //+------------------------------------------------------------------+ 04. #property description "DEMO Indicator" 05. //+------------------------------------------------------------------+ 06. #include "include\defines.mqh" 07. //+------------------------------------------------------------------+ 08. #property indicator_chart_window 09. #property indicator_height 150 10. #property indicator_plots 0 11. //+------------------------------------------------------------------+ 12. class C_MiniChart 13. { 14. private : 15. //+----------------+ 16. string m_szNameObject; 17. int m_Sub; 18. //+----------------+ 19. void SetInteger(ENUM_OBJECT_PROPERTY_INTEGER prop, int value) { ObjectSetInteger(0, m_szNameObject, prop, value); } 20. //+----------------+ 21. int WhatSubWin(void) 22. { 23. for (int c0 = 0; c0 < (int)(ChartGetInteger(0, CHART_WINDOWS_TOTAL)); c0++) 24. for (int c1 = (ChartIndicatorsTotal(0, c0) - 1); c1 >= 0; c1--) 25. if (ChartIndicatorName(0, c0, c1) == def_ShortName) 26. return c0; 27. return INVALID_HANDLE; 28. } 29. //+----------------+ 30. public : 31. //+----------------+ 32. C_MiniChart(string szName) 33. { 34. if ((m_Sub = WhatSubWin()) == INVALID_HANDLE) return; 35. ObjectCreate(0, m_szNameObject = szName, OBJ_CHART, m_Sub, 0, 0); 36. ObjectSetString(0, m_szNameObject, OBJPROP_SYMBOL, _Symbol); 37. SetInteger(OBJPROP_XDISTANCE, 10); 38. SetInteger(OBJPROP_YDISTANCE, 0); 39. SetInteger(OBJPROP_XSIZE, 300); 40. SetInteger(OBJPROP_YSIZE, indicator_height); 41. SetInteger(OBJPROP_PERIOD, PERIOD_M15); 42. SetInteger(OBJPROP_DATE_SCALE, false); 43. SetInteger(OBJPROP_PRICE_SCALE, false); 44. SetInteger(OBJPROP_SELECTABLE, true); 45. SetInteger(OBJPROP_SELECTED, false); 46. } 47. //+----------------+ 48. ~C_MiniChart() 49. { 50. ObjectDelete(0, m_szNameObject); 51. ChartRedraw(); 52. } 53. //+----------------+ 54. }*gl_MiniChart; 55. //+------------------------------------------------------------------+ 56. int OnInit(void) 57. { 58. IndicatorSetString(INDICATOR_SHORTNAME, def_ShortName); 59. 60. gl_MiniChart = new C_MiniChart("Mini Chart"); 61. 62. return INIT_SUCCEEDED; 63. }; 64. //+------------------------------------------------------------------+ 65. int OnCalculate(const int rates_total, const int prev_calculated, const int begin, const double &price[]) 66. { 67. return rates_total; 68. }; 69. //+------------------------------------------------------------------+ 70. void OnDeinit(const int reason) 71. { 72. delete gl_MiniChart; 73. }; 74. //+------------------------------------------------------------------+
Code 05
01. //+------------------------------------------------------------------+
02. #property copyright "Daniel Jose"
03. //+------------------------------------------------------------------+
04. #property description "DEMO Indicator"
05. //+------------------------------------------------------------------+
06. #include "include\defines.mqh"
07. //+------------------------------------------------------------------+
08. #property indicator_chart_window
09. #property indicator_plots           0
10. //+------------------------------------------------------------------+
11. #resource def_Resource
12. //+------------------------------------------------------------------+
13. #define def_ShortNamePrinc def_ShortName + "_main"
14. //+------------------------------------------------------------------+
15. int gl_subWin;
16. //+------------------------------------------------------------------+
17. int OnInit(void)
18. {
19.     IndicatorSetString(INDICATOR_SHORTNAME, def_ShortNamePrinc);
20.     ChartIndicatorAdd(0, gl_subWin = (int)ChartGetInteger(0, CHART_WINDOWS_TOTAL), iCustom(NULL, NULL, "::" + def_Resource));
21.
22.     return INIT_SUCCEEDED;
23. };
24. //+------------------------------------------------------------------+
25. int OnCalculate(const int rates_total, const int prev_calculated, const int begin, const double &price[])
26. {
27.     return rates_total;
28. };
29. //+------------------------------------------------------------------+
30. void OnDeinit(const int reason)
31. {
32.     ChartIndicatorDelete(0, gl_subWin, def_ShortName);
33. };
34. //+------------------------------------------------------------------+
Code 06
Please note that in Code 06, I added line 13 to assign a name to the main indicator. This will come in handy very soon. But for now, what matters to us is that we can configure everything much more easily and conveniently, without running the risk of creating an unmanageable monster over time. There's another way to do something very similar, but without using a header file. However, for now, we'll use this simpler method. Therefore, the result of executing the code shown above will be the same as in Animation 03. All right, let's move on to the next step.
Now we need to make a few decisions that will determine what we do next. In any case, I need you to have at least a basic understanding of how events are generated and processed. For this background, you can refer to the previous articles in this series, which explain these basics. In short, you need to understand the content of these two articles:
From Basic to Intermediate: Events (I)
From Basic to Intermediate: Events (II)
Understanding these two articles is essential for following along with what we do next, regardless of the decision we make. The idea here is to establish communication between different programs. And to do that, we'll use events. Thus, these two indicators will begin to interact with each other and perform the actions we define for them.
Don't forget that at this stage, we need to carefully weigh the decisions we make.
So, the first decision concerns how the code behaves when we delete an object created by one of our indicators. A situation like this, which at first glance might seem trivial, can completely change the user or operator's experience. This also determines how we will implement our code. Basically, we'll follow this principle: if any object created by one of the indicators is deleted, then the indicator that created that object must also be removed from the chart. I know this decision may seem somewhat punitive to the user or operator. But since the goal here isn't to create something specific, but rather to show how certain things can be implemented, I don't see any problem with this approach.
Determining whether an object has been deleted from the chart isn't particularly difficult. However, doing this manually is, at the very least, a waste of time, since we can configure MetaTrader 5 to tell us which object was deleted from the chart. Knowing this makes it much easier to implement the rest of the procedure.
The problem is that, by default, MetaTrader 5 does not generate certain events. We need to tell it that we want to receive notifications when these events occur. And one of these is the object deletion event on the chart. But don't worry: it's quite easy to tell MetaTrader 5 that we want to receive a notification when any object is deleted. All we need to do is send a command to MetaTrader 5 using MQL5 code. The question isn't how to do it, but where to put this command.
Let me clarify: you don't have to add this command to every indicator or program. All you have to do is add it to one of them, and every time that event occurs, MetaTrader 5 will notify us. This applies to a specific chart. Personally, I prefer to use this command at a key point in the code. I usually use it in the main file. In other cases, I use it in the file where the objects I need to track are created. It is up to you to decide where to place the command. Since I want to keep things as simple as possible, let's use this command in what could be considered the main code file. Therefore, by changing Code 06, we will get the result shown below.
01. //+------------------------------------------------------------------+
02. #property copyright "Daniel Jose"
03. //+------------------------------------------------------------------+
04. #property description "DEMO Indicator"
05. //+------------------------------------------------------------------+
06. #include "include\defines.mqh"
07. //+------------------------------------------------------------------+
08. #property indicator_chart_window
09. #property indicator_plots           0
10. //+------------------------------------------------------------------+
11. #resource def_Resource
12. //+------------------------------------------------------------------+
13. #define def_ShortNamePrinc def_ShortName + "_main"
14. //+------------------------------------------------------------------+
15. int gl_subWin;
16. //+------------------------------------------------------------------+
17. int OnInit(void)
18. {
19.     IndicatorSetString(INDICATOR_SHORTNAME, def_ShortNamePrinc);
20.     ChartSetInteger(0, CHART_EVENT_OBJECT_DELETE, 0, true);
21.     ChartIndicatorAdd(0, gl_subWin = (int)ChartGetInteger(0, CHART_WINDOWS_TOTAL), iCustom(NULL, NULL, "::" + def_Resource));
22.
23.     return INIT_SUCCEEDED;
24. };
25. //+------------------------------------------------------------------+
26. int OnCalculate(const int rates_total, const int prev_calculated, const int begin, const double &price[])
27. {
28.     return rates_total;
29. };
30. //+------------------------------------------------------------------+
31. void OnDeinit(const int reason)
32. {
33.     ChartIndicatorDelete(0, gl_subWin, def_ShortName);
34.     ChartSetInteger(0, CHART_EVENT_OBJECT_DELETE, 0, false);
35. };
36. //+------------------------------------------------------------------+
Code 07
Note that on line 20 of Code 07, we tell MetaTrader 5 that we want to receive a notification when an object is deleted from the chart. It is also good programming practice to specify that we no longer want to receive these notifications once we no longer need them. For this reason, we have also included a call on line 34 that disables these notifications. But we can also do this at specific times when we do not want to receive notifications while deleting an unwanted object from the chart. Okay, that's the first part. Now let's move on to the second part: deciding what happens when an object is deleted.
Here, we have two options. The first option is to simply recreate the object. The second option is to remove the indicator or application that created this object. Since the second approach is somewhat simpler—both to implement and because it saves us from having to worry about the object's internal parameters—we will use it as our initial handling mechanism.
This is where things start to get pretty interesting, although they can also get quite confusing. To understand this, take a look at Code 05. In it, we create objects that will be displayed on the chart. But there is one thing to keep in mind. The object name is declared on line 60 of Code 05. In principle, this approach shouldn't cause us any problems. However, it may happen that a user or trader has already placed an object with the same name on the chart before adding the indicator. In that case, a discrepancy may arise. To avoid this, the object created by our code must have a unique and easily recognizable name. Therefore, we will change how its name is generated.
To avoid creating an unnecessarily large file, we'll move the class out of Code 05 into a new header file. The header file is shown below, with the correction to how the object name is generated already applied.
01. //+------------------------------------------------------------------+
02. #property copyright "Daniel Jose"
03. //+------------------------------------------------------------------+
04. #include "defines.mqh"
05. //+------------------------------------------------------------------+
06. class C_MiniChart
07. {
08.     private :
09. //+----------------+
10.         string  m_szNameObject;
11.         int     m_Sub;
12. //+----------------+
13.         void SetInteger(ENUM_OBJECT_PROPERTY_INTEGER prop, int value) { ObjectSetInteger(0, m_szNameObject, prop, value); }
14. //+----------------+
15.         int WhatSubWin(void)
16.         {
17.             for (int c0 = 0; c0 < (int)(ChartGetInteger(0, CHART_WINDOWS_TOTAL)); c0++)
18.                 for (int c1 = (ChartIndicatorsTotal(0, c0) - 1); c1 >= 0; c1--)
19.                     if (ChartIndicatorName(0, c0, c1) == def_ShortName)
20.                         return c0;
21.             return INVALID_HANDLE;
22.         }
23. //+----------------+
24.     public  :
25. //+----------------+
26.         C_MiniChart(string szName)
27.         {
28.             if ((m_Sub = WhatSubWin()) == INVALID_HANDLE) return;
29.             ObjectCreate(0, m_szNameObject = def_ShortName + "#" + szName + "#" + (string)ObjectsTotal(0, -1, -1) , OBJ_CHART, m_Sub, 0, 0);
30.             ObjectSetString(0, m_szNameObject, OBJPROP_SYMBOL, _Symbol);
31.             SetInteger(OBJPROP_XDISTANCE, 10);
32.             SetInteger(OBJPROP_YDISTANCE, 0);
33.             SetInteger(OBJPROP_XSIZE, 300);
34.             SetInteger(OBJPROP_YSIZE, indicator_height);
35.             SetInteger(OBJPROP_PERIOD, PERIOD_M15);
36.             SetInteger(OBJPROP_DATE_SCALE, false);
37.             SetInteger(OBJPROP_PRICE_SCALE, false);
38.             SetInteger(OBJPROP_SELECTABLE, true);
39.             SetInteger(OBJPROP_SELECTED, false);
40.         }
41. //+----------------+
42.         ~C_MiniChart()
43.         {
44.             ObjectDelete(0, m_szNameObject);
45.             ChartRedraw();
46.         }
47. //+----------------+
48.         bool operator==(const string szArg) { return (szArg == m_szNameObject); }
49. //+----------------+
50. };
51. //+------------------------------------------------------------------+
Code 08
The correction that makes the name unique is on line 29 of Code 08. Now note that on line 48, we define an overloaded equality operator that compares a string with the stored object name. This is important so that we can check whether the deleted object is one of those we created in the indicators. In this same series, we explain operator overloading. See these articles for more details; the first one is “From Basic to Intermediate: Operator Overloading (I)”. As I've already said, knowledge accumulates over time. Now we can look at the revised version of Code 05. It is reproduced in full below.
01. //+------------------------------------------------------------------+
02. #property copyright "Daniel Jose"
03. //+------------------------------------------------------------------+
04. #property description "DEMO Indicator"
05. //+------------------------------------------------------------------+
06. #include "include\C_MiniChart.mqh"
07. //+------------------------------------------------------------------+
08. #property indicator_chart_window
09. #property indicator_height          150
10. #property indicator_plots           0
11. //+------------------------------------------------------------------+
12. C_MiniChart *gl_MiniChart;
13. //+------------------------------------------------------------------+
14. int OnInit(void)
15. {
16.     IndicatorSetString(INDICATOR_SHORTNAME, def_ShortName);
17.     gl_MiniChart = new C_MiniChart("Mini Chart");
18.
19.     return INIT_SUCCEEDED;
20. };
21. //+------------------------------------------------------------------+
22. int OnCalculate(const int rates_total, const int prev_calculated, const int begin, const double &price[])
23. {
24.     return rates_total;
25. };
26. //+------------------------------------------------------------------+
27. void OnChartEvent(const int id, const long &lparam, const double &dparam, const string &sparam)
28. {
29.     switch (id)
30.     {
31.         case CHARTEVENT_OBJECT_DELETE:
32.             if (gl_MiniChart == sparam)
33.             {
34.                 ChartIndicatorDelete(0, ChartWindowFind(0, def_ShortName), def_ShortName);
35.                 OnDeinit(REASON_INITFAILED);
36.             }
37.             break;
38.     }
39. };
40. //+------------------------------------------------------------------+
41. void OnDeinit(const int reason)
42. {
43.     delete gl_MiniChart;
44. };
45. //+------------------------------------------------------------------+
Code 09
Although this code isn't particularly elegant, it is fully functional. However, there are a few details you should keep in mind to avoid unpleasant surprises down the road. One of them is what happens on line 31. Please note that here we are handling the CHARTEVENT_OBJECT_DELETE event. However, this event is enabled not here in code 09, but in Code 07, since Code 07 is considered the application's main code. The next point is that in line 34, we remove the indicator itself from the chart, and immediately afterward, we deinitialize the code by calling OnDeinit.
But why do that? The thing is, we want to completely remove any trace of the indicator from the chart so that the next step will be a little easier. We could improve the situation a little more here. But that will be enough for now. Now we'll modify the main code so that Code 07 looks as shown below.
01. //+------------------------------------------------------------------+
02. #property copyright "Daniel Jose"
03. //+------------------------------------------------------------------+
04. #property description "DEMO Indicator"
05. //+------------------------------------------------------------------+
06. #include "include\defines.mqh"
07. //+------------------------------------------------------------------+
08. #property indicator_chart_window
09. #property indicator_plots           0
10. //+------------------------------------------------------------------+
11. #resource def_Resource
12. //+------------------------------------------------------------------+
13. #define def_ShortNamePrinc def_ShortName + "_main"
14. //+------------------------------------------------------------------+
15. int gl_subWin;
16. //+------------------------------------------------------------------+
17. int OnInit(void)
18. {
19.     IndicatorSetString(INDICATOR_SHORTNAME, def_ShortNamePrinc);
20.     ChartSetInteger(0, CHART_EVENT_OBJECT_DELETE, 0, true);
21.     ChartIndicatorAdd(0, gl_subWin = (int)ChartGetInteger(0, CHART_WINDOWS_TOTAL), iCustom(NULL, NULL, "::" + def_Resource));
22.
23.     return INIT_SUCCEEDED;
24. };
25. //+------------------------------------------------------------------+
26. int OnCalculate(const int rates_total, const int prev_calculated, const int begin, const double &price[])
27. {
28.     return rates_total;
29. };
30. //+------------------------------------------------------------------+
31. void OnChartEvent(const int id, const long &lparam, const double &dparam, const string &sparam)
32. {
33.     Print(__FILE__, " -> ", __FUNCTION__, " ?? ", EnumToString((ENUM_CHART_EVENT)id), " >> ", sparam);
34. };
35. //+------------------------------------------------------------------+
36. void OnDeinit(const int reason)
37. {
38.     ChartIndicatorDelete(0, gl_subWin, def_ShortName);
39.     ChartSetInteger(0, CHART_EVENT_OBJECT_DELETE, 0, false);
40. };
41. //+------------------------------------------------------------------+
Code 10
Code 10 is not yet complete. Before I finish it, I want you to understand one thing. Please note that in line 33, we'll print something to the terminal. I want you to understand exactly what information will be displayed. So, we compile the code and add the newly compiled application to the chart. Once the indicators appear, we can do what is shown in the following animation.
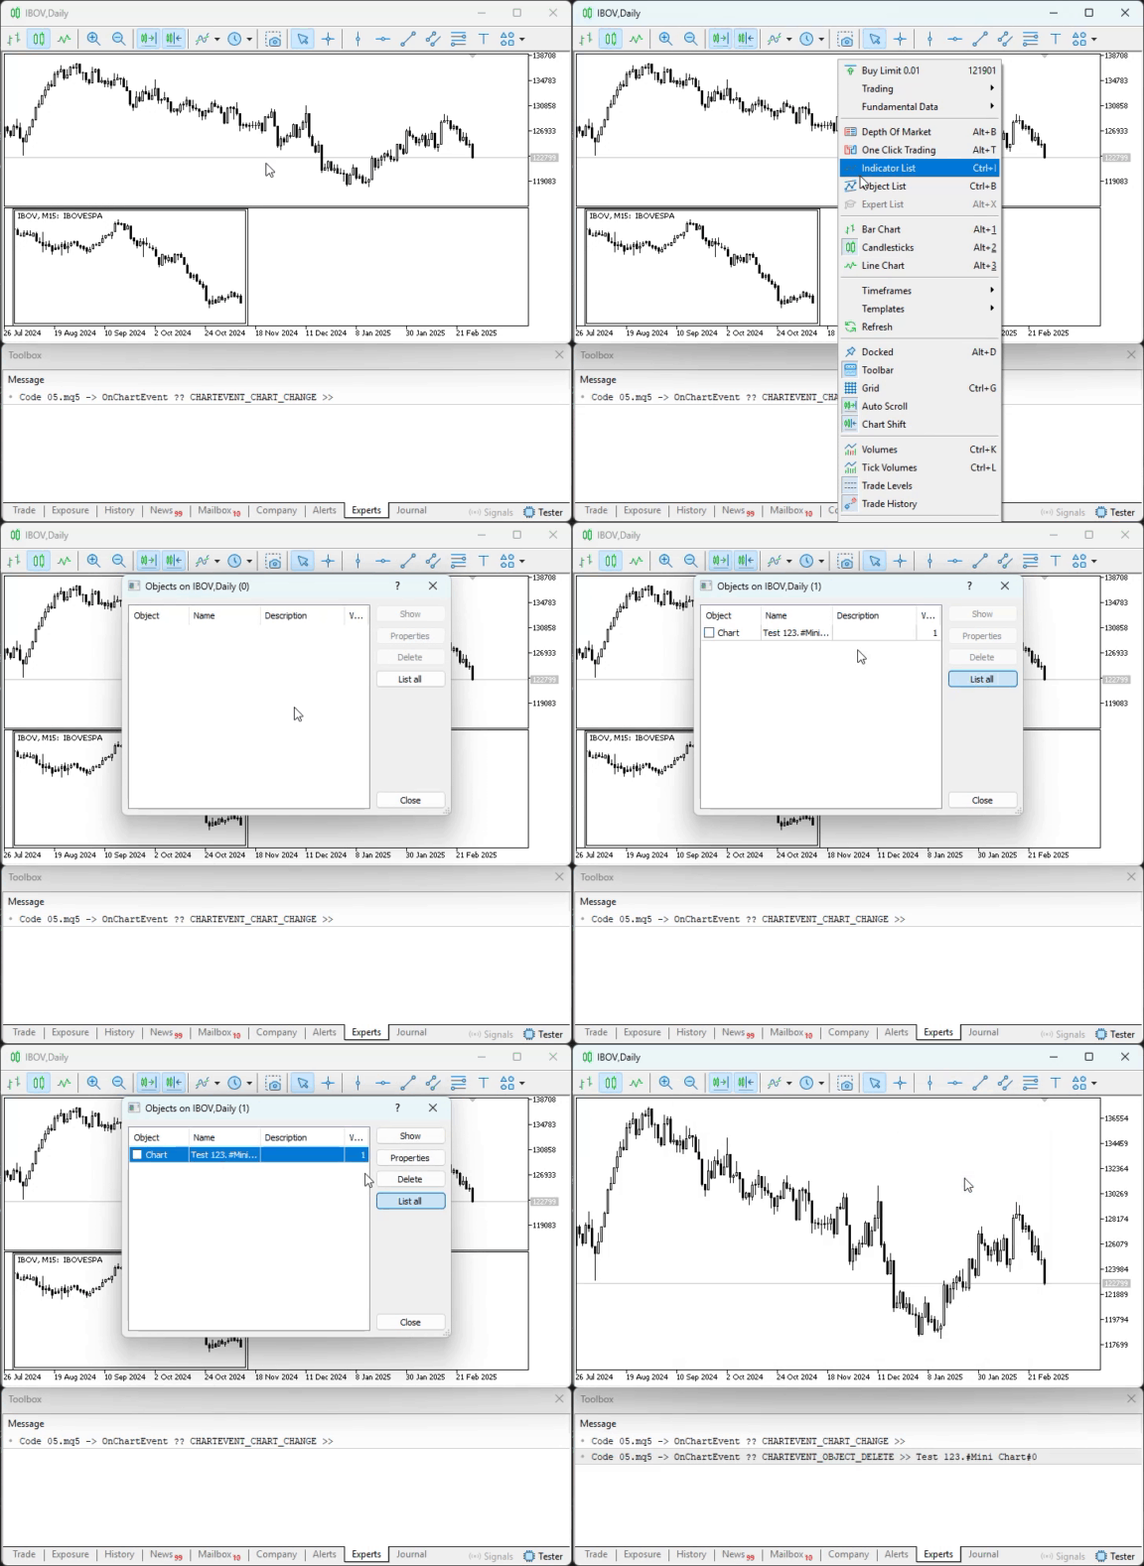
Animation 04
Hmm, Animation 04 is rather intriguing—and interesting at the same time. Now I want you to pay attention to one specific detail in this animation. To do this, we'll use the image shown below.
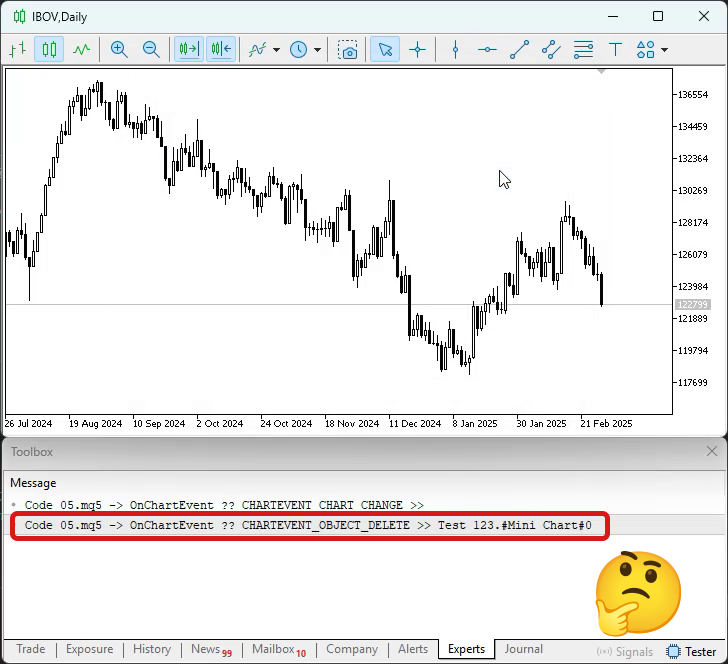
Image 03
Please note the highlighted area in Image 03. Although many people don't fully understand what exactly is displayed here, I want you to take a close look at this highlighted area. Please note that the sparam value specifies the name of the object removed from the chart. However, since we also used part of the indicator short name when naming the object, we can now take advantage of that.
To do this, simply extract the indicator name and check whether it matches the name of the indicator that our main code placed on the chart. In that case, we'll be able to steer the program's execution along the desired path. Thus, we have reached the point where the decisions made at the very beginning will be crucial to the outcome. Please note that by this point, we have done everything necessary to remove the auxiliary indicator from the chart. But there were other ways to do it.
As we have already seen, Code 10 is capable of intercepting object deletion events. Thus, we could handle this situation in a fairly straightforward manner, since the main goal would be precisely to remove the indicators if any of the objects they placed on the chart were removed. However, since we have already implemented part of the removal directly in the auxiliary indicator's code, as shown in Code 09, all that remains now is to remove the main indicator from the chart as soon as it detects that the auxiliary indicator has been removed. To do this correctly and without any problems, we need to modify Code 10 as shown below.
01. //+------------------------------------------------------------------+
02. #property copyright "Daniel Jose"
03. //+------------------------------------------------------------------+
04. #property description "DEMO Indicator"
05. //+------------------------------------------------------------------+
06. #include "include\defines.mqh"
07. //+------------------------------------------------------------------+
08. #property indicator_chart_window
09. #property indicator_plots           0
10. //+------------------------------------------------------------------+
11. #resource def_Resource
12. //+------------------------------------------------------------------+
13. #define def_ShortNamePrinc def_ShortName + "_main"
14. //+------------------------------------------------------------------+
15. int gl_subWin;
16. //+------------------------------------------------------------------+
17. int OnInit(void)
18. {
19.     IndicatorSetString(INDICATOR_SHORTNAME, def_ShortNamePrinc);
20.     ChartSetInteger(0, CHART_EVENT_OBJECT_DELETE, 0, true);
21.     ChartIndicatorAdd(0, gl_subWin = (int)ChartGetInteger(0, CHART_WINDOWS_TOTAL), iCustom(NULL, NULL, "::" + def_Resource));
22.
23.     return INIT_SUCCEEDED;
24. };
25. //+------------------------------------------------------------------+
26. int OnCalculate(const int rates_total, const int prev_calculated, const int begin, const double &price[])
27. {
28.     return rates_total;
29. };
30. //+------------------------------------------------------------------+
31. void OnChartEvent(const int id, const long &lparam, const double &dparam, const string &sparam)
32. {
33.     switch (id)
34.     {
35.         case CHARTEVENT_OBJECT_DELETE:
36.             {
37.                 string szRet[];
38.                 StringSplit(sparam, '#', szRet);
39.                 if (szRet[0] == def_ShortName)
40.                     ChartIndicatorDelete(0, 0, def_ShortNamePrinc);
41.             }
42.             break;
43.     }
44. };
45. //+------------------------------------------------------------------+
46. void OnDeinit(const int reason)
47. {
48.     ChartIndicatorDelete(0, gl_subWin, def_ShortName);
49.     ChartSetInteger(0, CHART_EVENT_OBJECT_DELETE, 0, false);
50. };
51. //+------------------------------------------------------------------+
Code 11
Now take a look at how we solved the problem in accordance with the decision we made earlier. All we needed to do was add a way to parse sparam to extract the indicator name. Next, we use line 39 to check whether the name matches the one defined in Code 04. If this condition is met, the next step will be to terminate the main indicator, as shown in line 40. And this will completely remove both indicators from the chart.
The approach presented here is just one option that allows us to maintain good control over how our code is presented to the user. I know that, in principle, this approach ultimately penalizes the user or operator who indiscriminately deletes objects from the chart. However, in my opinion, this approach is much simpler precisely because we don't have to worry about storing data on the position and characteristics of each object on the chart, which makes the code significantly easier to understand.
However, once you see what Code 11 does, you might wonder: isn't there a simpler way to do all this? After all, even before that, the main code was already capable of removing the auxiliary indicator from the chart. And yes, there is, dear reader. For this reason, you'll find two different versions of the code in the attachment: one shows what we've done here, and the other lets you see that, in the end, we need much less code. To select one option or the other, simply change one detail in Code 04. So keep in mind: in the attachment, Code 04 will initially be the same as the version we've examined up to this point in the article. However, you will also have an alternative version of the code for the auxiliary indicator. It is shown below.
01. //+------------------------------------------------------------------+
02. #property copyright "Daniel Jose"
03. //+------------------------------------------------------------------+
04. #property description "DEMO Indicator"
05. //+------------------------------------------------------------------+
06. #include "include\C_MiniChart.mqh"
07. //+------------------------------------------------------------------+
08. #property indicator_chart_window
09. #property indicator_height          150
10. #property indicator_plots           0
11. //+------------------------------------------------------------------+
12. C_MiniChart *gl_MiniChart;
13. //+------------------------------------------------------------------+
14. int OnInit(void)
15. {
16.     IndicatorSetString(INDICATOR_SHORTNAME, def_ShortName);
17.     gl_MiniChart = new C_MiniChart("Mini Chart");
18.
19.     return INIT_SUCCEEDED;
20. };
21. //+------------------------------------------------------------------+
22. int OnCalculate(const int rates_total, const int prev_calculated, const int begin, const double &price[])
23. {
24.     return rates_total;
25. };
26. //+------------------------------------------------------------------+
27. void OnDeinit(const int reason)
28. {
29.     delete gl_MiniChart;
30. };
31. //+------------------------------------------------------------------+
Code 12
Note that Code 12 is virtually identical to Code 09, except that Code 12 lacks the event handler present in Code 09, which we discussed in this article. However, despite the numbering used here, Code 09 will be named CODE 03.MQ5 in the attachment. Therefore, the code in the header file must be the same as in Code 04 of this article. If you want to see how the application works with Code 12, you need to replace the contents of the DEFINES.MQH file with what is shown below.1. //+------------------------------------------------------------------+ 2. #define def_Resource "Code 06.ex5" 3. //+------------------------------------------------------------------+ 4. #define def_ShortName "Test 123." 5. //+------------------------------------------------------------------+
Code 13
Thus, the file CODE 06.MQ5 will be compiled instead of CODE 03.MQ5—that is, Code 12, which we just discussed. This will allow you to take your time and learn all the details of how to remove indicators from the chart when necessary. And, since the results are exactly the same, I don't see any reason to show them here again.
Concluding Thoughts
You should take your time and study this article—as well as the code provided in the attachment—very carefully. This is because every detail shown here has a decisive impact on the quality and type of results you will be able to achieve in your future code. It is important to note that all the material presented here has a single purpose: to show the best way to avoid unnecessary checks to determine whether certain objects, indicators, or elements are present on the chart. We can get MetaTrader 5 to help us more with tasks of this kind, so that our actual work consists solely of processing the data it sends to our application as effectively as possible.
There is another way to solve this type of problem. However, since this method is significantly more labor-intensive—after all, we would have to maintain a list of properties and objects so that we could restore the data if those objects were deleted—it may be discussed in a future article.
In any case, you now know that not everything has to be programmed the way many people imagine it to be. If we understand how MetaTrader 5 works, we’ll be able to develop applications much faster and with a much lower risk of failures, precisely because our code will contain only what is truly necessary.
| MQ5 File | Description |
|---|---|
| Indicators\Code 01 | Basic Demonstration |
| Indicators\Code 02 | Basic Demonstration |
| Indicators\Code 03 | Basic Demonstration |
| Indicators\Code 04 | Basic Demonstration |
| Indicators\Code 05 | Basic Demonstration |
| Indicators\Code 06 | Basic Demonstration |
Translated from Portuguese by MetaQuotes Ltd.
Original article: https://www.mql5.com/pt/articles/17349
Warning: All rights to these materials are reserved by MetaQuotes Ltd. Copying or reprinting of these materials in whole or in part is prohibited.
This article was written by a user of the site and reflects their personal views. MetaQuotes Ltd is not responsible for the accuracy of the information presented, nor for any consequences resulting from the use of the solutions, strategies or recommendations described.