From Basic to Intermediate: Resources
 43
 0

Introduction
In the previous article, “From Basic to Intermediate: Subwindows (IV)”, we saw that things aren't always as we imagine them to be before we see how they work in practice. It's not uncommon for people to think they already know something simply because they've mastered the basics, but that's a big mistake.
Before we continue our discussion of subwindows, we need to take a brief pause and touch on another topic that is just as important. Given the nature of the topic we will be discussing in this article, I ask that you pay close attention to what follows, as a misunderstanding of this material will almost certainly lead to serious problems in the future.
What we'll cover in this article allows you to create applications that you would otherwise have to distribute as a set of multiple files—with all the inevitable inconveniences that entails. Instead, we'll be able to distribute them as a single executable file, which will make maintenance much easier.
Resources
One of the hardest concepts for beginners to grasp is that of so-called resources. I'm referring to resources in the software sense, not hardware resources. The thing is, the concept of a resource doesn't really make much sense when people suddenly start talking about it without any background knowledge. And it makes even less sense when it's explained superficially and hastily, as is usually the case.
To fully understand this topic, we first need to grasp a few concepts discussed in previous articles. So, if you're having trouble understanding a specific point, read the previous articles.
In theory, a resource is a fairly simple concept: a resource is anything you use in a program, as well as anything needed to run the program itself. That is precisely the basic idea. However, as a programmer, you need to have a better understanding of certain details in order to be able to add new elements to an existing program.
First, it should be noted that there are two main types of resources in software. The first type consists of the code's internal resources, and the second consists of its external resources. An internal resource is any element included in an executable file. In contrast, an external resource is something that the program must look for somewhere outside the memory area where the executable file itself is located. It is precisely this distinction that can be difficult to grasp at first. This is because many beginners are completely baffled when they see that one executable file is capable of performing certain actions, seemingly without requiring any external files or data, whereas another requires a large amount of data stored in various locations and in all sorts of external files.
For this reason, many beginners tend to think that code that produces the same result as another piece of code must be either better or worse. In fact, the difference between these two approaches depends on how the system you intend to run is designed. Depending on the situation, it may be more appropriate to use one approach or the other. In addition, there is another consideration that may well be the deciding factor in the final choice of model. And this is where things start to get interesting, since this issue is related to future updates to the app you're building.
You might think this topic is a little boring and not very important. Nevertheless, this becomes extremely important when we encounter certain types of problems. Let's say you want to create an Expert Advisor that will perform automated trades using a particular indicator. Many people might think that the only way to create something like this is to use two or more executable files: one for the Expert Advisor itself and one or more executable files for the indicators that will be used. In principle, that would be the correct and most appropriate way. However, when you decide to distribute your system, a small problem will arise: how can you ensure that the user doesn't delete the indicator used by the Expert Advisor?
One way to avoid this is to combine the entire system into a single file, which in this case would be the Expert Advisor file itself. "But wait a minute. Didn't you just say that the Expert Advisor will need indicators?" Yes, it will need the indicators that you create. "Then how can this possibly work if we don't distribute these indicators?" Well, this is exactly where it all starts to make sense, dear reader. There is a way to embed indicators or any other elements into an Expert Advisor's executable file. Thus, neither the user nor the operator will be able to influence the analysis for which the Expert Advisor was actually designed, since, in principle, neither the user nor the operator will even be aware of the existence of these indicators or the fact that they are being used.
I say "in principle" because you might want them to appear on the chart. In that case, the user will see them, though they won't understand why these lines start appearing on the chart when this Expert Advisor is attached to it. And when the Expert Advisor is removed, those same lines disappear from the chart along with it.
Even if the indicators aren't displayed on the chart—as we've already seen in previous articles—they'll still appear in the list of indicators. However, neither the user nor the operator will be able to tell where this indicator—or these indicators—came from, since they simply appear and disappear every time the Expert Advisor is added to or removed from the chart.
Hmm, that actually seems pretty interesting to me. So, instead of sending my colleague a bunch of files, I only need to send him one. And this file will contain a complete, pre-programmed configuration of what needs to be done. I like this idea.
In fact, that is precisely the main principle. However, that is not the end of the story. We can include both data that cannot be modified and data that can be modified. All of this is governed by a set of criteria that you, as a programmer, define in advance to determine what each user can and cannot change. And if an operator or user encounters any problems with the settings and asks you for help resolving them, you’ll simply need to tell them to uninstall the program, delete all the settings files, and then reinstall it. Do this, and everything will go back to normal. Although users might not like this idea at first, it will serve as a lesson, and next time they'll be more careful when changing settings. Or at least they may become less curious and avoid changing things they shouldn’t. :-)
So, now that the concept itself has been properly introduced, we can start thinking about how to begin working with what we call resources. To start with, forget the idea that you'll be working with one or more files. Working with resources requires patience and discipline. Without them, all your code will descend into utter chaos. In the MQL5 documentation itself, you can get an idea of how to work with resources. However, the explanation provided there is rather superficial. And even this article isn't enough to show everything that can actually be done. As new articles are published, you'll see that this topic is truly fascinating and quite enjoyable to explore.
So, let's start with a very simple example so you can understand how this concept works in practice. This example uses two files. The first one is a text file—don't worry about its contents. Focus on understanding how the concept of a resource is applied here. The text file is shown below. 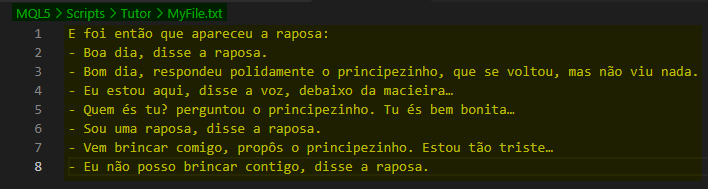
Image 01
In Image 01, the name and location of the text file are highlighted in green. The exact contents of this file are shown in yellow. So, what are we going to do with this? Stay calm, focus, and pay attention. Now let's move on to the part that needs to be implemented in MQL5. It is shown below.01. //+------------------------------------------------------------------+ 02. #property copyright "Daniel Jose" 03. //+------------------------------------------------------------------+ 04. #resource "MyFile.txt" as string Antoine; 05. //+------------------------------------------------------------------+ 06. void OnStart(void) 07. { 08. Print(Antoine); 09. } 10. //+------------------------------------------------------------------+
Code 01
When you run this code in the MetaTrader 5 terminal, you'll see the result shown in the following animation.
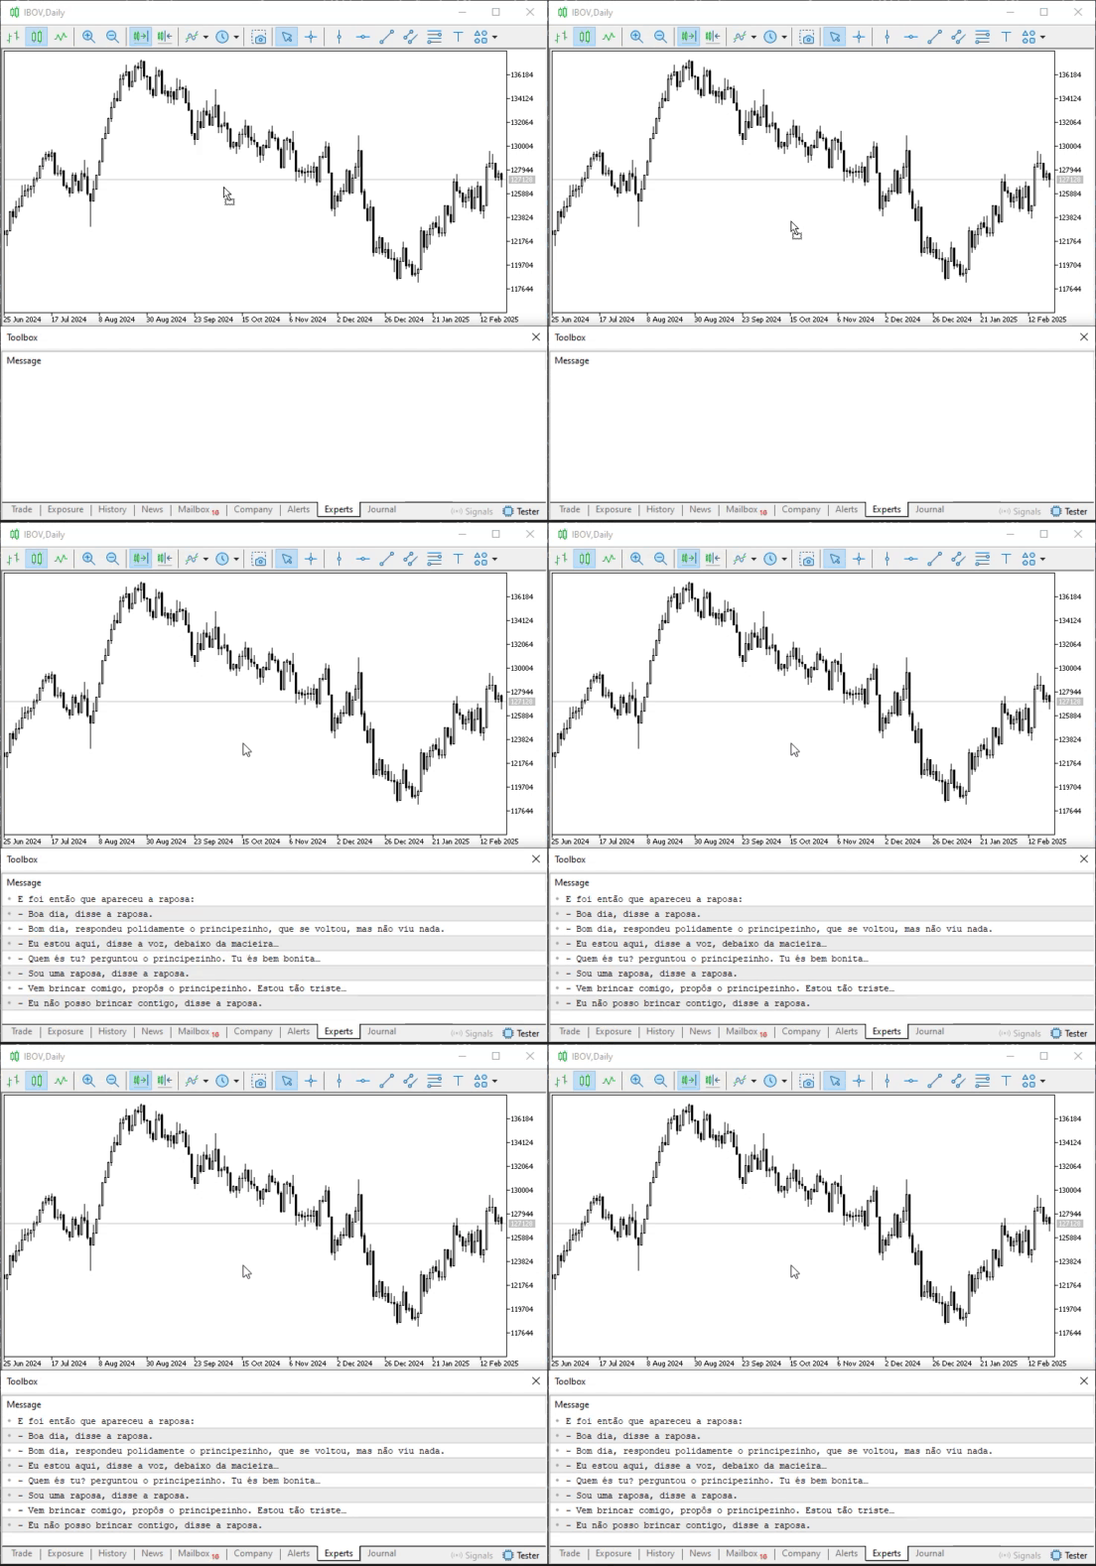
Animation 01
Now note that the area highlighted in yellow in Image 01 is displayed in the terminal. However, something is happening here that you may not understand. Or perhaps you think one thing is happening, when in fact something completely different is happening. So pay close attention to what I'm about to explain, because later, when we use this approach, I won't go over it again.
When Code 01 is compiled, the fourth line takes the entire contents of the file shown in Image 01 and embeds them in the executable file. Now think about this: from the executable file's perspective, the contents of this fourth line form a huge array containing everything that was previously in MyFile.txt. From now on, all of this content will be stored in this array. To simplify things, we're using the string type to represent the data stored in this huge constant named Antoine. To put this in terms you probably already know and understand, what we're doing in Code 01 is equivalent to what is shown in Code 02 below.01. //+------------------------------------------------------------------+ 02. #property copyright "Daniel Jose" 03. //+------------------------------------------------------------------+ 04. const string Antoine = 05. "E foi então que apareceu a raposa:\n\r" \ 06. "- Boa dia, disse a raposa.\n\r" \ 07. "- Bom dia, respondeu polidamente o principezinho, que se voltou, mas não viu nada.\n\r"\ 08. "- Eu estou aqui, disse a voz, debaixo da macieira…\n\r" \ 09. "- Quem és tu? perguntou o principezinho. Tu és bem bonita…\n\r" \ 10. "- Sou uma raposa, disse a raposa.\n\r" \ 11. "- Vem brincar comigo, propôs o principezinho. Estou tão triste…\n\r" \ 12. "- Eu não posso brincar contigo, disse a raposa.\n\r"; 13. //+------------------------------------------------------------------+ 14. void OnStart(void) 15. { 16. Print(Antoine); 17. } 18. //+------------------------------------------------------------------+
Code 02
"Hmm, I don't get it. How is that possible? In my opinion, Code 01 is much simpler and causes far fewer problems than Code 02. And yet you're telling me that Code 01 is equivalent to Code 02. That makes no sense to me at all."
That is exactly why I waited so long before explaining this topic. At first, things like this seem to make no sense at all. And this is despite the fact that we're only just beginning to realize what we're actually capable of doing. Nevertheless, it is very important to understand this introductory section correctly. It's also important to understand everything that was explained in the previous articles, because as we start adding new information here, things will become increasingly confusing. As strange as it may seem, what actually happens is this: the fourth line of Code 01 effectively creates the equivalent of the fourth line of Code 02. And that's exactly what makes it so interesting: Code 01 is much easier to understand than Code 02, especially if the goal is to include some more complex data in the executable file.
So pay close attention, because this is important to understand. We can include data of any type in the executable file. Any type—from executable MetaTrader 5 content to images, sounds, or any other elements you need or want to include. It is precisely these elements that are referred to as software resources.
Wait a minute. Are you saying that, using this system we just discussed, we can embed one executable file into another? But that won't work. At least, I don't understand how that could work. After all, in principle, including something in an indicator, script, or Expert Advisor does not necessarily make it an executable object. At least, that's how I imagine it works.
Since you’re still new to this world and don’t yet know some of the tricks we programmers can use, it’s time to realize that the world isn’t a bed of roses, where everything is beautiful and wonderful and everyone wishes only the best for others. Because, in reality, that's not quite how it works.
To understand what we're about to start doing, we'll have to go back to the previous article. There, we looked at how to set it up so that one indicator loads another onto the chart. This way, we could modify or control certain elements of the chart. Now, please note the following: to ensure the system ran without errors, both code files had to be compiled and placed in their respective locations. That's a fact, and if you've looked into what was shown there, you know exactly what I'm talking about. However, we don't always want things to work that way, because in that case the system would become much less stable—since its operation would depend on the presence of those executable files—which could make using it quite unpleasant for the end user. But what if we applied the concept we're discussing in this article? What would the system actually look like? To answer this question, let's go back to what we saw earlier.
So, below is the source code used in that article.01. //+------------------------------------------------------------------+ 02. #property copyright "Daniel Jose" 03. //+------------------------------------------------------------------+ 04. #property description "DEMO Indicator" 05. //+------------------------------------------------------------------+ 06. #property indicator_separate_window 07. #property indicator_height 50 08. #property indicator_plots 0 09. //+------------------------------------------------------------------+ 10. int OnInit(void) 11. { 12. IndicatorSetString(INDICATOR_SHORTNAME, "Test 123."); 13. 14. return INIT_SUCCEEDED; 15. }; 16. //+------------------------------------------------------------------+ 17. int OnCalculate(const int rates_total, const int prev_calculated, const int begin, const double &price[]) 18. { 19. return rates_total; 20. }; 21. //+------------------------------------------------------------------+
Code 03
01. //+------------------------------------------------------------------+
02. #property copyright "Daniel Jose"
03. //+------------------------------------------------------------------+
04. #property description "DEMO Indicator"
05. //+------------------------------------------------------------------+
06. #property indicator_chart_window
07. #property indicator_plots           0
08. //+------------------------------------------------------------------+
09. int OnInit(void)
10. {
11.     IndicatorSetString(INDICATOR_SHORTNAME, "Test 456.");
12.     ChartIndicatorAdd(0, (int)ChartGetInteger(0, CHART_WINDOWS_TOTAL), iCustom(NULL, NULL, "Tutor\\Code 01"));
13.
14.     return INIT_SUCCEEDED;
15. };
16. //+------------------------------------------------------------------+
17. int OnCalculate(const int rates_total, const int prev_calculated, const int begin, const double &price[])
18. {
19.     return rates_total;
20. };
21. //+------------------------------------------------------------------+
Code 04
Okay, the idea is for Code 04 to load and run the indicator shown in Code 03. I think by now everyone has figured out what's going on. Note that loading takes place specifically on line 12 of Code 04. There, we specify the name and path of the file to be used. Now pay very close attention to the details, because the devil is in the details.
The first thing to note is the location of the executable file itself, which we are going to embed in another file that we are creating. Pay special attention to this point, because if you don't understand it, you'll end up completely confused. In line 12 of Code 04, we specify the path to the executable file. However, when we intend to use it as a resource, we need to specify a relative path, not an absolute path. Hmm, what are relative and absolute paths? I've never heard of that. So, dear reader, MetaTrader 5 uses an absolute path to access certain files in the sandbox.In the article “From Basic to Intermediate: Navigating the Sandbox”, we’ve already discussed this sandbox; please refer to that article for more details. When you use an absolute path, you must specify it relative to the sandbox itself. However, the compiler uses the sandbox differently than MetaTrader 5 does. To make this easier to understand, imagine the following: MetaTrader 5 locates the executable file based on its location within the sandbox root directory. The compiler, on the other hand, uses a path relative to the source code file, regardless of where exactly it is located within the sandbox.
Yeah, this whole thing with the sandbox and relative and absolute paths seems really confusing. Isn't there some way to summarize all this and explain it more simply? Unfortunately, no. You need to understand this issue before trying to figure out how Code 04 will be changed. So, let's get back to the explanation. We know that Code 03 IS IN THE SAME DIRECTORY as Code 04. This information is very important during compilation and embedding. If Code 03 were located in a different directory, we would have to tell the compiler by specifying the full path to it. Without this information, the compiler WILL NOT BE ABLE to convert Code 03 into a resource within Code 04.
So, once we understand this, the first change we need to make is to define a macro. The thing is, we don't want to specify one path during embedding and then use a different one when accessing the resource. So, the first practical change is shown below.01. //+------------------------------------------------------------------+ 02. #property copyright "Daniel Jose" 03. //+------------------------------------------------------------------+ 04. #property description "DEMO Indicator" 05. //+------------------------------------------------------------------+ 06. #property indicator_chart_window 07. #property indicator_plots 0 08. //+------------------------------------------------------------------+ 09. #define def_Resource "Code 01.ex5" 10. //+------------------------------------------------------------------+ 11. int OnInit(void) 12. { 13. IndicatorSetString(INDICATOR_SHORTNAME, "Test 456."); 14. ChartIndicatorAdd(0, (int)ChartGetInteger(0, CHART_WINDOWS_TOTAL), iCustom(NULL, NULL, "Tutor\\Code 01")); 15. 16. return INIT_SUCCEEDED; 17. }; 18. //+------------------------------------------------------------------+ 19. int OnCalculate(const int rates_total, const int prev_calculated, const int begin, const double &price[]) 20. { 21. return rates_total; 22. }; 23. //+------------------------------------------------------------------+
Code 05
The only change we made here was to add line 9 to Code 05. So don't forget:
The indicator shown in Code 03 IS IN THE SAME DIRECTORY as the code we are about to create.
01. //+------------------------------------------------------------------+
02. #property copyright "Daniel Jose"
03. //+------------------------------------------------------------------+
04. #property description "DEMO Indicator"
05. //+------------------------------------------------------------------+
06. #property indicator_chart_window
07. #property indicator_plots           0
08. //+------------------------------------------------------------------+
09. #define def_Resource "Code 01.ex5"
10. //+------------------------------------------------------------------+
11. #resource def_Resource
12. //+------------------------------------------------------------------+
13. int OnInit(void)
14. {
15.     IndicatorSetString(INDICATOR_SHORTNAME, "Test 456.");
16.     ChartIndicatorAdd(0, (int)ChartGetInteger(0, CHART_WINDOWS_TOTAL), iCustom(NULL, NULL, "Tutor\\Code 01"));
17.
18.     return INIT_SUCCEEDED;
19. };
20. //+------------------------------------------------------------------+
21. int OnCalculate(const int rates_total, const int prev_calculated, const int begin, const double &price[])
22. {
23.     return rates_total;
24. };
25. //+------------------------------------------------------------------+
Code 06
Now we have something really interesting. And all of this is simply because we added this eleventh line to the previous code. This eleventh line embeds the code specified in the ninth line into code 06, thereby turning it into a resource of Code 06 itself. And that's not all. Actually, it's much, much more interesting than that. So let's take it step by step, because there's one practical challenge here, and I'll explain later how to solve it; this is exactly what frustrates many people when they embed one executable file inside another.
In my previous article, I mentioned that to add the indicator shown in Code 03 to a chart, you need to make sure it has been compiled and is ready to run. That's a fact. So, when you compile Code 06, something that looks like magic will happen. The fact is that IF the executable file DOES NOT EXIST, the compiler will create an executable file corresponding to the code specified in line 09. "Huh? How? What kind of madness is this? Are you saying that if we just have some code and we try to compile another piece of code that needs this executable file, the compiler will create it for us on its own?" Yes, that's exactly what will happen. The message displayed by the compiler is quite long. And since the width of the images is limited, it won't be displayed in its entirety. However, the section we need is highlighted below. 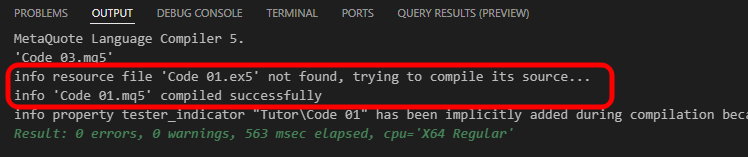
Image 02
In this message, the compiler is telling us that it couldn't find the executable file and is trying to compile it. Since it succeeded, we receive the message shown on the second line of Image 02. If an error had occurred, the message would have been different, as shown below. 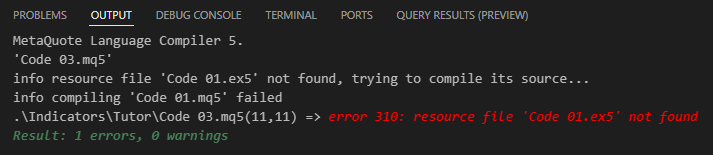
Image 03
Please note that the compiler now reports a compilation error. However, the error is specifically due to the fact that the compiler WAS UNABLE to compile the code needed to resolve the dependency on line 11. That is, the line where the embedding was supposed to take place. This may be due to an error in the code that needs to be embedded, or to an issue with the relative path to that code. In any case, the final executable file will not be created until you resolve the issue preventing embedding.
I think I'm starting to understand this now. But what happens if the executable file that needs to be embedded already exists? Will the compiler compile it again? In that case, the code will not be recompiled. Even if the code has been modified, the compiler will still use the previously compiled executable file. For this reason, you should pay close attention to what you're doing; otherwise, you might modify the code that's supposed to be embedded, only to discover when you run it that its previous version is being executed.
In any case, it's a good idea to pay close attention to the messages the compiler displays. If the executable file to be embedded already exists, we will get a result similar to the one shown in the following image. 
Image 04
Note that Image 04 looks very similar to what you would see if you compiled Code 04. However, the final result may differ significantly from what is produced during execution. We'll save the details for later, since this topic takes time to cover, and in this article I still want to show how embedding will be handled at runtime. So far, we've only created these pieces of code and embedded one inside the other as resources. So, it's time to see how we can turn all of this into something that can actually be executed.
Now let's move on to the second part, which might turn out to be quite confusing. To get the code to work, we need to perform a particular maneuver. This maneuver relies on the use of a special operator that must be added to the code in a very specific way. This operator is used to resolve scope directly within the code itself. Yeah, it's all getting more and more confusing and complicated. What exactly is this scope resolution operator? Well, you can read more about this in the MQL5 documentation itself, in this section. I apologize for not using a more appropriate name.
However, the documentation itself covers only the main aspects of this scope resolution operator. What really matters to us here and going forward is that we need to somehow tell our new code how to execute the code embedded within it. In other words, we need to make line 16 of Code 06 execute the code that is now an internal resource of the executable file we just created, rather than keep trying to execute the external code as before—which it still does because of the way line 16 is currently written.
All right, I think I see where you're going with this. But now I'd like to ask you: How are we going to do this? Because, from my perspective, we have no way of accessing this resource, which is embedded in the executable file using line 11 of Code 06. And there's something else. I reviewed the documentation on how to use code as a resource, and it shows something completely different from what you're doing in Code 06. Therefore, in my opinion, even if this embedding is carried out, it won't actually make the embedded code functional. Unless, of course, you have an ace up your sleeve that will allow you to do so. But in that case, I have no idea how a trick like that could work.
Well, for now, I won't go into detail about why what we're about to do works. But I assure you: all we need to do is change line 16 of Code 06 to match the corresponding line in the code shown below.01. //+------------------------------------------------------------------+ 02. #property copyright "Daniel Jose" 03. //+------------------------------------------------------------------+ 04. #property description "DEMO Indicator" 05. //+------------------------------------------------------------------+ 06. #property indicator_chart_window 07. #property indicator_plots 0 08. //+------------------------------------------------------------------+ 09. #define def_Resource "Code 01.ex5" 10. //+------------------------------------------------------------------+ 11. #resource def_Resource 12. //+------------------------------------------------------------------+ 13. int OnInit(void) 14. { 15. IndicatorSetString(INDICATOR_SHORTNAME, "Test 456."); 16. ChartIndicatorAdd(0, (int)ChartGetInteger(0, CHART_WINDOWS_TOTAL), iCustom(NULL, NULL, "::" + def_Resource)); 17. 18. return INIT_SUCCEEDED; 19. }; 20. //+------------------------------------------------------------------+ 21. int OnCalculate(const int rates_total, const int prev_calculated, const int begin, const double &price[]) 22. { 23. return rates_total; 24. }; 25. //+------------------------------------------------------------------+
Code 07
Thanks to this small change, we'll finally be able to create something truly interesting. And although it may seem that we will still need the executable file created from Code 03 shown in this article, that file can be deleted immediately after compiling Code 07. What's more, I'd even recommend that you delete it right after that; I'll explain why in another article. In any case, Code 07 will make the indicator embedded in the final executable file fully functional. This is because the indicator itself, shown in Code 03, is now part of Code 07. Therefore, all you need to do is share the executable file generated from Code 07 with your friends and colleagues, without worrying about whether they have the executable file generated from Code 03.
So, when you run Code 07 now, you'll see what's shown in the following animation. 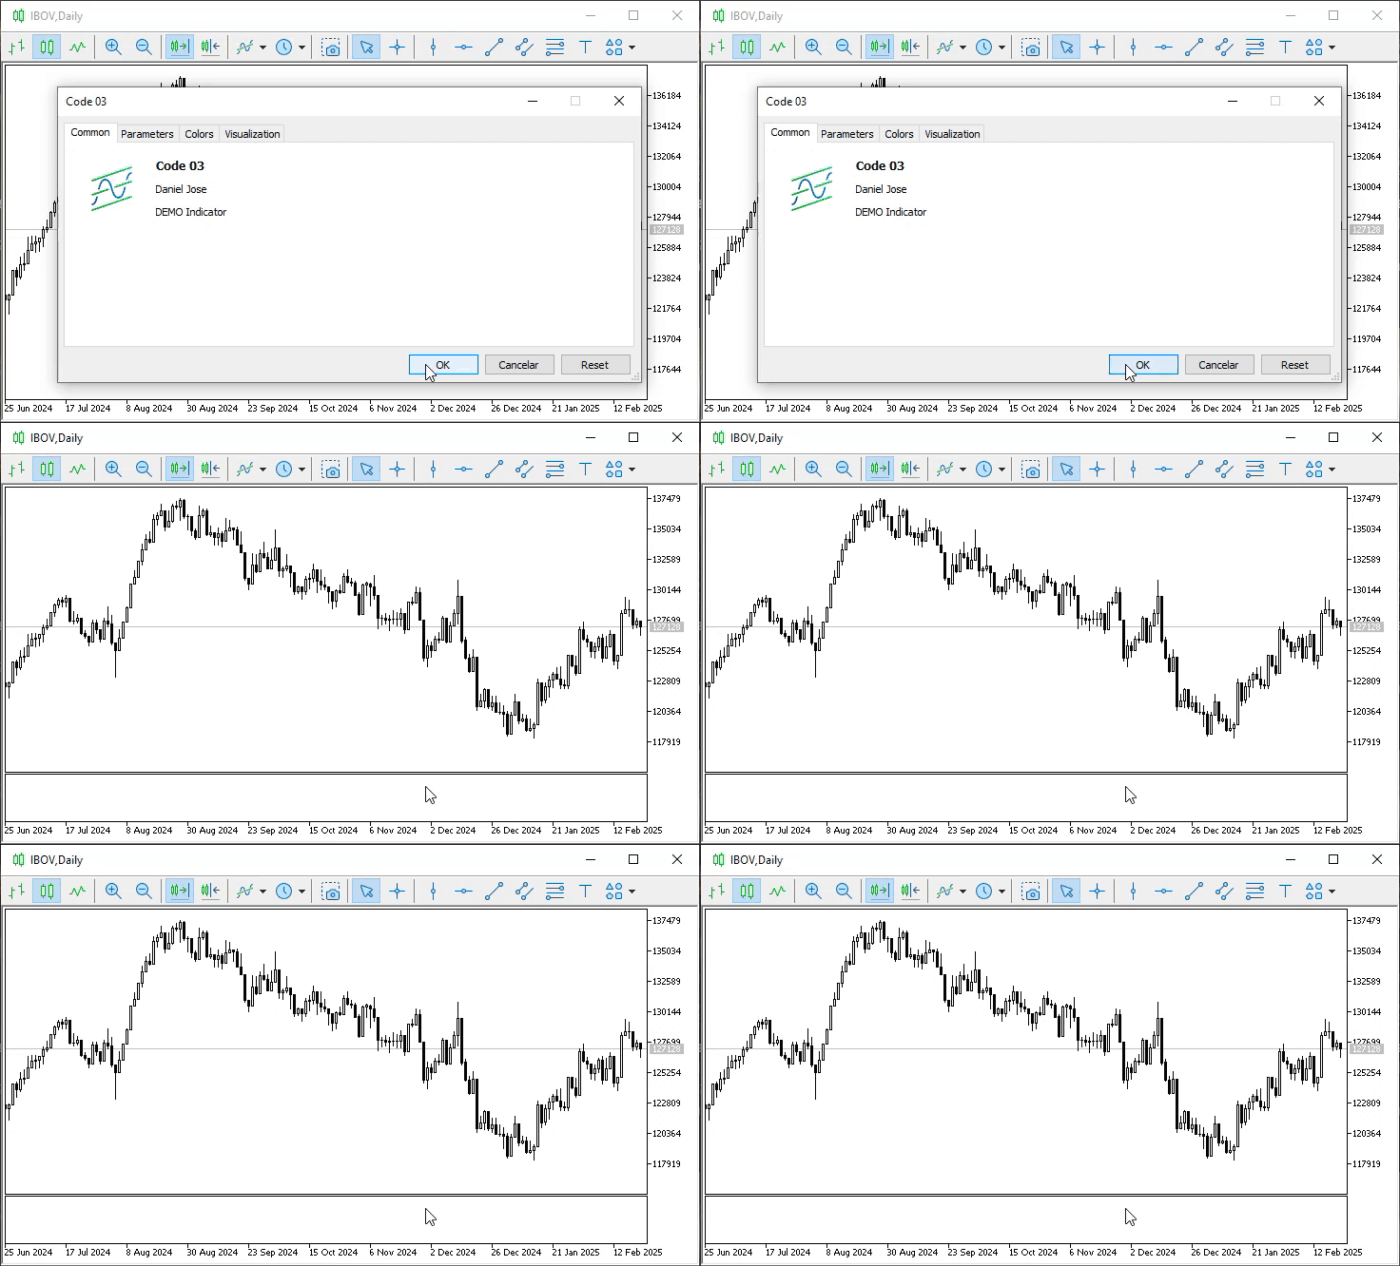
Animation 02
Hmm, I don't see anything special happening. This kind of behavior has been achieved before. Still, I'm not sure if you're trying to pull the wool over my eyes with this story about being able to embed and run code directly just because you changed the sixteenth line. I think you're joking. There's no way that line 16 of Code 07 actually runs the indicator embedded in the executable file.
Well, it seems we have a skeptic among us. Well, let's see if Code 07 can actually do what's described here. To do this, simply open the list of indicators on the chart and review the information displayed there. Once we've done that, we'll see something similar to the image below. 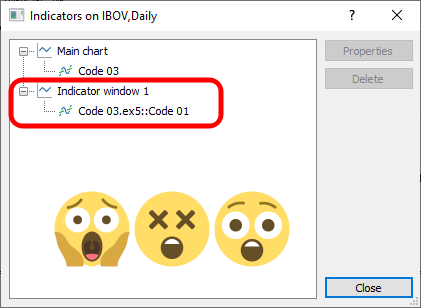
Image 05
Please note that I've highlighted something in this image. So, are you now convinced that Code 07 can actually run the indicator embedded in it? In any case, it's best if you see it with your own eyes and verify what was shown here.
Concluding Thoughts
In this article, you've learned about a concept that can prove extremely useful in many situations and significantly simplify the sharing of your apps and projects. Although it is not easy to fully explain this concept in a single article, what has already been outlined here will be enough for us to accomplish much more in the near future—including things that would otherwise be impossible. That is exactly why this article is being published: to provide you with supplementary material and a starting point for your studies.
So here's my recommendation: take your time to study the concept outlined here. As new articles are published, you'll find that understanding what has been covered here will make it much easier to understand and absorb the material that follows. So make the most of the code samples included in the attachment, and see you in the next article.| MQ5 File | Description |
|---|---|
| Indicators\Code 01 | Basic Demonstration |
| Indicators\Code 02 | Basic Demonstration |
| Indicators\Code 03 | Basic Demonstration |
| Scripts\Code 01 | Basic Demonstration |
| Scripts\Code 02 | Basic Demonstration |
| Scripts\MyFile.txt | A simple sample file |
Translated from Portuguese by MetaQuotes Ltd.
Original article: https://www.mql5.com/pt/articles/17253
Warning: All rights to these materials are reserved by MetaQuotes Ltd. Copying or reprinting of these materials in whole or in part is prohibited.
This article was written by a user of the site and reflects their personal views. MetaQuotes Ltd is not responsible for the accuracy of the information presented, nor for any consequences resulting from the use of the solutions, strategies or recommendations described.