From Basic to Intermediate: Objects and Subwindows (I)
 33
 0

Introduction
In the previous article, “From Basic to Intermediate: Resources”, we explored a rather interesting and engaging concept: using data or other information as an embedded resource in the application being developed. However, what we saw there is only a tiny fraction of what can be done using this concept. In practice, the only limitations are your imagination and your experience in applying the concept described there. And since the goal here is educational—and we aim to present everything in a way that is clear to everyone, even beginners—we will not skip any steps when explaining how certain concepts can and should be understood.
So, in this series of articles, we've already discussed graphical objects and how to handle simple events associated with them. In addition, we were briefly introduced to indicators and discussed how to approach some specific situations related to their use. We have also laid a solid foundation for working with subwindows. However, we haven't yet discussed how to use objects within them. Many people might think, “How important is it to know how to do this?” Isn’t this the same thing that was already explained when we were talking about graphical objects? Generally speaking—yes, it's more or less the same thing. However—and this is exactly what I'm about to explain—there are slight differences and nuances between using an object in the main window and using the same object in a subwindow. The most interesting part begins when we start using elements that are supposed to be in the main window but will ultimately be used in a subwindow. As it stands, you probably—or, more accurately, almost certainly—still don't understand what I'm trying to explain.
So, let's start by looking at situations like this: using graphical objects inside subwindows. Let's set aside all distractions and focus on the topic of this article, because this subject might change the way you look at code.Objects and Subwindows (I)
Although some programming concepts and structures haven't been explained yet, I don't want you to think that you need years of programming experience to create something useful. That's not true at all. Programming is a form of art in which, starting with an idea, you can use mathematical tools to tell a computer what it needs to do to bring that idea to life. And don't kid yourself: computers are just simple computing machines. Just because you don't see them that way doesn't make them anything else. So, even though we have some limitations at this stage, I want to show you that we can already do a lot of pretty interesting things—even if they may seem very simple and unappealing at first.
As usual, let's start with something very simple and easy to understand. To do this, we'll create the small indicator shown below.01. //+------------------------------------------------------------------+ 02. #property copyright "Daniel Jose" 03. //+------------------------------------------------------------------+ 04. #property description "DEMO Indicator" 05. //+------------------------------------------------------------------+ 06. #property indicator_chart_window 07. #property indicator_plots 0 08. //+------------------------------------------------------------------+ 09. #define def_ObjName "Mini Chart" 10. //+------------------------------------------------------------------+ 11. int OnInit(void) 12. { 13. IndicatorSetString(INDICATOR_SHORTNAME, "Test 123."); 14. 15. ObjectCreate(0, def_ObjName, OBJ_CHART, 0, 0, 0); 16. ObjectSetInteger(0, def_ObjName, OBJPROP_XDISTANCE, 10); 17. ObjectSetInteger(0, def_ObjName, OBJPROP_YDISTANCE, 10); 18. ObjectSetInteger(0, def_ObjName, OBJPROP_XSIZE, 300); 19. ObjectSetInteger(0, def_ObjName, OBJPROP_YSIZE, 300); 20. ObjectSetInteger(0, def_ObjName, OBJPROP_PERIOD, PERIOD_M15); 21. ObjectSetInteger(0, def_ObjName, OBJPROP_DATE_SCALE, false); 22. ObjectSetInteger(0, def_ObjName, OBJPROP_PRICE_SCALE, false); 23. ObjectSetString(0, def_ObjName, OBJPROP_SYMBOL, _Symbol); 24. ObjectSetInteger(0, def_ObjName, OBJPROP_SELECTABLE, true); 25. ObjectSetInteger(0, def_ObjName, OBJPROP_SELECTED, false); 26. 27. return INIT_SUCCEEDED; 28. }; 29. //+------------------------------------------------------------------+ 30. int OnCalculate(const int rates_total, const int prev_calculated, const int begin, const double &price[]) 31. { 32. return rates_total; 33. }; 34. //+------------------------------------------------------------------+ 35. void OnDeinit(const int reason) 36. { 37. ObjectDelete(0, def_ObjName); 38. ChartRedraw(); 39. }; 40. //+------------------------------------------------------------------+
Code 01
This code clearly illustrates what we want to do. Nevertheless, this isn't the best approach, although it is one that everyone can—or should—understand. Since we have already covered some aspects of object-oriented programming in this series of articles, we can improve Code 01 to achieve the same result using code that is much easier to use. So even if we overlook some detail, object-oriented programming itself will help us correct it. Therefore, Code 01 can be rewritten as shown below.01. //+------------------------------------------------------------------+ 02. #property copyright "Daniel Jose" 03. //+------------------------------------------------------------------+ 04. #property description "DEMO Indicator" 05. //+------------------------------------------------------------------+ 06. #property indicator_chart_window 07. #property indicator_plots 0 08. //+------------------------------------------------------------------+ 09. class C_MiniChart 10. { 11. private : 12. //+----------------+ 13. string m_szNameObject; 14. //+----------------+ 15. void SetInteger(ENUM_OBJECT_PROPERTY_INTEGER prop, int value) { ObjectSetInteger(0, m_szNameObject, prop, value); } 16. //+----------------+ 17. public : 18. //+----------------+ 19. C_MiniChart(string szName) 20. :m_szNameObject(szName) 21. { 22. ObjectCreate(0, m_szNameObject, OBJ_CHART, 0, 0, 0); 23. ObjectSetString(0, m_szNameObject, OBJPROP_SYMBOL, _Symbol); 24. SetInteger(OBJPROP_XDISTANCE, 10); 25. SetInteger(OBJPROP_YDISTANCE, 10); 26. SetInteger(OBJPROP_XSIZE, 300); 27. SetInteger(OBJPROP_YSIZE, 300); 28. SetInteger(OBJPROP_PERIOD, PERIOD_M15); 29. SetInteger(OBJPROP_DATE_SCALE, false); 30. SetInteger(OBJPROP_PRICE_SCALE, false); 31. SetInteger(OBJPROP_SELECTABLE, true); 32. SetInteger(OBJPROP_SELECTED, false); 33. } 34. //+----------------+ 35. ~C_MiniChart() 36. { 37. ObjectDelete(0, m_szNameObject); 38. ChartRedraw(); 39. } 40. //+----------------+ 41. }gl_MiniChart("Mini Chart"); 42. //+------------------------------------------------------------------+ 43. int OnInit(void) 44. { 45. IndicatorSetString(INDICATOR_SHORTNAME, "Test 123."); 46. 47. return INIT_SUCCEEDED; 48. }; 49. //+------------------------------------------------------------------+ 50. int OnCalculate(const int rates_total, const int prev_calculated, const int begin, const double &price[]) 51. { 52. return rates_total; 53. }; 54. //+------------------------------------------------------------------+
Code 02
All right, now we really do have code that's much easier to modify and explain. In addition, of course, it is much better suited for learning. Now I'd like you to take a look at some details in Code 02. Please note that in the sixth line, we specify that the indicator WILL NOT USE A SUBWINDOW. It is extremely important that you fully understand exactly what we are specifying in the sixth line. The second point we need to pay attention to relates to line 41. Here, we declare a global variable, which, in turn, initializes the class. However, when you look at the contents of OnInit, you might immediately think, “Okay, but this code won’t produce the same result as code 01.” This is exactly where it's easy to slip up and draw the wrong conclusions. Although code 02 looks different from code 01, it produces the same result and behaves exactly the same way. This is specifically due to what happens on line 41, as well as the fact that we are using object-oriented programming.
If you have any questions about this, please check out the article “From Basic to Intermediate: Classes (III)”, where I demonstrate something similar to what we’re doing here. Okay, but Code 02 is pretty boring and uninteresting, since all it does is create a chart with the same symbol as the main chart, but with a 15-minute timeframe. You can verify this by examining line 23, where we specify which symbol will be displayed on the chart, and line 28, where we define the chart timeframe used to plot the bars in the small window being created. However, before we delve deeper into this topic, I want to make sure you fully understand what's going on here. And to leave no doubt as to how the previous code works, an animation is shown below.
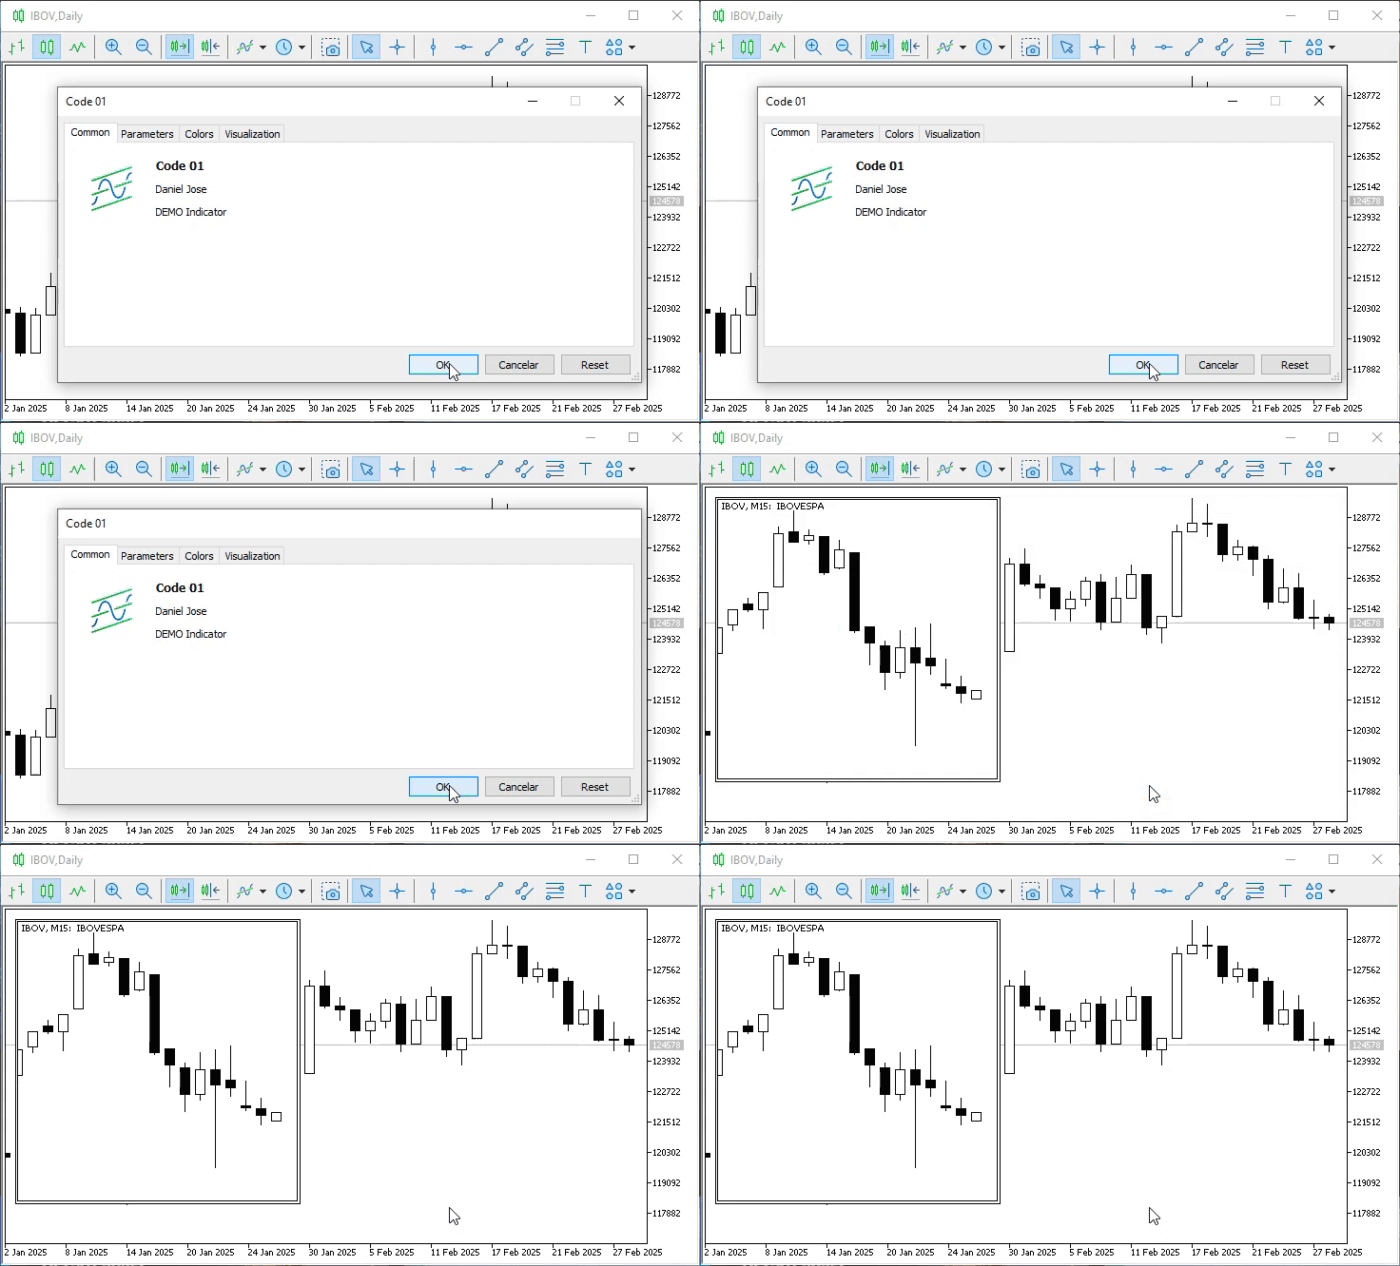
Animation 01
This animation shows the result of applying Code 01 to any chart. Similarly, the animation below shows what happens when we remove the indicator created in the previous code snippets from the chart.
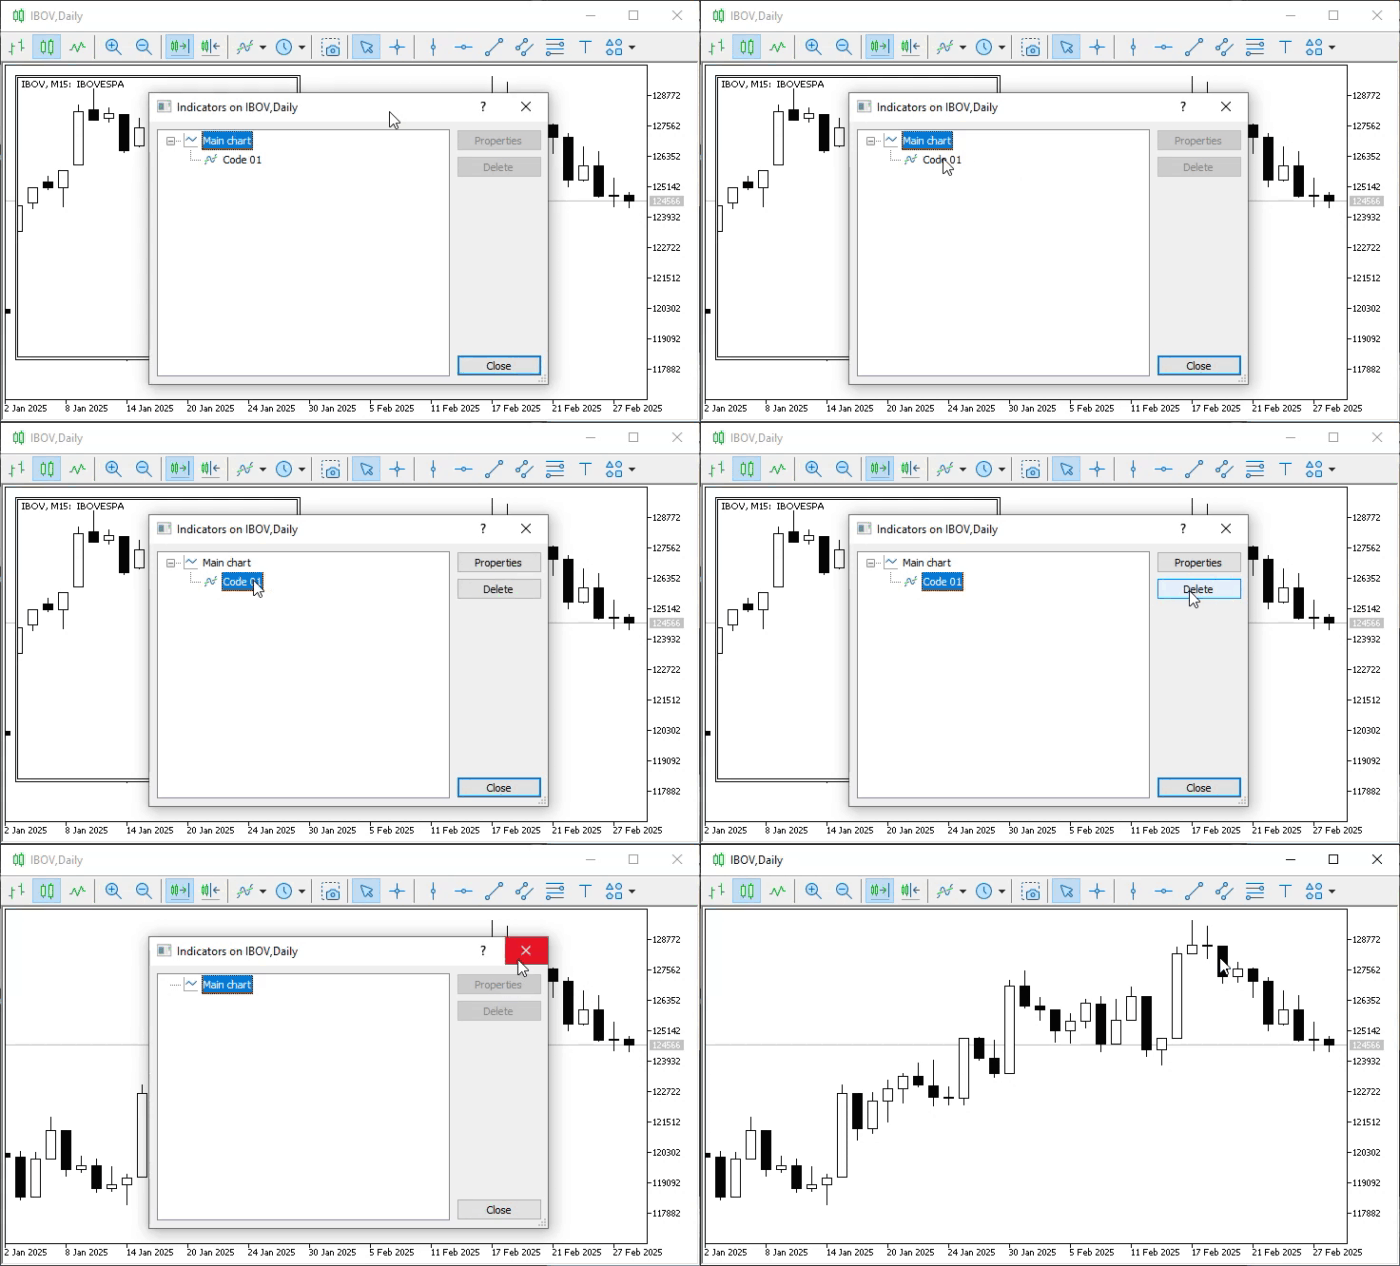
Animation 02
You can clearly see that the object placed on the chart is deleted as soon as we remove the indicator. That's exactly what you'd expect, given how the code was implemented. However, although this result may seem obvious, combining several concepts we’ve already covered in this series of articles does not always produce the results we expect, as you’ll see when you try out the attached code. One such situation involves using an indicator by calling it from the MQL5 library, as we've already seen in recent articles.
Since I don't want to overcomplicate things right now, let's do the following: create another indicator and, building on what was explained in recently published articles, have this new indicator place the indicator created in Code 02 into a subwindow. Remember that the indicator implemented in Code 02 DOES NOT USE A SUBWINDOW. It uses the main window to interact with the user—that is, the person operating the chart. To do this, we'll use the code below.01. //+------------------------------------------------------------------+ 02. #property copyright "Daniel Jose" 03. //+------------------------------------------------------------------+ 04. #property description "DEMO Indicator" 05. //+------------------------------------------------------------------+ 06. #property indicator_chart_window 07. #property indicator_plots 0 08. //+------------------------------------------------------------------+ 09. #define def_Resource "Code 01.ex5" 10. //+------------------------------------------------------------------+ 11. #resource def_Resource 12. //+------------------------------------------------------------------+ 13. int OnInit(void) 14. { 15. ChartIndicatorAdd(0, (int)ChartGetInteger(0, CHART_WINDOWS_TOTAL), iCustom(NULL, NULL, "::" + def_Resource)); 16. 17. return INIT_SUCCEEDED; 18. }; 19. //+------------------------------------------------------------------+ 20. int OnCalculate(const int rates_total, const int prev_calculated, const int begin, const double &price[]) 21. { 22. return rates_total; 23. }; 24. //+------------------------------------------------------------------+
Code 03
Now pay close attention, because—unlike when we plot a moving average on a chart—there are certain precautions you need to take when working with objects. And since I want everything to be clear, Code 03 contains only what is necessary to achieve our goal: placing the indicator shown in Code 02 in the subwindow. Since the executable file for Code 02 will be integrated into Code 03 via line 11—where we include this executable file as an embedded resource of Code 03—there will be no need to separately transfer Code 02 between different MetaTrader 5 installations. All we'll need to do is transfer the executable file generated by compiling Code 03 to another computer, and the behavior will remain the same. This was discussed in the previous article. For more detailed information, please review the explanation provided there.
Given that you already understand what line 15 of Code 03 will actually do, you might expect that a subwindow will be created and that the object will be placed in it. Right? All right, that's exactly what you expect to see. However, when you run the code, you get the result shown in the following animation. 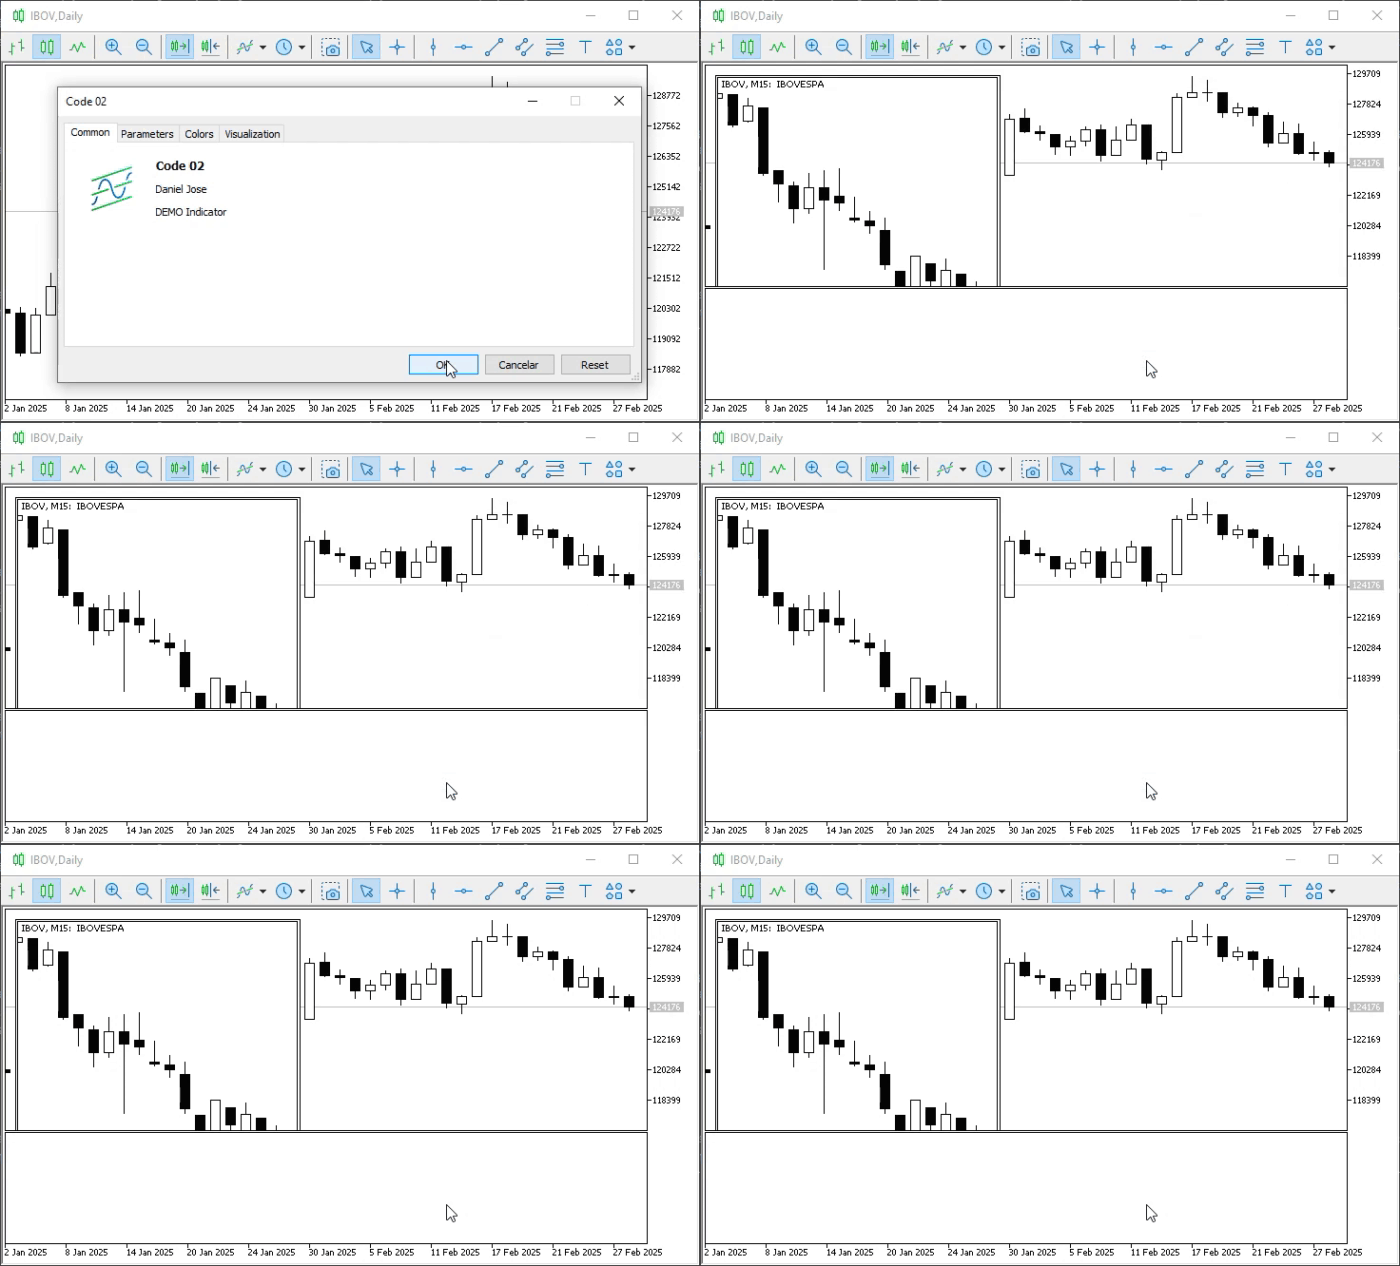
Animation 03
What happened? I don't understand. So, dear reader, let's make a small change to Code 02 to make everything much clearer. This change is shown in the excerpt below.. . . 26. SetInteger(OBJPROP_XSIZE, 300); 27. SetInteger(OBJPROP_YSIZE, 150); . . .
Excerpt 01
Here, we change the dimensions of the OBJ_CHART object that will be created. Next, we delete the executable file for Code 02 and recompile Code 03. This embeds the executable file again, with the new dimensions specified for the OBJ_CHART object. As a result, running Code 03 will produce what is shown in the following image.
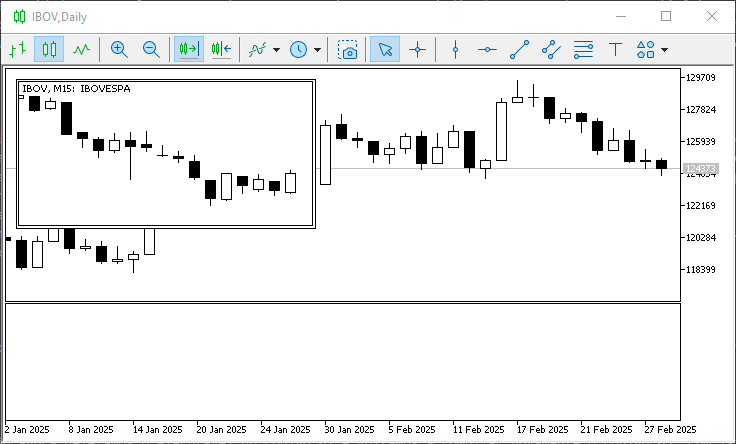
Image 01
"How strange. I thought the OBJ_CHART object would be added to the subwindow, since we're placing the indicator from code 02 in the subwindow. However, it appears that the code interpreted this differently and, as a result, placed the OBJ_CHART object in the main window. Yeah, that's really strange. But wait a minute. It's possible that the indicator from Code 02 isn't actually being placed in the subwindow. Perhaps that is why I see this result in Image 01. Maybe that's the reason?" Actually, no, dear reader. If you ask MetaTrader 5 to display a list of the indicators on the chart, you will see that the indicator from code 02 is indeed located in the subwindow, as clearly shown in the following image. 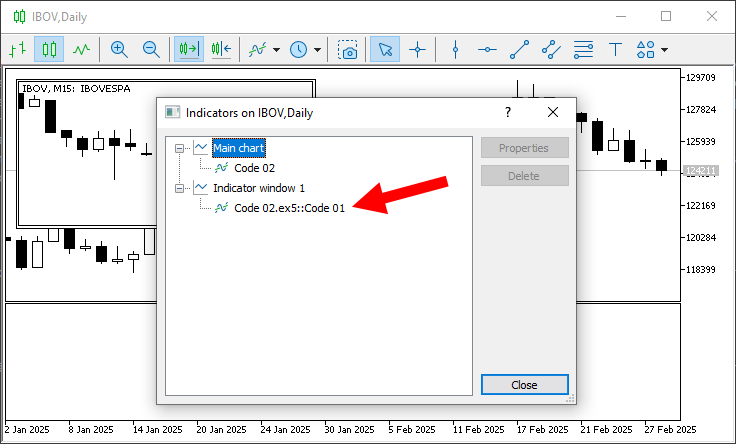
Image 02
Now I don't understand anything at all. I thought everything would work a certain way, but it's getting too complicated for me. Take it easy, my friend. The fun is just beginning. The thing is, you assumed that everything would go a certain way, but you've just realized that, in practice, things don't always turn out the way we expect. We really need to learn and understand things before we assume we already know how everything works. To make things a little easier, let's modify code 02 so that the OBJ_CHART object is displayed in a subwindow without having to use code 03. However, keep one thing in mind: the goal here is to use code 02 and code 03 to get the result we'll see shortly. But so you can understand what we're going to do, let's go through it step by step. So focus on the explanation that follows.
So, after modifying code 02, we get the code shown below.01. //+------------------------------------------------------------------+ 02. #property copyright "Daniel Jose" 03. //+------------------------------------------------------------------+ 04. #property description "DEMO Indicator" 05. //+------------------------------------------------------------------+ 06. #property indicator_separate_window 07. #property indicator_plots 0 08. #property indicator_height 150 09. //+------------------------------------------------------------------+ 10. class C_MiniChart 11. { 12. private : 13. //+----------------+ 14. string m_szNameObject; 15. //+----------------+ 16. void SetInteger(ENUM_OBJECT_PROPERTY_INTEGER prop, int value) { ObjectSetInteger(0, m_szNameObject, prop, value); } 17. //+----------------+ 18. public : 19. //+----------------+ 20. C_MiniChart(string szName) 21. :m_szNameObject(szName) 22. { 23. ObjectCreate(0, m_szNameObject, OBJ_CHART, 1, 0, 0); 24. ObjectSetString(0, m_szNameObject, OBJPROP_SYMBOL, _Symbol); 25. SetInteger(OBJPROP_XDISTANCE, 10); 26. SetInteger(OBJPROP_YDISTANCE, 0); 27. SetInteger(OBJPROP_XSIZE, 300); 28. SetInteger(OBJPROP_YSIZE, indicator_height); 29. SetInteger(OBJPROP_PERIOD, PERIOD_M15); 30. SetInteger(OBJPROP_DATE_SCALE, false); 31. SetInteger(OBJPROP_PRICE_SCALE, false); 32. SetInteger(OBJPROP_SELECTABLE, true); 33. SetInteger(OBJPROP_SELECTED, false); 34. } 35. //+----------------+ 36. ~C_MiniChart() 37. { 38. ObjectDelete(0, m_szNameObject); 39. ChartRedraw(); 40. } 41. //+----------------+ 42. }gl_MiniChart("Mini Chart"); 43. //+------------------------------------------------------------------+ 44. int OnInit(void) 45. { 46. IndicatorSetString(INDICATOR_SHORTNAME, "Test 123."); 47. 48. return INIT_SUCCEEDED; 49. }; 50. //+------------------------------------------------------------------+ 51. int OnCalculate(const int rates_total, const int prev_calculated, const int begin, const double &price[]) 52. { 53. return rates_total; 54. }; 55. //+------------------------------------------------------------------+
Code 04
Now, when we run Code 04, we'll get a result similar to the one shown in the following animation. 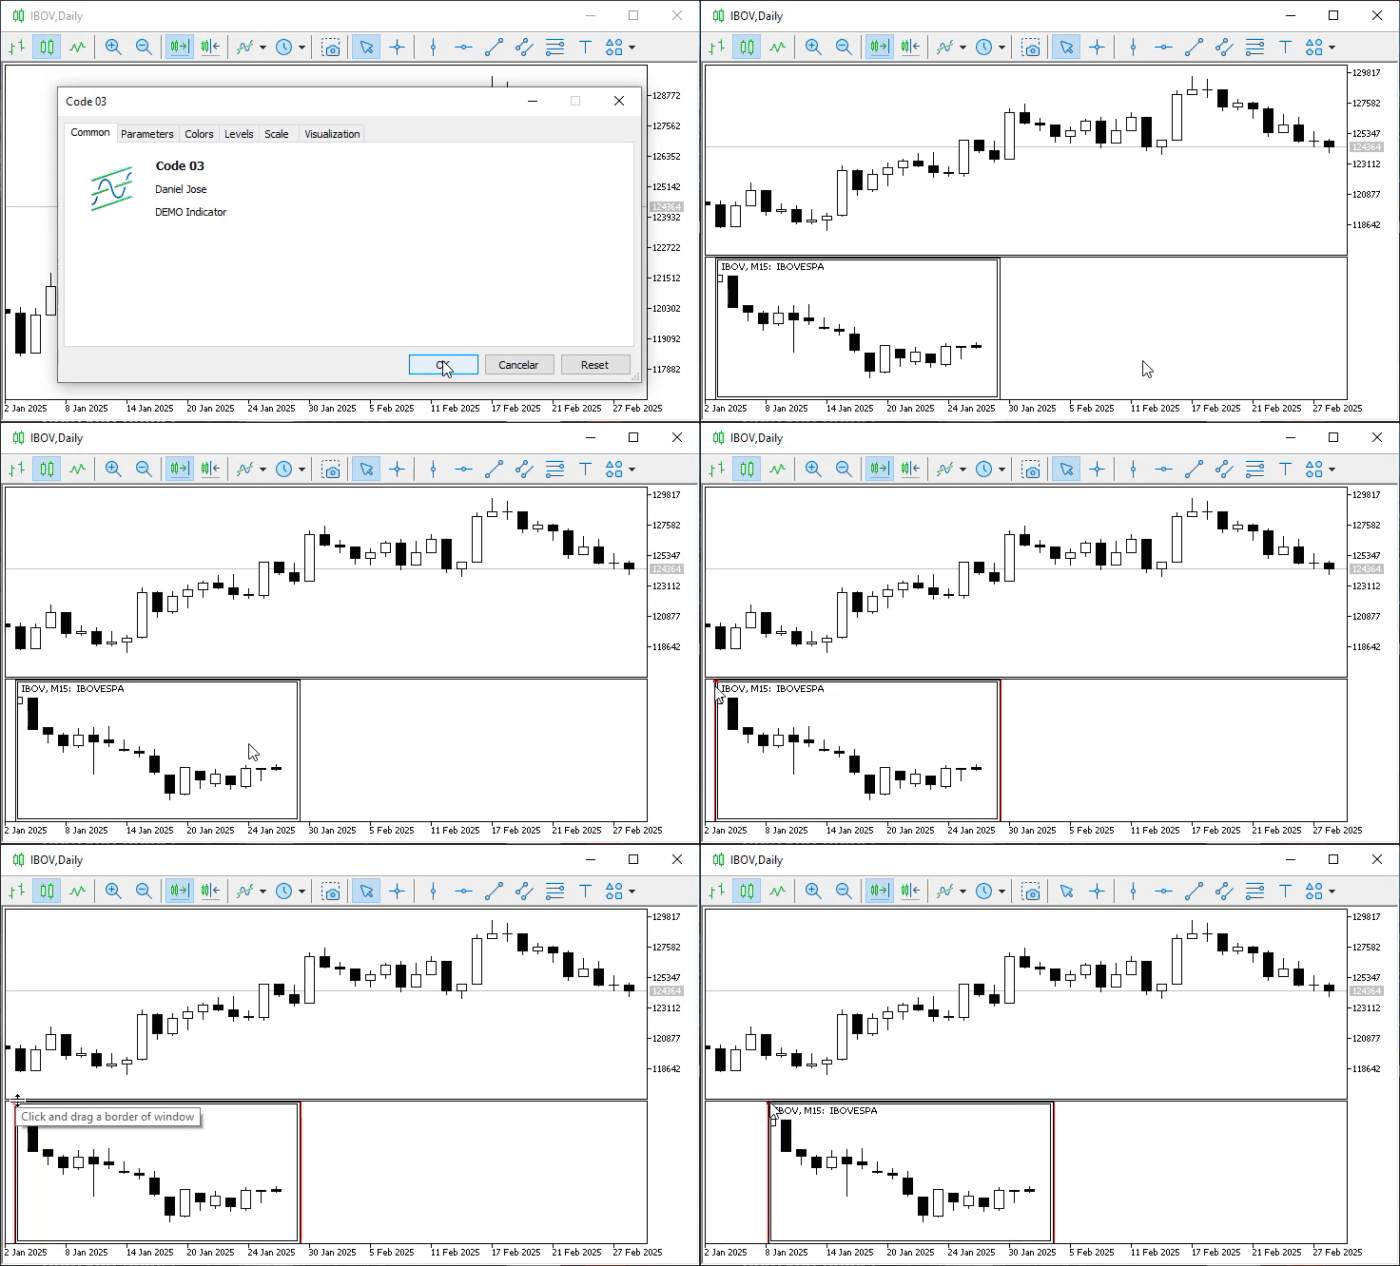
Animation 04
Hmm, that looks pretty interesting. Indeed, dear reader, things like this are very interesting, and as we move forward, they will become even more interesting. However, as interesting as it may seem, Code 04 has one problem. And if you don't fully understand what MetaTrader 5 does, this problem can cause you plenty of headaches and trouble. This might even discourage you from continuing to learn MQL5. So pay close attention. If you compare Code 04 with its predecessor—that is, Code 02—you'll notice that some changes have been made to it. However—and this is the key point—the change that really interests us is on line 23: it is the fourth argument passed to the ObjectCreate function. I don't understand: why should this fourth argument cause an error in Code 04? Could you explain that in more detail? Actually, the easiest way to understand this is to try out this code yourself. Nevertheless, I will try to explain this so that you can get a sense of the problem associated with this fourth argument.
Since we specify on line 6 of code 04 that a subwindow is required, MetaTrader 5 will create it if necessary, as we have already seen in previous articles. However—and this is precisely the point that often confuses many people—when creating an OBJ_CHART object, we instruct MetaTrader 5 to create it and place it in a subwindow. Now let me ask you: in which subwindow? Well, you might say it should be the subwindow created to hold the indicator. Right? That's not correct, dear reader. Or, more precisely, that may well be the case, provided that when Code 04 is added to the chart, there are NO OTHER SUBWINDOWS on it.
Pay special attention to this statement, as it can come in handy in many situations where we need to perform certain actions on a chart. However, that is not the case here. For this reason, if a subwindow already exists BEFORE the indicator from code 04 is added to the chart, MetaTrader 5 will create and place the OBJ_CHART object in the subwindow with index 1. This happens because the fourth argument specifies that particular subwindow.
To make this a little clearer, take a look at the following animation. 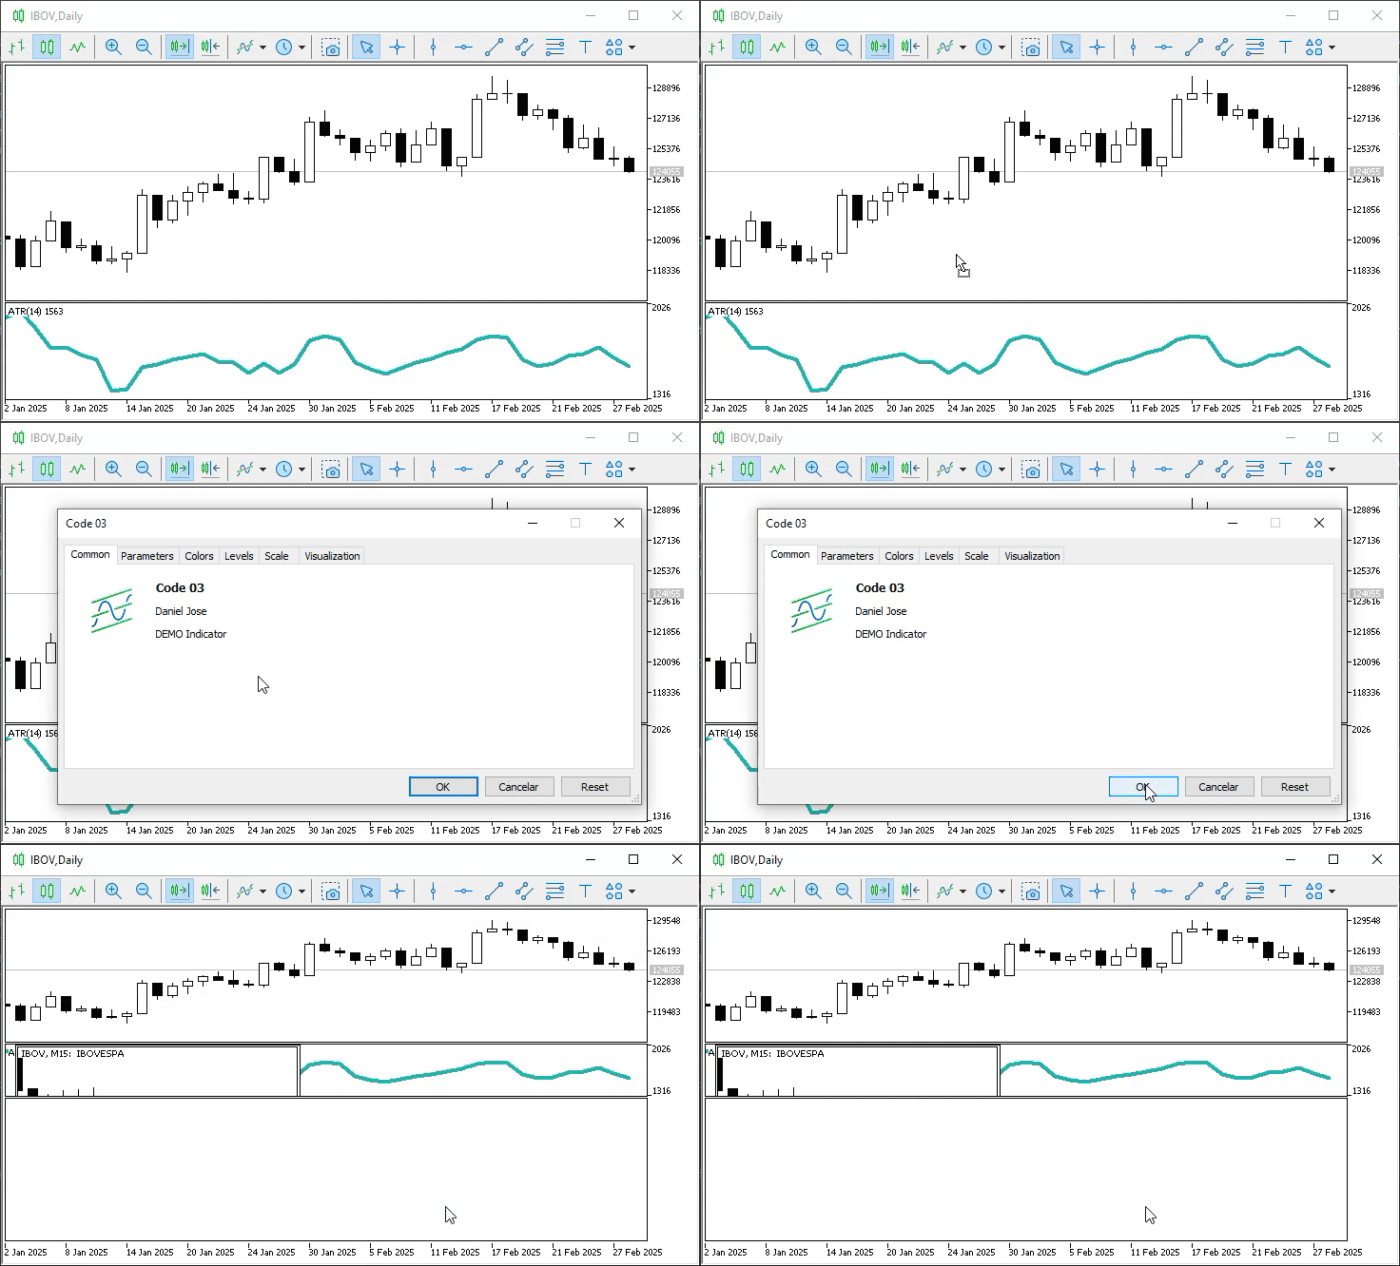
Animation 05
Notice that the code behaves differently from how you expected it to behave. However, in certain very specific situations, it is precisely this behavior—as shown in Animation 05—that we want to achieve. We may look into this in more detail later. So, let's return to our original task: to create a subwindow and add an OBJ_CHART object to it. Well, there are many different ways to solve this problem. Each of them may be easier or more difficult, depending on the specific situation and the goal we want to achieve. However, to keep the article focused on teaching, we will use what I believe to be the simplest of all methods. Remember that there are even simpler ways. However, since I haven't yet explained some of the MQL5 library's features, the solution we'll look at here is the simplest one currently available. This is because what we'll be doing here has already been explained in another article in this series.
In the article “From Basic to Intermediate: Subwindows (III)”, I showed how to see which indicators are present on a given chart. So, if you have any questions about what we'll be covering here, please refer to this article for more detailed information. Well, now let's move on to the most interesting part of the article. To do this, we'll start with the code shown below.
01. //+------------------------------------------------------------------+
02. #property copyright "Daniel Jose"
03. //+------------------------------------------------------------------+
04. #property description "DEMO Indicator"
05. //+------------------------------------------------------------------+
06. #property indicator_separate_window
07. #property indicator_plots           0
08. #property indicator_height          150
09. //+------------------------------------------------------------------+
10. #define def_ShortName "Test 123."
11. //+------------------------------------------------------------------+
12. class C_MiniChart
13. {
14.     private :
15. //+----------------+
16.         string  m_szNameObject;
17.         int     m_Sub;
18. //+----------------+
19.         void SetInteger(ENUM_OBJECT_PROPERTY_INTEGER prop, int value) { ObjectSetInteger(0, m_szNameObject, prop, value); }
20. //+----------------+
21.         int WhatSubWin(void)
22.         {
23.             for (int c0 = 0; c0 < (int)(ChartGetInteger(0, CHART_WINDOWS_TOTAL)); c0++)
24.                 for (int c1 = (ChartIndicatorsTotal(0, c0) - 1); c1 >= 0; c1--)
25.                     if (ChartIndicatorName(0, c0, c1) == def_ShortName)
26.                         return c0;
27.             return INVALID_HANDLE;
28.         }
29. //+----------------+
30.     public  :
31. //+----------------+
32.         C_MiniChart(string szName)
33.         {
34.             if ((m_Sub = WhatSubWin()) == INVALID_HANDLE) return;
35.             ObjectCreate(0, m_szNameObject = szName, OBJ_CHART, m_Sub, 0, 0);
36.             ObjectSetString(0, m_szNameObject, OBJPROP_SYMBOL, _Symbol);
37.             SetInteger(OBJPROP_XDISTANCE, 10);
38.             SetInteger(OBJPROP_YDISTANCE, 0);
39.             SetInteger(OBJPROP_XSIZE, 300);
40.             SetInteger(OBJPROP_YSIZE, indicator_height);
41.             SetInteger(OBJPROP_PERIOD, PERIOD_M15);
42.             SetInteger(OBJPROP_DATE_SCALE, false);
43.             SetInteger(OBJPROP_PRICE_SCALE, false);
44.             SetInteger(OBJPROP_SELECTABLE, true);
45.             SetInteger(OBJPROP_SELECTED, false);
46.         }
47. //+----------------+
48.         ~C_MiniChart()
49.         {
50.             ObjectDelete(0, m_szNameObject);
51.             ChartRedraw();
52.         }
53. //+----------------+
54. }*gl_MiniChart;
55. //+------------------------------------------------------------------+
56. int OnInit(void)
57. {
58.     IndicatorSetString(INDICATOR_SHORTNAME, def_ShortName);
59.
60.     gl_MiniChart = new C_MiniChart("Mini Chart");
61.
62.     return INIT_SUCCEEDED;
63. };
64. //+------------------------------------------------------------------+
65. int OnCalculate(const int rates_total, const int prev_calculated, const int begin, const double &price[])
66. {
67.     return rates_total;
68. };
69. //+------------------------------------------------------------------+
70. void OnDeinit(const int reason)
71. {
72.     delete gl_MiniChart;
73. };
74. //+------------------------------------------------------------------+
Code 05
At first glance, Code 05 may seem very complex and extremely well thought out. Nevertheless, nothing that is done here is—or should be—new to those who follow these articles and study them. We've seen everything that's going on here before. Of course, a few minor changes were made to make the code a little easier to understand. But the key point concerns what happens on line 54. Note that, unlike before, we no longer have the same degree of freedom. And the reason is quite simple: we need to know where the indicator will be placed. What does “where” mean? Of course, I know where it will be located. That's not what I mean, my friend.
The fact is that until MetaTrader 5 specifies the name of the executable file as a string that we can easily and unambiguously verify, we have no way of knowing where MetaTrader 5 will place the indicator or exactly how it will handle it. Keep in mind that depending on where you place the indicator and what its settings are, MetaTrader 5 may process it differently. This has already been discussed in previous articles.
After executing line 58, we can already determine where the indicator will actually be placed. Based on this, we can determine which subwindow the OBJ_CHART object should be placed in. This is done on line 34. However, since we're now working differently, we need to make sure that the pointer created on line 60 is destroyed. For this reason, we need to add an OnDeinit handler, which you can see on line 70.
Okay, but does Code 05 really work the way we need it to? To answer this question, watch the following animation. 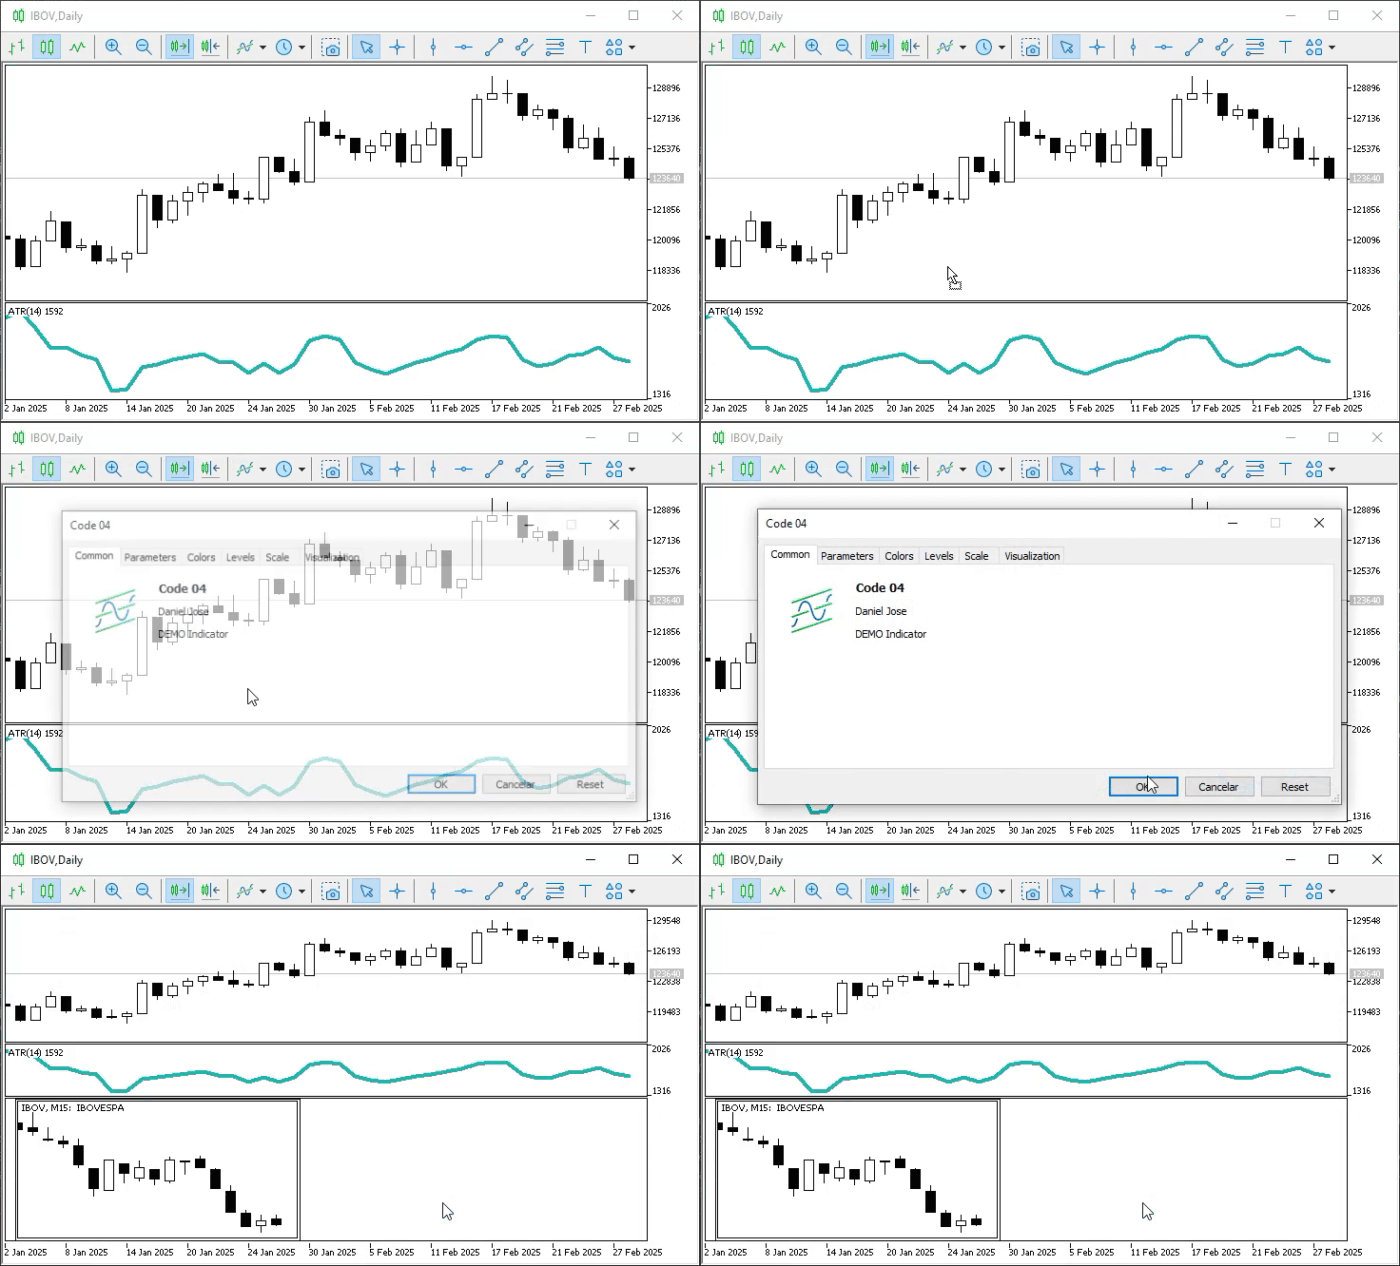
Animation 06
"Wow, this has really gotten a lot more interesting. Now it really does seem like we're heading in the right direction." And indeed, dear reader, things have become much more interesting. But there's always a "but" in every story. Even Code 05 has an error. "Come on, why don't you just show us the code without any errors? Why are you treating me this way? First you get my hopes up, and then right after that, it's like you're hitting me over the head with a hammer. That's very cruel." Well, if you look at it that way, perhaps it really could seem cruel. But I think you're forgetting that you're not a programmer yet, and you're reading these articles precisely to learn how to do everything the best way possible.
So, the problem with Code 05 is that if you try to add two instances of the same indicator to a single chart, no new instances of the OBJ_CHART object will be created. The reason is that we are telling MetaTrader 5 to use the same name for the OBJ_CHART object. All right, then it's very easy to fix this: just assign a unique name to each new instance of the object being created. The solution to this problem seems too simple. To be honest, this doesn't seem like a problem at all.
I wish everything were always as simple as it sometimes seems to you. In practice, the issue is a bit more complicated. Note that even if you do as you just suggested—and the idea itself is sound—the real problem arises when line 34 calls the function defined on line 21. Hmm, I don't get it. Then stop for a moment and think, because you'll soon realize what the real problem is.
When the indicator from Code 05 is added to the chart, it searches for the first instance of the indicator identified by the name we declared in line 10. Even if you give the OBJ_CHART object a different name, the function defined on line 21 will still return the index of the subwindow containing the first instance of the indicator, identified by the name on line 10. For this reason, if you change only the name of the OBJ_CHART object, you will not be able to place the new object in the correct subwindow.
There are ways to get around such problems. Some of them are even quite unusual. However, that is not our goal at this stage. I mention this only so that you keep in mind that, no matter how smoothly everything seems to be running, there may still be issues that you haven't noticed. And to tackle these challenges, we'll have to turn to slightly more complex topics and materials. Therefore, it is worth studying each of these articles carefully.
With that point made, and having shown how to work with what we just created in Code 05, we can return to integrating Code 02 with Code 03. And remember: Code 02 does not specify that we will be using a subwindow, whereas the approach used in Code 05 will help us avoid creating an object and placing it in the wrong subwindow. So, to correct Code 02 and subsequently integrate it with Code 03, we need to modify it as shown below.01. //+------------------------------------------------------------------+ 02. #property copyright "Daniel Jose" 03. //+------------------------------------------------------------------+ 04. #property description "DEMO Indicator" 05. //+------------------------------------------------------------------+ 06. #property indicator_chart_window 07. #property indicator_plots 0 08. //+------------------------------------------------------------------+ 09. #define def_ShortName "Test 123." 10. //+------------------------------------------------------------------+ 11. class C_MiniChart 12. { 13. private : 14. //+----------------+ 15. string m_szNameObject; 16. int m_Sub; 17. //+----------------+ 18. void SetInteger(ENUM_OBJECT_PROPERTY_INTEGER prop, int value) { ObjectSetInteger(0, m_szNameObject, prop, value); } 19. //+----------------+ 20. int WhatSubWin(void) 21. { 22. for (int c0 = 0; c0 < (int)(ChartGetInteger(0, CHART_WINDOWS_TOTAL)); c0++) 23. for (int c1 = (ChartIndicatorsTotal(0, c0) - 1); c1 >= 0; c1--) 24. if (ChartIndicatorName(0, c0, c1) == def_ShortName) 25. return c0; 26. return INVALID_HANDLE; 27. } 28. //+----------------+ 29. public : 30. //+----------------+ 31. C_MiniChart(string szName) 32. { 33. if ((m_Sub = WhatSubWin()) == INVALID_HANDLE) return; 34. ObjectCreate(0, m_szNameObject = szName, OBJ_CHART, m_Sub, 0, 0); 35. ObjectSetString(0, m_szNameObject, OBJPROP_SYMBOL, _Symbol); 36. SetInteger(OBJPROP_XDISTANCE, 10); 37. SetInteger(OBJPROP_YDISTANCE, 0); 38. SetInteger(OBJPROP_XSIZE, 300); 39. SetInteger(OBJPROP_YSIZE, 150); 40. SetInteger(OBJPROP_PERIOD, PERIOD_M15); 41. SetInteger(OBJPROP_DATE_SCALE, false); 42. SetInteger(OBJPROP_PRICE_SCALE, false); 43. SetInteger(OBJPROP_SELECTABLE, true); 44. SetInteger(OBJPROP_SELECTED, false); 45. } 46. //+----------------+ 47. ~C_MiniChart() 48. { 49. ObjectDelete(0, m_szNameObject); 50. ChartRedraw(); 51. } 52. //+----------------+ 53. }*gl_MiniChart; 54. //+------------------------------------------------------------------+ 55. int OnInit(void) 56. { 57. IndicatorSetString(INDICATOR_SHORTNAME, def_ShortName); 58. 59. gl_MiniChart = new C_MiniChart("Mini Chart"); 60. 61. return INIT_SUCCEEDED; 62. }; 63. //+------------------------------------------------------------------+ 64. int OnCalculate(const int rates_total, const int prev_calculated, const int begin, const double &price[]) 65. { 66. return rates_total; 67. }; 68. //+------------------------------------------------------------------+ 69. void OnDeinit(const int reason) 70. { 71. delete gl_MiniChart; 72. }; 73. //+------------------------------------------------------------------+
Code 06
Now take a look at this: Code 06 is very similar to Code 05. However, unlike Code 05, Code 06 is intended for use in the chart's main window. This is specifically due to the declaration on the sixth line of Code 06. But—and this is exactly what interests us right now—if we modify Code 03 so that it uses the executable file generated by Code 06, we’ll get some rather interesting behavior, practically the same as what we were aiming for from the very beginning.
To make sure you have the source code presented here and can study and test it step by step, the attached files include not only Code 03 but also other code examples to help you work through every detail at your own pace. So, below is the code that will embed the executable file generated by Code 06.01. //+------------------------------------------------------------------+ 02. #property copyright "Daniel Jose" 03. //+------------------------------------------------------------------+ 04. #property description "DEMO Indicator" 05. //+------------------------------------------------------------------+ 06. #property indicator_chart_window 07. #property indicator_plots 0 08. //+------------------------------------------------------------------+ 09. #define def_Resource "Code 05.ex5" 10. //+------------------------------------------------------------------+ 11. #resource def_Resource 12. //+------------------------------------------------------------------+ 13. int OnInit(void) 14. { 15. ChartIndicatorAdd(0, (int)ChartGetInteger(0, CHART_WINDOWS_TOTAL), iCustom(NULL, NULL, "::" + def_Resource)); 16. 17. return INIT_SUCCEEDED; 18. }; 19. //+------------------------------------------------------------------+ 20. int OnCalculate(const int rates_total, const int prev_calculated, const int begin, const double &price[]) 21. { 22. return rates_total; 23. }; 24. //+------------------------------------------------------------------+
Code 07
Please note that the only difference between Code 07 and Code 03 is in the ninth line; everything else is exactly the same. However, this minor difference will result in Code 06 being incorporated into Code 07. After compiling Code 07, you can run it on any MetaTrader 5 chart and see a result similar to the one shown in the following animation. 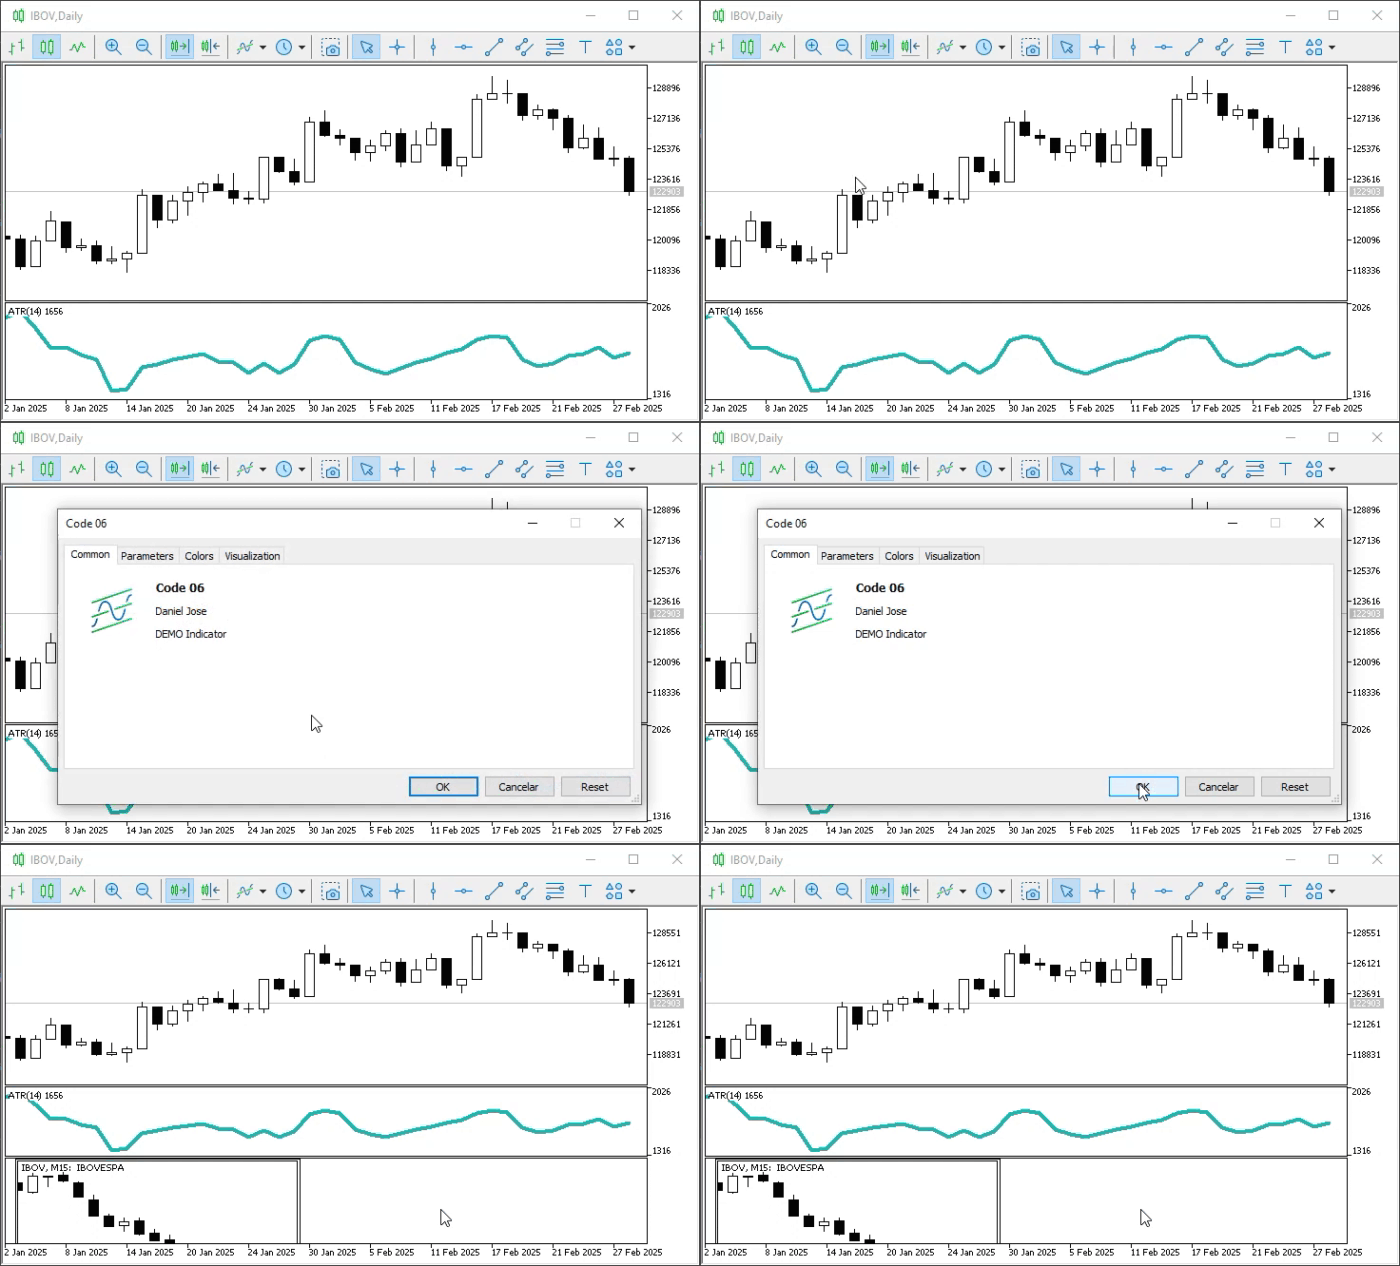
Animation 07
Wow, honestly, the result is really impressive. That's just wonderful. Now I really feel much more confident, and I'm studying every detail of your articles with even greater interest. However, I noticed that Code 06 differs from Code 05 in more than just the sixth line. Why? Wouldn't it be possible to use Code 05 by changing only the sixth line? Of course it is possible, dear reader. However, since Code 06 shows how Code 02 should have been written to place the OBJ_CHART object in the correct location, I made these changes solely to illustrate that update to Code 02. But there's nothing stopping you from using Code 05—you just need to change the sixth line. The result will be something we won't be using just yet. Still, you may already have an idea, so let's see how this can be done. You'll also find these code listings in the attached files so you can try them out. The first change will result in the code shown below.01. //+------------------------------------------------------------------+ 02. #property copyright "Daniel Jose" 03. //+------------------------------------------------------------------+ 04. #property description "DEMO Indicator" 05. //+------------------------------------------------------------------+ 06. #property indicator_chart_window 07. #property indicator_height 150 08. #property indicator_plots 0 09. //+------------------------------------------------------------------+ 10. #define def_ShortName "Test 123." 11. //+------------------------------------------------------------------+ 12. class C_MiniChart 13. { 14. private : 15. //+----------------+ 16. string m_szNameObject; 17. int m_Sub; 18. //+----------------+ 19. void SetInteger(ENUM_OBJECT_PROPERTY_INTEGER prop, int value) { ObjectSetInteger(0, m_szNameObject, prop, value); } 20. //+----------------+ 21. int WhatSubWin(void) 22. { 23. for (int c0 = 0; c0 < (int)(ChartGetInteger(0, CHART_WINDOWS_TOTAL)); c0++) 24. for (int c1 = (ChartIndicatorsTotal(0, c0) - 1); c1 >= 0; c1--) 25. if (ChartIndicatorName(0, c0, c1) == def_ShortName) 26. return c0; 27. return INVALID_HANDLE; 28. } 29. //+----------------+ 30. public : 31. //+----------------+ 32. C_MiniChart(string szName) 33. { 34. if ((m_Sub = WhatSubWin()) == INVALID_HANDLE) return; 35. ObjectCreate(0, m_szNameObject = szName, OBJ_CHART, m_Sub, 0, 0); 36. ObjectSetString(0, m_szNameObject, OBJPROP_SYMBOL, _Symbol); 37. SetInteger(OBJPROP_XDISTANCE, 10); 38. SetInteger(OBJPROP_YDISTANCE, 0); 39. SetInteger(OBJPROP_XSIZE, 300); 40. SetInteger(OBJPROP_YSIZE, indicator_height); 41. SetInteger(OBJPROP_PERIOD, PERIOD_M15); 42. SetInteger(OBJPROP_DATE_SCALE, false); 43. SetInteger(OBJPROP_PRICE_SCALE, false); 44. SetInteger(OBJPROP_SELECTABLE, true); 45. SetInteger(OBJPROP_SELECTED, false); 46. } 47. //+----------------+ 48. ~C_MiniChart() 49. { 50. ObjectDelete(0, m_szNameObject); 51. ChartRedraw(); 52. } 53. //+----------------+ 54. }*gl_MiniChart; 55. //+------------------------------------------------------------------+ 56. int OnInit(void) 57. { 58. IndicatorSetString(INDICATOR_SHORTNAME, def_ShortName); 59. 60. gl_MiniChart = new C_MiniChart("Mini Chart"); 61. 62. return INIT_SUCCEEDED; 63. }; 64. //+------------------------------------------------------------------+ 65. int OnCalculate(const int rates_total, const int prev_calculated, const int begin, const double &price[]) 66. { 67. return rates_total; 68. }; 69. //+------------------------------------------------------------------+ 70. void OnDeinit(const int reason) 71. { 72. delete gl_MiniChart; 73. }; 74. //+------------------------------------------------------------------+
Code 08
The code shown below, in turn, will embed the executable file compiled from Code 08 and handle calling the indicator and creating a subwindow.01. //+------------------------------------------------------------------+ 02. #property copyright "Daniel Jose" 03. //+------------------------------------------------------------------+ 04. #property description "DEMO Indicator" 05. //+------------------------------------------------------------------+ 06. #property indicator_chart_window 07. #property indicator_plots 0 08. //+------------------------------------------------------------------+ 09. #define def_Resource "Code 07.ex5" 10. //+------------------------------------------------------------------+ 11. #resource def_Resource 12. //+------------------------------------------------------------------+ 13. int OnInit(void) 14. { 15. ChartIndicatorAdd(0, (int)ChartGetInteger(0, CHART_WINDOWS_TOTAL), iCustom(NULL, NULL, "::" + def_Resource)); 16. 17. return INIT_SUCCEEDED; 18. }; 19. //+------------------------------------------------------------------+ 20. int OnCalculate(const int rates_total, const int prev_calculated, const int begin, const double &price[]) 21. { 22. return rates_total; 23. }; 24. //+------------------------------------------------------------------+
Code 09
Code 09 is very similar to the other code listings we use for integration. Essentially, the difference from the others lies in the definition on the ninth line. However—and you can check this for yourself—in Code 08, there is a definition on the seventh line. This definition will allow us to set the height of the subwindow when it is created. However, Code 08—unlike what we saw in Code 05—WILL NOT CREATE A SUBWINDOW. Code 09 will do that instead. So, even if you're not particularly interested in this, you can add the indicator from Code 09 to a subwindow that already contains another indicator. And this allows us to create new and interesting configurations for use in MetaTrader 5.
But we'll go into more detail about this in one of our upcoming articles. For now, I think you already have plenty to learn and practice.Concluding Thoughts
We often think that something is impossible, when in reality we simply lack the necessary knowledge to find the best solution to a particular problem.
In this article, we've covered only a small part of what can be explored in much greater depth to achieve truly impressive results. And we did all of this using basic knowledge and without any complications. So, the difference between an amazing result and a merely acceptable one depends on how determined you are to go where no one has gone before. Nevertheless, I am sure that even after everything shown here, many will say that there was no need to do all this, since there are more effective and simpler ways to achieve the same result. I have to admit that they're right. However, we haven't yet reached the point where, without the knowledge presented here, you wouldn't be able to achieve the same results as someone who really knows what they're doing. So take your time studying the material presented here, because in the following articles we'll take an even deeper look at using objects in subwindows.| MQ5 File | Description |
|---|---|
| Indicators\Code 01 | Basic Demonstration |
| Indicators\Code 02 | Basic Demonstration |
| Indicators\Code 03 | Basic Demonstration |
| Indicators\Code 04 | Basic Demonstration |
| Indicators\Code 05 | Basic Demonstration |
| Indicators\Code 06 | Basic Demonstration |
| Indicators\Code 07 | Basic Demonstration |
| Indicators\Code 08 | Basic Demonstration |
Translated from Portuguese by MetaQuotes Ltd.
Original article: https://www.mql5.com/pt/articles/17316
Warning: All rights to these materials are reserved by MetaQuotes Ltd. Copying or reprinting of these materials in whole or in part is prohibited.
This article was written by a user of the site and reflects their personal views. MetaQuotes Ltd is not responsible for the accuracy of the information presented, nor for any consequences resulting from the use of the solutions, strategies or recommendations described.