

From Basic to Intermediate: Operator Overloading (V)
 51
51
 0
0

Introduction
In the previous article “From Basic to Intermediate: Operator Overloading (IV)”, we had our “baptism by fire” with operator overloading. That article showed that operator overloading has certain limitations. Nevertheless, despite these limitations, they in no way prevent us from using operator overloading to make the code more readable and understandable to anyone.
There is one last point I would like to explain in this article—perhaps the last in this series on operator overloading at the most basic and simple level.
I want to show how combining various overloaded operators allows us to implement an application in a more symbolic yet much more understandable notation. At least, that is how I see it.
Since the topic we are discussing here is quite broad and, at the same time, quite in-depth, let's get right to the point. It is time to set aside anything that might distract you and focus entirely on the content of this article.
Operator Overloading (V)
There are many aspects of programming that can really be learned only with time, study, and practice, dear reader. Nevertheless, I want to help you get a handle on certain issues a little faster and gently nudge you in a certain direction so that you realize: things are not always the way we usually imagine them to be. That is exactly why I love programming. It is, without a doubt, the kind of a passion that perhaps not even death could take from me.
In my previous article, I presented a first approach to creating a linked list using operator overloading. Still, that version looks rather dull compared with what is proposed in this article. Before we get back to the topic of linked lists, I need to show you one more detail that, while it may seem minor, will help you understand the changes made to the linked list code.
So, in the article “From Basic to Intermediate: Queues, Lists, and Trees (II),” I explained how to convert a queue implemented using an array into a queue that uses pointers to link its elements. This transformation opened up the possibility of a new data structure: lists. However, that is not exactly the main point. What matters is how to implement the same type of queue shown in the article mentioned above using operator overloading.
Implementing this version is really exciting, and it breathes new life into the code, making it much more interesting.
As a starting point, we will use one of the code snippets discussed in that article. It is shown below.
01. //+------------------------------------------------------------------+
02. #property copyright "Daniel Jose"
03. //+------------------------------------------------------------------+
04. template <typename T> class C_Demo
05. {
06.     private:
07. //+----------------+
08.         T info;
09.         C_Demo <T> *prev;
10. //+----------------+
11.     public:
12. //+----------------+
13.         C_Demo(void)
14.             :prev(NULL)
15.         {}
16. //+----------------+
17.         void Push(T arg)
18.         {
19.             C_Demo <T> *loc;
20.
21.             loc = new C_Demo <T>;
22.             (*loc).info = arg;
23.             (*loc).prev = prev;
24.             prev = loc;
25.         }
26. //+----------------+
27.         bool Pop(T &arg)
28.         {
29.             C_Demo <T> *loc;
30.
31.             if (prev == NULL)
32.                 return false;
33.
34.             loc = prev;
35.             arg = (*loc).info;
36.             prev = (*loc).prev;
37.
38.             delete loc;
39.
40.             return true;
41.         }
42. //+----------------+
43. };
44. //+------------------------------------------------------------------+
45. void OnStart(void)
46. {
47.     C_Demo <char> demo;
48.
49.     demo.Push(10);
50.     demo.Push(84);
51.     demo.Push(-6);
52.
53.     for (char info; demo.Pop(info);)
54.         Print(info);
55. };
56. //+------------------------------------------------------------------+
Code 01
Running this code produces the result shown below.
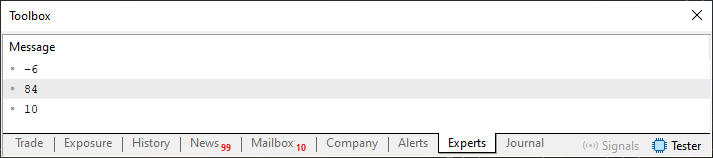
Figure 01
The idea is to recreate this same Code 01 using operator overloading and preserve the result shown in Figure 01. You might be thinking right now, “Come on, that’s crazy.” How can we achieve this without turning the code into a complete mess? Well then, dear reader, you will soon see how it is done. But first, let's give this code a more practical form. In practice, code is much more often split into several files than kept entirely in a single file, as in Code 01. So, now we have two files. As you can see, this separation does not change how the program works, although it does make the code much more interesting.
01. //+------------------------------------------------------------------+
02. #property copyright "Daniel Jose"
03. //+------------------------------------------------------------------+
04. #include "Include\C_Demo_01.mqh"
05. //+------------------------------------------------------------------+
06. void OnStart(void)
07. {
08.     C_Demo <char> demo;
09.
10.     demo.Push(10);
11.     demo.Push(84);
12.     demo.Push(-6);
13.
14.     for (char info; demo.Pop(info);)
15.         Print(info);
16. };
17. //+------------------------------------------------------------------+
Code 02
01. //+------------------------------------------------------------------+
02. #property copyright "Daniel Jose"
03. //+------------------------------------------------------------------+
04. template <typename T> class C_Demo
05. {
06.     private:
07. //+----------------+
08.         T info;
09.         C_Demo <T> *prev;
10. //+----------------+
11.     public:
12. //+----------------+
13.         C_Demo(void)
14.             :prev(NULL)
15.         {}
16. //+----------------+
17.         void Push(T arg)
18.         {
19.             C_Demo <T> *loc;
20.
21.             loc = new C_Demo <T>;
22.             (*loc).info = arg;
23.             (*loc).prev = prev;
24.             prev = loc;
25.         }
26. //+----------------+
27.         bool Pop(T &arg)
28.         {
29.             C_Demo <T> *loc;
30.
31.             if (prev == NULL)
32.                 return false;
33.
34.             loc = prev;
35.             arg = (*loc).info;
36.             prev = (*loc).prev;
37.
38.             delete loc;
39.
40.             return true;
41.         }
42. //+----------------+
43. };
44. //+------------------------------------------------------------------+
Code 03
Now the structure really does look much more appealing. However, the files in the attachment are different, because we modified them over the course of the article, and the attachment contains the final version. So take your time. Let's break it down step by step and see how this code evolves into the version you will find in the attachment.
Great. Now let's focus on operator overloading. Anyone studying C++ comes across the use of two well-known standard streams: stdin and stdout. They provide simple and convenient access to standard input or output. Nevertheless, they can also be used in other rather interesting situations.
Well, MQL5 does not have—or at least does not use—the exact same notion of stdin and stdout. Nevertheless, there is nothing stopping us from implementing our code in a way that uses the same concept.
The implementation we will discuss here is relatively simple. In another profile of mine, devoted to explaining techniques that can be used in MQL5, I will show a much more advanced way to apply this same concept. I do not want to spoil the surprise by telling you in advance what we will be doing there. This technique is quite interesting and makes the code much easier to understand.
Getting back to the topic, the concepts of `stdin` and `stdout` appear in the following code.
01. //+------------------------------------------------------------------+
02. #include <iostream>
03. //+------------------------------------------------------------------+
04. int main()
05. {
06.     int i1, i2, sum;
07.
08.     std::cout << "Summing two numbers.\n";
09.     std::cout << "Enter the first number: ";
10.     std::cin >> i1;
11.     std::cout << "Enter the second number: ";
12.     std::cin >> i2;
13.     sum = i1 + i2;
14.     std::cout << "The result is: " << sum << "\n";
15. }
16. //+------------------------------------------------------------------+
Code 04
You do not need to know C++ to understand this code, since knowing MQL5 is enough to get a general idea of how it works. Note the following pattern in Code 04. In some lines, you will see the following: `std::cout` followed by an operator. In other lines, we also encounter another element: `std::cin`, which is likewise followed by an operator. Now let's take a look at what this strange thing is that shows up in the code.
First, std::cout represents standard output. All the data we write is sent to standard output. In turn, std::cin represents standard input and works very similarly to std::cout. The difference is that std::cin corresponds to standard input. Thus, any data coming in through standard input is directed to a variable or some other code element.
Since std::cout and std::cin are often not very illustrative on their own, we use an operator that makes the direction of the data easier to understand. In a special case, such as line 14 of Code 04, this same operator is repeated several times, thereby showing how the C++ compiler should interpret the expressions.
All right, that concludes the section on C++ that we are covering in this article. Now we will reproduce the same operator shown in Code 04, but this time in MQL5. As a result, our MQL5 code takes on a slightly more unusual appearance. However, if operator overloading is well thought out, the code can become much more readable. I will develop this idea a little further in another article, which I will publish soon on my other profile. Here, we will limit ourselves to just the basics, since we are learning how to use operator overloading.
All right, let's modify the header file shown in Code 03. Now it looks as shown in full below.
01. //+------------------------------------------------------------------+
02. #property copyright "Daniel Jose"
03. //+------------------------------------------------------------------+
04. template <typename T> class C_Demo
05. {
06.     private:
07. //+----------------+
08.         T info;
09.         C_Demo <T> *prev;
10. //+----------------+
11.     public:
12. //+----------------+
13.         C_Demo(void)
14.             :prev(NULL)
15.         {}
16. //+----------------+
17.         void operator<<(const T arg)
18.         {
19.             C_Demo <T> *loc;
20.
21.             loc = new C_Demo <T>;
22.             (*loc).info = arg;
23.             (*loc).prev = prev;
24.             prev = loc;
25.         }
26. //+----------------+
27.         bool operator>>(T &arg)
28.         {
29.             C_Demo <T> *loc;
30.
31.             if (prev == NULL)
32.                 return false;
33.
34.             loc = prev;
35.             arg = (*loc).info;
36.             prev = (*loc).prev;
37.
38.             delete loc;
39.
40.             return true;
41.         }
42. //+----------------+
43. };
44. //+------------------------------------------------------------------+
Code 05
Take a look at Code 05 and compare it with Code 03. Note that the change was very minor. Nevertheless, these simple changes are more than enough to confuse quite a few of those who call themselves MQL5 programmers. Now the code really becomes much more interesting. So pay close attention to the next step. First of all, go back to code 02. Do you understand this code? All right, now take a look at code 06 below.
01. //+------------------------------------------------------------------+
02. #property copyright "Daniel Jose"
03. //+------------------------------------------------------------------+
04. #include "Include\C_Demo_01.mqh"
05. //+------------------------------------------------------------------+
06. void OnStart(void)
07. {
08.     C_Demo <char> demo;
09.
10.     demo << 10;
11.     demo << 84;
12.     demo << -6;
13.
14.     for (char info; demo >> info;)
15.         Print(info);
16. };
17. //+------------------------------------------------------------------+
Code 06
Wow, what kind of madness is going on in code 06? All right, I have to admit: you are completely crazy. If you had shown me that code 06 right from the start, I probably would have stopped reading these articles. But judging by what you are doing with the code, it seems to me that this approach is nothing more than a bit of fun for you. You enjoy playing around with code and language. Wow, I had no idea you could program that way in MQL5.
Well, dear reader, this example is just a small part of what we can actually do. And the result of executing code 06 is exactly the same as that of code 02. Actually, I deliberately split the file into two parts—the main file and the header file—to clearly show you the solution implemented here. It would be practically impossible to try to explain this implementation directly.
The fun is just getting started. If you have studied the material in the articles on queues, lists, and trees, you know that the result of executing code 06, just like code 02, is a stack. However, a minor change to the code—this time only in the header file—is all it takes to implement a FIFO queue. Below is the header file that makes this possible.
01. //+------------------------------------------------------------------+
02. #property copyright "Daniel Jose"
03. //+------------------------------------------------------------------+
04. template <typename T> struct C_Demo
05. {
06.     private:
07. //+----------------+
08.         T info[];
09. //+----------------+
10.     public:
11. //+----------------+
12.         void operator<<(const T arg)
13.         {
14.             T local[1];
15.             local[0] = arg;
16.             ArrayInsert(info, local, info.Size());
17.         }
18. //+----------------+
19.         bool operator>>(T &arg)
20.         {
21.             arg = NULL;
22.
23.             if (info.Size() > 0)
24.             {
25.                 arg = info[0];
26.                 ArrayRemove(info, 0, 1);
27.                 return true;
28.             }
29.             return false;
30.         }
31. //+----------------+
32. };
33. //+------------------------------------------------------------------+
Code 07
Obviously, in the attachment, this file, 07, has a different name, since I want to make testing as simple as possible so you can experiment with this material. Thus, Code 06 looks as follows.
01. //+------------------------------------------------------------------+
02. #property copyright "Daniel Jose"
03. //+------------------------------------------------------------------+
04. // #include "Include\C_Demo_01.mqh"
05. #include "Include\C_Demo_02.mqh"
06. //+------------------------------------------------------------------+
07. void OnStart(void)
08. {
09.     C_Demo <char> demo;
10.
11.     demo << 10;
12.     demo << 84;
13.     demo << -6;
14.
15.     for (char info; demo >> info;)
16.         Print(info);
17. };
18. //+------------------------------------------------------------------+
Code 08
And now, dear reader, please consider the following. If line 4 is enabled, we get a stack implementation. If line 5 is enabled, we get a FIFO queue. You should NOT enable both lines unless you modify the header files included in the attachment.
So, if we run the code as shown above, the result is shown in the following figure.
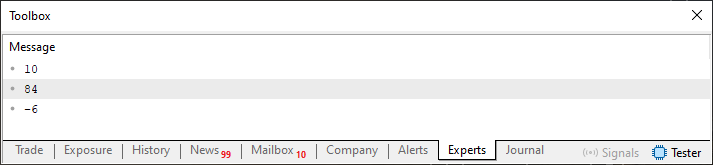
Figure 02
In short, the FIFO implementation using operator overloading also works in exactly the same way as the stack implementation. To create a circular queue, you need to make some changes to Code 07. But these changes should not cause you any problems.
Great. We are not done yet. Please keep reading the article, because I need to explain one more aspect of this topic. Now we are faced with a somewhat more difficult task. This is not really such a difficult task either, however: we need to implement a linked list in which operator overloading is used exclusively to create, modify, and manage its contents. We already started doing this in the previous article. However, in my opinion, that implementation is rather boring and not very engaging. It is time to write more engaging code that makes more active use of operator overloading. But I want you to first gain a solid understanding of this topic and avoid mixing up the concepts, so we will save this implementation for another section. So, make sure you fully understand this topic first, and then move on to the next section.
A Linked List Full of Fun (I)
Before we begin, I would like to remind you of the following concept, dear reader. A linked list is designed to behave in almost the same way as a dynamic array. That is precisely why, in the previous article, it was possible to implement it in exactly that way. However, here is what is important: DO NOT CONFUSE A LINKED LIST WITH AN ARRAY. These two structures serve completely different purposes.
Now that we have clarified this distinction, we can begin. We will not start by copying the code from the previous article, because changes have been made that might make the explanation a little confusing. Therefore, we will modify the header files discussed in the previous section to implement a linked list.
If you have any doubts about why the list initially needs to be implemented exactly as I present it, refer to the articles that explain this principle and show how to implement a linked list. Here, I will assume that you already know how to do this.
So, based on the principles and concepts needed to implement this list, below is the complete source code that we will be using.
01. //+------------------------------------------------------------------+
02. #property copyright "Daniel Jose"
03. //+------------------------------------------------------------------+
04. template <typename T> class C_Demo
05. {
06.     private:
07. //+----------------+
08.         uint        m_counter;
09.         T           m_info;
10.         C_Demo <T>  *m_prev,
11.                     *m_next;
12. //+----------------+
13.         void Store(T arg1, const uint arg2 = UINT_MAX)
14.         {
15.             C_Demo <T>  *loc = new C_Demo <T>,
16.                         *ptr1 = m_next,
17.                         *ptr2 = NULL;
18.             for (uint c = 0; (ptr1 != NULL) && (c < arg2); ptr2 = ptr1, ptr1 = (*ptr1).m_next, c++);
19.
20.             (*loc).m_info = arg1;
21.             (*loc).m_next = (ptr2 != NULL ? (*ptr2).m_next : ptr1);
22.             (*loc).m_prev = (ptr1 != NULL ? (*ptr1).m_prev : ptr2);
23.             if (ptr1 != NULL) (*ptr1).m_prev = loc; else m_prev = loc;
24.             if (ptr2 != NULL) (*ptr2).m_next = loc; else m_next = loc;
25.             m_counter++;
26.         }
27. //+----------------+
28.         bool Restore(T &arg1, const uint arg2 = UINT_MAX)
29.         {
30.             if ((m_prev == NULL) && (m_next == NULL)) return false;
31.             C_Demo <T>  *loc = (arg2 < m_counter ? m_next : m_prev),
32.                         *ptr = NULL;
33.
34.             for (uint c = 0; (loc != NULL) && (c < arg2) && (arg2 < m_counter); ptr = loc, loc = (*loc).m_next, c++);
35.             if (loc == NULL) return false;
36.             if (arg2 == 0)
37.             {
38.                 m_next = (*loc).m_next;
39.                 if (m_next != NULL) (*m_next).m_prev = NULL;
40.             }else if (arg2 >= (m_counter - 1))
41.             {
42.                 m_prev = (*loc).m_prev;
43.                 if (m_prev != NULL) (*m_prev).m_next = NULL;
44.             }else
45.             {
46.                 (*ptr).m_next = (*loc).m_next;
47.                 (*loc).m_next.m_prev = ptr;
48.             }
49.             arg1 = (*loc).m_info;
50.             delete loc;
51.             m_counter--;
52.             m_prev = (m_counter ? m_prev : NULL);
53.
54.             return true;
55.         }
56. //+----------------+
57.     public:
58. //+----------------+
59.         C_Demo() : m_counter(0), m_next(NULL), m_prev(NULL) {}
60. //+----------------+
61.         void operator<<(const T arg)
62.         {
63.             Store(arg);
64.         }
65. //+----------------+
66.         bool operator>>(T &arg)
67.         {
68.             return Restore(arg); // Stack Mode
69.             // return Restore(arg, 0); // FIFO mode
70.         }
71. //+----------------+
72. };
73. //+------------------------------------------------------------------+
Code 09
To test this code, we will use Code 08. Of course, with a slight change. So, since I do not want to overcomplicate the explanation, dear reader, here is the code we use.
01. //+------------------------------------------------------------------+
02. #property copyright "Daniel Jose"
03. //+------------------------------------------------------------------+
04. #include "Include\C_Demo_03.mqh"
05. //+------------------------------------------------------------------+
06. void OnStart(void)
07. {
08.     C_Demo <char> demo;
09.
10.     demo << 10;
11.     demo << 84;
12.     demo << -6;
13.
14.     for (char info; demo >> info;)
15.         Print(info);
16. };
17. //+------------------------------------------------------------------+
Code 10
How strange—it seems that code 10 is actually code 06. In fact, it does not just seem that way: this really is code 06, dear reader. The only difference is that on the fourth line, we use a different file. Now take a look at this detail. If you look at Code 09, you will see two commented-out lines on lines 68 and 69. These lines are commented out because I want you to try both scenarios. Depending on which one we use, we get a slightly different result when we run Code 10. I will not include that result here, as I do not think it is necessary.
Try running Code 10, first using line 68 from Code 09, and then line 69. The results are very similar to what is shown in the figures in the previous topic. This similarity is not surprising, since this behavior has already been demonstrated. Well, if you do not know or have absolutely no idea what I am talking about, check out the articles on queues, lists, and trees.
Since Code 09 now implements a linked list, we can refine the list code a bit further to make it fully functional. To do this, let's now add a subscript operator, as we discussed in the previous article. With this change, the new code is shown below.
01. //+------------------------------------------------------------------+
02. #property copyright "Daniel Jose"
03. //+------------------------------------------------------------------+
04. template <typename T> class C_Demo
05. {
06.     private:
07. //+----------------+
08.         uint        m_counter;
09.         T           m_info;
10.         C_Demo <T>  *m_prev,
11.                     *m_next;
12. //+----------------+
13.         void Store(T arg1, const uint arg2 = UINT_MAX)
14.         {
15.             C_Demo <T>  *loc = new C_Demo <T>,
16.                         *ptr1 = m_next,
17.                         *ptr2 = NULL;
18.             for (uint c = 0; (ptr1 != NULL) && (c < arg2); ptr2 = ptr1, ptr1 = (*ptr1).m_next, c++);
19.
20.             (*loc).m_info = arg1;
21.             (*loc).m_next = (ptr2 != NULL ? (*ptr2).m_next : ptr1);
22.             (*loc).m_prev = (ptr1 != NULL ? (*ptr1).m_prev : ptr2);
23.             if (ptr1 != NULL) (*ptr1).m_prev = loc; else m_prev = loc;
24.             if (ptr2 != NULL) (*ptr2).m_next = loc; else m_next = loc;
25.             m_counter++;
26.         }
27. //+----------------+
28.         bool Restore(T &arg1, const uint arg2 = UINT_MAX)
29.         {
30.             if ((m_prev == NULL) && (m_next == NULL)) return false;
31.             C_Demo <T>  *loc = (arg2 < m_counter ? m_next : m_prev),
32.                         *ptr = NULL;
33.
34.             for (uint c = 0; (loc != NULL) && (c < arg2) && (arg2 < m_counter); ptr = loc, loc = (*loc).m_next, c++);
35.             if (loc == NULL) return false;
36.             if (arg2 == 0)
37.             {
38.                 m_next = (*loc).m_next;
39.                 if (m_next != NULL) (*m_next).m_prev = NULL;
40.             }else if (arg2 >= (m_counter - 1))
41.             {
42.                 m_prev = (*loc).m_prev;
43.                 if (m_prev != NULL) (*m_prev).m_next = NULL;
44.             }else
45.             {
46.                 (*ptr).m_next = (*loc).m_next;
47.                 (*loc).m_next.m_prev = ptr;
48.             }
49.             arg1 = (*loc).m_info;
50.             delete loc;
51.             m_counter--;
52.             m_prev = (m_counter ? m_prev : NULL);
53.
54.             return true;
55.         }
56. //+----------------+
57.     public:
58. //+----------------+
59.         C_Demo() : m_counter(0), m_next(NULL), m_prev(NULL) {}
60. //+----------------+
61.         void operator<<(const T arg)
62.         {
63.             Store(arg);
64.         }
65. //+----------------+
66.         bool operator>>(T &arg)
67.         {
68.             return Restore(arg); // Stack Mode
69.             // return Restore(arg, 0); // FIFO mode
70.         }
71. //+----------------+
72.         C_Demo <T> *operator[](const uint arg)
73.         {
74.             C_Demo <T> *loc = m_next;
75.             for (uint c = 0; (loc != NULL) && (c < arg); loc = (*loc).m_next, c++);
76.
77.             return loc;
78.         }
79. //+----------------+
80.         void operator=(const T arg)
81.         {
82.             m_info = arg;
83.         }
84. //+----------------+
85.         void Debug(void)
86.         {
87.             Print("===== DEBUG =====");
88.             for (C_Demo <T> *loc = m_next; loc != NULL; loc = (*loc).m_next)
89.                 PrintFormat("0x%06X ->> 0x%06X <<- 0x%06X = [%d]", (*loc).m_next, loc, (*loc).m_prev, (*loc).m_info);
90.             Print("=================");
91.         }
92. //+----------------+
93. };
94. //+------------------------------------------------------------------+
Code 11
To test Code 11, we use the code shown below.
01. //+------------------------------------------------------------------+
02. #property copyright "Daniel Jose"
03. //+------------------------------------------------------------------+
04. #include "Include\C_Demo_03.mqh"
05. //+------------------------------------------------------------------+
06. void OnStart(void)
07. {
08.     C_Demo <char> demo;
09.
10.     demo << 10;
11.     demo << 84;
12.     demo << -6;
13.     demo.Debug();
14.     demo[0] = 47;
15.     demo.Debug();
16.     demo[2] = 35;
17.     demo.Debug();
18.
19.     for (char info; demo >> info;)
20.         Print(info);
21. };
22. //+------------------------------------------------------------------+
Code 12
This implementation already seems somewhat more interesting than the one discussed in the previous article, since here we delve much more deeply into the topic of operator overloading. Before moving on to the next step, I want you to see what result is produced by running Code 12 together with what was implemented in Code 11. The result is shown in the following figure.
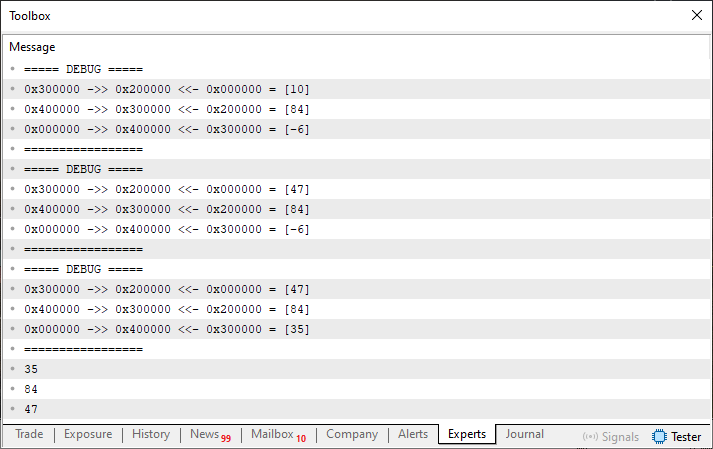
Figure 03
Now, dear reader, please take a close look at Figure 03. Please note: although our main goal is to add the values 47 and 35 to the list, these values actually replace the ones already in the list. Depending on your implementation, this result may be exactly what you need.
However, we DO NOT WANT TO REPLACE the existing values. We want to add new values to the list. So now I will present my solution to this problem. Do not be alarmed when you see the code, dear reader. Next, I will explain how and why this works, since understanding the underlying principle is more important than the code itself.
First, let's take a look at what the header file looks like now. It is reproduced in full below.
01. //+------------------------------------------------------------------+
02. #property copyright "Daniel Jose"
03. //+------------------------------------------------------------------+
04. template <typename T> class C_Demo
05. {
06.     private:
07. //+----------------+
08.         T           m_info;
09.         C_Demo <T>  *m_prev,
10.                     *m_next;
11. //+----------------+
12. #define def_Adjust(x) (m_prev = (m_prev == NULL ? x : ((*m_prev).m_prev != NULL ? (*m_prev).m_prev : m_prev)))
13. //+----------------+
14.     public:
15. //+----------------+
16.         C_Demo() : m_next(NULL), m_prev(NULL) {}
17. //+----------------+
18.         void operator<<(const T arg)
19.         {
20.             C_Demo <T>  *loc = new C_Demo <T>;
21.
22.             (*loc).m_info = arg;
23.             (*loc).m_prev = m_next;
24.             if (m_next != NULL) (*m_next).m_next = loc;
25.             m_next = loc;
26.             m_prev = def_Adjust(loc);
27.         }
28. //+----------------+
29.         bool operator>>(T &arg)
30.         {
31.             C_Demo <T>  *loc = def_Adjust(m_prev);
32.             if (loc == NULL) return false;
33.             arg = (*loc).m_info;
34.             if ((m_prev = (*loc).m_next) != NULL) (*m_prev).m_prev = NULL;
35.             delete loc;
36.
37.             return true;
38.         }
39. //+----------------+
40.         C_Demo <T> *operator[](const uint arg)
41.         {
42.             C_Demo <T> *loc = def_Adjust(m_prev);
43.             for (uint c = 0; (loc != NULL) && (c < arg); loc = (*loc).m_next, c++);
44.             return loc;
45.         }
46. //+----------------+
47.         void operator=(const T arg)
48.         {
49.             m_info = arg;
50.         }
51. //+----------------+
52.         void operator<<=(const T arg)
53.         {
54.             C_Demo <T>  *loc = new C_Demo <T>;
55.
56.             (*loc).m_info = arg;
57.             (*loc).m_next = GetPointer(this);
58.             (*loc).m_prev = m_prev;
59.             if (m_prev != NULL) (*m_prev).m_next = loc;
60.             m_prev = loc;
61.         }
62. //+----------------+
63.         void Debug(uint line)
64.         {
65.             Print("===== DEBUG [", line, "]=====");
66.             for (C_Demo <T> *loc = def_Adjust(m_prev); (loc != NULL); loc = (*loc).m_next)
67.                 PrintFormat("0x%06X ->> 0x%06X <<- 0x%06X = [%d]", (*loc).m_prev, loc, (*loc).m_next, (*loc).m_info);
68.             Print("=================");
69.         }
70. //+----------------+
71. #undef def_Adjust
72. //+----------------+
73. };
74. //+------------------------------------------------------------------+
Code 13
The code has a number of differences compared to the previous version. And these differences are entirely justified, as will become clear from the explanation. The code that uses this header file to create a linked list is shown below.
01. //+------------------------------------------------------------------+
02. #property copyright "Daniel Jose"
03. //+------------------------------------------------------------------+
04. #include "Include\C_Demo_04.mqh"
05. //+------------------------------------------------------------------+
06. void OnStart(void)
07. {
08.     C_Demo <char> demo;
09.
10.     demo << 10;
11.     demo << 84;
12.     demo << -6;
13.     demo.Debug(__LINE__);
14.     demo[2] <<= 35;
15.     demo.Debug(__LINE__);
16.     demo[0] <<= 47;
17.     demo.Debug(__LINE__);
18.     demo[0] <<= 110;
19.     demo.Debug(__LINE__);
20.
21.     for (char info; demo >> info;)
22.         Print(info);
23. };
24. //+------------------------------------------------------------------+
Code 14
"For the love of God and all that is holy. Don't you feel even the slightest bit sorry for us poor readers? What kind of meaningless and ridiculous code are you showing us? Yeah, I have never seen anything so complicated in my life. Now I'm absolutely certain: you're CRAZY." Please calm down, dear reader. As I said earlier, I will explain what is happening here. But first, let's look at the result of running Code 14. So, the result is shown in the following figure.
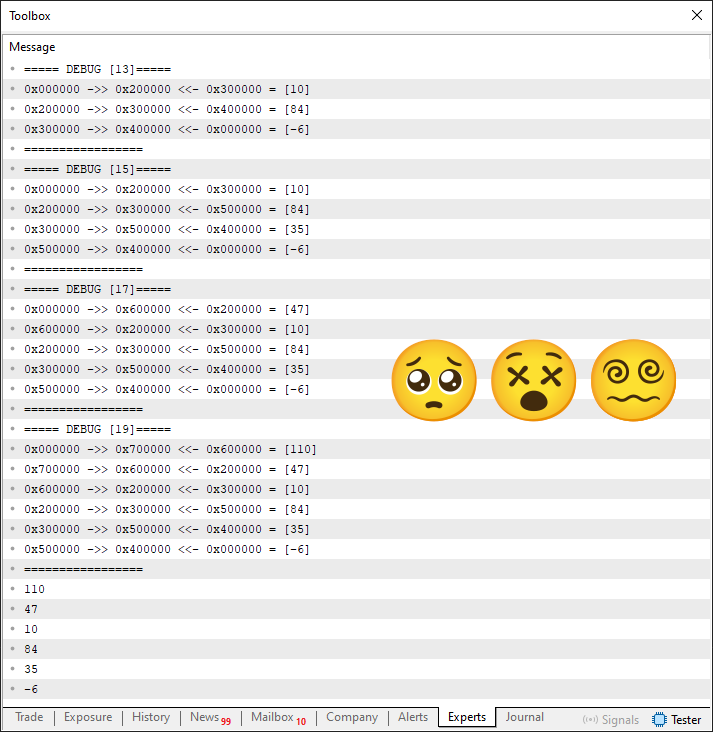
Figure 04
Please note that we now actually have what we want. We are not done yet. Before we continue, let's take a look at how Code 13 and Code 14 work. Obviously, if you analyze Code 14 first, the explanations from the previous section will already give you some idea of what is happening. However, lines 14, 16, and 18 of this Code 14 might puzzle you a bit, since they look completely crazy. As I mentioned earlier, this is my proposal for solving the problem. And, as Figure 04 shows, this solution really works. The question is: HOW does it work? So, to understand this mechanism, we now need to analyze Code 13.
Several more significant changes were made to Code 13 to make it more compact. At the same time, I configured the output in FIFO mode. Now, the way it works is a little different from the previous one. The difference comes down to one detail used in Code 13 that I have not mentioned yet. However, it is very important to understand this correctly in order to figure out why Code 14 works.
There are only two loops in the code: one on line 43 and the other on line 66. And why are these loops so important? Because if you do not understand their purpose, you WILL NOT UNDERSTAND how operator overloading works, as shown on line 52. What's more, if you do not fully understand what we did in the previous section, my explanation will seem much more confusing to you than it actually is. Let's start from the very beginning.
Line 18 shows the operator overloading implementation that adds new elements to a doubly linked list. The method for adding new elements here is very similar to adding elements to a queue. To make the list doubly linked, on line 20 we set the pointer that links to the previous element already present in the list, or we create the first element if the list is empty. This part allows us to avoid iterating through the list with a for loop, as we did before. Nevertheless, this solution affects how the code works. In any case, elements are placed into the list as they are added, always at the top of the list.
Good, adding elements to the list one by one does not mean we are operating in either FIFO mode or stack mode. The retrieval behavior is determined by the operator implemented on line 29. On line 31, we slightly adjust the search for the element located at the bottom of the list. In other words, the behavior itself is determined only when you need to use these elements. This setting ensures that the list is read in FIFO mode.
Why do we need the setting you mentioned? Aren't elements added in the same order in which we insert them into the list? Yes, dear reader, in principle, elements are always placed at the top of the list. However, we implemented a list, not a queue. Therefore, we can add or remove any element at any position. Well, there is one catch here. Let's break it down step by step.
Well, I think that up to this point it has not been hard to understand what we are doing. Now comes the tricky part, which is exactly why we need the setup we created. So try not to lose track of my explanation. Otherwise, you will get completely confused at some point.
In previous articles, I showed how the subscript operator can be combined with the assignment operator to change the value of a specific element using an index that specifies exactly which element to change. However, what we discussed in those articles is only part of the bigger picture—and, incidentally, the simplest part. When the loop on line 43 of Code 13 is executed, line 44 actually returns a pointer to a specific memory location. That is precisely why the assignment operator implemented on line 47 needs only line 49 in order to work and actually modify the contents of a specific element.
Now, dear reader, take a moment to reflect on this mechanism. If the subscript operator overload implemented on line 40 returns a pointer to a specific memory location, and in the procedure starting on line 18 we use pointers to add a new element to the list, what will we get if we apply the same principle to assigning a value using the assignment operator? So, exactly the implementation that begins on line 52.
Hmm, in a way, this mechanism strikes me as quite elegant. I have to admit that now that you've brought it up, Code 14 doesn't seem so complicated anymore. I like this idea. Looking at Code 13 again, I see that the code used to add new elements is not very similar to the code implemented on line 52. I even thought they might be the same, but I can see that there are some differences between them. Could you explain these differences in more detail? Yes, dear reader. Let's figure out, then, why the two pieces of code are different.
Let's start by noting that the code on line 18 knows that the element is ALWAYS—ABSOLUTELY ALWAYS—added to the top of the list. In contrast, the code on line 52 does not know exactly where the element will be added, since it can be inserted at any point in the list. But here is what is interesting: for this code on line 52, the element is always, in a sense, added to the bottom of the list.
Wait a minute. Now the explanation has become completely confusing. You said that the code on line 52 DOESN'T KNOW where the element is placed. But almost immediately after that, you say that the element is always added to the bottom of the list. No, you need to be clearer.
That is not what I mean, dear reader. You are misunderstanding what I am explaining. To clarify the difference, take a look at the code below.
01. //+------------------------------------------------------------------+
02. #property copyright "Daniel Jose"
03. //+------------------------------------------------------------------+
04. #include "Include\C_Demo_04.mqh"
05. //+------------------------------------------------------------------+
06. void OnStart(void)
07. {
08.     C_Demo <char> demo;
09.
10.     demo << 10;
11.     demo << 84;
12.     demo << -6;
13.     demo[2] <<= 35;
14.     demo[0] <<= 47;
15.     demo[0] <<= 110;
16.     demo.Debug(__LINE__);
17.     demo <<= 51;
18.     demo.Debug(__LINE__);
19.
20.     for (char info; demo >> info;)
21.         Print(info);
22. };
23. //+------------------------------------------------------------------+
Code 15
When we run Code 15, we get the following result:
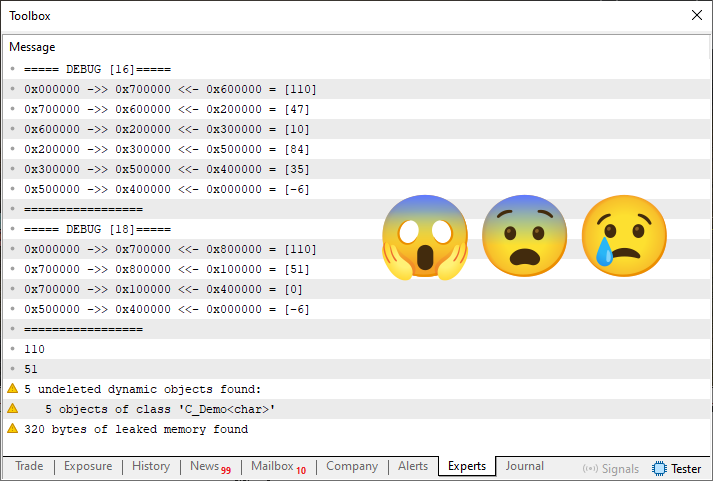
Figure 05
Take a look at what happened. When line 17 was executed, the code produced a rather strange result. However, everything worked perfectly up to line 15—precisely because of the way the code built the list. Why was it specifically line 17 that caused the list to become malformed? So, to understand the cause, we need to modify Code 13 by adding what is shown in the following snippet.
                   .
                   .
                   .
51. //+----------------+
52.         void operator<<=(const T arg)
53.         {
54.             C_Demo <T>  *loc = new C_Demo <T>;
55.
56.             (*loc).m_info = arg;
57.             (*loc).m_next = GetPointer(this);
58.             (*loc).m_prev = m_prev;
59.             if (m_prev != NULL) (*m_prev).m_next = loc;
60.             m_prev = loc;
61.             PrintFormat("%s %d :: 0x%06X ->> 0x%06X:[%d] <<- 0x%06X ?? (%d)", __FUNCTION__, __LINE__, m_prev, GetPointer(this), m_info, m_next, arg);
62.         }
63. //+----------------+
                   .
                   .
                   .
Snippet 01
Now we compile Code 15 again, and as a result we get what is shown in the following figure.
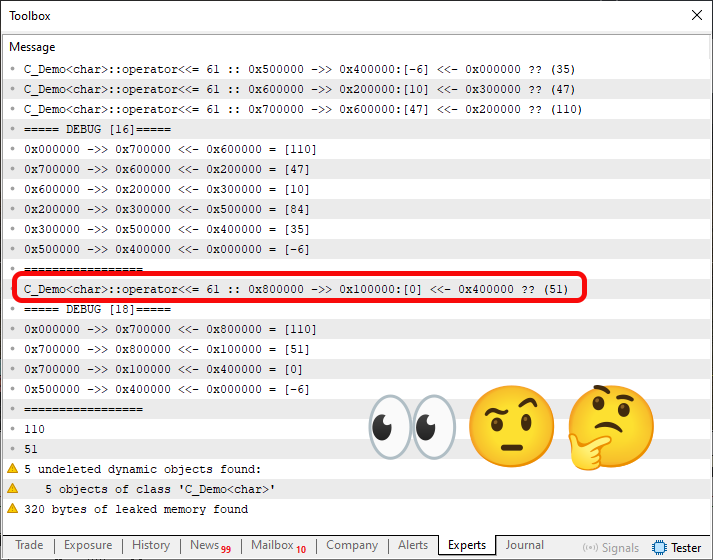
Figure 06
All right, now I can try to explain how the code on line 51 works and why it always points to the beginning of the local list. And, more importantly, you can now understand why we need to use the subscript operator before attempting to use the operator from line 51.
In the first three lines of Figure 06, we always point to some position in an already built list. This reference to a position in the list allows you to insert a new element between existing ones. Obviously, we insert the values 47 and 110 at the very beginning of the list that has already been built. Now take a look at what happens when we try to add the value 51 to the list. In this case, we run into a problem. This produces a very odd sequence in the list’s debug output. This sequence corrupts the list maintained by our code.
"Okay, but I still do not quite understand this point, dear author. Everything looks perfectly normal to me." All right, let's see if I can make this a little clearer for you, my dear reader. To see this, just look at Figure 04. Please note that the smallest hexadecimal value listed there is 0x200000. The reason is that the value 0x100000 CANNOT BE USED. This limitation was explained in previous articles. Check them out for more details. Thus, when attempting to access the element whose value is 51, line 17 of Code 15 attempts to use the address 0x100000 as the next address in the list, which is completely unacceptable. For this reason, the list is ultimately destroyed.
Let's come back to another point to understand why I say that the list is built only partially when we add an element to the middle of it. To understand this, we need to modify the code as shown in the following snippet.
01. //+------------------------------------------------------------------+
02. #property copyright "Daniel Jose"
03. //+------------------------------------------------------------------+
04. template <typename T> class C_Demo
05. {
06.     private:
07. //+----------------+
08.         T           m_info;
09.         C_Demo <T>  *m_prev,
10.                     *m_next;
11. //+----------------+
12. #define def_Adjust(x) (m_prev = (m_prev == NULL ? x : ((*m_prev).m_prev != NULL ? (*m_prev).m_prev : m_prev)))
13. //+----------------+
14.         void Debug_Private(string fn, uint line)
15.         {
16.             Print("===== DEBUG [", fn, " :: ", line, "]=====");
17.             for (C_Demo <T> *loc = m_prev; (loc != NULL); loc = (*loc).m_next)
18.                 PrintFormat("0x%06X ->> 0x%06X <<- 0x%06X = [%d]", (*loc).m_prev, loc, (*loc).m_next, (*loc).m_info);
19.             Print("=================");
20.         }
21. //+----------------+
                   .
                   .
                   .
59. //+----------------+
60.         void operator<<=(const T arg)
61.         {
62.             C_Demo <T>  *loc = new C_Demo <T>;
63.
64.             (*loc).m_info = arg;
65.             (*loc).m_next = GetPointer(this);
66.             (*loc).m_prev = m_prev;
67.             if (m_prev != NULL) (*m_prev).m_next = loc;
68.             m_prev = loc;
69.             Debug_Private(__FUNCTION__, __LINE__);
70.         }
71. //+----------------+
72.         void Debug(string fn, uint line)
73.         {
74.             m_prev = def_Adjust(m_prev);
75.             Debug_Private(fn, line);
76.         }
77. //+----------------+
78. #undef def_Adjust
79. //+----------------+
80. };
81. //+------------------------------------------------------------------+
Snippet 02
Here, we are specifically interested in the execution of line 69. In the attachment, you will find the entire header file. So you have nothing to worry about—after all, this is a modification of Code 13. This change was necessary to preserve the value of `m_prev`, because when line 69 was executed, the code used to debug the list ended up modifying the value of the m_prev pointer. The reason becomes clear right away. So, to demonstrate this partial list construction, we will use the code below.
01. //+------------------------------------------------------------------+
02. #property copyright "Daniel Jose"
03. //+------------------------------------------------------------------+
04. #include "Include\C_Demo_04.mqh"
05. //+------------------------------------------------------------------+
06. void OnStart(void)
07. {
08.     C_Demo <char> demo;
09.
10.     demo << 10;
11.     demo << 84;
12.     demo << -6;
13.     demo[2] <<= 35;
14.     demo[0] <<= 47;
15.     demo[4] <<= 110;
16.     demo.Debug(__FUNCTION__, __LINE__);
17.
18.     for (char info; demo >> info;)
19.         Print(info);
20. };
21. //+------------------------------------------------------------------+
Code 16
The result is truly interesting, dear reader. When you run Code 16, you get the result shown below.
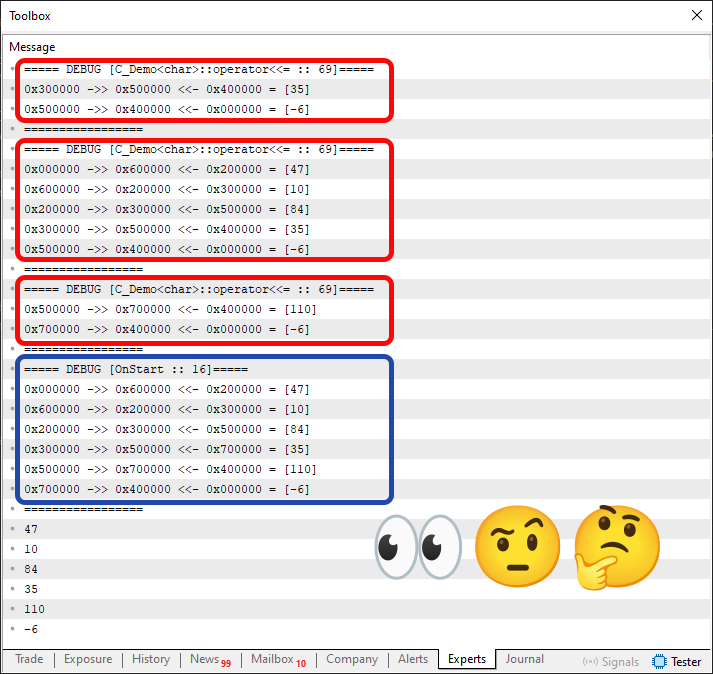
Figure 07
Figure 07 essentially explains how and why all the code discussed in this topic works. First and foremost, this clearly illustrates what I mentioned earlier: when adding elements at an arbitrary position, only part of the list is used as the basis.
Concluding Thoughts
So, this article has turned out to be much longer than I originally planned. However, I had to go into a little more detail on this in order to clearly explain how to put these ideas into practice. One more thing: I do not know whether you paid enough attention to all of the material. If you followed the explanation closely and know what is needed to implement a linked list, you may have noticed that a function or procedure for removing an element from the list still remains to be implemented. Of course, there are still a few minor details to work out before we can say: YES, we have an implementation of a linked list that takes full advantage of operator overloading, without code outside the list having to call virtually any other functions or procedures.
Removing elements from a list using operator overloading turns out to be a more complex task. Not because it is difficult to implement, but because most of you, the readers, have very little experience; it would be unfair to simply implement the deletion code without properly explaining why it works. At least, that is how I would feel in your place if someone simply gave me the code and left me to figure out how it works on my own.
I do not want to work that way, and I do not like it. I want everyone to learn and benefit from the materials I publish. For that, we need an article that properly explains why this implementation works. So, in the next article, I think we will wrap up this basic section on operator overloading. Take your time studying all this material, because you will need it to understand the next article.
| MQ5 file | Description |
|---|---|
| Code 01 | Basic Demo |
| Code 02 | Basic Demo |
| Code 03 | Basic Demo |
| Code 04 | Basic Demo |
| Code 05 | Basic Demo |
| Code.cpp | Basic Demo |
Translated from Portuguese by MetaQuotes Ltd.
Original article: https://www.mql5.com/pt/articles/16977
Warning: All rights to these materials are reserved by MetaQuotes Ltd. Copying or reprinting of these materials in whole or in part is prohibited.
This article was written by a user of the site and reflects their personal views. MetaQuotes Ltd is not responsible for the accuracy of the information presented, nor for any consequences resulting from the use of the solutions, strategies or recommendations described.

 Replay and Market Simulation: The Grand Finale
 MQL5 Expert Advisor Builder (Part 1): A Simple Static Template
 Building a PDF Creation Library in MQL5 (Part1): Writing a PDF by Hand
 Market Simulation: Unity Is Strength (III)

- Free trading apps
- Over 8,000 signals for copying
- Economic news for exploring financial markets
You agree to website policy and terms of use