

From Basic to Intermediate: Operator Overloading (II)
 35
35
 0
0

Introduction
In the previous article “From Basic to Intermediate: Operator Overloading (I)”, we began discussing how to implement what is known as operator overloading. However, the purpose of that article was simply to introduce one of the most confusing concepts for beginners. This is because, depending on how operator overloading is implemented, the same code can end up being either more readable or much more confusing. And all because the programmer fails to realize that operator overloading should be used precisely to make the code more readable and understandable.
Nevertheless, that article was merely a brief and enjoyable introduction to the possibilities offered by operator overloading and to just how fascinating and interesting this topic is from both a practical and a theoretical standpoint. I want to explain everything as simply and vividly as possible. And all of this without delving too deeply into the topic, which I'll cover in four more articles where I'll explore another way to use operator overloading, tailored to a very specific type of application. But that's a whole different story. So don't miss my articles—this alternative way of using operator overloading is really very practical and easy to understand. However, I will not be discussing this system here, in this series of articles. All right, let's move on to the main topic of this article.
Operator Overloading (II)
So, perhaps one of the most important tasks in programming is debugging code—whether using an IDE such as MetaEditor or directly through a log file. In simpler cases, you can even use the Toolbox message window in the MetaTrader 5 terminal. The method used to debug the code isn't that important. Nevertheless, understanding debugging mechanisms can help us detect failures and errors that would otherwise be very difficult to identify.
So, if you read the previous article carefully, you probably noticed that, near the very end, I slipped a little joke into one of the source code snippets included there. That joke was actually meant to illustrate the very point we're going to discuss in more detail here. You might find this interesting once you start exploring this topic and want to practice operator overloading. Since I want to keep things as simple and clear as possible, we'll start this article by breaking down one of the code snippets we analyzed in the previous article. Next, we'll move on to what I really want to show you. Below is the complete code.
01. //+------------------------------------------------------------------+
02. #property copyright "Daniel Jose"
03. //+------------------------------------------------------------------+
04. struct stComplex
05. {
06. //+----------------+
07.     private :
08.         double m_r, m_i;
09. //+----------------+
10.     public  :
11. //+----------------+
12.         stComplex(): m_r(0), m_i(0) {}
13. //+----------------+
14.         stComplex(double r, double i): m_r(r), m_i(i) {}
15. //+----------------+
16.         stComplex operator+(const stComplex &arg1)
17.         {
18.             return stComplex(m_r + arg1.m_r, m_i + arg1.m_i);
19.         }
20. //+----------------+
21.         stComplex operator+(const double arg2)
22.         {
23.             return stComplex(m_r + arg2, m_i);
24.         }
25. //+----------------+
26.         stComplex operator+=(const double arg2)
27.         {
28.             return stComplex(m_r += arg2, m_i);
29.         }
30. //+----------------+
31.         void Debug(void)
32.         {
33.             PrintFormat("Internal Value = %.02f %c %.02fi", m_r, (m_i < 0 ? '-' : '+'), MathAbs(m_i));
34.         }
35. //+----------------+
36. };
37. //+------------------------------------------------------------------+
38. void OnStart(void)
39. {
40.     stComplex   a(2, 5),
41.                 b(8, -3),
42.                 c;
43.
44.     c = a + b;
45.     c.Debug();
46.
47.     (c += 4).Debug();
48.     c = b + 4;
49.     c.Debug();
50. }
51. //+------------------------------------------------------------------+
Code 01
Good. Now I want you to set aside anything that might distract you and focus on how we're going to proceed. I'll try to explain something that drives a lot of people crazy when it comes to debugging code. However, let's start with a simpler and more straightforward implementation. Next, I'll show you something that borders on the absurd, but could very well happen when debugging code that uses operator overloading.
Okay, the key point is on line 47. Question: Why does line 47 of Code 01 work? Answer: Because the compiler interprets it slightly differently from how it is written. Again: understanding the explanation from one article is very important if you want to understand all the others. In the following snippet, I'll show you how the compiler interprets line 47 of Code 01.
                  .
                  .
                  .
    c.operator+=(4).Debug();
                  .
                  .
                  .
Snippet 01
Now, after analyzing Snippet 01, it is perfectly clear why line 47 of Code 01 works and outputs something to the terminal. Right? However, I want to show you how to extend the operation performed by this line. To do this, we'll make a small change to Code 01. Since the change is simple and straightforward, I'll present it as a code snippet, as there's no need to include the entire code to explain it.
                   .
                   .
                   .
30. //+----------------+
31.         void Debug(uint arg)
32.         {
33.             PrintFormat("Debugging the line %d = %.02f %c %.02fi", arg, m_r, (m_i < 0 ? '-' : '+'), MathAbs(m_i));
34.         }
35. //+----------------+
36. };
37. //+------------------------------------------------------------------+
38. void OnStart(void)
39. {
40.     stComplex   a(2, 5),
41.                 b(8, -3),
42.                 c;
43.
44.     c = a + b;
45.     c.Debug(__LINE__);
46.
47.     (c += 4).Debug(__LINE__);
48.     c = b + 4;
49.     c.Debug(__LINE__);
50. }
51. //+------------------------------------------------------------------+
Snippet 02
Please note: Snippet 02 shows the changes we made to Code 01 to implement a debugging mechanism that is better suited to what I want to demonstrate. Note that on line 31, we defined the Debug procedure so that it takes an argument. This value will indicate the line of code from which the procedure was called. To do this, we'll add a small detail to the lines that output information to the terminal. Thus, by running this new Code 01 with the changes from Snippet 02, we will get the result shown in the following figure.
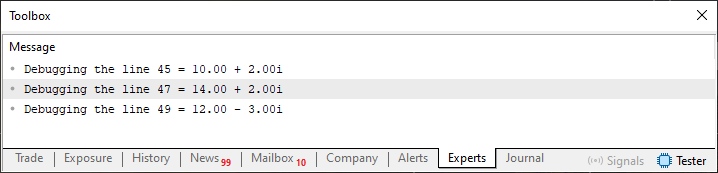
Figure 01
In other words, we now have a fairly useful debugging mechanism. Great. Now I want to move the debugging from lines 45 and 49 directly to lines 44 and 48. Question: How can we attach debugging directly to these lines? Hmm, that seems very difficult and extremely complicated, because in both cases we're assigning a value to a variable. So I don't see how we could debug them.
Well, dear reader, once again you are looking at things from a single perspective, when in fact you should be considering these lines from a completely different, less traditional point of view. I want you to consider lines 44 and 48 as expressions equivalent to the expression in Snippet 01. So I'll ask you again: How can we debug lines 44 and 48 and display the information in the MetaTrader 5 terminal?
So, there are two ways to implement this debugging: one is practically ready, while the other still needs to be developed. Which option you choose will depend on how much effort you're willing to put into implementing the code. But before explaining how to debug both lines, let's figure out how the compiler would interpret them. Based on the contents of Code 01 itself, the compiler would interpret these lines as follows.
                   .
                   .
                   .
    c = a.operator+(b);
                   .
                   .
                   .
    c = b.operator+(4);
                   .
                   .
                   .
Snippet 03
Snippet 03 reproduces how the compiler interprets these lines. Hmm, that's interesting. So, if we think about it carefully, all we need to do is imagine that Snippet 03 has been transformed into something similar to Snippet 01 to arrive at the solution. Is that really the answer? Yes, dear reader. Now you're heading in the right direction. But there is one detail: instead of writing out the expression from Snippet 03 and adding the expression from Snippet 01 to it to create a debugging expression, we can formulate it in a more suitable way. To do this, simply replace lines 44 and 48 with the expression shown in the following snippet. However, this will create another problem that will prevent the code from compiling. But don't worry—I'll explain how to fix it.
                   .
                   .
                   .
37. //+------------------------------------------------------------------+
38. void OnStart(void)
39. {
40.     stComplex   a(2, 5),
41.                 b(8, -3),
42.                 c;
43.
44.     c = (a + b).Debug(__LINE__);
45.     c.Debug(__LINE__);
46.
47.     (c += 4).Debug(__LINE__);
48.     c = (b + 4).Debug(__LINE__);
49.     c.Debug(__LINE__);
50. }
51. //+------------------------------------------------------------------+
Snippet 04
Although the idea is basically the same as in this snippet, you can immediately see that it might not work because of one small detail in Code 01. If you try to compile the new version of Code 01 after making the changes from Snippet 04, the compiler will produce several rather strange errors, as shown in the following figure.
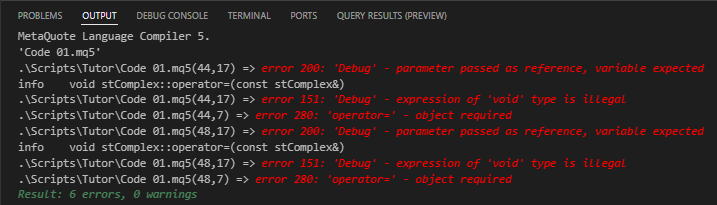
Figure 02
The errors in Figure 02 are due to the fact that the call used for debugging is NOT A FUNCTION RETURNING A VALUE, BUT A VOID METHOD. That is exactly why the compiler reports these errors. The solution here is quite simple, once you understand how it works. It's not enough to simply go to line 31 of the code and convert the procedure into a function, because that's not how it works. To fix the problem, the function must return an object of our class — in practice, something that refers back to the current object in the intended way. Remember that this means returning something equivalent to what is returned in lines 23 and 28.
Therefore, you should analyze how the compiler interprets Snippet 04. Based on this, we can choose two fairly simple solutions. Below, I will present the first of them.
01. //+------------------------------------------------------------------+
02. #property copyright "Daniel Jose"
03. //+------------------------------------------------------------------+
04. struct stComplex
05. {
06. //+----------------+
07.     private :
08.         double m_r, m_i;
09. //+----------------+
10.     public  :
11. //+----------------+
12.         stComplex(): m_r(0), m_i(0) {}
13. //+----------------+
14.         stComplex(double r, double i): m_r(r), m_i(i) {}
15. //+----------------+
16.         stComplex operator+(const stComplex &arg1)
17.         {
18.             return stComplex(m_r + arg1.m_r, m_i + arg1.m_i);
19.         }
20. //+----------------+
21.         stComplex operator+(const double arg2)
22.         {
23.             return stComplex(m_r + arg2, m_i);
24.         }
25. //+----------------+
26.         stComplex operator+=(const double arg2)
27.         {
28.             return stComplex(m_r += arg2, m_i);
29.         }
30. //+----------------+
31.         stComplex Debug(uint arg)
32.         {
33.             PrintFormat("Debugging the line %d = %.02f %c %.02fi", arg, m_r, (m_i < 0 ? '-' : '+'), MathAbs(m_i));
34.             return stComplex(m_r, m_i);
35.         }
36. //+----------------+
37. };
38. //+------------------------------------------------------------------+
39. void OnStart(void)
40. {
41.     stComplex   a(2, 5),
42.                 b(8, -3),
43.                 c;
44.
45.     c = (a + b).Debug(__LINE__);
46.     c.Debug(__LINE__);
47.     (c += 4).Debug(__LINE__);
48.     c = (b + 4).Debug(__LINE__);
49.     c.Debug(__LINE__);
50. }
51. //+------------------------------------------------------------------+
Code 02
Please note that we have now changed how line 31 works. Thus, the function will return a value that can be assigned to the variable c, as shown in lines 45 and 48. To do this, we add line 34, which creates the value returned by the function when debugging is complete. When we execute Code 02, we will get the result shown in the following figure.
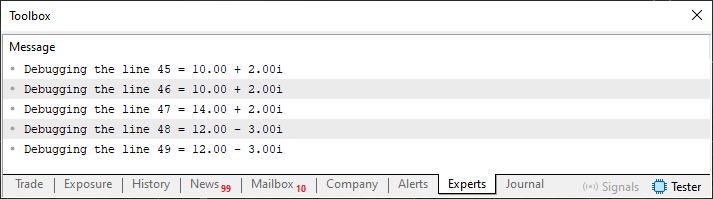
Figure 03
Now that's pretty interesting. But we can still improve the implementation. When the program executes line 34 of Code 02, this expression calls the constructor defined in line 14 and creates a new temporary instance of the stComplex type, which is defined as a structure. In practice, however, you're unlikely to encounter such an implementation, since it's completely unnecessary. In practice, we use a different operator to refer to the current instance of this type. Since we have not used it yet, it's time to introduce it. So, meet the `this` operator.
The `this` operator allows you to replace that specific line 34 of Code 02. However—and this is the most important part—this line calls the constructor, creates a new temporary instance of `stComplex`, and returns its value. Instead, the `this` operator allows you to access the current instance without creating a new temporary object. I know this might seem a little confusing, but in practice, it's much simpler. In fact, Code 02 needs only one change, which I'll show in the next snippet.
                   .
                   .
                   .
30. //+----------------+
31.         stComplex Debug(uint arg)
32.         {
33.             PrintFormat("Debugging the line %d = %.02f %c %.02fi", arg, m_r, (m_i < 0 ? '-' : '+'), MathAbs(m_i));
34.             return this;
35.         }
36. //+----------------+
                   .
                   .
                   .
Snippet 05
All right, I think I understand what to do now. But I have a rather tricky question. You explained that the `this` operator obtains a reference to the current instance of `stComplex`. Therefore, the implementation from Snippet 05 would be the most appropriate. However—and this is precisely my question—I don't see any difference between using line 34 of Code 02 and the same line of Snippet 05, since the result will ultimately be exactly the same.
Yes, my dear reader, the result will be exactly the same, but the memory addresses will be different. When you use the expression from line 34 of Code 02, you are actually creating a new temporary instance of `stComplex` that is distinct from the current instance. Depending on what you're implementing, creating a new instance MAY—and I want to emphasize that “may”—lead to an operation whose result is entirely different from what you expected, precisely because you created a different object. Remember: as a programmer, you should NEVER create something whose outcome you cannot predict. There's no point in writing any code without knowing whether the result will be correct or not. However, when you use the `this` operator in line 34 of Snippet 05, you WILL NOT CREATE a new instance. You will access the current instance via the reference provided by `this` and use the values stored in its member variables.
As I've already explained, things like this can seem a little confusing. However, I'm not here just to explain how it all works or how it should be interpreted. I'm here to show you how things really work behind the scenes. To understand whether we should use the `this` operator in our code, we need to analyze the difference between creating a new instance and accessing the current instance. To do this, we'll use code that's as simple as possible. I think this will make it much clearer how even a single choice like this can affect the entire code. Remember, once again, that this may or may not happen—depending, of course, on exactly what you're implementing. To achieve this goal, I suggest the following code.
01. //+------------------------------------------------------------------+
02. #property copyright "Daniel Jose"
03. //+------------------------------------------------------------------+
04. class C_Demo
05. {
06.     public  :
07. //+----------------+
08.         C_Demo *Check_1(void)
09.         {
10.             return GetPointer(this);
11.         }
12. //+----------------+
13.         C_Demo *Check_2(void)
14.         {
15.             return GetPointer(C_Demo());
16.         }
17. //+----------------+
18. };
19. //+------------------------------------------------------------------+
20. #define PrintX(x) PrintFormat("0x%08X -> %s", x, #x)
21. //+------------------------------------------------------------------+
22. void OnStart(void)
23. {
24.     C_Demo a;
25.
26.     PrintX(a.Check_1());
27.     PrintX(GetPointer(a));
28.     PrintX(a.Check_2());
29. }
30. //+------------------------------------------------------------------+
Code 03
When you run Code 03, the MetaTrader 5 terminal will display the result shown in the following figure.
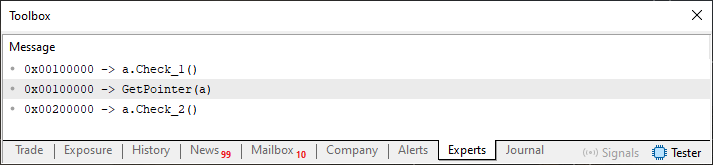
Figure 04
Now analyze the values in Figure 04. In line 4, we define the class `C_Demo`, that is, the type to which its instances will belong; this definition does not create any instances. In lines 8 and 13, we define two member functions. In line 10, the first function uses the `this` operator to obtain a reference to the instance for which the function was called, and passes this reference to `GetPointer`, which returns the memory address of that instance. The second function, defined on line 13, uses a different expression: the expression `C_Demo()` calls the constructor, creates a new temporary instance of type `C_Demo`, and `GetPointer` returns the memory address of that temporary instance.
Note that on line 24, we declare the only variable in Code 03: `a`, of type `C_Demo`. When this declaration is executed, the program creates an instance of the `C_Demo` class and stores it in the variable `a`; we use this variable to call both member functions. Now the real fun begins. In line 26, we print the address returned by the function defined in line 8, obtained from the `this` reference to the instance stored in `a`. In line 27, we directly print the memory address of that same instance. And in line 28, we print the address returned by the function defined in line 13. By comparing the results, you can clearly see that the first two addresses are the same: `this` refers to the instance stored in `a`, not to the class definition or to the variable as a separate entity. The third address is different because the expression `C_Demo()` on line 15 calls the constructor, creates another temporary instance, and `GetPointer` returns the address of this new instance.
So, given this result, I think it’s now quite clear when and how to use the `this` operator to refer to the instance for which the member function was called. GetPointer can then return the memory address of that instance. This is not the same as calling the constructor, creating another instance of the same type, and returning the memory address of that new object.
Nevertheless, I would like to address an issue related to operator overloading. I would like you to pay very close attention to the nuance of what we're going to discuss here, because under certain circumstances this can lead to extremely strange results. Since the case I'm about to present may seem somewhat alarming, I recommend that you study this topic calmly and avoid jumping to conclusions. But to keep one topic separate from another, let's start a new section.
Be Careful with Operator Overloading
Many people don't even realize that, in certain situations, programs can produce strange results. Many people believe that computers will always produce correct results if they are programmed correctly. However, that's not always the case. We are dealing with a situation that is hard to find described anywhere, and even harder to reproduce. We are talking about a very specific situation in which the code sometimes produces the correct result and sometimes an incorrect one. And, as strange as it may sound, the code will still be written correctly.
So, I've been keeping the code we're going to use for many years now, since I originally wrote it in C++ and have been waiting for the right moment to share this knowledge with other programmers. After all, to understand the analysis I’m about to present, you need to know a number of concepts that you, dear reader, probably already understand if you’ve been following this series of articles.
Below is the code.
01. //+------------------------------------------------------------------+
02. #property copyright "Daniel Jose"
03. //+------------------------------------------------------------------+
04. struct stComplex
05. {
06.     private:
07. //+----------------+
08.         double re;
09.         double im;
10. //+----------------+
11.     public  :
12. //+----------------+
13.         stComplex() :re(0), im(0) {}
14. //+----------------+
15.         stComplex(const stComplex &o) :re(o.re), im(o.im) {}
16. //+----------------+
17.         stComplex(const double r, const double i) :re(r), im(i) {}
18. //+----------------+
19.         stComplex operator+=(const stComplex &arg)
20.         {
21.             this = this + arg;
22.             return this;
23.         }
24. //+----------------+
25.         stComplex operator+(const stComplex &arg)
26.         {
27.             stComplex res;
28.
29.             res.re = this.re + arg.re;
30.             res.im = this.im + arg.im;
31.
32.             return res;
33.         };
34.         double GetReal(void) const { return re; }
35. //+----------------+
36.         double GetImaginary(void) const { return im; }
37. //+----------------+
38. };
39. //+------------------------------------------------------------------+
40. #define PrintX(x) Print(__LINE__, " :: ", #x, " -> ", x.GetReal(), " ", x.GetImaginary(), "i")
41. //+------------------------------------------------------------------+
42. void OnStart(void)
43. {
44.     stComplex   a(2, 5),
45.                 b(8, -3),
46.                 c;
47.
48.     c = a;
49.     PrintX(a);
50.     PrintX(b);
51.     PrintX(c);
52.     PrintX((a += b));
53.     c += b;
54.     PrintX(c);
55. }
56. //+------------------------------------------------------------------+
Code 04
Now, pay very close attention. In principle, this Code 04 serves the same purpose as the other code listings we are examining in this article. However, there is a problem with it that you're unlikely to be able to solve if you're just starting out in programming. Even if you show this code to other programmers, they are unlikely to find any error in it either. Sometimes the code returns the correct result, and sometimes an incorrect one, depending, of course, on the operation you are performing. To verify this, analyze the execution result shown below.
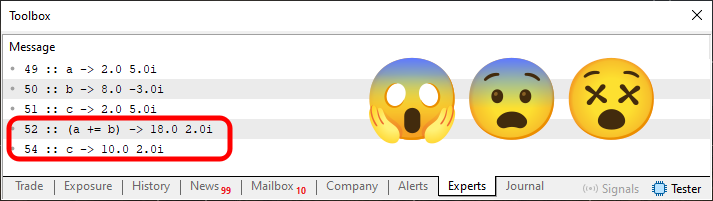
Figure 05
It is the highlighted area that we are really interested in. Now let me ask you: why do the results differ so much if the values used are the same and the operation being performed is also the same? You can analyze this operation in lines 52 and 53 of Code 04. However, even though it is the same type of operation and the same values are used, the result is completely different.
You might be thinking, “Hmm, this code doesn’t make any sense at all. Why are you using these double parentheses in line 52? Perhaps that is precisely why the results are incorrect.” Well, that is not the problem, my dear reader. You simply do not understand what is going on. But I will try to explain it another way. This might make it a little easier to understand what the problem is.
If you make the changes from the following snippet to Code 04, the situation begins to change.
                   .
                   .
                   .
41. //+------------------------------------------------------------------+
42. void OnStart(void)
43. {
44.     stComplex   a(2, 5),
45.                 b(8, -3),
46.                 c;
47.
48.     c = a;
49.     PrintX(a);
50.     PrintX(b);
51.     PrintX(c);
52.     PrintX((a + b));
53.     PrintX((a += b));
54.     c += b;
55.     PrintX(c);
56. }
57. //+------------------------------------------------------------------+
Snippet 06
Now, after running the code with the changes from Snippet 06, we will get the following result.
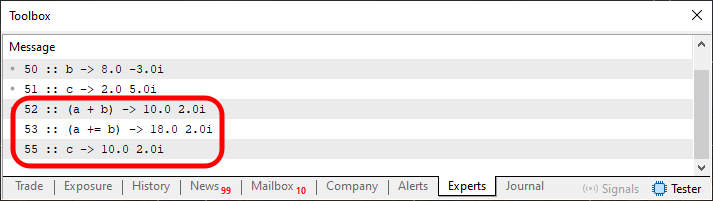
Figure 06
Once again, we're interested in the highlighted area. Please note that the problem isn't with the double parentheses. They're not there by accident. The thing is, some kind of strange error or extremely unusual interaction is occurring here. But why? Well, maybe you haven't realized yet just how strange this glitch is. Let me explain. If you carefully analyze Code 04, you'll notice that on line 40 we use a directive to check the values stored in the instance. The code works when we don't evaluate this check expression, as on line 54. However, when this expression is evaluated on line 53 of Snippet 06, the program returns an incorrect result. The question is this: why does the watch expression used to view these values change the result on one line—so that we end up with a completely strange and meaningless value—but not change it on another line, where we first perform the operation and only then inspect the values stored in the variable? That's the real problem—not something else you might be thinking of.
That's why situations like this make debugging very difficult: if you don't trace the execution, the code seems to work flawlessly. However, when the inspection expression used to view the values is evaluated, the code begins to produce strange results.
But before we delve deeper into this issue and explain what solution should be adopted to avoid such problems, let's figure out why double parentheses are necessary on lines 52 and 53 of Snippet 06.
Well, the thing is, without the double parentheses, the compiler can't form a valid expression. But how is that possible? I don't understand what you're trying to say. All right, let's go back to Code 01 at the beginning of the article. There, I explained why parentheses need to be used on line 47 of Code 01. The same applies in this case—both to Code 04 and to Snippet 06. However, unlike in Code 01, if we had not used double parentheses in line 52 of Code 04, the compiler would have reported the following errors.

Figure 07
This happens because, when processing the definition from line 40 to form the expression in line 52, the compiler cannot arrive at a correct interpretation. Well, if you're not sure how the compiler interprets definitions, check out the article “From Basic to Intermediate: Definitions (I)”. So, we've already explained why double parentheses are needed. Now we just need to figure out exactly what is causing the code to return incorrect values. To find out, we need to add something to Code 04. This gives us the following version.
01. //+------------------------------------------------------------------+
02. #property copyright "Daniel Jose"
03. //+------------------------------------------------------------------+
04. struct stComplex
05. {
06.     private:
07. //+----------------+
08.         double re;
09.         double im;
10. //+----------------+
11.     public  :
12. //+----------------+
13.         stComplex() :re(0), im(0) {}
14. //+----------------+
15.         stComplex(const stComplex &o) :re(o.re), im(o.im) {}
16. //+----------------+
17.         stComplex(const double r, const double i) :re(r), im(i) {}
18. //+----------------+
19.         stComplex operator+=(const stComplex &arg)
20.         {
21.             Print(__FUNCTION__);
22.             this = this + arg;
23.             return this;
24.         }
25. //+----------------+
26.         stComplex operator+(const stComplex &arg)
27.         {
28.             stComplex res;
29.
30.             res.re = this.re + arg.re;
31.             res.im = this.im + arg.im;
32.
33.             return res;
34.         };
35.         double GetReal(void) const { return re; }
36. //+----------------+
37.         double GetImaginary(void) const { return im; }
38. //+----------------+
39. };
40. //+------------------------------------------------------------------+
41. #define PrintX(x) Print(__LINE__, " :: ", #x, " -> ", x.GetReal(), " ", x.GetImaginary(), "i")
42. //+------------------------------------------------------------------+
43. void OnStart(void)
44. {
45.     stComplex   a(2, 5),
46.                 b(8, -3),
47.                 c;
48.
49.     c = a;
50.     PrintX(a);
51.     PrintX(b);
52.     PrintX(c);
53.     PrintX((a + b));
54.     PrintX((a += b));
55.     c += b;
56.     PrintX(c);
57. }
58. //+------------------------------------------------------------------+
Code 05
In Code 05, we added a new debugging message on line 21. Line 21 will output this message to the terminal and allow us to check how many times the code calls the function defined in line 19. Now, please take note of the following. If everything goes as expected, line 21 will output one message BEFORE line 54 is executed, and another BEFORE line 56 is executed. Is that clear? All right, then let's compile Code 05 and examine the output in the terminal. And, to everyone's surprise, the terminal outputs the result shown in the following figure.

Figure 08
But that's really strange. In one case, the expression being evaluated results in two calls, and in the other, only one—just as we expected. Wait, what's going on here? I have absolutely no idea where the mistake is here, because it doesn't make any sense at all. How can evaluating an expression lead to this behavior? Indeed, dear reader, this kind of failure is very strange, and it is extremely difficult to fix, especially when we are just learning to program or have little experience. In that case, we won't know for sure how to proceed, since at first glance there don't seem to be any errors in the code. Sometimes it works, and sometimes it doesn't; it all depends on whether or not we evaluate the watch expression on a given line of code.
However, despite all this madness, the solution—strange as it may seem—is not where you might think; that is, it’s not a bug in the code that implements the operator on line 19. In fact, the error lies in the definition used to construct the inspection expression. What? Wait a minute. How is that possible? What you're saying makes even less sense. How can the error be in the definition if, when instrumenting the code with the change introduced in Code 05, we clearly see that something strange is happening: line 54 calls the function defined on line 19 twice? This is exactly what is shown in Figure 08. I don't understand why the error lies in the definition used to construct the inspection expression.
But yes, my dear reader, the mistake lies precisely in the definition. Although not exactly in the definition itself, but rather in the data-access expressions that are generated during its expansion. For some strange reason, the compiler sometimes processes this expansion differently than expected. I won't go into detail so as not to further complicate something that's already complicated enough. However, if we redefine the PrintX directive, we will fix the problem discussed in this section. To do this, we'll modify the code as follows.
01. //+------------------------------------------------------------------+
02. #property copyright "Daniel Jose"
03. //+------------------------------------------------------------------+
04. struct stComplex
05. {
06.     private:
07. //+----------------+
08.         double re;
09.         double im;
10. //+----------------+
11.     public  :
12. //+----------------+
13.         stComplex() :re(0), im(0) {}
14. //+----------------+
15.         stComplex(const stComplex &o) :re(o.re), im(o.im) {}
16. //+----------------+
17.         stComplex(const double r, const double i) :re(r), im(i) {}
18. //+----------------+
19.         stComplex operator+=(const stComplex &arg)
20.         {
21.             this = this + arg;
22.             return this;
23.         }
24. //+----------------+
25.         stComplex operator+(const stComplex &arg)
26.         {
27.             stComplex res;
28.
29.             res.re = this.re + arg.re;
30.             res.im = this.im + arg.im;
31.
32.             return res;
33.         };
34. //+----------------+
35.         void GetInfos(double &r, double &i) { r = re; i = im; }
36. //+----------------+
37. };
38. //+------------------------------------------------------------------+
39. #define PrintX(x) { double r, i; x.GetInfos(r, i); Print(__LINE__, " :: ", #x, " -> ", r, " ", i, "i"); }
40. //+------------------------------------------------------------------+
41. void OnStart(void)
42. {
43.     stComplex   a(2, 5),
44.                 b(8, -3),
45.                 c;
46.
47.     c = a;
48.     PrintX(a);
49.     PrintX(b);
50.     PrintX(c);
51.     PrintX((a + b));
52.     PrintX((a += b));
53.     c += b;
54.     PrintX(c);
55. }
56. //+------------------------------------------------------------------+
Code 06
Now, when you run Code 06, the terminal will display the result shown in the following figure.

Figure 09
This proves that the error was indeed fixed.
Concluding Thoughts
It was quite enjoyable to write this article, even though what we covered may seem rather confusing and difficult to understand. Nevertheless, I would like you, dear reader, to study what I have explained here very carefully and understand it thoroughly, because something similar might happen to you one day. And without the necessary experience, you are sure to become very frustrated trying to figure out why your code sometimes produces one result and sometimes another.
Still, I think I have managed to pass on some of my knowledge on this topic, since much of what I have presented here is the result of many years of analyzing strange situations and constantly searching for a solution. But if even one of you grasps what I have explained here, then writing this article was worth it.
| MQ5 file | Description |
|---|---|
| Code 01 | Basic demonstration |
| Code 02 | Basic demonstration |
| Code 03 | Basic demonstration |
| Code 04 | Basic demonstration |
| Code 05 | Basic demonstration |
Translated from Portuguese by MetaQuotes Ltd.
Original article: https://www.mql5.com/pt/articles/16903
Warning: All rights to these materials are reserved by MetaQuotes Ltd. Copying or reprinting of these materials in whole or in part is prohibited.
This article was written by a user of the site and reflects their personal views. MetaQuotes Ltd is not responsible for the accuracy of the information presented, nor for any consequences resulting from the use of the solutions, strategies or recommendations described.

 Features of Custom Indicators Creation
 Market Simulation: Position View (XIX)
 Features of Experts Advisors
 Neural Networks in Trading: Heterogeneity-Informed Meta-Parameter Learning (Conclusion)

- Free trading apps
- Over 8,000 signals for copying
- Economic news for exploring financial markets
You agree to website policy and terms of use