

Replay and Market Simulation: The Grand Finale
 26
26
 0
0

Introduction
Hello, everyone, and welcome to a new article in our series on the replay/simulation system.
In the previous article “Market Simulation: Unity Is Strength (III)”, we had practically completed this phase of developing the replay/simulation system. However, we still need to show how to make a minor adjustment and a few necessary changes so that the replay/simulation system can be used within a suitable training approach. In this article, we will conclude our discussion of these aspects, since in the next one I want to move on to a different topic. Perhaps, dear reader, you believe that we have not yet implemented all the elements necessary for using the replay/simulation system. However, you will see that all of them have already been developed or are nearly complete. Since I want to wrap up this stage in this article, let's jump right into what interests us.
Set the number of digits
I spent quite a long time developing this system, intending to finish it as soon as I completed the graphical display system. However, some people close to me suggested expanding the replay/simulation system so that it could also be used to simulate trades. This was a major challenge, since many people simply don't know how to implement this kind of functionality. At first, I realized that this was indeed a challenging task, since MetaTrader 5 did not provide direct support for achieving this goal.
Therefore, it was necessary to implement a position indicator. This indicator was fully developed and tested on a live trading server. Once it reached the desired state, we integrated it into the replay/simulation system. However, an error occurred in the process. This error is related to a property that was necessary for the graphical display system but ultimately interfered with the operation of the position indicator. As a result, the data displayed did not match what we would have seen if we had been connected to a real server.
It's very easy to fix this error. However, we'll have to make a few changes. To begin with, take a look at the snippet below.
105. //+------------------------------------------------------------------+
106.         int SetSymbolInfos(void)
107.             {
108.                 int iRet;
109.
110.                 CustomSymbolSetInteger(def_SymbolReplay, SYMBOL_DIGITS, iRet = (m_Ticks.ModePlot == PRICE_EXCHANGE ? 4 : 5));
111.                 CustomSymbolSetInteger(def_SymbolReplay, SYMBOL_TRADE_CALC_MODE, m_Ticks.ModePlot == PRICE_EXCHANGE ? SYMBOL_CALC_MODE_EXCH_STOCKS : SYMBOL_CALC_MODE_FOREX);
112.                 CustomSymbolSetInteger(def_SymbolReplay, SYMBOL_CHART_MODE, m_Ticks.ModePlot == PRICE_EXCHANGE ? SYMBOL_CHART_MODE_LAST : SYMBOL_CHART_MODE_BID);
113.
114.                 return iRet;
115.             }
116. //+------------------------------------------------------------------+
117.     public    :
118. //+------------------------------------------------------------------+
119.         C_FileTicks()
120.             {
121.                 ArrayResize(m_Ticks.Rate, def_BarsDiary);
122.                 m_Ticks.nRate = -1;
123.                 m_Ticks.nTicks = 0;
124.                 m_Ticks.Rate[0].time = 0;
125.             }
126. //+------------------------------------------------------------------+
127.         bool BarsToTicks(const string szFileNameCSV, int MaxTickVolume)
128.             {
129.                 C_FileBars       *pFileBars;
130.                 C_Simulation     *pSimulator = NULL;
131.                 int              iMem = m_Ticks.nTicks,
132.                                  iRet = -1;
133.                 MqlRates         rate[1];
134.                 MqlTick          local[];
135.                 bool             bInit = false;
136.
137.                 pFileBars = new C_FileBars(szFileNameCSV);
138.                 ArrayResize(local, def_MaxSizeArray);
139.                 Print("Converting bars to ticks. Please wait...");
140.                 while ((*pFileBars).ReadBar(rate) && (!_StopFlag))
141.                 {
142.                     if (!bInit)
143.                     {
144.                         m_Ticks.ModePlot = (rate[0].real_volume > 0 ? PRICE_EXCHANGE : PRICE_FOREX);
145.                         pSimulator = new C_Simulation(SetSymbolInfos());
146.                         bInit = true;
147.                     }
                   .
                                   .
                                   .
165.             }
166. //+------------------------------------------------------------------+
167.         datetime LoadTicks(const string szFileNameCSV, const bool ToReplay, const int MaxTickVolume)
168.             {
169.                 int         MemNRates,
170.                             MemNTicks,
171.                             nDigits,
172.                             nShift;
173.                 datetime dtRet = TimeCurrent();
174.                 MqlRates RatesLocal[],
175.                             rate;
176.                 MqlTick    TicksLocal[];
177.                 bool        bNew;
178.
179.                 MemNRates = (m_Ticks.nRate < 0 ? 0 : m_Ticks.nRate);
180.                 nShift = MemNTicks = m_Ticks.nTicks;
181.                 if (!Open(szFileNameCSV)) return 0;
182.                 if (!ReadAllsTicks()) return 0;
183.                 rate.time = 0;
184.                 nDigits = SetSymbolInfos();
185.                 m_Ticks.bTickReal = true;
186.                 for (int c0 = MemNTicks, c1, MemShift = nShift; c0 < m_Ticks.nTicks; c0++, nShift++)
187.                 {
188.                     if (nShift != c0) m_Ticks.Info[nShift] = m_Ticks.Info[c0];
189.                     if (!BuildBar1Min(c0, rate, bNew)) continue;
190.                     if (bNew)
191.                     {
192.                         if ((m_Ticks.nRate >= 0) && (ToReplay)) if (m_Ticks.Rate[m_Ticks.nRate].tick_volume > MaxTickVolume)
193.                         {
194.                             nShift = MemShift;
195.                             ArrayResize(TicksLocal, def_MaxSizeArray);
196.                             C_Simulation *pSimulator = new C_Simulation(nDigits);
197.                             if ((c1 = (*pSimulator).Simulation(m_Ticks.Rate[m_Ticks.nRate], TicksLocal, MaxTickVolume)) > 0)
198.                                 nShift += ArrayCopy(m_Ticks.Info, TicksLocal, nShift, 0, c1);
199.                             delete pSimulator;
200.
Code snippet from C_FileTicks
This snippet is from the C_FileTicks class. On line 110, we set a value for the SYMBOL_DIGITS property. However, the position indicator displays the values in a strange way. In addition, the SYMBOL_DIGITS property is also used on line 184 to tell the simulator, on line 196, how to normalize the values to be generated. The same thing happens on line 145. All right. We will change this part as shown in the following snippet.
105. //+------------------------------------------------------------------+
106.         int SetSymbolInfos(void)
107.             {
108.                 CustomSymbolSetInteger(def_SymbolReplay, SYMBOL_TRADE_CALC_MODE, m_Ticks.ModePlot == PRICE_EXCHANGE ? SYMBOL_CALC_MODE_EXCH_STOCKS : SYMBOL_CALC_MODE_FOREX);
109.                 CustomSymbolSetInteger(def_SymbolReplay, SYMBOL_CHART_MODE, m_Ticks.ModePlot == PRICE_EXCHANGE ? SYMBOL_CHART_MODE_LAST : SYMBOL_CHART_MODE_BID);
110.
111.                 return (m_Ticks.ModePlot == PRICE_EXCHANGE ? 4 : 5);
112.             }
113. //+------------------------------------------------------------------+
114.     public    :
115. //+------------------------------------------------------------------+
116.         C_FileTicks()
117.             {
118.                 ArrayResize(m_Ticks.Rate, def_BarsDiary);
119.                 m_Ticks.nRate = -1;
120.                 m_Ticks.nTicks = 0;
121.                 m_Ticks.Rate[0].time = 0;
122.             }
123. //+------------------------------------------------------------------+
124.         bool BarsToTicks(const string szFileNameCSV, int MaxTickVolume)
125.             {
126.                 C_FileBars   *pFileBars;
127.                 C_Simulation *pSimulator = NULL;
128.                 int          iMem = m_Ticks.nTicks,
129.                              iRet = -1;
130.                 MqlRates     rate[1];
131.                 MqlTick      local[];
132.                 bool         bInit = false;
133.
134.                 pFileBars = new C_FileBars(szFileNameCSV);
135.                 ArrayResize(local, def_MaxSizeArray);
136.                 Print("Converting bars to ticks. Please wait...");
137.                 while ((*pFileBars).ReadBar(rate) && (!_StopFlag))
138.                 {
139.                     if (!bInit)
140.                     {
141.                         m_Ticks.ModePlot = (rate[0].real_volume > 0 ? PRICE_EXCHANGE : PRICE_FOREX);
142.                         pSimulator = new C_Simulation(SetSymbolInfos());
143.                         bInit = true;
144.                     }
                   .
                                   .
                                   .
162.             }
163. //+------------------------------------------------------------------+
164.         datetime LoadTicks(const string szFileNameCSV, const bool ToReplay, const int MaxTickVolume)
165.             {
166.                 int      MemNRates,
167.                          MemNTicks,
168.                          nDigits,
169.                          nShift;
170.                 datetime dtRet = TimeCurrent();
171.                 MqlRates RatesLocal[],
172.                          rate;
173.                 MqlTick  TicksLocal[];
174.                 bool     bNew;
175.
176.                 MemNRates = (m_Ticks.nRate < 0 ? 0 : m_Ticks.nRate);
177.                 nShift = MemNTicks = m_Ticks.nTicks;
178.                 if (!Open(szFileNameCSV)) return 0;
179.                 if (!ReadAllsTicks()) return 0;
180.                 rate.time = 0;
181.                 nDigits = SetSymbolInfos();
182.                 m_Ticks.bTickReal = true;
183.                 for (int c0 = MemNTicks, c1, MemShift = nShift; c0 < m_Ticks.nTicks; c0++, nShift++)
184.                 {
185.                     if (nShift != c0) m_Ticks.Info[nShift] = m_Ticks.Info[c0];
186.                     if (!BuildBar1Min(c0, rate, bNew)) continue;
187.                     if (bNew)
188.                     {
189.                         if ((m_Ticks.nRate >= 0) && (ToReplay)) if (m_Ticks.Rate[m_Ticks.nRate].tick_volume > MaxTickVolume)
190.                         {
191.                             nShift = MemShift;
192.                             ArrayResize(TicksLocal, def_MaxSizeArray);
193.                             C_Simulation *pSimulator = new C_Simulation(nDigits);
194.                             if ((c1 = (*pSimulator).Simulation(m_Ticks.Rate[m_Ticks.nRate], TicksLocal, MaxTickVolume)) > 0)
195.                                 nShift += ArrayCopy(m_Ticks.Info, TicksLocal, nShift, 0, c1);
196.                             delete pSimulator;
197.
Code snippet from C_FileTicks
Please note that the change is very minor. However, I'd also like to be able to configure the number of digits. To do this, we'll modify the C_ConfigService class so that the user can specify this value, as shown in the following code snippet.
060. //+------------------------------------------------------------------+
061. inline bool Configs(const string szInfo)
062.             {
063.                 const string szList[] = {
064.                             "PATH",
065.                             "POINTSPERTICK",
066.                             "VALUEPERPOINTS",
067.                             "VOLUMEMINIMAL",
068.                             "LOADMODEL",
069.                             "ACCOUNT",
070.                             "MAXTICKSPERBAR",
071.                             "DIGITS"
072.                                                 };
073.                 string     szRet[];
074.                 char        cWho;
075.
076.                 if (StringSplit(szInfo, '=', szRet) == 2)
077.                 {
078.                     StringTrimRight(szRet[0]);
079.                     StringTrimLeft(szRet[1]);
080.                     for (cWho = 0; cWho < ArraySize(szList); cWho++) if (szList[cWho] == szRet[0]) break;
081.                     switch (cWho)
082.                     {
083.                         case 0:
084.                             m_GlPrivate.szPath = szRet[1];
085.                             return true;
086.                         case 1:
087.                             CustomSymbolSetDouble(def_SymbolReplay, SYMBOL_TRADE_TICK_SIZE, StringToDouble(szRet[1]));
088.                             return true;
089.                         case 2:
090.                             CustomSymbolSetDouble(def_SymbolReplay, SYMBOL_TRADE_TICK_VALUE, StringToDouble(szRet[1]));
091.                             return true;
092.                         case 3:
093.                             CustomSymbolSetDouble(def_SymbolReplay, SYMBOL_VOLUME_STEP, StringToDouble(szRet[1]));
094.                             return true;
095.                         case 4:
096.                             m_GlPrivate.ModelLoading = StringInit(szRet[1]);
097.                             m_GlPrivate.ModelLoading = ((m_GlPrivate.ModelLoading < 1) && (m_GlPrivate.ModelLoading > 4) ? 1 : m_GlPrivate.ModelLoading);
098.                             return true;
099.                         case 5:
100.                             if (szRet[1] == "HEDGING") m_GlPrivate.AccountHedging = true;
101.                             else if (szRet[1] == "NETTING") m_GlPrivate.AccountHedging = false;
102.                             else
103.                             {
104.                                 Print("Entered account type is not invalid.");
105.                                 return false;
106.                             }
107.                             return true;
108.                         case 6:
109.                             m_GlPrivate.MaxTickVolume = (int) MathAbs(StringToInteger(szRet[1]));
110.                             return true;
111.                         case 7:
112.                             CustomSymbolSetInteger(def_SymbolReplay, SYMBOL_DIGITS, (int) MathAbs(StringToInteger(szRet[1])));
113.                             return true;
114.
115.                     }
116.                     Print("Variable >>", szRet[0], "<< not defined.");
117.                 }else
118.                     Print("Configuration definition >>", szInfo, "<< invalidates.");
119.
120.                 return false;
121.             }
122. //+------------------------------------------------------------------+
Code snippet from C_ConfigService
Notice how simple it is. On line 71, we add an uppercase string that the user should use. After that, all that's left is to add the appropriate handling for this string, which is what we do on line 111. Next, on line 112, we specify where this value will be used. Since the string was processed correctly, we return `true` on line 113 to ensure that the replay/simulation service is initialized.
The code below shows how a user can set this value in a configuration file.
01. [Config]
02. Path = WDO
03. PointsPerTick = 0.5
04. ValuePerPoints = 5.0
05. VolumeMinimal = 1.0
06. Account = NETTING
07. Digits = 3
08.
09. [Bars]
10. WDON22_M1_202206140900_202206141759
11.
12. [ Ticks -> Bars]
13.
14. [ Bars -> Ticks ]
15. WDON22_M1_202206150900_202206151759
16.
17. [Ticks]
18.
Configuration file
As you can see, it is very simple. On line 7, the user specifies how many decimal places will be used for the symbol. As a result, the position indicator displays values exactly as they would appear if connected to a live server. To help you better understand what I'm explaining, let's look at a practical example. A dollar contract has a minimum tick size of 0.5, that is, half a point, as people usually say when trading this contract. If you configure the file as shown in the code above, you will get the result shown below.
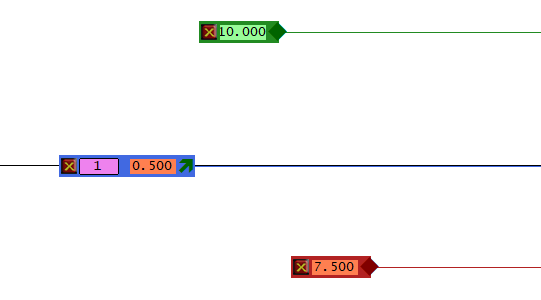
This result is incorrect because when using the position indicator on a demo or live account, the displayed value will have one decimal place, not three. To solve this problem, simply modify line 7, where we specify the number of digits, as shown below.
Digits = 1
This way, we will get the following result, and it will now be correct.
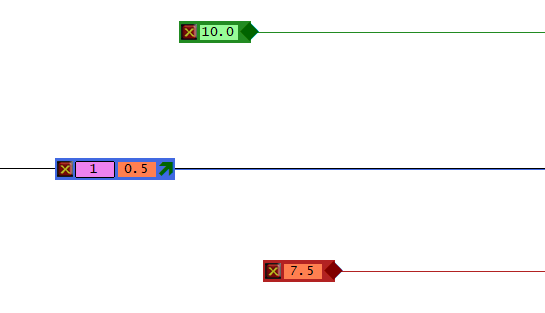
It's simple, isn't it? The next issue I want to explain may arise if you do not take the necessary precautions when working with SQL. If you modify the code in an attempt to do certain things, it could result in database corruption. To explain how to avoid this, let's move on to the next section.
How to Avoid Corrupting the Database Contents
Many people avoid using SQL or have a hard time with it because they don't realize that SQL isn't a program, but a language. If you use SQL correctly, you'll be able to avoid a lot of problems and difficulties. However, if used incorrectly, it can turn into a nightmare from which there is no escape. One factor that definitely harms any database is the presence of duplicate records or records whose columns contain anomalous or invalid values. This effectively breaks the database. Many people believe that to prevent these problems, it is necessary to resort to external programming or to write code with particular care. However, the solution is very simple, since such situations can be avoided using SQL constraints. How? It is simply a matter of defining the necessary constraints. We can also prevent certain records from being modified or deleted, but I'll leave that for you to explore on your own. Tip: Use TRIGGERS, as this is the simplest solution.
In the C_InServer class constructor, we use an SQL statement to define table creation. Since our code allows us to integrate SQL scripts and even execute them outside the main executable file, we will modify the code so that the SQL script can be edited in a separate file. However, we will include this script in the executable file as a resource. I've already explained how to do this. See the articles in this series on SQL. Below is the updated version of the code we need to modify.
01. //+------------------------------------------------------------------+
02. #property copyright "Daniel Jose"
03. //+------------------------------------------------------------------+
04. #include "..\Defines.mqh"
05. #include "..\SQL\C_ReplayDataBase.mqh"
06. //+------------------------------------------------------------------+
07. #resource "Script.sql" as string SQL_01
08. //+------------------------------------------------------------------+
09. class C_InServer : public C_ReplayDataBase
10. {
11.     private    :
12.         bool    m_IsReplay;
13.         struct stLocal
14.         {
15.             ulong   numberMagic,
16.                     ticket;
17.             int     type;
18.             double  volume,
19.                     price,
20.                     sl,
21.                     tp;
22.         }m_Info;
23.     public    :
24. //+------------------------------------------------------------------+
25.         C_InServer()
26.             :C_ReplayDataBase(),
27.             m_IsReplay(_Symbol == def_SymbolReplay)
28.         {
29.             ZeroMemory(m_Info);
30.             ExecResourceSQL(SQL_01);
31.         }
32. //+------------------------------------------------------------------+
C_InServer code snippet
The script is shown below.
CREATE TABLE IF NOT EXISTS tb_Replay (
    magic NOT NULL DEFAULT 0,      -- ID Expert Advisor
    ticket PRIMARY KEY NOT NULL,   -- Position Ticket
    type NOT NULL,                 -- Position type
    volume NOT NULL,               -- Position volume
    price NOT NULL,                -- Opening point
    sl NOT NULL DEFAULT 0,         -- Stop loss point
    tp NOT NULL DEFAULT 0,         -- Take profit point
    history NOT NULL DEFAULT 0     -- If false, the position is open
);
SQL script
Essentially, here we define in SQL how records should be created. It is pretty simple. If you're not sure where to place the script file, save it in the folder shown in the following image.
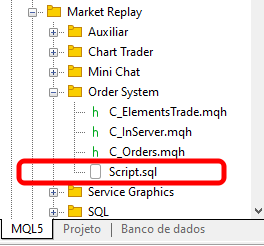
After compiling the code, you should see the message highlighted in the image below.
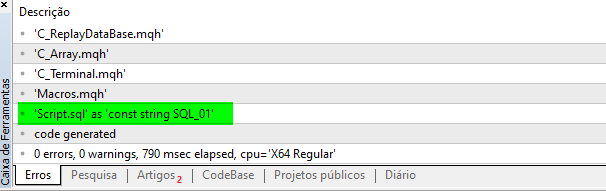
In this way, we eliminate many of the problems that can arise in the database. This is a simple yet highly functional solution. At this stage, there's practically nothing else we need to change to configure the system. However, there is one more detail to implement: making the Take Profit and Stop Loss lines functional. As you can see, it's quite simple. To keep the topics separate, let's move on to a new section.
Take Profit and Stop Loss
There is one issue here that many novice traders are unsure about. Even some traders with a certain amount of market experience misunderstand this issue, to put it mildly. Take Profit and Stop Loss lines are not pending orders. They are a specific type of protective order. Some platforms—and even some traders—make this issue seem much more complicated than it actually is. I mention this because here in Brazil, many analysts and professional traders who use other platforms have a hard time understanding what I'll explain below. It is incorrect to say that you need to adjust the so-called OFFSET so that the Stop Loss line does not close the position. This is one of the most common misconceptions spread by traders and market analysts in Brazil. The so-called OFFSET, which many people talk about, exists only for one type of order—BUY STOP LIMIT or SELL STOP LIMIT—as you can see in the highlighted section of the following image.
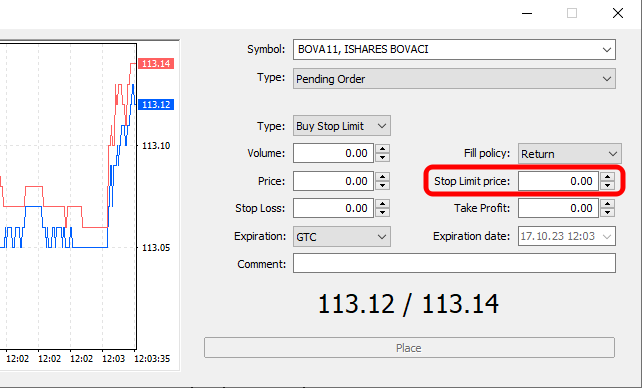
This parameter, shown in the image, can only be configured for pending orders before they become a position. There is no need to set any offset to prevent a position from remaining open after the Stop Loss or Take Profit level has been crossed. Incidentally, it is curious that, under this logic, only the Stop Loss could supposedly be crossed, while the Take Profit could not. Why is that? In any case, I'm not here to discuss this issue. I want to show you how to make the Take Profit and Stop Loss lines functional. For now, you can only open and close a position, but you have to do it manually. Thus, in the replay/simulation system, the Take Profit and Stop Loss lines are not working yet, although you can manage them.
To make these lines functional, we just need to perform one check. That is all that is required. If the check returns a positive result, we will send the system a request to close the position. This check is quite simple. However, it must be programmed with some caution. If you do this carelessly, you'll end up with a misconception that could lead to problems later on. However, it is precisely this kind of careless implementation of the check that will also allow you to do something else, which I'll discuss a little later. But first, let's figure out how to program this check so that Stop Loss and Take Profit start working.
There are several places in the system where the necessary check can be implemented. Some of them are better suited for this than others, since you'll need to pass the close price and the Take Profit and Stop Loss levels between applications. The worst place to implement it would be the Expert Advisor. Every Expert Advisor you develop would have to include the same code for checking Take Profit and Stop Loss levels when the Expert Advisor is used in the replay/simulation system. That is, without a doubt, the worst option. Can we perform the check in the control indicator? Yes, we could, but there are better options. What about the Chart Trade indicator? That would also be a perfectly reasonable option, although we still have more suitable alternatives.
In that case, maybe we should implement it in the position indicator? That would be perfect, wouldn't it? Indeed, that would be very convenient, because we wouldn't have to query the database for Take Profit and Stop Loss levels. The position indicator already has these levels. It would also be interesting to add this check to the replay/simulation service. In that case, we would have to access the database periodically. This would allow the system to simulate certain specific situations in a very interesting way. However, I don't want the service to constantly access the database. For this reason, we will perform the check in the position indicator. However, consider implementing it in the replay/simulation service. You'll see that this is also a very interesting solution.
All right. Now that the decision has been made, let's look at what needs to be done so that the position indicator code can truly "SIMULATE" what a real trading server would do. You can see this in the following snippet.
018. //+------------------------------------------------------------------+
019. struct st00
020. {
021.     ulong   ticket;
022.     string  szShortName,
023.             szSymbol;
024.     double  priceOpen,
025.             var,
026.             sl, tp,
027.             tickSize;
028.     char    digits;
029.     bool    bIsBuy;
030. }m_Infos;
031. //+------------------------------------------------------------------+
                                   .
                                   .
                                   .
071. //+------------------------------------------------------------------+
072. int OnInit()
073. {
074.     ZeroMemory(m_Infos);
075.     Order = new C_InServer();
076.     IndicatorSetString(INDICATOR_SHORTNAME, def_ShortName);
077.     if (!CheckCatch(user00))
078.     {
079.         ChartIndicatorDelete(0, 0, def_ShortName);
080.         return INIT_FAILED;
081.     }
082.
083.     return INIT_SUCCEEDED;
084. }
085. //+------------------------------------------------------------------+
086. int OnCalculate (const int rates_total, const int prev_calculated, const datetime &time[], const double &open[],
087.                  const double &high[], const double &low[], const double &close[], const long &tick_volume[],
088.                  const long &volume[], const int &spread[])
089. {
090.     ProfitNow();
091.
092.     if ((close[rates_total - 1] == m_Infos.sl) || (close[rates_total - 1] == m_Infos.tp))
093.         EventChartCustom(0, evMsgClosePositionEA, m_Infos.ticket, 0, m_Infos.szSymbol);
094.
095.     return rates_total;
096. }
097. //+------------------------------------------------------------------+
098. void OnChartEvent(const int id, const long &lparam, const double &dparam, const string &sparam)
099. {
                                   .
                                   .
                                   .
144.             volume = (*Order)._PositionGetDouble(POSITION_VOLUME);
145.             (*Open).UpdatePrice(0, m_Infos.priceOpen = (*Order)._PositionGetDouble(POSITION_PRICE_OPEN), volume, m_Infos.var);
146.             (*Take).UpdatePrice(m_Infos.priceOpen, m_Infos.tp = (*Order)._PositionGetDouble(POSITION_TP), volume, m_Infos.var, (*Order)._PositionGetDouble(POSITION_SL));
147.             (*Stop).UpdatePrice(m_Infos.priceOpen, m_Infos.sl = (*Order)._PositionGetDouble(POSITION_SL), volume, m_Infos.var, (*Order)._PositionGetDouble(POSITION_TP));
148.             ProfitNow();
Position indicator snippet
Now let's take a look at what this code does. On line 26, I set the new values that we will use in the indicator. On line 74, I initialize the data structure with zeros to ensure that the variables do not contain garbage values. Next, on lines 146 and 147, we obtain the Take Profit and Stop Loss values. So far, we haven't done anything particularly difficult. Now, pay close attention to what happens inside the OnCalculate function, located on line 86.
Please note that I have modified this function compared with the previous version to ensure that the value taken from the close-price array is what gets checked. We could also have kept the previous model, but it had one drawback: the user or trader could manipulate the price-array value, which would completely undermine the approach used by the indicator.
The detail I'd like to draw your attention to, dear reader, is on line 92. Before I forget: if the check on line 92 passes, we'll generate an event on line 93. Its purpose is to send a custom message to the Expert Advisor. This message indicates that a request must be sent to the server to close the position. It is the indicator's position that will be affected.
Let's go back to line 92, because that's where the key to these checks lies. If you understand what's happening in this line of code, you'll be able to create a pending order indicator. In addition, if you manage to implement this, you'll also be able to ensure that it works properly. To address this issue separately, let's move on to a new section. Although the title refers to a different topic, we'll actually take a closer look at what happens on line 92. So, if you still don't fully understand how the condition on line 92 triggers the event on line 93, pay very close attention.
Types of Pending Orders and How to Make Them Work
Although the title of this section suggests that I will be discussing pending orders directly, in reality, that is not exactly what we will be doing. First, we need to understand what is happening on line 92 of the last snippet from the previous section. As you can see, here I am comparing the close price with two other levels: Take Profit and Stop Loss. Well then. If any of these conditions are met, an event is triggered, causing the position to be closed during replay/simulation. But what would happen if, instead of checking for equality, we checked a different condition? What would happen? For example, let's say we change this position indicator so that, instead of an open position, it displays a pending order. Can we simulate opening a position?
If you've really given this possibility some thought, dear reader, I'd like to talk with you and maybe even hire you, because you've just figured out how to implement a pending order system. To understand this—even if you haven’t considered this possibility—we’ll break down a few schemes and see how they can trigger events that simulate opening a position without changing any part of the existing code. All user messages or events that can be created are listed in the C_ChartFloatingRAD class between lines 345 and 356. All you need to do is construct a string from the values in the pending order indicator. After that, all you'll need to do is make a few changes to the position indicator to turn it into a pending order indicator, and everything will work correctly. The first figure is shown in the following image.
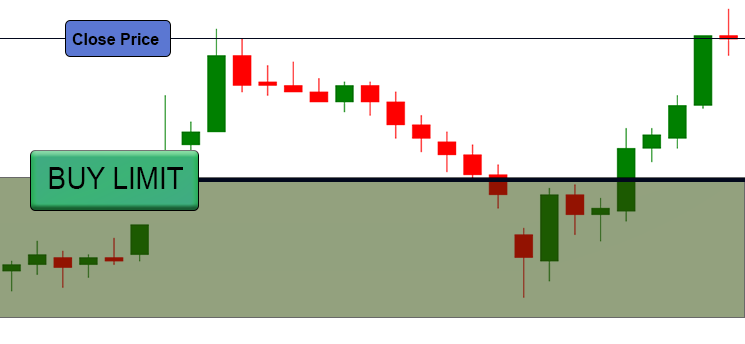
This is the first type of pending order: a BUY LIMIT order. Here's how it works: when the close price enters the GREEN zone—that is, when it becomes less than or equal to the order price—a market buy will be executed. We can simulate this behavior using the following check inside `OnCalculate`:
092.     if (close[rates_total - 1] <= m_Infos.open)
093.         EventChartCustom(...See the article for details...);
Please note that an event will be triggered the very moment the check condition is met. All you need to do is configure it so that the Expert Advisor recognizes it as a signal from Chart Trade, even if it actually came from the pending order indicator. Be sure to deinitialize the pending order indicator after the event is triggered so that it does not continue to fire repeatedly.
Just as with BUY LIMIT, we have a new figure, shown below.
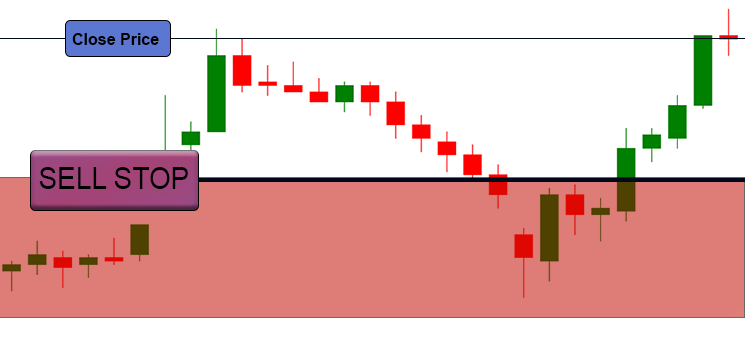
In this case, we will execute a sell when the close price falls below the specified level. The trigger code will be the same as the one we saw earlier. The only difference is that instead of executing a market buy, you will execute a market sell. Now let's look at the following figure.
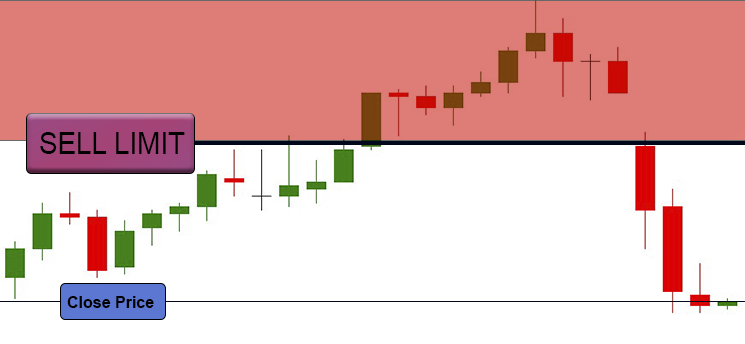
In this case, the approach is different: we will not sell when the price falls, but rather when it rises above a certain level. This value will be determined by the price of the pending order. To do this, we need to replace the check with the one shown below.
092.     if (close[rates_total - 1] >= m_Infos.open)
093.         EventChartCustom(...See the article for details...);
Please note that the change in the code is very minor. Nevertheless, this change will be enough to make everything work. The same code will work for the figure shown below as well.
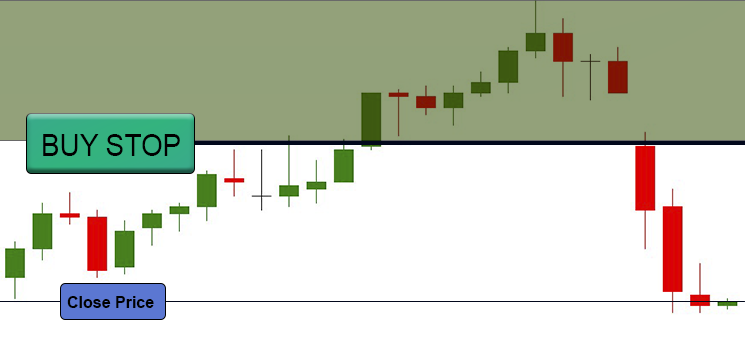
The difference is that now, when the event is triggered, it will correspond to a market buy rather than a market sell. See how easy it is to simulate a pending order? So I'll wrap it up here. I don't see any reason to publish new articles just to explain this point. If you've been following this series from the beginning, it will be easy for you to make the necessary changes so that the code can simulate pending orders.
However, there is one more issue that deserves to be addressed separately so as not to confuse you, dear reader. So, let's move on to the next section.
BUY STOP LIMIT and SELL STOP LIMIT
All right. If you understand how to simulate the previous types, implementing these types will be even easier. It might seem complicated, but it's actually not that hard. All you need to do is figure out exactly what needs to be done and carry it out.
BUY STOP LIMIT and SELL STOP LIMIT orders are not actually direct orders, but rather indirect ones. In other words, they are not triggered by just any price and are not executed immediately as soon as the price reaches a certain level. These orders are designed to avoid sudden spikes in market volatility. For this reason, I believe that it might not make much sense for you to implement them. However, if you want to do that, you first need to understand how they actually work. To do this, take a look at the following images.
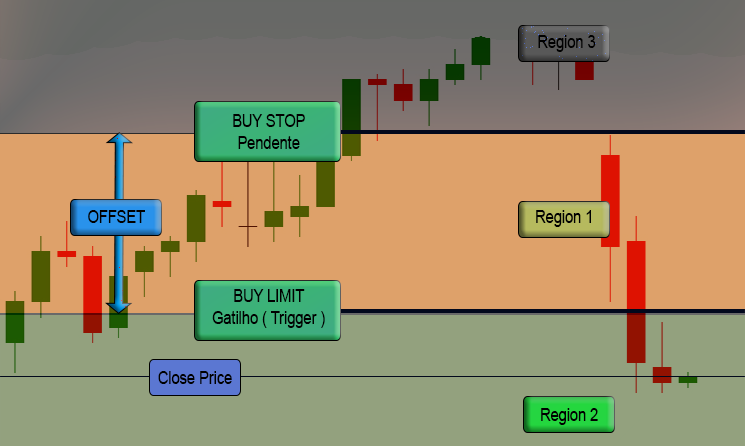
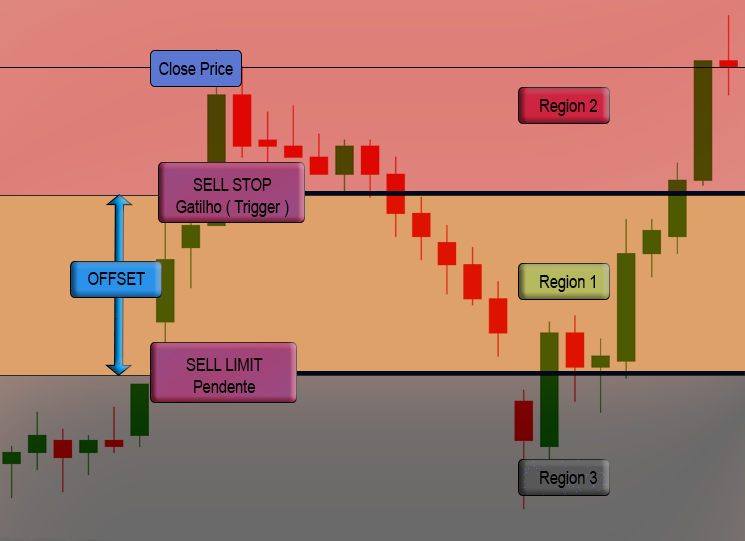
Both images show how a BUY STOP LIMIT order and a SELL STOP LIMIT order are structured from the server's perspective. In fact, if you place such an order on a MetaTrader 5 chart, you'll see that four lines appear, not three. Why? The fact is that three of these four lines represent one of the orders discussed in the previous section. The fourth line shown on the chart corresponds to the trigger level. When this level is reached, one of the four types of orders we discussed earlier is triggered; it may either be executed immediately or remain pending. This is exactly where the so-called offset comes into play.
As you can see in the figures, there is a gap between these two orders. This distance is the offset. If volatility is very high, it may happen that the trigger level is reached, but the order generated—one of the four discussed in the previous section—is never filled. In that case, you'll see a pending order on the chart instead of the open position that many would expect to see.
As I've already explained, this type of order is quite specific. To create this logic, we first need to perform a check based on what we covered in the previous section. Once this first check returns a true result, we will stop performing it and move on to one of the previous checks. It's very simple. Once this second check returns a true result, we will trigger an event that will simulate the opening of a position.
Thus, with minimal effort, we will fully implement the simulation of pending orders.
Show history
In the final part of this series of articles, we will examine how to display the trade history for trades executed in the replay/simulation system. There are several ways to do this. It all depends on how you want to visualize the data. Since this data will be available in an SQL database, anyone will be able to analyze what happened. However, you may prefer to review the trade history directly on the chart to identify potential improvements to your trading strategy. Creating an indicator of this type is even easier. However, you'll need to add the date and time of each trade to the database table. Since this is a very simple modification, I think any enthusiast will be able to implement it. After that, all you have to do is query the database and find the records that have a value of 1 in the History column.
Values equal to zero indicate that this is an open position. Once you've retrieved the data from the record, all you need to do is add a few OBJ_ARROW_BUY and OBJ_ARROW_SELL objects to the chart, as well as an OBJ_TREND object. As a result, the trade history will be displayed directly on the chart. You can also create these objects when you close the position. In any case, the process for creating these objects remains virtually the same. It all depends on what you really want and what you need to develop.
Concluding Thoughts
Finally, we have arrived at the replay/simulation system, which you, our esteemed and patient reader, can now use. I know that many of you may have expected me to publish a few more articles explaining other aspects of this system. However, I don't think this is necessary, since everything you need to do has already been explained in this article. Don't assume that some parts were left unimplemented because of an unjustified oversight on my part; instead, treat this as a challenge for yourself if you are just starting to learn programming. That's exactly how I got started. So, if you really want to become a good programmer, start with the problems I left unsolved. Read the articles carefully and pay attention to how I gradually built the system, making fewer and fewer changes and always trying to reuse what already existed or had been implemented. Don't try to create something entirely from scratch without first trying to modify existing elements, as I've explained throughout this series.
And one more thing: if you use one of the checks shown when explaining how to simulate pending orders in the position indicator, you can create a system that will continue to monitor the position. Even if the price jumps past the Stop Loss or Take Profit level, the position indicator itself will detect this and send a request to the Expert Advisor to close the position for you.
As I've mentioned throughout this series, by the time you read any of these articles, the code contained in them will already be completely outdated. In the series of articles devoted to creating an automated Expert Advisor, I did not cover what I am explaining in this article and in this series. So don't expect me to teach you everything all at once. Follow my posts and keep learning.
If you don't know how to compile the complete replay/simulation system code, I'll include all the applications and necessary files in the attachments so that you'll have at least one example. So, you might be interested in exploring and learning how to program the parts that are still missing but were explained in this final article. Other than that, I wish you the best of luck. See you in the next article, where I'll start exploring a different topic. I might update this replay/simulation system in the future, but only GOD knows if I’ll actually do it. 😂😁👍 Big hugs to everyone. See you in the next article.
| File | Description |
|---|---|
| Experts\Expert Advisor.mq5 | Shows interaction between Chart Trade and the Expert Advisor. Mouse Study is required for interaction. |
| Indicators\Chart Trade.mq5 | Creates a window where you can configure the order to be sent. Mouse Study is required for interaction. |
| Indicators\Market Replay.mq5 | Creates the controls needed to interact with the replay/simulation service. Mouse Study is required for interaction. |
| Indicators\Mouse Study.mq5 | Enables user interaction with the graphical controls. This is necessary both for using the replay/simulation system and for trading in the real market. |
| Indicators\Order Indicator.mq5 | Displays market orders and allows users to interact with and manage them. |
| Indicators\Position View.mq5 | Displays market positions and allows users to interact with and manage them. |
| Services\Market Replay.mq5 | Creates and maintains the market replay/simulation service. This is the main file for the entire system. |
Translated from Portuguese by MetaQuotes Ltd.
Original article: https://www.mql5.com/pt/articles/13582
Warning: All rights to these materials are reserved by MetaQuotes Ltd. Copying or reprinting of these materials in whole or in part is prohibited.
This article was written by a user of the site and reflects their personal views. MetaQuotes Ltd is not responsible for the accuracy of the information presented, nor for any consequences resulting from the use of the solutions, strategies or recommendations described.

 Building a PDF Creation Library in MQL5 (Part1): Writing a PDF by Hand
 From Basic to Intermediate: Operator Overloading (V)
 Features of Experts Advisors
 MQL5 Expert Advisor Builder (Part 1): A Simple Static Template

- Free trading apps
- Over 8,000 signals for copying
- Economic news for exploring financial markets
You agree to website policy and terms of use