

MQL5 Expert Advisor Builder (Part 1): A Simple Static Template
 72
72
 0
0

Contents
- Introduction
- Why Do We Need a Simple Template?
- Simple Template Architecture
- Input Parameters
- Initialization, Deinitialization, and the Main Loop
- Trading Logic: Signal and Entry/Exit
- Automatic Lot Sizing and Risk Management
- Additional Entries, Martingale, and Waiting Out Losses
- Interface and Testing
- Additional Overview
- Conclusion
- Attached Files
Introduction
After writing a significant amount of code in MQL5, you come to realize that many algorithms, approaches, and local solutions are very similar, if not identical. So why keep writing the same thing over and over again in different ways, when all of it can be standardized into something common, thereby saving time when writing new trading strategies? The question is, in fact, rhetorical — but not for everyone.
By asking ourselves this question and working to generalize the core algorithms we use in our solutions, we can arrive at a template-based approach and save as much time as possible when writing trading robots. This can be achieved by creating a set of templates that can be applied across a fairly wide range of solutions. By combining these templates, you can not only speed up and standardize your solutions but also develop the habit of creating more and more similar templates, thereby covering a wider range of solutions.
I arrived at this approach after repeatedly performing the same actions across different Expert Advisors (EAs): loading history, checking for a new bar, opening and closing positions, and accounting for commission and swap. Obviously, it makes sense to set this up as a template once and then simply plug in different entry and exit logic. A simple static template is like an exoskeleton for your trading signal: you decide "when to enter" and "when to exit," and the template takes care of everything else. Of course, such templates are not a cure-all for every problem, but they can still solve a significant portion of the typical challenges faced by beginner and intermediate traders. This same approach serves as the foundation for more complex templates — multi-timeframe, diversified, and others that emerge as the concept evolves; these will be discussed in the following articles in this series. First, a solid foundation.
Why Do We Need a Simple Template?
Beginners often write an Expert Advisor (EA) in a straightforward way: in OnTick, they check the conditions, open a position, and then check whether to close it somewhere else. The result is a monolith in which the strategy, risk management, and the platform's technical details are all mixed together. It is difficult to test, difficult to change the logic, and easy to make a mistake in calculating the lot size or accounting for swap.
The template-based approach handles this differently. There is a framework: written once, tested, and ready for reuse. The framework clearly sets aside a place for the strategy — typically, one or more methods of the trading robot class. Everything else — data loading, updating the virtual chart, checking the spread, calculating the lot size, opening and closing positions, and the interface — is built into the template and does not require any action on your part when changing strategies.
What you will get with this template:
- a ready-to-use trading robot for a single symbol and timeframe,
- automatic lot sizing based on the deposit, or a fixed lot size,
- averaging mode or martingale,
- “waiting out losses” mode (holding losing positions for a specified period of time),
- customizable stop-loss and take-profit levels,
- an extensible framework for writing your own strategies.
Thus, using this framework allows traders to focus exclusively on the trading rules, without being distracted by the technical implementation of risk control and order execution. You plug your own logic into the signal calculation method (in the example, a countertrend approach based on a sequence of bars) and adjust the parameters as needed.
Simple Template Architecture
The template is built around three main entities:
- virtual chart — stores historical data (OHLC and time) for the current symbol and timeframe, and is updated on every tick;
- trading robot instance — stores trading parameters, state (whether there are open positions and what the signal is), and objects for working with positions and deals;
- global initialization and cycle functions — tie everything together.
This modular structure simplifies debugging and makes it easy to extend the EA's functionality in the future. All trading logic — signal calculation, opening positions, and closing positions — is encapsulated in the trading robot class. When the EA starts, one chart object and one trading robot object are created; when it stops, they are deleted. In real time, the main loop is triggered by a timer (once per second); in the Strategy Tester, it is triggered by a tick. This is done to ensure stable operation in live trading, where ticks may arrive infrequently.
One Simulated() cycle:
- updating the virtual chart (new bar, copying quotes),
- calculating and executing the trading robot's trading logic,
- updating the graphical interface.
A clear division of responsibilities between these stages ensures that the trading signal is always based on up-to-date information about the account and market conditions. The diagram below shows the flow from initialization to one iteration of the simulation loop. Rectangles represent stages; arrows indicate the sequence. After OnInit(), a timer is created (or, in the Strategy Tester, it is not created); when the timer event or a tick occurs for the first time, Init() is called, creating the chart, the trading robot, and the interface. Each subsequent trigger calls Simulated(): updating the chart, running the trading robot's calculations and deal execution, and updating the status on the chart.
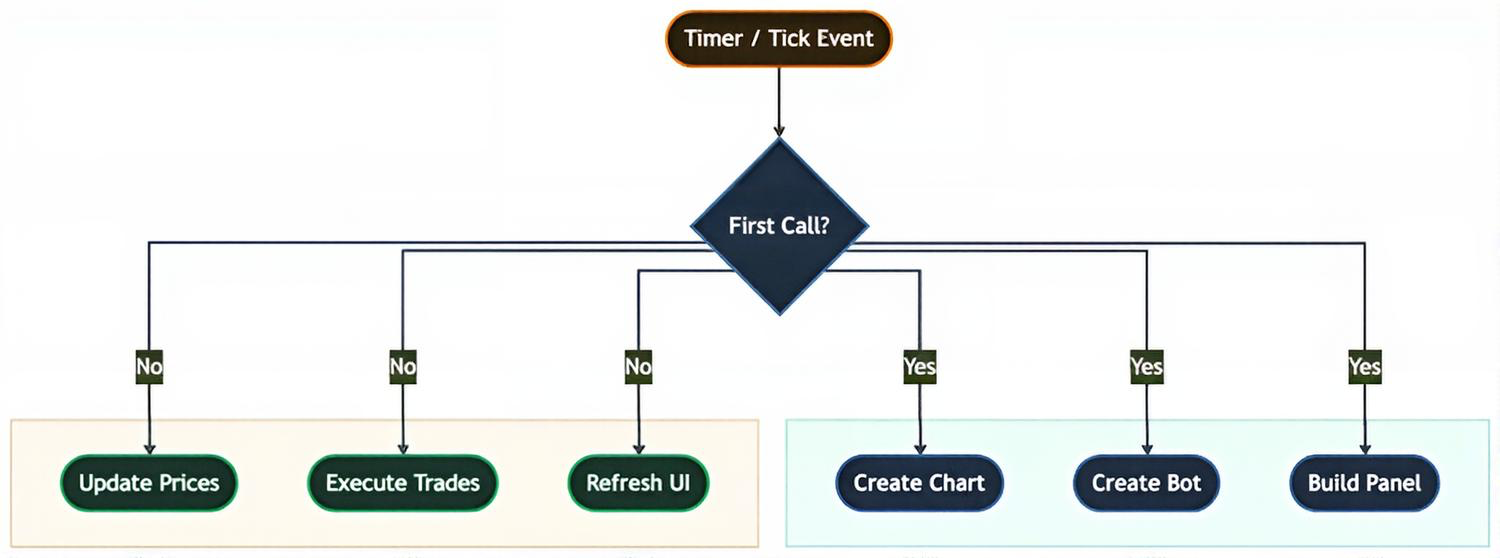
Fig. 1. Initialization flow and main loop
Now let's take a look at how this is implemented in the code. Initializing the EA — the "OnInit()" function. It determines whether we are working in the Strategy Tester; in live trading, a timer is created with a 1-second interval (up to five attempts). The timer is not created in the Strategy Tester, and the logic will be called from "OnTick()". This ensures stable operation both on historical data and in live trading.
//+------------------------------------------------------------------+
//| Expert initialization function                                   |
//| Sets up timer for real-time mode or marks tester mode            |
//+------------------------------------------------------------------+
int OnInit()
  {
   // Determine whether we are in the Strategy Tester
   bTester=MQLInfoInteger(MQL_TESTER);

   // Try to create a 1-second timer (up to 5 attempts)
   for (int i = 0; i < 5; i++)
      {
      if (!bTester)
         {
         bTimerCreated = EventSetTimer(1);  // Timer fires every 1 second
         }
      else bTimerCreated=false;             // No timer required in the Strategy Tester

      // If timer creation failed, kill the old timer and retry
      if (!bTimerCreated)
         {
         EventKillTimer();
         Sleep(100);
         }
      else break;                          // Timer created successfully
      }
   return(INIT_SUCCEEDED);
  }
The "bTester" flag is used later in the code to determine which mode we are running in. In real time, the main loop is triggered by a timer — this ensures stable operation even with infrequent ticks. In the Strategy Tester, the timer is not created: all the logic runs from "OnTick()".
Let's take a look at how the other MQL5 event handlers are structured: deinitialization, timer, and tick. Note the general pattern: on the first call (the "bFirstTimer / bFirstTick" flags), "Init()" is called; on subsequent calls, "Simulated()" is called. This provides a single entry point, whether we are working in the Strategy Tester or in real time.
//+------------------------------------------------------------------+
//| Expert Advisor (EA) deinitialization function                    |
//+------------------------------------------------------------------+
void OnDeinit(const int reason)
  {
     bTimerCreated=false;               // Reset the timer flag
     bFirstTimer = false;               // Reset the "first-timer" flag
     bFirstTick = false;                // Reset the first-tick flag
     DeInit();                          // Delete chart, bot, and interface
     EventKillTimer();                  // Stop the timer
  }

//+------------------------------------------------------------------+
//| Timer event handler — fires every 1 second in real time          |
//+------------------------------------------------------------------+
void OnTimer()
   {
   if (bTimerCreated)
      {
      if (!bFirstTimer)
         {
         Init();                        // First call: create chart, bot, and interface
         bFirstTimer=true;
         }
      else Simulated();                 // Subsequent calls: main trading loop
      }
   }

//+----------------------------------------------------------------------+
//| Tick event handler — used in the Strategy Tester instead of a timer  |
//+----------------------------------------------------------------------+
void OnTick()
   {
   if (!bTimerCreated)                  // Runs only if a timer was not created (Strategy Tester)
      {
      if (!bFirstTick)
         {
         Init();                        // First tick: create chart, bot, and interface
         bFirstTick=true;
         }
      else Simulated();                 // Subsequent ticks: main trading loop
      }
   }
The structure is obvious: OnTimer and OnTick are mirror event handlers. The first call is Init(), and all subsequent calls are Simulated(). Deinitialization correctly releases all resources. Thus, all the logic resides in Simulated(), while Init() is executed exactly once after startup. Init() itself runs the initialization sequence, while DeInit() removes the interface and frees memory (delete ChartO, delete BotO).
The Simulated() method:
In a single iteration, Simulated() invokes several sequential operations. The idea is simple. First, we update the state of the chart to which the virtual trading robot is attached, and only then can we start processing operations inside the virtual trading robot, after making sure we have the latest chart data.- ChartTick() — updates the virtual chart
- BotTick() — calculates the signal and executes the trading robot's logic
- UpdateStatus() — updates the labels on the chart
This compact set of functions ensures that the trading robot performs all necessary actions within each processing cycle. Here we can see how this happens in the Simulated() method:
//+------------------------------------------------------------------+
//| Main simulation loop — called on every timer/tick event          |
//| Coordinates: chart data -> bot logic -> interface update         |
//+------------------------------------------------------------------+
void Simulated()
   {
   ChartO.ChartTick();                 // Update the virtual chart with the latest OHLC data
   BotTick();                          // Execute the bot's trading logic (signals, open/close)
   UpdateStatus();                     // Refresh the interface labels on the chart
   }
I would also like to clarify why the ChartTick() method is part of the ChartO instance, while BotTick() is a global method. The point is that BotTick() manages a much more complex, though similar, process by analogy with ChartO. In this method, we need to do more than just perform the same action every tick; we also need to optimize the process so that we don't perform any unnecessary calculations. For complex strategies, this will be critical to the trading robot's operating speed. We will discuss this method later.
Input Parameters
All template settings are exposed as input parameters and grouped by purpose. This makes it easier for you to navigate, and during optimization in the Strategy Tester you can iterate through the required group. Below is a concise table of categories and key parameters.
| Category | Parameter | Description |
|---|---|---|
| Volumes | bInitLotControl | Enable automatic lot size calculation based on the deposit |
| LotE | Fixed lot size (if auto lot sizing is turned off) | |
| DepositE | Deposit for calculating automatic lot sizing | |
| Waiting Out Losses | bInitSitE | "Loss Linearization" Mode — Holding a Position for a Specified Time |
| MinutesHoldE | Holding time in minutes | |
| Martingale | bInitMartinE | Enable Martingale |
| MaxMartinLotMultiplierStepsE | Maximum lot multiplier steps | |
| Additional Entries | bInitRepurchaseE | Enable additional entries |
| MinPercenPriceStepE | First price step for additional entries (%) | |
| NextStepMultiplierE | Additional-entry step multiplier | |
| Other | MagicE | Magic number |
| SLE, TPE | Stop-loss and take-profit in "_Point" units (0 — disabled) | |
| ComissionPerLotE | Commission per lot | |
| SpreadEE | Maximum spread in points | |
| CommentI | Comment for orders | |
| TBE, TSE | Enabling buys and sells | |
| Strategy Variables | BarsChainForOpenE, BarsChainForCloseE | Number of consecutive bars for entry and exit (strategy example) |
In the code, the parameters are declared using `input group` and `input`/`sinput`. Groups define sections in the EA properties window; `sinput` is a parameter declaration specifier that disables optimization in the Strategy Tester optimizer (for example, for `magic` or `comment`). Below is the complete block of input parameters, exactly as you will see it in the code:
//+------------------------------------------------------------------+
//| Robot input parameters                                           |
//+------------------------------------------------------------------+
#define EANICK "Simple Template"        // robot name in GUI
#define GLOBALVARPREFIX "HelpVar"       // prefix for global variables
#define EABARS 990                      // max bars for internal virtual chart

//+----------------- group "Volumes" -----------------------+
input group "Volumes";
sinput bool bInitLotControl=false;      // automatic lot calculation
sinput double LotE=0.01;                // fixed lot size
sinput double DepositE=1000.0;          // deposit for lot calculation

//+----------------- group "Waiting Out Losses Mode" -----------------------+
input group "Waiting Out Losses Mode";
input bool bInitSitE=false;             // loss linearization (hold the position for a set time)
input int MinutesHoldE=144000;          // hold time in minutes

//+----------------- group "Martingale" -----------------------+
input group "Martingale";
input bool bInitMartinE=false;            // enable Martingale
input int MaxMartinLotMultiplierStepsE=5; // maximum number of Martingale steps

//+----------------- group "Additional Entry" -----------------------+
input group "Repurchase";
input bool bInitRepurchaseE=false;      // enable additional entries (averaging)
input double MinPercenPriceStepE=0.25;  // first price step for additional entries (%)
input double NextStepMultiplierE=1.5;   // additional entry step multiplier

//+----------------- group "Other" -----------------------+
input group "Other";
sinput int MagicE = 15464;              // magic number
input int SLE=0;                        // stop loss in points
input int TPE=0;                        // take profit in points
input double ComissionPerLotE=0.0;      // commission per lot
input const int SpreadEE=5000;          // maximum spread in points
sinput string CommentI="Simple Template"; // order comment

//+----------------- group "Fighting the Obsolescence of Settings" -----------------------+
input group "Fighting The Obsolescence Of Settings";
sinput uint DaysToFuture=365;           // days ahead for opening positions

//+----------------- group "Direction Variables" -----------------------+
input group "Direction Variables";
input bool TBE=true;                    // allow BUY
input bool TSE=true;                    // allow SELL

//+----------------- group "Strategy Variables" -----------------------+
input group "Strategy Variables";
input int BarsChainForOpenE = 5;        // consecutive bars for opening
input int BarsChainForCloseE = 5;       // consecutive bars for closing
The DaysToFuture parameter limits how many days ahead of the current date new positions may be opened — this protects against settings becoming “stale” during long-running operation of the EA. Meanwhile, existing positions are still allowed to be closed. By default, this parameter is set to "365" days and is counted from the predefined __DATETIME__ value, which is automatically inserted into the compiled source code and contains the date at the time of compilation (this is done for simplicity, but you can change it).
Initialization, Deinitialization, and the Main Loop
We have already partly touched on the initialization and loop section above, but that is not quite the kind of initialization we will discuss here. Event handlers themselves — especially OnInit() — do not handle computationally intensive operations well and, frankly, were not designed for them. They can be used to perform some preliminary processing, cleanup, or something similar. That is precisely why it is better to implement full-fledged Init() and DeInit() methods, which will mitigate the shortcomings of the basic event handlers.
The Init() sequence:
It is important not to confuse this method with OnInit(). The latter is a required event handler present in every EA or indicator. You should not perform computationally intensive calculations there if they take more than 2 seconds, because this may lead to an initialization error. To avoid this kind of error, a similar method was created that runs once on the first tick or timer event and is not subject to such limitations.
- Delete the old interface: DeleteSimpleInterface
- Create a chart object: CreateChart
- Create an EA object: CreateInstance
- Build the interface: CreateSimpleInterface
- Update the status: UpdateStatus
Here we see a specific sequence that ensures the EA restarts correctly even if it did not shut down properly during the previous session. Following this order is critical for correctly linking objects to one another and preventing memory access errors. DeInit() is much simpler: it simply frees dynamic memory by deleting Chart and BotInstance, and also clears the chart of our EA's graphical objects.
//+------------------------------------------------------------------+
//| System initialization — creates all objects                      |
//| Called once on the first timer/tick event                        |
//+------------------------------------------------------------------+
void Init()
   {
   DeleteSimpleInterface();            // Remove any old interface objects, if any

   CreateChart();                      // Create a virtual chart using OHLC arrays
   CreateInstance();                   // Create a single bot instance

   CreateSimpleInterface();            // Build an info panel on the chart
   UpdateStatus();                     // Populate the panel with initial values
   }

//+------------------------------------------------------------------+
//| System deinitialization — frees all resources                    |
//+------------------------------------------------------------------+
void DeInit()
   {
   DeleteSimpleInterface();            // Remove all interface objects from the chart
   delete ChartO;                      // Free memory used by the Chart object
   delete BotO;                        // Free bot instance memory
   }
Initialization is deliberately kept lightweight, because I felt it would be better to separate the logic for preparing the internal state of objects from the logic for dynamic state maintenance; therefore, we only create new objects, populate their most essential fields, assign array sizes, and so on. This is the bare minimum — a kind of preliminary step. In such a simple template, this may not be all that critical, but when we encounter more complex templates in the following articles, it will become important. Any missing data, such as bars and ticks, will be loaded later, after initialization is complete and BotTick() has started running, but as part of a separate process.
In this regard, it is worth mentioning the function for ongoing dynamic state maintenance — BotTick(). It is called from the Simulated() function on every tick and determines whether to execute the trading logic, calculate missing values, or do both. Objects of the Chart class have a similar function
Order of checks in BotTick():
In fact, this method offers a solution for two situations. The first situation occurs if we detected a new bar within the first 20 seconds after it opened. This situation is usually the most common. This happens when an EA has been running on a chart for a sufficiently long time, but exceptional situations are also possible. For example, we have just launched the EA, but are currently in the middle of a bar. The second scenario is specifically designed to handle such cases:
- chart data readiness and the trading session,
- detecting a new bar (START — within the first 20 seconds, LATE — after that),
- starting the logic immediately in START mode or with a 20-second delay in LATE mode.
This protective logic allows the EA to correctly handle quiet market conditions and high volatility. This is critically important: in live trading, ticks arrive irregularly, and without such a mechanism, the EA could miss the moment when a new bar opens.
The START/LATE mechanism addresses a typical live trading problem: ticks may arrive with a delay. For example, on illiquid symbols or during periods of low activity, a tick may arrive a minute after a new bar opens. Without LATE mode, the EA would execute the logic once upon detecting a new bar and would not return to it again. In LATE mode, an attempt to execute the logic is repeated every 20 seconds until the next bar appears. This ensures that trading signals will not be missed even when ticks are infrequent.
//+--------------------------------------------------------------+
//| Virtual robot tick processing                                |
//| Main trading logic function, called on every tick            |
//| Detects new bars and triggers trading algorithms             |
//+--------------------------------------------------------------+
void BotTick()
   {
   // Check data readiness and the trading session
   if ( ChartO.lastcopied >= Chart::TCN+1 && ChartO.ChartPoint > 0.0 && BotO.bInTradeSession() )
      {
      BotO.bNewBarV=BotO.bNewBar();                // Determine whether a new bar has appeared
      }
   else BotO.bNewBarV=false;                       // If the data is not ready, there is no new bar

   datetime tc=TimeCurrent();                      // Current server time used to check the conditions for executing the trading logic

   // Check the conditions for executing the trading logic
   // Either a new bar (START mode) or 20 seconds have elapsed (LATE mode)
   if ( (BotO.NewBarType == "START" && BotO.bNewBarV) || (BotO.NewBarType == "LATE" && tc - BotO.PreviousLateTick >= 20))
      {
      BotO.PreviousLateTick=tc;                    // Update the last tick time

      // Recalculate trading parameters only if the time has changed
      if (BotO.PreviousTimeCalc != ChartO.TimeI[1])
         {
         BotO.CalculateForTrade();                 // Calculate trading signals and parameters
         BotO.PreviousTimeCalc=ChartO.TimeI[1];    // Store the calculation time
         }

      BotO.bOpened=BotO.Opened();                  // Check for open positions

      if (!BotO.bOpened) BotO.InstanceTick(true);  // Initial processing for closing positions
      BotO.InstanceTick(false);                    // Second processing pass for opening positions
      }
   }
The call to CalculateForTrade() is the only place where you insert your strategy. Everything else in BotTick() is part of the template infrastructure: checking the session, detecting a new bar, and managing the order of opening and closing positions. The Chart class also has a similar dynamic state maintenance method called ChartTick(), and readers are encouraged to explore it on their own.
Trading Logic: Signal and Entry/Exit
Your entire trading strategy in this template boils down to managing two key variables that determine the Expert Advisor's actions on each new bar. The first is responsible for opening new positions, and the second is responsible for closing them. At any given moment, any trading action can be divided into closing positions, opening new ones, or simply waiting if we have no clear signal. That is the approach I took. With the right approach to trading, that is all you need. Everything else is just an extension of the core logic, such as Martingale or something even more interesting.
- TradeDirection — entry signal: 1 (buy), 2 (sell), 0 (no signal)
- TradeDirectionClose — exit signal: 1 (close sell positions), 2 (close buy positions), 0 (do not close)
These values are calculated in the CalculateForTrade() method, and the Trade() and TradeClose() functions automatically convert them into actual trading operations. As an example, the template implements a very simple counter-trend logic written in accordance with our paradigm for working with the template. We will look at this example later.
The diagram below shows how we go from BotTick() to calculating the signal and then to opening or closing positions. After checking for a new bar, CalculateForTrade() is called; the result is stored in TradeDirection and TradeDirectionClose; if there are open positions, closing is performed first; otherwise, new positions are opened.
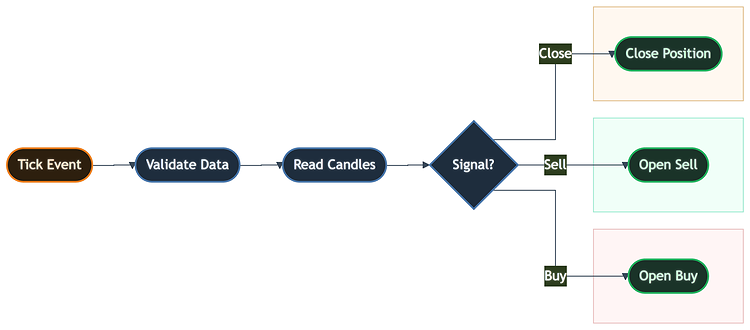
Fig. 2. From BotTick to Closing or Opening
This logic is just an example and, of course, is not mandatory, but I personally found this structure quite convenient. However, you are free to rewrite everything to suit your needs. Now let's take a look at the complete implementation of CalculateForTrade().
CalculateForTrade() logic:
This logic is based on a simple sequence of consecutive bullish or bearish bars. For example, if we have several bullish bars, we sell (short); for bearish bars, the reverse applies (long). At the same time, the number of consecutive bars of the same type can be configured differently; these settings are exposed in the inputs. I think this example will be more than enough for the article.
- Determine the direction of the last closed bar "1" (bullish or bearish);
- In a loop, check that the previous bars go in the same direction;
- If BarsChainForOpen consecutive bars have formed, this is a signal to open a position in the opposite direction;
- Similarly, BarsChainForClose is a signal to close;
- The logic is completely symmetrical for both the bullish and bearish chains.
Now let's take a look at what an example of our strategy looks like in code:
//+------------------------------------------------------------------+
//| Calculate trade signals — YOUR STRATEGY GOES HERE                |
//| Sets TradeDirection (open) and TradeDirectionClose (close)       |
//| Example: counter-trend strategy based on consecutive bars        |
//+------------------------------------------------------------------+
void CalculateForTrade()
   {
   // Determine the direction of the last closed bar [1]
   int firstTradeDirection = 0;
   if ( ChartO.OpenI[1] > ChartO.CloseI[1] ) firstTradeDirection = 1; // Bearish bar
   if ( ChartO.CloseI[1] > ChartO.OpenI[1] ) firstTradeDirection = 2; // Bullish bar

   bool Aborted=false;                 // Flag: chain broken by opposite bar
   if (firstTradeDirection == 1)       // --- Bearish chain detected ---
      {
      // --- start of important block ---
      // Check that all previous bars are also bearish (for open signal)
      for ( int i=2; i<=BarsChainForOpen; i++ )
         {
         if (ChartO.OpenI[i] <= ChartO.CloseI[i]) { Aborted=true; break; }
         }
      if ( !Aborted ) TradeDirection = 1; // Open LONG (counter-trend to bearish chain)
      else TradeDirection = 0;

      Aborted=false;
      // Check chain for close signal
      for ( int i=2; i<=BarsChainForClose; i++ )
         {
         if (ChartO.OpenI[i] <= ChartO.CloseI[i]) { Aborted=true; break; }
         }
      if ( !Aborted ) TradeDirectionClose = 1; // Close SHORT positions
      else TradeDirectionClose = 0;
      // --- end of important block ---
      }
   else if (firstTradeDirection == 2)  // --- Bullish chain detected ---
      {
      // --- start of important block ---
      for ( int i=2; i<=BarsChainForOpen; i++ )
         {
         if (ChartO.CloseI[i] <= ChartO.OpenI[i]) { Aborted=true; break; }
         }
      if ( !Aborted ) TradeDirection = 2; // Open SHORT (counter-trend to a bullish chain)
      else TradeDirection = 0;

      Aborted=false;
      for ( int i=2; i<=BarsChainForClose; i++ )
         {
         if (ChartO.CloseI[i] <= ChartO.OpenI[i]) { Aborted=true; break; }
         }
      if ( !Aborted ) TradeDirectionClose = 2; // Close LONG positions
      else TradeDirectionClose = 0;
      // --- end of important block ---
      }
   else
      {
      TradeDirection = 0;              // No signal — doji or insufficient data
      TradeDirectionClose = 0;
      }
   }
This is where your strategy goes. You can replace the body of CalculateForTrade() with any logic — indicators, levels, patterns, machine learning — and the interface to the template remains the same (TradeDirection and TradeDirectionClose). The Trade() and TradeClose() methods simply translate these signals into calls to trading functions.
Why this particular interface? The point is that the template must be universal: it has to work with any strategy, from simple patterns to complex algorithms. If we had hard-coded the entry logic into the template, we would have had to rewrite all the code for each new strategy. Instead, we separated out two values: the opening direction and the closing direction. Everything else — lot size calculation, spread checking, order submission, and risk management — remains unchanged.
In practice, this means you can take any ready-made strategy from a forum or a book, rewrite its logic in CalculateForTrade(), and immediately get a full-fledged EA with automatic lot sizing, additional entries, and a user interface. You do not need to understand the intricacies of working with positions, write code to calculate lot size based on the deposit, or think about how to close positions correctly when adding to a position. All of this is already included in the template. The Trade() and TradeClose() methods are simple translators that convert signals into actions.
Mapping between signals and actions:
As mentioned earlier, your entire strategy in the template boils down to setting two integer variables: TradeDirection (1 — buy, 2 — sell, 0 — no signal to open a position) and TradeDirectionClose (1 — close sell positions, 2 — close buy positions, 0 — do not close). In the code, it looks like this:
- TradeDirectionClose = 1 → CloseSellF() (close all SELL positions)
- TradeDirectionClose = 2 → CloseBuyF() (close all BUY positions)
- TradeDirection = 1 → BuyF()
- TradeDirection = 2 → SellF()
This division of roles clearly separates the EA's analytical part from its execution framework. Also note the DaysToFuture check in Trade() — it protects against trading with outdated settings after the EA has been running for a long time:
//+------------------------------------------------------------------+
//| Execute close logic based on the TradeDirectionClose signal      |
//+------------------------------------------------------------------+
void TradeClose()
   {
   if (TradeDirectionClose==1) CloseSellF();        // Signal 1 = close SELL positions
   else if (TradeDirectionClose==2) CloseBuyF();    // Signal 2 = close BUY positions
   }

//+------------------------------------------------------------------+
//| Execute open logic based on the TradeDirection signal            |
//| DaysToFuture limits how long after optimization we can trade     |
//+------------------------------------------------------------------+
void Trade()
   {
   if (TradeDirection==1 && Days() <= DaysToFuture) BuyF();      // Signal 1 = open BUY
   else if (TradeDirection==2 && Days() <= DaysToFuture) SellF(); // Signal 2 = open SELL
   }
The condition `Days() <= DaysToFuture` in `Trade()` limits the opening of positions by time. This protects against settings becoming "outdated": if more than DaysToFuture days have passed since optimization, no new positions are opened. In practice, this prevents trading based on parameters that have long since become obsolete.
Why is this necessary? Imagine this scenario: you optimized your strategy on historical data for the past year, obtained excellent parameters, and launched the EA on a live account. Half a year has passed, the market has changed, the strategy is no longer working, but the EA continues to open positions based on the old parameters. DaysToFuture solves this problem: after a specified number of days, trading automatically stops, and you are forced to review your settings or re-optimize your strategy.
The Days() function counts the number of days since the EA was compiled. It's important to understand that if you recompile the EA, the count starts over. Therefore, it makes sense to set DaysToFuture with a margin — for example, "365" days — so you do not have to recompile every month. But if you want to limit trading to a shorter period (for example, three months), set it to "90" days.
Automatic Lot Sizing and Risk Management
The template supports a fixed lot size and an automatic lot calculation mode based on the account balance. In the latter case, the current balance is not used; instead, the maximum balance over the analyzed period is used — this way, we tie the position size to the account's "peak" and limit drawdown. The maximum balance is recalculated in the UpdateMaxBalance() function before each position opening.
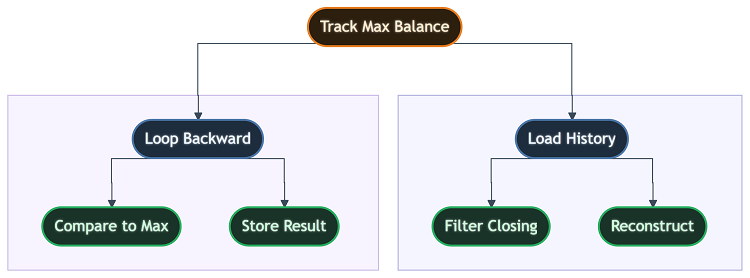
Fig. 3. Iterating Through Deal History and Updating the Maximum Balance
Let's take a look at the complete implementation of UpdateMaxBalance().
The UpdateMaxBalance() algorithm:
Sometimes you may encounter situations — for example, when you have withdrawn a certain amount from your account balance, or after realizing fairly painful losses on positions that had been open for a very long time. In this case, your balance will change, which means that the automatically calculated lot size for new positions will be reduced. To avoid worrying about this, we need to restore the previous balance level from before it dropped and perform all risk calculations relative to that level. This approach will, of course, increase your risks for a relatively short period of time, but it will allow you to comfortably withdraw a reasonable amount of profit from your trading account without adjusting the risk settings. At some point, the current balance will recover.
- Load the deal history for the last HistoryDaysLoadI days;
- iterate from newest to oldest;
- consider only closing deals (DEAL_ENTRY_OUT) with our magic number;
- for each deal, subtract the profit from the current balance, reconstructing the balance at that point in time;
- if the reconstructed balance is higher than LastMaxBalance, update it;
- anomaly protection: if the value exceeds the current value by more than 20%, cap it at 120% of the current value.
Overall, this mechanism is not mandatory, but it has certain advantages that become apparent when calculating automatic lot sizing. Very few people are aware of the reverse Martingale effect. This effect reduces the profit factor of every single strategy without exception. This happens because as profits grow, the lot size increases as well (a reverse Martingale condition), and when we incur losses, we reduce the lot size, which is also reverse Martingale logic.
As a result, we reduce drawdown in this way, but at the same time we also lower the profit factor. This effect will not be noticeable in overfitted trading systems, but you will easily see it in systems with realistic risks and trading metrics. Nevertheless, this effect can be compensated for by using the last maximum balance we had. Let's reconstruct it using the trading history:
//+-----------------------------------------------------------------------------+
//| Update maximum balance from deal history                                    |
//| Walk through closed deals from newest to oldest, reconstructing the balance |
//| at each point to find the historical maximum                                |
//+-----------------------------------------------------------------------------+
void UpdateMaxBalance()
   {
   double TempSummDelta=0.0;         // Cumulative profit delta for balance reconstruction
   datetime LastTimeBorderTemp=LastTimeBorder; // Temporary boundary for already-processed deals

   // Load deal history for the configured period
   HistorySelect(TimeCurrent()-HistoryDaysLoadI*86400,TimeCurrent());

   // Walk deals from newest to oldest
   for ( int i=HistoryDealsTotal()-1; i>=0; i-- )
      {
      ulong ticket=HistoryDealGetTicket(i);

      // Only consider closing deals with our magic number
      if ( HistoryDealGetInteger(ticket,DEAL_ENTRY) == DEAL_ENTRY_OUT && bOurMagic(HistoryDealGetInteger(ticket,DEAL_MAGIC)) )
         {
         datetime DealTime = datetime(HistoryDealGetInteger(ticket,DEAL_TIME));

         if (DealTime >= LastTimeChecked && DealTime >= LastTimeBorder )
            {
            // Subtract the deal profit to reconstruct the balance at that moment
            TempSummDelta-=HistoryDealGetDouble(ticket,DEAL_PROFIT);
            double AB = AccountInfoDouble(ACCOUNT_BALANCE);
            double ConstructedBalance = TempSummDelta + AB;

            // --- start of important block ---
            // Update the maximum if the reconstructed balance is higher
            if (ConstructedBalance > LastMaxBalance)
               LastMaxBalance=ConstructedBalance;
            // --- end of important block ---

            // Safety: cap at 120% of the current balance to prevent anomalies
            if (AB > 0.0 && ConstructedBalance > AB && (ConstructedBalance - AB) / AB > 0.2 )
               {
               LastMaxBalance = AB * 1.2;
               break;
               }
            if (DealTime > LastTimeBorderTemp) LastTimeBorderTemp=DealTime;
            }
         else break;                       // Reached already-processed deals
         }
      }

   // If no maximum balance has been found yet, use the current balance as the starting point
   if (LastMaxBalance == 0) LastMaxBalance=AccountInfoDouble(ACCOUNT_BALANCE);
   LastTimeBorder=LastTimeBorderTemp;
   }
This mechanism offers an important advantage: the position size is tied to the account's maximum balance, not to the current balance. During a drawdown, the lot size does not decrease (it is calculated from the maximum balance), which helps offset losses during recovery. Anomaly protection (20%) prevents situations where, due to an error in historical data, the lot size skyrockets to unrealistic values.
Why the maximum balance, rather than the current balance? Imagine this scenario: you had a balance of $10,000, and you opened a position with a lot size calculated from that balance. The position went into loss, and the balance dropped to $8,000. If the lot size were calculated from the current balance, the next position would be 20% smaller — and it would take longer for the balance to recover. When calculated from the maximum balance, the lot size remains the same, and when the price returns, the balance recovers more quickly.
Anomaly protection (a cap at 120% of the current balance) is needed in case of errors in the deal history or incorrect data from the broker. Without this protection, a situation is theoretically possible where the recovered balance is several times greater than the current balance — and the lot size skyrockets to unrealistic values. Checking for a 20% deviation prevents such cases.
Chain leading to opening a position:
First, a general signal is received to open or close a position according to our strategy. This signal only indicates the direction in which our algorithm considers the price more likely to move. After that, we must calculate the entry volume based on our risk, then check whether there are enough funds in the account to execute the operation, and also comply with the spread limits.
- Checking the spread,
- choosing a fixed lot size or auto lot (for auto lot: UpdateMaxBalance() and calculation),
- optionally, Martingale,
- lot size adjustment (normalization),
- checking available funds,
- submitting an order.
The figure below shows an analogy for this process in the form of a simple chain:

Fig. 4. Chain from the opening request to Buy/Sell
I am also including a code snippet that performs these preparatory operations. This is an excerpt from the corresponding method, which then sends the ready trade requests for opening new orders to the server. Requests are executed only after the entire preceding chain has been completed successfully:
//+------------------------------------------------------------------+
//| Lot calculation inside CheckForOpen (after spread check)         |
//+------------------------------------------------------------------+
if ( bLotControl0 == false )
   {
   LotTemp=Lot0;                           // Use fixed lot size from input
   }
else if ( bLotControl0 == true )
   {
   UpdateMaxBalance();                     // Refresh max balance from deal history
   LotTemp=Lot0*(LastMaxBalance/DepositE); // Lot proportional to max balance / deposit
   }
if (bInitMartinE)
   {
   LotTemp=CalcMartinLot(LotTemp);         // Apply Martingale lot amplification
   }

LotAntiError=GetLotAniError(LotTemp);      // Normalize lot size to the symbol step
// Send the order only if the lot size is valid and margin is sufficient
if ( OrdType == OP_SELL && LotAntiError > 0.0 && CheckMoneyForTrade(ChartO.CurrentSymbol,LotAntiError,ORDER_TYPE_SELL) )
   {
   bool rez = m_trade.Sell(LotAntiError, ...);
   }
This is just one example of how to use such combined chains for preliminary preparation for trading. You do not have to implement them exactly as I did. The main thing is to understand the logic, purpose, and sequence of these actions. First, the spread or other costs are checked. If the spread exceeds the limit, there is no point in continuing down the chain. If the spread is within the normal range, you need to calculate the preliminary entry volume.
It is worth noting here that, depending on the calculation method used, the resulting lot size may be larger than the maximum or smaller than the minimum. This range is limited for each trading instrument. In addition, basic normalization to the lot step for this trading instrument may be required.
We normalize to the lot step in any case, but if the lot size falls outside the acceptable range, you will need to decide whether to open a position with a larger or smaller allowed volume. I always open the position — we take whatever the system allows.
Additional Entries, Martingale, and Waiting Out Losses
The template optionally implements three mechanisms: “additional entry,” “Martingale,” and the “waiting out losses” mode (“loss linearization” — my own informal name for the algorithm that holds losing positions for a specified time without closing them by stop-loss). Let’s start with the algorithm for adding to a position. The implementation of this logic is handled by the predicate `AdditionalOpenPrice(double CurrentPrice, bool bDirection)`. The predicate indicates whether an additional position can be opened in the same direction.
Logic of AdditionalOpenPrice:
This predicate indicates that the price has pulled back far enough from the previous additional buy/sell entry, according to the price step settings. The step size can be fixed (as a percentage of the price of the last additional entry) or can increase or decrease (see the template's input variables). The check is performed only if an entry signal is received from our main logic, which indicates the possibility of opening a position in a specific direction.
- For buys, the lowest opening price among BUY positions is searched for; for sells, the highest among SELL positions is searched for.
- An additional entry is allowed if the price has moved one step away from the extreme price (see the formula below).
- In netting account mode, additional entries are disabled when positions are already open.
This mechanism makes it possible to configure the additional-entry algorithm more flexibly, taking into account the specific characteristics of a particular trading instrument or the current market situation, or to search for such characteristics more thoroughly using the optimizer in the Strategy Tester. Let's look at an example of such an implementation:
//+--------------------------------------------------------------------------+
//| Check if an additional position can be opened (additional-entry system)  |
//| Finds the extreme open price among the current positions, then checks    |
//| if the price has moved enough to warrant another entry                   |
//+--------------------------------------------------------------------------+
bool AddtionalOpenPrice(double CurrentPrice, bool bDirection)
   {
   double BorderPriceBUY = -1.0;       // Lowest open price among BUY positions (-1 = none)
   double BorderPriceSELL = -1.0;      // Highest open price among SELL positions (-1 = none)
   double PriceSymbolASK = SymbolInfoDouble(_Symbol,SYMBOL_ASK);
   double PriceSymbolBID = SymbolInfoDouble(_Symbol,SYMBOL_BID);
   int PositionsBuy=0;                  // Counter of open BUY positions
   int PositionsSell=0;                 // Counter of open SELL positions

   // Scan all positions to find the extreme open price
   for ( int i=0; i<PositionsTotal(); i++ )
      {
      ulong ticket=PositionGetTicket(i);
      if ( PositionSelectByTicket(ticket) && PositionGetInteger(POSITION_MAGIC) == MagicE
      && _Symbol == PositionGetString(POSITION_SYMBOL) )
         {
         double PriceOpen = PositionGetDouble(POSITION_PRICE_OPEN);
         if (PositionGetInteger(POSITION_TYPE) == POSITION_TYPE_BUY)
            { if (BorderPriceBUY == -1.0 || PriceOpen < BorderPriceBUY) BorderPriceBUY = PriceOpen; PositionsBuy++; }
         else if (PositionGetInteger(POSITION_TYPE) == POSITION_TYPE_SELL)
            { if (BorderPriceSELL == -1.0 || PriceOpen > BorderPriceSELL) BorderPriceSELL = PriceOpen; PositionsSell++; }
         }
      }

   // Netting mode: no additional entries if any positions exist
   if (AccountInfoInteger(ACCOUNT_MARGIN_MODE) == ACCOUNT_MARGIN_MODE_RETAIL_NETTING && (PositionsBuy > 0 || PositionsSell > 0)) return false;

   // Check if the price has moved far enough from the extreme price: step = MinPercenPriceStepE * NextStepMultiplier^(N-1)
   if ( bDirection && (BorderPriceBUY == -1.0 || (BorderPriceBUY > PriceSymbolASK && PositionsBuy > 0
   && BorderPriceBUY-PriceSymbolASK >= MathPow(NextStepMultiplierE,double(PositionsBuy-1))*BorderPriceBUY*MinPercenPriceStepE/100.0 )) )
      return true;

   return false;
   }
The basic logic of this process can also be illustrated graphically to aid understanding:
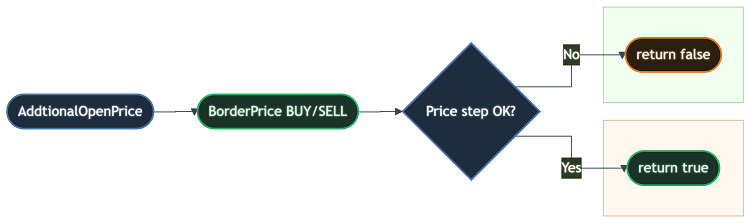
Fig. 5. Checking the price step from the outermost position to allow an additional entry
Additional-entry step formula:
- MathPow(NextStepMultiplierE, N-1) * BorderPrice * MinPercenPriceStepE / 100
A mathematically calculated step between additional entries prevents a snowballing increase in margin requirements during strong unidirectional price movements. If you set N to 1, the step size becomes fixed; conversely, if the number is between 0 and 1, the step size gradually decreases. The opposite situation is also possible, when N ranges from 1 to infinity. In this case, on the contrary, we widen the step with each new additional entry.
For an arithmetic progression:
- the first step is 0.25%;
- the second is 0.5%;
- the third is 0.75%.
Although this approach seems intuitive, it carries hidden risks when the market enters a prolonged sideways phase. Of course, you can also configure it as an arithmetic progression; this is not prohibited. Our approach, on the other hand, is more flexible. For example:
With a geometric progression (multiplier 1.5):
- 0.25%;
- 0.375%;
- 0.5625%;
- 0.84375%.
Using exponential step expansion is a more conservative strategy that significantly increases the “survivability” of the EA. Additional entries occur less frequently, which reduces the risk of overloading the account with positions. Closing additional entries in profit is implemented in CloseToProfit().
The CloseToProfit() algorithm:
- First pass: calculate the total profit for all positions in the direction (including swaps and commissions);
- If the total is positive — second pass: collect the tickets and close all positions at the same time.
This is an important point: when making additional entries, we do not close positions individually, but wait until the total profit from all positions in that direction becomes positive. Why is that? This is because individual positions may be at a loss, but the average entry price may be favorable, and if the price moves in the right direction, all the positions together will generate a profit. Closing positions individually would result in us closing profitable positions while leaving losing ones open — which is inefficient.
//+---------------------------------------------------------------------------------+
//| Close all positions in one direction when the total profit is greater than 0    |
//| Accounts for swaps and commissions in profit calculation                        |
//+---------------------------------------------------------------------------------+
void CloseToProfit(bool bDirection)
   {
   ulong Tickets[];                   // Array of tickets to close
   int TicketsTotal=0;
   double SummProfit=0.0;              // Total profit, including swaps and commissions

   // First pass: Calculate the total profit across all positions in this direction
   for ( int i=0; i<PositionsTotal(); i++ )
      {
      ulong ticket=PositionGetTicket(i);
      if (PositionSelectByTicket(ticket) && PositionGetString(POSITION_SYMBOL) == _Symbol
      && PositionGetInteger(POSITION_MAGIC) == MagicE )
         {
         if ( (bDirection && PositionGetInteger(POSITION_TYPE) == POSITION_TYPE_BUY)
         || (!bDirection && PositionGetInteger(POSITION_TYPE) == POSITION_TYPE_SELL) )
            {
            TicketsTotal++;
            // Net profit = trade profit + swap - commission
            SummProfit += PositionGetDouble(POSITION_PROFIT) + PositionGetDouble(POSITION_SWAP)
                        - PositionGetDouble(POSITION_VOLUME)*ComissionPerLotE;
            }
         }
      }

   // Second pass: If the total profit is positive, collect and close all tickets
   if (SummProfit > 0.0)
      {
      ArrayResize(Tickets,TicketsTotal);
      // ... collect the tickets, then close them all ...
      for ( int i=0; i<ArraySize(Tickets); i++ )
         { if (Tickets[i] != 0) BotO.m_trade.PositionClose(Tickets[i]); }
      }
   }
Our template also uses other methods for grouping positions, thanks to its variety of built-in effects and features. You can combine the modes as you see fit. It is impossible to cover the full range of such variations in a single article due to reasonable limitations on text length; therefore, readers are encouraged to explore this topic on their own.
The CalcMartinLot() algorithm:
This algorithm is none other than the well-known “Martingale” strategy. However, in our case, we use a "safe Martingale" strategy, adapted to account for the versatility of the template. There is no overly aggressive increase in trading volume here; on the contrary, a fairly balanced algorithm is used, which assumes that the primary signal is profitable — that is, that it has positive expectancy. Otherwise, no matter how we use this algorithm, the result will always be the same. To implement this algorithm, I decided to:
- Find the point at which cumulative profit reached its last peak;
- calculate the average loss per lot based on the most recent losing deals (up to MaxMartinLotMultiplierStepsE);
- increase the lot size so as to offset the accumulated loss;
- return the initial volume plus the additional volume.
It is important to understand that we have a certain trading volume with which we would like to open a new position if there have not yet been any losing positions in the series. If that is the case, we open the first position with the base volume; otherwise, we simply add the volume of all previous losing positions to it. Simple, reliable, and no-frills. In addition, aggressive calculation of deal volume requires a mandatory “safeguard” in the form of a maximum number of scaling steps. This increases the lot size after a series of losses. Use with caution and within the specified limits. Lot size calculation has been moved into a single method. All of these operations are performed here:
//+--------------------------------------------------------------+
//| Martingale system lot size calculation                       |
//| Function analyzes deal history and calculates the increased  |
//| lot size to compensate for previous losses                   |
//| Parameters: BasicLot - base lot size                         |
//| Returns: adjusted lot size (double)                          |
//+--------------------------------------------------------------+
double CalcMartinLot(double BasicLot)
   {
   //Martingale lot calculation
   //MaxMartinLotMultiplierStepsE
   bool bFirst=false;                  // flag for the first deal in the analyzed period
   bool bSecond=false;                 // flag for finding the maximum balance in the analyzed period
   double TempSummProfit=0.0;          // cumulative profit total for calculating the maximum balance
   double LastMaxProfit=0.0;           // maximum profit found over the analyzed period
   datetime FirstDate=0;               // date of the first deal in the analyzed period
   HistorySelect(TimeCurrent()-HistoryDaysLoadI*86400,TimeCurrent());
   for ( int i=HistoryDealsTotal()-1; i>=0; i-- )//searching for the last maximum
      {
      ulong ticket=HistoryDealGetTicket(i);
      if ( HistoryDealGetInteger(ticket,DEAL_MAGIC) == MagicE && HistoryDealGetString(ticket,DEAL_SYMBOL) == ChartO.CurrentSymbol
      && HistoryDealGetInteger(ticket,DEAL_ENTRY) == DEAL_ENTRY_OUT )
         {
         if ( HistoryDealGetInteger(ticket,DEAL_TIME) >= OptimizationBorderTime)
            {
            // current deal profit, including commission and swap (inverted for loss calculation)
            double TempProfit=-(HistoryDealGetDouble(ticket,DEAL_PROFIT) + HistoryDealGetDouble(ticket,DEAL_COMMISSION) + HistoryDealGetDouble(ticket,DEAL_SWAP));
            TempSummProfit+=TempProfit;//
            if (!bFirst)
               {
               FirstDate=datetime(HistoryDealGetInteger(ticket,DEAL_TIME)+1);
               bFirst=true;
               }
            if (TempSummProfit > LastMaxProfit)
               {
               LastMaxProfit = TempSummProfit;
               LastMaxBalanceTime=datetime(HistoryDealGetInteger(ticket,DEAL_TIME));
               bSecond=true;
               }
            }
         else break;
         }
      }
   if (!bSecond) LastMaxBalanceTime=FirstDate;
   if (LastMaxBalanceTime > OptimizationBorderTime) OptimizationBorderTime=LastMaxBalanceTime;

   double TempSummLots=0.0;            // total lot size of all losing positions to calculate the average loss per lot
   int summs=0;                        // counter for losing positions found (limited by MaxMartinLotMultiplierStepsE)
   TempSummProfit=0.0;                 // cumulative loss amount to calculate the average loss per lot
   double MiddleProfit=0.0;            // average loss per lot used to calculate the Martingale multiplier
   // Now we need to calculate the total lot size of losing positions

   for ( int i=HistoryDealsTotal()-1; i>=0; i-- )//calculate the average loss per lot across all trades
   {
   ulong ticket=HistoryDealGetTicket(i);
   if ( HistoryDealGetInteger(ticket,DEAL_MAGIC) == MagicE && HistoryDealGetString(ticket,DEAL_SYMBOL) == ChartO.CurrentSymbol
   && HistoryDealGetInteger(ticket,DEAL_ENTRY) == DEAL_ENTRY_OUT )
      {
      if (HistoryDealGetInteger(ticket,DEAL_TIME) < LastMaxBalanceTime) break;//stop if we've reached an already calculated part of the history
      if (summs >= MaxMartinLotMultiplierStepsE) break;//stop if we exceed the allowed number of losses

      // current deal profit, including commission and swap
      double TempProfit=HistoryDealGetDouble(ticket,DEAL_PROFIT) + HistoryDealGetDouble(ticket,DEAL_COMMISSION) + HistoryDealGetDouble(ticket,DEAL_SWAP);
      if (TempProfit < 0 )
         {
         double TempVolume=HistoryDealGetDouble(ticket,DEAL_VOLUME);//determine the current deal volume
         TempSummProfit+=MathAbs(TempProfit/TempVolume);
         summs++;
         }
      }
   }

   // finish calculating the average loss per lot, if there was more than one position
   if (summs>1)
      {
      MiddleProfit = TempSummProfit/summs;
      }
   //

   summs=0;//reset counter
   // Now, using this average loss size, we will assign weights to each losing lot
   for ( int i=HistoryDealsTotal()-1; i>=0; i-- )//Calculate the total lot size of losing positions (taking into account the maximum quantity limit)
      {
      ulong ticket=HistoryDealGetTicket(i);
      if ( HistoryDealGetInteger(ticket,DEAL_MAGIC) == MagicE && HistoryDealGetString(ticket,DEAL_SYMBOL) == ChartO.CurrentSymbol
      && HistoryDealGetInteger(ticket,DEAL_ENTRY) == DEAL_ENTRY_OUT )
         {
         if (HistoryDealGetInteger(ticket,DEAL_TIME) < LastMaxBalanceTime) break;//Stop if we have entered an already calculated part of the historical data
         if (summs >= MaxMartinLotMultiplierStepsE) break;//Stop if we exceed the allowed number of losses

         // current deal profit, including commission and swap
         double TempProfit=HistoryDealGetDouble(ticket,DEAL_PROFIT) + HistoryDealGetDouble(ticket,DEAL_COMMISSION) + HistoryDealGetDouble(ticket,DEAL_SWAP);
         if (TempProfit < 0 )
            {
            double TempVolume=HistoryDealGetDouble(ticket,DEAL_VOLUME); // current deal volume in lots
            if (MiddleProfit > 0.0)
               {
               double Multiplier = MathAbs(TempProfit/TempVolume)/MiddleProfit; // weight multiplier for the current losing deal relative to the average loss per lot
               TempSummLots += TempVolume * Multiplier;
               summs++;
               }
            else
               {
               TempSummLots += TempVolume;
               summs++;
               }
            }
         }
      }

// decision making
return BasicLot + TempSummLots;
}
It is also important to clarify that lot size scaling starts from the previous virtual balance peak. This is not a global peak, but the most recent peak, which allows the Martingale to reset risks in time so as not to overload the deposit. Thus, this peak is periodically reset to protect your deposit. A losing strategy will wipe out your deposit anyway, and I have no desire to give you false hope. It is better if the account wipeout is gradual: maybe some of you will come to your senses in time — that is not impossible either. Miracles do happen.
Closing condition (Linearization mode):
The bInitSitE and MinutesHoldE parameters enable a mode in which a position is not closed on a normal signal if closing it would not result in a profit. Instead, we let the Expert Advisor hold the position for a while in the hope of future profit. If the position becomes profitable before the waiting period expires, we simply close it; if not, we wait until the very end and for a closing signal after the waiting period has expired. We close the position based on a signal from our strategy, rather than simply in a straightforward way, so that even at this stage we can minimize our costs at least a little.- Positive profit — close,
- We've held the position for "MinutesHoldE" minutes — close it.
The time-based position-holding mode gives the strategy "room for error," allowing it to wait out short-term noise against the entry. In addition, this mode is most effective when used in combination with trading exclusively in the direction of positive swap. Many people don't even take these costs into account, let alone consider how to make time work in our favor rather than undermine our strategy's metrics. A simple method is used to determine the point at which to exit waiting mode:
//+--------------------------------------------------------------+
//| Position holding time check function                         |
//| Returns: true if the holding period has expired              |
//+--------------------------------------------------------------+
bool bTimeIsOut(int TimeStart)
   {
   if ( double(int(TimeCurrent()) - TimeStart)/60.0 > double(MinutesHoldE)  ) return true;
   else return false;
   }
We pass the position opening "datetime" to it and calculate how many minutes have passed. If the time exceeds our window, we exit the waiting mode. You can use search to find where this method is used. It is only part of a larger logical expression. There are only two such places: the handler methods for closing long and short positions, which were discussed earlier.
Interface and Testing
As an example, a simple interface with labels for key parameters is created on the chart. The interface consists of the simplest graphical elements: a text label, a rectangle, or a button. The simpler it is, the more reliable it is — and the easier it is for other users to understand. Graphics are a separate topic that can be explored in more detail if desired. I believe that when learning how to work with graphics, there is no need to overcomplicate things; instead, you should focus on the most important aspects of the logic.
Interface elements:
- trading instruments
- timeframes
- magic numbers
- lot sizes
- current unrealized profit
- balance
- additional and supplementary information
This visualization of the operating status makes monitoring the trading account quick and clear. Creating and deleting objects (RectLabelCreate, LabelCreate, and similar functions) — in CreateSimpleInterface() and DeleteSimpleInterface(); UpdateStatus() updates the labels on every tick. This allows you to visually monitor the status of the EA without opening the "Experts" tab.
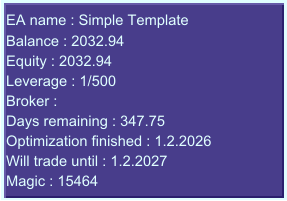
Fig. 6. Screenshot of the EA panel on the chart
Tester mode:
In the Strategy Tester, the template runs tick by tick, while in other cases it runs on a timer. For this reason, I should also point out that this template should be tested in the Strategy Tester in OHLC M1 mode (in MetaTrader 4, this is called "Control points"). This will ensure both ideal testing quality and maximum testing speed. One of the reasons for choosing this approach for this template and all subsequent ones was the desire to ensure that Expert Advisors built on it could be tested in the Strategy Tester and optimized as quickly as possible.- The timer is not created;
- Init() is called on the first tick;
- Simulated() — on each subsequent occurrence.
Adhering to these backtesting rules ensures that the results obtained from backtests will be as close as possible to real trading conditions. Of course, you can test in "Every Tick" or "Real Ticks" modes so that the new-bar logic and trading-session handling work more accurately. You can try it out and see for yourself that the results will show only slight differences — and in some cases, there won't be any at all. Everything is designed for fast performance in the tester or optimizer. All of this is so you don't waste time testing on ticks or with delays, and do not waste effort on pointless work. Now let's look at some examples of testing the template in the various operating modes discussed earlier, using the OHLC M1 mode.
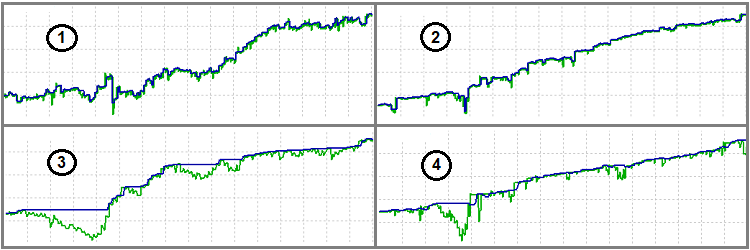
Fig. 7. Results in the Strategy Tester
In the figure, you will see four test modes:
- a bare strategy (our simplest example of a "countertrend" strategy, as described above),
- our strategy, enhanced with "Martingale",
- our strategy, enhanced with "waiting out losses",
- our strategy, enhanced with "additional entries".
I want to point out that the test segment was chosen solely to demonstrate the minimum functionality, just like the simplest countertrend strategy itself — simply to showcase the main capabilities of our template, particularly the additional trading modes listed above. To be honest, I wouldn't call this a full-fledged strategy myself. It is only about 5 percent complete at most, but my goal in this article is not to give you a fish, but rather a fishing rod, so you can learn how to catch one yourself.
Additional Overview
In the main sections, we covered the architecture, trading logic, and key mechanisms. Now let’s dig deeper — we will examine the internal structure of the classes, the complete logic for opening and closing positions, and the supporting functions. This section is for those who want to do more than just use a template — they want to understand every line and customize it to their needs.
Chart Class: Virtual Chart
The Chart class is a wrapper over historical data for a trading symbol–timeframe pair. If you stop to think about how most conventional Expert Advisors (EAs) work, you'll find that, as a rule, they operate on the chart to which the EA is attached. However, we must understand that this working chart also has a timeframe. In other words, we always use a "symbol–timeframe" pair. Those who have worked with MQL4 before know that it was very convenient to retrieve data from the current chart using predefined arrays. This mechanism was expanded and modified in MQL5, requiring us to retrieve chart data ourselves and manage this process.
At first glance, everything seemed to have become more inconvenient. But what's stopping us from creating an intermediate class or method that would control this process while still giving us access to the same arrays containing the chart data? That is a rhetorical question. Yes, it will take a little mental effort, and although that's good for everyone, the result will be immeasurably more valuable. You can maintain several instances of such virtual chart objects within a single EA, trading several symbols at once or multiple timeframes of the same symbol. This turns the chart in MetaTrader from a decision-making center into a simple starting point for trading code. The code itself — not the chart it is attached to — determines which symbols to trade and how. That is precisely what should have been the foundation from the very beginning when designing the architecture of any well-designed EA.
Chart class data:
- association with a symbol and timeframe
- OHLC and time arrays
- symbol parameters (ChartPoint, ChartAsk, ChartBid)
- trading session boundaries for each day of the week (MONDAY_MinuteEquivalentFrom/To, etc.)
- helper methods
Encapsulating arrays, important methods, and other virtual chart markers contributes to cleaner code and helps develop the right approach to designing more complex algorithms, allowing you to focus first and foremost on the overall logic rather than the details, which usually take up most of the time. Let's move on to examining the Chart class contents:
//+------------------------------------------------------------------+
//| Chart class — manages virtual chart data and sessions            |
//+------------------------------------------------------------------+
class Chart
   {
   public:
   // Historical data arrays (indexed as time series: [0] = current, [1] = previous)
   datetime TimeI[];                   // Bar timestamps
   double CloseI[];                    // Close prices
   double OpenI[];                     // Open prices
   double HighI[];                     // High prices
   double LowI[];                      // Low prices

   double ChartPoint;                  // Symbol point size (e.g., 0.00001 for EURUSD)
   double ChartAsk;                    // Current Ask price
   double ChartBid;                    // Current Bid price
   datetime tTimeI[];                  // Helper array for detecting new bars
   static int TCN;                     // Total bars count (shared across instances)

   string CurrentSymbol;               // Symbol name (e.g., "EURUSD")
   ENUM_TIMEFRAMES Timeframe;          // Chart timeframe (e.g., PERIOD_H1)
   int copied;                         // Bars copied in the last CopyTime call
   int lastcopied;                     // Bars copied in the last full OHLC update
   datetime LastCloseTime;             // Timestamp of the last known bar
   MqlTick LastTick;                   // Latest tick data

   // Trading session boundaries (minutes from midnight) for each weekday
   int MONDAY_MinuteEquivalentFrom;    // Start of the Monday session
   int MONDAY_MinuteEquivalentTo;      // End of the Monday session
   // ... TUESDAY through SUNDAY (same pattern) ...
   };
Session boundaries (MONDAY_MinuteEquivalentFrom/To, etc.) are populated via SymbolInfoSessionTrade during initialization. This allows the EA to trade strictly within the symbol's trading hours. The CorrectSeries() function handles the edge case where the start and end of a session are both 0:00 (24-hour trading); in this case, the end is set to 23:59.
Data is updated in ChartTick(), which is called on every tick from Simulated().
ChartTick() steps:
- get the latest tick (SymbolInfoTick);
- check for a new bar (CopyTime, compared with LastCloseTime);
- if the bar has changed, reload all OHLC arrays (CopyClose, CopyOpen, CopyHigh, CopyLow, CopyTime);
- set the arrays to time-series mode (ArraySetAsSeries);
- update the current quotes (ChartBid, ChartAsk, ChartPoint).
Regularly updating internal structures ensures that the algorithm has instant access to the most up-to-date price values on every tick. The data is copied as usual, and then the arrays are switched to time-series mode so that index "0" points to the current bar.
//+------------------------------------------------------------------+
//| ChartTick — updates chart data on every tick                     |
//| Detects new bars and reloads the OHLC history                    |
//+------------------------------------------------------------------+
void ChartTick()
   {
   // Get the latest tick for the current symbol
   SymbolInfoTick(CurrentSymbol,LastTick);

   // Check for a new bar by comparing the bar timestamps
   ArraySetAsSeries(tTimeI,false);
   copied=CopyTime(CurrentSymbol,Timeframe,0,2,tTimeI);
   ArraySetAsSeries(tTimeI,true);

   // If a new bar appears, reload all OHLC data
   if ( copied == 2 && tTimeI[1] > LastCloseTime )
      {
      // Set arrays to their normal order for CopyXXX functions
      ArraySetAsSeries(CloseI,false);
      ArraySetAsSeries(OpenI,false);
      ArraySetAsSeries(HighI,false);
      ArraySetAsSeries(LowI,false);
      ArraySetAsSeries(TimeI,false);

      // Copy the full OHLC history
      lastcopied=CopyClose(CurrentSymbol,Timeframe,0,Chart::TCN+2,CloseI);
      lastcopied=CopyOpen(CurrentSymbol,Timeframe,0,Chart::TCN+2,OpenI);
      lastcopied=CopyHigh(CurrentSymbol,Timeframe,0,Chart::TCN+2,HighI);
      lastcopied=CopyLow(CurrentSymbol,Timeframe,0,Chart::TCN+2,LowI);
      lastcopied=CopyTime(CurrentSymbol,Timeframe,0,Chart::TCN+2,TimeI);

      // Switch back to time series mode: index [0] = current bar
      ArraySetAsSeries(CloseI,true);
      ArraySetAsSeries(OpenI,true);
      ArraySetAsSeries(HighI,true);
      ArraySetAsSeries(LowI,true);
      ArraySetAsSeries(TimeI,true);

      LastCloseTime=tTimeI[1];        // Remember the time of the last known bar
      }

   // Update current quotes
   ChartBid=LastTick.bid; ChartAsk=LastTick.ask;
   ChartPoint=SymbolInfoDouble(CurrentSymbol,SYMBOL_POINT);
   }
Why is `ArraySetAsSeries` called twice? The CopyClose/CopyOpen functions populate the array in chronological order (from oldest to newest), and for ease of use within the strategy, index "0" should point to the current bar (as in indicators). Switching makes this possible without recopying the data — this is a standard pattern in MQL5. I did not include tick volumes in the Chart class, as I believe this information is useless. However, you can easily add the missing arrays in the same way. Among other things, you can store the history of individual ticks.
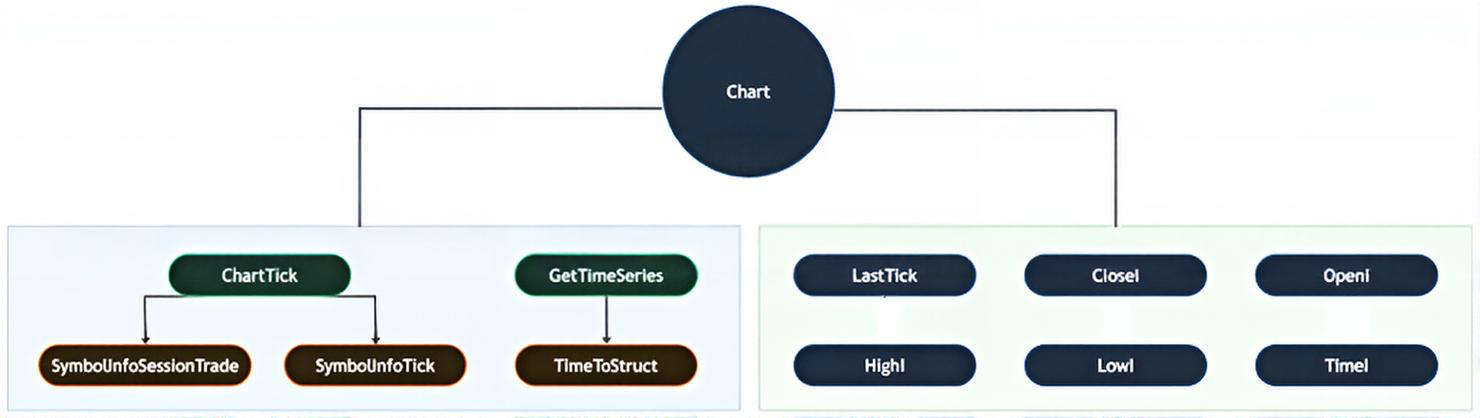
Fig. 8. The Chart Class
The BotInstance Class: The Core of the Expert Advisor
Once you understand the purpose of the previous class, it is much easier to understand its counterpart in the form of this class. In fact, we have moved away from the paradigm of writing code for the current chart to the paradigm of working on the chart selected in our code. In our case, we already use an internal stub: the chart and its timeframe are selected based on data from the chart to which the Expert Advisor is attached. But from a purely mechanical standpoint, we are already using the correct architecture, which can be extended in the following articles.
Thanks to this architecture, all trading code is now concentrated here again. The methods presented here range from fairly simple ones that help with calculations, rounding, and other operations (for example, checking trading sessions and controlling trading in accordance with them) to core trading methods, including the key method "CalculateForTrade()", in which we define the rules of our strategy.
BotInstance components:
- parameters — magic number, spread, allowed directions (bInitBuy, bInitSell)
- trading objects — CPositionInfo and CTrade
- signals — TradeDirection, TradeDirectionClose
- state variables — bOpened, bNewBarV, NewBarType
- helper methods and other variables
Integrating all control parameters within a single class significantly simplifies scaling the system to multi-currency configurations. The constructor initializes the default values and calls `RestartParams()`, which copies the input parameters into the class fields.
//+------------------------------------------------------------------+
//| BotInstance — trading robot core class                           |
//| Contains all trading logic, parameters, and state                |
//+------------------------------------------------------------------+
class BotInstance
   {
   public:
   bool bInitBuy;                      // Allow BUY positions
   bool bInitSell;                     // Allow SELL positions
   int BarsChainForOpen;               // Consecutive bars for an open signal
   int BarsChainForClose;              // Consecutive bars for a close signal
   int SpreadE;                        // Maximum allowed spread for opening
   int MagicF;                         // Expert Advisor (EA) magic number
   int TradeDirection;                 // Open signal: 0=none, 1=buy, 2=sell
   int TradeDirectionClose;            // Close signal: 0=none, 1=close sells, 2=close buys
   bool bOpened;                       // Was the position opened on the current candle?
   CPositionInfo  m_position;          // Standard MQL5 position info object
   CTrade         m_trade;             // Standard MQL5 trade execution object
   bool bNewBarV;                      // New bar detected flag
   string NewBarType;                  // "START" (first 20 seconds) or "LATE" (after 20 seconds)
   datetime PreviousLateTick;          // Last "LATE" mode tick timestamp

   //+------------------------------------------------------------------+
   //| Constructor — sets default values and copies input parameters    |
   //+------------------------------------------------------------------+
   BotInstance()
      {
      bOpened = false;
      SpreadE=SpreadEE;                // Copy the maximum spread from the input
      MagicF=MagicE;                   // Copy the magic number from the input
      RestartParams();                 // Initialize all trading parameters
      }

   //+------------------------------------------------------------------+
   //| RestartParams — copy input parameters to class fields            |
   //+------------------------------------------------------------------+
   void RestartParams()
      {
      bInitBuy = TBE;                  // Allow buys from the input
      bInitSell = TSE;                 // Allow sells from the input
      BarsChainForOpen = BarsChainForOpenE;   // Strategy parameter
      BarsChainForClose = BarsChainForCloseE; // Strategy parameter
      CurrentSymbol=ChartO.CurrentSymbol;
      this.m_trade.SetExpertMagicNumber(MagicF); // Set the magic number for all orders
      }
   };
Why use RestartParams() if the values can simply be copied in the constructor? This is because a mechanism should be provided to restart each virtual trading robot with new parameters without recreating the robot object. In a simple template, this is not critical, but the architecture is designed with room to grow for future articles in this series that describe more complex and feature-rich templates.
Now let's look at bNewBar(), the function for detecting a new bar. It returns true when the bar changes and sets NewBarType to START if the tick arrived within the first 20 seconds of the bar, or to LATE if it arrived later. This is critically important in live trading, where ticks arrive irregularly.
//+------------------------------------------------------------------+
//| Detect a new bar and classify it as START or LATE                |
//| START: tick arrived within the first 20 seconds of a new bar     |
//| LATE: tick arrived after 20 seconds — logic runs every 20 seconds|
//+------------------------------------------------------------------+
bool bNewBar()
   {
   // START mode: new bar AND tick within the first 20 seconds
   if (ChartO.LastTick.time > 0 && ChartO.TimeI[1] > 0 && ChartO.TimeI[1] != Time0
   && ChartO.ChartPoint != 0.0
   && ChartO.LastTick.time - ChartO.TimeI[0] <= 20 && ChartO.LastTick.time - ChartO.TimeI[0] >= 0 )
      {
      NewBarType = "START";             // Execute the logic immediately
      Time0=ChartO.TimeI[1];
      return true;
      }
   // LATE mode: new bar, but after the first 20 seconds
   else if ( ChartO.LastTick.time > 0 && ChartO.TimeI[1] > 0 && ChartO.TimeI[1] != Time0
   && ChartO.ChartPoint != 0.0 )
      {
      NewBarType = "LATE";              // Execute the logic every 20 seconds
      Time0=ChartO.TimeI[1];
      return true;
      }
   else return false;
   }
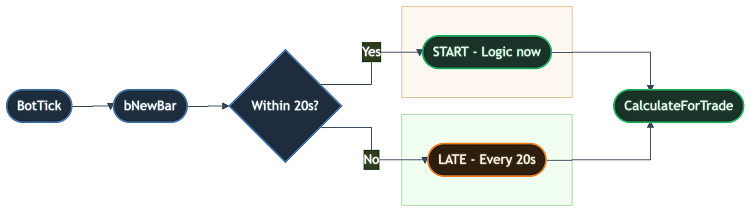
Fig. 9. Detecting a New Bar
Why two modes? In live trading, ticks can arrive a minute after a bar opens on illiquid symbols. Without LATE mode, the trading robot would execute the logic once when detecting a new bar and would not run it again. With LATE mode, a retry is made every 20 seconds until the next bar appears.
Logic for opening long/short positions: BuyF and SellF
BuyF() is a "facade" for opening a buy position. It performs a number of preliminary checks, such as verifying whether our virtual trading robot already has any open positions, and decides whether to perform further checks in nested methods to definitively determine whether a trade request should be sent to the server. Methods for both entering and exiting positions always come in pairs for each direction. In our case, one example of each will be enough for the purposes of this article. You can always check the source code for the other one.
Further checks in BuyF():
- price validity;
- new bar mode (START/LATE);
- duplicate prevention via GlobalVariable;
- account mode (hedging/netting);
- enabling buys (bInitBuy);
- additional entries (AddtionalOpenPrice if there are positions).
Why are there so many checks before opening a position? The fact is that various situations can arise on a live account: ticks may arrive with a delay, prices may be incorrect, the account may be in netting mode (when you cannot open opposing positions), and additional entries may be prohibited by the settings. All of these checks help prevent errors and ensure that an order is sent only when it is truly safe and appropriate to do so.
Special attention should be paid to duplicate prevention via GlobalVariable. This prevents the same tick from being processed multiple times (for example, due to network delays or the terminal's behavior). GlobalVariable stores the time of the last operation for the given magic number, and if not enough time has passed since the last operation, the new operation is blocked. This prevents multiple identical positions from being opened in a row.
//+----------------------------------------------------------------------------+
//| BuyF — open a BUY position with all pre-checks                             |
//| Validates prices, timing, account mode, and additional-entry conditions    |
//+----------------------------------------------------------------------------+
void BuyF()
   {
   double SLTemp0=MathAbs(SLE);        // Absolute stop-loss in points
   double TPTemp0=MathAbs(TPE);        // Absolute take-profit in points

   // Time since the last operation (anti-duplicate protection via GlobalVariable)
   double DtA=double(TimeCurrent())-GlobalVariableGet(GLOBALVARPREFIX+IntegerToString(MagicF));

   // Main guard: valid prices, LATE price filter, anti-duplicate, account mode
   if ( ChartO.LastTick.bid > 0.0 && ChartO.OpenI[0] > 0.0
   && ((NewBarType == "LATE" && ChartO.OpenI[0] >= ChartO.LastTick.bid) || NewBarType == "START")
   && (DtA > 0 || DtA < 0)
   && ((AccountInfoInteger(ACCOUNT_MARGIN_MODE) == ACCOUNT_MARGIN_MODE_RETAIL_HEDGING)
      || (AccountInfoInteger(ACCOUNT_MARGIN_MODE) == ACCOUNT_MARGIN_MODE_RETAIL_NETTING && OrdersS()==0)) )
      {
      // Check: buys allowed AND (no positions OR additional-entry conditions met)
      if (bInitBuy && ( (!bInitRepurchaseE && OrdersG() == 0)
      || (bInitRepurchaseE && OrdersG(true) && AddtionalOpenPrice(ChartO.LastTick.ask,true))) )
         {
         CheckForOpen(MagicF,OP_BUY,ChartO.ChartBid,ChartO.ChartAsk,ChartO.CloseI[0],
                      int(SLTemp0),int(TPTemp0),LotE,ChartO.CurrentSymbol,0,CommentI,
                      bInitLotControl,bInitSpreadControl,SpreadE);
         }
      }
   }
Please note the condition for LATE mode: ChartO.OpenI[0] >= ChartO.LastTick.bid. This is a price filter: in LATE mode, a buy is allowed only if the current price is not higher than the opening price of the current bar. This reduces the risk of entering at an unfavorable price after a significant move.
Why is this filter needed? Imagine this scenario: a new bar opened at 1.1000, but the tick arrived only a minute later, when the price had already risen to 1.1020. Without the filter, the EA would have opened a position at 1.1020, which is 20 points worse than the bar's opening price. With the filter, the buy is blocked, and the EA waits for a more favorable opportunity. For sells, the filter works similarly, but in the opposite direction: a sell is allowed only if the current price is not lower than the bar's opening price.
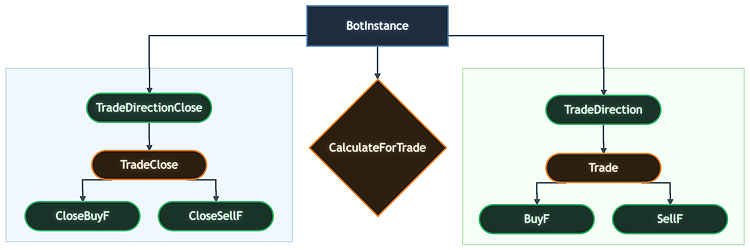
Fig. 10. The BotInstance Class
Logic for closing long/short positions: CloseBuyF and CloseSellF
These methods may look compact at first glance, but they are extremely dense with logic and branches, because several mechanisms intersect here and I have consolidated them into a single processing point. Some closing modes are mutually exclusive, which is exactly why it's all quite confusing. For example, holding positions for an extended period conflicts with the additional entry (averaging) mode. In this case, it is important to understand which mode takes priority over the other to ensure they function properly. Only one of these modes can be active at a time. Their combined use is also possible, but personally I do not see an obvious point in it.
CloseSellF/CloseBuyF mechanisms:
- Standard closing — by stop, take-profit, or signal;
- waiting-out-losses mode (sit) — checking MinutesHoldE before closing;
- additional entries (averaging) — when additional entries are enabled, CloseToProfit is called.
This flexibility in closing mechanisms allows the EA to be adapted to both trend-following and counter-trend scenarios. Without additional entries — all SELL positions are closed with the sit condition checked; with additional entries — CloseToProfit is used. Why are these mechanisms the most complex? The fact is that closing positions is where all risk management mechanisms come together. Standard signal-based closing, closing with additional entries (only when the total profit is positive), and closing in waiting-out-losses mode (only after the time has elapsed or when there is a profit) — all of this must be handled in a single function. If we were to split the logic into several functions, we would have to duplicate the checks and make the code more complex. Instead, we use conditional branches that activate the appropriate mechanism depending on the settings:
//+--------------------------------------------------------------+
//| Function for closing sell positions (SELL)                   |
//| Closes short positions based on strategy conditions          |
//| Takes into account spread settings and holding time          |
//+--------------------------------------------------------------+
void CloseSellF()
   {
   //--- Declaration of local variables
   ulong ticket;                       // stores the ticket ID of the current position being iterated over
   bool ord;                           // flag indicating that the position was successfully selected by ticket
   ulong Tickets[];                    // a dynamic array to store tickets of positions eligible for closing
   int TicketsTotal = 0;               // counter for the total number of positions that meet the closing criteria

   //---+ GLOBAL MARKET CONDITIONS CHECK +-------------------------
   //--- Verify market data validity and strategy entry/exit permissions
   if(ChartO.LastTick.bid > 0.0 &&
      ChartO.OpenI[0] > 0.0 &&
      ((NewBarType == "LATE" && ChartO.LastTick.bid >= ChartO.OpenI[0]) || NewBarType == "START") &&
      (!bInitSpreadControl || (bInitSpreadControl && MarketInfo(ChartO.CurrentSymbol, MODE_SPREAD) <= SpreadCloseE)))
      {
      //---+ LOGIC BRANCH CHECK +-----------------------------------
      //--- Proceed only if additional-entry logic is disabled OR situational logic is enabled
      //--- This prevents conflicting exit strategies during additional-entry phases
      if(!bInitRepurchaseE || bInitSitE)
         {
         //---+ PASS 1: COUNT ELIGIBLE POSITIONS +-----------------
         //--- The first iteration is required to determine the exact array size for ArrayResize()
         //--- This avoids the overhead of memory reallocation during the second pass
         for(int i = 0; i < PositionsTotal(); i++)
            {
            ticket = PositionGetTicket(i);              // Get the ticket of the i-th open position
            ord = PositionSelectByTicket(ticket);       // Select the position to access its properties

            //--- Filter conditions for SELL positions:
            if(ord &&
               PositionGetInteger(POSITION_MAGIC) == MagicF &&
               PositionGetInteger(POSITION_TYPE) == POSITION_TYPE_SELL &&
               PositionGetString(POSITION_SYMBOL) == ChartO.CurrentSymbol &&
               (!bInitSitE ||
                (bInitSitE &&
                 ((PositionGetDouble(POSITION_PROFIT) + PositionGetDouble(POSITION_SWAP) - PositionGetDouble(POSITION_VOLUME) * ComissionPerLotE) > 0.0 ||
                  bTimeIsOut(int(PositionGetInteger(POSITION_TIME)))))))
               {
               //--- Validate that the ticket is non-zero before counting
               if(ticket != 0) TicketsTotal++;
               }
            }

         //---+ PASS 2: COLLECT TICKETS INTO ARRAY +---------------
         //--- Allocate the exact memory size based on the count from Pass 1
         if(TicketsTotal > 0)
            {
            ArrayResize(Tickets, TicketsTotal);         // Resize the array to fit the exact number of positions
            TicketsTotal = 0;                           // Reset the counter to use as an array index

            //--- Second iteration: fill the array with valid tickets
            for(int i = 0; i < PositionsTotal(); i++)
               {
               ticket = PositionGetTicket(i);
               ord = PositionSelectByTicket(ticket);

               //--- Apply the same filtering logic as in Pass 1 to ensure consistency
               if(ord &&
                  PositionGetInteger(POSITION_MAGIC) == MagicF &&
                  PositionGetInteger(POSITION_TYPE) == POSITION_TYPE_SELL &&
                  PositionGetString(POSITION_SYMBOL) == ChartO.CurrentSymbol &&
                  (!bInitSitE ||
                   (bInitSitE &&
                    ((PositionGetDouble(POSITION_PROFIT) + PositionGetDouble(POSITION_SWAP) - PositionGetDouble(POSITION_VOLUME) * ComissionPerLotE) > 0.0 ||
                     bTimeIsOut(int(PositionGetInteger(POSITION_TIME)))))))
                  {
                  if(ticket != 0)
                     {
                     Tickets[TicketsTotal] = ticket;    // store the ticket in the array
                     TicketsTotal++;                    // increment array index
                     }
                  }
               }

            //---+ PASS 3: EXECUTE CLOSE ORDERS +-------------------
            //--- Iterate through the collected tickets and send close requests
            for(int i = 0; i < TicketsTotal; i++)
               {
               //--- Send a market order to close a position by ticket
               //--- m_trade is an instance of the CTrade class
               m_trade.PositionClose(Tickets[i]);
               }
            }
         }
      else
         {
         //---+ FALLBACK LOGIC +-----------------------------------
         //--- If the conditions for situational logic are not met (the "else" branch of the logic check)
         //--- Call the helper function to close positions based only on profit
         //--- Parameter 'false' indicates a specific mode for the CloseToProfit function
         CloseToProfit(false);
         }
      }
   //--- Function ends silently if global market conditions are not met
   }
It is worth noting the sit condition: the position is closed either when profit is positive (including swap and commission) or when MinutesHoldE minutes have elapsed (bTimeIsOut). If "sit" is turned off, the condition is always "true". If additional entries are enabled via bInitRepurchase and sit is not enabled, CloseToProfit is called; it will close all BUY/SELL positions only when the total profit becomes positive. This mechanism is enabled or disabled by the bInitSitE variable and operates independently of any other algorithms.
The waiting-out-losses mode (sit) is a mechanism that allows a losing position to be held for a specified period of time in the hope of a price reversal. Why is this necessary? Sometimes the price temporarily moves against a position, but then reverses and generates a profit. Without sit mode, the position would have closed immediately upon receiving the signal, without waiting for a possible price reversal — even if the price had returned to positive territory an hour later. In sit mode, the position is held for at least MinutesHoldE minutes and is closed only if the profit becomes positive or the time expires. However, the position is not closed immediately when the allotted time elapses, but only after our strategy, implemented in CalculateForTrade(), generates a close signal. This is important because the closing signal gives us additional expectancy.
Conclusion
My goal was not so much to provide bare code or discuss specific trading approaches as to give beginners a professional framework for their future strategies, so they could study and test it. This code is ready for experimentation and study. Although it isn't the gold standard for experienced users, we shouldn't forget about beginners.
The result is ready-to-use working code: all you need to do is implement your own logic in the CalculateForTrade() method and adjust the parameters as needed. This template is a basic building block: in the next articles in the series, it will serve as the basis for examining a multi-timeframe template (one symbol, multiple timeframes) and static diversification (multiple symbols in a single EA). Understanding a simple template will make it easier to advance to new levels.
Essentially, this is already a ready-made EA that incorporates most of the mechanisms you will try in one way or another when building your own trading systems. All that remains is to implement your strategy, and some may even find this simple version appealing. I hope my static template will help you speed up the learning process or the creation of finished products. In any case, this will expand your toolkit for developing your own trading algorithms.
Attached Files
| File | Description |
|---|---|
| Simple Static Template MT5.mq5 | Source code for a MetaTrader 5 template |
| Simple Static Template MT4.mq4 | An equivalent template for those who are still fond of MetaTrader 4 |
Translated from Russian by MetaQuotes Ltd.
Original article: https://www.mql5.com/ru/articles/16672
Warning: All rights to these materials are reserved by MetaQuotes Ltd. Copying or reprinting of these materials in whole or in part is prohibited.
This article was written by a user of the site and reflects their personal views. MetaQuotes Ltd is not responsible for the accuracy of the information presented, nor for any consequences resulting from the use of the solutions, strategies or recommendations described.

 Features of Custom Indicators Creation
 Market Simulation: Unity Is Strength (III)
 Features of Experts Advisors
 Developing a Multi-Currency Expert Advisor (Part 32): Secrets of the Optimization Project Creation Step (II)

- Free trading apps
- Over 8,000 signals for copying
- Economic news for exploring financial markets
You agree to website policy and terms of use