
Creating an MQL5-Telegram Integrated Expert Advisor (Part 1): Sending Messages from MQL5 to Telegram
Introduction
This article will follow the course of integrating Telegram with MetaTrader 5. We intend to achieve this by crafting a custom Expert Advisor (EA) in the MetaQuotes Language 5 (MQL5) programming language. Our main task is to program a trading assistant that operates in real-time and keeps us in the loop via a chat on Telegram. The Telegram bot that we will build will act like an update server, sending us juicy morsels of information that help us make important trading decisions.
To reach this goal, we will go through the process of establishing a Telegram bot and adjusting our EA to communicate with Telegram's Application Programming Interface (API). We will first set up BotFather, a Telegram bot that helps you create new bots and manage your existing ones. Using "BotFather", we will create a new bot and will have the chance to name it. We will also get a vital piece of information—the token—that we will use to identify and gain access to our bot from the Application Programming Interface (API). After that, we will get the chat ID and will use these two items to reach the API and make it work.
Thus, in this article, we will offer a comprehensive coding tutorial. We'll show you how to write and implement an Expert Advisor that will establish a two-way link between MetaTrader 5 and Telegram. We will explain not only the "how" but also the "why," so you will understand the integration's technical and practical aspects. We will also discuss potential errors that may occur during setup and operation, mainly to help you avoid them, but also to ensure you know how to handle them if they happen despite our best efforts at foreseeing and preventing them.
To easily absorb the content in small chunks, we will break down the process into the following subtopics:
- Introduction to MQL5 and Telegram Integration
- Setting up the Telegram Bot
- Configuring MetaTrader 5 for Telegram Communication
- Implementation in MQL5
- Testing the Integration
- Conclusion
By the end of the article, you should have a solid understanding of how to achieve integrated, automated communication between MetaTrader 5 and Telegram, with a working EA as the end product.
Introduction to MQL5 and Telegram Integration
- Overview of the series and objectives:
This series of articles is intended to close the loop between your trading on the MetaTrader 5 platform and your instant communications on the Telegram application. By the end of the series, you will have a working Expert Advisor (EA) in MQL5 that can send and receive messages and even relay images through your trading platform and to your Telegram account. Each part of the series builds on the last, sharpening the EA's functionality and the overall trading system you could use.
- Benefits of integrating Telegram with MQL5:
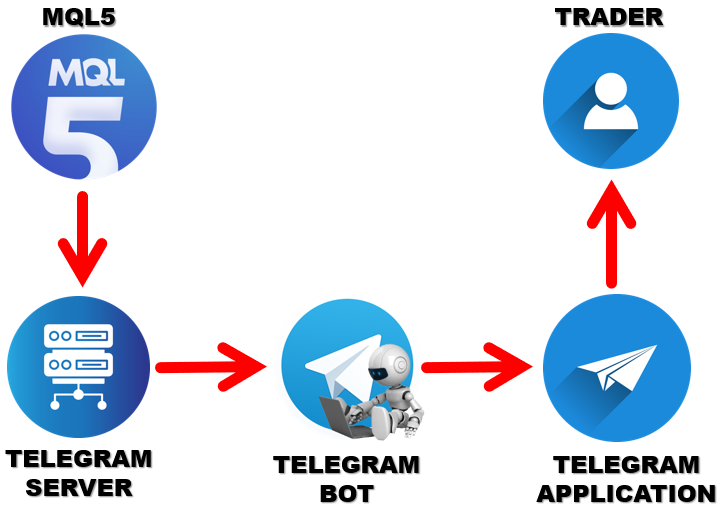
There are several advantages to integrating Telegram with MQL5. To start, it offers the ability to send instant notifications. If you’ve set up an expert advisor to trade with MQL5, you can program it to send you alerts via Telegram. This works nicely because you can configure your trading algorithm in such a way that the only alerts you get are for either an amazing new trading opportunity or an important update regarding an open position. The other major route through which you can communicate with your trading algorithm via Telegram is through the use of a Telegram bot. Bots offer a few distinct advantages when it comes to programming a service to send you alerts and/or allow for the limited but safe and secure communication of trading-sensitive data. Additionally, you can share all sorts of trade-relevant media—like charts or screenshots—working in tandem with the bot to allow your trade algorithms to serve you better. Technically, the bot relays communication between the user and the server. Here is a detailed visualization of the chronological processes:
- Relevance in modern trading:
Today's trading world demands fast adaptability from its players; it is a profit-and-loss issue. Necessarily, we traders have sought ways to automate our strategies—to be in touch with the markets while not being tied to our desks. One of the more recent approaches to achieving this involves the use of MQL5, a powerful programming language, with Telegram, an instant messaging app that can be made to perform almost as a customized trading dashboard. This proxy trading telegram setup covers the necessary bases for inclusion in any telegram that serves to notify the user of relevant happenings for any accounts they might be managing. Whether or not you have a team, Telegram's peer-to-peer update capabilities make the app a legitimate candidate for inclusion in a trader's toolkit.
- Setting the foundation for the series:
Understanding the essential concepts and basic tools of the integration is paramount. We will start with the basics: creating a Telegram bot and configuring MQL5 to send messages through it. This step is fundamental. It allows us to establish a groundwork on which we can build more advanced, more sophisticated, and more useful functionalities in future installments. By the end of Part 1, we will possess a basic but functional system capable of sending text messages from our EA to Telegram. This foundation will not only give you practical skills but also prepare you for the more complex tasks ahead, such as sending images and handling bi-directional communication between MQL5 and Telegram. At the end, we will have the integration as follows:
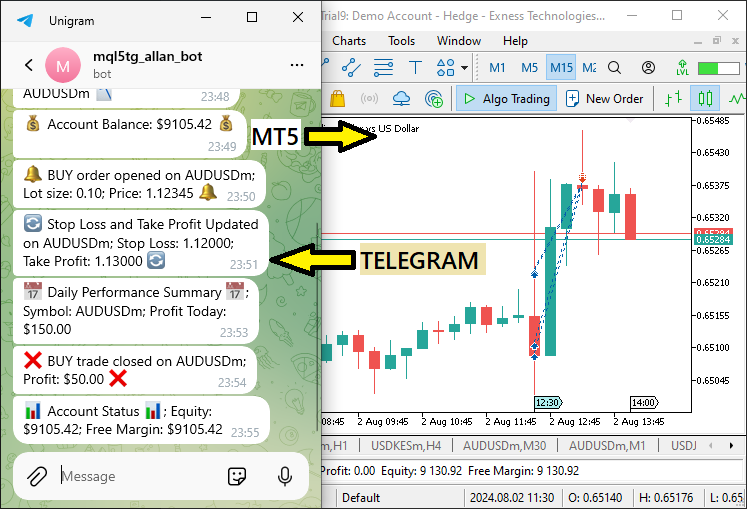
This will serve as the basic foundation for the other parts.
Setting up the Telegram Bot
The first step in connecting Telegram to MetaTrader 5 is to create a Telegram bot. This bot will serve as the intermediary for messages sent to and received from Telegram and MetaTrader 5. Using the BotFather, we will create a new bot, configure it with the necessary permissions, and then obtain the API token that allows for communication with our bot.
To create a bot, you first open the Telegram app and search for "BotFather." This is a special bot that you use to create and manage other bots. As there could be many of them with almost similar names, make sure to key in the wordings as illustrated.
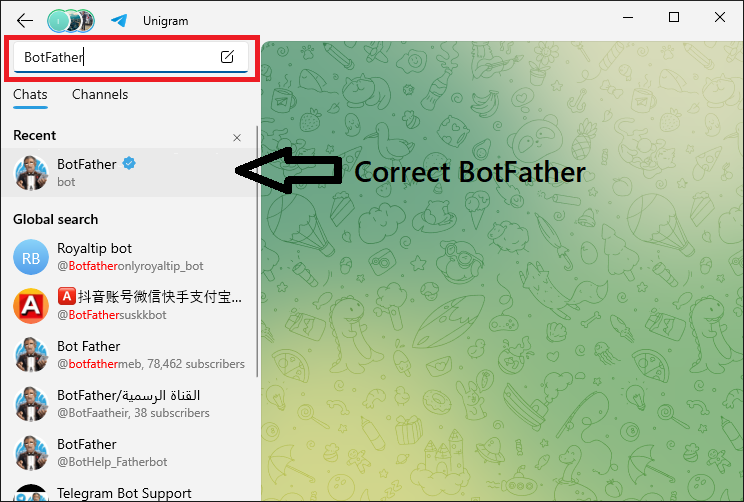
You start a chat with BotFather and use the command "/newbot" to create a new bot. BotFather then prompts you for a name and a username for your bot. After that, you get a unique API token. This is a big deal because it allows your application to authenticate with Telegram's servers and interact with them in a way that the servers know is legitimate. To illustrate the process undertaken, we considered a Graphics Interchange Format (GIF) image visualization as below to ensure that you get the correct steps.
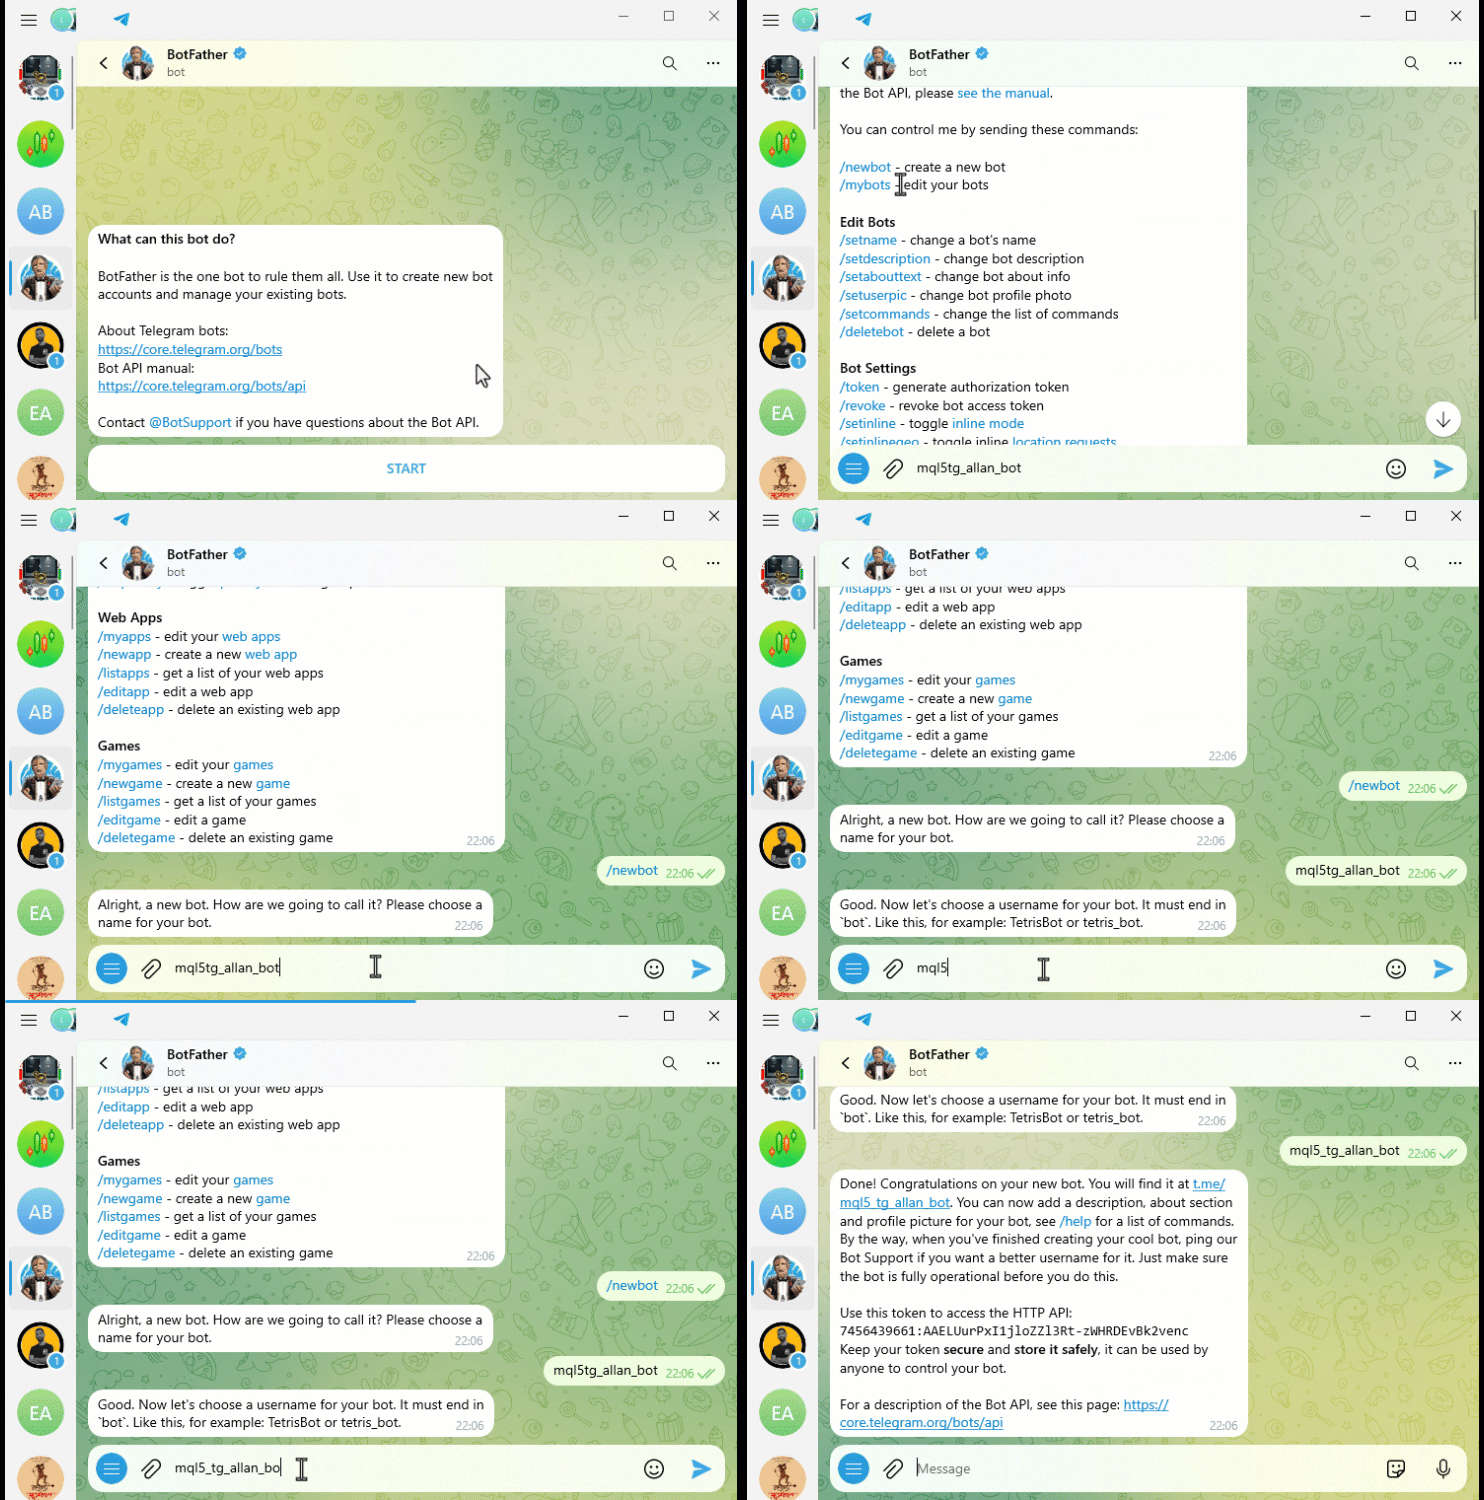
Setting up the bot: After acquiring the API token, we must set up the bot to meet our needs. We can program it to recognize and respond to commands using BotFather's "/setcommands" command. To open the bot, you can either search it using its name or just click on the first link provided by "BotFather" as shown below:
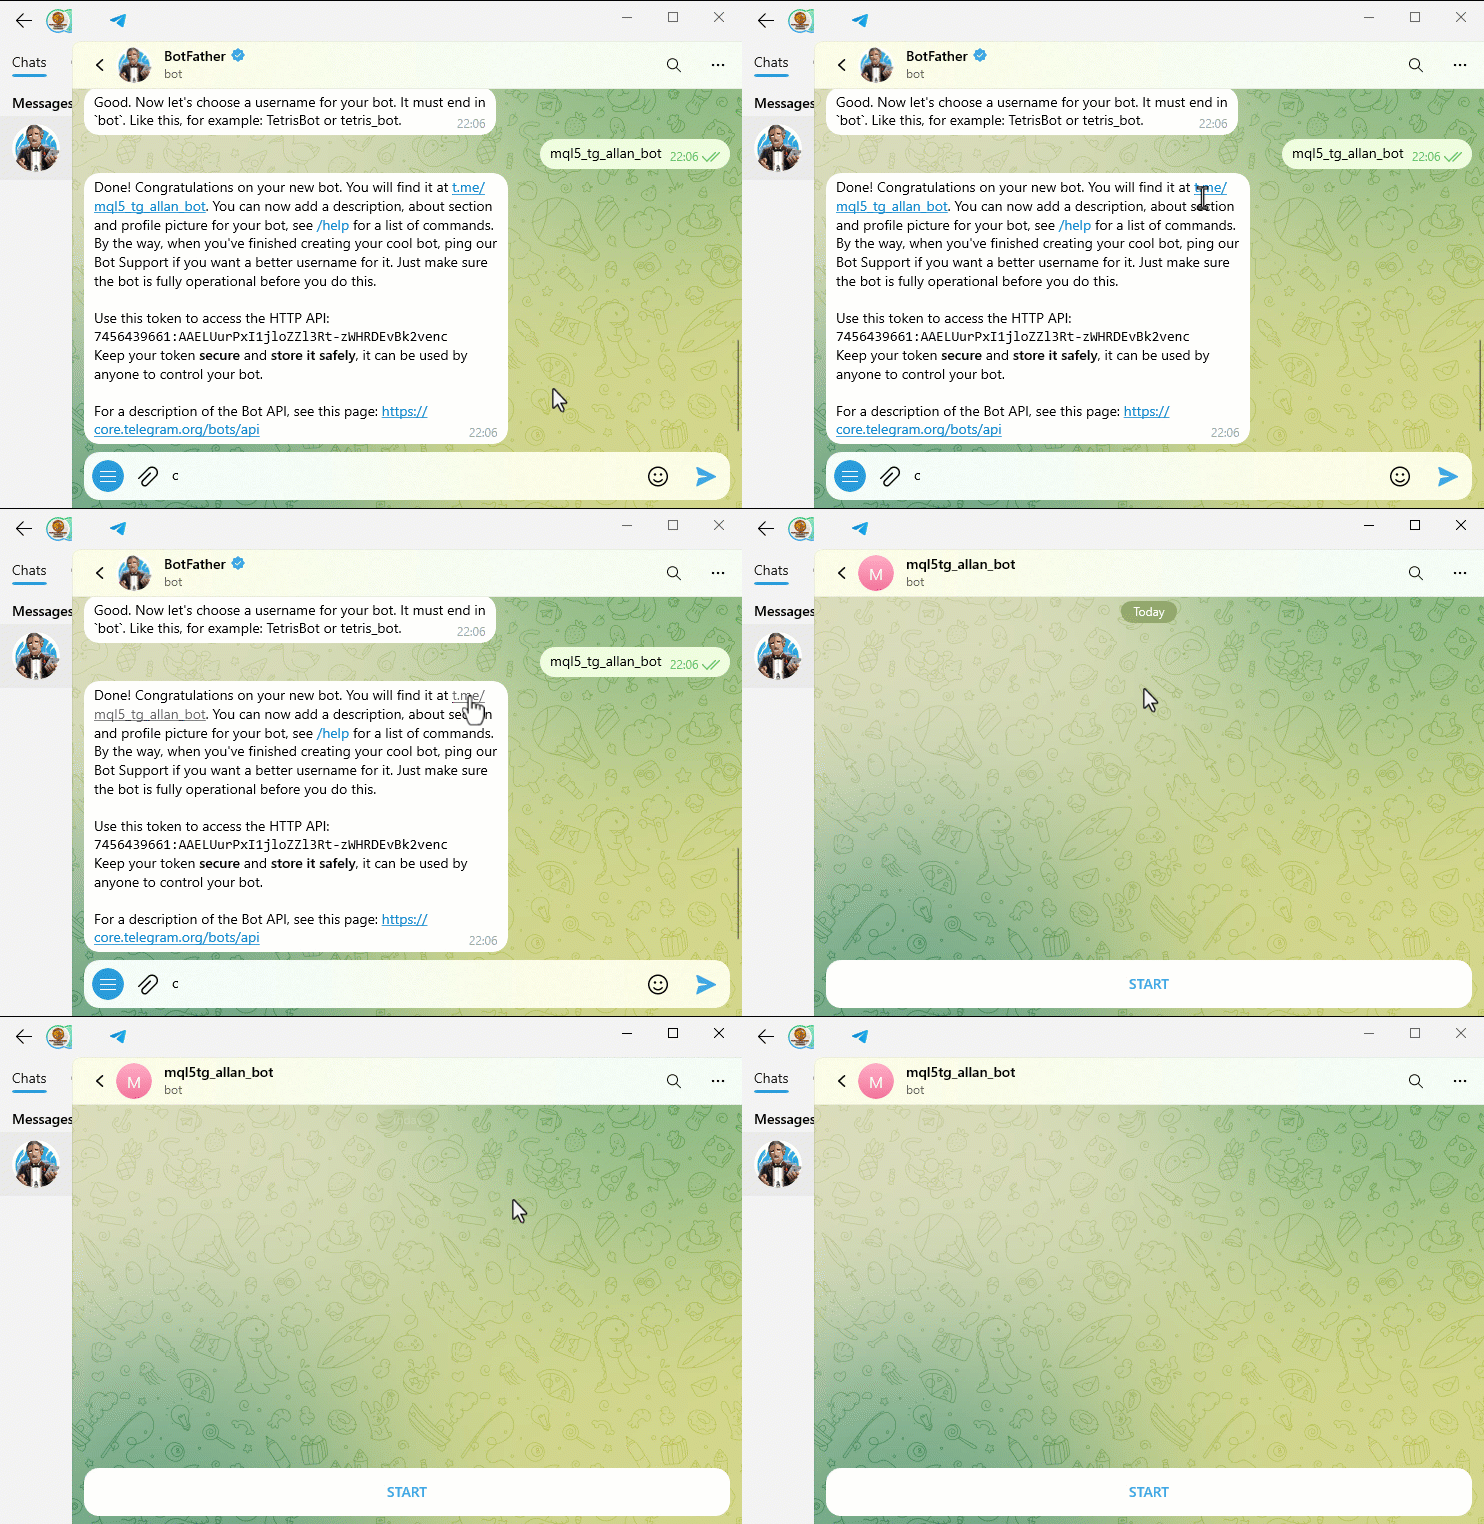
We can also give the bot a more friendly user interface. Adding a profile, a description, and a picture will make it a little more inviting, but this is an optional step. The next step in configuring the bot is to ensure that it can handle the actual messaging according to our requirements.
Getting the Chat ID: To send direct messages from our bot to a specific chat or group, we need to obtain the chat ID. We can achieve this by messaging our bot and then using the Telegram API "getUpdates" method to pull the chat ID. We'll need this ID if we want our bot to send messages anywhere other than to its owner. If we want the bot to send messages to a group or channel, we can add the bot to the group first and then use the same methods to obtain the chat ID. To get the chat ID, we use the following code snippet. Just copy, and replace the bot token with your bot's token and run it on your browser.
//CHAT ID = https://api.telegram.org/bot{BOT TOKEN}/getUpdates
//https://api.telegram.org/bot7456439661:AAELUurPxI1jloZZl3Rt-zWHRDEvBk2venc/getUpdates
These are the results we get:

You can see that our result does not contain any message update, even if we return true, indicating that everything provided is correct. If you input something in the link that is not correct, you will receive a bad web request and get a false return like below:
{"ok":false,"error_code":404,"description":"Not Found"} In our case, we return true, and yet our structure is empty. That is because we need to send a message to the bot so that there is an update. In our case, we send a starting "/start" command.
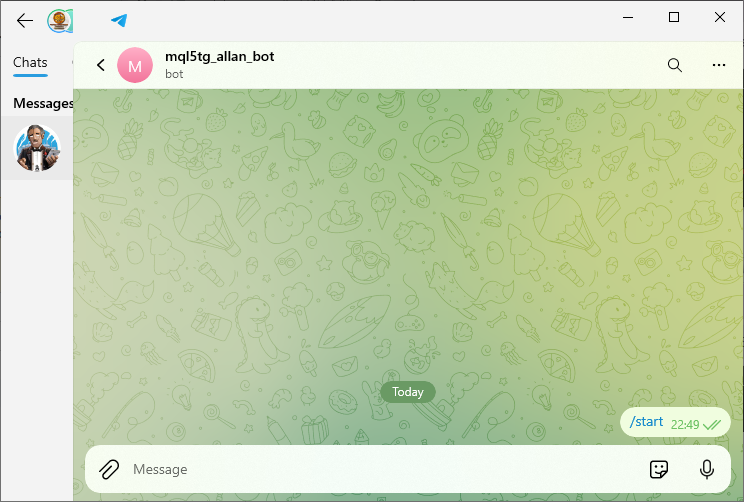
Once we send the message and refresh the link again, we now get the update. Here, it is good to note that messages are stored on the telegram server for 24 hours only, and are afterwards discarded. So, if you are getting the chat ID using this method, make sure that the messages were sent within 24 hours before the process. Here is what we have:

We get the updates but the presentation structure is pretty compact and unappealing. To achieve a more readable format, just check the "Pretty-Print" box and you should have the below structure.
{
  "ok": true,
  "result": [
    {
      "update_id": 794283176,
      "message": {
        "message_id": 1,
        "from": {
          "id": [YOUR ID],
          "is_bot": false,
          "first_name": "Forex Algo-Trader",
          "username": "Forex_Algo_Trader",
          "language_code": "en"
        },
        "chat": {
          "id": [YOUR ID],
          "first_name": "Forex Algo-Trader",
          "username": "Forex_Algo_Trader",
          "type": "private"
        },
        "date": 1722368989,
        "text": "/start",
        "entities": [
          {
            "offset": 0,
            "length": 6,
            "type": "bot_command"
          }
        ]
      }
    }
  ]
}
Our chat ID is the one under the "chat id" column. Up to this point, armed with the bot token and chat ID, we can create a program that sends messages from MQL5 to the telegram bot that we have created.
Configuring MetaTrader 5 for Telegram Communication
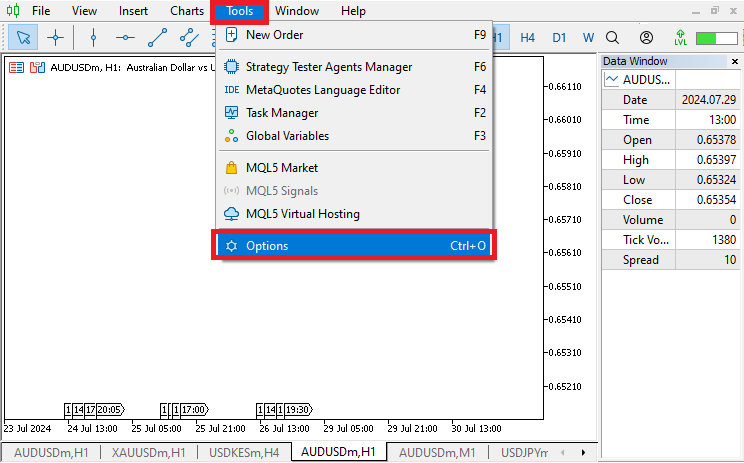
To ensure that our MetaTrader 5 platform can communicate with Telegram, we need to add the Telegram API URL to the list of allowed URLs in MetaTrader 5. We start by opening MetaTrader 5 and navigating to the "Tools" menu. From there, we select "Options", which can alternatively be opened by pressing "CTRL + O".
Once the "Options" window pops up, navigate to the "Expert Advisors" tab. Here, we check the box labeled "Allow WebRequest for listed URL" and add the URL "https://api.telegram.org" to the list. This step is crucial because it grants our Expert Advisor the necessary permissions to send HTTP requests to the Telegram API, enabling it to send messages and updates to our Telegram bot. By configuring these settings, we ensure smooth and secure communication between our MetaTrader 5 platform and Telegram, allowing our trading activities to be monitored and managed effectively on a real-time basis.
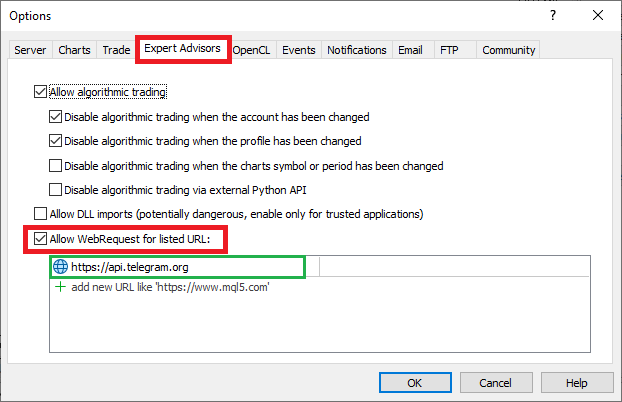
After doing all that, you are all set and we can now begin the implementation in MQL5, where we define all the logic that will be used to create the program that relays messages from MQL5 to Telegram. Let us then get started.
Implementation in MQL5
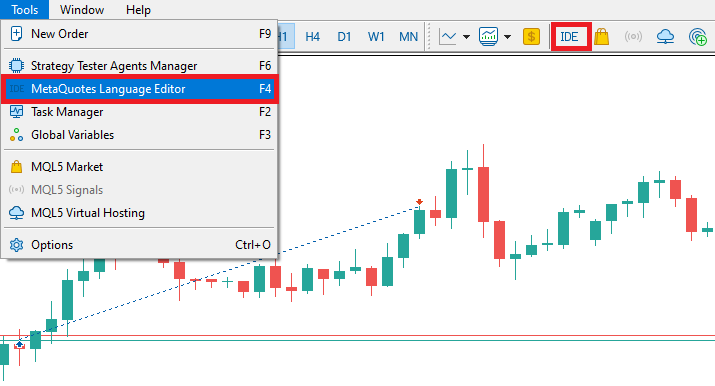
The integration will be based on an Expert Advisor (EA). To create an Expert Advisor, on your MetaTrader 5 terminal, click the Tools tab and check MetaQuotes Language Editor, or press F4 on your keyboard. Alternatively, click the IDE (Integrated Development Environment) icon on the tools bar. This will open the MetaQuotes Language Editor environment, which allows the writing of trading robots, technical indicators, scripts, and libraries of functions.
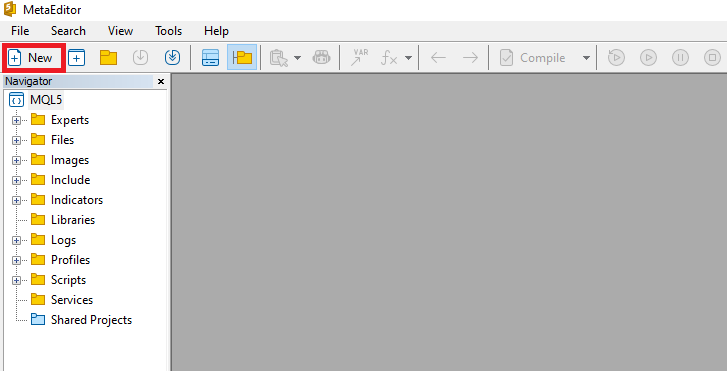
Once the MetaEditor is opened, on the tools bar, navigate to the File tab and check New File, or simply press CTRL + N, to create a new document. Alternatively, you can click on the New icon on the tools tab. This will result in a MQL Wizard pop-up.
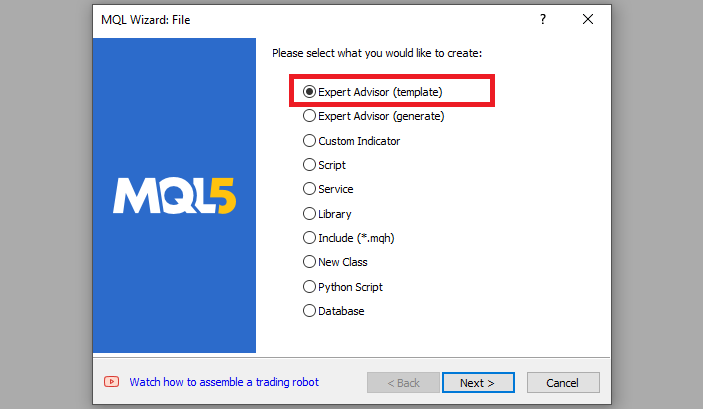
On the Wizard that pops, check Expert Advisor (template) and click Next.
On the general properties of the Expert Advisor, under the name section, provide your expert's file name. Note that to specify or create a folder if it doesn't exist, you use the backslash before the name of the EA. For example, here we have "Experts\" by default. That means that our EA will be created in the Experts folder and we can find it there. The other sections are pretty straightforward, but you can follow the link at the bottom of the Wizard to know how to precisely undertake the process.
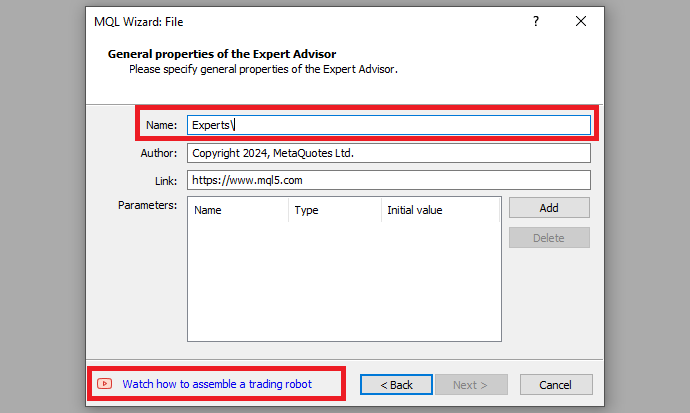
After providing your desired Expert Advisor file name, click on Next, click Next, and then click Finish. After doing all that, we are ready to code and create our program.
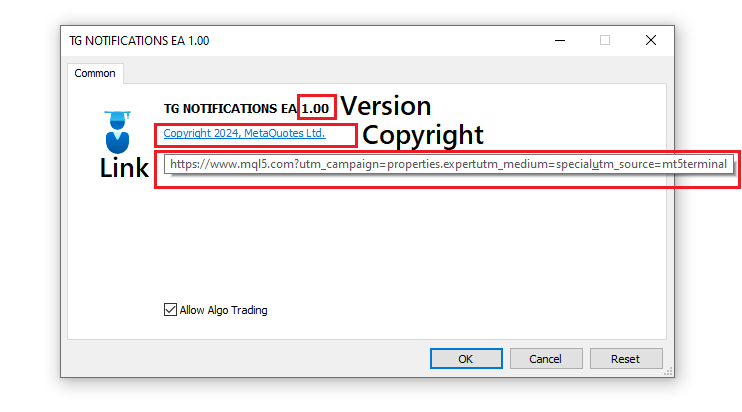
First, we start by defining some metadata about the Expert Advisor (EA). This includes the name of the EA, the copyright information, and a link to the MetaQuotes website. We also specify the version of the EA, which is set to "1.00".
//+------------------------------------------------------------------+
//|                                          TG NOTIFICATIONS EA.mq5 |
//|                                  Copyright 2024, MetaQuotes Ltd. |
//|                                             https://www.mql5.com |
//+------------------------------------------------------------------+
#property copyright "Copyright 2024, MetaQuotes Ltd."
#property link      "https://www.mql5.com"
#property version   "1.00"
When loading the program, information that depicts the one shown below is realized.
Next, we define several constants that will be used throughout our code.
const string TG_API_URL = "https://api.telegram.org";
const string botTkn = "7456439661:AAELUurPxI1jloZZl3Rt-zWHRDEvBk2venc";
const string chatID = "{YOUR CHAT ID}";
Here, the "TG_API_URL" constant holds the base URL for Telegram's API, which is essential for sending Hyper Text Transfer Protocol (HTTP) requests to Telegram's servers. The "botTkn" constant contains the unique token for our Telegram bot, provided by BotFather, which is necessary for authentication. The "chatID" constant is the unique identifier for the Telegram chat where we want to send messages. This is where you input your chat ID that we obtained using the Telegram API’s getUpdates method. Notice that we used constant string variables. The const keyword makes sure that our variables remain intact and unchanged once defined. Thus, we will not have to redefine them again and they will maintain their initialization values throughout the code. This way, we save time and space as we do not have to re-input them every time we need the values, we just call the necessary variables and again, the chances of wrongly inputting their values are significantly reduced.
Our code will be majorly based on the expert initialization section since we want to make quick illustrations without having to wait for ticks on the chart so we have signals being generated. Thus, the OnInit event handler will house most of the code structure.
//+------------------------------------------------------------------+
//| Expert initialization function                                   |
//+------------------------------------------------------------------+

int OnInit(){

   ...

   return(INIT_SUCCEEDED);
}
The OnInit function is an event handler that is called on the expert initialization instance to do necessary initializations if necessary.
To make communication with the telegram server, we use an MQL5 in-built function called WebRequest. The function is typically an overloading integer data type function, with two forms.
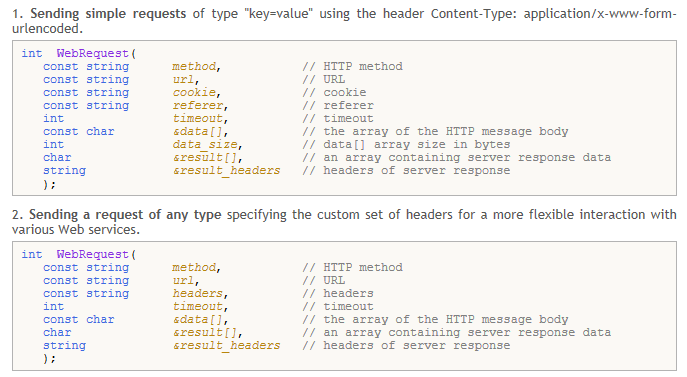
For simplicity, we will use the second version. Let us break the function down so that we can understand what every parameter means.
int WebRequest(
   const string method,      // HTTP method (e.g., "GET", "POST")
   const string url,         // URL of the web server
   const string headers,     // Optional HTTP headers
   int timeout,              // Request timeout in milliseconds
   const char &data[],       // Data to send with the request
   char &result[],           // Buffer to store the response
   string &result_headers    // Buffer to store the response headers
);
Let us briefly explain the parameters of WebRequest function.
- method: The HTTP method to use for the request. Common methods include "GET" and "POST". "GET" is typically used to retrieve data from a server. "POST" is used to send data to a server.
- url: The URL of the web server to which the request is sent. This includes the protocol (http:// or https://), the domain, and the path/resource being accessed.
- headers: Optional HTTP headers to include in the request. Headers can provide additional information to the server (e.g., content type, authentication tokens).
- timeout: The maximum time (in milliseconds) to wait for a response from the server. If the server does not respond within this time, the request is aborted, and an error code is returned. For example, if we set a timeout of 10000 milliseconds, we have 10000/1000 = 10 seconds.
- data: The data to send with the request. For "POST" requests, this would typically be the body of the request (e.g., form data, JSON payload).
- result: The buffer to store the response data from the server. This array will be filled with the server's response, which we can then process in our code.
- result_headers: The buffer to store the response headers from the server. This string will be filled with the headers sent by the server in its response.
Now having the idea of what the parameters are used for and why we need them, let us continue to define some of the most necessary variables that we will use.
   char data[];
   char res[];
   string resHeaders;
   string msg = "EA INITIALIZED ON CHART "+_Symbol;
   //https://api.telegram.org/bot{HTTP_API_TOKEN}/sendmessage?chat_id={CHAT_ID}&text={MESSAGE_TEXT}
   const string url = TG_API_URL+"/bot"+botTkn+"/sendmessage?chat_id="+chatID+
   "&text="+msg;
First, we declare the "data" and "res" arrays of type char. These arrays will be used in the WebRequest function to hold the data sent to and received from the web server, respectively. The "data" array is intended for any payload that we might want to send with our HTTP request, although for now, we will keep it empty. The "res" array will be populated with the response from the server, allowing us to process and utilize the server's reply in our program.
Next, we define a string variable named "resHeaders" to store the headers of the HTTP response we receive from the server. HTTP response headers provide important metadata about the response, such as content type, server information, and status codes. By capturing these headers, we can gain more context about the response and handle it appropriately with our Expert Advisor (EA).
We then create a string variable named "msg" which contains the message we want to send to Telegram. In this case, the message is set to "EA INITIALIZED ON CHART" followed by the symbol of the current chart, represented by the built-in _Symbol variable. The _Symbol variable holds the symbol name of the financial instrument for which the EA is running, such as "AUDUSD" or "GBPUSD". By including this information in our message, we provide clear and specific context about the action or event that has occurred, which can be particularly useful for monitoring and logging purposes. This is just an arbitrary value that we want to show when the program is initialized and thus you can have your own.
We then construct the Uniform Resource Locator (URL) required to make a request to the Telegram API. We start with the base URL stored in the "TG_API_URL" constant, which is "https://api.telegram.org". We then append the path to the "sendMessage" API method, including our bot's token (botTkn). This token uniquely identifies and authenticates our bot with Telegram's servers, ensuring that the request is valid and authorized. The URL path looks like this: "/bot<botTkn>/sendmessage", where <botTkn> is replaced by the actual bot token.
Next, we append the query parameters to the URL. The first parameter is "chat_id", which specifies the unique identifier of the Telegram chat where we want to send our message. This is stored in the "chatID" constant. The second parameter is text, which contains the actual message we want to send, stored in the "msg" variable. These parameters are concatenated to the base URL to form the complete request URL. The final URL looks like this: "https://api.telegram.org/bot<botTkn>/sendmessage?chat_id=<chatID>&text=<msg>", where <botTkn>, <chatID>, and <msg> are replaced by their respective values.
Finally, we just call the function to make the communication by passing the necessary arguments.
int send_res = WebRequest("POST",url,"",10000,data,res,resHeaders);
Here, we employ the WebRequest function to send an HTTP POST request to the designated URL. Communicating with an external web service, like the Telegram API, requires us to use this function. We must specify the HTTP method; in this case, it is "POST". We use this method when sending data to a server that performs some action. The action we want this server to perform is sending a message to a Telegram chat. We provide the "url" variable, which we constructed earlier in the code. The URL we use contains the base address of the Telegram API, our unique bot token, the sendMessage method of the API, the ID of the chat we want to send the message to, and the text of the message itself.
We then specify that the headers parameter is an empty string, which indicates that this request doesn't need any extra HTTP headers. The timeout is specified as 10 seconds, which is typically 10*1000 = 10000 milliseconds, which tends to be pretty generous in a world where servers should usually respond within a few seconds. This timeout guards against the request hanging indefinitely and is designed to keep the EA responsive. The next thing we do is pass the data array and the response array to the function. The data array holds any extra information we want to send with the request, and we use the response array to hold the result of the request. Finally, we pass the response header string, which the function also uses in "storing" the response header sent by the server.
The function returns an integer status code, stored in the "send_res" variable, which indicates whether the request was successful or if an error occurred. Using the results, we can check whether the message was sent successfully and if not, inform of the error encountered.
After making the HTTP request, we can handle the response by checking the status code stored in the "send_res" variable. To achieve this, we can use conditional statements to determine the outcome of our request and take appropriate actions based on the status code returned.
   if (send_res == 200){
      Print("TELEGRAM MESSAGE SENT SUCCESSFULLY");
   }
Here, if our variable contains the status code 200, then we know that our request was successful. We can take this as a sign that our message made it to the specified Telegram chat. So, in this case, we print to the terminal something along the lines of "TELEGRAM MESSAGE SENT SUCCESSFULLY."
   else if (send_res == -1){
      if (GetLastError()==4014){
         Print("PLEASE ADD THE ",TG_API_URL," TO THE TERMINAL");
      }
      Print("UNABLE TO SEND THE TELEGRAM MESSAGE");
   }
If the result doesn't equal 200, we next check to see if it equals -1. This status tells us that something went wrong with the HTTP request—error! But we can't just leave our end-user stuck at this error screen. To make things more meaningful for them, we can get a little more detailed and crafty with our error messages. That's exactly what we're going to do next.
First, we check the specific error (message) we got when the function call failed. We use the GetLastError function to retrieve the error code that tells us what went wrong. Then, we interpret the likely scenario (what the error code means) and print a message to the user that will guide them in fixing the problem that caused the error. In this case, if it equals 4014, we know that the URL is not either listed or enabled on the terminal. Thus we inform the user to add and enable the correct URL on their trading terminal. We are going to test this and see the significance of the shout-out.
When the problem isn't associated with the URL restriction (GetLastError doesn't yield 4014), we don't just shrug our shoulders resignedly. We print a message—to the user, mind you—that states clearly the nature of the malfunction: "UNABLE TO SEND THE TELEGRAM MESSAGE." It's bad enough if we can't communicate with our bot, but to have a bot, and the two of us on this side of the screen, rendered completely mute, is worse than anything. We even catch the random "anomalous" response condition.
   else if (send_res != 200){
      Print("UNEXPECTED RESPONSE ",send_res," ERR CODE = ",GetLastError());
   }
If "send_res" is not equivalent to 200 (that is, it's not good), and it's not -1 (which indicates an obvious, URL restriction-related problem), then we've got a head-scratcher on our hands. If everything goes well, we return the succeeded integer value.
return(INIT_SUCCEEDED);
Let us test this and see if everything works out fine.
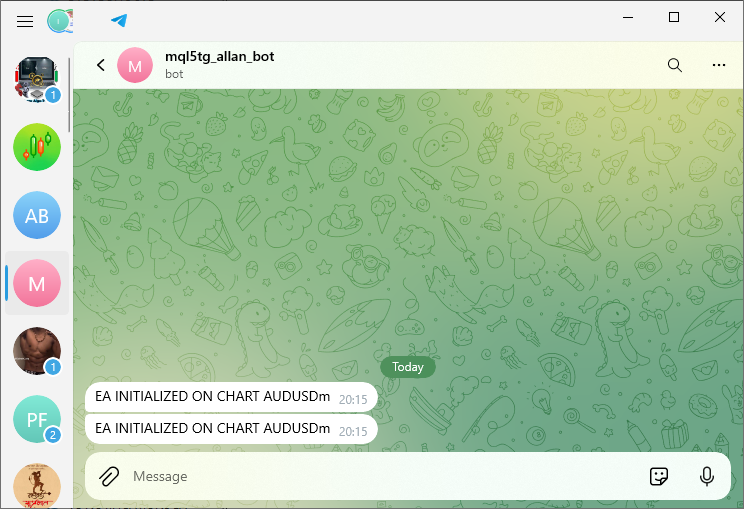
On the Telegram bot chat, this is what we get:
On the trading terminal, this is what we get:
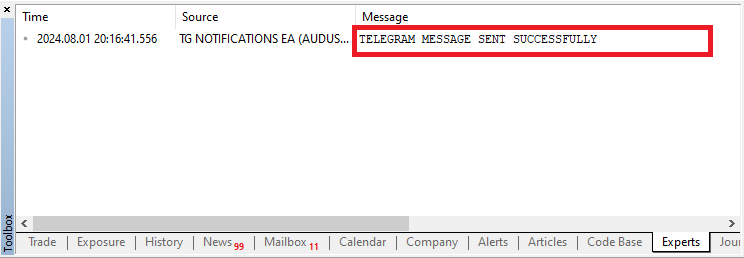
You can see that we were able to send a message from the trading terminal to the telegram server which relayed it to the telegram chat, which means it is a success.
The full source code responsible for sending the message from the trading terminal to the Telegram chat via a bot is as below:
//+------------------------------------------------------------------+
//|                                          TG NOTIFICATIONS EA.mq5 |
//|                                  Copyright 2024, MetaQuotes Ltd. |
//|                                             https://www.mql5.com |
//+------------------------------------------------------------------+
#property copyright "Copyright 2024, MetaQuotes Ltd."
#property link      "https://www.mql5.com"
#property version   "1.00"

// Define constants for Telegram API URL, bot token, and chat ID
const string TG_API_URL = "https://api.telegram.org";  // Base URL for Telegram API
const string botTkn = "7456439661:AAELUurPxI1jloZZl3Rt-zWHRDEvBk2venc";  // Telegram bot token
const string chatID = "{YOUR CHAT ID}";  // Chat ID for the Telegram chat

// The following URL can be used to get updates from the bot and retrieve the chat ID
// CHAT ID = https://api.telegram.org/bot{BOT TOKEN}/getUpdates
// https://api.telegram.org/bot7456439661:AAELUurPxI1jloZZl3Rt-zWHRDEvBk2venc/getUpdates

//+------------------------------------------------------------------+
//| Expert initialization function                                   |
//+------------------------------------------------------------------+
int OnInit() {
   char data[];  // Array to hold data to be sent in the web request (empty in this case)
   char res[];  // Array to hold the response data from the web request
   string resHeaders;  // String to hold the response headers from the web request
   string msg = "EA INITIALIZED ON CHART " + _Symbol;  // Message to send, including the chart symbol

   // Construct the URL for the Telegram API request to send a message
   // Format: https://api.telegram.org/bot{HTTP_API_TOKEN}/sendmessage?chat_id={CHAT_ID}&text={MESSAGE_TEXT}
   const string url = TG_API_URL + "/bot" + botTkn + "/sendmessage?chat_id=" + chatID +
      "&text=" + msg;

   // Send the web request to the Telegram API
   int send_res = WebRequest("POST", url, "", 10000, data, res, resHeaders);

   // Check the response status of the web request
   if (send_res == 200) {
      // If the response status is 200 (OK), print a success message
      Print("TELEGRAM MESSAGE SENT SUCCESSFULLY");
   } else if (send_res == -1) {
      // If the response status is -1 (error), check the specific error code
      if (GetLastError() == 4014) {
         // If the error code is 4014, it means the Telegram API URL is not allowed in the terminal
         Print("PLEASE ADD THE ", TG_API_URL, " TO THE TERMINAL");
      }
      // Print a general error message if the request fails
      Print("UNABLE TO SEND THE TELEGRAM MESSAGE");
   } else if (send_res != 200) {
      // If the response status is not 200 or -1, print the unexpected response code and error code
      Print("UNEXPECTED RESPONSE ", send_res, " ERR CODE = ", GetLastError());
   }

   return(INIT_SUCCEEDED);  // Return initialization success status
}
//+------------------------------------------------------------------+
//| Expert deinitialization function                                 |
//+------------------------------------------------------------------+
void OnDeinit(const int reason) {
   // Code to execute when the expert is deinitialized
}
//+------------------------------------------------------------------+
//| Expert tick function                                             |
//+------------------------------------------------------------------+
void OnTick() {
   // Code to execute on every tick event
}
//+------------------------------------------------------------------+
Since this was a success, on the next subtopic, let us alter the code to a few different message formats so we can see our extent of sending messages, make errors that one may make, and see how to mitigate them. Thus, it is also equally significant.
Testing the Integration
To ensure that our Expert Advisor (EA) correctly sends messages to Telegram, we need to test the integration thoroughly. One crucial aspect of testing is to verify the behavior of the EA when certain settings are incorrect, such as when the "Allow WebRequest for listed URL" checkbox is disabled in the trading terminal. To ensure we get this correct, let us disable the check box.
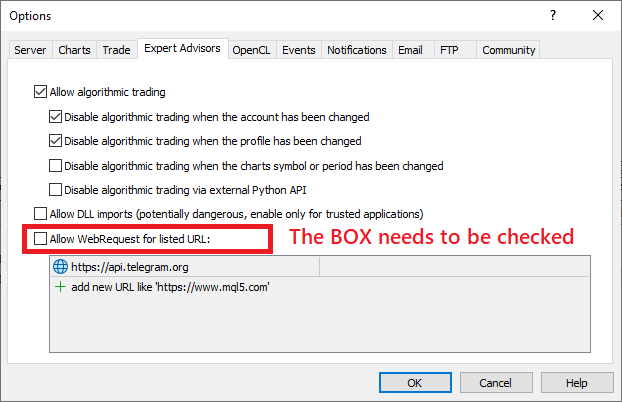
If we run the program, we get an error instructing the user that communication can only be done if the link provided is included and allowed on the trading terminal.
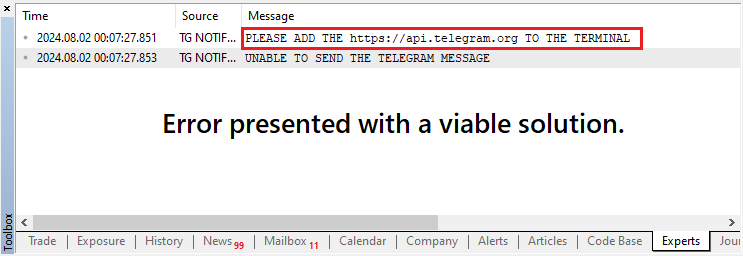
Moreso, you can see that we not only inform of the error but also present the user with a viable solution to mitigate the errors encountered.
Now that we can identify and solve the errors, let us proceed to make the message formats more creative, clear, and fancy. First, let us include emojis in our initial message.
   //--- Simple Notification with Emoji:
   string msg = "🚀 EA INITIALIZED ON CHART " + _Symbol + " 🚀";
Here, we just append two rocket emojis to the initial message. Upon compilation, this is what we get:
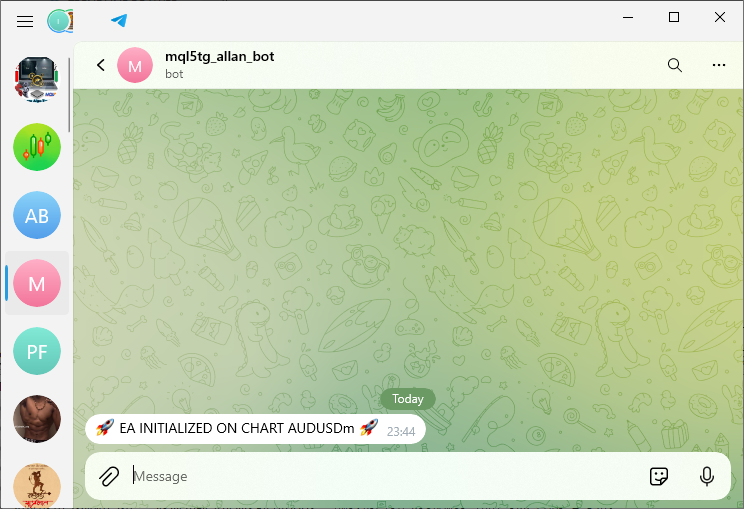
You can see that the simple message with the emoji was successfully sent. To get the emoji characters, just press the Windows + period (.) keys simultaneously. We can now continue to be more creative and modify our message notification to have trading signals like "BUY" or "SELL", account balance information, the opening of trade instances, modified trade levels like stop loss and take profit, daily performance summary, and account status update information. These are just arbitrary messages that can be modified to fit one's trading style. This is achieved via the following code.
   //--- Simple Notification with Emoji:
   string msg = "🚀 EA INITIALIZED ON CHART " + _Symbol + " 🚀";
   //--- Buy/Sell Signal with Emoji:
   string msg = "📈 BUY SIGNAL GENERATED ON " + _Symbol + " 📈";
   string msg = "📉 SELL SIGNAL GENERATED ON " + _Symbol + " 📉";
   //--- Account Balance Notification:
   double accountBalance = AccountInfoDouble(ACCOUNT_BALANCE);
   string msg = "💰 Account Balance: $" + DoubleToString(accountBalance, 2) + " 💰";
   //--- Trade Opened Notification:
   string orderType = "BUY";  // or "SELL"
   double lotSize = 0.1;  // Example lot size
   double price = 1.12345;  // Example price
   string msg = "🔔 " + orderType + " order opened on " + _Symbol + "; Lot size: " + DoubleToString(lotSize, 2) + "; Price: " + DoubleToString(price, 5) + " 🔔";
   //--- Stop Loss and Take Profit Update:
   double stopLoss = 1.12000;  // Example stop loss
   double takeProfit = 1.13000;  // Example take profit
   string msg = "🔄 Stop Loss and Take Profit Updated on " + _Symbol + "; Stop Loss: " + DoubleToString(stopLoss, 5) + "; Take Profit: " + DoubleToString(takeProfit, 5) + " 🔄";
   //--- Daily Performance Summary:
   double profitToday = 150.00;  // Example profit for the day
   string msg = "📅 Daily Performance Summary 📅; Symbol: " + _Symbol + "; Profit Today: $" + DoubleToString(profitToday, 2);
   //--- Trade Closed Notification:
   string orderType = "BUY";  // or "SELL"
   double profit = 50.00;  // Example profit
   string msg = "❌ " + orderType + " trade closed on " + _Symbol + "; Profit: $" + DoubleToString(profit, 2) + " ❌";
   //--- Account Status Update:
   double accountEquity = AccountInfoDouble(ACCOUNT_EQUITY);
   double accountFreeMargin = AccountInfoDouble(ACCOUNT_FREEMARGIN);
   string msg = "📊 Account Status 📊; Equity: $" + DoubleToString(accountEquity, 2) + "; Free Margin: $" + DoubleToString(accountFreeMargin, 2);
When we run this code snippet with the message formats individually, we get the following summation of results:
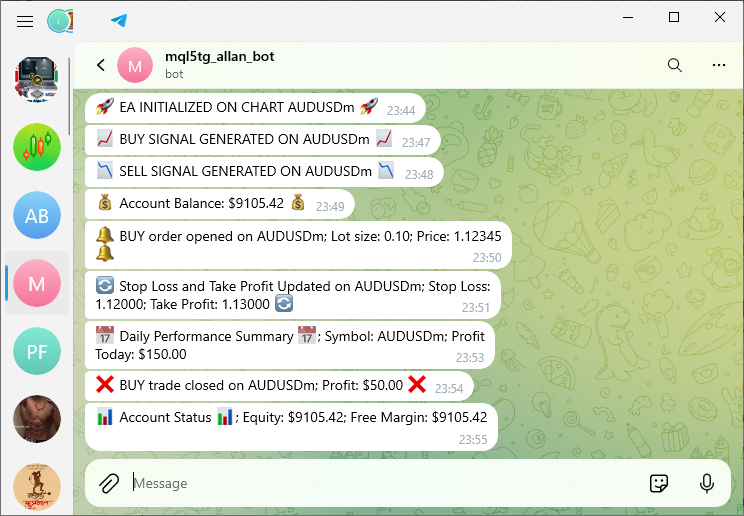
From the above code snippet and image, you can see that the integration was a success. Thus, we achieved our objective of sending messages from trading terminals to telegram bot chat. In case you want to send the messages to a telegram channel or group, you just need to add the bot to the group or channel and make it an administrator. For example, we created a group and named it "Forex Algo Trader Group", taking after our name and logo, but you can assign yours a more creative and different name. Afterward, we made the bot an administrator.
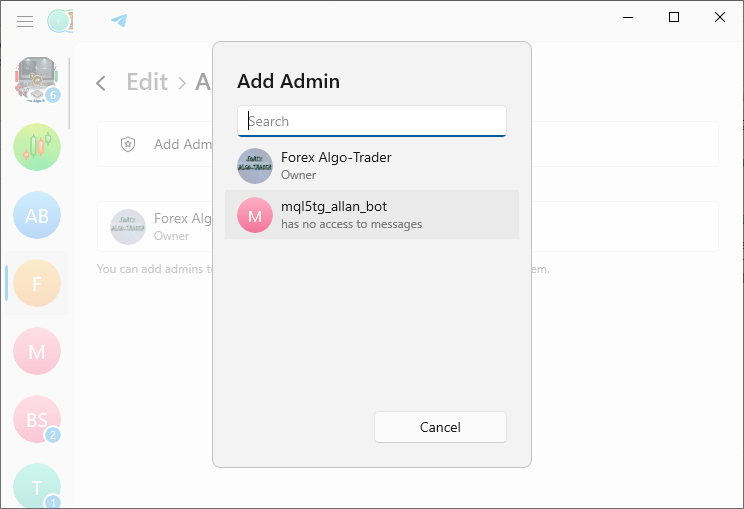
However, even if you promote the bot to an administrator, you still need to get the chat ID for the group specifically. If the bot chat ID remains, the messages will always be forwarded to it and not to the intended group. Thus, the process to get the group's ID is just similar to the initial one.
// The following URL can be used to get updates from the bot and retrieve the chat ID
// CHAT ID = https://api.telegram.org/bot{BOT TOKEN}/getUpdates
https://api.telegram.org/bot7456439661:AAELUurPxI1jloZZl3Rt-zWHRDEvBk2venc/getUpdates
We just need to send a message to the group and run the code on the browser. The message we sent is as below:
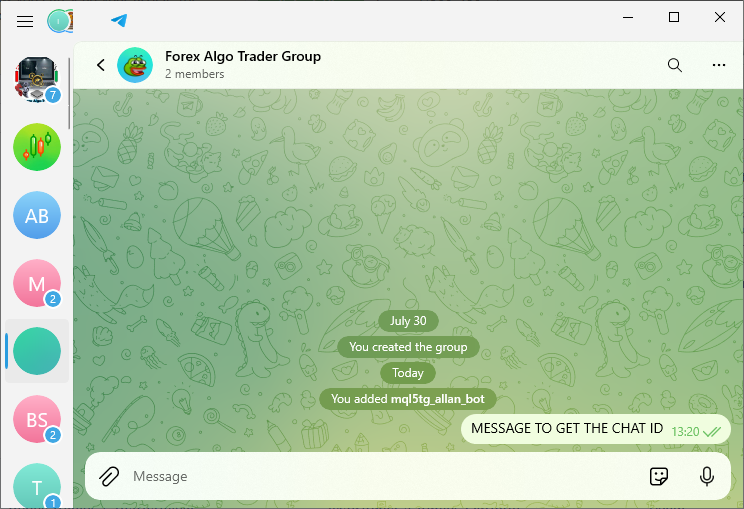
On the browser, we get the following information in a structured format:
{
  "ok": true,
  "result": [
    {
      "update_id": 794283177,
      "my_chat_member": {
        "chat": {
          "id": -4273023945,
          "title": "Forex Algo Trader Group",
          "type": "group",
          "all_members_are_administrators": true
        },
        "from": {
          "id": <YOUR ID>,
          "is_bot": false,
          "first_name": "Forex Algo-Trader",
          "username": "Forex_Algo_Trader",
          "language_code": "en"
        },
        "date": 1722593740,
        "old_chat_member": {
          "user": {
            "id":
<YOUR ID> ,
            "is_bot": true,
            "first_name": "mql5tg_allan_bot",
            "username": "mql5_tg_allan_bot"
          },
          "status": "left"
        },
        "new_chat_member": {
          "user": {
            "id": <YOUR ID>,
            "is_bot": true,
            "first_name": "mql5tg_allan_bot",
            "username": "mql5_tg_allan_bot"
          },
          "status": "member"
        }
      }
    },
    {
      "update_id": 794283178,
      "message": {
        "message_id": 64,
        "from": {
          "id":
<FROM ID> ,
          "is_bot": false,
          "first_name": "Forex Algo-Trader",
          "username": "Forex_Algo_Trader",
          "language_code": "en"
        },
        "chat": {
          "id": -4273023945,
          "title": "Forex Algo Trader Group",
          "type": "group",
          "all_members_are_administrators": true
        },
        "date": 1722593740,
        "new_chat_participant": {
          "id":
<NEW ID> ,
          "is_bot": true,
          "first_name": "mql5tg_allan_bot",
          "username": "mql5_tg_allan_bot"
        },
        "new_chat_member": {
          "id": <NEW ID>,
          "is_bot": true,
          "first_name": "mql5tg_allan_bot",
          "username": "mql5_tg_allan_bot"
        },
        "new_chat_members": [
          {
            "id":
<NEW ID> ,
            "is_bot": true,
            "first_name": "mql5tg_allan_bot",
            "username": "mql5_tg_allan_bot"
          }
        ]
      }
    },
    {
      "update_id": 794283179,
      "my_chat_member": {
        "chat": {
          "id": -4273023945,
          "title": "Forex Algo Trader Group",
          "type": "group",
          "all_members_are_administrators": true
        },
        "from": {
          "id": <FROM ID>,
          "is_bot": false,
          "first_name": "Forex Algo-Trader",
          "username": "Forex_Algo_Trader",
          "language_code": "en"
        },
        "date": 1722593975,
        "old_chat_member": {
          "user": {
            "id": <USER ID>,
            "is_bot": true,
            "first_name": "mql5tg_allan_bot",
            "username": "mql5_tg_allan_bot"
          },
          "status": "member"
        },
        "new_chat_member": {
          "user": {
            "id": <USER ID>,
            "is_bot": true,
            "first_name": "mql5tg_allan_bot",
            "username": "mql5_tg_allan_bot"
          },
          "status": "administrator",
          "can_be_edited": false,
          "can_manage_chat": true,
          "can_change_info": true,
          "can_delete_messages": true,
          "can_invite_users": true,
          "can_restrict_members": true,
          "can_pin_messages": true,
          "can_promote_members": false,
          "can_manage_video_chats": true,
          "can_post_stories": false,
          "can_edit_stories": false,
          "can_delete_stories": false,
          "is_anonymous": false,
          "can_manage_voice_chats": true
        }
      }
    },
    {
      "update_id": 794283180,
      "message": {
        "message_id": 65,
        "from": {
          "id": <YOUR FROM ID>,
          "is_bot": false,
          "first_name": "Forex Algo-Trader",
          "username": "Forex_Algo_Trader",
          "language_code": "en"
        },
        "chat": {
          "id": -4273023945,
          "title": "Forex Algo Trader Group",
          "type": "group",
          "all_members_are_administrators": true
        },
        "date": 1722594029,
        "text": "MESSAGE TO GET THE CHAT ID"
      }
    }
  ]
}
Here, our chat ID has a negative sign in front of the number. This is the ID we extract and switch it with the initial one. So now our chat ID will be as below:
// Define constants for Telegram API URL, bot token, and chat ID
const string TG_API_URL = "https://api.telegram.org";  // Base URL for Telegram API
const string botTkn = "7456439661:AAELUurPxI1jloZZl3Rt-zWHRDEvBk2venc";  // Telegram bot token
const string chatID = "-4273023945";  // Chat ID for the Telegram chat
If we run this, we get the following result.
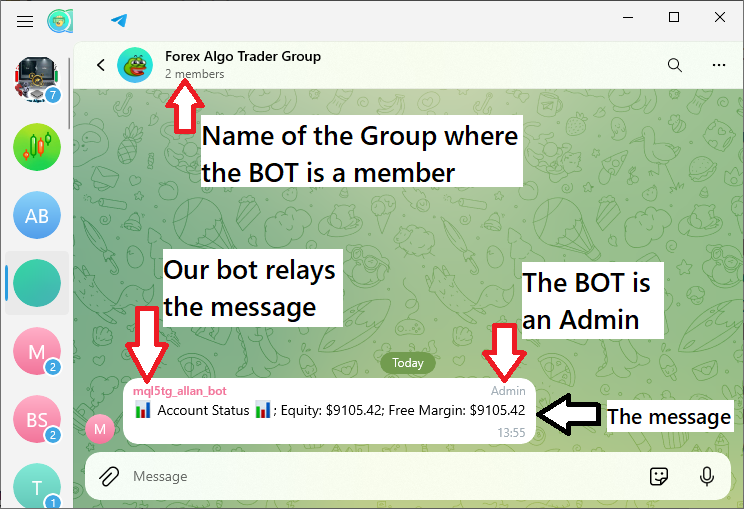
Up to this point, you can see that we were able to create a program in MQL5 that correctly sends messages from the trading terminal to the telegram's bot chat field with all the necessary information. This is a success for a simple message but for complex messages that contain foreign characters like New line feed characters "\n" or letters from Unicode character sets like emoji codes "U+1F600" will not be sent. We will consider that in the following parts. For now, let us keep everything simple and straight to the point. Cheers!
Conclusion
In this article, we created an Expert Advisor that works with MQL5 and Telegram. This allows for communication between the terminal and a Telegram bot, which means you can send messages from the terminal to the bot and from the bot to the terminal. This is very cool for two reasons: one, because the bot is essentially a proxy between you and the terminal for sending and receiving messages; two, because for some reason, this trading setup seems much cooler than sending a message via email.
We also probed into the testing process, pinpointing the possible mistakes that can happen when the WebRequest parameters are not set correctly. We figured out the reasons for these errors and then fixed them so that the program now runs with a higher reliability. That is, it operates smoothly and error-free, sending messages with the correct information to the correct place at the proper time. This understanding of the "why" and "how" of the error allows us to build with confidence in the future, knowing that our "foundational cell" can be trusted.
In the subsequent parts of this series, we will elevate our integration to a higher level by constructing a custom indicator that produces trading signals. These signals are to be used to set off messages sent to our group chat in Telegram, giving us all real-time updates on the kinds of potential trading opportunities we usually look for and pounce on. This isn't just about making our trading strategy work better. It's also about showing off how we can combine MQL5 with Telegram to create a dynamic trading workflow that sends alerts without us having to do anything except watch our phones. Stay tuned as we continue to build and refine this integrated system.
Warning: All rights to these materials are reserved by MetaQuotes Ltd. Copying or reprinting of these materials in whole or in part is prohibited.
This article was written by a user of the site and reflects their personal views. MetaQuotes Ltd is not responsible for the accuracy of the information presented, nor for any consequences resulting from the use of the solutions, strategies or recommendations described.
 Implementing the Deus EA: Automated Trading with RSI and Moving Averages in MQL5
 Data Science and ML (Part 29): Essential Tips for Selecting the Best Forex Data for AI Training Purposes
 Integrate Your Own LLM into EA (Part 5): Develop and Test Trading Strategy with LLMs(I)-Fine-tuning
 DoEasy. Service functions (Part 2): Inside Bar pattern
- Free trading apps
- Over 8,000 signals for copying
- Economic news for exploring financial markets
You agree to website policy and terms of use
I guess the need to write code.
Well, I think we shouldn't jump to conclusions, maybe there are situations we don't know about, that's why I asked.
I myself see two solutions:
1. what Rashid wrote, get the indicator name and get the handle by it.
2. What I wrote, run the indicator virtually and get the handle.
In my opinion, these two options cover almost all possible situations. But maybe I'm wrong.
S.F. Funny translator))))))
this is realy helpfull thx matte :)
Sure. Welcome.
Sure. Welcome.
i heve eror when attach the ea
2025.09.15 21:55:07.147 TELEGRAM_NOTIFICATIONS_EA (EURUSD,H1) UNEXPECTED RESPONSE 1007 ERR CODE = 5203idk what thats mean