
数据科学和机器学习(第 32 部分):保持您的 AI 模型更新,在线学习

内容
什么是在线学习?
在线机器学习是一种机器学习方法,其中模型从实时点数据流中增量学习。这是一个动态过程,会随时间推移调整其预测算法,允许模型随新数据的到来而变化。这种方法在数据丰富、且快速扩展的环境中非常重要,譬如在交易数据中,在于它能提供及时准确的预测。
在处置交易数据时,总是很难判定更新模型的正确时间、以及更新频率,举例,如果您去年依据比特币训练了人工智能模型,考虑到这种加密货币上周刚刚创下新高,最近的信息可能会被机器学习模型当作异常值。
不同于在特定范围历史内上下波动的外汇工具,纳斯达克 100 指数、标准普尔 500 指数、和其它同类工具及股票往往会上涨,并触及新的峰值。
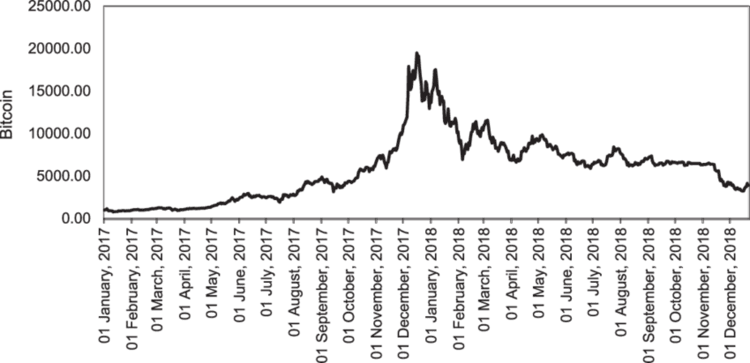
在线学习不仅是担心旧的训练信息会过时,也是为了令模型据最新信息保持更新,这或许会对市场当前发生的事情产生一些影响。
在线学习的益处
- 适应性
就像骑自行车的人边走边学一样,在线机器学习可以适应数据中的新形态,随时间推移有提高其性能的潜力。 - 可扩展性
某些模型的一些在线学习方法,一次处理一个数据。对于我们大多数人所拥有的紧张计算资源来说,该技术更安全,最终能有助于扩展依赖于大数据的模型。 - 实时预测
不同于批量学习,其在实现时可能就已过时,在线学习提供了实时洞察,这在许多交易应用程序中至关重要。 - 效率:
增量机器学习允许持续学习和更新模型,这会导致更快、更具成本效益的训练过程。
现在我们了解了该技术的若干益处,我们来看看在 MetaTrader 5 中进行有效在线学习所需的基础设施。
MetaTrader 5 在线学习基础设施
由于我们的最终目标是在 MetaTrader 5 中把 AI 模型用于交易目的,因此它与通常在基于 Python 的应用程序中看到的在线学习基础设施不同。

步骤 01:Python 客户端
在 Python 客户端(脚本)中,我们希望基于从 MetaTrader 5 收到的交易数据构建 AI 模型。
使用 MetaTrader 5(python 函数库),我们首先初始化平台。
import pandas as pd
import numpy as np
import MetaTrader5 as mt5
from datetime import datetime

if not mt5.initialize(): # Initialize the MetaTrader 5 platform
    print("initialize() failed")
    mt5.shutdown()
MetaTrader 5 平台初始化后,我们能够通过 copy_rates_from_pos 方法从中获取交易信息。
def getData(start = 1, bars = 1000):

    rates = mt5.copy_rates_from_pos("EURUSD", mt5.TIMEFRAME_H1, start, bars)

   if len(rates) < bars: # if the received information is less than specified
        print("Failed to copy rates from MetaTrader 5, error = ",mt5.last_error())

    # create a pnadas DataFrame out of the obtained data

    df_rates = pd.DataFrame(rates)

    return df_rates
我们能打印出来,以便查看所获信息。
print("Trading info:\n",getData(1, 100)) # get 100 bars starting at the recent closed bar
输出
           time     open     high      low    close  tick_volume  spread  real_volume
0   1731351600  1.06520  1.06564  1.06451  1.06491         1688       0            0
1   1731355200  1.06491  1.06519  1.06460  1.06505         1607       0            0
2   1731358800  1.06505  1.06573  1.06495  1.06512         1157       0            0
3   1731362400  1.06512  1.06564  1.06512  1.06557         1112       0            0
4   1731366000  1.06557  1.06579  1.06553  1.06557          776       0            0
..         ...      ...      ...      ...      ...          ...     ...          ...
95  1731693600  1.05354  1.05516  1.05333  1.05513         5125       0            0
96  1731697200  1.05513  1.05600  1.05472  1.05486         3966       0            0
97  1731700800  1.05487  1.05547  1.05386  1.05515         2919       0            0
98  1731704400  1.05515  1.05522  1.05359  1.05372         2651       0            0
99  1731708000  1.05372  1.05379  1.05164  1.05279         2977       0            0

[100 rows x 8 columns]
我们调用 copy_rates_from_pos 方法,在于它允许我们访问放置在索引 1 处的 recenlyt 已收盘柱线,相比按照固定日期访问,这非常实用。
我们始终可以确信,通过从位于索引 1 处的柱线复制,我们始终从最近收盘的柱线、直至我们想要的某个指定数量的柱线获得信息。
收到这些信息后,我们就能据这些数据进行典型的机器学习操作。
我们为模型创建一个单独的文件,通过将每个模型放在其单独的文件中,我们可以从 “main.py” 文件中调用这些模型,轻松地部署所有关键进程和功能。
文件 catboost_models.py
from catboost import CatBoostClassifier
from sklearn.metrics import accuracy_score

from onnx.helper import get_attribute_value
from skl2onnx import convert_sklearn, update_registered_converter
from sklearn.pipeline import Pipeline
from skl2onnx.common.shape_calculator import (
    calculate_linear_classifier_output_shapes,
)  # noqa
from skl2onnx.common.data_types import (
    FloatTensorType,
    Int64TensorType,
    guess_tensor_type,
)
from skl2onnx._parse import _apply_zipmap, _get_sklearn_operator_name
from catboost.utils import convert_to_onnx_object

# Example initial data (X_initial, y_initial are your initial feature matrix and target)

class CatBoostClassifierModel():
    def __init__(self, X_train, X_test, y_train, y_test):

        self.X_train = X_train
        self.X_test = X_test
        self.y_train = y_train
        self.y_test = y_test
        self.model = None

    def train(self, iterations=100, depth=6, learning_rate=0.1, loss_function="CrossEntropy", use_best_model=True):
        # Initialize the CatBoost model

        params = {
            "iterations": iterations,
            "depth": depth,
            "learning_rate": learning_rate,
            "loss_function": loss_function,
            "use_best_model": use_best_model
        }

        self.model = Pipeline([ # wrap a catboost classifier in sklearn pipeline | good practice (not necessary tho :))
            ("catboost", CatBoostClassifier(**params))
        ])

        # Testing the model

        self.model.fit(X=self.X_train, y=self.y_train, catboost__eval_set=(self.X_test, self.y_test))

        y_pred = self.model.predict(self.X_test)
        print("Model's accuracy on out-of-sample data = ",accuracy_score(self.y_test, y_pred))

    # a function for saving the trained CatBoost model to ONNX format

    def to_onnx(self, model_name):

        update_registered_converter(
            CatBoostClassifier,
            "CatBoostCatBoostClassifier",
            calculate_linear_classifier_output_shapes,
            self.skl2onnx_convert_catboost,
            parser=self.skl2onnx_parser_castboost_classifier,
            options={"nocl": [True, False], "zipmap": [True, False, "columns"]},
        )

        model_onnx = convert_sklearn(
            self.model,
            "pipeline_catboost",
            [("input", FloatTensorType([None, self.X_train.shape[1]]))],
            target_opset={"": 12, "ai.onnx.ml": 2},
        )

        # And save.
        with open(model_name, "wb") as f:
            f.write(model_onnx.SerializeToString())
有关该 CatBoost 模型的更多信息,请参阅这篇文章。 我以 CatBoost 模型为例,请随意用您喜欢的任何模型。
现在我们有了这个类来帮助我们初始化、训练、及保存 catboost 模型。我们在 “main.py” 文件中部署该模型。
文件: main.py
再次,我们首先从 MetaTrader 5 桌面应用程序接收数据。
data = getData(start=1, bars=1000)
如果您仔细观察 CatBoost 模型,您会发现它是一个分类器模型。我们还没有这个分类器的目标变量,故我们做一个。
# Preparing the target variable

data["future_open"] = data["open"].shift(-1) # shift one bar into the future
data["future_close"] = data["close"].shift(-1)

target = []
for row in range(data.shape[0]):
    if data["future_close"].iloc[row] > data["future_open"].iloc[row]: # bullish signal
        target.append(1)
    else: # bearish signal
        target.append(0)

data["target"] = target # add the target variable to the dataframe

data = data.dropna() # drop empty rows
我们可从 X 二维数组中删除所有含有大量零值的未来变量、及其它特征,并将 “target” 变量分配给 y 一维数组。
X = data.drop(columns = ["spread","real_volume","future_close","future_open","target"])
y = data["target"]
然后,我们将信息拆分为训练样本和验证样本,据市场数据初始化 CatBoost 模型,然后对其进行训练。
X_train, X_test, y_train, y_test = train_test_split(X, y, train_size=0.7, random_state=42)

catboost_model = catboost_models.CatBoostClassifierModel(X_train, X_test, y_train, y_test)
catboost_model.train()
最后,我们将该模型以 ONNX 格式保存在 MetaTrader 5 的 Common 目录之中。
步骤 02:Common 文件夹
利用 MetaTrader 5 Python,我们能得到有关 Common 路径的信息。
terminal_info_dict = mt5.terminal_info()._asdict()
common_path = terminal_info_dict["commondata_path"]
这是我们想要保存来自 Python 客户端中所有经过训练的 AI 模型的地方。
当利用 MQL5 访问 Common 文件夹时,它通常是指在 Common 文件夹下找到的 “Files” 子文件夹,为了从 MQL5 的立场更容易访问这些文件,我们必须将模型保存在该子文件夹之中。
# Save models in a specific location under the common parent folder

models_path = os.path.join(common_path, "Files")

if not os.path.exists(models_path): #if the folder exists
    os.makedirs(models_path) # Create the folder if it doesn't exist

catboost_model.to_onnx(model_name=os.path.join(models_path, "catboost.H1.onnx"))
最后,我们必须将所有这些代码行包装在一个函数当中,以便随时更轻松地运作所有这些不同的过程。
def trainAndSaveCatBoost():

    data = getData(start=1, bars=1000)

    # Check if we were able to receive some data

    if (len(data)<=0):
        print("Failed to obtain data from Metatrader5, error = ",mt5.last_error())
        mt5.shutdown()

    # Preparing the target variable

    data["future_open"] = data["open"].shift(-1) # shift one bar into the future
    data["future_close"] = data["close"].shift(-1)

    target = []
    for row in range(data.shape[0]):
        if data["future_close"].iloc[row] > data["future_open"].iloc[row]: # bullish signal
            target.append(1)
        else: # bearish signal
            target.append(0)

    data["target"] = target # add the target variable to the dataframe

    data = data.dropna() # drop empty rows

    X = data.drop(columns = ["spread","real_volume","future_close","future_open","target"])
    y = data["target"]

    X_train, X_test, y_train, y_test = train_test_split(X, y, train_size=0.7, random_state=42)

    catboost_model = catboost_models.CatBoostClassifierModel(X_train, X_test, y_train, y_test)
    catboost_model.train()

    # Save models in a specific location under the common parent folder

    models_path = os.path.join(common_path, "Files")

    if not os.path.exists(models_path): #if the folder exists
        os.makedirs(models_path) # Create the folder if it doesn't exist

    catboost_model.to_onnx(model_name=os.path.join(models_path, "catboost.H1.onnx"))
然后我们调用该函数,看看它的所作所为。
trainAndSaveCatBoost()
exit() # stop the script
成果
0:      learn: 0.6916088        test: 0.6934968 best: 0.6934968 (0)     total: 163ms    remaining: 16.1s
1:      learn: 0.6901684        test: 0.6936087 best: 0.6934968 (0)     total: 168ms    remaining: 8.22s
2:      learn: 0.6888965        test: 0.6931576 best: 0.6931576 (2)     total: 175ms    remaining: 5.65s
3:      learn: 0.6856524        test: 0.6927187 best: 0.6927187 (3)     total: 184ms    remaining: 4.41s
4:      learn: 0.6843646        test: 0.6927737 best: 0.6927187 (3)     total: 196ms    remaining: 3.72s
...
...
...
96:     learn: 0.5992419        test: 0.6995323 best: 0.6927187 (3)     total: 915ms    remaining: 28.3ms
97:     learn: 0.5985751        test: 0.7002011 best: 0.6927187 (3)     total: 924ms    remaining: 18.9ms
98:     learn: 0.5978617        test: 0.7003299 best: 0.6927187 (3)     total: 928ms    remaining: 9.37ms
99:     learn: 0.5968786        test: 0.7010596 best: 0.6927187 (3)     total: 932ms    remaining: 0us

bestTest = 0.6927187021
bestIteration = 3

Shrink model to first 4 iterations.
Model's accuracy on out-of-sample data =  0.5
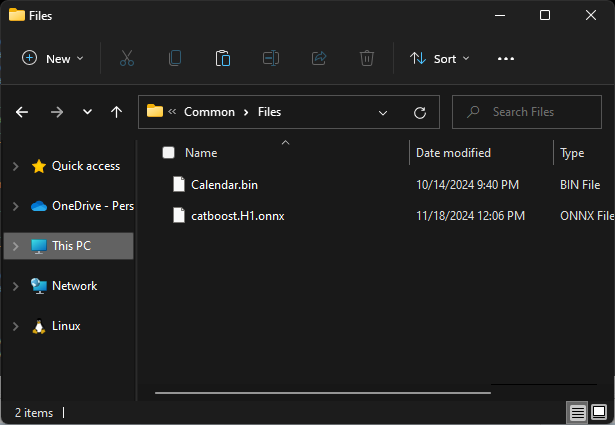
可在 Common\Files 下看到 .onnx 文件。
步骤 03:MetaTrader 5
现在我们必须在 MetaTrader 5 中加载以 ONNX 格式保存的模型。
我们首先导入函数库来帮助我们完成该任务。
"Online Learning Catboost.mq5" 的内容
#include <CatBoost.mqh>
CCatBoost *catboost;

input string model_name = "catboost.H1.onnx";
input string symbol = "EURUSD";
input ENUM_TIMEFRAMES timeframe = PERIOD_H1;

string common_path;
我们在 Oninit 函数中要做的第一件事是检查该文件是否存在于 Common 文件夹之中,如果它不存在,这可能表明该模型尚未经过训练。
之后,我们通过传递 ONNX_COMMON_FOLDER 标志来初始化 ONNX 模型,以从“Common” 文件夹显式加载模型。
int OnInit()
  {
//--- Check if the model file exists

   if (!FileIsExist(model_name, FILE_COMMON))
     {
       printf("%s Onnx file doesn't exist",__FUNCTION__);
       return INIT_FAILED;
     }

//--- Initialize a catboost model

  catboost = new CCatBoost();
  if (!catboost.Init(model_name, ONNX_COMMON_FOLDER))
    {
      printf("%s failed to initialize the catboost model, error = %d",__FUNCTION__,GetLastError());
      return INIT_FAILED;
    }

//---
}
为了运用这个加载的模型进行预测,我们回到 Python 脚本,并检查删除一些特征之后,哪些可在训练中所用。
必须在 MQL5 中按相同的特征和相同的顺序收集数据。
Python 代码 "main.py" 文件。
X = data.drop(columns = ["spread","real_volume","future_close","future_open","target"])
y = data["target"]

print(X.head())
成果
         time     open     high      low    close  tick_volume
0  1726772400  1.11469  1.11584  1.11453  1.11556         3315
1  1726776000  1.11556  1.11615  1.11525  1.11606         2812
2  1726779600  1.11606  1.11680  1.11606  1.11656         2309
3  1726783200  1.11656  1.11668  1.11590  1.11622         2667
4  1726786800  1.11622  1.11644  1.11605  1.11615         1166
现在,我们在 OnTick 函数内获取该信息,并调用预测类里的 predict_bin 函数。
该函数将依据我们在 Python 客户端中准备的目标变量预测 0(看涨)、1(看跌)。
void OnTick()
  {
//---
     MqlRates rates[];
     CopyRates(symbol, timeframe, 1, 1, rates); //copy the recent closed bar information

     vector x = {
                 (double)rates[0].time,
                 rates[0].open,
                 rates[0].high,
                 rates[0].low,
                 rates[0].close,
                 (double)rates[0].tick_volume};

     Comment(TimeCurrent(),"\nPredicted signal: ",catboost.predict_bin(x)==0?"Bearish":"Bullish");// if the predicted signal is 0 it means a bearish signal, otherwise it is a bullish signal
  }
成果
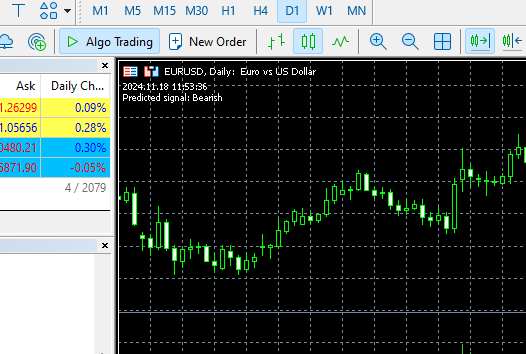
自动化训练和部署过程
我们能够在 MetaTrader 5 中训练和部署模型,但这并非我们所愿,我们的主要目标是自动化整个过程。
在 Python 虚拟环境内,我们必须安装 schedule 函数库。
$ pip install schedule
这个小模块能帮助我们调度何时执行特定函数。由于我们已把收集数据、训练、和保存模型的代码包装在一个函数当中,因此我们调度每分钟调用一次该函数。
schedule.every(1).minute.do(trainAndSaveCatBoost) #schedule catboost training

# Keep the script running to execute the scheduled tasks
while True:
    schedule.run_pending()
    time.sleep(60)  # Wait for 1 minute before checking again
这种调度操作颇具魅力:)
在我们的主要智能系统中,我们还调度 EA 应从公用目录加载模型的时间和频率,如此行事,我们就可有效地更新交易机器人模型。
我们可用 OnTimer 函数,它的操作亦充满魅力:)
int OnInit()
  {
//--- Check if the model file exists

  ....

//--- Initialize a catboost model

....

//---

   if (!EventSetTimer(60)) //Execute the OnTimer function after every 60 seconds
     {
       printf("%s failed to set the event timer, error = %d",__FUNCTION__,GetLastError());
       return INIT_FAILED;
     }


//---
   return(INIT_SUCCEEDED);
  }
//+------------------------------------------------------------------+
//| Expert deinitialization function                                 |
//+------------------------------------------------------------------+
void OnDeinit(const int reason)
  {
//---
    if (CheckPointer(catboost) != POINTER_INVALID)
      delete catboost;
  }
//+------------------------------------------------------------------+
//| Expert tick function                                             |
//+------------------------------------------------------------------+
void OnTick()
  {
//---
     ....
  }
//+------------------------------------------------------------------+
//|                                                                  |
//+------------------------------------------------------------------+
void OnTimer(void)
  {
    if (CheckPointer(catboost) != POINTER_INVALID)
      delete catboost;

//--- Load the new model after deleting the prior one from memory

     catboost = new CCatBoost();
     if (!catboost.Init(model_name, ONNX_COMMON_FOLDER))
       {
         printf("%s failed to initialize the catboost model, error = %d",__FUNCTION__,GetLastError());
         return;
       }

     printf("%s New model loaded",TimeToString(TimeCurrent(), TIME_DATE|TIME_MINUTES));
  }
成果
HO      0       13:14:00.648    Online Learning Catboost (EURUSD,D1)    2024.11.18 12:14 New model loaded
FK      0       13:15:55.388    Online Learning Catboost (GBPUSD,H1)    2024.11.18 12:15 New model loaded
JG      0       13:16:55.380    Online Learning Catboost (GBPUSD,H1)    2024.11.18 12:16 New model loaded
MP      0       13:17:55.376    Online Learning Catboost (GBPUSD,H1)    2024.11.18 12:17 New model loaded
JM      0       13:18:55.377    Online Learning Catboost (GBPUSD,H1)    2024.11.18 12:18 New model loaded
PF      0       13:19:55.368    Online Learning Catboost (GBPUSD,H1)    2024.11.18 12:19 New model loaded
CR      0       13:20:55.387    Online Learning Catboost (GBPUSD,H1)    2024.11.18 12:20 New model loaded
NO      0       13:21:55.377    Online Learning Catboost (GBPUSD,H1)    2024.11.18 12:21 New model loaded
LH      0       13:22:55.379    Online Learning Catboost (GBPUSD,H1)    2024.11.18 12:22 New model loaded
现在我们已经了解了如何调度训练过程,并保持新模型与 MetaTrader 5 中的智能系统同步。虽然对于大多数机器学习技术来说,该过程很容易实现,但在与深度学习模型,诸如循环神经网络(RNN)等搭配工作时,这可能是一个颇具挑战性的过程,其不能包含在 Sklearn 管道之中,这令我们在与各种机器学习模型配合工作时更轻松。
我们看看在运用门控循环单元(GRU)时如何应用该技术,即其是循环神经网络的一种特殊形式。
深度学习 AI 模型的在线学习
Python 客户端
我们在 GRUClassifier 类中应用了典型的机器学习素材。有关 GRU 的更多信息,请参阅这篇文章。
训练模型之后,我们将其保存为 ONNX,这次我们还把 StandardScaler 的信息保存在二进制文件之中,这将有助于我们往后在 MQL5 中类似地规范化新数据,就如它目前在 Python 中一样。
文件 gru_models.py
import numpy as np
import tensorflow as tf
from tensorflow.keras.models import Sequential
from tensorflow.keras.layers import GRU, Dense, Input, Dropout
from keras.callbacks import EarlyStopping
from keras.optimizers import Adam
import tf2onnx


class GRUClassifier():
    def __init__(self, time_step, X_train, X_test, y_train, y_test):

        self.X_train = X_train
        self.X_test = X_test
        self.y_train = y_train
        self.y_test = y_test
        self.model = None
        self.time_step = time_step
        self.classes_in_y = np.unique(self.y_train)


    def train(self, learning_rate=0.001, layers=2, neurons = 50, activation="relu", batch_size=32, epochs=100, loss="binary_crossentropy", verbose=0):

        self.model = Sequential()
        self.model.add(Input(shape=(self.time_step, self.X_train.shape[2])))
        self.model.add(GRU(units=neurons, activation=activation)) # input layer


        for layer in range(layers): # dynamically adjusting the number of hidden layers

            self.model.add(Dense(units=neurons, activation=activation))
            self.model.add(Dropout(0.5))

        self.model.add(Dense(units=len(self.classes_in_y), activation='softmax', name='output_layer')) # the output layer

        # Compile the model
        adam_optimizer = Adam(learning_rate=learning_rate)
        self.model.compile(optimizer=adam_optimizer, loss=loss, metrics=['accuracy'])


        early_stopping = EarlyStopping(monitor='val_loss', patience=10, restore_best_weights=True)

        history = self.model.fit(self.X_train, self.y_train, epochs=epochs, batch_size=batch_size,
                                 validation_data=(self.X_test, self.y_test),
                                 callbacks=[early_stopping], verbose=verbose)

        val_loss, val_accuracy = self.model.evaluate(self.X_test, self.y_test, verbose=verbose)

        print("Gru accuracy on validation sample = ",val_accuracy)


    def to_onnx(self, model_name, standard_scaler):

        # Convert the Keras model to ONNX
        spec = (tf.TensorSpec((None, self.time_step, self.X_train.shape[2]), tf.float16, name="input"),)
        self.model.output_names = ['outputs']

        onnx_model, _ = tf2onnx.convert.from_keras(self.model, input_signature=spec, opset=13)

        # Save the ONNX model to a file
        with open(model_name, "wb") as f:
            f.write(onnx_model.SerializeToString())

        # Save the mean and scale parameters to binary files
        standard_scaler.mean_.tofile(f"{model_name.replace('.onnx','')}.standard_scaler_mean.bin")
        standard_scaler.scale_.tofile(f"{model_name.replace('.onnx','')}.standard_scaler_scale.bin")
在 “main.py” 文件中,我们创建一个函数,负责我们运用 GRU 模型时希望发生的一切。
def trainAndSaveGRU():

    data = getData(start=1, bars=1000)

    # Preparing the target variable

    data["future_open"] = data["open"].shift(-1)
    data["future_close"] = data["close"].shift(-1)

    target = []
    for row in range(data.shape[0]):
        if data["future_close"].iloc[row] > data["future_open"].iloc[row]:
            target.append(1)
        else:
            target.append(0)

    data["target"] = target

    data = data.dropna()

    # Check if we were able to receive some data

    if (len(data)<=0):
        print("Failed to obtain data from Metatrader5, error = ",mt5.last_error())
        mt5.shutdown()

    X = data.drop(columns = ["spread","real_volume","future_close","future_open","target"])
    y = data["target"]

    X_train, X_test, y_train, y_test = train_test_split(X, y, train_size=0.7, shuffle=False)

    ########### Preparing data for timeseries forecasting ###############

    time_step = 10

    scaler = StandardScaler()

    X_train = scaler.fit_transform(X_train)
    X_test = scaler.transform(X_test)

    x_train_seq, y_train_seq = create_sequences(X_train, y_train, time_step)
    x_test_seq, y_test_seq = create_sequences(X_test, y_test, time_step)

    ###### One HOt encoding #######

    y_train_encoded = to_categorical(y_train_seq)
    y_test_encoded = to_categorical(y_test_seq)

    gru = gru_models.GRUClassifier(time_step=time_step,
                                    X_train= x_train_seq,
                                    y_train= y_train_encoded,
                                    X_test= x_test_seq,
                                    y_test= y_test_encoded
                                    )

    gru.train(
        batch_size=64,
        learning_rate=0.001,
        activation = "relu",
        epochs=1000,
        loss="binary_crossentropy",
        layers = 2,
        neurons = 50,
        verbose=1
        )

    # Save models in a specific location under the common parent folder

    models_path = os.path.join(common_path, "Files")

    if not os.path.exists(models_path): #if the folder exists
        os.makedirs(models_path) # Create the folder if it doesn't exist

    gru.to_onnx(model_name=os.path.join(models_path, "gru.H1.onnx"), standard_scaler=scaler)
最后,我们能调度 trainAndSaveGRU 函数应当被调用的频率,类似于我们调度 CatBoost 函数。
schedule.every(1).minute.do(trainAndSaveGRU) #scheduled GRU training
成果
Epoch 1/1000
11/11 ━━━━━━━━━━━━━━━━━━━━ 7s 87ms/step - accuracy: 0.4930 - loss: 0.6985 - val_accuracy: 0.5000 - val_loss: 0.6958
Epoch 2/1000
11/11 ━━━━━━━━━━━━━━━━━━━━ 0s 16ms/step - accuracy: 0.4847 - loss: 0.6957 - val_accuracy: 0.4931 - val_loss: 0.6936
Epoch 3/1000
11/11 ━━━━━━━━━━━━━━━━━━━━ 0s 17ms/step - accuracy: 0.5500 - loss: 0.6915 - val_accuracy: 0.4897 - val_loss: 0.6934
Epoch 4/1000
11/11 ━━━━━━━━━━━━━━━━━━━━ 0s 16ms/step - accuracy: 0.4910 - loss: 0.6923 - val_accuracy: 0.4690 - val_loss: 0.6938
Epoch 5/1000
11/11 ━━━━━━━━━━━━━━━━━━━━ 0s 16ms/step - accuracy: 0.5538 - loss: 0.6910 - val_accuracy: 0.4897 - val_loss: 0.6935
Epoch 6/1000
11/11 ━━━━━━━━━━━━━━━━━━━━ 0s 20ms/step - accuracy: 0.5037 - loss: 0.6953 - val_accuracy: 0.4931 - val_loss: 0.6937
Epoch 7/1000
...
...
...
11/11 ━━━━━━━━━━━━━━━━━━━━ 0s 22ms/step - accuracy: 0.4964 - loss: 0.6952 - val_accuracy: 0.4793 - val_loss: 0.6940
Epoch 20/1000
11/11 ━━━━━━━━━━━━━━━━━━━━ 0s 19ms/step - accuracy: 0.5285 - loss: 0.6914 - val_accuracy: 0.4793 - val_loss: 0.6949
Epoch 21/1000
11/11 ━━━━━━━━━━━━━━━━━━━━ 0s 17ms/step - accuracy: 0.5224 - loss: 0.6935 - val_accuracy: 0.4966 - val_loss: 0.6942
Epoch 22/1000
11/11 ━━━━━━━━━━━━━━━━━━━━ 0s 21ms/step - accuracy: 0.5009 - loss: 0.6936 - val_accuracy: 0.5103 - val_loss: 0.6933
10/10 ━━━━━━━━━━━━━━━━━━━━ 0s 19ms/step - accuracy: 0.4925 - loss: 0.6938
Gru accuracy on validation sample =  0.5103448033332825
MetaTrader 5 版本
我们首先加载函数库,助力我们加载 GRU 模型、及标准缩放器的任务。
#include <preprocessing.mqh>
#include <GRU.mqh>

CGRU *gru;
StandardizationScaler *scaler;

//--- Arrays for temporary storage of the scaler values
double scaler_mean[], scaler_std[];

input string model_name = "gru.H1.onnx";

string mean_file;
string std_file;
我们要在 OnInit 函数中做的第一件事是获取缩放器二进制文件的名称,我们在创建这些文件时应用了相同的原则。
 string base_name__ = model_name;

 if (StringReplace(base_name__,".onnx","")<0)
   {
     printf("%s Failed to obtain the parent name for the scaler files, error = %d",__FUNCTION__,GetLastError());
     return INIT_FAILED;
   }

  mean_file = base_name__ + ".standard_scaler_mean.bin";
  std_file = base_name__ + ".standard_scaler_scale.bin";
最后,我们继续从公用文件夹加载 ONNX 格式的 GRU 模型,我们还读取二进制格式的缩放器文件,以便在 scaler_mean 和 scaler_std 数组中为它们赋值。
int OnInit()
  {

   string base_name__ = model_name;

   if (StringReplace(base_name__,".onnx","")<0) //we followed this same file patterns while saving the binary files in python client
     {
       printf("%s Failed to obtain the parent name for the scaler files, error = %d",__FUNCTION__,GetLastError());
       return INIT_FAILED;
     }

   mean_file = base_name__ + ".standard_scaler_mean.bin";
   std_file = base_name__ + ".standard_scaler_scale.bin";

//--- Check if the model file exists

   if (!FileIsExist(model_name, FILE_COMMON))
     {
       printf("%s Onnx file doesn't exist",__FUNCTION__);
       return INIT_FAILED;
     }

//--- Initialize the GRU model from the common folder

     gru = new CGRU();
     if (!gru.Init(model_name, ONNX_COMMON_FOLDER))
       {
         printf("%s failed to initialize the gru model, error = %d",__FUNCTION__,GetLastError());
         return INIT_FAILED;
       }

//--- Read the scaler files

   if (!readArray(mean_file, scaler_mean) || !readArray(std_file, scaler_std))
     {
       printf("%s failed to read scaler information",__FUNCTION__);
       return INIT_FAILED;
     }

   scaler = new StandardizationScaler(scaler_mean, scaler_std); //Load the scaler class by populating it with values

//--- Set the timer

   if (!EventSetTimer(60))
     {
       printf("%s failed to set the event timer, error = %d",__FUNCTION__,GetLastError());
       return INIT_FAILED;
     }

//---
   return(INIT_SUCCEEDED);
  }
//+------------------------------------------------------------------+
//| Expert deinitialization function                                 |
//+------------------------------------------------------------------+
void OnDeinit(const int reason)
  {
//---

    if (CheckPointer(gru) != POINTER_INVALID)
      delete gru;
    if (CheckPointer(scaler) != POINTER_INVALID)
      delete scaler;
  }
我们调度 OnTimer 函数从公用文件夹读取缩放器和模型文件的过程。
void OnTimer(void)
  {
//--- Delete the existing pointers in memory as the new ones are about to be created

    if (CheckPointer(gru) != POINTER_INVALID)
      delete gru;
    if (CheckPointer(scaler) != POINTER_INVALID)
      delete scaler;

//---

   if (!readArray(mean_file, scaler_mean) || !readArray(std_file, scaler_std))
     {
       printf("%s failed to read scaler information",__FUNCTION__);
       return;
     }

   scaler = new StandardizationScaler(scaler_mean, scaler_std);

     gru = new CGRU();
     if (!gru.Init(model_name, ONNX_COMMON_FOLDER))
       {
         printf("%s failed to initialize the gru model, error = %d",__FUNCTION__,GetLastError());
         return;

       }
     printf("%s New model loaded",TimeToString(TimeCurrent(), TIME_DATE|TIME_MINUTES));
  }
成果
II      0       14:49:35.920    Online Learning GRU (GBPUSD,H1) 2024.11.18 13:49 New model loaded
QP      0       14:50:35.886    Online Learning GRU (GBPUSD,H1) Initilaizing ONNX model...
MF      0       14:50:35.919    Online Learning GRU (GBPUSD,H1) ONNX model Initialized
IJ      0       14:50:35.919    Online Learning GRU (GBPUSD,H1) 2024.11.18 13:50 New model loaded
EN      0       14:51:35.894    Online Learning GRU (GBPUSD,H1) Initilaizing ONNX model...
JD      0       14:51:35.913    Online Learning GRU (GBPUSD,H1) ONNX model Initialized
EL      0       14:51:35.913    Online Learning GRU (GBPUSD,H1) 2024.11.18 13:51 New model loaded
NM      0       14:52:35.885    Online Learning GRU (GBPUSD,H1) Initilaizing ONNX model...
KK      0       14:52:35.915    Online Learning GRU (GBPUSD,H1) ONNX model Initialized
QQ      0       14:52:35.915    Online Learning GRU (GBPUSD,H1) 2024.11.18 13:52 New model loaded
DK      0       14:53:35.899    Online Learning GRU (GBPUSD,H1) Initilaizing ONNX model...
HI      0       14:53:35.935    Online Learning GRU (GBPUSD,H1) ONNX model Initialized
MS      0       14:53:35.935    Online Learning GRU (GBPUSD,H1) 2024.11.18 13:53 New model loaded
DI      0       14:54:35.885    Online Learning GRU (GBPUSD,H1) Initilaizing ONNX model...
IL      0       14:54:35.908    Online Learning GRU (GBPUSD,H1) ONNX model Initialized
QE      0       14:54:35.908    Online Learning GRU (GBPUSD,H1) 2024.11.18 13:54 New model loaded
为了从 GRU 模型接收预测,我们必须考虑有助于循环神经网络(RNN)理解数据中时态依赖关系的时间步长值。
我们在函数 “trainAndSaveGRU” 中使用了ten(10) 的时间步长值。
def trainAndSaveGRU():

    data = getData(start=1, bars=1000)

     ....
     ....

    time_step = 10
我们在 MQL5 中从历史记录中的最近收盘柱线开始收集最后 10 根柱线(时间步长)。(推测它应当如此)
input int time_step = 10;
void OnTick()
  {
//---
     MqlRates rates[];
     CopyRates(symbol, timeframe, 1, time_step, rates); //copy the recent closed bar information

     vector classes = {0,1}; //Beware of how classes are organized in the target variable. use numpy.unique(y) to determine this array

     matrix X = matrix::Zeros(time_step, 6); // 6 columns
     for (int i=0; i<time_step; i++)
       {
         vector row = {
                 (double)rates[i].time,
                 rates[i].open,
                 rates[i].high,
                 rates[i].low,
                 rates[i].close,
                 (double)rates[i].tick_volume};

         X.Row(row, i);
       }

     X = scaler.transform(X); //it's important to normalize the data
     Comment(TimeCurrent(),"\nPredicted signal: ",gru.predict_bin(X, classes)==0?"Bearish":"Bullish");// if the predicted signal is 0 it means a bearish signal, otherwise it is a bullish signal
  }
成果
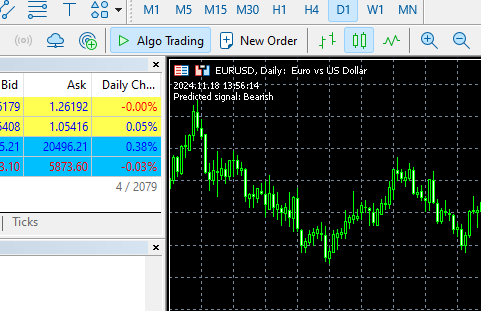
增量机器学习
至于训练方法,一些模型比之其它更熟练、更稳健。当您在互联网上搜索“在线机器学习”时,大多数人会说这是一个过程,通过该过程,小批量重训练数据被回馈给模型,从而实现更大的训练目标。
这样做的问题在于,当给定的数据样本太少时,许多模型不支持、或无法正常工作。
像 CatBoost 这样的现代机器学习技术已伴随了增量学习。这种训练方法能用于在线学习,在处置大数据时有助于节省大量内存,在于数据可拆分为小块,其可被重新训练回馈到初始模型。
def getData(start = 1, bars = 1000):

    rates = mt5.copy_rates_from_pos("EURUSD", mt5.TIMEFRAME_H1, start, bars)

    df_rates = pd.DataFrame(rates)

    return df_rates

def trainIncrementally():

    # CatBoost model
    clf = CatBoostClassifier(
        task_type="CPU",
        iterations=2000,
        learning_rate=0.2,
        max_depth=1,
        verbose=0,
    )

    # Get big data
    big_data = getData(1, 10000)

    # Split into chunks of 1000 samples
    chunk_size = 1000
    chunks = [big_data[i:i + chunk_size].copy() for i in range(0, len(big_data), chunk_size)]  # Use .copy() here

    for i, chunk in enumerate(chunks):

        # Preparing the target variable

        chunk["future_open"] = chunk["open"].shift(-1)
        chunk["future_close"] = chunk["close"].shift(-1)

        target = []
        for row in range(chunk.shape[0]):
            if chunk["future_close"].iloc[row] > chunk["future_open"].iloc[row]:
                target.append(1)
            else:
                target.append(0)

        chunk["target"] = target

        chunk = chunk.dropna()

        # Check if we were able to receive some data

        if (len(chunk)<=0):
            print("Failed to obtain chunk from Metatrader5, error = ",mt5.last_error())
            mt5.shutdown()

        X = chunk.drop(columns = ["spread","real_volume","future_close","future_open","target"])
        y = chunk["target"]

        X_train, X_val, y_train, y_val = train_test_split(X, y, train_size=0.8, random_state=42)

        if i == 0:
            # Initial training, training the model for the first time
            clf.fit(X_train, y_train, eval_set=(X_val, y_val))

            y_pred = clf.predict(X_val)
            print(f"---> Acc score: {accuracy_score(y_pred=y_pred, y_true=y_val)}")
        else:
            # Incremental training by using the intial trained model
            clf.fit(X_train, y_train, init_model="model.cbm", eval_set=(X_val, y_val))

            y_pred = clf.predict(X_val)
            print(f"---> Acc score: {accuracy_score(y_pred=y_pred, y_true=y_val)}")

        # Save the model
        clf.save_model("model.cbm")
        print(f"Chunk {i + 1}/{len(chunks)} processed and model saved.")
成果
---> Acc score: 0.555
Chunk 1/10 processed and model saved.
---> Acc score: 0.505
Chunk 2/10 processed and model saved.
---> Acc score: 0.55
Chunk 3/10 processed and model saved.
---> Acc score: 0.565
Chunk 4/10 processed and model saved.
---> Acc score: 0.495
Chunk 5/10 processed and model saved.
---> Acc score: 0.55
Chunk 6/10 processed and model saved.
---> Acc score: 0.555
Chunk 7/10 processed and model saved.
---> Acc score: 0.52
Chunk 8/10 processed and model saved.
---> Acc score: 0.455
Chunk 9/10 processed and model saved.
---> Acc score: 0.535
Chunk 10/10 processed and model saved.
您可在逐步构建模型时,遵循相同的在线学习架构,并将最终模型以 ONNX 格式保存在 “Common” 文件夹中,以供 MetaTrader 5 使用。
后记
在线学习是一种优异的方式,以最少的人工干预保持模型不断更新。通过实现该基础设施,您可确保您的模型与最新的市场趋势保持一致,并快速适应新信息。然而,值得注意的是,在线学习有时会令模型对数据处理的顺序高度敏感,往往需人工监督来验证从人类角度来看模型及训练信息是否具有逻辑意义。您需要在自动化学习过程,及定期评估模型之间找到适当的平衡,以确保一切按预期进行。
附件表
基础结构(文件夹) | 文件 | 说明 & 用法 |
|---|---|---|
Python 客户端 | - catboost_models.py - gru_models.py - main.py - incremental_learning.py | - 在此文件中可以找到 CatBoost 模型 - 在此文件中可以找到 GRU 模型 - 用于将它们组合在一起的主 python 文件 - CatBoost 模型的增量学习部署在此文件中 |
Common 文件夹 | - catboost.H1.onnx - gru.H1.onnx - gru.H1.standard_scaler_mean.bin - gru.H1.standard_scaler_scale.bin | 所有 ONNX 格式的 AI 模型和二进制格式的缩放器文件都可以在此文件夹中找到 |
| MetaTrader 5 版本 | - Experts\Online Learning Catboost.mq5 - Experts\Online Learning GRU.mq5 - Include\CatBoost.mqh - Include\GRU.mqh - Include\preprocessing.mqh | 部署 CatBoost 模型- Deploys a GRU model in MQL5 - 用于初始化和部署 ONNX 格式的 CatBoost 模型的库文件 - 用于初始化和部署 ONNX 格式的 GRU 模型的库文件 - 包含 StandardScaler 的库文件,用于规范化 ML 模型用到的数据 |
本文由MetaQuotes Ltd译自英文
原文地址: https://www.mql5.com/en/articles/16390
注意: MetaQuotes Ltd.将保留所有关于这些材料的权利。全部或部分复制或者转载这些材料将被禁止。
本文由网站的一位用户撰写,反映了他们的个人观点。MetaQuotes Ltd 不对所提供信息的准确性负责,也不对因使用所述解决方案、策略或建议而产生的任何后果负责。

你好,Omega J Msigwa
我问你这篇文章使用的是什么版本的 python,我安装了它,但出现了库冲突。
冲突的原因是
用户请求 protobuf==3.20.3
onnx 1.17.0 依赖于 protobuf>=3.20.2
onnxconverter-common 1.14.0 依赖于 protobuf==3.20.2
然后我按照建议编辑了版本,结果又出现了安装错误。
要解决这个问题,你可以尝试
1. 放宽你指定的软件包版本范围
2. 删除软件包版本,让 pip 尝试解决依赖冲突。
造成冲突的原因是
用户请求 protobuf==3.20.2
onnx 1.17.0 依赖于 protobuf>=3.20.2
onnxconverter-common 1.14.0 依赖于 protobuf==3.20.2
tensorboard 2.18.0 依赖于 protobuf!=4.24.0 和 >=3.19.6
tensorflow-intel 2.18.0 依赖于 protobuf!=4.21.0, !=4.21.1, !=4.21.2, !=4.21.3, !=4.21.4, !=4.21.5, <6.0.0dev 和 >=3.20.3
要解决这个问题,您可以尝试
1. 放宽你指定的软件包版本范围
2. 删除软件包版本,让 pip 尝试解决依赖冲突问题
请提供更多说明
嗨,奥米加-J-姆西格瓦
我问你这篇文章使用的是什么版本的 python,我安装了它,但出现了库冲突。
造成冲突的原因是
用户请求 protobuf==3.20.3
onnx 1.17.0 依赖于 protobuf>=3.20.2
onnxconverter-common 1.14.0 依赖于 protobuf==3.20.2
然后我按照建议编辑了版本,结果又出现了安装错误。
要解决这个问题,你可以尝试
1. 放宽您指定的软件包版本范围
2. 删除软件包版本,让 pip 试图
解决依赖冲突
造成冲突的原因是
用户请求 protobuf==3.20.2
onnx 1.17.0 依赖于 protobuf>=3.20.2
onnxconverter-common 1.14.0 依赖于 protobuf==3.20.2
tensorboard 2.18.0 依赖于 protobuf!=4.24.0 和 >=3.19.6
tensorflow-intel 2.18.0 依赖于 protobuf!=4.21.0, !=4.21.1, !=4.21.2, !=4.21.3, !=4.21.4, !=4.21.5, <6.0.0dev 和 >=3.20.3
要解决这个问题,您可以尝试
1. 放宽您指定的软件包版本范围
2. 删除软件包版本,让 pip 尝试解决依赖冲突问题
请提供更多说明
你好,Omega J Msigwa
我问您这篇文章使用的是什么版本的 python,我安装了它,但出现了库冲突。
造成冲突的原因是
用户请求 protobuf==3.20.3
onnx 1.17.0 依赖于 protobuf>=3.20.2
onnxconverter-common 1.14.0 依赖于 protobuf==3.20.2
然后我按照建议编辑了版本,结果又出现了安装错误。
要解决这个问题,你可以尝试
1. 放宽您指定的软件包版本范围
2. 删除软件包版本,让 pip 尝试解决依赖冲突问题
造成冲突的原因是
用户请求 protobuf==3.20.2
onnx 1.17.0 依赖于 protobuf>=3.20.2
onnxconverter-common 1.14.0 依赖于 protobuf==3.20.2
tensorboard 2.18.0 依赖于 protobuf!=4.24.0 和 >=3.19.6
tensorflow-intel 2.18.0 依赖于 protobuf!=4.21.0, !=4.21.1, !=4.21.2, !=4.21.3, !=4.21.4, !=4.21.5, <6.0.0dev 和 >=3.20.3
要解决这个问题,您可以尝试
1. 放宽您指定的软件包版本范围
2. 删除软件包版本,让 pip 尝试解决依赖冲突问题
请提供更多说明
numpy==1.23.5