Guia prático do MQL5: Desenvolvendo uma estrutura para um sistema de negócios baseado na estratégia de tela tripla
Introdução
Ao buscar ou desenvolver sistemas de negócios, muitos investidores devem ter ouvido falar a respeito da estratégia da tela tripla apresentada pelo Dr. Alexander Elder. Existem várias pessoas na internet cujo julgamento sobre essa estratégia é negativo. Entretanto, muitas pessoas acreditam que ela pode ajudar alguém a obter lucro. Você não precisa confiar nessas duas opiniões. Tudo deve ser sempre verificado previamente. Se você estudar programação, tudo está em suas mãos já que pode verificar o desempenho da estratégia de negócios utilizando testes comparativos.
Nesse artigo, desenvolveremos uma estrutura para um sistema de negócios baseado na estratégia de tela tripla no MQL5. O Consultor Especialista não será desenvolvido do zero. Ao invés disso, simplesmente modificaremos o programa do artigo anterior "Guia prático do MQL5: Usando indicadores para definir condições de negócio em Consultores Especialistas". Então o artigo também demonstrará como você pode modificar facilmente padrões de programas já prontos.
O Consultor Especialista do artigo anterior já apresenta a possibilidade de habilitar/desabilitar o Stop Loss/Take Profit (parar perdas/obter lucros) e os níveis de Trailing Stop (parada móvel), aumento do volume de posição e inversão de posição no sinal oposto. Todas as funções necessárias foram estabelecidas. Então, nossa tarefa está focada na alteração da lista de parâmetros externos através da inclusão de opções adicionais e da modificação de algumas funções existentes.
Para fins ilustrativos, organizaremos quatro sinais em três prazos a serem gerados utilizando o indicador de Média Móvel. Mais tarde, ao prosseguir para o experimento na estrutura desenvolvida, você será capaz de empregar qualquer outro indicador através de uma ligeira modificação no código. Também implementaremos a oportunidade de ajustar intervalos de tempo para cada tela. Se o parâmetro responsável pelo período do indicador tiver valor zero, isso indicará que a tela correspondente não está utilizada. Em outras palavras, o sistema pode ser montado para ter um ou dois intervalos de tempo.
Antes de começar, faça uma cópia da pasta com os arquivos do Consultor Especialista do artigo anterior e o renomeie.
Desenvolvimento do Consultor Especialista
Vamos começar com os parâmetros externos. Abaixo está o código da lista atualizada. Novas linhas foram escolhidas. Intervalos de tempo são declarados com o tipo de enumeração ENUM_TIMEFRAMES. Você terá a capacidade de selecionar qualquer intervalo de tempo da lista suspensa.
//--- External parameters of the Expert Advisor
sinput   long              MagicNumber=777;        // Magic number
sinput   int               Deviation=10;           // Slippage
//---
input    ENUM_TIMEFRAMES   Screen01TimeFrame=PERIOD_W1;  // Time frame of the first screen
input    int               Screen01IndicatorPeriod=14;   // Indicator period of the first screen
//---
input    ENUM_TIMEFRAMES   Screen02TimeFrame=PERIOD_D1;  // Time frame of the second screen
input    int               Screen02IndicatorPeriod=24;   // Indicator period of the second screen
//---
input    ENUM_TIMEFRAMES   Screen03TimeFrame=PERIOD_H4;  // Time frame of the third screen
input    int               Screen03IndicatorPeriod=44;   // Indicator period of the third screen
//---
input    double            Lot=0.1;                      // Lot
input    double            VolumeIncrease=0.1;           // Position volume increase
input    double            VolumeIncreaseStep=10;        // Step for position volume increase
input    double            StopLoss=50;                  // Stop Loss
input    double            TakeProfit=100;               // Take Profit
input    double            TrailingStop=10;              // Trailing Stop
input    bool              Reverse=true;                 // Position reversal
sinput   bool              ShowInfoPanel=true;           // Display of the info panel
O parâmetro IndicatorSegments, assim como a variável AllowedNumberOfSegments e a função CorrectInputParameters() foram removidas para simplificar o exemplo. Aqueles que estiverem interessados nessa condição podem tentar implementá-la por sua conta. Você deve também remover a enumeração dos indicadores no arquivo Enums.mqh já que esse Consultor Especialista empregará apenas um indicador.
Já que haverá um indicador diferente em cada prazo, precisaremos de uma variável diferente para obter um identificador de cada um dos indicadores:
//--- Indicator handles
int                  Screen01IndicatorHandle=INVALID_HANDLE;   // Indicator handle on the first screen
int                  Screen02IndicatorHandle=INVALID_HANDLE;   // Indicator handle on the second screen
int                  Screen03IndicatorHandle=INVALID_HANDLE;   // Indicator handle on the third screen
A nova barra será verificada utilizando o prazo mínimo. Ao ajustar o prazo mínimo nos parâmetros externos, não temos que seguir uma ordem específica, isto é máximo, intermediário, mínimo. A ordem contrária e basicamente qualquer outra ordem funcionariam. Dessa forma, precisamos de uma função que identificará o prazo mínimo entre todos os prazos especificados.
Já que o Consultor Especialista pode ser ajustado para operar em três prazos, assim como em um ou dois, todas as opções precisam ser consideradas ao determinar o prazo mínimo. Abaixo se o código da função GetMinimumTimeframe():
//+------------------------------------------------------------------+
//| Determining the minimum time frame for the new bar check         |
//+------------------------------------------------------------------+
ENUM_TIMEFRAMES GetMinimumTimeframe(ENUM_TIMEFRAMES timeframe1,int period1,
                                    ENUM_TIMEFRAMES timeframe2,int period2,
                                    ENUM_TIMEFRAMES timeframe3,int period3)
  {
//--- Default minimum time frame value
   ENUM_TIMEFRAMES timeframe_min=PERIOD_CURRENT;

//--- Convert time frame values to seconds for calculations
   int t1= PeriodSeconds(timeframe1);
   int t2= PeriodSeconds(timeframe2);
   int t3= PeriodSeconds(timeframe3);

//--- Check for incorrect period values
   if(period1<=0 && period2<=0 && period3<=0)
      return(timeframe_min);

//--- Conditions for a single time frame
   if(period1>0 && period2<=0 && period3<=0)
      return(timeframe1);
   if(period2>0 && period1<=0 && period3<=0)
      return(timeframe2);
   if(period3>0 && period1<=0 && period2<=0)
      return(timeframe3);

//--- Conditions for two time frames
   if(period1>0 && period2>0 && period3<=0)
     {
      timeframe_min=(MathMin(t1,t2)==t1) ? timeframe1 : timeframe2;
      return(timeframe_min);
     }
   if(period1>0 && period3>0 && period2<=0)
     {
      timeframe_min=(MathMin(t1,t3)==t1) ? timeframe1 : timeframe3;
      return(timeframe_min);
     }
   if(period2>0 && period3>0 && period1<=0)
     {
      timeframe_min=(MathMin(t2,t3)==t2) ? timeframe2 : timeframe3;
      return(timeframe_min);
     }

//--- Conditions for three time frames
   if(period1>0 && period2>0 && period3>0)
     {
      timeframe_min=(int)MathMin(t1,t2)==t1 ? timeframe1 : timeframe2;
      int t_min=PeriodSeconds(timeframe_min);
      timeframe_min=(int)MathMin(t_min,t3)==t_min ? timeframe_min : timeframe3;
      return(timeframe_min);
     }
   return(WRONG_VALUE);
  }
Para gravar o valor do prazo mínimo, criaremos outra variável de âmbito global:
//--- Variable for determining the minimum time frame
ENUM_TIMEFRAMES  MinimumTimeframe=WRONG_VALUE;
A função GetMinimumTimeframe() precisará ser acionada ao inicializar o Consultor Especialista na função OnInit().
//+------------------------------------------------------------------+
//| Expert initialization function                                   |
//+------------------------------------------------------------------+
int OnInit()
  {
//--- Determine the minimum time frame for the new bar check
   MinimumTimeframe=GetMinimumTimeframe(Screen01TimeFrame,Screen01IndicatorPeriod,
                                        Screen02TimeFrame,Screen02IndicatorPeriod,
                                        Screen03TimeFrame,Screen03IndicatorPeriod);
//--- Get indicator handles
   GetIndicatorHandles();
//--- Initialize the new bar
   CheckNewBar();
//--- Get the properties
   GetPositionProperties(P_ALL);
//--- Set the info panel
   SetInfoPanel();
//---
   return(0);
  }
O valor da variável MinimumTimeframe é então utilizado nas funçõesCheckNewBar() e GetBarsData().
A função GetIndicatorHandle() agora parece-se conforme abaixo. O período e o prazo são especificados para cada indicador.
//+------------------------------------------------------------------+
//| Getting indicator handles                                        |
//+------------------------------------------------------------------+
void GetIndicatorHandles()
  {
//--- Get handles of the indicators specified in the parameters
   if(Screen01IndicatorPeriod>0)
     Screen01IndicatorHandle=iMA(_Symbol,Screen01TimeFrame,Screen01IndicatorPeriod,0,MODE_SMA,PRICE_CLOSE);
   if(Screen02IndicatorPeriod>0)
     Screen02IndicatorHandle=iMA(_Symbol,Screen02TimeFrame,Screen02IndicatorPeriod,0,MODE_SMA,PRICE_CLOSE);
   if(Screen03IndicatorPeriod>0)
     Screen03IndicatorHandle=iMA(_Symbol,Screen03TimeFrame,Screen03IndicatorPeriod,0,MODE_SMA,PRICE_CLOSE);

//--- If the indicator handle for the first time frame could not be obtained
   if(Screen01IndicatorHandle==INVALID_HANDLE)
     Print("Failed to get the indicator handle for Screen 1!");
//--- If the indicator handle for the second time frame could not be obtained
   if(Screen01IndicatorHandle==INVALID_HANDLE)
     Print("Failed to get the indicator handle for Screen 2!");
//--- If the indicator handle for the third time frame could not be obtained
   if(Screen01IndicatorHandle==INVALID_HANDLE)
     Print("Failed to get the indicator handle for Screen 3!");
  }
Mais adiante, precisaremos adicionar arranjos para obter os valores do indicador (diferente para cada prazo):
//--- Arrays for values of the indicators
double               indicator_buffer1[];
double               indicator_buffer2[];
double               indicator_buffer3[];
A função GetIndicatorsData() para obter os valores do indicador agora parece-se conforme mostrado abaixo: Os identificadores obtidos são verificados quanto à precisão e se tudo estiver bem, os arranjos são preenchidos com os valores do indicador.
//+------------------------------------------------------------------+
//| Getting indicator values                                         |
//+------------------------------------------------------------------+
bool GetIndicatorsData()
  {
//--- Number of indicator buffer values for determining the trading signal
   int NumberOfValues=3;
//--- If indicator handles have not been obtained
   if((Screen01IndicatorPeriod>0 && Screen01IndicatorHandle==INVALID_HANDLE) ||
      (Screen02IndicatorPeriod>0 && Screen02IndicatorHandle==INVALID_HANDLE) ||
      (Screen03IndicatorPeriod>0 && Screen03IndicatorHandle==INVALID_HANDLE))
      //--- try to get them again
      GetIndicatorHandles();

//--- If the time frame of the first screen is used and the indicator handle has been obtained
   if(Screen01TimeFrame>0 && Screen01IndicatorHandle!=INVALID_HANDLE)
     {
      //--- Reverse the indexing order (... 3 2 1 0)
      ArraySetAsSeries(indicator_buffer1,true);
      //--- Get indicator values
      if(CopyBuffer(Screen01IndicatorHandle,0,0,NumberOfValues,indicator_buffer1)<NumberOfValues)
        {
         Print("Failed to copy the values ("+
                  _Symbol+"; "+TimeframeToString(Period())+") to the indicator_buffer1 array! Error ("+
                  IntegerToString(GetLastError())+"): "+ErrorDescription(GetLastError()));
         //---
         return(false);
        }
     }
//--- If the time frame of the second screen is used and the indicator handle has been obtained
   if(Screen02TimeFrame>0 && Screen02IndicatorHandle!=INVALID_HANDLE)
     {
      //--- Reverse the indexing order (... 3 2 1 0)
      ArraySetAsSeries(indicator_buffer2,true);
      //--- Get indicator values
      if(CopyBuffer(Screen02IndicatorHandle,0,0,NumberOfValues,indicator_buffer2)<NumberOfValues)
        {
         Print("Failed to copy the values ("+
                  _Symbol+"; "+TimeframeToString(Period())+") to the indicator_buffer2 array! Error ("+
                  IntegerToString(GetLastError())+"): "+ErrorDescription(GetLastError()));
         //---
         return(false);
        }
     }
//--- If the time frame of the third screen is used and the indicator handle has been obtained
   if(Screen03TimeFrame>0 && Screen03IndicatorHandle!=INVALID_HANDLE)
     {
      //--- Reverse the indexing order (... 3 2 1 0)
      ArraySetAsSeries(indicator_buffer3,true);
      //--- Get indicator values
      if(CopyBuffer(Screen03IndicatorHandle,0,0,NumberOfValues,indicator_buffer3)<NumberOfValues)
        {
         Print("Failed to copy the values ("+
                  _Symbol+"; "+TimeframeToString(Period())+") to the indicator_buffer3 array! Error ("+
                  IntegerToString(GetLastError())+"): "+ErrorDescription(GetLastError()));
         //---
         return(false);
        }
     }
//---
   return(true);
  }
As funções GetTradingSignal() e GetSignal() devem ser modificadas de acordo com a tarefa em questão. Abaixo está o código dessas três funções para sua consideração.
//+------------------------------------------------------------------+
//| Determining trading signals                                      |
//+------------------------------------------------------------------+
ENUM_ORDER_TYPE GetTradingSignal()
  {
//--- If there is no position
   if(!pos.exists)
     {
      //--- A Sell signal
      if(GetSignal()==ORDER_TYPE_SELL)
         return(ORDER_TYPE_SELL);
      //--- A Buy signal
      if(GetSignal()==ORDER_TYPE_BUY)
         return(ORDER_TYPE_BUY);
     }
//--- If the position exists
   if(pos.exists)
     {
      //--- Get the position type
      GetPositionProperties(P_TYPE);
      //--- Get the last deal price
      GetPositionProperties(P_PRICE_LAST_DEAL);

      //--- A Sell signal
      if(pos.type==POSITION_TYPE_BUY &&
         GetSignal()==ORDER_TYPE_SELL)
         return(ORDER_TYPE_SELL);
      if(pos.type==POSITION_TYPE_SELL &&
         GetSignal()==ORDER_TYPE_SELL &&
         close_price[1]<pos.last_deal_price-CorrectValueBySymbolDigits(VolumeIncreaseStep*_Point))
         return(ORDER_TYPE_SELL);

      //--- A Buy signal
      if(pos.type==POSITION_TYPE_SELL &&
         GetSignal()==ORDER_TYPE_BUY)
         return(ORDER_TYPE_BUY);
      if(pos.type==POSITION_TYPE_BUY &&
         GetSignal()==ORDER_TYPE_BUY &&
         close_price[1]>pos.last_deal_price+CorrectValueBySymbolDigits(VolumeIncreaseStep*_Point))
         return(ORDER_TYPE_BUY);

     }
//--- No signal
   return(WRONG_VALUE);
  }
A função GetSignal(), assim como na determinação do prazo mínimo, leva em conta todas as variantes possíveis de estados de parâmetros externos relacionados às condições de abertura de posição. O código da função é fornecido abaixo:
//+------------------------------------------------------------------+
//| Checking the condition and returning a signal                    |
//+------------------------------------------------------------------+
ENUM_ORDER_TYPE GetSignal()
  {
//--- A SELL SIGNAL: the current value of the indicators on completed bars is lower than on the previous bars
//--- Conditions for a single time frame
   if(Screen01IndicatorPeriod>0 && Screen02IndicatorPeriod<=0 && Screen03IndicatorPeriod<=0)
     {
      if(indicator_buffer1[1]<indicator_buffer1[2])
         return(ORDER_TYPE_SELL);
     }
   if(Screen01IndicatorPeriod<=0 && Screen02IndicatorPeriod>0 && Screen03IndicatorPeriod<=0)
     {
      if(indicator_buffer2[1]<indicator_buffer2[2])
         return(ORDER_TYPE_SELL);
     }
//---
   if(Screen01IndicatorPeriod<=0 && Screen02IndicatorPeriod<=0 && Screen03IndicatorPeriod>0)
     {
      if(indicator_buffer3[1]<indicator_buffer3[2])
         return(ORDER_TYPE_SELL);
     }

//--- Conditions for two time frames
   if(Screen01IndicatorPeriod>0 && Screen02IndicatorPeriod>0 && Screen03IndicatorPeriod<=0)
     {
      if(indicator_buffer1[1]<indicator_buffer1[2] &&
         indicator_buffer2[1]<indicator_buffer2[2])
         return(ORDER_TYPE_SELL);
     }
   if(Screen01IndicatorPeriod<=0 && Screen02IndicatorPeriod>0 && Screen03IndicatorPeriod>0)
     {
      if(indicator_buffer2[1]<indicator_buffer2[2] &&
         indicator_buffer3[1]<indicator_buffer3[2])
         return(ORDER_TYPE_SELL);
     }
   if(Screen01IndicatorPeriod>0 && Screen02IndicatorPeriod<=0 && Screen03IndicatorPeriod>0)
     {
      if(indicator_buffer1[1]<indicator_buffer1[2] &&
         indicator_buffer3[1]<indicator_buffer3[2])
         return(ORDER_TYPE_SELL);
     }

//--- Conditions for three time frames
   if(Screen01IndicatorPeriod>0 && Screen02IndicatorPeriod>0 && Screen03IndicatorPeriod>0)
     {
      if(indicator_buffer1[1]<indicator_buffer1[2] &&
         indicator_buffer2[1]<indicator_buffer2[2] &&
         indicator_buffer3[1]<indicator_buffer3[2]
         )
         return(ORDER_TYPE_SELL);
     }

//--- A BUY SIGNAL: the current value of the indicators on completed bars is higher than on the previous bars
//--- Conditions for a single time frame
   if(Screen01IndicatorPeriod>0 && Screen02IndicatorPeriod<=0 && Screen03IndicatorPeriod<=0)
     {
      if(indicator_buffer1[1]>indicator_buffer1[2])
         return(ORDER_TYPE_BUY);
     }
   if(Screen01IndicatorPeriod<=0 && Screen02IndicatorPeriod>0 && Screen03IndicatorPeriod<=0)
     {
      if(indicator_buffer2[1]>indicator_buffer2[2])
         return(ORDER_TYPE_BUY);
     }
   if(Screen01IndicatorPeriod<=0 && Screen02IndicatorPeriod<=0 && Screen03IndicatorPeriod>0)
     {
      if(indicator_buffer3[1]>indicator_buffer3[2])
         return(ORDER_TYPE_BUY);
     }

//--- Conditions for two time frames
   if(Screen01IndicatorPeriod>0 && Screen02IndicatorPeriod>0 && Screen03IndicatorPeriod<=0)
     {
      if(indicator_buffer1[1]>indicator_buffer1[2] &&
         indicator_buffer2[1]>indicator_buffer2[2])
         return(ORDER_TYPE_BUY);
     }
   if(Screen01IndicatorPeriod<=0 && Screen02IndicatorPeriod>0 && Screen03IndicatorPeriod>0)
     {
      if(indicator_buffer2[1]>indicator_buffer2[2] &&
         indicator_buffer3[1]>indicator_buffer3[2])
         return(ORDER_TYPE_BUY);
     }
   if(Screen01IndicatorPeriod>0 && Screen02IndicatorPeriod<=0 && Screen03IndicatorPeriod>0)
     {
      if(indicator_buffer1[1]>indicator_buffer1[2] &&
         indicator_buffer3[1]>indicator_buffer3[2])
         return(ORDER_TYPE_BUY);
     }

//--- Conditions for three time frames
   if(Screen01IndicatorPeriod>0 && Screen02IndicatorPeriod>0 && Screen03IndicatorPeriod>0)
     {
      if(indicator_buffer1[1]>indicator_buffer1[2] &&
         indicator_buffer2[1]>indicator_buffer2[2] &&
         indicator_buffer3[1]>indicator_buffer3[2]
         )
         return(ORDER_TYPE_BUY);
     }

//--- No signal
   return(WRONG_VALUE);
  }
Nesse momento, precisamos somente fazer pequenas alterações às funções OnInit() e OnDeinit(). Você pode ver as alterações destacadas no código abaixo:
//+------------------------------------------------------------------+
//| Expert initialization function                                   |
//+------------------------------------------------------------------+
int OnInit()
  {
//--- Determine the minimum time frame for the new bar check
   MinimumTimeframe=GetMinimumTimeframe(Screen01TimeFrame,Screen01IndicatorPeriod,
                                        Screen02TimeFrame,Screen02IndicatorPeriod,
                                        Screen03TimeFrame,Screen03IndicatorPeriod);
//--- Get indicator handles
   GetIndicatorHandles();
//--- Initialize the new bar
   CheckNewBar();
//--- Get the properties
   GetPositionProperties(P_ALL);
//--- Set the info panel
   SetInfoPanel();
//---
   return(0);
  }
//+------------------------------------------------------------------+
//| Expert deinitialization function                                 |
//+------------------------------------------------------------------+
void OnDeinit(const int reason)
  {
//--- Print the deinitialization reason to the journal
   Print(GetDeinitReasonText(reason));
//--- When deleting from the chart
   if(reason==REASON_REMOVE)
     {
      //--- Delete all objects relating to the info panel from the chart
      DeleteInfoPanel();
      //--- Delete the indicator handles
      IndicatorRelease(Screen01IndicatorHandle);
      IndicatorRelease(Screen02IndicatorHandle);
      IndicatorRelease(Screen03IndicatorHandle);
     }
  }
A estrutura para sistemas de negócios baseada na estratégia da tela tripla está pronta. Ela pode ser modificada a qualquer momento, alterando os indicadores ou adicionando algumas condições adicionais, se necessário.
Otimizando parâmetros e testando o Consultor Especialista
Vamos avançar para a otimização de parâmetro e verificar os resultados. O testador de estratégia é configurado conforme mostrado abaixo (certifique-se de especificar o mais baixo dos três prazos):

Fig. 1. Configurações do Testador de Estratégia.
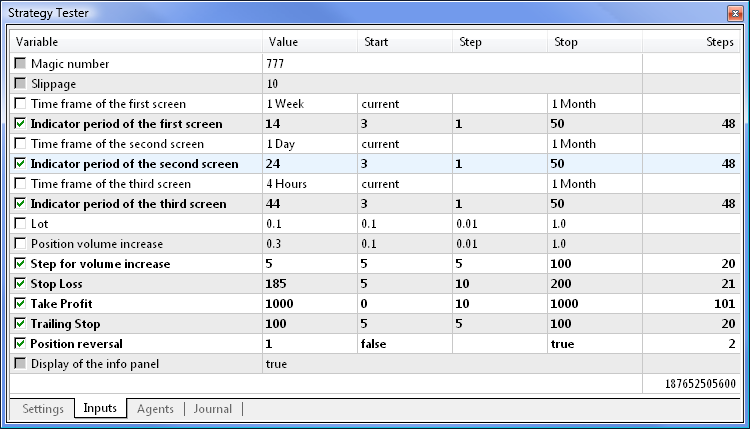
Os parâmetros do Consultor Especialista para otimização foram ajustados conforme mostrado abaixo. Prazos podem ser ajustados para otimização, mas eu prefiro ajustá-los manualmente.

Fig. 2. Configurações do Consultor Especialista.
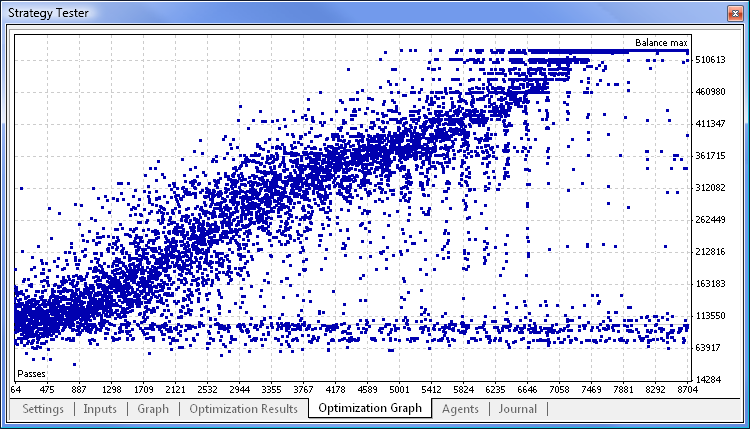
A otimização foi concluída em cerca de 30 minutos em um processador dual-core. O Gráfico de Otimização é fornecido abaixo:

Fig. 3. Gráfico de otimização.
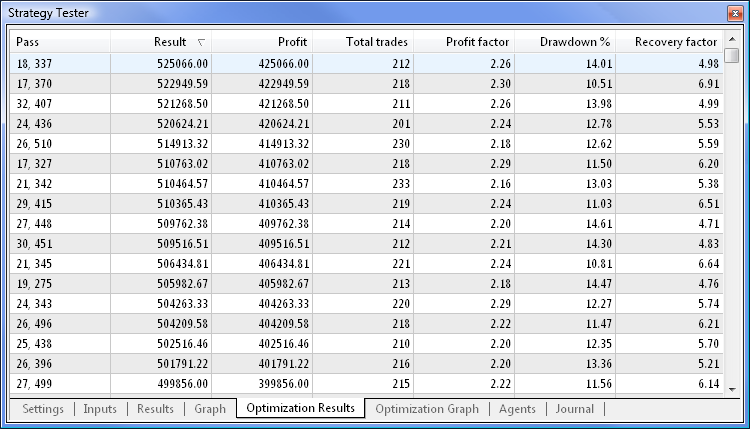
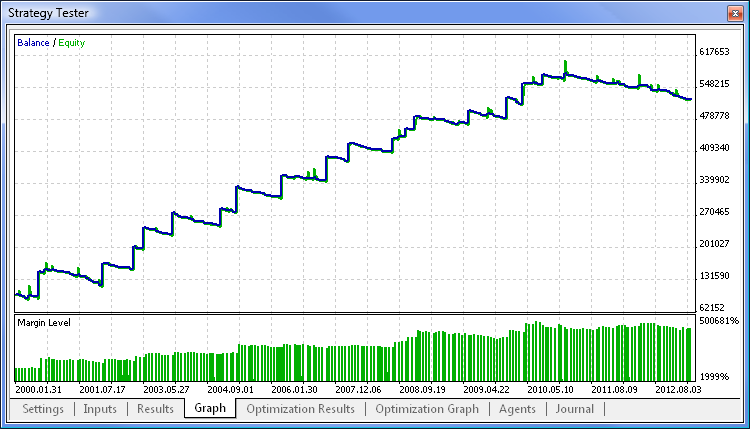
Resultados do teste de balanço máximo mostram menos redução do que os resultados do teste de fator de recuperação máximo, que é o motivo pelo qual os resultados do teste de balanço máximo serem utilizados para fins de demonstração:

Fig. 4. Resultados do teste de balanço máximo.

Fig. 5. Gráfico do teste de balanço máximo.
Conclusão
O artigo demonstrou que o Consultor Especialista pode ser muito rapidamente modificado, se a função principal estiver disponível. Você pode obter um novo sistema de negócios apenas alterando o bloco do sinal e os indicadores. Anexo nesse artigo está um arquivo que pode ser baixado contendo os códigos-fonte do Consultor Especialista descrito acima para estudo pessoal, assim como um arquivo configurado com as definições do parâmetro de entrada.
Traduzido do russo pela MetaQuotes Ltd.
Artigo original: https://www.mql5.com/ru/articles/647
Aviso: Todos os direitos sobre esses materiais pertencem à MetaQuotes Ltd. É proibida a reimpressão total ou parcial.
Esse artigo foi escrito por um usuário do site e reflete seu ponto de vista pessoal. A MetaQuotes Ltd. não se responsabiliza pela precisão das informações apresentadas nem pelas possíveis consequências decorrentes do uso das soluções, estratégias ou recomendações descritas.
- Aplicativos de negociação gratuitos
- 8 000+ sinais para cópia
- Notícias econômicas para análise dos mercados financeiros
Você concorda com a política do site e com os termos de uso
Obrigado pelo artigo!
É possível usar esse especialista em uma conta com limite de lote de 0,1? Não na conta ECN. Eu tentei na ECN - pelo menos o teste parece estar funcionando bem, como no artigo.Eu entendo que isso foi publicado há muito tempo, mas, surpreendentemente, não há nenhuma discussão no fórum!
O teste funciona perfeitamente na conta ECN!Artigo publicado MQL5 Recipes - Desenvolvendo um esquema para um sistema de negociação do tipo "Elder's Three Screens":
Autor: Anatoli Kazharski
O artigo é interessante... mas:
i) a estratégia implementada não é a Triple Screen do Elder. A proposta do Elder baseava-se no antigo princípio da Maré, Onda e Ondulações: Encontrar uma maré, esperar por uma onda e seguir com as ondulações. Não é o que você implementou.
ii) ele usa 3 MA simples como cada indicador de período de tempo e só compara valor com valor, o que não é realista.