Manuale MQL5: Sviluppo di un framework per un sistema di trading basato sulla strategia a triplo schermo
Introduzione
Durante la ricerca o lo sviluppo di sistemi di trading, molti trader devono aver sentito parlare della strategia Triple Screen introdotta dal Dott. Alexander Elder. Ci sono molte persone in Internet che giudicano negativamente questa strategia. Tuttavia, molte persone credono che possa aiutare a trarre profitto. Non devi fidarti di nessuna delle due opinioni. Tutto dovrebbe sempre essere controllato in prima persona. Se studi programmazione, è tutto nelle tue mani in quanto puoi controllare le prestazioni della strategia di trading utilizzando il back-testing.
In questo articolo, svilupperemo un framework per un sistema di trading basato sulla strategia Triple Screen in MQL5. L'Expert Advisor non sarà sviluppato da zero. Invece, modificheremo semplicemente il programma dal precedente articolo "Manuale MQL5: Utilizzo degli indicatori per impostare le condizioni di trading in Expert Advisors". Quindi l'articolo dimostrerà anche come è possibile modificare facilmente i modelli di programmi già pronti.
L'Expert Advisor dell'articolo precedente offre già la possibilità di abilitare/disabilitare i livelli Stop Loss/Take Profit e Trailing Stop, l'aumento del volume di posizione e l'inversione di posizione sul segnale opposto. Tutte le funzioni necessarie sono state impostate in atto. Quindi il nostro compito è incentrato sulla modifica dell'elenco dei parametri esterni aggiungendo opzioni aggiuntive e modificando alcune funzioni esistenti.
A scopo illustrativo, organizzeremo segnali su tre intervalli di tempo da generare utilizzando l'indicatore della media mobile. Successivamente, continuando a sperimentare sul framework sviluppato, sarai in grado di utilizzare qualsiasi altro indicatore modificando leggermente il codice. Implementeremo anche l'opportunità di impostare intervalli di tempo per ogni schermo. Se il parametro responsabile del periodo dell'indicatore ha valore zero, ciò indicherà che la schermata corrispondente non viene utilizzata. In altre parole, il sistema può essere impostato per avere uno o due intervalli di tempo.
Prima di iniziare, fare una copia della cartella con i file di Expert Advisor dall'articolo precedente e rinominarla.
Sviluppo di Expert Advisor
Iniziamo con i parametri esterni. Di seguito è riportato il codice dell'elenco aggiornato. Nuove linee sono individuati. Gli intervalli di tempo vengono dichiarati con il tipo di enumerazione ENUM_TIMEFRAMES. Sarai in grado di selezionare qualsiasi intervallo di tempo dall'elenco a discesa.
//--- External parameters of the Expert Advisor
sinput   long              MagicNumber=777;        // Magic number
sinput   int               Deviation=10;           // Slippage
//---
input    ENUM_TIMEFRAMES   Screen01TimeFrame=PERIOD_W1;  // Time frame of the first screen
input    int               Screen01IndicatorPeriod=14;   // Indicator period of the first screen
//---
input    ENUM_TIMEFRAMES   Screen02TimeFrame=PERIOD_D1;  // Time frame of the second screen
input    int               Screen02IndicatorPeriod=24;   // Indicator period of the second screen
//---
input    ENUM_TIMEFRAMES   Screen03TimeFrame=PERIOD_H4;  // Time frame of the third screen
input    int               Screen03IndicatorPeriod=44;   // Indicator period of the third screen
//---
input    double            Lot=0.1;                      // Lot
input    double            VolumeIncrease=0.1;           // Position volume increase
input    double            VolumeIncreaseStep=10;        // Step for position volume increase
input    double            StopLoss=50;                  // Stop Loss
input    double            TakeProfit=100;               // Take Profit
input    double            TrailingStop=10;              // Trailing Stop
input    bool              Reverse=true;                 // Position reversal
sinput   bool              ShowInfoPanel=true;           // Display of the info panel
Il parametro IndicatorSegments, la variabile AllowedNumberOfSegments e la funzione CorrectInputParameters() sono stati rimossi per semplificare l'esempio. Quelli di voi che sono interessati a questa condizione possono provare a implementarla da soli. È inoltre necessario rimuovere l'enumerazione degli indicatori nel file Enums.mqh poiché questo Expert Advisor utilizzerà un solo indicatore.
Poiché ci sarà un indicatore separato su ogni intervallo di tempo, avremo bisogno di una variabile separata per ottenere una gestione di ciascuno degli indicatori:
//--- Indicator handles
int                  Screen01IndicatorHandle=INVALID_HANDLE;   // Indicator handle on the first screen
int                  Screen02IndicatorHandle=INVALID_HANDLE;   // Indicator handle on the second screen
int                  Screen03IndicatorHandle=INVALID_HANDLE;   // Indicator handle on the third screen
La nuova barra verrà controllata utilizzando l'intervallo di tempo minimo. Quando si imposta l'intervallo di tempo minimo nei parametri esterni, non è necessario seguire un ordine specifico, ovvero massimo, intermedio, minimo. L'ordine inverso e praticamente qualsiasi ordine andrebbe a finire. Quindi abbiamo bisogno di una funzione che identifichi l'intervallo di tempo minimo tra tutti gli intervalli di tempo specificati.
Poiché l'Expert Advisor può essere impostato per operare su tre intervalli di tempo, nonché su uno o due, tutte le opzioni devono essere considerate quando si determina l'intervallo di tempo minimo. Di seguito se il codice della funzione GetMinimumTimeframe():
//+------------------------------------------------------------------+
//| Determining the minimum time frame for the new bar check         |
//+------------------------------------------------------------------+
ENUM_TIMEFRAMES GetMinimumTimeframe(ENUM_TIMEFRAMES timeframe1,int period1,
                                    ENUM_TIMEFRAMES timeframe2,int period2,
                                    ENUM_TIMEFRAMES timeframe3,int period3)
  {
//--- Default minimum time frame value
   ENUM_TIMEFRAMES timeframe_min=PERIOD_CURRENT;

//--- Convert time frame values to seconds for calculations
   int t1= PeriodSeconds(timeframe1);
   int t2= PeriodSeconds(timeframe2);
   int t3= PeriodSeconds(timeframe3);

//--- Check for incorrect period values
   if(period1<=0 && period2<=0 && period3<=0)
      return(timeframe_min);

//--- Conditions for a single time frame
   if(period1>0 && period2<=0 && period3<=0)
      return(timeframe1);
   if(period2>0 && period1<=0 && period3<=0)
      return(timeframe2);
   if(period3>0 && period1<=0 && period2<=0)
      return(timeframe3);

//--- Conditions for two time frames
   if(period1>0 && period2>0 && period3<=0)
     {
      timeframe_min=(MathMin(t1,t2)==t1) ? timeframe1 : timeframe2;
      return(timeframe_min);
     }
   if(period1>0 && period3>0 && period2<=0)
     {
      timeframe_min=(MathMin(t1,t3)==t1) ? timeframe1 : timeframe3;
      return(timeframe_min);
     }
   if(period2>0 && period3>0 && period1<=0)
     {
      timeframe_min=(MathMin(t2,t3)==t2) ? timeframe2 : timeframe3;
      return(timeframe_min);
     }

//--- Conditions for three time frames
   if(period1>0 && period2>0 && period3>0)
     {
      timeframe_min=(int)MathMin(t1,t2)==t1 ? timeframe1 : timeframe2;
      int t_min=PeriodSeconds(timeframe_min);
      timeframe_min=(int)MathMin(t_min,t3)==t_min ? timeframe_min : timeframe3;
      return(timeframe_min);
     }
   return(WRONG_VALUE);
  }
Per salvare il valore minimo dell'intervallo di tempo, creeremo un'altra variabile di ambito globale:
//--- Variable for determining the minimum time frame
ENUM_TIMEFRAMES  MinimumTimeframe=WRONG_VALUE;
La funzione GetMinimumTimeframe() dovrà essere chiamata quando si inizializza Expert Advisor nella funzione OnInit().
//+------------------------------------------------------------------+
//| Expert initialization function                                   |
//+------------------------------------------------------------------+
int OnInit()
  {
//--- Determine the minimum time frame for the new bar check
   MinimumTimeframe=GetMinimumTimeframe(Screen01TimeFrame,Screen01IndicatorPeriod,
                                        Screen02TimeFrame,Screen02IndicatorPeriod,
                                        Screen03TimeFrame,Screen03IndicatorPeriod);
//--- Get indicator handles
   GetIndicatorHandles();
//--- Initialize the new bar
   CheckNewBar();
//--- Get the properties
   GetPositionProperties(P_ALL);
//--- Set the info panel
   SetInfoPanel();
//---
   return(0);
  }
Il valore della variabile MinimumTimeframe viene quindi utilizzato nelle funzioni CheckNewBar() e GetBarsData().
La funzione GetIndicatorHandle() ora appare come mostrato di seguito. Il periodo e l'intervallo di tempo sono specificati per ciascun indicatore.
//+------------------------------------------------------------------+
//| Getting indicator handles                                        |
//+------------------------------------------------------------------+
void GetIndicatorHandles()
  {
//--- Get handles of the indicators specified in the parameters
   if(Screen01IndicatorPeriod>0)
     Screen01IndicatorHandle=iMA(_Symbol,Screen01TimeFrame,Screen01IndicatorPeriod,0,MODE_SMA,PRICE_CLOSE);
   if(Screen02IndicatorPeriod>0)
     Screen02IndicatorHandle=iMA(_Symbol,Screen02TimeFrame,Screen02IndicatorPeriod,0,MODE_SMA,PRICE_CLOSE);
   if(Screen03IndicatorPeriod>0)
     Screen03IndicatorHandle=iMA(_Symbol,Screen03TimeFrame,Screen03IndicatorPeriod,0,MODE_SMA,PRICE_CLOSE);

//--- If the indicator handle for the first time frame could not be obtained
   if(Screen01IndicatorHandle==INVALID_HANDLE)
     Print("Failed to get the indicator handle for Screen 1!");
//--- If the indicator handle for the second time frame could not be obtained
   if(Screen01IndicatorHandle==INVALID_HANDLE)
     Print("Failed to get the indicator handle for Screen 2!");
//--- If the indicator handle for the third time frame could not be obtained
   if(Screen01IndicatorHandle==INVALID_HANDLE)
     Print("Failed to get the indicator handle for Screen 3!");
  }
Inoltre, dobbiamo aggiungere matrici per ottenere i valori degli indicatori (separatamente per ogni intervallo di tempo):
//--- Arrays for values of the indicators
double               indicator_buffer1[];
double               indicator_buffer2[];
double               indicator_buffer3[];
La funzione GetIndicatorsData() per ottenere i valori degli indicatori ora appare come mostrato di seguito. Le maniglie ottenute vengono controllate per la precisione e se tutto va bene, gli array vengono riempiti con valori indicatori.
//+------------------------------------------------------------------+
//| Getting indicator values                                         |
//+------------------------------------------------------------------+
bool GetIndicatorsData()
  {
//--- Number of indicator buffer values for determining the trading signal
   int NumberOfValues=3;
//--- If indicator handles have not been obtained
   if((Screen01IndicatorPeriod>0 && Screen01IndicatorHandle==INVALID_HANDLE) ||
      (Screen02IndicatorPeriod>0 && Screen02IndicatorHandle==INVALID_HANDLE) ||
      (Screen03IndicatorPeriod>0 && Screen03IndicatorHandle==INVALID_HANDLE))
      //--- try to get them again
      GetIndicatorHandles();

//--- If the time frame of the first screen is used and the indicator handle has been obtained
   if(Screen01TimeFrame>0 && Screen01IndicatorHandle!=INVALID_HANDLE)
     {
      //--- Reverse the indexing order (... 3 2 1 0)
      ArraySetAsSeries(indicator_buffer1,true);
      //--- Get indicator values
      if(CopyBuffer(Screen01IndicatorHandle,0,0,NumberOfValues,indicator_buffer1)<NumberOfValues)
        {
         Print("Failed to copy the values ("+
                  _Symbol+"; "+TimeframeToString(Period())+") to the indicator_buffer1 array! Error ("+
                  IntegerToString(GetLastError())+"): "+ErrorDescription(GetLastError()));
         //---
         return(false);
        }
     }
//--- If the time frame of the second screen is used and the indicator handle has been obtained
   if(Screen02TimeFrame>0 && Screen02IndicatorHandle!=INVALID_HANDLE)
     {
      //--- Reverse the indexing order (... 3 2 1 0)
      ArraySetAsSeries(indicator_buffer2,true);
      //--- Get indicator values
      if(CopyBuffer(Screen02IndicatorHandle,0,0,NumberOfValues,indicator_buffer2)<NumberOfValues)
        {
         Print("Failed to copy the values ("+
                  _Symbol+"; "+TimeframeToString(Period())+") to the indicator_buffer2 array! Error ("+
                  IntegerToString(GetLastError())+"): "+ErrorDescription(GetLastError()));
         //---
         return(false);
        }
     }
//--- If the time frame of the third screen is used and the indicator handle has been obtained
   if(Screen03TimeFrame>0 && Screen03IndicatorHandle!=INVALID_HANDLE)
     {
      //--- Reverse the indexing order (... 3 2 1 0)
      ArraySetAsSeries(indicator_buffer3,true);
      //--- Get indicator values
      if(CopyBuffer(Screen03IndicatorHandle,0,0,NumberOfValues,indicator_buffer3)<NumberOfValues)
        {
         Print("Failed to copy the values ("+
                  _Symbol+"; "+TimeframeToString(Period())+") to the indicator_buffer3 array! Error ("+
                  IntegerToString(GetLastError())+"): "+ErrorDescription(GetLastError()));
         //---
         return(false);
        }
     }
//---
   return(true);
  }
Le funzioni GetTradingSignal() e GetSignal() devono essere modificate in base all'attività da svolgere. Di seguito è riportato il codice di queste funzioni per la vostra considerazione.
//+------------------------------------------------------------------+
//| Determining trading signals                                      |
//+------------------------------------------------------------------+
ENUM_ORDER_TYPE GetTradingSignal()
  {
//--- If there is no position
   if(!pos.exists)
     {
      //--- A Sell signal
      if(GetSignal()==ORDER_TYPE_SELL)
         return(ORDER_TYPE_SELL);
      //--- A Buy signal
      if(GetSignal()==ORDER_TYPE_BUY)
         return(ORDER_TYPE_BUY);
     }
//--- If the position exists
   if(pos.exists)
     {
      //--- Get the position type
      GetPositionProperties(P_TYPE);
      //--- Get the last deal price
      GetPositionProperties(P_PRICE_LAST_DEAL);

      //--- A Sell signal
      if(pos.type==POSITION_TYPE_BUY &&
         GetSignal()==ORDER_TYPE_SELL)
         return(ORDER_TYPE_SELL);
      if(pos.type==POSITION_TYPE_SELL &&
         GetSignal()==ORDER_TYPE_SELL &&
         close_price[1]<pos.last_deal_price-CorrectValueBySymbolDigits(VolumeIncreaseStep*_Point))
         return(ORDER_TYPE_SELL);

      //--- A Buy signal
      if(pos.type==POSITION_TYPE_SELL &&
         GetSignal()==ORDER_TYPE_BUY)
         return(ORDER_TYPE_BUY);
      if(pos.type==POSITION_TYPE_BUY &&
         GetSignal()==ORDER_TYPE_BUY &&
         close_price[1]>pos.last_deal_price+CorrectValueBySymbolDigits(VolumeIncreaseStep*_Point))
         return(ORDER_TYPE_BUY);

     }
//--- No signal
   return(WRONG_VALUE);
  }
La funzione GetSignal(), proprio come nel determinare l'intervallo di tempo minimo, tiene conto di tutte le possibili varianti di stati dei parametri esterni relativi alle condizioni di apertura della posizione. Il codice della funzione è fornito di seguito:
//+------------------------------------------------------------------+
//| Checking the condition and returning a signal                    |
//+------------------------------------------------------------------+
ENUM_ORDER_TYPE GetSignal()
  {
//--- A SELL SIGNAL: the current value of the indicators on completed bars is lower than on the previous bars
//--- Conditions for a single time frame
   if(Screen01IndicatorPeriod>0 && Screen02IndicatorPeriod<=0 && Screen03IndicatorPeriod<=0)
     {
      if(indicator_buffer1[1]<indicator_buffer1[2])
         return(ORDER_TYPE_SELL);
     }
   if(Screen01IndicatorPeriod<=0 && Screen02IndicatorPeriod>0 && Screen03IndicatorPeriod<=0)
     {
      if(indicator_buffer2[1]<indicator_buffer2[2])
         return(ORDER_TYPE_SELL);
     }
//---
   if(Screen01IndicatorPeriod<=0 && Screen02IndicatorPeriod<=0 && Screen03IndicatorPeriod>0)
     {
      if(indicator_buffer3[1]<indicator_buffer3[2])
         return(ORDER_TYPE_SELL);
     }

//--- Conditions for two time frames
   if(Screen01IndicatorPeriod>0 && Screen02IndicatorPeriod>0 && Screen03IndicatorPeriod<=0)
     {
      if(indicator_buffer1[1]<indicator_buffer1[2] &&
         indicator_buffer2[1]<indicator_buffer2[2])
         return(ORDER_TYPE_SELL);
     }
   if(Screen01IndicatorPeriod<=0 && Screen02IndicatorPeriod>0 && Screen03IndicatorPeriod>0)
     {
      if(indicator_buffer2[1]<indicator_buffer2[2] &&
         indicator_buffer3[1]<indicator_buffer3[2])
         return(ORDER_TYPE_SELL);
     }
   if(Screen01IndicatorPeriod>0 && Screen02IndicatorPeriod<=0 && Screen03IndicatorPeriod>0)
     {
      if(indicator_buffer1[1]<indicator_buffer1[2] &&
         indicator_buffer3[1]<indicator_buffer3[2])
         return(ORDER_TYPE_SELL);
     }

//--- Conditions for three time frames
   if(Screen01IndicatorPeriod>0 && Screen02IndicatorPeriod>0 && Screen03IndicatorPeriod>0)
     {
      if(indicator_buffer1[1]<indicator_buffer1[2] &&
         indicator_buffer2[1]<indicator_buffer2[2] &&
         indicator_buffer3[1]<indicator_buffer3[2]
         )
         return(ORDER_TYPE_SELL);
     }

//--- A BUY SIGNAL: the current value of the indicators on completed bars is higher than on the previous bars
//--- Conditions for a single time frame
   if(Screen01IndicatorPeriod>0 && Screen02IndicatorPeriod<=0 && Screen03IndicatorPeriod<=0)
     {
      if(indicator_buffer1[1]>indicator_buffer1[2])
         return(ORDER_TYPE_BUY);
     }
   if(Screen01IndicatorPeriod<=0 && Screen02IndicatorPeriod>0 && Screen03IndicatorPeriod<=0)
     {
      if(indicator_buffer2[1]>indicator_buffer2[2])
         return(ORDER_TYPE_BUY);
     }
   if(Screen01IndicatorPeriod<=0 && Screen02IndicatorPeriod<=0 && Screen03IndicatorPeriod>0)
     {
      if(indicator_buffer3[1]>indicator_buffer3[2])
         return(ORDER_TYPE_BUY);
     }

//--- Conditions for two time frames
   if(Screen01IndicatorPeriod>0 && Screen02IndicatorPeriod>0 && Screen03IndicatorPeriod<=0)
     {
      if(indicator_buffer1[1]>indicator_buffer1[2] &&
         indicator_buffer2[1]>indicator_buffer2[2])
         return(ORDER_TYPE_BUY);
     }
   if(Screen01IndicatorPeriod<=0 && Screen02IndicatorPeriod>0 && Screen03IndicatorPeriod>0)
     {
      if(indicator_buffer2[1]>indicator_buffer2[2] &&
         indicator_buffer3[1]>indicator_buffer3[2])
         return(ORDER_TYPE_BUY);
     }
   if(Screen01IndicatorPeriod>0 && Screen02IndicatorPeriod<=0 && Screen03IndicatorPeriod>0)
     {
      if(indicator_buffer1[1]>indicator_buffer1[2] &&
         indicator_buffer3[1]>indicator_buffer3[2])
         return(ORDER_TYPE_BUY);
     }

//--- Conditions for three time frames
   if(Screen01IndicatorPeriod>0 && Screen02IndicatorPeriod>0 && Screen03IndicatorPeriod>0)
     {
      if(indicator_buffer1[1]>indicator_buffer1[2] &&
         indicator_buffer2[1]>indicator_buffer2[2] &&
         indicator_buffer3[1]>indicator_buffer3[2]
         )
         return(ORDER_TYPE_BUY);
     }

//--- No signal
   return(WRONG_VALUE);
  }
Ora, dobbiamo solo apportare piccole modifiche alle funzioni OnInit() e OnDeinit(). Puoi vedere le modifiche evidenziate nel codice seguente:
//+------------------------------------------------------------------+
//| Expert initialization function                                   |
//+------------------------------------------------------------------+
int OnInit()
  {
//--- Determine the minimum time frame for the new bar check
   MinimumTimeframe=GetMinimumTimeframe(Screen01TimeFrame,Screen01IndicatorPeriod,
                                        Screen02TimeFrame,Screen02IndicatorPeriod,
                                        Screen03TimeFrame,Screen03IndicatorPeriod);
//--- Get indicator handles
   GetIndicatorHandles();
//--- Initialize the new bar
   CheckNewBar();
//--- Get the properties
   GetPositionProperties(P_ALL);
//--- Set the info panel
   SetInfoPanel();
//---
   return(0);
  }
//+------------------------------------------------------------------+
//| Expert deinitialization function                                 |
//+------------------------------------------------------------------+
void OnDeinit(const int reason)
  {
//--- Print the deinitialization reason to the journal
   Print(GetDeinitReasonText(reason));
//--- When deleting from the chart
   if(reason==REASON_REMOVE)
     {
      //--- Delete all objects relating to the info panel from the chart
      DeleteInfoPanel();
      //--- Delete the indicator handles
      IndicatorRelease(Screen01IndicatorHandle);
      IndicatorRelease(Screen02IndicatorHandle);
      IndicatorRelease(Screen03IndicatorHandle);
     }
  }
Il framework per i sistemi di trading basati sulla strategia Triple Screen è pronto. Può essere modificato in qualsiasi momento, cambiando gli indicatori o aggiungendo alcune condizioni aggiuntive, se necessario.
Ottimizzazione dei parametri e test expert advisor
Procediamo all'ottimizzazione dei parametri e controlliamo i risultati. Lo Strategy Tester è impostato come mostrato di seguito (assicurarsi di specificare il più basso dei tre intervalli di tempo):

Fig. 1. Impostazioni di Strategy Tester.
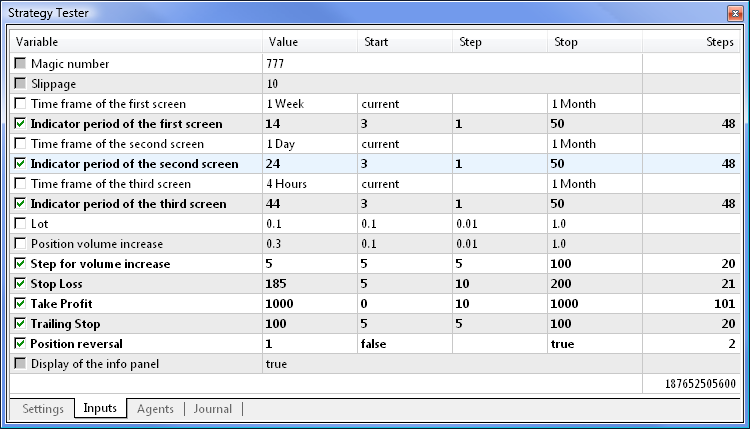
I parametri di Expert Advisor per l'ottimizzazione sono stati impostati come mostrato di seguito. Gli intervalli di tempo possono essere impostati per l'ottimizzazione, ma preferisco impostarli manualmente.

Fig. 2. Impostazioni dell'Expert Advisor.
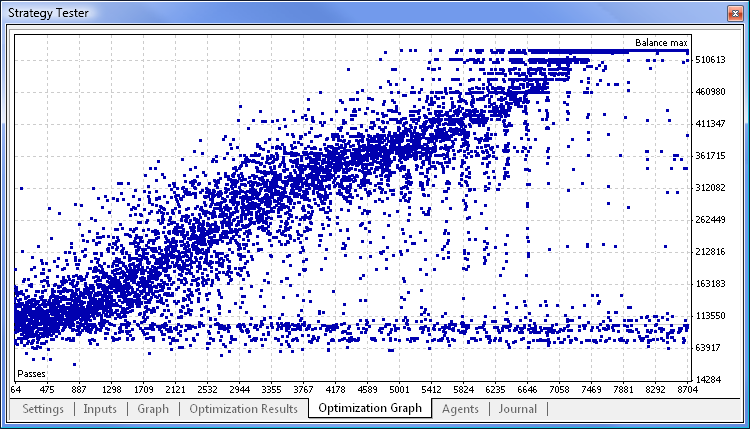
L'ottimizzazione è stata completata in circa 30 minuti su un processore dual-core. Il grafico di ottimizzazione è fornito di seguito:

Fig. 3. Grafico di Ottimizzazione.
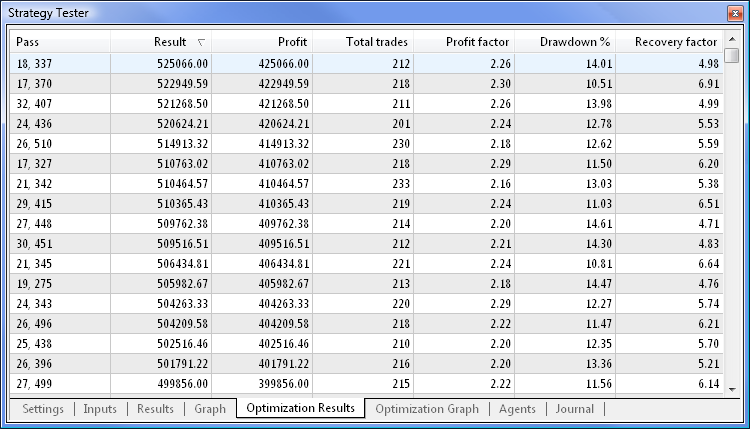
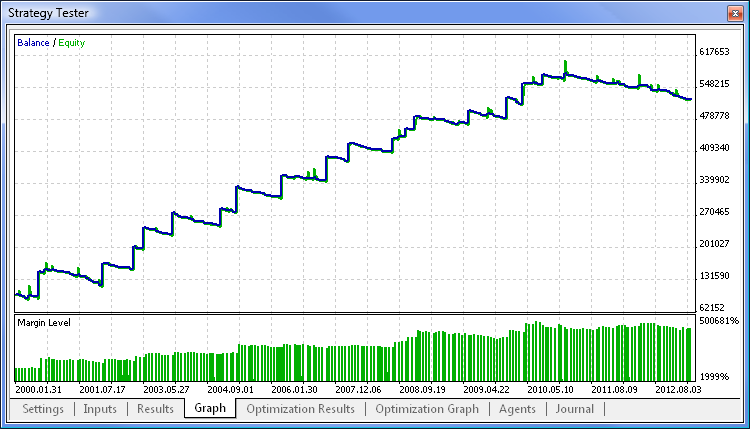
I risultati dei test del bilanciamento massimo mostrano meno drawdown rispetto ai risultati del test del fattore di recupero massimo, motivo per cui i risultati del test del bilanciamento massimo vengono utilizzati a scopo dimostrativo:

Fig. 4. Risultati del test di bilanciamento massimo.

Fig. 5. Grafico del test del bilanciamento massimo.
Conclusione
L'articolo ha dimostrato che l'Expert Advisor può essere modificato abbastanza rapidamente, se sono disponibili le funzioni principali. È possibile ottenere un nuovo sistema di trading modificando solo il blocco del segnale e gli indicatori. Allegato all'articolo è un archivio scaricabile contenente i codici sorgente dell'Expert Advisor descritti sopra per il tuo ulteriore studio autonomo, nonché un set-file con le impostazioni dei parametri di input.
Tradotto dal russo da MetaQuotes Ltd.
Articolo originale: https://www.mql5.com/ru/articles/647
Avvertimento: Tutti i diritti su questi materiali sono riservati a MetaQuotes Ltd. La copia o la ristampa di questi materiali in tutto o in parte sono proibite.
Questo articolo è stato scritto da un utente del sito e riflette le sue opinioni personali. MetaQuotes Ltd non è responsabile dell'accuratezza delle informazioni presentate, né di eventuali conseguenze derivanti dall'utilizzo delle soluzioni, strategie o raccomandazioni descritte.
- App di trading gratuite
- Oltre 8.000 segnali per il copy trading
- Notizie economiche per esplorare i mercati finanziari
Accetti la politica del sito e le condizioni d’uso
Grazie per l'articolo!
E' possibile utilizzare questo esperto su un conto con limitazione di 0,1 lotti? Non su un conto ECN. Ho provato su un conto ECN -- almeno i test sembrano andare bene, come nell'articolo.Capisco, questo è stato pubblicato molto tempo fa, ma sorprendentemente, nessuna discussione sul forum!
Il test funziona perfettamente sul conto ECN!Articolo pubblicato Ricette MQL5 - Sviluppo di uno schema per un sistema di trading del tipo "Tre schermi di Elder":
Autore: Anatoli Kazharski
L'articolo è interessante... ma:
i) la strategia implementata non è il Triple Screen di Elder. La proposta di Elder si basava sul vecchio principio Tide, Wave e Ripples: Trova una marea, aspetta un'onda e segui le ondate. Non è quello che avete implementato.
ii) utilizza 3 semplici MA come indicatore per ogni timeframe e confronta solo il valore con il valore, il che non è realistico.