
Melhore os gráficos de negociação com uma interface gráfica interativa baseada em MQL5 (Parte III): Interface de negociação simples e móvel
Introdução
Para começar, vamos relembrar o que examinamos nas duas partes anteriores:
1. Na primeira parte, examinamos o conceito de eventos gráficos e, em seguida, criamos dois painéis móveis simples em um único gráfico.
2. Na segunda parte, fomos ainda mais longe. Usamos classes no arquivo .mqh para tornar nosso código mais eficiente e versátil, pronto para integração com EAs/indicadores em larga escala.
Na terceira parte, nos concentraremos em aprimorar nossos painéis através da integração de interfaces gráficas. Sem uma interface gráfica, os painéis não servirão ao propósito pretendido.
Aqui está um breve resumo do que abordaremos neste artigo:
- O que estamos criando?
- Criação de um painel de negociação estático simples
- Discussão sobre a movimentação do nosso painel estático com todos os elementos dentro dele
- Aplicação prática da abordagem escolhida para criar um painel móvel
- Considerações finais
O que estamos criando?
Queremos fazer um painel móvel com interface gráfica, e para isso precisamos decidir o que vamos criar. Escolhi como base um EA simples, especificamente o Simple Trading.
Primeiramente, precisamos criar este painel de controle estático, ou seja, o EA Simple Trading. É extremamente importante fazer isso de forma eficiente, já que estamos criando um EA completo. Por eficiência, quero dizer que não podemos simplesmente abrir um arquivo e escrever todo o código lá. Em vez disso, precisamos de um plano bem pensado que nos permita escrever um código mínimo em vários arquivos .mqh bem organizados. O mais importante é evitar duplicar o mesmo código várias vezes para criar as interfaces gráficas estáticas necessárias para o nosso painel móvel.
Aqui está o painel estático básico que usaremos como base:
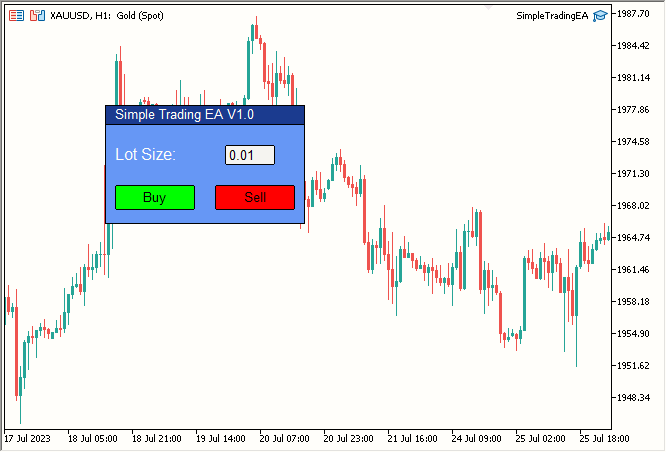
Fig. 1. Painel Estático Simples
Ele inclui:
| Elemento | Descrição |
|---|---|
| Label 1 | Texto do título (Simple Trading EA V1.0) |
| Label 2 | Tamanho do lote. |
| Edit 1 | Campo de edição de cor branca com o valor 0,01 escrito dentro. |
| Button 1 | Botão Buy verde. |
| Button 2 | Botão Sell vermelho. |
| Rectangle Label 1 | Barra do título, faixa azul-escuro com "Simple Trading EA V1.0" escrito nela. |
| Rectangle Label 2 | Área principal do painel de cor azul-clara. |
Então, nosso painel é formado por esses sete componentes. Na minha opinião, é um painel de ferramentas bastante elegante que criamos, simplesmente combinando esses sete elementos.
Agora vamos para o código.
Criação de um painel de negociação estático simples
Quais classes precisaremos?
Precisaremos de 2 rótulos (Label), 2 botões (Button), 1 campo de edição (Edit) e 2 rótulos retangulares (Rectangle Label). Então, vamos criar 4 arquivos .mqh, um para cada um deles. Aqui está a estrutura de pastas do nosso projeto:
- Simple Trading EA/
- SimpleTradingEA.mq5
- Button.mqh
- Label.mqh
- Edit.mqh
- RectangleLabel.mqh
Estes são os arquivos nos quais escreveremos nosso código. Agora, vamos criar nosso primeiro arquivo SimpleTradingEA.mq5, que é o arquivo principal do EA.
Eu removi a função OnTick(), já que ela não será necessária neste projeto. Veja como o arquivo parece no momento:
//+------------------------------------------------------------------+
//| Expert initialization function                                   |
//+------------------------------------------------------------------+
int OnInit()
   {
    return(INIT_SUCCEEDED);
   }

//+------------------------------------------------------------------+
//| Expert deinitialization function                                 |
//+------------------------------------------------------------------+
void OnDeinit(const int reason)
   {
   }
//+------------------------------------------------------------------+
Vamos agora elaborar um plano. Construiremos nosso painel estático na seguinte ordem:
- Barra do título
- Parte principal do painel
- Texto do título
- Texto "Tamanho do Lote:"
- Campo de edição
- Botões Buy e Sell
- Toques finais necessários
Tudo parece lógico. Vamos começar.
- Barra do título
Para criar a barra do título, precisamos usar o objeto Rectangle Label. Então, vamos criar uma classe que lidará com tudo relacionado ao objeto Rectangle Label. Criaremos um arquivo .mqh. Para simplificar, chamaremos de RectangleLabel.mqh, e a classe será denominada RectangleLabel.
Aqui está a classe vazia que criamos:
//+------------------------------------------------------------------+
//| Class Definition: RectangleLabel                                 |
//+------------------------------------------------------------------+
class RectangleLabel
   {
public:
                     RectangleLabel(void);
                    ~RectangleLabel(void);
   };

//+------------------------------------------------------------------+
//| Constructor: RectangleLabel                                      |
//+------------------------------------------------------------------+
RectangleLabel::RectangleLabel(void)
   {
   }

//+------------------------------------------------------------------+
//| Destructor: RectangleLabel                                       |
//+------------------------------------------------------------------+
RectangleLabel::~RectangleLabel(void)
   {
   }
//+------------------------------------------------------------------+
Precisaremos de algumas funções:
- Create -> Criação do rótulo retangular
- Destroy -> Remoção do painel
- SetBorderType -> Tipo de borda
- SetBGColor -> Cor de fundo
Vamos declarar essas funções na lista de funções-membro. Agora nossa classe parece o seguinte:
//+------------------------------------------------------------------+
//| Class Definition: RectangleLabel                                 |
//+------------------------------------------------------------------+
class RectangleLabel
   {
public:
                     RectangleLabel(void); // Constructor
                    ~RectangleLabel(void); // Destructor
    void             Create(string name, int xDis, int yDis, int xSize, int ySize); //Creates a Rectangle Label with the given parameters
    void             Destroy(); // Destroys the Rectangle Label
    void             SetBorderType(ENUM_BORDER_TYPE borderType); // Sets the border type of the Rectangle Label
    void             SetBGColor(color col); // Sets the background color of the Rectangle Label
   };
//+------------------------------------------------------------------+
Vamos escrever a função básica de criação:
//+------------------------------------------------------------------+
//| RectangleLabel Class - Create Method                             |
//+------------------------------------------------------------------+
void RectangleLabel::Create(string name, int xDis, int yDis, int xSize, int ySize)
   {
    ObjectCreate(0, name, OBJ_RECTANGLE_LABEL, 0, 0, 0); // Create the Rectangle Label object
    ObjectSetInteger(0, name, OBJPROP_XDISTANCE, xDis); // Set the X-axis distance
    ObjectSetInteger(0, name, OBJPROP_YDISTANCE, yDis); // Set the Y-axis distance
    ObjectSetInteger(0, name, OBJPROP_XSIZE, xSize); // Set the X size
    ObjectSetInteger(0, name, OBJPROP_YSIZE, ySize); // Set the Y size
   }
//+------------------------------------------------------------------+
Criaremos Destroy, SetBorderType e SetBGColor em uma única linha. Aqui está nossa classe atualizada:
//+------------------------------------------------------------------+
//| Class Definition for the Rectangle Label                         |
//+------------------------------------------------------------------+
class RectangleLabel
   {
private:
    string           _name; // Name of the rectangle label
public:
                     RectangleLabel(void); // Constructor
                    ~RectangleLabel(void); // Destructor

    void             Create(string name, int xDis, int yDis, int xSize, int ySize); // Method to create a rectangle label with given dimensions

    void             Destroy() {ObjectDelete(0, _name);} // Method to delete the object using the object's name

    void             SetBorderType(ENUM_BORDER_TYPE borderType) {ObjectSetInteger(0, _name, OBJPROP_BORDER_TYPE, borderType);} // Method to set the border type for the rectangle label

    void             SetBGColor(color col) {ObjectSetInteger(0, _name, OBJPROP_BGCOLOR, col);} // Method to set the background color for the rectangle label
   };
//+------------------------------------------------------------------+
Também adicionamos a variável privada "_name", já que ObjectDelete requer um nome, e definimos "_name" na função Create:
//+------------------------------------------------------------------+
//| Rectangle Label Creation Method                                  |
//+------------------------------------------------------------------+
void RectangleLabel::Create(string name, int xDis, int yDis, int xSize, int ySize)
   {
    ObjectCreate(0, name, OBJ_RECTANGLE_LABEL, 0, 0, 0); // Create rectangle label object
    ObjectSetInteger(0, name, OBJPROP_XDISTANCE, xDis); // Set X distance
    ObjectSetInteger(0, name, OBJPROP_YDISTANCE, yDis); // Set Y distance
    ObjectSetInteger(0, name, OBJPROP_XSIZE, xSize); // Set X size
    ObjectSetInteger(0, name, OBJPROP_YSIZE, ySize); // Set Y size
    _name = name; // Assign the name to the member variable
   }
//+------------------------------------------------------------------+
Simplesmente adicionamos "_name = name;" na última linha para atribuir a variável _name como o nome do rótulo retangular criado.
Você pode perguntar onde está o código para implementar a movimentação. No momento, estamos ignorando esse aspecto para simplificar a tarefa, até criarmos um painel de controle estático simples.
Usaremos esta classe no arquivo principal, como SimpleTradingEA.mq5, para ver o resultado:
Primeiro, incluímos o arquivo RectangleLabel.mqh com #include e criamos uma instância da classe chamada TitleBar, já que estamos criando a barra do título do painel usando uma instância da classe RectangleLabel. Nós o usaremos novamente para o corpo principal do painel.Em seguida, usamos esta instância para criar um rótulo retangular no gráfico nas coordenadas (100,100) com tamanho 200x20. Depois, fazemos a sua borda plana (BORDER_FLAT), pois, na minha opinião, isso parece melhor. Você pode alterar esta configuração conforme desejar. Então, usamos a função ChartRedraw(0) para redesenhar o gráfico. Dessa forma, o painel será criado no gráfico imediatamente. Caso contrário, teríamos que esperar o próximo update de preço, ou seja, um tick.
Tudo foi implementado em OnInit(). Apenas uma execução é necessária para criar e exibir o painel no gráfico.
Finalmente, removemos o painel usando a função Destroy() que criamos em OnDeinit(), ou seja, quando o EA é removido do gráfico.
Resultado:
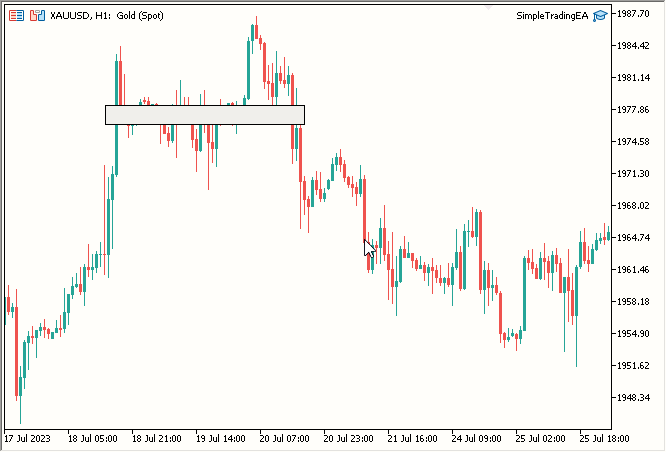
Fig. 2. Barra do Título
- Parte principal do painel
Usaremos novamente a classe RectangleLabel para criar o corpo principal. Só precisamos criar mais uma instância. Vamos nomeá-la "MainDashboardBody" e adicionar o seguinte código simples em OnInit() após a criação da barra do título, e então, finalmente, adicionar MainDashboardBody.Destroy() em OnDeinit():
// Creating a rectangle label called "MainDashboardBody" with specific dimensions
MainDashboardBody.Create("MainDashboardBody", 100, 119, 200, 100);
// Setting the border type of the "MainDashboardBody" rectangle label to be flat
MainDashboardBody.SetBorderType(BORDER_FLAT);
Após isso, nosso código fica assim:
#include "RectangleLabel.mqh" // Including the RectangleLabel class definition
RectangleLabel TitleBar; // Declaration of a TitleBar object
RectangleLabel MainDashboardBody; // Declaration of a MainDashboardBody object

//+------------------------------------------------------------------+
//| Expert initialization function                                   |
//+------------------------------------------------------------------+
int OnInit()
   {
    TitleBar.Create("TitleBar", 100, 100, 200, 20); // Creating the TitleBar with specified dimensions
    TitleBar.SetBorderType(BORDER_FLAT); // Setting the border type of TitleBar to be flat

    MainDashboardBody.Create("MainDashboardBody", 100, 119, 200, 100); // Creating the MainDashboardBody with specified dimensions
    MainDashboardBody.SetBorderType(BORDER_FLAT); // Setting the border type of MainDashboardBody to be flat

    ChartRedraw(0); // Redrawing the chart to reflect changes
    return(INIT_SUCCEEDED); // Indicating successful initialization
   }

//+------------------------------------------------------------------+
//| Expert deinitialization function                                 |
//+------------------------------------------------------------------+
void OnDeinit(const int reason)
   {
    MainDashboardBody.Destroy(); // Destroying the MainDashboardBody object
    TitleBar.Destroy(); // Destroying the TitleBar object
   }
//+------------------------------------------------------------------+
O resultado parece bom:
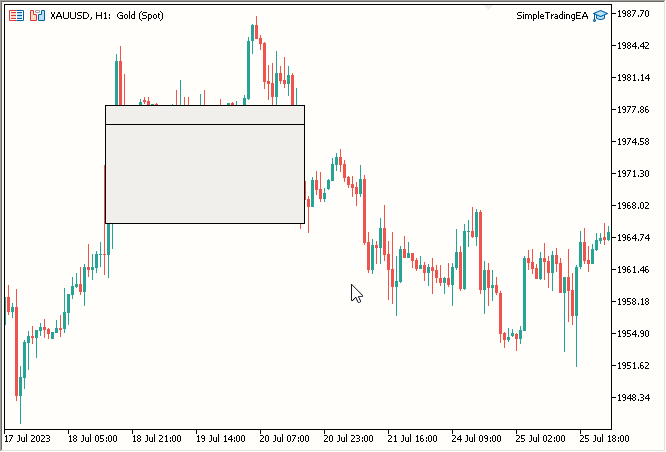
Fig. 3. Corpo principal do painel adicionado
- Texto do título
Para adicionar o texto do título, precisamos criar uma classe semelhante à RectangleLabel, mas especificamente para rótulos, o que nos permitirá adicionar texto. Aqui está o código da nova classe chamada Label:
//+------------------------------------------------------------------+
//| Label class definition                                           |
//+------------------------------------------------------------------+
class Label
   {
private:
    string           _name; // Name of the label
public:
                     Label(void); // Constructor
                    ~Label(void); // Destructor

    void             Create(string name, int xDis, int yDis); // Method to create a label
    void             Destroy() {ObjectDelete(0, _name);} // Method to destroy a label
    void             SetTextColor(color col) {ObjectSetInteger(0, _name, OBJPROP_COLOR, col);} // Method to set the text color
    void             SetText(string text) {ObjectSetString(0, _name, OBJPROP_TEXT, text);} // Method to set the text content
    string           GetText() {return ObjectGetString(0, _name, OBJPROP_TEXT);} // Method to retrieve the text content
    void             SetFontSize(int fontSize) {ObjectSetInteger(0, _name, OBJPROP_FONTSIZE, fontSize);} // Method to set the font size
    void             SetFont(string fontName) {ObjectSetString(0, _name, OBJPROP_FONT, fontName);} // Method to set the font name
   };

//+------------------------------------------------------------------+
//| Constructor                                                      |
//+------------------------------------------------------------------+
Label::Label(void)
   {

   }

//+------------------------------------------------------------------+
//| Destructor                                                       |
//+------------------------------------------------------------------+
Label::~Label(void)
   {

   }

//+------------------------------------------------------------------+
//| Method to create a label object                                  |
//+------------------------------------------------------------------+
void Label::Create(string name, int xDis, int yDis)
   {
    // Code to create label object, set its position, and assign its name
    ObjectCreate(0, name, OBJ_LABEL, 0, 0, 0);
    ObjectSetInteger(0, name, OBJPROP_XDISTANCE, xDis);
    ObjectSetInteger(0, name, OBJPROP_YDISTANCE, yDis);
    _name = name;
   }
//+------------------------------------------------------------------+
- Classe chamada Label criada em um novo arquivo .mqh denominado Label.mqh
- Variável privada _name declarada para armazenamento não público do nome
- Função Create criada com três parâmetros obrigatórios: name, xDis e yDis. O tamanho não importa para o objeto Label. Para alterar o tamanho do texto, alteramos o tamanho da fonte
- Função Destroy criada para remover o rótulo
- Função SetTextColor criada para definir a cor do texto
- Função criada para definir o texto do objeto Label
- Função GetText criada para obter o texto do objeto Label, que retorna uma string
- Função SetFontSize criada para definir o tamanho da fonte
- Função criada para definir o tipo de fonte. É necessário o nome da fonte em uma string. Claro, a fonte deve estar instalada no sistema operacional.
Agora vamos usá-lo para criar dois objetos de rótulo no gráfico.
Agora, SimpleTradingEA.mq5 parece o seguinte:
#include "RectangleLabel.mqh" // Including the RectangleLabel class definition
RectangleLabel TitleBar; // Declaration of a TitleBar object
RectangleLabel MainDashboardBody; // Declaration of a MainDashboardBody object

#include "Label.mqh" // Including the Label class definition
Label TitleText; // Declaration of a Label object

//+------------------------------------------------------------------+
//| Expert initialization function                                   |
//+------------------------------------------------------------------+
int OnInit()
   {
    TitleBar.Create("TitleBar", 100, 100, 200, 20); // Creating the TitleBar with specified dimensions
    TitleBar.SetBorderType(BORDER_FLAT); // Setting the border type of TitleBar to be flat

    MainDashboardBody.Create("MainDashboardBody", 100, 119, 200, 100); // Creating the MainDashboardBody with specified dimensions
    MainDashboardBody.SetBorderType(BORDER_FLAT); // Setting the border type of MainDashboardBody to be flat

    TitleText.Create("TitleText", 110, 101); // Creating the TitleText at (110,101)
    TitleText.SetText("Simple Trading EA V1.0"); // Setting its text to "Simple Trading EA V1.0"
    TitleText.SetFontSize(10); // Setting its font size to 10
    TitleText.SetTextColor(clrBlack); // Setting its text color to clrBlack

    ChartRedraw(0); // Redrawing the chart to reflect changes
    return(INIT_SUCCEEDED); // Indicating successful initialization
   }

//+------------------------------------------------------------------+
//| Expert deinitialization function                                 |
//+------------------------------------------------------------------+
void OnDeinit(const int reason)
   {
    MainDashboardBody.Destroy(); // Destroying the MainDashboardBody object
    TitleBar.Destroy(); // Destroying the TitleBar object
    TitleText.Destroy(); // Destroying the TitleText object
   }
//+------------------------------------------------------------------+
- Instância de rótulo criada com o nome TitleText
- Função TitleText.Create usada para criar o TitleText
- TitleText.SetText usado para definir o valor "Simple Trading EA V1.0" para o TitleText
- TitleText.SetFontSize usado para definir FontSize igual a 10
- TitleText.SetTextColor usado para definir a cor preta
- TitleText.Destroy usado para destruir o objeto TitleText em OnDeinit
Resultado:
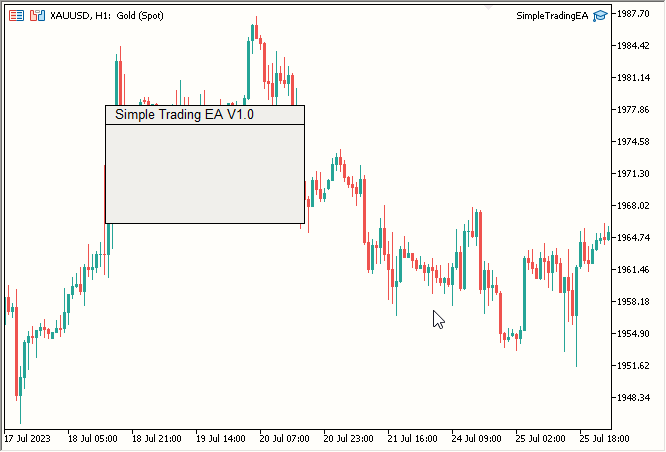
Fig. 4. Texto do título adicionado
- Texto "Tamanho do Lote:"
Para o texto "Lot Size:", execute um processo semelhante ao do texto do título. O código final parece o seguinte:
#include "RectangleLabel.mqh" // Including the RectangleLabel class definition
RectangleLabel TitleBar; // Declaration of a TitleBar object
RectangleLabel MainDashboardBody; // Declaration of a MainDashboardBody object

#include "Label.mqh" // Including the Label class definition
Label TitleText; // Declaration of a Label object
Label LotSizeText; // Declaration of a LotSizeText object

//+------------------------------------------------------------------+
//| Expert initialization function                                   |
//+------------------------------------------------------------------+
int OnInit()
   {
    TitleBar.Create("TitleBar", 100, 100, 200, 20); // Creating the TitleBar with specified dimensions
    TitleBar.SetBorderType(BORDER_FLAT); // Setting the border type of TitleBar to be flat

    MainDashboardBody.Create("MainDashboardBody", 100, 119, 200, 100); // Creating the MainDashboardBody with specified dimensions
    MainDashboardBody.SetBorderType(BORDER_FLAT); // Setting the border type of MainDashboardBody to be flat

    TitleText.Create("TitleText", 110, 101); // Creating the TitleText at (110,101)
    TitleText.SetText("Simple Trading EA V1.0"); // Setting its text to "Simple Trading EA V1.0"
    TitleText.SetFontSize(10); // Setting its font size to 10
    TitleText.SetTextColor(clrBlack); // Setting its text color to clrBlack

    LotSizeText.Create("LotSizeText", 110, 140); // Creating the LotSizeText at (110,140)
    LotSizeText.SetText("Lot Size:"); // Setting its text to "Lot Size:"
    LotSizeText.SetFontSize(12); // Setting its font size to 12
    LotSizeText.SetTextColor(clrBlack); // Setting its text color to clrBlack

    ChartRedraw(0); // Redrawing the chart to reflect changes
    return(INIT_SUCCEEDED); // Indicating successful initialization
   }

//+------------------------------------------------------------------+
//| Expert deinitialization function                                 |
//+------------------------------------------------------------------+
void OnDeinit(const int reason)
   {
    MainDashboardBody.Destroy(); // Destroying the MainDashboardBody object
    TitleBar.Destroy(); // Destroying the TitleBar object
    TitleText.Destroy(); // Destroying the TitleText object
    LotSizeText.Destroy(); // Destroying the LotSizeText object
   }
//+------------------------------------------------------------------+
- Instância de Label criada com o nome LotSizeText
- Função LotSizeText.Create usada para criar o texto
- LotSizeText.SetText usado para definir o texto "Lot Size:"
- LotSizeText.SetFontSize usado para definir FontSize igual a 12
- LotSizeText.SetTextColor usado para definir a cor preta
- LotSizeText.Destroy usado para destruir o objeto Label em OnDeinit
- Campo de edição
Para o campo de edição, criaremos uma classe muito semelhante à classe Label. Código da nova classe Edit:
//+------------------------------------------------------------------+
//| Edit class definition                                            |
//+------------------------------------------------------------------+
class Edit
   {
private:
    string           _name; // Name of the edit control
public:
                     Edit(void); // Constructor
                    ~Edit(void); // Destructor

    void             Create(string name, int xDis, int yDis, int xSize, int ySize); // Method to create an edit control
    void             Destroy() {ObjectDelete(0, _name);} // Method to destroy an edit control
    void             SetBorderColor(color col) {ObjectSetInteger(0, _name, OBJPROP_BORDER_COLOR, col);} // Method to set the border color
    void             SetBGColor(color col) {ObjectSetInteger(0, _name, OBJPROP_BGCOLOR, col);} // Method to set the background color
    void             SetTextColor(color col) {ObjectSetInteger(0, _name, OBJPROP_COLOR, col);} // Method to set the text color
    void             SetText(string text) {ObjectSetString(0, _name, OBJPROP_TEXT, text);} // Method to set the text content
    string           GetText() {return ObjectGetString(0, _name, OBJPROP_TEXT);} // Method to retrieve the text content
   };

//+------------------------------------------------------------------+
//| Constructor                                                      |
//+------------------------------------------------------------------+
Edit::Edit(void)
   {

   }

//+------------------------------------------------------------------+
//| Destructor                                                       |
//+------------------------------------------------------------------+
Edit::~Edit(void)
   {

   }

//+------------------------------------------------------------------+
//| Method to create an edit control object                          |
//+------------------------------------------------------------------+
void Edit::Create(string name, int xDis, int yDis, int xSize, int ySize)
   {
    // Code to create edit control object, set its position, size, and assign its name
    ObjectCreate(0, name, OBJ_EDIT, 0, 0, 0);
    ObjectSetInteger(0, name, OBJPROP_XDISTANCE, xDis);
    ObjectSetInteger(0, name, OBJPROP_YDISTANCE, yDis);
    ObjectSetInteger(0, name, OBJPROP_XSIZE, xSize);
    ObjectSetInteger(0, name, OBJPROP_YSIZE, ySize);
    _name = name;
   }
//+------------------------------------------------------------------+
- Classe Edit criada em um novo arquivo .mqh chamado Edit.mqh
- Variável privada _name declarada para armazenamento não público do nome
- Função Create criada com cinco parâmetros obrigatórios: name, xDis, yDis, xSize e ySize
- Função Destroy criada para remover o objeto de edição
- Função SetBorderColor criada para definir a cor da borda
- Função SetBGColor criada para definir a cor do fundo como WhiteSmoke
- Função SetTextColor criada para definir a cor do texto dentro do campo de edição
- Função SetText criada para definir o texto
- Função GetText criada para obter o texto
Agora você pode usar a classe Edit em SimpleTradingEA, conforme mostrado abaixo:
#include "RectangleLabel.mqh" // Including the RectangleLabel class definition
RectangleLabel TitleBar; // Declaration of a TitleBar object
RectangleLabel MainDashboardBody; // Declaration of a MainDashboardBody object

#include "Label.mqh" // Including the Label class definition
Label TitleText; // Declaration of a Label object
Label LotSizeText; // Declaration of a LotSizeText object

#include "Edit.mqh" // Including the Edit class definition
Edit LotSize; // Declaration of a LotSize object

//+------------------------------------------------------------------+
//| Expert initialization function                                   |
//+------------------------------------------------------------------+
int OnInit()
   {
    TitleBar.Create("TitleBar", 100, 100, 200, 20); // Creating the TitleBar with specified dimensions
    TitleBar.SetBorderType(BORDER_FLAT); // Setting the border type of TitleBar to be flat

    MainDashboardBody.Create("MainDashboardBody", 100, 119, 200, 100); // Creating the MainDashboardBody with specified dimensions
    MainDashboardBody.SetBorderType(BORDER_FLAT); // Setting the border type of MainDashboardBody to be flat

    TitleText.Create("TitleText", 110, 101); // Creating the TitleText at (110,101)
    TitleText.SetText("Simple Trading EA V1.0"); // Setting its text to "Simple Trading EA V1.0"
    TitleText.SetFontSize(10); // Setting its font size to 10
    TitleText.SetTextColor(clrBlack); // Setting its text color to clrBlack

    LotSizeText.Create("LotSizeText", 110, 140); // Creating the LotSizeText at (110,140)
    LotSizeText.SetText("Lot Size:"); // Setting its text to "Lot Size:"
    LotSizeText.SetFontSize(12); // Setting its font size to 12
    LotSizeText.SetTextColor(clrBlack); // Setting its text color to clrBlack

    LotSize.Create("LotSize", 220, 140, 50, 20); // Creating the LotSize with specified dimensions
    LotSize.SetBorderColor(clrBlack); // Setting its Border Color to clrBlack
    LotSize.SetBGColor(clrWhiteSmoke); // Setting its BG Color to clrWhiteSmoke
    LotSize.SetText("0.01"); // Setting its text to 0.01
    LotSize.SetTextColor(clrBlack); // Setting its text color to clrBlack

    ChartRedraw(0); // Redrawing the chart to reflect changes
    return(INIT_SUCCEEDED); // Indicating successful initialization
   }

//+------------------------------------------------------------------+
//| Expert deinitialization function                                 |
//+------------------------------------------------------------------+
void OnDeinit(const int reason)
   {
    MainDashboardBody.Destroy(); // Destroying the MainDashboardBody object
    TitleBar.Destroy(); // Destroying the TitleBar object
    TitleText.Destroy(); // Destroying the TitleText object
    LotSizeText.Destroy(); // Destroying the LotSizeText object
    LotSize.Destroy(); // Destroying the LotSize object
   }
//+------------------------------------------------------------------+
- Instância de Edit criada com o nome LotSize
- Função LotSize.Create usada para criar o objeto de edição
- LotSize.SetBorderColor usado para definir a cor da borda como preta
- LotSize.SetBGColor usado para definir a cor do fundo como WhiteSmoke
- LotSize.SetText usado para definir o texto 0,01, indicando o tamanho do lote
- LotSize.SetTextColor usado para definir a cor do texto dentro do campo de edição como preta
- LotSize.Destroy usado para remover o objeto Edit em OnDeinit
- Botões Buy e Sell
Finalmente chegamos aos botões. Vamos criar uma classe para os botões de maneira semelhante à que fizemos para os outros elementos:
//+------------------------------------------------------------------+
//| Button class definition                                          |
//+------------------------------------------------------------------+
class Button
   {
private:
    string           _name; // Name of the button control

public:
                     Button(void); // Constructor
                    ~Button(void); // Destructor

    void             Create(string name, int xDis, int yDis, int xSize, int ySize); // Method to create a button control
    void             SetBorderColor(color col) {ObjectSetInteger(0, _name, OBJPROP_BORDER_COLOR, col);} // Method to set the border color
    void             SetBGColor(color col) {ObjectSetInteger(0, _name, OBJPROP_BGCOLOR, col);} // Method to set the background color
    void             SetText(string text) {ObjectSetString(0, _name, OBJPROP_TEXT, text);} // Method to set the text content
    void             Destroy() {ObjectDelete(0, _name);} // Method to destroy a button control
   };

//+------------------------------------------------------------------+
//| Constructor                                                      |
//+------------------------------------------------------------------+
Button::Button(void)
   {

   }

//+------------------------------------------------------------------+
//| Destructor                                                       |
//+------------------------------------------------------------------+
Button::~Button(void)
   {

   }

//+------------------------------------------------------------------+
//| Method to create a button control object                         |
//+------------------------------------------------------------------+
void Button::Create(string name, int xDis = 0, int yDis = 0, int xSize = 0, int ySize = 0)
   {
    // Code to create button control object, set its position, size, and assign its name
    ObjectCreate(0, name, OBJ_BUTTON, 0, 0, 0);
    ObjectSetInteger(0, name, OBJPROP_XDISTANCE, xDis);
    ObjectSetInteger(0, name, OBJPROP_YDISTANCE, yDis);
    ObjectSetInteger(0, name, OBJPROP_XSIZE, xSize);
    ObjectSetInteger(0, name, OBJPROP_YSIZE, ySize);
    _name = name;
   }
//+------------------------------------------------------------------+
Em um novo arquivo .mqh chamado Button.mqh, criamos uma classe chamada Button. Declaramos uma variável privada _name para armazenamento não público do nome. Também criamos as seguintes funções:
- Função Create com cinco parâmetros obrigatórios: name, xDis, yDis, xSize e ySize.
- Função Destroy para remover o objeto botão (Button Object).
- Função SetBorderColor para definir a cor da borda (Border Color).
- Função SetBGColor para definir a cor do fundo como WhiteSmoke.
- Função SetText para definir o texto.
Agora vamos olhar para o arquivo principal SimpleTradingEA.mq5 após a adição dos botões. Você notará que agora ele contém instâncias de RectangleLabel, Label, Edit, Button para BuyButton e SellButton.
#include "RectangleLabel.mqh" // Including the RectangleLabel class definition
RectangleLabel TitleBar; // Declaration of a TitleBar object
RectangleLabel MainDashboardBody; // Declaration of a MainDashboardBody object

#include "Label.mqh" // Including the Label class definition
Label TitleText; // Declaration of a Label object
Label LotSizeText; // Declaration of a LotSizeText object

#include "Edit.mqh" // Including the Edit class definition
Edit LotSize; // Declaration of a LotSize object

#include "Button.mqh" // Including the Button class definition
Button BuyButton; // Declaration of a BuyButton object
Button SellButton; // Declaration of a SellButton object

//+------------------------------------------------------------------+
//| Expert initialization function                                   |
//+------------------------------------------------------------------+
int OnInit()
   {
    TitleBar.Create("TitleBar", 100, 100, 200, 20); // Creating the TitleBar with specified dimensions
    TitleBar.SetBorderType(BORDER_FLAT); // Setting the border type of TitleBar to be flat

    MainDashboardBody.Create("MainDashboardBody", 100, 119, 200, 100); // Creating the MainDashboardBody with specified dimensions
    MainDashboardBody.SetBorderType(BORDER_FLAT); // Setting the border type of MainDashboardBody to be flat

    TitleText.Create("TitleText", 110, 101); // Creating the TitleText at (110,101)
    TitleText.SetText("Simple Trading EA V1.0"); // Setting its text to "Simple Trading EA V1.0"
    TitleText.SetFontSize(10); // Setting its font size to 10
    TitleText.SetTextColor(clrBlack); // Setting its text color to clrBlack

    LotSizeText.Create("LotSizeText", 110, 140); // Creating the LotSizeText at (110,140)
    LotSizeText.SetText("Lot Size:"); // Setting its text to "Lot Size:"
    LotSizeText.SetFontSize(12); // Setting its font size to 12
    LotSizeText.SetTextColor(clrBlack); // Setting its text color to clrBlack

    LotSize.Create("LotSize", 220, 140, 50, 20); // Creating the LotSize with specified dimensions
    LotSize.SetBorderColor(clrBlack); // Setting its Border Color to clrBlack
    LotSize.SetBGColor(clrWhiteSmoke); // Setting its BG Color to clrWhiteSmoke
    LotSize.SetText("0.01"); // Setting its text to 0.01
    LotSize.SetTextColor(clrBlack); // Setting its text color to clrBlack

    BuyButton.Create("BuyButton", 110, 180, 80, 25); // Creating the BuyButton with specified dimensions
    BuyButton.SetBorderColor(clrBlack); // Setting its Border Color to clrBlack
    BuyButton.SetText("Buy"); // Setting its text to "Buy"
    BuyButton.SetBGColor(clrLime); // Setting its BG Color to clrLime

    SellButton.Create("SellButton", 210, 180, 80, 25); // Creating the SellButton with specified dimensions
    SellButton.SetBorderColor(clrBlack); // Setting its Border Color to clrBlack
    SellButton.SetText("Sell"); // Setting its text to "Sell"
    SellButton.SetBGColor(clrRed); // Setting its BG Color to clrRed

    ChartRedraw(0); // Redrawing the chart to reflect changes
    return(INIT_SUCCEEDED); // Indicating successful initialization
   }

//+------------------------------------------------------------------+
//| Expert deinitialization function                                 |
//+------------------------------------------------------------------+
void OnDeinit(const int reason)
   {
    MainDashboardBody.Destroy(); // Destroying the MainDashboardBody object
    TitleBar.Destroy(); // Destroying the TitleBar object
    TitleText.Destroy(); // Destroying the TitleText object
    LotSizeText.Destroy(); // Destroying the LotSizeText object
    LotSize.Destroy(); // Destroying the LotSize object
    BuyButton.Destroy(); // Destroying the BuyButton object
    SellButton.Destroy(); // Destroying the SellButton object
   }
//+------------------------------------------------------------------+
- Instância de Button criada com o nome BuyButton
- Função BuyButton.Create usada para criar o objeto de edição (Edit Object)
- BuyButton.SetBorderColor usado para definir a cor da borda como preta
- BuyButton.SetBGColor usado para definir a cor do fundo como Lime.
- BuyButton.SetText usado para definir o texto como Buy
- BuyButton.Destroy usado para remover o objeto Button em OnDeinit
Para o botão Sell:
- Instância de Button criada com o nome SellButton
- Função SellButton.Create usada para criar o objeto botão (Button Object)
- SellButton.SetBorderColor usado para definir a cor da borda como preta
- SellButton.SetBGColor usado para definir a cor do fundo como vermelha
- SellButton.SetText usado para definir o texto como Sell
- SellButton.Destroy usado para remover o objeto Button em OnDeinit
Resultado:
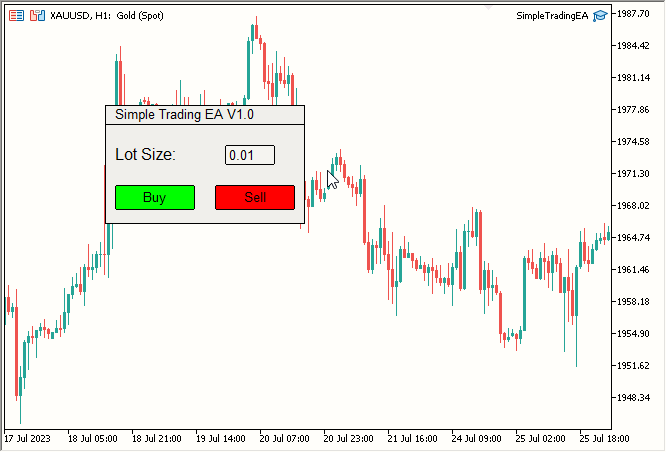
Fig. 6. Botões Buy e Sell adicionados - Últimos retoques
- Alterar a cor da barra do título para azul escuro
- Alterar a cor do corpo do painel principal para azul claro
- Mudar a cor do texto do título de preto para branco
- Mudar a cor do texto "Lot Size" de preto para branco
- Adicionar função de compra/venda
-
Alterações de cor:
- A cor do fundo da linha do título foi alterada para azul escuro usando TitleBar.SetBGColor(C'27, 59, 146').
- A cor do corpo principal do painel de informações foi alterada para azul claro usando MainDashboardBody.SetBGColor(C'102, 152, 250').
- A cor do texto do título foi alterada para branco usando TitleText.SetTextColor(clrWhite).
- A cor do texto "Lot Size" foi alterada para branco usando LotSizeText.SetTextColor(clrWhite).
-
Incorporação da biblioteca de negociação:
- A biblioteca de negociação foi integrada e um objeto chamado trade foi criado com o seguinte código:
#include <Trade/Trade.mqh> CTrade trade;
- A biblioteca de negociação foi integrada e um objeto chamado trade foi criado com o seguinte código:
-
Criação da função OnChartEvent:
Implementada a função OnChartEvent, que executa imediatamente o pedido correspondente quando o botão Buy ou Sell é pressionado. O código funciona da seguinte maneira:
//+------------------------------------------------------------------+ //| Chart event handling function | //+------------------------------------------------------------------+ void OnChartEvent(const int id, const long& lparam, const double& dparam, const string& sparam) { if(id == CHARTEVENT_OBJECT_CLICK) { double ask = SymbolInfoDouble(_Symbol, SYMBOL_ASK); double bid = SymbolInfoDouble(_Symbol, SYMBOL_BID); if(sparam == "BuyButton") { trade.PositionOpen(_Symbol, ORDER_TYPE_BUY, (double)LotSize.GetText(), ask, 0, 0); } if(sparam == "SellButton") { trade.PositionOpen(_Symbol, ORDER_TYPE_SELL, (double)LotSize.GetText(), bid, 0, 0); } } } //+------------------------------------------------------------------+
Se o identificador do evento for CHARTEVENT_OBJECT_CLICK, a função detecta um clique no objeto, obtém o nome desse objeto usando sparam, verifica se o nome do objeto é BuyButton ou SellButton, e então realiza a negociação correspondente usando a biblioteca Trade.
Isso é tudo. Resultado:
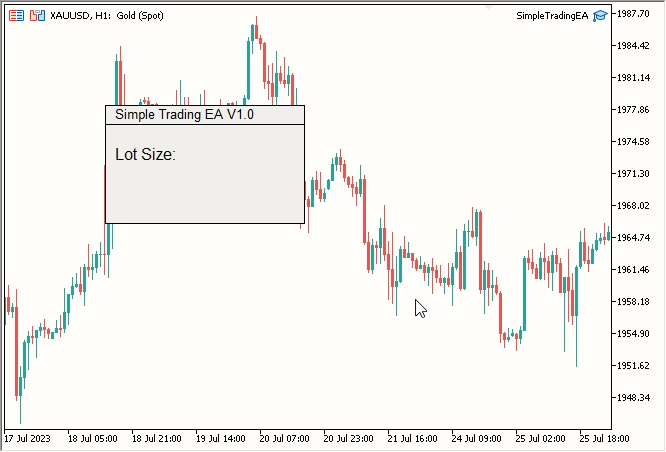
Fig. 5. Texto "Lot Size:" adicionado
Vamos nos concentrar nas cores. Faremos as seguintes mudanças:
O código final do SimpleTradingEA.mq5 inclui mudanças de cor e a biblioteca de negociação. Ele também cria uma função OnChartEvent, para que quando os botões Buy ou Sell forem pressionados, a respectiva ordem seja colocada imediatamente.
#include "RectangleLabel.mqh" // Including the RectangleLabel class definition
RectangleLabel TitleBar; // Declaration of a TitleBar object
RectangleLabel MainDashboardBody; // Declaration of a MainDashboardBody object

#include "Label.mqh" // Including the Label class definition
Label TitleText; // Declaration of a Label object
Label LotSizeText; // Declaration of a LotSizeText object

#include "Edit.mqh" // Including the Edit class definition
Edit LotSize; // Declaration of a LotSize object

#include "Button.mqh" // Including the Button class definition
Button BuyButton; // Declaration of a BuyButton object
Button SellButton; // Declaration of a SellButton object

//+------------------------------------------------------------------+
//| Expert initialization function                                   |
//+------------------------------------------------------------------+
int OnInit()
   {
    TitleBar.Create("TitleBar", 100, 100, 200, 20); // Creating the TitleBar with specified dimensions
    TitleBar.SetBorderType(BORDER_FLAT); // Setting the border type of TitleBar to be flat
    TitleBar.SetBGColor(C'27, 59, 146'); // Setting the color to RGB code: C'27, 59, 146'

    MainDashboardBody.Create("MainDashboardBody", 100, 119, 200, 100); // Creating the MainDashboardBody with specified dimensions
    MainDashboardBody.SetBorderType(BORDER_FLAT); // Setting the border type of MainDashboardBody to be flat
    MainDashboardBody.SetBGColor(C'102, 152, 250'); // Setting the color to RGB code: C'102, 152, 250'

    TitleText.Create("TitleText", 110, 101); // Creating the TitleBar at (110,101)
    TitleText.SetText("Simple Trading EA V1.0"); // Setting its text to "Simple Trading EA V1.0"
    TitleText.SetFontSize(10); // Setting its font size to 10
    TitleText.SetTextColor(clrWhite); // Setting its text color to clrWhite

    LotSizeText.Create("LotSizeText", 110, 140); // Creating the LotSizeText at (110,140)
    LotSizeText.SetText("Lot Size:"); // Setting its text to "Lot Size:"
    LotSizeText.SetFontSize(12); // Setting its font size to 12
    LotSizeText.SetTextColor(clrWhite); // Setting its text color to clrWhite

    LotSize.Create("LotSize", 220, 140, 50, 20); // Creating the LotSize with specified dimensions
    LotSize.SetBorderColor(clrBlack); // Setting its Border Color to clrBlack
    LotSize.SetBGColor(clrWhiteSmoke); // Setting its BG Color to clrWhiteSmoke
    LotSize.SetText("0.01"); // Setting its text to 0.01
    LotSize.SetTextColor(clrBlack); // Setting its text color to clrBlack

    BuyButton.Create("BuyButton", 110, 180, 80, 25); // Creating the BuyButton with specified dimensions
    BuyButton.SetBorderColor(clrBlack); // Setting its Border Color to clrBlack
    BuyButton.SetText("Buy"); // Setting its text to "Buy"
    BuyButton.SetBGColor(clrLime); // Setting its BG Color to clrLime

    SellButton.Create("SellButton", 210, 180, 80, 25); // Creating the SellButton with specified dimensions
    SellButton.SetBorderColor(clrBlack); // Setting its Border Color to clrBlack
    SellButton.SetText("Sell"); // Setting its text to "Sell"
    SellButton.SetBGColor(clrRed); // Setting its BG Color to clrRed

    ChartRedraw(0); // Redrawing the chart to reflect changes
    return(INIT_SUCCEEDED); // Indicating successful initialization
   }

//+------------------------------------------------------------------+
//| Expert deinitialization function                                 |
//+------------------------------------------------------------------+
void OnDeinit(const int reason)
   {
    MainDashboardBody.Destroy(); // Destroying the MainDashboardBody object
    TitleBar.Destroy(); // Destroying the TitleBar object
    TitleText.Destroy(); // Destroying the TitleText object
    LotSizeText.Destroy(); // Destroying the LotSizeText object
    LotSize.Destroy(); // Destroying the LotSize object
    BuyButton.Destroy(); // Destroying the BuyButton object
    SellButton.Destroy(); // Destroying the SellButton object
   }

//+------------------------------------------------------------------+
//| Chart event handling function                                    |
//+------------------------------------------------------------------+
void OnChartEvent(const int id, const long& lparam, const double& dparam, const string& sparam)
   {
    // Handles click events for Buy and Sell buttons and opens corresponding positions
    if(id == CHARTEVENT_OBJECT_CLICK) {
        double ask = SymbolInfoDouble(_Symbol, SYMBOL_ASK);
        double bid = SymbolInfoDouble(_Symbol, SYMBOL_BID);
        if(sparam == "BuyButton") {
            trade.PositionOpen(_Symbol, ORDER_TYPE_BUY, (double)LotSize.GetText(), ask, 0, 0);
        }
        if(sparam == "SellButton") {
            trade.PositionOpen(_Symbol, ORDER_TYPE_SELL, (double)LotSize.GetText(), bid, 0, 0);
        }
    }
   }
//+------------------------------------------------------------------+
Mudanças:
Resultado final:
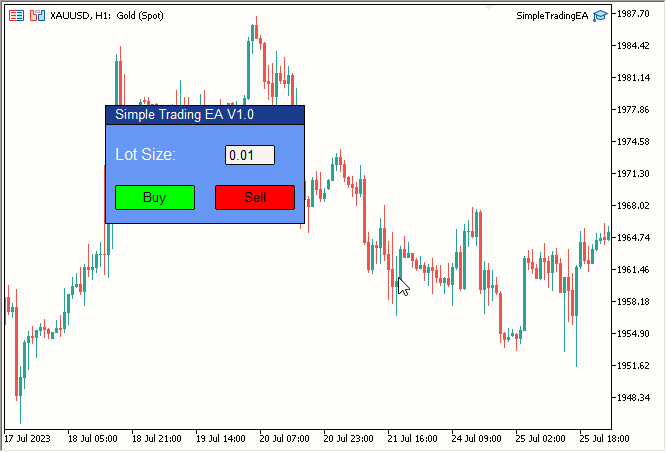
Fig. 7. EA Simple Trading Completo (Estático)
Discussão sobre a movimentação do nosso painel estático com todos os elementos dentro dele
Agora começa o verdadeiro trabalho. Como tornar tudo móvel?
Até o momento, podemos mover qualquer elemento individual. Mas precisamos que todos os elementos sejam móveis. Então, vamos tornar um elemento móvel e fazer todos os outros segui-lo. Podemos fazer os elementos seguirem o principal usando CustomChartEvent, mas, infelizmente, esse método é lento e ineficiente. Acredito que a abordagem mais eficaz é mover nosso elemento principal (ao redor do qual todos os outros elementos se movem) e mover simultaneamente os outros elementos. Como implementar essa ideia na prática?
Vamos chamar nosso elemento principal de Elemento Central (Central Element). Faremos a linha do título ser o Elemento Central. Agora, vamos mover todos os outros elementos ao redor dele.
Anteriormente, movíamos um único elemento usando a função OnEvent, definida em sua classe. Agora, modificaremos esta função para que ela mova um elemento e, em seguida, mova todos os outros elementos exatamente na mesma quantidade.
Aqui está nossa função OnEvent atual:
//+------------------------------------------------------------------+
//|                                                                  |
//+------------------------------------------------------------------+
void RectangleLabel::OnEvent(int id, long lparam, double dparam, string sparam)
  {
   //Verify the event that triggered the OnChartEvent was CHARTEVENT_MOUSE_MOVE because we only want to execute out code when that is the case
   if(id == CHARTEVENT_MOUSE_MOVE)
     {
      //define X, Y, XDistance, YDistance, XSize, YSize
      int X = (int)lparam;
      int Y = (int)dparam;
      int MouseState = (int)sparam;

      string name = Name;
      int XDistance = (int)ObjectGetInteger(0, name, OBJPROP_XDISTANCE); //Should be 100 initially as we set it in OnInit()
      int YDistance = (int)ObjectGetInteger(0, name, OBJPROP_YDISTANCE); //Should be 100 initially as we set it in OnInit()
      int XSize = (int)ObjectGetInteger(0, name, OBJPROP_XSIZE); //Should be 200 initially as we set it in OnInit()
      int YSize = (int)ObjectGetInteger(0, name, OBJPROP_YSIZE); //Should be 200 initially as we set it in OnInit()

      if(previousMouseState == 0 && MouseState == 1) //Check if this was the MLB first click
        {
         mlbDownX = X; //Set mlbDownX (Variable that stores the initial MLB X location) equal to the current X
         mlbDownY = Y; //Set mlbDownY (Variable that stores the initial MLB Y location) equal to the current Y
         mlbDownXDistance = XDistance; //Set mlbDownXDistance (Variable that stores the initial XDistance i.e. Width of the dashboard) equal to the current XDistance
         mlbDownYDistance = YDistance; //Set mlbDownYDistance (Variable that stores the initial YDistance i.e. Height of the dashboard) equal to the current YDistance

         if(X >= XDistance && X <= XDistance + XSize && Y >= YDistance && Y <= YDistance + YSize) //Check if the click was on the dashboard
           {
            movingState = true; //If yes the set movingState to True
           }

        }

      if(movingState)//if movingState is true, Update the Dashboard position
        {
         ChartSetInteger(0, CHART_MOUSE_SCROLL, false);//Restrict Chart to be moved by Mouse
         ObjectSetInteger(0, name, OBJPROP_XDISTANCE, mlbDownXDistance + X - mlbDownX);//Update XDistance to: mlbDownXDistance + (X - mlbDownX)
         ObjectSetInteger(0, name, OBJPROP_YDISTANCE, mlbDownYDistance + Y - mlbDownY);//Update YDistance to: mlbDownYDistance + (Y - mlbDownY)
         ChartRedraw(0); //Redraw Chart
        }

      if(MouseState == 0)//Check if MLB is not pressed
        {
         movingState = false;//set movingState again to false
         ChartSetInteger(0, CHART_MOUSE_SCROLL, true);//allow the cahrt to be moved again
        }

      previousMouseState = MouseState;//update the previousMouseState at the end so that we can use it next time and copare it with new value
     }
  }
//+------------------------------------------------------------------+
Até agora, não adicionamos essa função à classe RectangleLabel. Faremos isso após discutir a abordagem.
O que precisamos para mover qualquer objeto? Seu nome, certo?
Vamos proceder de maneira bastante simples: passaremos por esses nomes e moveremos os objetos na mesma quantidade que movemos o elemento central. No entanto, aqui há um ponto não tão óbvio, mas significativo.
Sempre que o mouse se move, definimos XDis e YDis do elemento central da seguinte maneira:
ObjectSetInteger(0, name, OBJPROP_XDISTANCE, mlbDownXDistance + X - mlbDownX);//Update XDistance to: mlbDownXDistance + (X - mlbDownX)
ObjectSetInteger(0, name, OBJPROP_YDISTANCE, mlbDownYDistance + Y - mlbDownY);//Update YDistance to: mlbDownYDistance + (Y - mlbDownY)
Sabemos o XDis e YDis do elemento central quando o botão do meio do mouse é pressionado. Precisamos conhecer essa informação também para os outros elementos. No entanto, isso tornaria a função muito complicada ou ineficiente, então precisamos de uma abordagem melhor.
Ao analisar mais de perto, a melhor abordagem está bem diante de nós. Precisamos apenas manter o "distanciamento X e Y entre o Elemento Central e os outros elementos" (X Distance and Y Distance between Central Elements and Other Elements). Sim, é tão simples quanto isso.
Então, vamos especificar o "distanciamento X e Y entre o Elemento Central e os outros elementos" e manter essa distância. Como vamos registrar essas distâncias? Em algum momento, adicionaremos outros elementos ao elemento central, e é nesse momento que especificaremos o "distanciamento X e Y entre o Elemento Central e os outros elementos".
Vamos repetir: em algum momento, usaremos os nomes dos outros elementos para adicioná-los ao elemento central, e é nesse momento que vamos registrar e manter o distanciamento X e Y entre o elemento central e os outros elementos. Atualizaremos essa distância após a atualização da posição do elemento central.
Vamos implementar essa abordagem na prática.
Aplicação prática da abordagem escolhida para criar um painel móvel
Então, vamos discutir onde armazenaremos o nome, distanciamento X e Y entre o Elemento Central e os outros elementos. Essas são as únicas categorias de informação que precisamos armazenar.
Vamos criar uma função Add na classe RectangleLabel. Usando esta função, armazenaremos as seguintes duas coisas:
- Nome no array addNames
- Distância X e Y entre os elementos centrais e outros elementos em addXDisDifference e addYDisDifference, respectivamente.
Quanto às convenções de nomenclatura, "added" (adicionado) implica que a variável está relacionada a outro elemento adicionado ao central, enquanto "XDis" e "YDis" são bastante diretos. "Difference" (diferença) sugere que a variável tem alguma relação com uma diferença. A escolha cuidadosa do nome ajuda a evitar confusão.
Vamos declarar essas variáveis:
string           addedNamed[];
int              addedXDisDiffrence[], addedYDisDiffrence[];
Note que as declaramos como privadas (Private). Não precisamos que sejam públicas (Public). Além disso, todas são arrays.
Agora vamos criar a função Add:
//+------------------------------------------------------------------+
//| Method to add an object by name to the rectangle label           |
//+------------------------------------------------------------------+
void RectangleLabel::Add(string name)
   {
    ArrayResize(addedNames, ArraySize(addedNames) + 1);
    ArrayResize(addedXDisDiffrence, ArraySize(addedXDisDiffrence) + 1);
    ArrayResize(addedYDisDiffrence, ArraySize(addedYDisDiffrence) + 1);

    addedNames[ArraySize(addedNames) - 1] = name;
    addedXDisDiffrence[ArraySize(addedXDisDiffrence) - 1] = ObjectGetInteger(0, _name, OBJPROP_XDISTANCE) - ObjectGetInteger(0, name, OBJPROP_XDISTANCE);
    addedYDisDiffrence[ArraySize(addedYDisDiffrence) - 1] = ObjectGetInteger(0, _name, OBJPROP_YDISTANCE) - ObjectGetInteger(0, name, OBJPROP_YDISTANCE);
   }
//+------------------------------------------------------------------+
Esta função é declarada na classe RectangleLabel, pois o TitleBar é o nosso elemento central e, essencialmente, um objeto RECTANGLE_LABEL. Obviamente, declaramos as variáveis na mesma classe, pois as utilizamos nessa função.
Essa função recebe um nome como parâmetro e, em seguida, aumenta o tamanho desses três arrays em um. No último índice, salvamos os dados correspondentes. Como Name, simplesmente armazenamos o nome. Para a diferença de distâncias (X e Y), guardamos a diferença entre o elemento central (neste caso, TitleBar) e o elemento cujo nome é fornecido como parâmetro. Isso completa a nossa função Add.
Em seguida, precisamos modificar a função OnEvent. Criamos um loop para percorrer o array addNames e manter a distância entre o TitleBar e o elemento nomeado, definindo-a igual à nova distância X/Y do TitleBar menos o valor da diferença especificado nos arrays correspondentes.
for(int i = 0; i < ArraySize(addedNames); i++)
   {
    ObjectSetInteger(0, addedNames[i], OBJPROP_XDISTANCE, mlbDownXDistance + X - mlbDownX - addedXDisDiffrence[i]);
    ObjectSetInteger(0, addedNames[i], OBJPROP_YDISTANCE, mlbDownYDistance + Y - mlbDownY - addedYDisDiffrence[i]);
   }
Observe que a parte sublinhada é a nova distância X/Y do título (elemento central), e subtraímos a diferença especificada nos arrays correspondentes (referindo-se à diferença de distâncias X e Y entre o elemento central e os outros elementos).
Onde colocaremos esse loop? Imediatamente após a atualização do elemento central.
Aqui está como nossa nova função OnEvent se parece:
//+------------------------------------------------------------------+
//| Event handling for mouse movements                               |
//+------------------------------------------------------------------+
void RectangleLabel::OnEvent(int id, long lparam, double dparam, string sparam)
   {
    // Handle mouse movement events for dragging the rectangle label
    if(id == CHARTEVENT_MOUSE_MOVE)
       {
        int X = (int)lparam;
        int Y = (int)dparam;
        int MouseState = (int)sparam;

        string name = _name;
        int XDistance = (int)ObjectGetInteger(0, name, OBJPROP_XDISTANCE);
        int YDistance = (int)ObjectGetInteger(0, name, OBJPROP_YDISTANCE);
        int XSize = (int)ObjectGetInteger(0, name, OBJPROP_XSIZE);
        int YSize = (int)ObjectGetInteger(0, name, OBJPROP_YSIZE);

        if(previousMouseState == 0 && MouseState == 1)
           {
            mlbDownX = X;
            mlbDownY = Y;
            mlbDownXDistance = XDistance;
            mlbDownYDistance = YDistance;

            if(X >= XDistance && X <= XDistance + XSize && Y >= YDistance && Y <= YDistance + YSize)
               {
                movingState = true;
               }

           }

        if(movingState)
           {
            ChartSetInteger(0, CHART_MOUSE_SCROLL, false);
            ObjectSetInteger(0, name, OBJPROP_XDISTANCE, mlbDownXDistance + X - mlbDownX);
            ObjectSetInteger(0, name, OBJPROP_YDISTANCE, mlbDownYDistance + Y - mlbDownY);
            for(int i = 0; i < ArraySize(addedNames); i++)
               {
                ObjectSetInteger(0, addedNames[i], OBJPROP_XDISTANCE, mlbDownXDistance + X - mlbDownX - addedXDisDiffrence[i]);
                ObjectSetInteger(0, addedNames[i], OBJPROP_YDISTANCE, mlbDownYDistance + Y - mlbDownY - addedYDisDiffrence[i]);
               }
            ChartRedraw(0);
           }

        if(MouseState == 0)
           {
            movingState = false;
            ChartSetInteger(0, CHART_MOUSE_SCROLL, true);
           }

        previousMouseState = MouseState;
       }
   }
A parte destacada é o nosso novo loop.
Agora, basta usar a função Add para anexar elementos ao central, já que escolhemos o TitleBar. Usamos a função Add do exemplo TitleBar ("TitleBar").
Vamos utilizar a função Add no exemplo TitleBar para adicionar todos os outros elementos ao TitleBar:
// Add the other elements to the Central Element i.e. TitleBar object in this case
TitleBar.Add("MainDashboardBody");
TitleBar.Add("TitleText");
TitleBar.Add("LotSizeText");
TitleBar.Add("LotSize");
TitleBar.Add("BuyButton");
TitleBar.Add("SellButton");
Com isso, os nomes de todos esses elementos são adicionados ao array addNames, permitindo que eles se movam. Além disso, a distância deles em relação ao TitleBar é registrada, então essa distância será mantida.
Agora vamos usar a função OnEvent. Sem ela, tudo seria em vão.
// Passes events to the TitleBar object
TitleBar.OnEvent(id, lparam, dparam, sparam);
Adicionamos isso em OnChartEvent(), e isso é tudo. O código é bastante extenso, mas o resultado final deve valer a pena. 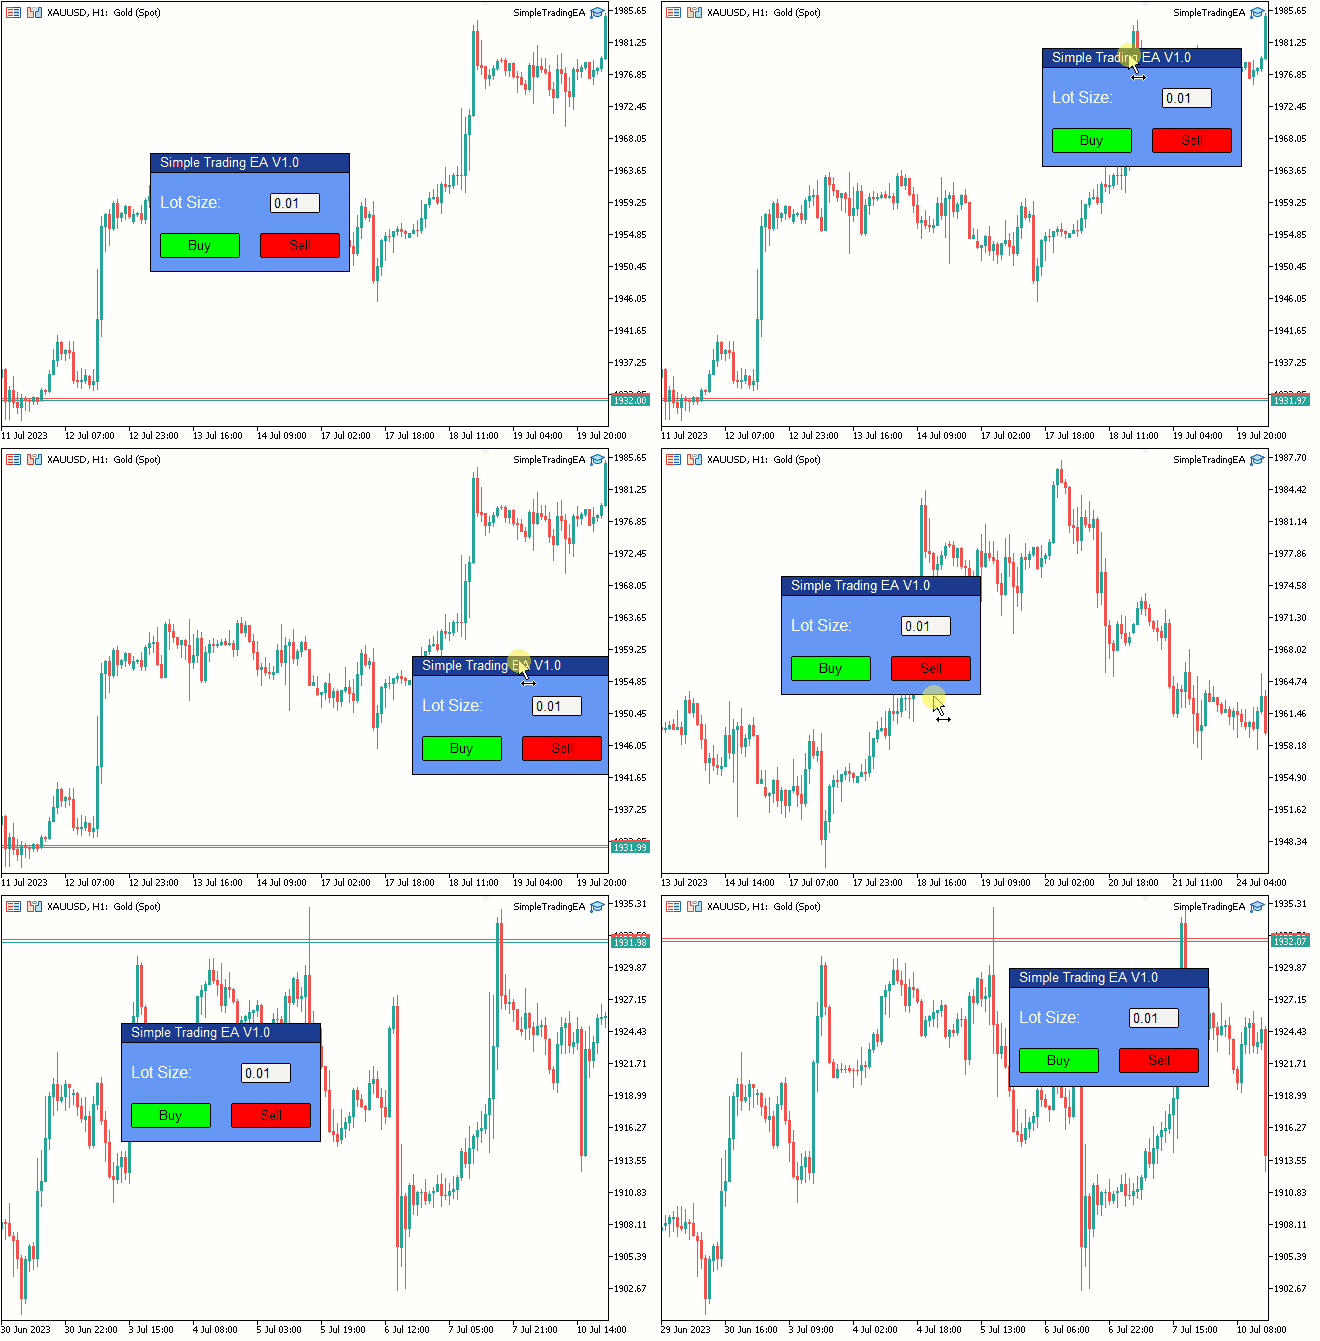
Fig. 8. Resultado Final
Considerações finais
Conseguimos alcançar os objetivos que estabelecemos nas primeiras duas partes da série "Interface Móvel", trazendo à vida uma interface dinâmica e amigável para gráficos de negociação. Obrigado por tirar um tempo para ler meus artigos! Espero que eles sejam úteis em suas empreitadas.
Se você tiver quaisquer ideias ou sugestões sobre o que gostaria de ver no meu próximo artigo, por favor, escreva para mim.
Boa programação! Boas negociações!
Traduzido do Inglês pela MetaQuotes Ltd.
Artigo original: https://www.mql5.com/en/articles/12923
Aviso: Todos os direitos sobre esses materiais pertencem à MetaQuotes Ltd. É proibida a reimpressão total ou parcial.
Esse artigo foi escrito por um usuário do site e reflete seu ponto de vista pessoal. A MetaQuotes Ltd. não se responsabiliza pela precisão das informações apresentadas nem pelas possíveis consequências decorrentes do uso das soluções, estratégias ou recomendações descritas.
 Desenvolvendo um sistema de Replay (Parte 41): Iniciando a segunda fase (II)
- Aplicativos de negociação gratuitos
- 8 000+ sinais para cópia
- Notícias econômicas para análise dos mercados financeiros
Você concorda com a política do site e com os termos de uso
A opção mais prática e universal é projetar formulários visualmente, sem se preocupar com o código do layout - é exatamente isso que as classes devem fazer. Uma das soluções possíveis estava no artigo.
Stanislav, bem, no artigo para iniciantes você fornece um link para o artigo para usuários avançados :)
Eu o li, não o li, mas apenas o li, porque meu nível de programação é muito mais baixo do que o necessário para entender o que está escrito lá.
Tento usar o mínimo possível o que não entendo. Uma situação recente me fez acreditar ainda mais nisso.
Você provavelmente está lendo o tópico "Erros, bugs, perguntas", então eu tinha a tarefa de exibir setas de posições fechadas em um renko gráfico, entrada-saída entre elas - uma linha.
Decidi não escrever eu mesmo, mas pegar um código pronto do Saiber e, como resultado, perdi meio dia de tempo. No final, o Saiber corrigiu seu código, mas eu perdi tempo.
E se eu quisesse pegar o código do seu artigo e precisasse ajustar alguma coisa, bem, você entende, nada de bom sairia disso.
Tenho uma tarefa mais simples do que a que você se propôs ao escrever seu artigo. Só preciso fazer com que eu possa construir o próximo painel a partir de peças de código prontas, como as crianças constroem casas com lego.
Na minha opinião, não preciso de OOP para esse fim. Não a conheço, portanto não gosto dela.
O princípio MVC é bastante adequado para meus objetivos, se eu o entendi corretamente)))))
Em geral, já tenho uma ideia de como deve ser.
A propósito, você pode me dizer como fazer para que, quando eu acessar as funções da classe herdeira do programa, eu não veja as funções da classe base? Bem, se for possível.
me veio à mente :-)
Para quem não está no mercado, quer algo mais ou menos complexo, mas bonito, e tem muita preguiça de escrever uma DLL, há o GtkServer https://sourceforge.net/projects/gtk-server/ e o designer de formulários Glade.
Metodologia: O GtkServer é iniciado como um ouvinte tcp, o orientador que usa SocketOpen/SocketSend envia o texto "load form" (ou ele mesmo por etapas forma widgets gtk) e também lê o resultado....
Você também :)
Eu considero palavras como tcp listener, SocketOpen/SocketSend como palavrões , nem mesmo sei o significado delas sem o Google, e você sugere usá-las.
Senhores, tenham consciência, parem de assustar as pessoas com sua terminologia)))))
Stanislav, bem yo-ma-yo, abaixo do artigo para iniciantes você coloca um link para o artigo para avançados :)
Eu o li, não o li, mas apenas o li, porque meu nível de programação é muito mais baixo do que o necessário para entender o que está escrito lá.
Tento usar o mínimo possível o que não entendo. Uma situação recente me fez acreditar ainda mais nisso.
Infelizmente, a situação do software é tal que é impossível entender tudo por conta própria. De acordo com essa lógica, o sistema operacional deve ser personalizado (que é o que alguns apologistas do Linux fazem).
É por isso que a abordagem moderna é pegar tijolos prontos (que fazem mais ou menos o que você precisa) e acoplá-los (sem se aprofundar na implementação).
Eu estava apenas respondendo à pergunta sobre como fazer mais universalmente. Você não pode contestar o fato de que meu artigo é complicado, mas o ponto é que você pode descrever a GUI necessária como um modelo sem programação, apenas conectando gabinetes para obter controladores, arrastar janelas, redimensionar e assim por diante.
Fantástico!
Não consegui descobrir sozinho,
sim, li duas vezes.
Obrigado!
Felipe