
Mejore sus gráficos comerciales con una GUI interactiva basada en MQL5 (Parte III): Interfaz comercial simple y móvil
Introducción
Primero, debemos recordar el material que abarcamos en las dos partes anteriores:
1. En la primera parte analizamos el concepto de eventos del gráfico y luego creamos dos paneles móviles simples en el mismo gráfico.
2. En la segunda parte fuimos aún más lejos: usamos las clases en el archivo .mqh para hacer que nuestro código resulte más eficiente y versátil, listo para la integración con asesores/indicadores completos.
En la tercera parte nos centraremos en mejorar nuestros paneles integrando una GUI en ellos; sin una interfaz gráfica, los paneles no cumplirán su propósito previsto.
Aquí tenemos una descripción general de lo que abarcaremos en este artículo:
- ¿Qué vamos a crear?
- Creamos un panel de comercio estático simple
- Analizamos el desplazamiento de nuestro panel estático con todos los elementos dentro de él
- Aplicamos el enfoque elegido en la práctica para crear un panel móvil
- Conclusión
¿Qué vamos a crear?
Hoy crearemos un panel móvil con una GUI, y para ello debemos decidir qué crearemos. Como base, hemos seleccionado un asesor sencillo: Simple Trading.
Primero, necesitaremos crear este panel de control estático, es decir, el asesor Simple Trading. Es extremadamente importante hacer esto de forma efectiva mientras creamos un asesor de plenamente funcional. Con «efectivo», nos referimos a que no podemos simplemente abrir un archivo y escribir todo el código allí. En cambio, necesitaremos un plan bien pensado que nos permita escribir un código mínimo en unos pocos archivos .mqh bien organizados. Lo más importante es que deberemos evitar duplicar el mismo código una y otra vez para crear las GUI estáticas necesarias para nuestro panel móvil.
Aquí tenemos el panel estático básico que usaremos como base:
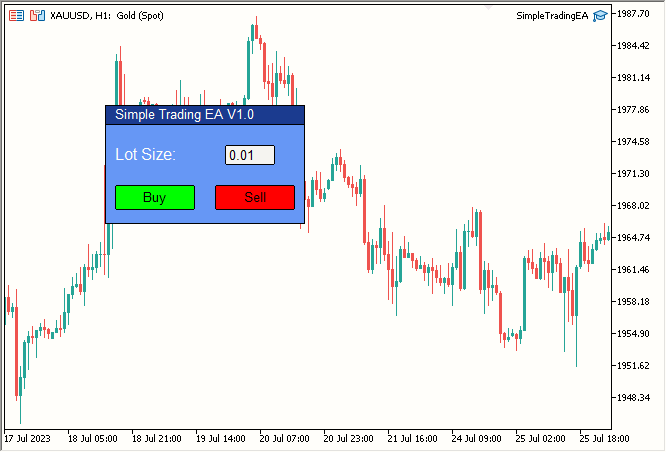
Figura 1. Panel estático simple
Este incluye:
| Elemento | Descripción |
|---|---|
| Label 1 | Texto del encabezado (Simple Trading EA V1.0) |
| Label 2 | Tamaño del lote. |
| Edit 1 | El campo de edición es de color blanco, con el valor 0,01 escrito en su interior. |
| Button 1 | Botón Buy verde. |
| Button 2 | Botón Sell rojo. |
| Rectangle Label 1 | Línea de encabezado; una barra azul oscuro con "Simple Trading EA V1.0" escrito en ella. |
| Rectangle Label 2 | El área principal del panel será azul. |
Entonces nuestro panel constará de estos siete componentes. En mi opinión, se trata de una barra de herramientas bastante hermosa que crearemos simplemente combinando estos siete elementos.
Ahora vamos a pasar al código.
Creamos un panel de comercio estático simple
¿Qué clases necesitaremos?
Necesitaremos 2 etiquetas (Label), 2 botones (Button), 1 campo de edición (Edit) y 2 etiquetas rectangulares (Rectangle Label). Entonces, crearemos 4 archivos .mqh, uno para cada uno de estos elementos. Aquí tenemos la estructura de las carpetas de nuestro proyecto:
- Simple Trading EA/
- SimpleTradingEA.mq5
- Button.mqh
- Label.mqh
- Edit.mqh
- RectangleLabel.mqh
Estos son los archivos en los que escribiremos nuestro código. Ahora crearemos nuestro primer archivo, SimpleTradingEA.mq5, que será el archivo principal del asesor.
Hemos eliminado la función OnTick(), ya que no la necesitaremos en este proyecto. Así es como se verá el archivo en este momento:
//+------------------------------------------------------------------+
//| Expert initialization function                                   |
//+------------------------------------------------------------------+
int OnInit()
   {
    return(INIT_SUCCEEDED);
   }

//+------------------------------------------------------------------+
//| Expert deinitialization function                                 |
//+------------------------------------------------------------------+
void OnDeinit(const int reason)
   {
   }
//+------------------------------------------------------------------+
Ahora crearemos el plan. Para ello, construiremos nuestro panel estático en el siguiente orden:
- Línea de encabezado
- Parte principal del panel
- Texto del encabezado
- Texto "Lot Size:" (tamaño de lote)
- Editar campo
- Botones de Buy y Sell
- Detalles finales
Todo parece lógico. Vamos a empezar.
- Línea de encabezado
Para crear la línea de encabezado, necesitaremos usar el objeto Rectangle Label. Entonces, crearemos una clase que gestionará todo lo relacionado con el objeto Rectangle Label. Ahora crearemos un archivo .mqh. Para simplificar, lo llamaremos RectangleLabel.mqh, mientras que la clase se llamará RectangleLabel.
Aquí tenemos la clase vacía que vamos a crear:
//+------------------------------------------------------------------+
//| Class Definition: RectangleLabel                                 |
//+------------------------------------------------------------------+
class RectangleLabel
   {
public:
                     RectangleLabel(void);
                    ~RectangleLabel(void);
   };

//+------------------------------------------------------------------+
//| Constructor: RectangleLabel                                      |
//+------------------------------------------------------------------+
RectangleLabel::RectangleLabel(void)
   {
   }

//+------------------------------------------------------------------+
//| Destructor: RectangleLabel                                       |
//+------------------------------------------------------------------+
RectangleLabel::~RectangleLabel(void)
   {
   }
//+------------------------------------------------------------------+
Necesitaremos algunas funciones:
- Create -> Crear una etiqueta rectangular
- Destroy -> Eliminar el panel
- SetBorderType -> Tipo de borde
- SetBGColor -> Color del fondo
Declaremos estas funciones en una lista de funciones-miembro. Ahora nuestra clase se verá así:
//+------------------------------------------------------------------+
//| Class Definition: RectangleLabel                                 |
//+------------------------------------------------------------------+
class RectangleLabel
   {
public:
                     RectangleLabel(void); // Constructor
                    ~RectangleLabel(void); // Destructor
    void             Create(string name, int xDis, int yDis, int xSize, int ySize); //Creates a Rectangle Label with the given parameters
    void             Destroy(); // Destroys the Rectangle Label
    void             SetBorderType(ENUM_BORDER_TYPE borderType); // Sets the border type of the Rectangle Label
    void             SetBGColor(color col); // Sets the background color of the Rectangle Label
   };
//+------------------------------------------------------------------+
A continuación, escribiremos la función de creación básica:
//+------------------------------------------------------------------+
//| RectangleLabel Class - Create Method                             |
//+------------------------------------------------------------------+
void RectangleLabel::Create(string name, int xDis, int yDis, int xSize, int ySize)
   {
    ObjectCreate(0, name, OBJ_RECTANGLE_LABEL, 0, 0, 0); // Create the Rectangle Label object
    ObjectSetInteger(0, name, OBJPROP_XDISTANCE, xDis); // Set the X-axis distance
    ObjectSetInteger(0, name, OBJPROP_YDISTANCE, yDis); // Set the Y-axis distance
    ObjectSetInteger(0, name, OBJPROP_XSIZE, xSize); // Set the X size
    ObjectSetInteger(0, name, OBJPROP_YSIZE, ySize); // Set the Y size
   }
//+------------------------------------------------------------------+
Luego crearemos Destroy, SetBorderType y SetBGColor en una línea. Aquí está nuestra clase actualizada:
//+------------------------------------------------------------------+
//| Class Definition for the Rectangle Label                         |
//+------------------------------------------------------------------+
class RectangleLabel
   {
private:
    string           _name; // Name of the rectangle label
public:
                     RectangleLabel(void); // Constructor
                    ~RectangleLabel(void); // Destructor

    void             Create(string name, int xDis, int yDis, int xSize, int ySize); // Method to create a rectangle label with given dimensions

    void             Destroy() {ObjectDelete(0, _name);} // Method to delete the object using the object's name

    void             SetBorderType(ENUM_BORDER_TYPE borderType) {ObjectSetInteger(0, _name, OBJPROP_BORDER_TYPE, borderType);} // Method to set the border type for the rectangle label

    void             SetBGColor(color col) {ObjectSetInteger(0, _name, OBJPROP_BGCOLOR, col);} // Method to set the background color for the rectangle label
   };
//+------------------------------------------------------------------+
También añadiremos la variable privada "_name" ya que ObjectDelete requiere un nombre, y configuraremos "_name" en la función Create:
//+------------------------------------------------------------------+
//| Rectangle Label Creation Method                                  |
//+------------------------------------------------------------------+
void RectangleLabel::Create(string name, int xDis, int yDis, int xSize, int ySize)
   {
    ObjectCreate(0, name, OBJ_RECTANGLE_LABEL, 0, 0, 0); // Create rectangle label object
    ObjectSetInteger(0, name, OBJPROP_XDISTANCE, xDis); // Set X distance
    ObjectSetInteger(0, name, OBJPROP_YDISTANCE, yDis); // Set Y distance
    ObjectSetInteger(0, name, OBJPROP_XSIZE, xSize); // Set X size
    ObjectSetInteger(0, name, OBJPROP_YSIZE, ySize); // Set Y size
    _name = name; // Assign the name to the member variable
   }
//+------------------------------------------------------------------+
Simplemente hemos añadido "_name = name;" en la última línea para asignar la variable _name como el nombre de la etiqueta rectangular creada.
Quizá se pregunte dónde está el código para implementar la capacidad de desplazarse. Por ahora estamos ignorando este aspecto para mantener las cosas simples hasta que creemos el panel estático simple.
Usaremos esta clase en el archivo principal, por ejemplo SimpleTradingEA.mq5, para ver el resultado:
Primero, incluiremos el archivo RectangleLabel.mqh usando #include y crearemos un ejemplar de la clase con el nombre TitleBar, porque estamos creando la línea de encabezado de la barra usando un ejemplar de la clase RectangleLabel. Lo usaremos nuevamente para el cuerpo principal del panel.Luego usaremos este ejemplar para crear una etiqueta rectangular en el gráfico en las coordenadas (100,100), y con un tamaño de 200x20. Después haremos que su borde sea plano (BORDER_FLAT), porque, a mi juicio, se verá mejor. Podrá cambiar esta configuración como desee. Luego usaremos la función ChartRedraw(0) para redibujar el gráfico. De esta forma, el panel se creará en el gráfico inmediatamente. De lo contrario, deberemos esperar la próxima actualización de los precios, es decir, el siguiente tick.
Todo se ha implementado en OnInit(). Solo se necesitará una ejecución para crear y mostrar el panel en el gráfico.
Finalmente, eliminaremos el panel usando la función Destroy() que creamos en OnDeinit(), es decir, al eliminar el asesor del gráfico.
Resultado:
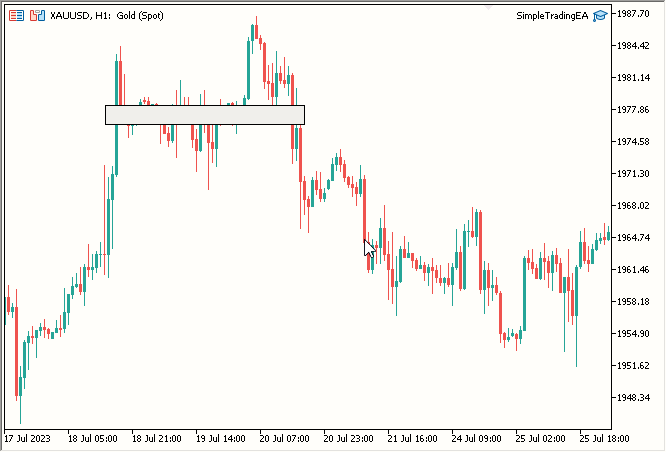
Figura 2. Línea de encabezado
- Parte principal del panel
Utilizaremos la clase RectangleLabel nuevamente para crear el cuerpo principal. Solo necesitaremos crear otro ejemplar. Lo llamaremos "MainDashboardBody"; añadiremos el siguiente código simple a OnInit() tras crear la línea de encabezado. Finalmente, añadiremos MainDashboardBody.Destroy() a OnDeinit():
// Creating a rectangle label called "MainDashboardBody" with specific dimensions
MainDashboardBody.Create("MainDashboardBody", 100, 119, 200, 100);
// Setting the border type of the "MainDashboardBody" rectangle label to be flat
MainDashboardBody.SetBorderType(BORDER_FLAT);
Después de esto, nuestro código se verá así:
#include "RectangleLabel.mqh" // Including the RectangleLabel class definition
RectangleLabel TitleBar; // Declaration of a TitleBar object
RectangleLabel MainDashboardBody; // Declaration of a MainDashboardBody object

//+------------------------------------------------------------------+
//| Expert initialization function                                   |
//+------------------------------------------------------------------+
int OnInit()
   {
    TitleBar.Create("TitleBar", 100, 100, 200, 20); // Creating the TitleBar with specified dimensions
    TitleBar.SetBorderType(BORDER_FLAT); // Setting the border type of TitleBar to be flat

    MainDashboardBody.Create("MainDashboardBody", 100, 119, 200, 100); // Creating the MainDashboardBody with specified dimensions
    MainDashboardBody.SetBorderType(BORDER_FLAT); // Setting the border type of MainDashboardBody to be flat

    ChartRedraw(0); // Redrawing the chart to reflect changes
    return(INIT_SUCCEEDED); // Indicating successful initialization
   }

//+------------------------------------------------------------------+
//| Expert deinitialization function                                 |
//+------------------------------------------------------------------+
void OnDeinit(const int reason)
   {
    MainDashboardBody.Destroy(); // Destroying the MainDashboardBody object
    TitleBar.Destroy(); // Destroying the TitleBar object
   }
//+------------------------------------------------------------------+
El resultado parece bueno:
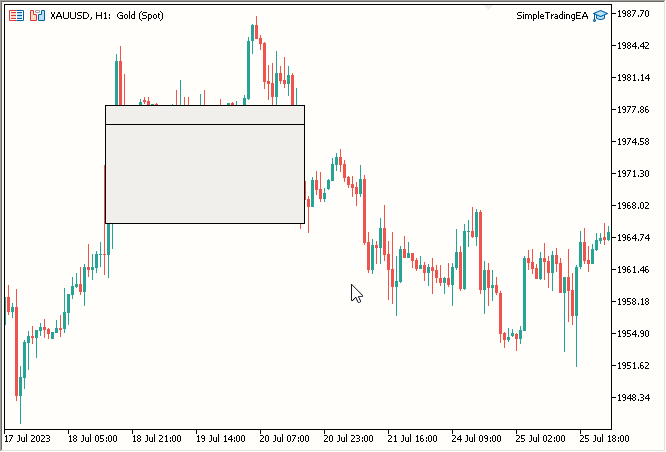
Fig. 3. Cuerpo principal del panel añadido
- Texto del encabezado
Para añadir el texto del encabezado, necesitaremos crear una clase similar a RectangleLabel, pero específicamente para etiquetas, lo cual nos permitirá agregar texto. Aquí tenemos el código para la nueva clase llamada Label:
//+------------------------------------------------------------------+
//| Label class definition                                           |
//+------------------------------------------------------------------+
class Label
   {
private:
    string           _name; // Name of the label
public:
                     Label(void); // Constructor
                    ~Label(void); // Destructor

    void             Create(string name, int xDis, int yDis); // Method to create a label
    void             Destroy() {ObjectDelete(0, _name);} // Method to destroy a label
    void             SetTextColor(color col) {ObjectSetInteger(0, _name, OBJPROP_COLOR, col);} // Method to set the text color
    void             SetText(string text) {ObjectSetString(0, _name, OBJPROP_TEXT, text);} // Method to set the text content
    string           GetText() {return ObjectGetString(0, _name, OBJPROP_TEXT);} // Method to retrieve the text content
    void             SetFontSize(int fontSize) {ObjectSetInteger(0, _name, OBJPROP_FONTSIZE, fontSize);} // Method to set the font size
    void             SetFont(string fontName) {ObjectSetString(0, _name, OBJPROP_FONT, fontName);} // Method to set the font name
   };

//+------------------------------------------------------------------+
//| Constructor                                                      |
//+------------------------------------------------------------------+
Label::Label(void)
   {

   }

//+------------------------------------------------------------------+
//| Destructor                                                       |
//+------------------------------------------------------------------+
Label::~Label(void)
   {

   }

//+------------------------------------------------------------------+
//| Method to create a label object                                  |
//+------------------------------------------------------------------+
void Label::Create(string name, int xDis, int yDis)
   {
    // Code to create label object, set its position, and assign its name
    ObjectCreate(0, name, OBJ_LABEL, 0, 0, 0);
    ObjectSetInteger(0, name, OBJPROP_XDISTANCE, xDis);
    ObjectSetInteger(0, name, OBJPROP_YDISTANCE, yDis);
    _name = name;
   }
//+------------------------------------------------------------------+
- Primero hemos declarado una clase llamada Label en un nuevo archivo .mqh con el nombre Label.mqh
- Luego hemos declarado la variable privada _name para almacenar el nombre de forma no pública
- Después hemos creado la función Create con los tres parámetros requeridos: name, xDis e yDis, el tamaño no importa para el objeto Label. Para cambiar el tamaño del texto hemos modificado el tamaño de la fuente.
- Asimismo, hemos creado la función Destroy para eliminar una etiqueta.
- Luego hemos creado la función SetTextColor para establecer el color del texto.
- Y hemos creado una función para establecer el texto de un objeto de etiqueta.
- También hemos creado la función GetText para obtener el texto de un objeto Label que retorne una línea.
- Acto seguido, hemos creado la función SetFontSize para establecer el tamaño de la fuente
- Asimismo, hemos creado una función para configurar la fuente. Se requiere el nombre de la fuente en una línea. Obviamente, la fuente debe establecerse en el sistema operativo.
Ahora la usaremos para crear dos objetos de etiqueta en el gráfico.
Así, SimpleTradingEA.mq5 tendrá el aspecto que sigue:
#include "RectangleLabel.mqh" // Including the RectangleLabel class definition
RectangleLabel TitleBar; // Declaration of a TitleBar object
RectangleLabel MainDashboardBody; // Declaration of a MainDashboardBody object

#include "Label.mqh" // Including the Label class definition
Label TitleText; // Declaration of a Label object

//+------------------------------------------------------------------+
//| Expert initialization function                                   |
//+------------------------------------------------------------------+
int OnInit()
   {
    TitleBar.Create("TitleBar", 100, 100, 200, 20); // Creating the TitleBar with specified dimensions
    TitleBar.SetBorderType(BORDER_FLAT); // Setting the border type of TitleBar to be flat

    MainDashboardBody.Create("MainDashboardBody", 100, 119, 200, 100); // Creating the MainDashboardBody with specified dimensions
    MainDashboardBody.SetBorderType(BORDER_FLAT); // Setting the border type of MainDashboardBody to be flat

    TitleText.Create("TitleText", 110, 101); // Creating the TitleText at (110,101)
    TitleText.SetText("Simple Trading EA V1.0"); // Setting its text to "Simple Trading EA V1.0"
    TitleText.SetFontSize(10); // Setting its font size to 10
    TitleText.SetTextColor(clrBlack); // Setting its text color to clrBlack

    ChartRedraw(0); // Redrawing the chart to reflect changes
    return(INIT_SUCCEEDED); // Indicating successful initialization
   }

//+------------------------------------------------------------------+
//| Expert deinitialization function                                 |
//+------------------------------------------------------------------+
void OnDeinit(const int reason)
   {
    MainDashboardBody.Destroy(); // Destroying the MainDashboardBody object
    TitleBar.Destroy(); // Destroying the TitleBar object
    TitleText.Destroy(); // Destroying the TitleText object
   }
//+------------------------------------------------------------------+
- Primero hemos creado un ejemplar de etiqueta con el nombre TitleText
- Después hemos usado la función TitleText.Create para crear TitleText
- Y después hemos utilizado TitleText.SetText para configurar TitleText en "Simple Trading EA V1.0"
- Después hemos usado TitleText.SetFontSize para establecer FontSize en 10
- Acto seguido, hemos utilizado TitleText.SetTextColor para establecer el color en negro
- A continuación, hemos usado TitleText.Destroy para destruir el objeto TitleText en OnDeinit
Resultado:
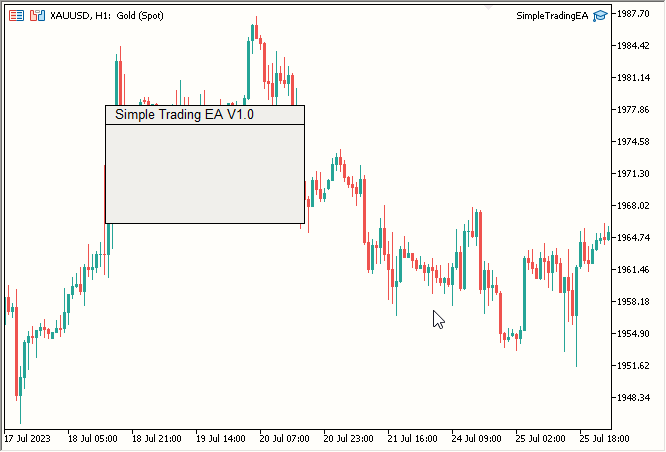
Figura 4. Texto de encabezado añadido
- Texto "Lot Size:" (tamaño de lote)
Para el texto "Lote Size:", seguiremos el mismo proceso que el texto del encabezado. El código final se verá así:
#include "RectangleLabel.mqh" // Including the RectangleLabel class definition
RectangleLabel TitleBar; // Declaration of a TitleBar object
RectangleLabel MainDashboardBody; // Declaration of a MainDashboardBody object

#include "Label.mqh" // Including the Label class definition
Label TitleText; // Declaration of a Label object
Label LotSizeText; // Declaration of a LotSizeText object

//+------------------------------------------------------------------+
//| Expert initialization function                                   |
//+------------------------------------------------------------------+
int OnInit()
   {
    TitleBar.Create("TitleBar", 100, 100, 200, 20); // Creating the TitleBar with specified dimensions
    TitleBar.SetBorderType(BORDER_FLAT); // Setting the border type of TitleBar to be flat

    MainDashboardBody.Create("MainDashboardBody", 100, 119, 200, 100); // Creating the MainDashboardBody with specified dimensions
    MainDashboardBody.SetBorderType(BORDER_FLAT); // Setting the border type of MainDashboardBody to be flat

    TitleText.Create("TitleText", 110, 101); // Creating the TitleText at (110,101)
    TitleText.SetText("Simple Trading EA V1.0"); // Setting its text to "Simple Trading EA V1.0"
    TitleText.SetFontSize(10); // Setting its font size to 10
    TitleText.SetTextColor(clrBlack); // Setting its text color to clrBlack

    LotSizeText.Create("LotSizeText", 110, 140); // Creating the LotSizeText at (110,140)
    LotSizeText.SetText("Lot Size:"); // Setting its text to "Lot Size:"
    LotSizeText.SetFontSize(12); // Setting its font size to 12
    LotSizeText.SetTextColor(clrBlack); // Setting its text color to clrBlack

    ChartRedraw(0); // Redrawing the chart to reflect changes
    return(INIT_SUCCEEDED); // Indicating successful initialization
   }

//+------------------------------------------------------------------+
//| Expert deinitialization function                                 |
//+------------------------------------------------------------------+
void OnDeinit(const int reason)
   {
    MainDashboardBody.Destroy(); // Destroying the MainDashboardBody object
    TitleBar.Destroy(); // Destroying the TitleBar object
    TitleText.Destroy(); // Destroying the TitleText object
    LotSizeText.Destroy(); // Destroying the LotSizeText object
   }
//+------------------------------------------------------------------+
- Primero hemos creado un ejemplar Label con el nombre LotSizeText
- Luego hemos utilizado la función LotSizeText.Create para crear el texto
- Después hemos usado LotSizeText.SetText para establecer el texto "Lot Size:"
- Y hemos usado LotSizeText.SetFontSize para establecer FontSize en 12.
- Acto seguido, hemos utilizado LotSizeText.SetTextColor para establecer el color en negro.
- Finalmente, hemos usado LotSizeText.Destroy para destruir el objeto Label en OnDeinit.
- Editar campo
Para el campo de edición, crearemos una clase muy similar a la clase Label. Código para la nueva clase Edit:
//+------------------------------------------------------------------+
//| Edit class definition                                            |
//+------------------------------------------------------------------+
class Edit
   {
private:
    string           _name; // Name of the edit control
public:
                     Edit(void); // Constructor
                    ~Edit(void); // Destructor

    void             Create(string name, int xDis, int yDis, int xSize, int ySize); // Method to create an edit control
    void             Destroy() {ObjectDelete(0, _name);} // Method to destroy an edit control
    void             SetBorderColor(color col) {ObjectSetInteger(0, _name, OBJPROP_BORDER_COLOR, col);} // Method to set the border color
    void             SetBGColor(color col) {ObjectSetInteger(0, _name, OBJPROP_BGCOLOR, col);} // Method to set the background color
    void             SetTextColor(color col) {ObjectSetInteger(0, _name, OBJPROP_COLOR, col);} // Method to set the text color
    void             SetText(string text) {ObjectSetString(0, _name, OBJPROP_TEXT, text);} // Method to set the text content
    string           GetText() {return ObjectGetString(0, _name, OBJPROP_TEXT);} // Method to retrieve the text content
   };

//+------------------------------------------------------------------+
//| Constructor                                                      |
//+------------------------------------------------------------------+
Edit::Edit(void)
   {

   }

//+------------------------------------------------------------------+
//| Destructor                                                       |
//+------------------------------------------------------------------+
Edit::~Edit(void)
   {

   }

//+------------------------------------------------------------------+
//| Method to create an edit control object                          |
//+------------------------------------------------------------------+
void Edit::Create(string name, int xDis, int yDis, int xSize, int ySize)
   {
    // Code to create edit control object, set its position, size, and assign its name
    ObjectCreate(0, name, OBJ_EDIT, 0, 0, 0);
    ObjectSetInteger(0, name, OBJPROP_XDISTANCE, xDis);
    ObjectSetInteger(0, name, OBJPROP_YDISTANCE, yDis);
    ObjectSetInteger(0, name, OBJPROP_XSIZE, xSize);
    ObjectSetInteger(0, name, OBJPROP_YSIZE, ySize);
    _name = name;
   }
//+------------------------------------------------------------------+
- Primero hemos creado la clase Edit en un nuevo archivo .mqh con el nombre Edit.mqh
- Luego hemos declarado la variable privada _name para almacenar el nombre de forma no pública
- A continuación, hemos creado la función Create con los cinco parámetros requeridos: name, xDis, yDis, xSize y ySize
- Y hemos creado Destroy para eliminar el objeto de edición
- Después hemos creado la función SetBorderColor para establecer el color del borde
- Luego hemos creado la función SetBGColor para establecer el color de fondo en WhiteSmoke
- Acto seguido, hemos creado la función SetTextColor para establecer el color del texto dentro del campo de edición
- También hemos creado la función SetText para configurar el texto
- Asimismo, hemos creado la función GetText para obtener el texto
Ahora podremos usar la clase Edit en SimpleTradingEA como se muestra a continuación:
#include "RectangleLabel.mqh" // Including the RectangleLabel class definition
RectangleLabel TitleBar; // Declaration of a TitleBar object
RectangleLabel MainDashboardBody; // Declaration of a MainDashboardBody object

#include "Label.mqh" // Including the Label class definition
Label TitleText; // Declaration of a Label object
Label LotSizeText; // Declaration of a LotSizeText object

#include "Edit.mqh" // Including the Edit class definition
Edit LotSize; // Declaration of a LotSize object

//+------------------------------------------------------------------+
//| Expert initialization function                                   |
//+------------------------------------------------------------------+
int OnInit()
   {
    TitleBar.Create("TitleBar", 100, 100, 200, 20); // Creating the TitleBar with specified dimensions
    TitleBar.SetBorderType(BORDER_FLAT); // Setting the border type of TitleBar to be flat

    MainDashboardBody.Create("MainDashboardBody", 100, 119, 200, 100); // Creating the MainDashboardBody with specified dimensions
    MainDashboardBody.SetBorderType(BORDER_FLAT); // Setting the border type of MainDashboardBody to be flat

    TitleText.Create("TitleText", 110, 101); // Creating the TitleText at (110,101)
    TitleText.SetText("Simple Trading EA V1.0"); // Setting its text to "Simple Trading EA V1.0"
    TitleText.SetFontSize(10); // Setting its font size to 10
    TitleText.SetTextColor(clrBlack); // Setting its text color to clrBlack

    LotSizeText.Create("LotSizeText", 110, 140); // Creating the LotSizeText at (110,140)
    LotSizeText.SetText("Lot Size:"); // Setting its text to "Lot Size:"
    LotSizeText.SetFontSize(12); // Setting its font size to 12
    LotSizeText.SetTextColor(clrBlack); // Setting its text color to clrBlack

    LotSize.Create("LotSize", 220, 140, 50, 20); // Creating the LotSize with specified dimensions
    LotSize.SetBorderColor(clrBlack); // Setting its Border Color to clrBlack
    LotSize.SetBGColor(clrWhiteSmoke); // Setting its BG Color to clrWhiteSmoke
    LotSize.SetText("0.01"); // Setting its text to 0.01
    LotSize.SetTextColor(clrBlack); // Setting its text color to clrBlack

    ChartRedraw(0); // Redrawing the chart to reflect changes
    return(INIT_SUCCEEDED); // Indicating successful initialization
   }

//+------------------------------------------------------------------+
//| Expert deinitialization function                                 |
//+------------------------------------------------------------------+
void OnDeinit(const int reason)
   {
    MainDashboardBody.Destroy(); // Destroying the MainDashboardBody object
    TitleBar.Destroy(); // Destroying the TitleBar object
    TitleText.Destroy(); // Destroying the TitleText object
    LotSizeText.Destroy(); // Destroying the LotSizeText object
    LotSize.Destroy(); // Destroying the LotSize object
   }
//+------------------------------------------------------------------+
- Primero hemos creado un ejemplar Edit con el nombre LotSize
- Después hemos utilizado la función LotSize.Create para crear un objeto de edición
- Luego hemos usado LotSize.SetBorderColor para establecer el color del borde en negro
- A continuación, hemos utilizado LotSize.SetBGColor para establecer el color de fondo en WhiteSmoke
- También hemos usado LotSize.SetText para establecer el texto en 0,01, lo cual indica el tamaño del lote
- Asimismo, hemos utilizado LotSize.SetTextColor para establecer el color del texto dentro del cuadro de edición en negro
- Y hemos usado LotSize.Destroy para eliminar el objeto Edit en OnDeinit.
- Botones de Buy y Sell
Finalmente hemos llegado a los botones. Crearemos la clase para los botones de la misma manera que para los otros elementos:
//+------------------------------------------------------------------+
//| Button class definition                                          |
//+------------------------------------------------------------------+
class Button
   {
private:
    string           _name; // Name of the button control

public:
                     Button(void); // Constructor
                    ~Button(void); // Destructor

    void             Create(string name, int xDis, int yDis, int xSize, int ySize); // Method to create a button control
    void             SetBorderColor(color col) {ObjectSetInteger(0, _name, OBJPROP_BORDER_COLOR, col);} // Method to set the border color
    void             SetBGColor(color col) {ObjectSetInteger(0, _name, OBJPROP_BGCOLOR, col);} // Method to set the background color
    void             SetText(string text) {ObjectSetString(0, _name, OBJPROP_TEXT, text);} // Method to set the text content
    void             Destroy() {ObjectDelete(0, _name);} // Method to destroy a button control
   };

//+------------------------------------------------------------------+
//| Constructor                                                      |
//+------------------------------------------------------------------+
Button::Button(void)
   {

   }

//+------------------------------------------------------------------+
//| Destructor                                                       |
//+------------------------------------------------------------------+
Button::~Button(void)
   {

   }

//+------------------------------------------------------------------+
//| Method to create a button control object                         |
//+------------------------------------------------------------------+
void Button::Create(string name, int xDis = 0, int yDis = 0, int xSize = 0, int ySize = 0)
   {
    // Code to create button control object, set its position, size, and assign its name
    ObjectCreate(0, name, OBJ_BUTTON, 0, 0, 0);
    ObjectSetInteger(0, name, OBJPROP_XDISTANCE, xDis);
    ObjectSetInteger(0, name, OBJPROP_YDISTANCE, yDis);
    ObjectSetInteger(0, name, OBJPROP_XSIZE, xSize);
    ObjectSetInteger(0, name, OBJPROP_YSIZE, ySize);
    _name = name;
   }
//+------------------------------------------------------------------+
En un nuevo archivo .mqh llamado Button.mqh, hemos creado una clase llamada Button. Después hemos declarado la variable privada _name para almacenar el nombre de forma no pública. También hemos creado las siguientes características:
- Una función Create con los cinco parámetros requeridos: name, xDis, yDis, xSize y ySize.
- Una función Destroy para eliminar el objeto de botón (Button Object).
- Una función SetBorderColor para establecer el color del borde (Border Color).
- Una función SetBGColor para establecer el color de fondo en WhiteSmoke.
- Una función SetText para configurar el texto.
Ahora veremos el archivo principal SimpleTradingEA.mq5 después de añadir los botones. Notará que ahora contiene los ejemplares RectangleLabel, Label, Edit, Button para BuyButton y SellButton.
#include "RectangleLabel.mqh" // Including the RectangleLabel class definition
RectangleLabel TitleBar; // Declaration of a TitleBar object
RectangleLabel MainDashboardBody; // Declaration of a MainDashboardBody object

#include "Label.mqh" // Including the Label class definition
Label TitleText; // Declaration of a Label object
Label LotSizeText; // Declaration of a LotSizeText object

#include "Edit.mqh" // Including the Edit class definition
Edit LotSize; // Declaration of a LotSize object

#include "Button.mqh" // Including the Button class definition
Button BuyButton; // Declaration of a BuyButton object
Button SellButton; // Declaration of a SellButton object

//+------------------------------------------------------------------+
//| Expert initialization function                                   |
//+------------------------------------------------------------------+
int OnInit()
   {
    TitleBar.Create("TitleBar", 100, 100, 200, 20); // Creating the TitleBar with specified dimensions
    TitleBar.SetBorderType(BORDER_FLAT); // Setting the border type of TitleBar to be flat

    MainDashboardBody.Create("MainDashboardBody", 100, 119, 200, 100); // Creating the MainDashboardBody with specified dimensions
    MainDashboardBody.SetBorderType(BORDER_FLAT); // Setting the border type of MainDashboardBody to be flat

    TitleText.Create("TitleText", 110, 101); // Creating the TitleText at (110,101)
    TitleText.SetText("Simple Trading EA V1.0"); // Setting its text to "Simple Trading EA V1.0"
    TitleText.SetFontSize(10); // Setting its font size to 10
    TitleText.SetTextColor(clrBlack); // Setting its text color to clrBlack

    LotSizeText.Create("LotSizeText", 110, 140); // Creating the LotSizeText at (110,140)
    LotSizeText.SetText("Lot Size:"); // Setting its text to "Lot Size:"
    LotSizeText.SetFontSize(12); // Setting its font size to 12
    LotSizeText.SetTextColor(clrBlack); // Setting its text color to clrBlack

    LotSize.Create("LotSize", 220, 140, 50, 20); // Creating the LotSize with specified dimensions
    LotSize.SetBorderColor(clrBlack); // Setting its Border Color to clrBlack
    LotSize.SetBGColor(clrWhiteSmoke); // Setting its BG Color to clrWhiteSmoke
    LotSize.SetText("0.01"); // Setting its text to 0.01
    LotSize.SetTextColor(clrBlack); // Setting its text color to clrBlack

    BuyButton.Create("BuyButton", 110, 180, 80, 25); // Creating the BuyButton with specified dimensions
    BuyButton.SetBorderColor(clrBlack); // Setting its Border Color to clrBlack
    BuyButton.SetText("Buy"); // Setting its text to "Buy"
    BuyButton.SetBGColor(clrLime); // Setting its BG Color to clrLime

    SellButton.Create("SellButton", 210, 180, 80, 25); // Creating the SellButton with specified dimensions
    SellButton.SetBorderColor(clrBlack); // Setting its Border Color to clrBlack
    SellButton.SetText("Sell"); // Setting its text to "Sell"
    SellButton.SetBGColor(clrRed); // Setting its BG Color to clrRed

    ChartRedraw(0); // Redrawing the chart to reflect changes
    return(INIT_SUCCEEDED); // Indicating successful initialization
   }

//+------------------------------------------------------------------+
//| Expert deinitialization function                                 |
//+------------------------------------------------------------------+
void OnDeinit(const int reason)
   {
    MainDashboardBody.Destroy(); // Destroying the MainDashboardBody object
    TitleBar.Destroy(); // Destroying the TitleBar object
    TitleText.Destroy(); // Destroying the TitleText object
    LotSizeText.Destroy(); // Destroying the LotSizeText object
    LotSize.Destroy(); // Destroying the LotSize object
    BuyButton.Destroy(); // Destroying the BuyButton object
    SellButton.Destroy(); // Destroying the SellButton object
   }
//+------------------------------------------------------------------+
- Primero hemos creado un ejemplar Button llamado BuyButton
- Luego hemos usado la función BuyButton.Create para crear un objeto de edición (Edit Object)
- Después hemos utilizado BuyButton.SetBorderColor para establecer el color del borde en negro
- Acto seguido, hemos usado BuyButton.SetBGColor para establecer el color de fondo de Lime.
- Y hemos usado BuyButton.SetText para configurar el texto de Buy
- A continuación, hemos utilizado BuyButton.Destroy para eliminar el objeto Button en OnDeinit
Para el botón Sell:
- Primero hemos creado un ejemplar Button con el nombre SellButton
- Luego hemos usado la función SellButton.Create para crear un objeto de botón (Button Object)
- Después hemos usado SellButton.SetBorderColor para establecer el color del borde en negro
- Y hemos utilizado SellButton.SetBGColor para establecer el color de fondo en rojo
- A continuación, hemos usado SellButton.SetText para configurar el texto de Sell
- Y finalmente hemos utilizado SellButton.Destroy para eliminar el objeto Button en OnDeinit
Resultado:
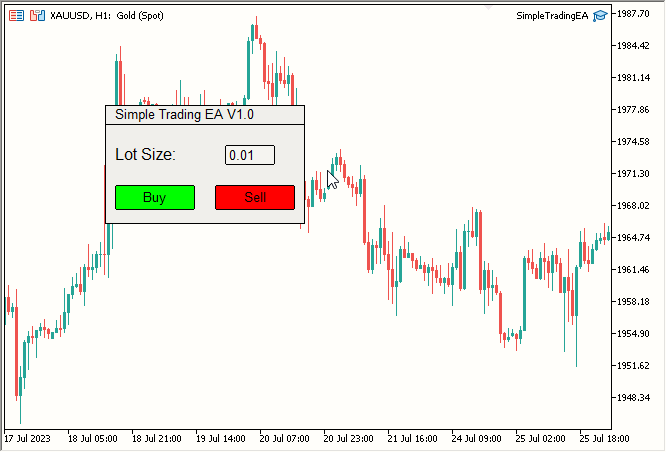
Fig. 6. Botones Buy y Sell añadidos - Últimos retoques
- Cambiaremos el color de la línea de encabezado a azul oscuro
- Cambiaremos el color del cuerpo del panel principal a azul claro
- Cambiaremos el color del texto del encabezado de negro a blanco
- Cambiaremos el color del texto Lot Size de negro a blanco
- Añadiremos la función de compra/venta
-
Cambios de color:
- Primero hemos modificado el color de fondo de la línea de encabezado a azul oscuro usando TitleBar.SetBGColor(C'27, 59, 146').
- Luego hemos cambiado el color del cuerpo del panel principal a azul claro usando MainDashboardBody.SetBGColor(C'102, 152, 250').
- Después hemos cambiado el color del texto del encabezado a blanco usando TitleText.SetTextColor(clrWhite).
- Y hemos cambiado el color del texto de Lote Size a blanco usando LotSizeText.SetTextColor(clrWhite).
-
Activación de la biblioteca comercial:
- Hemos integrado la biblioteca comercial y creado un ejemplar llamado trade con el siguiente código:
#include <Trade/Trade.mqh> CTrade trade;
- Hemos integrado la biblioteca comercial y creado un ejemplar llamado trade con el siguiente código:
-
Creamos la función OnChartEvent:
Primero hemos implementado la función OnChartEvent, que ejecuta inmediatamente la orden correspondiente al clicar en el botón Buy o Sell. El código tiene el aspecto siguiente:
//+------------------------------------------------------------------+ //| Chart event handling function | //+------------------------------------------------------------------+ void OnChartEvent(const int id, const long& lparam, const double& dparam, const string& sparam) { if(id == CHARTEVENT_OBJECT_CLICK) { double ask = SymbolInfoDouble(_Symbol, SYMBOL_ASK); double bid = SymbolInfoDouble(_Symbol, SYMBOL_BID); if(sparam == "BuyButton") { trade.PositionOpen(_Symbol, ORDER_TYPE_BUY, (double)LotSize.GetText(), ask, 0, 0); } if(sparam == "SellButton") { trade.PositionOpen(_Symbol, ORDER_TYPE_SELL, (double)LotSize.GetText(), bid, 0, 0); } } } //+------------------------------------------------------------------+
Si el identificador del evento es CHARTEVENT_OBJECT_CLICK, la función detectará el clic sobre un objeto, obtendrá el nombre de dicho objeto usando sparam, verificará si el nombre del objeto es BuyButton o SellButton y luego realizará la operación correspondiente usando la biblioteca Trade.
Eso es todo. Resultado:
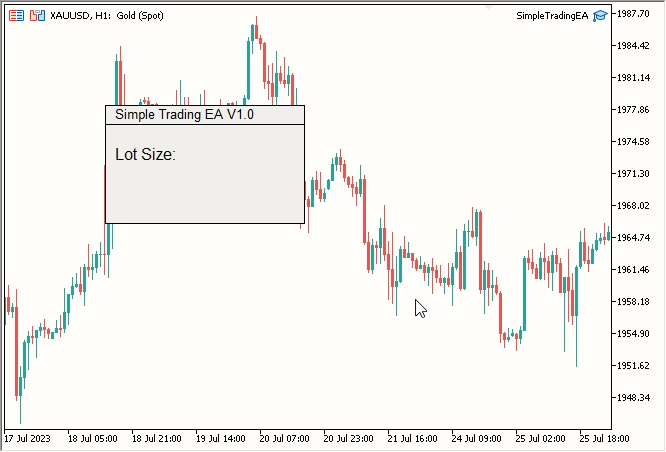
Fig. 5. Texto "Lot Size:" añadido
Ahora nos ocuparemos de los colores. Haremos los siguientes cambios:
El código final SimpleTradingEA.mq5 incluye cambios de color y una biblioteca comercial. También crearemos la función OnChartEvent para que, al clicar en el botón Buy o Sell, la orden correspondiente sea colocada inmediatamente.
#include "RectangleLabel.mqh" // Including the RectangleLabel class definition
RectangleLabel TitleBar; // Declaration of a TitleBar object
RectangleLabel MainDashboardBody; // Declaration of a MainDashboardBody object

#include "Label.mqh" // Including the Label class definition
Label TitleText; // Declaration of a Label object
Label LotSizeText; // Declaration of a LotSizeText object

#include "Edit.mqh" // Including the Edit class definition
Edit LotSize; // Declaration of a LotSize object

#include "Button.mqh" // Including the Button class definition
Button BuyButton; // Declaration of a BuyButton object
Button SellButton; // Declaration of a SellButton object

//+------------------------------------------------------------------+
//| Expert initialization function                                   |
//+------------------------------------------------------------------+
int OnInit()
   {
    TitleBar.Create("TitleBar", 100, 100, 200, 20); // Creating the TitleBar with specified dimensions
    TitleBar.SetBorderType(BORDER_FLAT); // Setting the border type of TitleBar to be flat
    TitleBar.SetBGColor(C'27, 59, 146'); // Setting the color to RGB code: C'27, 59, 146'

    MainDashboardBody.Create("MainDashboardBody", 100, 119, 200, 100); // Creating the MainDashboardBody with specified dimensions
    MainDashboardBody.SetBorderType(BORDER_FLAT); // Setting the border type of MainDashboardBody to be flat
    MainDashboardBody.SetBGColor(C'102, 152, 250'); // Setting the color to RGB code: C'102, 152, 250'

    TitleText.Create("TitleText", 110, 101); // Creating the TitleBar at (110,101)
    TitleText.SetText("Simple Trading EA V1.0"); // Setting its text to "Simple Trading EA V1.0"
    TitleText.SetFontSize(10); // Setting its font size to 10
    TitleText.SetTextColor(clrWhite); // Setting its text color to clrWhite

    LotSizeText.Create("LotSizeText", 110, 140); // Creating the LotSizeText at (110,140)
    LotSizeText.SetText("Lot Size:"); // Setting its text to "Lot Size:"
    LotSizeText.SetFontSize(12); // Setting its font size to 12
    LotSizeText.SetTextColor(clrWhite); // Setting its text color to clrWhite

    LotSize.Create("LotSize", 220, 140, 50, 20); // Creating the LotSize with specified dimensions
    LotSize.SetBorderColor(clrBlack); // Setting its Border Color to clrBlack
    LotSize.SetBGColor(clrWhiteSmoke); // Setting its BG Color to clrWhiteSmoke
    LotSize.SetText("0.01"); // Setting its text to 0.01
    LotSize.SetTextColor(clrBlack); // Setting its text color to clrBlack

    BuyButton.Create("BuyButton", 110, 180, 80, 25); // Creating the BuyButton with specified dimensions
    BuyButton.SetBorderColor(clrBlack); // Setting its Border Color to clrBlack
    BuyButton.SetText("Buy"); // Setting its text to "Buy"
    BuyButton.SetBGColor(clrLime); // Setting its BG Color to clrLime

    SellButton.Create("SellButton", 210, 180, 80, 25); // Creating the SellButton with specified dimensions
    SellButton.SetBorderColor(clrBlack); // Setting its Border Color to clrBlack
    SellButton.SetText("Sell"); // Setting its text to "Sell"
    SellButton.SetBGColor(clrRed); // Setting its BG Color to clrRed

    ChartRedraw(0); // Redrawing the chart to reflect changes
    return(INIT_SUCCEEDED); // Indicating successful initialization
   }

//+------------------------------------------------------------------+
//| Expert deinitialization function                                 |
//+------------------------------------------------------------------+
void OnDeinit(const int reason)
   {
    MainDashboardBody.Destroy(); // Destroying the MainDashboardBody object
    TitleBar.Destroy(); // Destroying the TitleBar object
    TitleText.Destroy(); // Destroying the TitleText object
    LotSizeText.Destroy(); // Destroying the LotSizeText object
    LotSize.Destroy(); // Destroying the LotSize object
    BuyButton.Destroy(); // Destroying the BuyButton object
    SellButton.Destroy(); // Destroying the SellButton object
   }

//+------------------------------------------------------------------+
//| Chart event handling function                                    |
//+------------------------------------------------------------------+
void OnChartEvent(const int id, const long& lparam, const double& dparam, const string& sparam)
   {
    // Handles click events for Buy and Sell buttons and opens corresponding positions
    if(id == CHARTEVENT_OBJECT_CLICK) {
        double ask = SymbolInfoDouble(_Symbol, SYMBOL_ASK);
        double bid = SymbolInfoDouble(_Symbol, SYMBOL_BID);
        if(sparam == "BuyButton") {
            trade.PositionOpen(_Symbol, ORDER_TYPE_BUY, (double)LotSize.GetText(), ask, 0, 0);
        }
        if(sparam == "SellButton") {
            trade.PositionOpen(_Symbol, ORDER_TYPE_SELL, (double)LotSize.GetText(), bid, 0, 0);
        }
    }
   }
//+------------------------------------------------------------------+
Cambios:
Resultado final:
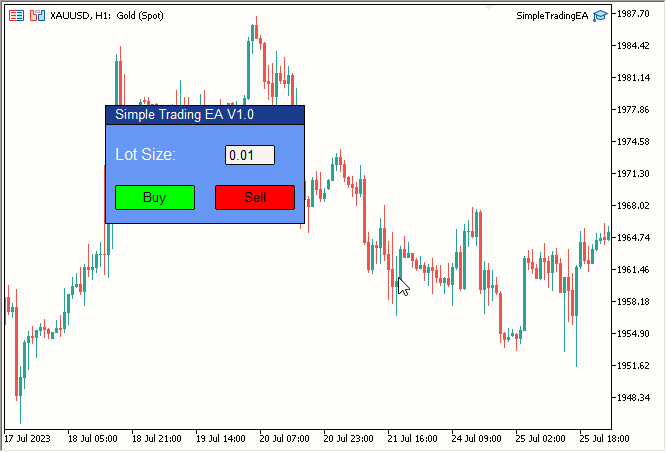
Fig. 7. Asesor finalizado Simple Trading (estático)
Analizamos el desplazamiento de nuestro panel estático con todos los elementos dentro de él
Ahora comenzará el verdadero trabajo. ¿Cómo hacer que todo resulte móvil?
En estos momentos, podemos hacer que cualquier elemento sea móvil, pero necesitaremos que todos los elementos tengan esa capacidad. Así que haremos que un elemento sea móvil y que todos los demás lo sigan. Podemos hacer que los elementos sigan al principal usando CustomChartEvent, pero desafortunadamente este método resulta lento e ineficiente. A mi juicio, el enfoque más eficiente sería desplazar nuestro elemento principal (alrededor del cual se moverán todos los demás elementos) y mover los demás elementos al mismo tiempo. ¿Y cómo poner en práctica esta idea?
Llamaremos a nuestro elemento principal Elemento Central (Central Element). Haremos de la línea de encabezado la pieza central. Ahora desplazaremos todos los demás elementos a su alrededor.
Antes, desplazábamos un elemento usando la función OnEvent definida en su clase. Ahora cambiaremos esta función para que desplace un elemento y luego mueva todos los demás elementos exactamente en la misma magnitud.
Aquí tenemos nuestra función OnEvent actual:
//+------------------------------------------------------------------+
//|                                                                  |
//+------------------------------------------------------------------+
void RectangleLabel::OnEvent(int id, long lparam, double dparam, string sparam)
  {
   //Verify the event that triggered the OnChartEvent was CHARTEVENT_MOUSE_MOVE because we only want to execute out code when that is the case
   if(id == CHARTEVENT_MOUSE_MOVE)
     {
      //define X, Y, XDistance, YDistance, XSize, YSize
      int X = (int)lparam;
      int Y = (int)dparam;
      int MouseState = (int)sparam;

      string name = Name;
      int XDistance = (int)ObjectGetInteger(0, name, OBJPROP_XDISTANCE); //Should be 100 initially as we set it in OnInit()
      int YDistance = (int)ObjectGetInteger(0, name, OBJPROP_YDISTANCE); //Should be 100 initially as we set it in OnInit()
      int XSize = (int)ObjectGetInteger(0, name, OBJPROP_XSIZE); //Should be 200 initially as we set it in OnInit()
      int YSize = (int)ObjectGetInteger(0, name, OBJPROP_YSIZE); //Should be 200 initially as we set it in OnInit()

      if(previousMouseState == 0 && MouseState == 1) //Check if this was the MLB first click
        {
         mlbDownX = X; //Set mlbDownX (Variable that stores the initial MLB X location) equal to the current X
         mlbDownY = Y; //Set mlbDownY (Variable that stores the initial MLB Y location) equal to the current Y
         mlbDownXDistance = XDistance; //Set mlbDownXDistance (Variable that stores the initial XDistance i.e. Width of the dashboard) equal to the current XDistance
         mlbDownYDistance = YDistance; //Set mlbDownYDistance (Variable that stores the initial YDistance i.e. Height of the dashboard) equal to the current YDistance

         if(X >= XDistance && X <= XDistance + XSize && Y >= YDistance && Y <= YDistance + YSize) //Check if the click was on the dashboard
           {
            movingState = true; //If yes the set movingState to True
           }

        }

      if(movingState)//if movingState is true, Update the Dashboard position
        {
         ChartSetInteger(0, CHART_MOUSE_SCROLL, false);//Restrict Chart to be moved by Mouse
         ObjectSetInteger(0, name, OBJPROP_XDISTANCE, mlbDownXDistance + X - mlbDownX);//Update XDistance to: mlbDownXDistance + (X - mlbDownX)
         ObjectSetInteger(0, name, OBJPROP_YDISTANCE, mlbDownYDistance + Y - mlbDownY);//Update YDistance to: mlbDownYDistance + (Y - mlbDownY)
         ChartRedraw(0); //Redraw Chart
        }

      if(MouseState == 0)//Check if MLB is not pressed
        {
         movingState = false;//set movingState again to false
         ChartSetInteger(0, CHART_MOUSE_SCROLL, true);//allow the cahrt to be moved again
        }

      previousMouseState = MouseState;//update the previousMouseState at the end so that we can use it next time and copare it with new value
     }
  }
//+------------------------------------------------------------------+
Todavía no hemos añadido esta funcionalidad a la clase RectangleLabel. Lo haremos tras discutir el enfoque.
¿Qué necesitamos para desplazar cualquier objeto? Su nombre, ¿no?
Lo que haremos es bastante simple: revisaremos estos nombres y desplazaremos los objetos la misma magnitud que hemos movido el elemento central. Pero aquí hay un inconveniente que no es evidente pero sí grave.
Cada vez que movemos el ratón, configuramos los XDis e YDis del elemento central de la siguiente manera:
ObjectSetInteger(0, name, OBJPROP_XDISTANCE, mlbDownXDistance + X - mlbDownX);//Update XDistance to: mlbDownXDistance + (X - mlbDownX)
ObjectSetInteger(0, name, OBJPROP_YDISTANCE, mlbDownYDistance + Y - mlbDownY);//Update YDistance to: mlbDownYDistance + (Y - mlbDownY)
Podemos conocer los XDis e YDis del elemento central al presionar el botón central del ratón. También necesitaremos conocer esta información para otros elementos. No obstante, esto haría que la función resultara muy compleja o ineficaz, por lo que necesitaremos un mejor enfoque.
Tras realizar un análisis más profundo, hemos visto que el mejor enfoque se encuentra justo delante de nuestras narices. Solo deberemos mantener la "Distancia X y la Distancia Y entre los elementos centrales y los otros elementos" (X Distance and Y Distance between Central Elements and Other Elements). Así de simple.
Bien, entonces especificaremos "la Distancia X y la Distancia Y entre los elementos centrales y los otros elementos" y guardaremos esta distancia. ¿Cómo anotar estas distancias? En algún momento añadiremos otros elementos al elemento central y en ese punto especificaremos "la Distancia X y la Distancia Y entre los elementos centrales y los otros elementos".
Nuevamente, en algún momento usaremos los nombres de los otros elementos para añadirlos al elemento central, momento en el que almacenaremos y mantendremos la distancia X y la distancia Y entre los elementos centrales y los otros elementos. Actualizaremos esta distancia después de actualizar la posición del elemento central.
Vamos a poner este enfoque en acción.
Aplicamos el enfoque elegido en la práctica para crear un panel móvil
Bien, vamos a analizar dónde almacenaremos el nombre, la distancia X y la distancia Y entre los elementos centrales y los otros elementos. Estas son las únicas categorías de información que necesitaremos almacenar.
Luego crearemos la función Add en la clase RectangleLabel. Usando esta función almacenaremos las siguientes dos cosas:
- El nombre en el array addNames
- La distancia X y la distancia Y entre los elementos centrales y los otros elementos en addXDisDifference y addYDisDifference respectivamente.
En cuanto a las convenciones de nomenclatura, "added" implica que la variable estará asociada a otro elemento añadido al central, mientras que "XDis" e "YDis" serán bastante simples. "Difference" presupone que la variable tiene algo que ver con la diferencia. La selección cuidadosa de los nombres evitará confusiones.
Vamos a declarar estas variables:
string           addedNamed[];
int              addedXDisDiffrence[], addedYDisDiffrence[];
Tenga en cuenta que las declararemos como privadas. No necesitamos que estén disponibles públicamente. Además, todas serán arrays.
Ahora crearemos la función Add:
//+------------------------------------------------------------------+
//| Method to add an object by name to the rectangle label           |
//+------------------------------------------------------------------+
void RectangleLabel::Add(string name)
   {
    ArrayResize(addedNames, ArraySize(addedNames) + 1);
    ArrayResize(addedXDisDiffrence, ArraySize(addedXDisDiffrence) + 1);
    ArrayResize(addedYDisDiffrence, ArraySize(addedYDisDiffrence) + 1);

    addedNames[ArraySize(addedNames) - 1] = name;
    addedXDisDiffrence[ArraySize(addedXDisDiffrence) - 1] = ObjectGetInteger(0, _name, OBJPROP_XDISTANCE) - ObjectGetInteger(0, name, OBJPROP_XDISTANCE);
    addedYDisDiffrence[ArraySize(addedYDisDiffrence) - 1] = ObjectGetInteger(0, _name, OBJPROP_YDISTANCE) - ObjectGetInteger(0, name, OBJPROP_YDISTANCE);
   }
//+------------------------------------------------------------------+
Esta función se declarará en la clase TriangleLabel porque TitleBar es nuestro elemento central y es esencialmente un objeto RECTANGLE_LABEL. Obviamente, estamos declarando las variables en la misma clase ya que las usamos en esta función.
Dicha función tomará un nombre como parámetro y luego aumentará el tamaño de estos tres arrays en uno. Luego almacenaremos los datos correspondientes según el último índice. Como Name simplemente guardaremos el nombre. Para la diferencia de distancias (X e Y), almacenaremos la diferencia entre el elemento central (en este caso, TitleBar) y el elemento cuyo nombre se especifica como parámetro. Esto constituirá nuestra función Add.
A continuación necesitaremos cambiar la función OnEvent. Después crearemos un ciclo para iterar a través del array addNames y mantendremos la distancia entre TitleBar y el elemento nombrado estableciéndola igual a la nueva distancia TitleBar X/Y, menos el valor de diferencia especificado en los respectivos arrays.
for(int i = 0; i < ArraySize(addedNames); i++)
   {
    ObjectSetInteger(0, addedNames[i], OBJPROP_XDISTANCE, mlbDownXDistance + X - mlbDownX - addedXDisDiffrence[i]);
    ObjectSetInteger(0, addedNames[i], OBJPROP_YDISTANCE, mlbDownYDistance + Y - mlbDownY - addedYDisDiffrence[i]);
   }
Tenga en cuenta que la parte subrayada será la nueva distancia X/Y del encabezado (elemento central): nosotros restaremos la diferencia especificada en los arrays correspondientes (es decir, la diferencia entre la distancia X y la distancia Y entre el elemento central y los otros).
¿Dónde colocaremos este ciclo? Justo después de actualizar el elemento central.
Así se verá nuestra nueva función OnEvent:
//+------------------------------------------------------------------+
//| Event handling for mouse movements                               |
//+------------------------------------------------------------------+
void RectangleLabel::OnEvent(int id, long lparam, double dparam, string sparam)
   {
    // Handle mouse movement events for dragging the rectangle label
    if(id == CHARTEVENT_MOUSE_MOVE)
       {
        int X = (int)lparam;
        int Y = (int)dparam;
        int MouseState = (int)sparam;

        string name = _name;
        int XDistance = (int)ObjectGetInteger(0, name, OBJPROP_XDISTANCE);
        int YDistance = (int)ObjectGetInteger(0, name, OBJPROP_YDISTANCE);
        int XSize = (int)ObjectGetInteger(0, name, OBJPROP_XSIZE);
        int YSize = (int)ObjectGetInteger(0, name, OBJPROP_YSIZE);

        if(previousMouseState == 0 && MouseState == 1)
           {
            mlbDownX = X;
            mlbDownY = Y;
            mlbDownXDistance = XDistance;
            mlbDownYDistance = YDistance;

            if(X >= XDistance && X <= XDistance + XSize && Y >= YDistance && Y <= YDistance + YSize)
               {
                movingState = true;
               }

           }

        if(movingState)
           {
            ChartSetInteger(0, CHART_MOUSE_SCROLL, false);
            ObjectSetInteger(0, name, OBJPROP_XDISTANCE, mlbDownXDistance + X - mlbDownX);
            ObjectSetInteger(0, name, OBJPROP_YDISTANCE, mlbDownYDistance + Y - mlbDownY);
            for(int i = 0; i < ArraySize(addedNames); i++)
               {
                ObjectSetInteger(0, addedNames[i], OBJPROP_XDISTANCE, mlbDownXDistance + X - mlbDownX - addedXDisDiffrence[i]);
                ObjectSetInteger(0, addedNames[i], OBJPROP_YDISTANCE, mlbDownYDistance + Y - mlbDownY - addedYDisDiffrence[i]);
               }
            ChartRedraw(0);
           }

        if(MouseState == 0)
           {
            movingState = false;
            ChartSetInteger(0, CHART_MOUSE_SCROLL, true);
           }

        previousMouseState = MouseState;
       }
   }
La parte resaltada será nuestro nuevo ciclo.
Ahora solo necesitaremos usar la función Add para adjuntar los elementos al central, ya que tenemos la línea de encabezado seleccionada. Usaremos la función Add del ejemplar de TitleBar ("TitleBar").
Usaremos la función Add en el ejemplar de TitleBar para añadir todos los demás elementos a TitleBar:
// Add the other elements to the Central Element i.e. TitleBar object in this case
TitleBar.Add("MainDashboardBody");
TitleBar.Add("TitleText");
TitleBar.Add("LotSizeText");
TitleBar.Add("LotSize");
TitleBar.Add("BuyButton");
TitleBar.Add("SellButton");
En este caso, además, los nombres de todos estos elementos se añadirán al array addNames, lo cual permitirá desplazarlos. Además, anotaremos su distancia desde la línea de encabezado, por lo que se mantendrá la distancia.
Ahora usaremos la función OnEvent. Sin ella todo sería en vano.
// Passes events to the TitleBar object
TitleBar.OnEvent(id, lparam, dparam, sparam);
La añadiremos a OnChartEvent() y listo. El código es bastante largo, pero el resultado final debería merecer la pena. 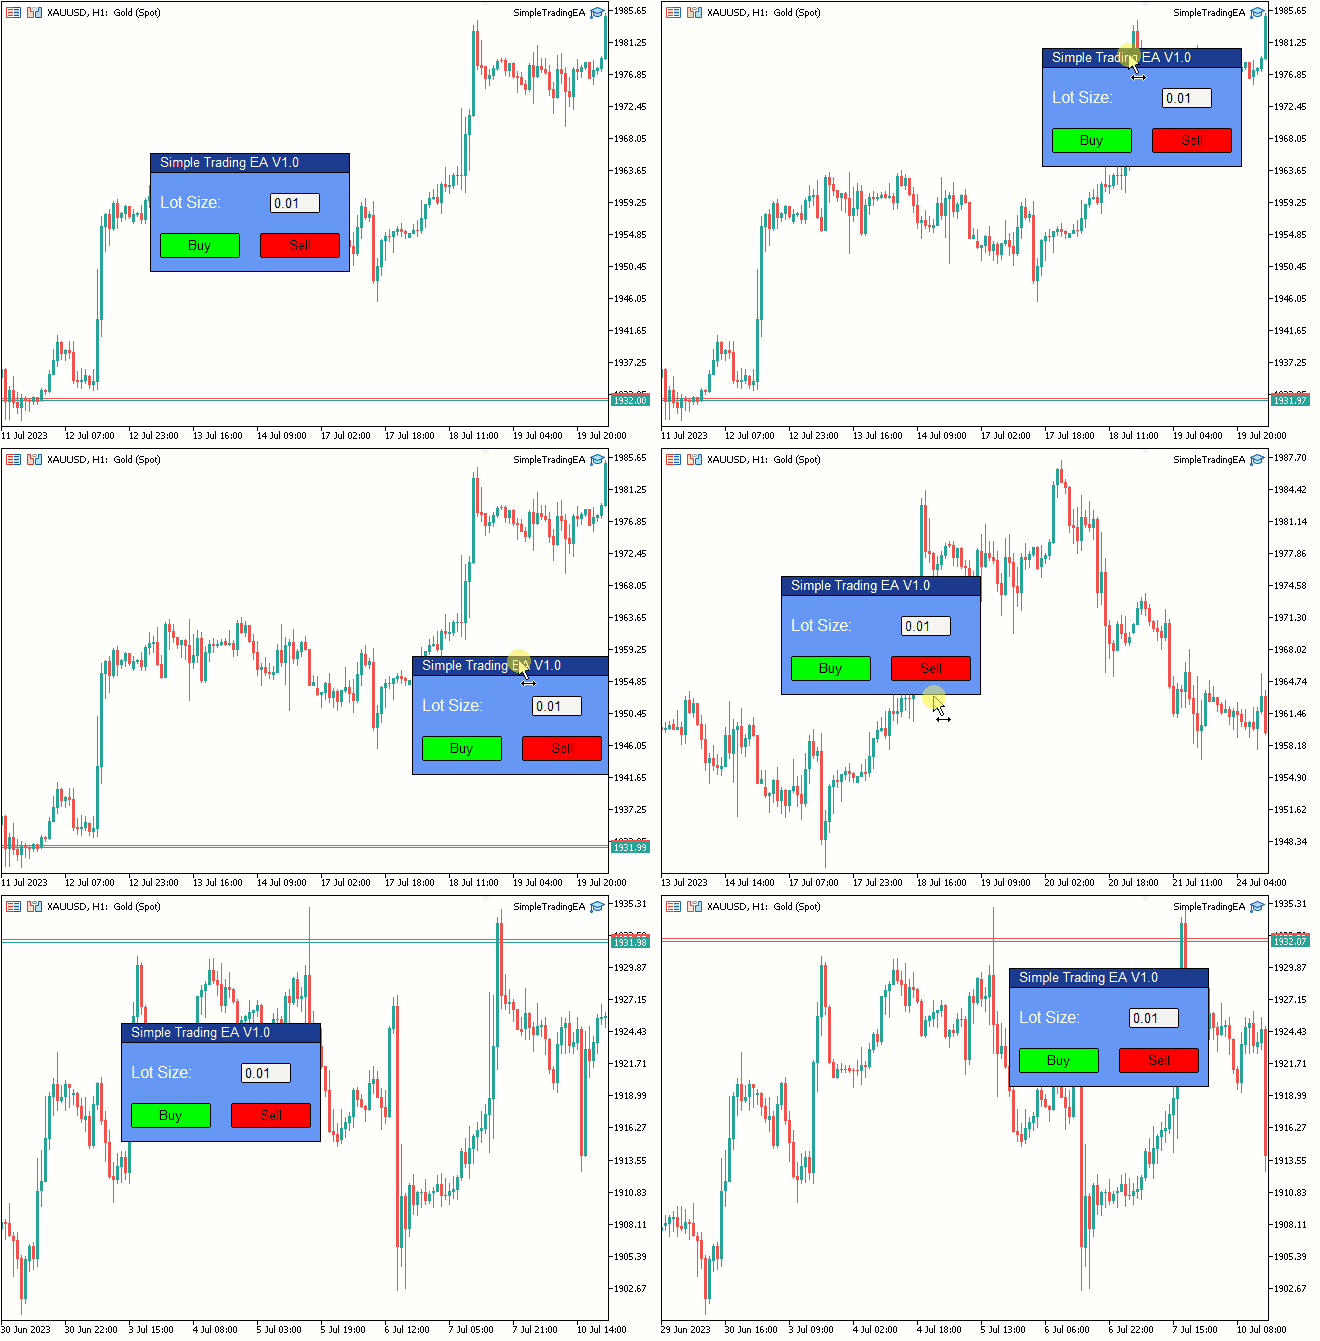
Fig. 8. Resultado final
Conclusión
Hoy hemos logrado los objetivos que fijamos en las dos primeras partes de la serie "Interfaz móvil", dando vida a una interfaz dinámica y fácil de usar para gráficos comerciales. ¡Gracias por su tiempo! Espero que mis artículos le resulten útiles en su trabajo.
Si tiene alguna idea o sugerencia que le gustaría ver en mi próximo artículo, envíeme un correo electrónico.
¡Le deseo todos los éxitos en la programación y el comercio!
Traducción del inglés realizada por MetaQuotes Ltd.
Artículo original: https://www.mql5.com/en/articles/12923
Advertencia: todos los derechos de estos materiales pertenecen a MetaQuotes Ltd. Queda totalmente prohibido el copiado total o parcial.
Este artículo ha sido escrito por un usuario del sitio web y refleja su punto de vista personal. MetaQuotes Ltd. no se responsabiliza de la exactitud de la información ofrecida, ni de las posibles consecuencias del uso de las soluciones, estrategias o recomendaciones descritas.
- Aplicaciones de trading gratuitas
- 8 000+ señales para copiar
- Noticias económicas para analizar los mercados financieros
Usted acepta la política del sitio web y las condiciones de uso
La opción más práctica y universal es diseñar los formularios visualmente, sin preocuparse en absoluto del código de maquetación: eso es exactamente lo que deberían hacer las clases. Una de las posibles soluciones estaba en el artículo.
Stanislav, bueno, debajo del artículo para principiantes proporcionas un enlace al artículo para usuarios avanzados :)
Lo leo, no lo leo, sólo lo leo, porque mi nivel en programación es mucho más bajo de lo que necesito para entender lo que está escrito ahí.
Intento utilizar lo menos posible lo que no entiendo. Una situación reciente me ha arraigado en esto aún con más fuerza.
Usted probablemente está leyendo el tema "Errores, bugs, preguntas", así que tuve una tarea para mostrar las flechas de las posiciones cerradas en un renko-gráfico, entrada-salida entre ellos - una línea.
Decidí no escribirlo yo mismo, sino tomar un código ya hecho de Saiber, como resultado - medio día de tiempo perdido. Saiber corregido su código en el final, pero he perdido el tiempo.
Y si quisiera tomar el código de su artículo y necesitara retocar algo, bueno, usted entiende, nada bueno saldría de ello.
Tengo una tarea más sencilla que la que te propusiste al escribir tu artículo. Sólo necesito hacerlo de manera que pueda construir el siguiente panel a partir de piezas de código ya hechas como los niños construyen casas de lego.
No necesito OOP para este propósito en absoluto, en mi opinión. No la conozco, así que no me gusta.
El principio MVC es bastante adecuado para mis propósitos, si lo he entendido correctamente)))))
En general, ya me hago una idea de cómo debería ser.
Por cierto, ¿me podéis decir cómo hacer para que cuando acceda a las funciones de la clase heredera desde el programa, no vea las funciones de la clase base? Pues si es posible.
me vino a la mente :-)
para aquellos que no son para el mercado, quieren más o menos complejo, pero hermoso, y es demasiado perezoso para escribir una DLL, hay GtkServer https://sourceforge.net/projects/gtk-server/ y Glade diseñador de formularios a la misma.
Metodología: GtkServer se lanza como un oyente tcp, asesor utilizando SocketOpen/SocketSend envía texto "formulario de carga" (o sí mismo por pasos forma widgets gtk) y también lee el resultado....
Usted también :)
Tomo palabras como tcp listener, SocketOpen/SocketSend como blasfemia , ni siquiera se su significado sin google, y tu sugieres usarlo.
Señores, tengan conciencia, dejen de asustar a la gente con su terminología)))))
Stanislav, bueno yo-ma-yo, debajo del artículo para principiantes lanzas un enlace al artículo para avanzados :)
Yo lo he leído, no leído, sino sólo leído, porque mi nivel en programación es muy inferior al que necesito para entender lo que allí se escribe.
Intento utilizar lo menos posible lo que no entiendo. Una situación reciente me ha arraigado aún más en esto.
Por desgracia, la situación del software es tal que es imposible entenderlo todo por uno mismo. Según esta lógica, hay que personalizar el sistema operativo (que es lo que hacen algunos apologistas de Linux).
Por eso el enfoque moderno es tomar ladrillos ya hechos (que hacen más o menos lo que necesitas) y acoplarlos (sin profundizar en la implementación).
Simplemente estaba respondiendo a la pregunta de cómo hacer más universalmente. No se puede discutir con el hecho de que mi artículo es complicado, pero el punto es que usted puede describir la interfaz gráfica de usuario necesaria como una plantilla sin necesidad de programación, sólo mediante la conexión de los recintos para obtener los controladores, arrastre de ventanas, cambiar el tamaño y así sucesivamente.
¡Fantástico!
No podía entenderlo por mi cuenta,
Sí, lo leí dos veces.
Gracias.
Philip