
利用 MQL5 的交互式 GUI 改进您的交易图表(第 III 部分):简易可移动交易 GUI
概述
您好,欢迎回到我们系列的第 3 部分《利用 MQL5 的交互式 GUI 改进您的交易图表》。
在我们进入新领域之前,我们先快速回顾一下我们在第 I 部分和第 II 部分中涵盖的内容:
1. 在第 I 部分中,我们从理解图表事件概念开始,然后在同一图表上创建了两个简单的可移动仪表板。
2. 至于第 II 部分,我们更进一步。我们利用 .mqh 文件中的类令我们的代码更加高效和通用,准备好与满级的 EA/指标集成。
现在,我们已经准备好了第 III 部分!在该部分中,我们把重点放在通过将 GUI 集成到仪表板中来增强仪表板。因为若无 GUI,仪表板就无法达到其预期目的。
以下的快速概览,就是我们将在本文中解决的问题:
我们在创造什么?
我们瞄准的目标是创建一个带有 GUI 的可移动仪表板,为此,我们需要决定我们将要创建的内容。我选择了一个简单的 EA,特别是简易交易 EA,作为我们的基础。
首先,我们需要构建这个静态仪表板,即简易交易 EA。有效地做到这一点至关重要,因为我们正在创建一个成熟的 EA。至于效率,我指的是我们不能仅开一个文件,并在那里编写所有代码。取而代之,我们需要一个经过深思熟虑的计划,允许我们跨若干规划良好的 .mqh 文件,并在每个文件里编写最少的代码。最重要的是,在为我们的可移动仪表板创建所需的静态 GUI 时,我们必须避免重复相同的代码。
以下是我们将为此目的创建的基础静态仪表板:
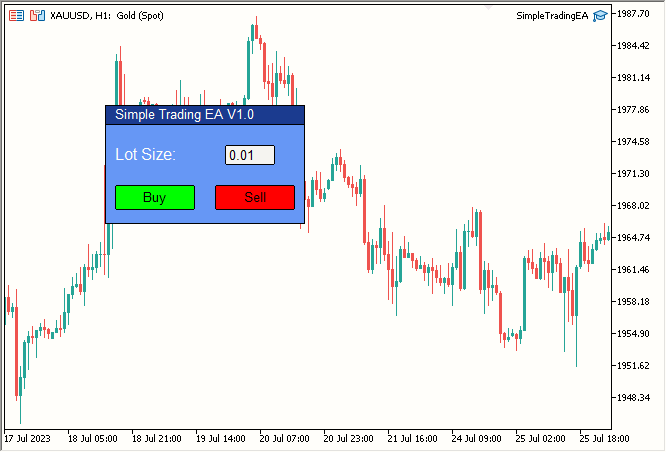
图例 1. 简易静态仪表盘
其构成:
| 元素 | 说明 |
|---|---|
| Label 1 | 标题文本(Simple Trading EA V1.0) |
| 标签就是这样。 | 手数 |
| Edit 1 | 您在上图中看到的白色编辑框,里面写着 0.01。 |
| Button 1 | 绿色的 “Buy(买入)”按钮。 |
| Button 2 | 红色的 “Sell(卖出)” 按钮。 |
| Rectangle Label 1 | 标题栏,写有 “Simple Trading EA V1.0” 字样的深蓝色栏。 |
| Rectangle Label 2 | 主仪表板区域,浅蓝色仪表板。 |
因此,我们的仪表板由这七个组件构成。如果您问我,我会说这是我们创建的一个非常漂亮的仪表板,仅结合了七个元素。
现在,我们开始编写仪表板代码。
创建简易的静态交易仪表板
我们要编写什么样的类?我们想想......
我们需要 2 个标签、2 个按钮、1 个编辑框、和 2 个矩形标签。故此,我们创建 4 个 .mqh 文件,每种元素一个文件。以下是我们项目的文件夹结构:
- Simple Trading EA/
- SimpleTradingEA.mq5
- Button.mqh
- Label.mqh
- Edit.mqh
- RectangleLabel.mqh
这些就是我们将在其中编写代码的文件。现在,我们创建第一个文件 “SimpleTradingEA.mq5”,其为我们的主要 EA 文件。
我已经删除了 OnTick() 函数,因为在这个项目中我们不需要它。以下是文件此刻的样子:
//+------------------------------------------------------------------+
//| Expert initialization function                                   |
//+------------------------------------------------------------------+
int OnInit()
   {
    return(INIT_SUCCEEDED);
   }

//+------------------------------------------------------------------+
//| Expert deinitialization function                                 |
//+------------------------------------------------------------------+
void OnDeinit(const int reason)
   {
   }
//+------------------------------------------------------------------+
现在我们制定一个计划。我们将按以下顺序构建静态仪表板:
- 标题栏
- 主仪表板实体
- 标题文本
- “Lot Size:” 文本
- 编辑框
- 买入和卖出按钮
- 添加任何必要的收尾润色
这看似是一个合理的后续顺序。我们开始吧,
- 标题栏
为了创建标题栏,我们需要使用矩形标签对象。故此,我们创建一个类来处理与矩形标签对象相关的所有事宜。我们将创建一个 .mqh 文件;从简起见,我们将其命名为 “RectangleLabel.mqh”,且再为简约而将该类命名为 “RectangleLabel”。
下面是我们创建的空类:
//+------------------------------------------------------------------+
//| Class Definition: RectangleLabel                                 |
//+------------------------------------------------------------------+
class RectangleLabel
   {
public:
                     RectangleLabel(void);
                    ~RectangleLabel(void);
   };

//+------------------------------------------------------------------+
//| Constructor: RectangleLabel                                      |
//+------------------------------------------------------------------+
RectangleLabel::RectangleLabel(void)
   {
   }

//+------------------------------------------------------------------+
//| Destructor: RectangleLabel                                       |
//+------------------------------------------------------------------+
RectangleLabel::~RectangleLabel(void)
   {
   }
//+------------------------------------------------------------------+
我们将需要一些函数,我们看看
- Create -> 创建矩形标签
- Destroy -> 注销仪表板
- SetBorderType -> 设置边框类型
- SetBGColor -> 设置背景颜色
我们在成员函数清单中声明上述函数。现在我们的类看起来像这样:
//+------------------------------------------------------------------+
//| Class Definition: RectangleLabel                                 |
//+------------------------------------------------------------------+
class RectangleLabel
   {
public:
                     RectangleLabel(void); // Constructor
                    ~RectangleLabel(void); // Destructor
    void             Create(string name, int xDis, int yDis, int xSize, int ySize); //Creates a Rectangle Label with the given parameters
    void             Destroy(); // Destroys the Rectangle Label
    void             SetBorderType(ENUM_BORDER_TYPE borderType); // Sets the border type of the Rectangle Label
    void             SetBGColor(color col); // Sets the background color of the Rectangle Label
   };
//+------------------------------------------------------------------+
我们编写一个基本的创建函数:
//+------------------------------------------------------------------+
//| RectangleLabel Class - Create Method                             |
//+------------------------------------------------------------------+
void RectangleLabel::Create(string name, int xDis, int yDis, int xSize, int ySize)
   {
    ObjectCreate(0, name, OBJ_RECTANGLE_LABEL, 0, 0, 0); // Create the Rectangle Label object
    ObjectSetInteger(0, name, OBJPROP_XDISTANCE, xDis); // Set the X-axis distance
    ObjectSetInteger(0, name, OBJPROP_YDISTANCE, yDis); // Set the Y-axis distance
    ObjectSetInteger(0, name, OBJPROP_XSIZE, xSize); // Set the X size
    ObjectSetInteger(0, name, OBJPROP_YSIZE, ySize); // Set the Y size
   }
//+------------------------------------------------------------------+
我们在同一行中创建 Destroy、SetBorderType 和 SetBGColor,因为它们只需要一行。此处我们更新的类:
//+------------------------------------------------------------------+
//| Class Definition for the Rectangle Label                         |
//+------------------------------------------------------------------+
class RectangleLabel
   {
private:
    string           _name; // Name of the rectangle label
public:
                     RectangleLabel(void); // Constructor
                    ~RectangleLabel(void); // Destructor

    void             Create(string name, int xDis, int yDis, int xSize, int ySize); // Method to create a rectangle label with given dimensions

    void             Destroy() {ObjectDelete(0, _name);} // Method to delete the object using the object's name

    void             SetBorderType(ENUM_BORDER_TYPE borderType) {ObjectSetInteger(0, _name, OBJPROP_BORDER_TYPE, borderType);} // Method to set the border type for the rectangle label

    void             SetBGColor(color col) {ObjectSetInteger(0, _name, OBJPROP_BGCOLOR, col);} // Method to set the background color for the rectangle label
   };
//+------------------------------------------------------------------+
还有,我们添加了一个名为 “_name” 的私密变量,因为 ObjectDelete 需要一个名称,故我们在 Create 函数中设置了 “_name”,现在它如下所示:
//+------------------------------------------------------------------+
//| Rectangle Label Creation Method                                  |
//+------------------------------------------------------------------+
void RectangleLabel::Create(string name, int xDis, int yDis, int xSize, int ySize)
   {
    ObjectCreate(0, name, OBJ_RECTANGLE_LABEL, 0, 0, 0); // Create rectangle label object
    ObjectSetInteger(0, name, OBJPROP_XDISTANCE, xDis); // Set X distance
    ObjectSetInteger(0, name, OBJPROP_YDISTANCE, yDis); // Set Y distance
    ObjectSetInteger(0, name, OBJPROP_XSIZE, xSize); // Set X size
    ObjectSetInteger(0, name, OBJPROP_YSIZE, ySize); // Set Y size
    _name = name; // Assign the name to the member variable
   }
//+------------------------------------------------------------------+
我们简单地在最后一行加上 “_name = name;”,即可在 _name 变量里设置创建矩形标签时的名称。
如果您正在犹豫,代码在何处可令它移动,我们此刻忽略了这个方面,是为了保持简单,直到我们创建一个简易静态仪表板。
现在,我们在主文件(即 SimpleTradingEA.mq5)中使用这个类来查看结果:
我们首先使用 “#include” 包含 RectangleLabel.mqh 文件,并创建了一个名为 TitleBar 的类实例,因为我们会用这个 RectangleLabel 类实例创建仪表板的标题栏,我们将还会将其用于主仪表板实体。然后,我们用该实例在图表上创建一个矩形标签,坐标为(100,100),尺寸为 200x20。然后我们将其边框设置为平坦 (BORDER_FLAT),因为在我看来这更好;您可以根据自己的喜好进行更改。然后我们调用 ChartRedraw(0) 函数重绘图表;这样,仪表板会立即在图表上创建。否则,它可能会等待下一次价格更新,即跳价来临时。
这一切都在 OnInit() 中,即,仅一次性执行就可在图表上创建和显示仪表板。
最后,我们在 OnDeinit() 里,即从图表中删除 EA 时,调用已创建的 Destroy() 函数注销仪表板。
结果:
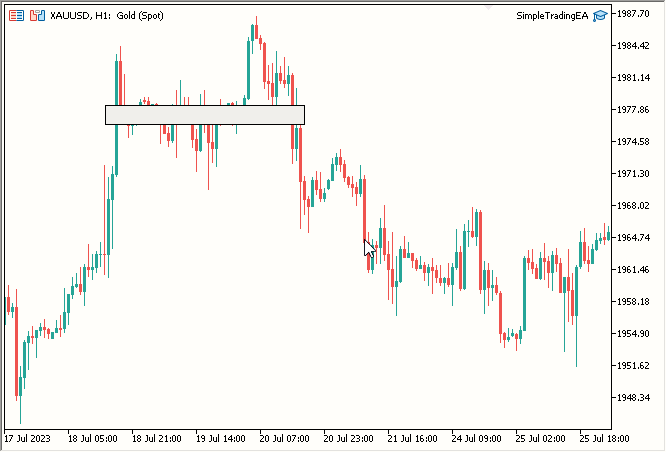
图例 2. 标题栏
- 主仪表板实体
我们再次利用 RectangleLabel 类来创建主体。这很简单;我们只需要创建另一个实例;我们将其命名为 “MainDashboardBody”,并在创建标题栏后在 OnInit() 中添加以下简单代码,最后在 OnDeinit() 中加入 MainDashboardBody.Destroy():
// Creating a rectangle label called "MainDashboardBody" with specific dimensions
MainDashboardBody.Create("MainDashboardBody", 100, 119, 200, 100);
// Setting the border type of the "MainDashboardBody" rectangle label to be flat
MainDashboardBody.SetBorderType(BORDER_FLAT);
之后,我们的代码如下所示:
#include "RectangleLabel.mqh" // Including the RectangleLabel class definition
RectangleLabel TitleBar; // Declaration of a TitleBar object
RectangleLabel MainDashboardBody; // Declaration of a MainDashboardBody object

//+------------------------------------------------------------------+
//| Expert initialization function                                   |
//+------------------------------------------------------------------+
int OnInit()
   {
    TitleBar.Create("TitleBar", 100, 100, 200, 20); // Creating the TitleBar with specified dimensions
    TitleBar.SetBorderType(BORDER_FLAT); // Setting the border type of TitleBar to be flat

    MainDashboardBody.Create("MainDashboardBody", 100, 119, 200, 100); // Creating the MainDashboardBody with specified dimensions
    MainDashboardBody.SetBorderType(BORDER_FLAT); // Setting the border type of MainDashboardBody to be flat

    ChartRedraw(0); // Redrawing the chart to reflect changes
    return(INIT_SUCCEEDED); // Indicating successful initialization
   }

//+------------------------------------------------------------------+
//| Expert deinitialization function                                 |
//+------------------------------------------------------------------+
void OnDeinit(const int reason)
   {
    MainDashboardBody.Destroy(); // Destroying the MainDashboardBody object
    TitleBar.Destroy(); // Destroying the TitleBar object
   }
//+------------------------------------------------------------------+
如此这般,我们的结果看起来相当不错:
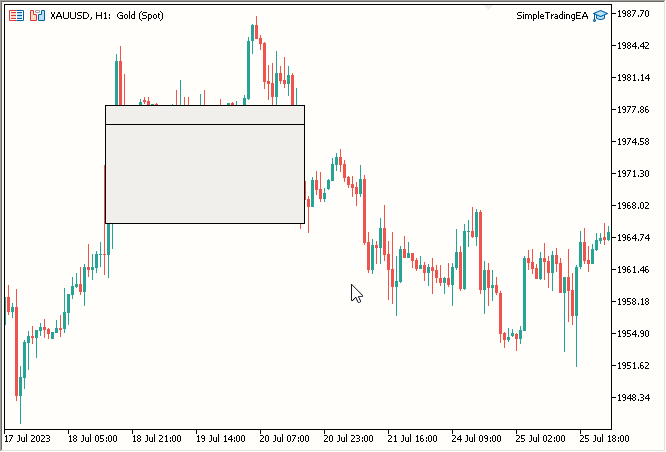
图例 3. 添加了主仪表板实体
- 标题文本
为了添加标题文本,我们需要创建一个类似于 RectangleLabel 的类,但专门当做标签,允许我们添加文本。下面是一个名为 Label 的新类代码:
//+------------------------------------------------------------------+
//| Label class definition                                           |
//+------------------------------------------------------------------+
class Label
   {
private:
    string           _name; // Name of the label
public:
                     Label(void); // Constructor
                    ~Label(void); // Destructor

    void             Create(string name, int xDis, int yDis); // Method to create a label
    void             Destroy() {ObjectDelete(0, _name);} // Method to destroy a label
    void             SetTextColor(color col) {ObjectSetInteger(0, _name, OBJPROP_COLOR, col);} // Method to set the text color
    void             SetText(string text) {ObjectSetString(0, _name, OBJPROP_TEXT, text);} // Method to set the text content
    string           GetText() {return ObjectGetString(0, _name, OBJPROP_TEXT);} // Method to retrieve the text content
    void             SetFontSize(int fontSize) {ObjectSetInteger(0, _name, OBJPROP_FONTSIZE, fontSize);} // Method to set the font size
    void             SetFont(string fontName) {ObjectSetString(0, _name, OBJPROP_FONT, fontName);} // Method to set the font name
   };

//+------------------------------------------------------------------+
//| Constructor                                                      |
//+------------------------------------------------------------------+
Label::Label(void)
   {

   }

//+------------------------------------------------------------------+
//| Destructor                                                       |
//+------------------------------------------------------------------+
Label::~Label(void)
   {

   }

//+------------------------------------------------------------------+
//| Method to create a label object                                  |
//+------------------------------------------------------------------+
void Label::Create(string name, int xDis, int yDis)
   {
    // Code to create label object, set its position, and assign its name
    ObjectCreate(0, name, OBJ_LABEL, 0, 0, 0);
    ObjectSetInteger(0, name, OBJPROP_XDISTANCE, xDis);
    ObjectSetInteger(0, name, OBJPROP_YDISTANCE, yDis);
    _name = name;
   }
//+------------------------------------------------------------------+
- 在名为 Label.mqh 的新 .mqh 文件中创建了名为 Label 的类
- 声明一个名为 _name 的私密变量,以私密形式存储名称。
- 创建一个名为 Create 的函数,其中包含 3 个必需的参数:name、xDis、yDis。大小与标签对象无关,若要更改文本大小,我们更改字号
- 创建一个名为 Destroy 的函数来注销标签
- 创建一个函数 SetTextColor 来设置文本颜色
- 创建一个 SetText 函数来设置标签对象的文本
- 创建一个函数 GetText 来获取标签对象的文本,该对象当然是返回字符串
- 创建一个函数 SetFontSize 当然是为了设置字号
- 创建一个 setFont 函数设置字体,需要字符串格式的字体名称,当然该字体应该在操作系统中可用/已安装
对于标签就是这些。现在我们用它在图表上创建一个标签对象,图表上实际上没有 2 个标签对象。
现在我们的 SimpleTradingEA.mq5 如下所示:#include "RectangleLabel.mqh" // Including the RectangleLabel class definition RectangleLabel TitleBar; // Declaration of a TitleBar object RectangleLabel MainDashboardBody; // Declaration of a MainDashboardBody object #include "Label.mqh" // Including the Label class definition Label TitleText; // Declaration of a Label object //+------------------------------------------------------------------+ //| Expert initialization function | //+------------------------------------------------------------------+ int OnInit() { TitleBar.Create("TitleBar", 100, 100, 200, 20); // Creating the TitleBar with specified dimensions TitleBar.SetBorderType(BORDER_FLAT); // Setting the border type of TitleBar to be flat MainDashboardBody.Create("MainDashboardBody", 100, 119, 200, 100); // Creating the MainDashboardBody with specified dimensions MainDashboardBody.SetBorderType(BORDER_FLAT); // Setting the border type of MainDashboardBody to be flat TitleText.Create("TitleText", 110, 101); // Creating the TitleText at (110,101) TitleText.SetText("Simple Trading EA V1.0"); // Setting its text to "Simple Trading EA V1.0" TitleText.SetFontSize(10); // Setting its font size to 10 TitleText.SetTextColor(clrBlack); // Setting its text color to clrBlack ChartRedraw(0); // Redrawing the chart to reflect changes return(INIT_SUCCEEDED); // Indicating successful initialization } //+------------------------------------------------------------------+ //| Expert deinitialization function | //+------------------------------------------------------------------+ void OnDeinit(const int reason) { MainDashboardBody.Destroy(); // Destroying the MainDashboardBody object TitleBar.Destroy(); // Destroying the TitleBar object TitleText.Destroy(); // Destroying the TitleText object } //+------------------------------------------------------------------+
- 创建名为 TitleText 的标签实例
- 调用 TitleText.Create 函数创建标题文本
- 调用 TitleText.SetText 将标题文本设置为 “Simple Trading EA V1.0”
- 调用 TitleText.SetFontSize 将字号设置为 10
- 调用 TitleText.SetTextColor 将颜色设置为黑色
- 调用 TitleText.Destroy 注销 OnDeinit 中的标题文本对象
结果:
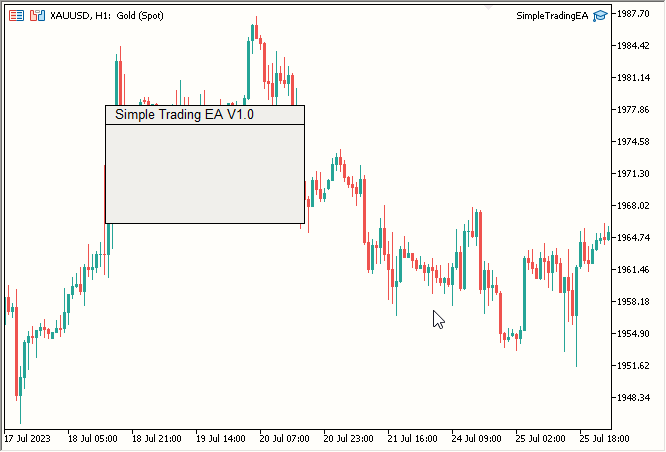
图例 4. 添加了标题文本
- “Lot Size:” 文本
对于 “Lot Size:” 文本,您将遵循与标题文本类似的流程。最终代码如下:
#include "RectangleLabel.mqh" // Including the RectangleLabel class definition
RectangleLabel TitleBar; // Declaration of a TitleBar object
RectangleLabel MainDashboardBody; // Declaration of a MainDashboardBody object

#include "Label.mqh" // Including the Label class definition
Label TitleText; // Declaration of a Label object
Label LotSizeText; // Declaration of a LotSizeText object

//+------------------------------------------------------------------+
//| Expert initialization function                                   |
//+------------------------------------------------------------------+
int OnInit()
   {
    TitleBar.Create("TitleBar", 100, 100, 200, 20); // Creating the TitleBar with specified dimensions
    TitleBar.SetBorderType(BORDER_FLAT); // Setting the border type of TitleBar to be flat

    MainDashboardBody.Create("MainDashboardBody", 100, 119, 200, 100); // Creating the MainDashboardBody with specified dimensions
    MainDashboardBody.SetBorderType(BORDER_FLAT); // Setting the border type of MainDashboardBody to be flat

    TitleText.Create("TitleText", 110, 101); // Creating the TitleText at (110,101)
    TitleText.SetText("Simple Trading EA V1.0"); // Setting its text to "Simple Trading EA V1.0"
    TitleText.SetFontSize(10); // Setting its font size to 10
    TitleText.SetTextColor(clrBlack); // Setting its text color to clrBlack

    LotSizeText.Create("LotSizeText", 110, 140); // Creating the LotSizeText at (110,140)
    LotSizeText.SetText("Lot Size:"); // Setting its text to "Lot Size:"
    LotSizeText.SetFontSize(12); // Setting its font size to 12
    LotSizeText.SetTextColor(clrBlack); // Setting its text color to clrBlack

    ChartRedraw(0); // Redrawing the chart to reflect changes
    return(INIT_SUCCEEDED); // Indicating successful initialization
   }

//+------------------------------------------------------------------+
//| Expert deinitialization function                                 |
//+------------------------------------------------------------------+
void OnDeinit(const int reason)
   {
    MainDashboardBody.Destroy(); // Destroying the MainDashboardBody object
    TitleBar.Destroy(); // Destroying the TitleBar object
    TitleText.Destroy(); // Destroying the TitleText object
    LotSizeText.Destroy(); // Destroying the LotSizeText object
   }
//+------------------------------------------------------------------+
- 建名为 LotSizeText 的标签实例
- 调用 LotSizeText.Create 函数创建手数文本
- 调用 LotSizeText.SetText 将文本设置为 “Lot Size:”
- 调用 LotSizeText.SetFontSize 将字号设置为 12
- 调用 LotSizeText.SetTextColor 将颜色设置为黑色
- 调用 LotSizeText.Destroy 注销 OnDeinit 中的标签对象
- 编辑框
对于编辑框,您将创建一个与标签类非常相似的类。下面是一个名为 Edit 的新类代码:
//+------------------------------------------------------------------+
//| Edit class definition                                            |
//+------------------------------------------------------------------+
class Edit
   {
private:
    string           _name; // Name of the edit control
public:
                     Edit(void); // Constructor
                    ~Edit(void); // Destructor

    void             Create(string name, int xDis, int yDis, int xSize, int ySize); // Method to create an edit control
    void             Destroy() {ObjectDelete(0, _name);} // Method to destroy an edit control
    void             SetBorderColor(color col) {ObjectSetInteger(0, _name, OBJPROP_BORDER_COLOR, col);} // Method to set the border color
    void             SetBGColor(color col) {ObjectSetInteger(0, _name, OBJPROP_BGCOLOR, col);} // Method to set the background color
    void             SetTextColor(color col) {ObjectSetInteger(0, _name, OBJPROP_COLOR, col);} // Method to set the text color
    void             SetText(string text) {ObjectSetString(0, _name, OBJPROP_TEXT, text);} // Method to set the text content
    string           GetText() {return ObjectGetString(0, _name, OBJPROP_TEXT);} // Method to retrieve the text content
   };

//+------------------------------------------------------------------+
//| Constructor                                                      |
//+------------------------------------------------------------------+
Edit::Edit(void)
   {

   }

//+------------------------------------------------------------------+
//| Destructor                                                       |
//+------------------------------------------------------------------+
Edit::~Edit(void)
   {

   }

//+------------------------------------------------------------------+
//| Method to create an edit control object                          |
//+------------------------------------------------------------------+
void Edit::Create(string name, int xDis, int yDis, int xSize, int ySize)
   {
    // Code to create edit control object, set its position, size, and assign its name
    ObjectCreate(0, name, OBJ_EDIT, 0, 0, 0);
    ObjectSetInteger(0, name, OBJPROP_XDISTANCE, xDis);
    ObjectSetInteger(0, name, OBJPROP_YDISTANCE, yDis);
    ObjectSetInteger(0, name, OBJPROP_XSIZE, xSize);
    ObjectSetInteger(0, name, OBJPROP_YSIZE, ySize);
    _name = name;
   }
//+------------------------------------------------------------------+
- 在名为 Edit.mqh 的新 .mqh 文件中创建了名为 Edit 的类
- 声明一个名为 _name 的私密变量,以私密形式存储名称。
- 创建一个名为 Create 的函数,其中包含 5 个必需参数:name、xDis、yDis、xSize、ySize
- 创建一个名为 Destroy 的函数来注销编辑框对象
- 创建一个函数 SetBorderColor 来设置边框颜色
- 创建一个函数 SetBGColor 来设置背景色为 WhiteSmoke
- 创建一个函数 SetTextColor 来设置编辑框内文本的文本颜色
- 创建一个函数 SetText 来设置文本
- 创建一个函数 GetText 来获取文本
您现在可以在 SimpleTradingEA 中使用编辑框类,如下所示:
#include "RectangleLabel.mqh" // Including the RectangleLabel class definition
RectangleLabel TitleBar; // Declaration of a TitleBar object
RectangleLabel MainDashboardBody; // Declaration of a MainDashboardBody object

#include "Label.mqh" // Including the Label class definition
Label TitleText; // Declaration of a Label object
Label LotSizeText; // Declaration of a LotSizeText object

#include "Edit.mqh" // Including the Edit class definition
Edit LotSize; // Declaration of a LotSize object

//+------------------------------------------------------------------+
//| Expert initialization function                                   |
//+------------------------------------------------------------------+
int OnInit()
   {
    TitleBar.Create("TitleBar", 100, 100, 200, 20); // Creating the TitleBar with specified dimensions
    TitleBar.SetBorderType(BORDER_FLAT); // Setting the border type of TitleBar to be flat

    MainDashboardBody.Create("MainDashboardBody", 100, 119, 200, 100); // Creating the MainDashboardBody with specified dimensions
    MainDashboardBody.SetBorderType(BORDER_FLAT); // Setting the border type of MainDashboardBody to be flat

    TitleText.Create("TitleText", 110, 101); // Creating the TitleText at (110,101)
    TitleText.SetText("Simple Trading EA V1.0"); // Setting its text to "Simple Trading EA V1.0"
    TitleText.SetFontSize(10); // Setting its font size to 10
    TitleText.SetTextColor(clrBlack); // Setting its text color to clrBlack

    LotSizeText.Create("LotSizeText", 110, 140); // Creating the LotSizeText at (110,140)
    LotSizeText.SetText("Lot Size:"); // Setting its text to "Lot Size:"
    LotSizeText.SetFontSize(12); // Setting its font size to 12
    LotSizeText.SetTextColor(clrBlack); // Setting its text color to clrBlack

    LotSize.Create("LotSize", 220, 140, 50, 20); // Creating the LotSize with specified dimensions
    LotSize.SetBorderColor(clrBlack); // Setting its Border Color to clrBlack
    LotSize.SetBGColor(clrWhiteSmoke); // Setting its BG Color to clrWhiteSmoke
    LotSize.SetText("0.01"); // Setting its text to 0.01
    LotSize.SetTextColor(clrBlack); // Setting its text color to clrBlack

    ChartRedraw(0); // Redrawing the chart to reflect changes
    return(INIT_SUCCEEDED); // Indicating successful initialization
   }

//+------------------------------------------------------------------+
//| Expert deinitialization function                                 |
//+------------------------------------------------------------------+
void OnDeinit(const int reason)
   {
    MainDashboardBody.Destroy(); // Destroying the MainDashboardBody object
    TitleBar.Destroy(); // Destroying the TitleBar object
    TitleText.Destroy(); // Destroying the TitleText object
    LotSizeText.Destroy(); // Destroying the LotSizeText object
    LotSize.Destroy(); // Destroying the LotSize object
   }
//+------------------------------------------------------------------+
- 创建名为 LotSize 的编辑框实例
- 调用 LotSize.Create 函数创建编辑框对象
- 调用 LotSize.SetBorderColor 将边框颜色设置为黑色
- 调用 LotSize.SetBGColor 将背景颜色设置为 WhiteSmoke
- 调用 LotSize.SetText 将文本设置为 0.01,表示手数大小
- 调用 LotSize.SetTextColor 将编辑框内的文本颜色设置为黑色
- 调用 LotSize.Destroy 注销 OnDeinit 中的编辑框对象
- 买入和卖出按钮
最后,我们来到按钮。我们为按钮创建一个类,类似针对其它元素的方式:
//+------------------------------------------------------------------+
//| Button class definition                                          |
//+------------------------------------------------------------------+
class Button
   {
private:
    string           _name; // Name of the button control

public:
                     Button(void); // Constructor
                    ~Button(void); // Destructor

    void             Create(string name, int xDis, int yDis, int xSize, int ySize); // Method to create a button control
    void             SetBorderColor(color col) {ObjectSetInteger(0, _name, OBJPROP_BORDER_COLOR, col);} // Method to set the border color
    void             SetBGColor(color col) {ObjectSetInteger(0, _name, OBJPROP_BGCOLOR, col);} // Method to set the background color
    void             SetText(string text) {ObjectSetString(0, _name, OBJPROP_TEXT, text);} // Method to set the text content
    void             Destroy() {ObjectDelete(0, _name);} // Method to destroy a button control
   };

//+------------------------------------------------------------------+
//| Constructor                                                      |
//+------------------------------------------------------------------+
Button::Button(void)
   {

   }

//+------------------------------------------------------------------+
//| Destructor                                                       |
//+------------------------------------------------------------------+
Button::~Button(void)
   {

   }

//+------------------------------------------------------------------+
//| Method to create a button control object                         |
//+------------------------------------------------------------------+
void Button::Create(string name, int xDis = 0, int yDis = 0, int xSize = 0, int ySize = 0)
   {
    // Code to create button control object, set its position, size, and assign its name
    ObjectCreate(0, name, OBJ_BUTTON, 0, 0, 0);
    ObjectSetInteger(0, name, OBJPROP_XDISTANCE, xDis);
    ObjectSetInteger(0, name, OBJPROP_YDISTANCE, yDis);
    ObjectSetInteger(0, name, OBJPROP_XSIZE, xSize);
    ObjectSetInteger(0, name, OBJPROP_YSIZE, ySize);
    _name = name;
   }
//+------------------------------------------------------------------+
在一个名为 Button.mqh 的新 .mqh 文件中,我们创建了一个名为 Button 的类。我们声明了一个名为 _name 的私密变量,以私密形式存储名称。我们还创建了以下函数:
- 名为 Create 的函数,具有 5 个必需参数:name、xDis、yDis、xSize、ySize。
- 一个名为 Destroy 的函数,用于注销按钮对象。
- 一个名为 SetBorderColor 的函数,用于设置边框颜色。
- 一个名为 SetBGColor 的函数,用于将背景颜色设置为 WhiteSmoke。
- 一个名为 SetText 的函数,用于设置文本。
现在我们看一下添加按钮后的 SimpleTradingEA.mq5 主文件。您会注意到,它现在包括矩形标签、标签、编辑框、BuyButton 和 SellButton 的按钮实例。
#include "RectangleLabel.mqh" // Including the RectangleLabel class definition
RectangleLabel TitleBar; // Declaration of a TitleBar object
RectangleLabel MainDashboardBody; // Declaration of a MainDashboardBody object

#include "Label.mqh" // Including the Label class definition
Label TitleText; // Declaration of a Label object
Label LotSizeText; // Declaration of a LotSizeText object

#include "Edit.mqh" // Including the Edit class definition
Edit LotSize; // Declaration of a LotSize object

#include "Button.mqh" // Including the Button class definition
Button BuyButton; // Declaration of a BuyButton object
Button SellButton; // Declaration of a SellButton object

//+------------------------------------------------------------------+
//| Expert initialization function                                   |
//+------------------------------------------------------------------+
int OnInit()
   {
    TitleBar.Create("TitleBar", 100, 100, 200, 20); // Creating the TitleBar with specified dimensions
    TitleBar.SetBorderType(BORDER_FLAT); // Setting the border type of TitleBar to be flat

    MainDashboardBody.Create("MainDashboardBody", 100, 119, 200, 100); // Creating the MainDashboardBody with specified dimensions
    MainDashboardBody.SetBorderType(BORDER_FLAT); // Setting the border type of MainDashboardBody to be flat

    TitleText.Create("TitleText", 110, 101); // Creating the TitleText at (110,101)
    TitleText.SetText("Simple Trading EA V1.0"); // Setting its text to "Simple Trading EA V1.0"
    TitleText.SetFontSize(10); // Setting its font size to 10
    TitleText.SetTextColor(clrBlack); // Setting its text color to clrBlack

    LotSizeText.Create("LotSizeText", 110, 140); // Creating the LotSizeText at (110,140)
    LotSizeText.SetText("Lot Size:"); // Setting its text to "Lot Size:"
    LotSizeText.SetFontSize(12); // Setting its font size to 12
    LotSizeText.SetTextColor(clrBlack); // Setting its text color to clrBlack

    LotSize.Create("LotSize", 220, 140, 50, 20); // Creating the LotSize with specified dimensions
    LotSize.SetBorderColor(clrBlack); // Setting its Border Color to clrBlack
    LotSize.SetBGColor(clrWhiteSmoke); // Setting its BG Color to clrWhiteSmoke
    LotSize.SetText("0.01"); // Setting its text to 0.01
    LotSize.SetTextColor(clrBlack); // Setting its text color to clrBlack

    BuyButton.Create("BuyButton", 110, 180, 80, 25); // Creating the BuyButton with specified dimensions
    BuyButton.SetBorderColor(clrBlack); // Setting its Border Color to clrBlack
    BuyButton.SetText("Buy"); // Setting its text to "Buy"
    BuyButton.SetBGColor(clrLime); // Setting its BG Color to clrLime

    SellButton.Create("SellButton", 210, 180, 80, 25); // Creating the SellButton with specified dimensions
    SellButton.SetBorderColor(clrBlack); // Setting its Border Color to clrBlack
    SellButton.SetText("Sell"); // Setting its text to "Sell"
    SellButton.SetBGColor(clrRed); // Setting its BG Color to clrRed

    ChartRedraw(0); // Redrawing the chart to reflect changes
    return(INIT_SUCCEEDED); // Indicating successful initialization
   }

//+------------------------------------------------------------------+
//| Expert deinitialization function                                 |
//+------------------------------------------------------------------+
void OnDeinit(const int reason)
   {
    MainDashboardBody.Destroy(); // Destroying the MainDashboardBody object
    TitleBar.Destroy(); // Destroying the TitleBar object
    TitleText.Destroy(); // Destroying the TitleText object
    LotSizeText.Destroy(); // Destroying the LotSizeText object
    LotSize.Destroy(); // Destroying the LotSize object
    BuyButton.Destroy(); // Destroying the BuyButton object
    SellButton.Destroy(); // Destroying the SellButton object
   }
//+------------------------------------------------------------------+
- 创建名为 BuyButton 的按钮实例
- 调用 BuyButton.Create 函数创建按钮对象
- 调用 BuyButton.SetBorderColor 将边框颜色设置为黑色
- 调用 BuyButton.SetBGColor 将背景颜色设置为 Lime
- 调用 BuyButton.SetText 设置文本 “Buy”
- 调用 BuyButton.Destroy 注销 OnDeinit 中的按钮对象
现在对于 “Sell” 按钮:
- 创建名为 SellButton 的按钮实例
- 调用 SellButton.Create 函数创建按钮对象
- 调用 SellButton.SetBorderColor 将边框颜色设置为黑色
- 调用 SellButton.SetBGColor 将背景色设置为红色
- 调用 SellButton.SetText 设置文本 “Sell”
- 调用 SellButton.Destroy 注销 OnDeinit 中的按钮对象
结果:
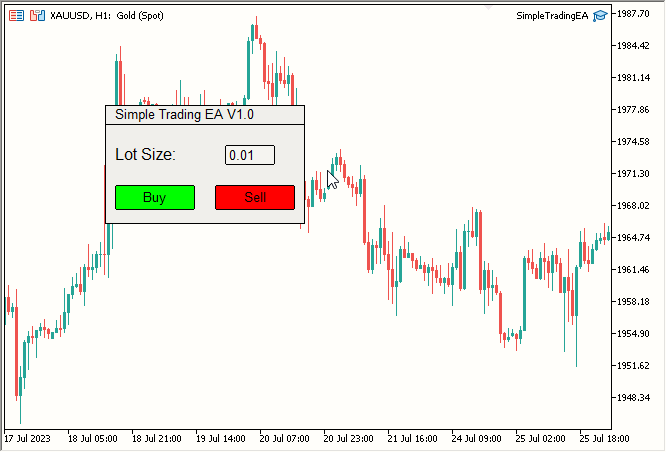
图例 6. 添加了 Buy(买入)和 Sell(卖出)按钮 - 收尾润色
- 将标题栏颜色更改为深蓝色
- 将主仪表板实体颜色更改为浅蓝色
- 将标题文本颜色从黑色更改为白色
- 将手数大小文本颜色从黑色更改为白色
- 添加买入/卖出功能
-
颜色修改:
- 调用 TitleBar.SetBGColor(C'27, 59, 146') 将标题栏的背景色更改为深蓝色。
- 调用 MainDashboardBody.SetBGColor(C'102, 152, 250') 将主仪表板实体的颜色更新为浅蓝色。
- 调用 TitleText.SetTextColor(clrWhite) 将标题文本的颜色更改为白色。
- 调用 LotSizeText.SetTextColor(clrWhite) 将手数文本的颜色调整为白色。
-
包含交易函数库:
- 集成了交易函数库,并用以下代码创建了一个名为 trade 的实例:
#include <Trade/Trade.mqh> CTrade trade;
- 集成了交易函数库,并用以下代码创建了一个名为 trade 的实例:
-
创建 OnChartEvent 函数:
实现了一个 OnChartEvent 函数,该函数在单击 “Buy” 或 “Sell” 按钮时立即执行相应的订单。代码如下:
//+------------------------------------------------------------------+ //| Chart event handling function | //+------------------------------------------------------------------+ void OnChartEvent(const int id, const long& lparam, const double& dparam, const string& sparam) { if(id == CHARTEVENT_OBJECT_CLICK) { double ask = SymbolInfoDouble(_Symbol, SYMBOL_ASK); double bid = SymbolInfoDouble(_Symbol, SYMBOL_BID); if(sparam == "BuyButton") { trade.PositionOpen(_Symbol, ORDER_TYPE_BUY, (double)LotSize.GetText(), ask, 0, 0); } if(sparam == "SellButton") { trade.PositionOpen(_Symbol, ORDER_TYPE_SELL, (double)LotSize.GetText(), bid, 0, 0); } } } //+------------------------------------------------------------------+
如果事件 ID 等于 CHARTEVENT_OBJECT_CLICK,则该函数会检测对象点击,通过 sparam 提取被点击对象的名称,检查对象名称是 “BuyButton” 亦或 “SellButton”,然后调用交易函数库进行相应的交易。
仅此而已。结果:
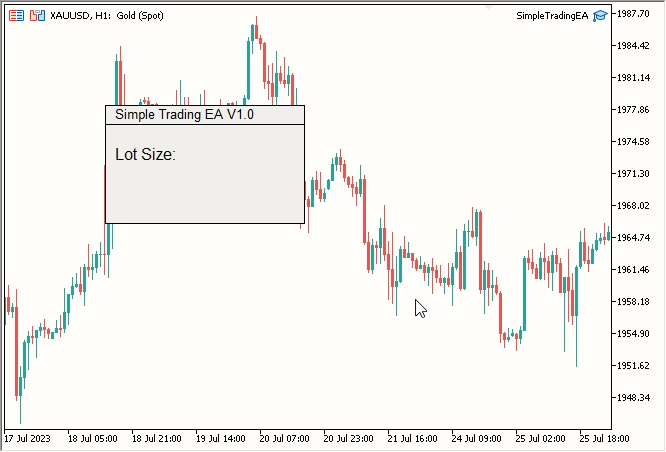
图例 5. 添加了 “Lot Size:” 文本
现在进行收尾润色,我们令它变得丰富多彩。我们将进行以下修改:
我们来做以下事宜:最终的 SimpleTradingEA.mq5 代码包括颜色变化,并包含交易函数库。它还创建一个 OnChartEvent 函数,以便在单击 “Buy” 或 “Sell” 按钮时立即相应下单。
#include "RectangleLabel.mqh" // Including the RectangleLabel class definition
RectangleLabel TitleBar; // Declaration of a TitleBar object
RectangleLabel MainDashboardBody; // Declaration of a MainDashboardBody object

#include "Label.mqh" // Including the Label class definition
Label TitleText; // Declaration of a Label object
Label LotSizeText; // Declaration of a LotSizeText object

#include "Edit.mqh" // Including the Edit class definition
Edit LotSize; // Declaration of a LotSize object

#include "Button.mqh" // Including the Button class definition
Button BuyButton; // Declaration of a BuyButton object
Button SellButton; // Declaration of a SellButton object

//+------------------------------------------------------------------+
//| Expert initialization function                                   |
//+------------------------------------------------------------------+
int OnInit()
   {
    TitleBar.Create("TitleBar", 100, 100, 200, 20); // Creating the TitleBar with specified dimensions
    TitleBar.SetBorderType(BORDER_FLAT); // Setting the border type of TitleBar to be flat
    TitleBar.SetBGColor(C'27, 59, 146'); // Setting the color to RGB code: C'27, 59, 146'

    MainDashboardBody.Create("MainDashboardBody", 100, 119, 200, 100); // Creating the MainDashboardBody with specified dimensions
    MainDashboardBody.SetBorderType(BORDER_FLAT); // Setting the border type of MainDashboardBody to be flat
    MainDashboardBody.SetBGColor(C'102, 152, 250'); // Setting the color to RGB code: C'102, 152, 250'

    TitleText.Create("TitleText", 110, 101); // Creating the TitleBar at (110,101)
    TitleText.SetText("Simple Trading EA V1.0"); // Setting its text to "Simple Trading EA V1.0"
    TitleText.SetFontSize(10); // Setting its font size to 10
    TitleText.SetTextColor(clrWhite); // Setting its text color to clrWhite

    LotSizeText.Create("LotSizeText", 110, 140); // Creating the LotSizeText at (110,140)
    LotSizeText.SetText("Lot Size:"); // Setting its text to "Lot Size:"
    LotSizeText.SetFontSize(12); // Setting its font size to 12
    LotSizeText.SetTextColor(clrWhite); // Setting its text color to clrWhite

    LotSize.Create("LotSize", 220, 140, 50, 20); // Creating the LotSize with specified dimensions
    LotSize.SetBorderColor(clrBlack); // Setting its Border Color to clrBlack
    LotSize.SetBGColor(clrWhiteSmoke); // Setting its BG Color to clrWhiteSmoke
    LotSize.SetText("0.01"); // Setting its text to 0.01
    LotSize.SetTextColor(clrBlack); // Setting its text color to clrBlack

    BuyButton.Create("BuyButton", 110, 180, 80, 25); // Creating the BuyButton with specified dimensions
    BuyButton.SetBorderColor(clrBlack); // Setting its Border Color to clrBlack
    BuyButton.SetText("Buy"); // Setting its text to "Buy"
    BuyButton.SetBGColor(clrLime); // Setting its BG Color to clrLime

    SellButton.Create("SellButton", 210, 180, 80, 25); // Creating the SellButton with specified dimensions
    SellButton.SetBorderColor(clrBlack); // Setting its Border Color to clrBlack
    SellButton.SetText("Sell"); // Setting its text to "Sell"
    SellButton.SetBGColor(clrRed); // Setting its BG Color to clrRed

    ChartRedraw(0); // Redrawing the chart to reflect changes
    return(INIT_SUCCEEDED); // Indicating successful initialization
   }

//+------------------------------------------------------------------+
//| Expert deinitialization function                                 |
//+------------------------------------------------------------------+
void OnDeinit(const int reason)
   {
    MainDashboardBody.Destroy(); // Destroying the MainDashboardBody object
    TitleBar.Destroy(); // Destroying the TitleBar object
    TitleText.Destroy(); // Destroying the TitleText object
    LotSizeText.Destroy(); // Destroying the LotSizeText object
    LotSize.Destroy(); // Destroying the LotSize object
    BuyButton.Destroy(); // Destroying the BuyButton object
    SellButton.Destroy(); // Destroying the SellButton object
   }

//+------------------------------------------------------------------+
//| Chart event handling function                                    |
//+------------------------------------------------------------------+
void OnChartEvent(const int id, const long& lparam, const double& dparam, const string& sparam)
   {
    // Handles click events for Buy and Sell buttons and opens corresponding positions
    if(id == CHARTEVENT_OBJECT_CLICK) {
        double ask = SymbolInfoDouble(_Symbol, SYMBOL_ASK);
        double bid = SymbolInfoDouble(_Symbol, SYMBOL_BID);
        if(sparam == "BuyButton") {
            trade.PositionOpen(_Symbol, ORDER_TYPE_BUY, (double)LotSize.GetText(), ask, 0, 0);
        }
        if(sparam == "SellButton") {
            trade.PositionOpen(_Symbol, ORDER_TYPE_SELL, (double)LotSize.GetText(), bid, 0, 0);
        }
    }
   }
//+------------------------------------------------------------------+
变化:
最终结果:
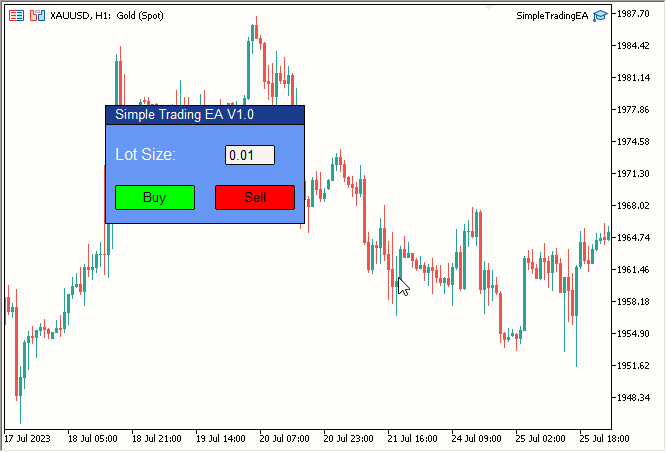
图例 7. 完成简易交易 EA(静态)
本章节就此完结。
讨论令我们其中包含所有元素的静态仪表板能够移动的方式。
现在真正的工作开始了。我们如何让所有东西都可移动?我们思考一下。
此刻,我们可以令任何单个元素可移动。但我们需要的是让所有元素都移动起来。然后,我们让一个元素移动,且所有其它元素都跟随它。我们可以使用 CustomChartEvent 令其它元素从字面上跟随主动元素,但不幸的是,该方法速度很慢,因此效率低下。由此,我发现最有效的方法是移动我们的主动元素(所有其它元素将围绕它移动),并同时移动其它元素。这只是理论,但我们如何实施它呢?
我们将主动元素称为“中心元素”,并将标题栏设置为 “Central Element”。现在我们将围绕它移动所有其它元素。
以前,我们调用在类中定义的名为 OnEvent 的函数来移动单个元素。现在我们将修改此函数,如此其可移动单个元素,然后按精确的距离移动所有其它元素。
下面是我们当前的 OnEvent 函数:
//+------------------------------------------------------------------+
//|                                                                  |
//+------------------------------------------------------------------+
void RectangleLabel::OnEvent(int id, long lparam, double dparam, string sparam)
  {
   //Verify the event that triggered the OnChartEvent was CHARTEVENT_MOUSE_MOVE because we only want to execute out code when that is the case
   if(id == CHARTEVENT_MOUSE_MOVE)
     {
      //define X, Y, XDistance, YDistance, XSize, YSize
      int X = (int)lparam;
      int Y = (int)dparam;
      int MouseState = (int)sparam;

      string name = Name;
      int XDistance = (int)ObjectGetInteger(0, name, OBJPROP_XDISTANCE); //Should be 100 initially as we set it in OnInit()
      int YDistance = (int)ObjectGetInteger(0, name, OBJPROP_YDISTANCE); //Should be 100 initially as we set it in OnInit()
      int XSize = (int)ObjectGetInteger(0, name, OBJPROP_XSIZE); //Should be 200 initially as we set it in OnInit()
      int YSize = (int)ObjectGetInteger(0, name, OBJPROP_YSIZE); //Should be 200 initially as we set it in OnInit()

      if(previousMouseState == 0 && MouseState == 1) //Check if this was the MLB first click
        {
         mlbDownX = X; //Set mlbDownX (Variable that stores the initial MLB X location) equal to the current X
         mlbDownY = Y; //Set mlbDownY (Variable that stores the initial MLB Y location) equal to the current Y
         mlbDownXDistance = XDistance; //Set mlbDownXDistance (Variable that stores the initial XDistance i.e. Width of the dashboard) equal to the current XDistance
         mlbDownYDistance = YDistance; //Set mlbDownYDistance (Variable that stores the initial YDistance i.e. Height of the dashboard) equal to the current YDistance

         if(X >= XDistance && X <= XDistance + XSize && Y >= YDistance && Y <= YDistance + YSize) //Check if the click was on the dashboard
           {
            movingState = true; //If yes the set movingState to True
           }

        }

      if(movingState)//if movingState is true, Update the Dashboard position
        {
         ChartSetInteger(0, CHART_MOUSE_SCROLL, false);//Restrict Chart to be moved by Mouse
         ObjectSetInteger(0, name, OBJPROP_XDISTANCE, mlbDownXDistance + X - mlbDownX);//Update XDistance to: mlbDownXDistance + (X - mlbDownX)
         ObjectSetInteger(0, name, OBJPROP_YDISTANCE, mlbDownYDistance + Y - mlbDownY);//Update YDistance to: mlbDownYDistance + (Y - mlbDownY)
         ChartRedraw(0); //Redraw Chart
        }

      if(MouseState == 0)//Check if MLB is not pressed
        {
         movingState = false;//set movingState again to false
         ChartSetInteger(0, CHART_MOUSE_SCROLL, true);//allow the cahrt to be moved again
        }

      previousMouseState = MouseState;//update the previousMouseState at the end so that we can use it next time and copare it with new value
     }
  }
//+------------------------------------------------------------------+
我知道我们还没有将此函数添加到 RectangleLabel 类中;我们将在方法讨论完毕后再做这件事。
现在,我们移动任何物体时需要什么?其名称,对吧?
我们要做的十分简单:我们将遍历这些名称,并按中心元素相同的距离移动其它对象。但这里有一个很难发现的重大缺陷。
每当鼠标移动时,我们都会像这样设置中心元素的 XDis 和 YDis:
ObjectSetInteger(0, name, OBJPROP_XDISTANCE, mlbDownXDistance + X - mlbDownX);//Update XDistance to: mlbDownXDistance + (X - mlbDownX)
ObjectSetInteger(0, name, OBJPROP_YDISTANCE, mlbDownYDistance + Y - mlbDownY);//Update YDistance to: mlbDownYDistance + (Y - mlbDownY)
此处,我们知道按下鼠标 MLB 时中心元素的 XDis 和 YDis。故此,我们也需要知道其它元素的信息。然而,这将令该函数变得非常复杂或效率低下,因此我们需要一种更好的方式。
经过仔细检查,更好的方式就在我们面前。我们只需要保持“中心元素和其它元素之间的 X 距离和 Y 距离”。是的,就这么简单。
故此,我们将记下“中心元素和其它元素之间的 X 距离和 Y 距离”,并保持该距离。我们如何记录这些距离呢?好吧,在某个时候,我们将把其它元素添加到中心元素当中,在这一点上,我们将注意到“中心元素和其它元素之间的 X 距离和 Y 距离”。
重申一下,在某个点,我们将使用其它元素的名称,把它们添加到中心元素当中,在此点,我们将保存“中心元素和其它元素之间的 X 距离和 Y 距离”。然后,我们将保持其它元素和中心元素之间的距离。我们将在更新中心元素的位置后更新该距离。
这就是我们完成任务的方式。现在,我们将其付诸行动。
使用讨论的方式来移动我们的静态仪表板
由此,我们讨论一下中心元素和其它元素之间的名称、X 距离和 Y 距离的存储位置。这是我们需要存储的仅有的两类信息。
我们将在 RectangleLabel 类中创建一个名为 Add 的函数。调用该函数,我们将存储以下两件事:
- addedNames 数组中的名称
- 而中心元素与其它元素之间的 X 距离和 Y 距离,分别在 addedXDisDifference 和 addedYDisDifference 之中。
关于命名约定,“added” 意味着变量与添加到中心元素的另一个元素相关,而 “XDis” 和 “YDis” 则相当简单。“Difference” 表明变量与差值有关,因此它是一个合理的名称。讨论名称的原因是为了减少任何混淆,因为正确的变量名称可以最大限度地减少误解。
我们声明这些变量:
string           addedNamed[];
int              addedXDisDiffrence[], addedYDisDiffrence[];
请注意,我们将它们声明为私密,因为我们不需要将它们公开。此外,它们都是数组。
现在,我们创建 Add 函数:
//+------------------------------------------------------------------+
//| Method to add an object by name to the rectangle label           |
//+------------------------------------------------------------------+
void RectangleLabel::Add(string name)
   {
    ArrayResize(addedNames, ArraySize(addedNames) + 1);
    ArrayResize(addedXDisDiffrence, ArraySize(addedXDisDiffrence) + 1);
    ArrayResize(addedYDisDiffrence, ArraySize(addedYDisDiffrence) + 1);

    addedNames[ArraySize(addedNames) - 1] = name;
    addedXDisDiffrence[ArraySize(addedXDisDiffrence) - 1] = ObjectGetInteger(0, _name, OBJPROP_XDISTANCE) - ObjectGetInteger(0, name, OBJPROP_XDISTANCE);
    addedYDisDiffrence[ArraySize(addedYDisDiffrence) - 1] = ObjectGetInteger(0, _name, OBJPROP_YDISTANCE) - ObjectGetInteger(0, name, OBJPROP_YDISTANCE);
   }
//+------------------------------------------------------------------+
此函数在 RectangleLabel 类中声明,因为 TitleBar 是我们的中心元素,它本质上是一个 RECTANGLE_LABEL 对象。显然,因为我们要在这个函数中使用它们,故我们在同一类中声明变量。
此函数的作用是接受名称作为参数,然后将这三个数组的大小增加一个。在最后一个索引处,我们存储相应的数据。对于 Name,我们只需存储名称。对于距离差值(X 和 Y),我们存储中心元素(在本例中为 TitleBar)和其名称作为参数提供的元素之间的差值。这构成了我们的 Add 函数。
接下来,我们需要修改 OnEvent 函数。我们创建一个循环来遍历 addedNames 数组,并保持 TitleBar 和命名元素之间的距离,将其设置为新的 TitleBar X/Y 距离减去相应数组中给出的差值。
for(int i = 0; i < ArraySize(addedNames); i++)
   {
    ObjectSetInteger(0, addedNames[i], OBJPROP_XDISTANCE, mlbDownXDistance + X - mlbDownX - addedXDisDiffrence[i]);
    ObjectSetInteger(0, addedNames[i], OBJPROP_YDISTANCE, mlbDownYDistance + Y - mlbDownY - addedYDisDiffrence[i]);
   }
请注意,带下划线的部分是 TitleBar(中心元素)的新 X/Y 距离,我们减去相应数组中给出的差值(指中心元素与其它元素之间 X 距离和 Y 距离的差值)。
我们把这个循环放在哪里?我们把它放在中心元素更新之后。
下面是我们的新 OnEvent 函数:
//+------------------------------------------------------------------+
//| Event handling for mouse movements                               |
//+------------------------------------------------------------------+
void RectangleLabel::OnEvent(int id, long lparam, double dparam, string sparam)
   {
    // Handle mouse movement events for dragging the rectangle label
    if(id == CHARTEVENT_MOUSE_MOVE)
       {
        int X = (int)lparam;
        int Y = (int)dparam;
        int MouseState = (int)sparam;

        string name = _name;
        int XDistance = (int)ObjectGetInteger(0, name, OBJPROP_XDISTANCE);
        int YDistance = (int)ObjectGetInteger(0, name, OBJPROP_YDISTANCE);
        int XSize = (int)ObjectGetInteger(0, name, OBJPROP_XSIZE);
        int YSize = (int)ObjectGetInteger(0, name, OBJPROP_YSIZE);

        if(previousMouseState == 0 && MouseState == 1)
           {
            mlbDownX = X;
            mlbDownY = Y;
            mlbDownXDistance = XDistance;
            mlbDownYDistance = YDistance;

            if(X >= XDistance && X <= XDistance + XSize && Y >= YDistance && Y <= YDistance + YSize)
               {
                movingState = true;
               }

           }

        if(movingState)
           {
            ChartSetInteger(0, CHART_MOUSE_SCROLL, false);
            ObjectSetInteger(0, name, OBJPROP_XDISTANCE, mlbDownXDistance + X - mlbDownX);
            ObjectSetInteger(0, name, OBJPROP_YDISTANCE, mlbDownYDistance + Y - mlbDownY);
            for(int i = 0; i < ArraySize(addedNames); i++)
               {
                ObjectSetInteger(0, addedNames[i], OBJPROP_XDISTANCE, mlbDownXDistance + X - mlbDownX - addedXDisDiffrence[i]);
                ObjectSetInteger(0, addedNames[i], OBJPROP_YDISTANCE, mlbDownYDistance + Y - mlbDownY - addedYDisDiffrence[i]);
               }
            ChartRedraw(0);
           }

        if(MouseState == 0)
           {
            movingState = false;
            ChartSetInteger(0, CHART_MOUSE_SCROLL, true);
           }

        previousMouseState = MouseState;
       }
   }
高亮显示的部分是我们的新循环。
现在我们只需要调用 Add 函数将元素附加到中心元素,如我们所选的 TitleBar。我们调用 TitleBar 实例中的 Add 函数,我们将其命名为 “TitleBar”。
我们调用 TitleBar 实例中的 Add 函数将所有其它元素添加到 TitleBar:
// Add the other elements to the Central Element i.e. TitleBar object in this case
TitleBar.Add("MainDashboardBody");
TitleBar.Add("TitleText");
TitleBar.Add("LotSizeText");
TitleBar.Add("LotSize");
TitleBar.Add("BuyButton");
TitleBar.Add("SellButton");
如此这般,所有这些元素的名称都将添加到 addedNames 数组之中,允许它们移动。此外,还会记录它们与 TitleBar 的距离,如此即可保持该距离。
现在,我们调用 OnEvent 函数。没有它,这一切都将是徒劳的。
// Passes events to the TitleBar object
TitleBar.OnEvent(id, lparam, dparam, sparam);
我们将其添加到 OnChartEvent() 当中,我们最终完成了。我知道这很漫长,但最终的结果应该是值得的。 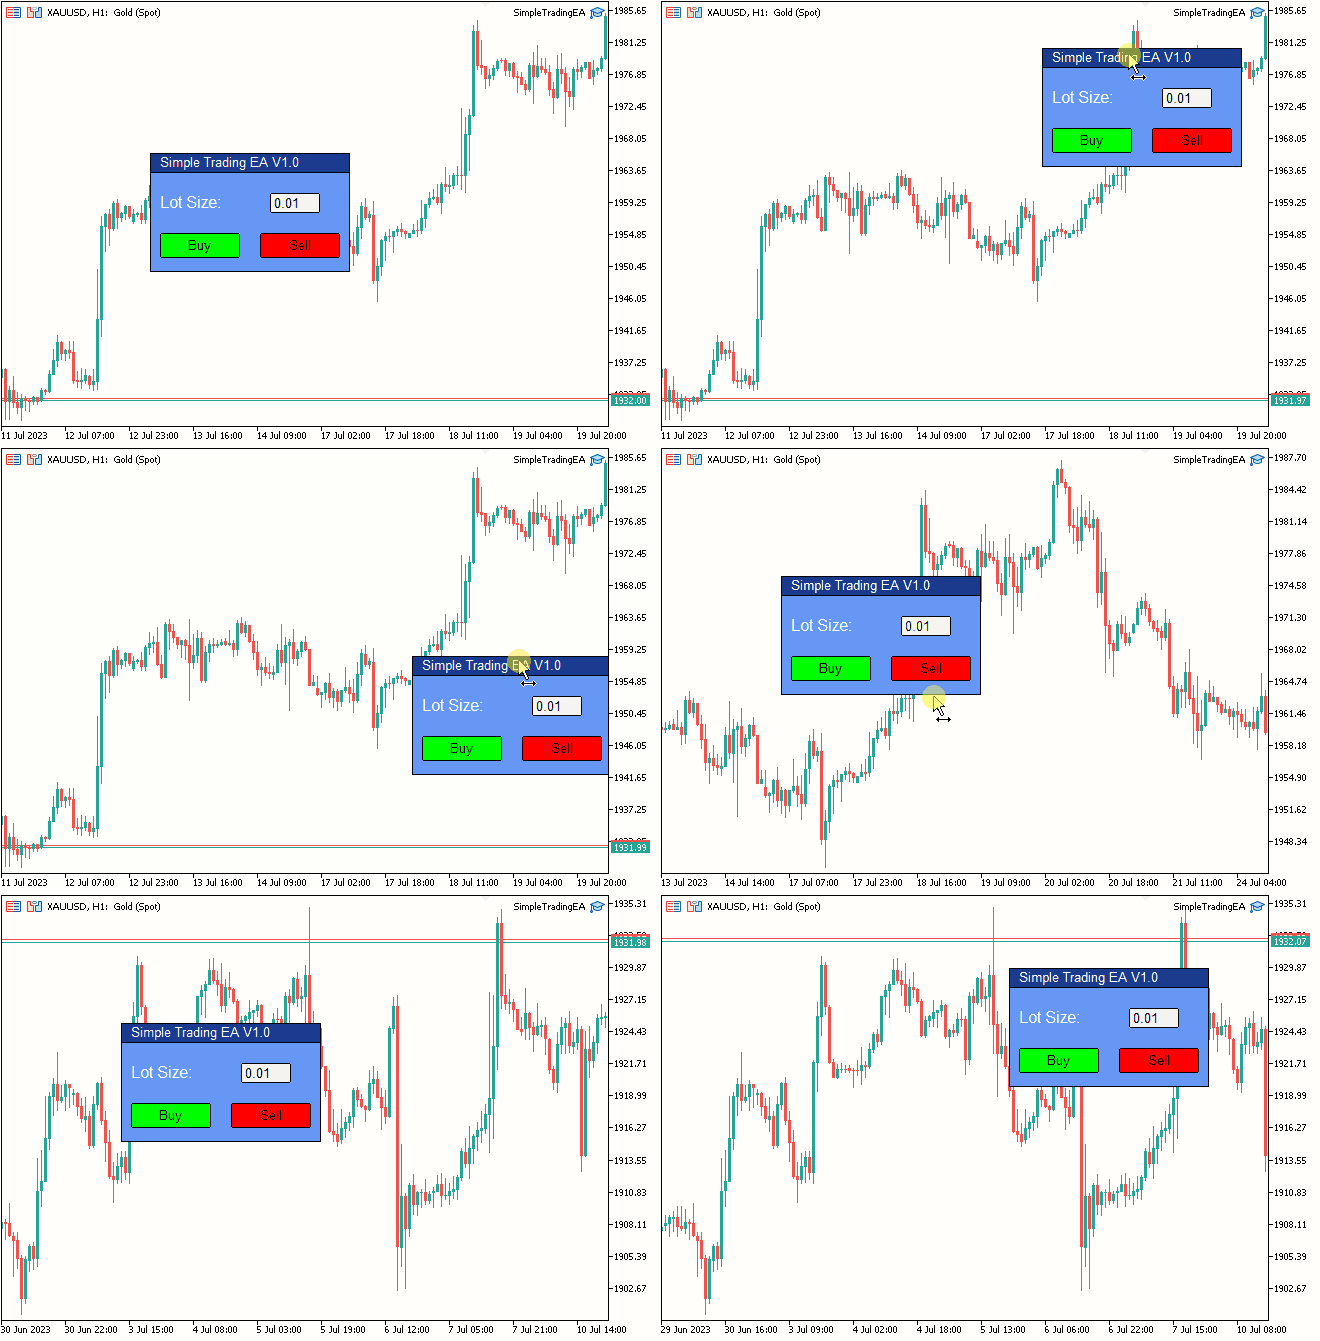
图例 8. 最终结果
结束语
至此,我们来到了本文的结尾。在本文经历的旅程中,我们取得了极大的成就,最终完成了第 3 部分《利用 MQL5 的交互式 GUI 改进您的交易图表》。
我们已经成功地实现了我们在《可移动 GUI》系列中为自己设定的目标,即第 1 部分和第 2 部分,为动态交易图表和用户友好的界面带来了生命。感谢您抽出宝贵时间阅读我的文章。我希望您能发现它们对您的努力既有益处、又有帮助。
如果您对我的下一篇文章有任何想法或建议,请不必犹豫尽管分享。
祝编码愉快!祝交易愉快!
本文由MetaQuotes Ltd译自英文
原文地址: https://www.mql5.com/en/articles/12923
注意: MetaQuotes Ltd.将保留所有关于这些材料的权利。全部或部分复制或者转载这些材料将被禁止。
本文由网站的一位用户撰写,反映了他们的个人观点。MetaQuotes Ltd 不对所提供信息的准确性负责,也不对因使用所述解决方案、策略或建议而产生的任何后果负责。
 MacOS 上的 MetaTrader 4
最实用、最普遍的选择是直观地设计表单,而完全不用担心布局代码,这正是类应该做的。文章 中提出了一种可能的解决方案。
斯坦尼斯拉夫,在针对初学者的文章下,你提供了针对高级用户的文章链接:)
我读了,不是读了,只是读了,因为我的编程水平远低于理解文章内容的需要。
我尽量少用我不懂的东西。最近的一个情况让我更加坚信这一点。
您可能正在阅读 "错误、bug、问题 "主题,因此我有一项任务,要在renko-graph上显示从封闭位置出发的箭头,以及它们之间的出入口--一条线。
我决定不自己写,而是从 Saiber 拿现成的代码,结果浪费了半天时间。最后,Saiber 更正了它的代码,但我损失了时间。
如果我想从你的文章中获取代码,并需要对某些地方进行调整,那么,你明白,这样做不会有什么好结果。
我的任务比你写文章时给自己设定的简单。我只需要用现成的代码块搭建下一个面板,就像孩子们用乐高积木搭建房子一样。
在我看来,我根本不需要 OOP 来达到这个目的。我不了解它,所以我不喜欢它。
如果我理解正确的话,MVC 原理非常适合我的目的)))))。
总的来说,我已经想到了应该怎么做。
顺便问一下,你能告诉我如何让我在程序中访问继承类的函数时,看不到基类的函数吗?如果可以的话。
我想到了)
对于那些不面向市场、想要或多或少复杂但漂亮、又懒得写 DLL 的人,有 GtkServerhttps://sourceforge.net/projects/gtk-server/ 和 Glade 表单设计器。
方法:GtkServer 作为一个 tcp 监听器启动,顾问使用 SocketOpen/SocketSend 发送文本 "加载表单"(或通过步骤表单 gtk 部件本身),并读取结果....。
你也是:)
我把 tcp 监听器、 SocketOpen/SocketSend 等词视为亵渎, 我甚至不通过谷歌就不知道它们的含义,而你却建议我使用它们。
先生们,有点良知吧,别再用你们的术语吓唬人了)))))。
斯坦尼斯拉夫,好吧,溜溜球,在初学者文章下,你扔了一个链接到高级文章:)
我已经读过了,不是读过,只是读过,因为我的编程水平远低于我理解文章内容所需的水平。
我尽量少用我不懂的东西。最近的一个情况让我更加坚信这一点。
不幸的是,软件的情况就是这样,不可能自己了解所有的东西。根据这种逻辑,操作系统应该是定制的(一些 Linux 的辩护者就是这么做的)。
这就是为什么现代的做法是采用现成的砖块(它们或多或少能满足你的需求),然后将它们对接起来(而不去深入实施)。
我只是回答了如何做得更普遍的问题。我的文章很复杂,你无法反驳,但重点是,你可以将必要的图形用户界面描述为模板,无需编程,只需插入外壳即可获得控制器、窗口拖动、大小调整等功能。
太棒了!
我自己怎么也想不明白、
是的,我读了两遍。
谢谢!
菲利普