
エキスパートアドバイザとインディケータに素早く制御パネルを追加する方法

グラフィックパネルは何のために必要なのか
貴方のMQL4/MQL5プログラム(インディケータやエキスパートアドバイザ)は、割り当てられたタスクを完全に実行する最高のプログラムの中の一つかもしれません。しかし、それを更に良くすることができるのです。原則として、プログラムの入力パラメータのあらゆる変更には、99%の場合において、その設定を触わる必要がでてきます。それは避けたいと思いますか?
これは標準ライブラリのクラスをベースに独自の管理パネルを作成することで行うことができます。これでプログラムを再起動することなく、設定を変更することができます。また、このようなアプローチはプログラムを活性化し、他のプログラムとの違いをつけることができます。グラフィックパネルの例は、マーケットで参照することができます。
この記事では、貴方のMQL4/MQL5プログラムに自分で簡単なパネルを追加する方法を紹介します。プログラムに入力パラメータを読み込み、数値の変化に反応をするようにする方法を学んでいきましょう。
1. インディケータとパネルを接続する
1.1. インディケータ
NewBar.mq5インディケータは、新しいバーが発生した時にターミナルのエキスパートアドバイザの操作ログにメッセージを印字するという一つの動作を実行します。インディケータのコードは以下の通りです。
//+------------------------------------------------------------------+
//|                                                       NewBar.mq5 |
//|                        Copyright 2015, MetaQuotes Software Corp. |
//|                                             https://www.mql5.com |
//+------------------------------------------------------------------+
#property copyright "Copyright 2015, MetaQuotes Software Corp."
#property link      "https://www.mql5.com"
#property version   "1.00"
#property description "The indicator identifies a new bar"
#property indicator_chart_window
#property indicator_plots 0
//+------------------------------------------------------------------+
//| Custom indicator initialization function                         |
//+------------------------------------------------------------------+
int OnInit()
  {
//--- indicator buffers mapping

//---
   return(INIT_SUCCEEDED);
  }
//+------------------------------------------------------------------+
//| Custom indicator iteration function                              |
//+------------------------------------------------------------------+
int OnCalculate(const int rates_total,
                const int prev_calculated,
                const datetime &time[],
                const double &open[],
                const double &high[],
                const double &low[],
                const double &close[],
                const long &tick_volume[],
                const long &volume[],
                const int &spread[])
  {
   static datetime prev_time;
//--- revert access to array time[] - do it like in timeseries
   ArraySetAsSeries(time,true);
//--- first calculation or number of bars was changed
   if(prev_calculated==0)// first calculation
     {
      prev_time=time[0];
      return(rates_total);
     }
//---
   if(time[0]>prev_time)
      Print("New bar!");
//---
   prev_time=time[0];
//--- return value of prev_calculated for next call
   return(rates_total);
  }
//+------------------------------------------------------------------+
NewBar.mq5インディケータがどのように動作するか、もう少し詳しくお話しします。
OnCalculate()関数で静的変数prev_timeは宣言され、この変数内で開始時間(time[0])が格納されます。次のエントリーで開始時間(time[0])がprev_time変数と比較されます。つまり、現在のティックの開始時間(time[0])と前のティックの開始時間(time[0])の比較が行われます。条件が実行される場合
if(time[0]>prev_time)
新しいバーが検出されたとみなします。
次の例では、NewBar.mq5インディケータがどのように新しいバーを検出するかを詳細に分析していきましょう。
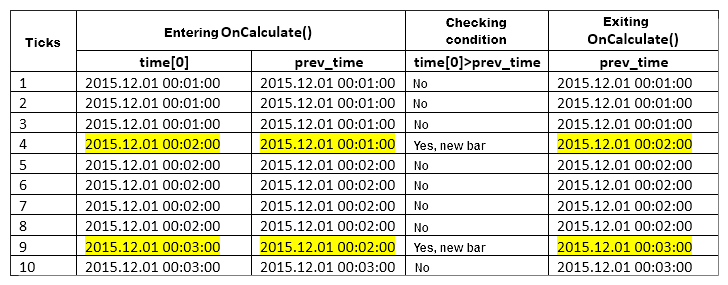
図1. インディケータで新しいバーを検出するプロセス
非常に穏やかな市場における10ティックを見てみましょう。
1から3までのティックは、バーの開始時間のインデックスは『0』(time[0])で、prev_time変数に格納された時間と同じなので、新しいバーはないということです。
4番目のティックは新しいバーで発生しました。OnCalculate()関数に入る際、 time[0]にはバーの開始時間(2015.12.01 00:02:00)が、そしてprev_time変数には更に前のティックからの時間(2015.12.01 00:01:00)が格納されます。その為、time[0]>prev_timeの条件のチェック時に、私達は新しいバーを検出します。OnCalculate()から出る際にprev_time変数にはtime[0]から時間(2015.12.01 00:02:00)時間が記録されます。
5から8のティックは、バーの開始時間のインデックスは『0』 (time[0])で、prev_time静的変数で格納された時間と同じなので、新しいバーはないということです。
9番目のティックは新しいバーで発生しました。OnCalculate()関数に入る際、 time[0]にはバーの開始時間(2015.12.01 00:03:00)が、そしてprev_time変数には更に前のティックからの時間(2015.12.01 00:02:00)が格納されます。その為、time[0]>prev_timeの条件のチェック時に、私達は新しいバーを検出します。OnCalculate()から出る際にprev_time変数にはtime[0]から時間(2015.12.01 00:03:00)時間が記録されます。
10番目のティックは、バーの開始時間のインデックスは『0』(time[0])で、prev_time静的変数で格納された時間と同じなので、新しいバーはないということです。
1.2. パネル
パネル構築の全てのパラメータは、制御要素の位置、サイズ、数が添付ファイルのPanelDialog.mqhに集中しています。PanelDialog.mqhファイルは、パネル実装クラスです。
パネルはこのようになります。

図2. パネル
PanelDialog.mqhファイルのコードは以下のようになります。
//+------------------------------------------------------------------+
//|                                                  PanelDialog.mqh |
//|                        Copyright 2015, MetaQuotes Software Corp. |
//|                                              http://www.mql5.com |
//+------------------------------------------------------------------+
#include <Controls\Dialog.mqh>
#include <Controls\CheckGroup.mqh>
//+------------------------------------------------------------------+
//| defines                                                          |
//+------------------------------------------------------------------+
//--- indents and gaps
#define INDENT_LEFT                         (11)      // indent from left (with allowance for border width)
#define INDENT_TOP                          (11)      // indent from top (with allowance for border width)
#define INDENT_BOTTOM                       (11)      // indent from bottom (with allowance for border width)
//--- for buttons
#define BUTTON_WIDTH                        (100)     // size by X coordinate
//+------------------------------------------------------------------+
//| Class CControlsDialog                                            |
//| Usage: main dialog of the Controls application                   |
//+------------------------------------------------------------------+
class CControlsDialog : public CAppDialog
  {
private:
   CCheckGroup       m_check_group;                   // CCheckGroup object

public:
                     CControlsDialog(void);
                    ~CControlsDialog(void);
   //--- create
   virtual bool      Create(const long chart,const string name,const int subwin,const int x1,const int y1,const int x2,const int y2);
   //--- chart event handler
   virtual bool      OnEvent(const int id,const long &lparam,const double &dparam,const string &sparam);

protected:
   //--- create dependent controls
   bool              CreateCheckGroup(void);
   //--- handlers of the dependent controls events
   void              OnChangeCheckGroup(void);
  };
//+------------------------------------------------------------------+
//| Event Handling                                                   |
//+------------------------------------------------------------------+
EVENT_MAP_BEGIN(CControlsDialog)
ON_EVENT(ON_CHANGE,m_check_group,OnChangeCheckGroup)
EVENT_MAP_END(CAppDialog)
//+------------------------------------------------------------------+
//| Constructor                                                      |
//+------------------------------------------------------------------+
CControlsDialog::CControlsDialog(void)
  {
  }
//+------------------------------------------------------------------+
//| Destructor                                                       |
//+------------------------------------------------------------------+
CControlsDialog::~CControlsDialog(void)
  {
  }
//+------------------------------------------------------------------+
//| Create                                                           |
//+------------------------------------------------------------------+
bool CControlsDialog::Create(const long chart,const string name,const int subwin,const int x1,const int y1,const int x2,const int y2)
  {
   if(!CAppDialog::Create(chart,name,subwin,x1,y1,x2,y2))
      return(false);
//--- create dependent controls
   if(!CreateCheckGroup())
      return(false);
//--- succeed
   return(true);
  }
//+------------------------------------------------------------------+
//| Create the "CheckGroup" element                                  |
//+------------------------------------------------------------------+
bool CControlsDialog::CreateCheckGroup(void)
  {
//--- coordinates
   int x1=INDENT_LEFT;
   int y1=INDENT_TOP;
   int x2=x1+BUTTON_WIDTH;
   int y2=ClientAreaHeight()-INDENT_BOTTOM;
//--- create
   if(!m_check_group.Create(m_chart_id,m_name+"CheckGroup",m_subwin,x1,y1,x2,y2))
      return(false);
   if(!Add(m_check_group))
      return(false);
   m_check_group.Alignment(WND_ALIGN_HEIGHT,0,y1,0,INDENT_BOTTOM);
//--- fill out with strings
   if(!m_check_group.AddItem("Mail",1<<0))
      return(false);
   if(!m_check_group.AddItem("Push",1<<1))
      return(false);
   if(!m_check_group.AddItem("Alert",1<<2))
      return(false);
   Comment(__FUNCTION__+" : Value="+IntegerToString(m_check_group.Value()));
//--- succeed
   return(true);
  }
//+------------------------------------------------------------------+
//| Event handler                                                    |
//+------------------------------------------------------------------+
void CControlsDialog::OnChangeCheckGroup(void)
  {
   Comment(__FUNCTION__+" : Value="+IntegerToString(m_check_group.Value()));
  }
//+------------------------------------------------------------------+
私達のパネルのクラスには、設定と非依存的な固定を伴うスイッチャーのプロパティの読み取りのメソッドがない事が分かります。
私達の課題は、メインファイルでNewBar.mq5インディケータを作成し、例えば何かしらのメソッド(Mail、PushまたはAlert)を使用して新しいバーの検出をユーザーに知らせる入力パラメータを追加することです。また、PanelDialog.mqhファイルに、設定メソッドと独立して固定されるMail、Push、Alertを持つスイッチャーのプロパティの読み取りのメソッドを追加する必要があります。
1.3. インディケータを変更する
注:導入する全ての変更は色が付きます。
初めにPanelDialog.mqhファイルを接続する必要があります。
#property indicator_chart_window
#property indicator_plots 0
#include "PanelDialog.mqh"
//+------------------------------------------------------------------+
//| Custom indicator initialization function                         |
//+------------------------------------------------------------------+
int OnInit()
それから入力パラメータを追加します。
#property indicator_chart_window
#property indicator_plots 0
#include "PanelDialog.mqh"
//--- input parameters
input bool     bln_mail=false;      // Notify by email
input bool     bln_push=false;      // Notify by push
input bool     bln_alert=true;      // Notify by alert
//+------------------------------------------------------------------+
//| Custom indicator initialization function                         |
//+------------------------------------------------------------------+
int OnInit()
インディケータをコンパイルし(MetaEditorのF7)、ターミナルでの入力パラメータの表示を確認します。
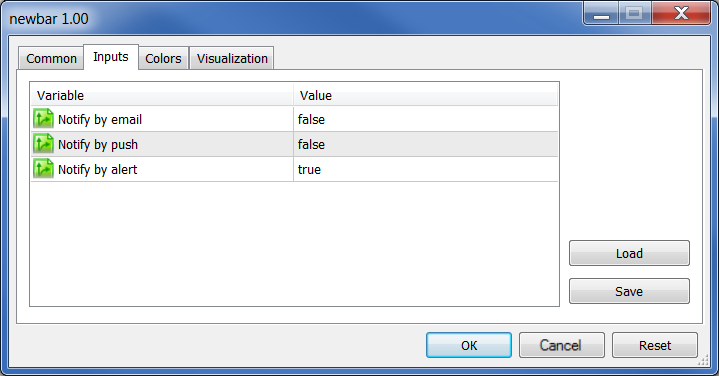
図3. インディケータの入力パラメータ
1.4. パネルを変更する。
パネルに設定メソッドと、独立して固定されるMail、Push、Alertを伴う、スイッチャーの状態プロパティの読み取りメソッドを追加する必要があります。
パネルのクラスに新しいメソッドを追加します。
class CControlsDialog : public CAppDialog
  {
private:
   CCheckGroup       m_check_group;                   // CCheckGroup object

public:
                     CControlsDialog(void);
                    ~CControlsDialog(void);
   //--- create
   virtual bool      Create(const long chart,const string name,const int subwin,const int x1,const int y1,const int x2,const int y2);
   //--- chart event handler
   virtual bool      OnEvent(const int id,const long &lparam,const double &dparam,const string &sparam);
   //--- set check for element
   virtual bool      SetCheck(const int idx,const int value);
   //--- get check for element
   virtual int       GetCheck(const int idx) const;

protected:
   //--- create dependent controls
   bool              CreateCheckGroup(void);
これらのメソッドの実装。
//+------------------------------------------------------------------+
//| Set check for element                                            |
//+------------------------------------------------------------------+
bool CControlsDialog::SetCheck(const int idx,const bool check)
  {
   return(m_check_group.Check(idx,check));
  }
//+------------------------------------------------------------------+
//| Get check for element                                            |
//+------------------------------------------------------------------+
int CControlsDialog::GetCheck(const int idx)
  {
   return(m_check_group.Check(idx));
  }
1.5. パネルとインディケータを組み合わせる最終段階
NewBar.mq5インディケータでは、グローバル変数の宣言領域で私達のパネルのクラスの変数を宣言します。
#property indicator_chart_window
#property indicator_plots 0
#include "PanelDialog.mqh"
//+------------------------------------------------------------------+
//| Global Variables                                                 |
//+------------------------------------------------------------------+
CControlsDialog ExtDialog;
//--- input parameters
input bool     bln_mail=false;      // Notify by email
input bool     bln_push=false;      // Notify by push
input bool     bln_alert=true;      // Notify by alert
インディケータの最後にOnChartEvent()関数を追加します。
//+------------------------------------------------------------------+
//| ChartEvent function                                              |
//+------------------------------------------------------------------+
void OnChartEvent(const int id,
                  const long &lparam,
                  const double &dparam,
                  const string &sparam)
  {
   ExtDialog.ChartEvent(id,lparam,dparam,sparam);
  }
NewBar.mq5インディケータのOnInit()関数でパネルを作成し、入力パラメータに応じたチェックボックスをクリックします。
int OnInit()
  {
//--- indicator buffers mapping
//--- create application dialog
   if(!ExtDialog.Create(0,"Notification",0,50,50,180,160))
      return(INIT_FAILED);
//--- run application
   if(!ExtDialog.Run())
      return(INIT_FAILED);
//---
   ExtDialog.SetCheck(0,bln_mail);
   ExtDialog.SetCheck(1,bln_push);
   ExtDialog.SetCheck(2,bln_alert);
//---
   return(INIT_SUCCEEDED);
  }
これでインディケータとパネルの組み合わせは完了です。パネルのクラスではチャックボックスのオン/オフ状態の設定メソッド(SetCheck)とチェックボックスの状態を取得するメソッド(GetCheck)を実装しました。
2. インディケータとパネルを接続する
2.1. エキスパートアドバイザ
標準配布のものからベースとなるエキスパートアドバイザを取り入れています(\MQL5\Experts\Examples\MACD\MACD Sample.mq5)。
2.2. パネル
最後の変更を行った後のPanelDialog2.mqhパネルは以下のようになります。

図4. 2つ目のパネル
MACD Sample.mq5エキスパートアドバイザとPanelDialog2.mqhパネルの組み合わせの後には何が得られるのでしょうか?エキスパートアドバイザが動作する現在の時間軸では、エキスパートアドバイザのパラメータ (Lots、Trailing Stop Level (in pips)など)を変更することができ、 またエキスパートアドバイザの取引イベントについての通知パラメータ(Mail、Push、Alert)を変更することができます。
変更されたエキスパートアドバイザのパラメータ(Lots、Trailing Stop Level (in pips)など) は、変更を適用するボタンのクリック後に適用されます。エキスパートアドバイザの取引イベントについての通知パラメータ(Mail、Push、Alert)の変更は、自動的に適用され、変更を適用するボタンのクリックは必要ではありません。
2.3. エキスパートアドバイザとパネルには交信が必要

図5. エキスパートアドバイザとパネルの交信
起動時にエキスパートアドバイザは、自分のパラメータをパネルに渡す必要があります。『変更を適用する』をクリックした後にデータが変更された場合、パネルも新しいパラメータを伴うエキスパートアドバイザの初期化の為にエキスパートアドバイザに変更されたパラメータを返す必要があります。
2.4. 第一ステップ。エキスパートアドバイザへの変更
動作プラン:標準配布のものから\MQL5\Experts\Examples\MACD\MACD Sample.mq5エキスパートアドバイザを取り入れ、それを自分のフォルダにコピーしてください。例えば、Notificationフォルダを作成し、そこにエキスパートアドバイザをコピーします。

図6. 新しいフォルダの作成
エキスパートアドバイザのグローバル変数の領域(これらをターミナルのグローバル変数と混同しないようにしてください)で、エキスパートアドバイザの取引動作についての通知を送信する新しい変数を宣言します。これらの変数は、他の外部変数と同様に、接頭辞Inpを持っていることにご注意ください。
#include <Trade\PositionInfo.mqh>
#include <Trade\AccountInfo.mqh>
//--- input parameters
input bool     InpMail=false;          // Notify by email
input bool     InpPush=false;          // Notify by push
input bool     InpAlert=true;          // Notify by alert
//---
input double InpLots          =0.1; // Lots
input int    InpTakeProfit    =50;  // Take Profit (in pips)
エキスパートアドバイザの全ての外部変数のバックアップを後で追加します。バックアップは接頭辞Extを持ちます。
input int    InpMACDCloseLevel=2;   // MACD close level (in pips)
input int    InpMATrendPeriod =26;  // MA trend period
//--- ext variables
bool           ExtMail;
bool           ExtPush;
bool           ExtAlert;

double         ExtLots;
int            ExtTakeProfit;
int            ExtTrailingStop;
int            ExtMACDOpenLevel;
int            ExtMACDCloseLevel;
int            ExtMATrendPeriod;
//---
int ExtTimeOut=10; // time out in seconds between trade operations
//+------------------------------------------------------------------+
//| MACD Sample expert class                                         |
//+------------------------------------------------------------------+
OnInit()でエキスパートアドバイザの外部変数からのコピー値を変数のバックアップ値に書き込みます。
//| Expert initialization function                                   |
//+------------------------------------------------------------------+
int OnInit(void)
  {
   ExtMail=InpMail;
   ExtPush=InpPush;
   ExtAlert=InpAlert;

   ExtLots=InpLots;
   ExtTakeProfit=InpTakeProfit;
   ExtTrailingStop=InpTrailingStop;
   ExtMACDOpenLevel=InpMACDOpenLevel;
   ExtMACDCloseLevel=InpMACDCloseLevel;
   ExtMATrendPeriod=InpMATrendPeriod;
//--- create all necessary objects
   if(!ExtExpert.Init())
この段階でエキスパートアドバイザのCSampleExpert::InitIndicators、CSampleExpert::InitCheckParameters、CSampleExpert::Init関数では、接頭辞Inpを持つエキスパートアドバイザの外部変数を使用します。これらの関数では外部変数をそれらのバックアップの置換える必要があります(接頭辞Extを持つバックアップ)。十分に独創的な方法でこれを行います。
置き換え後は、動作(ファイルのコンパイル)の正確さを必ずチェックする必要があります。エラーがないようにしましょう。
2.5. 第二ステップ。パネルへの変更。
図4のパネルは空白です。ここにはまだ、エキスパートアドバイザと交信する関数も、入力データを処理する関数もありません。パネルの空ファイルPanelDialog2Original.mqhもNotificationフォルダにコピーします。
パネルのクラスに、全ての入力データの状態を保存する内部変数を追加します。mModification変数に注意をしてください。これについては項目2.7で説明します。
private:
   //--- get check for element
   virtual int       GetCheck(const int idx);
   //---
   bool              mMail;
   bool              mPush;
   bool              mAlert_;
   double            mLots;               // Lots
   int               mTakeProfit;         // Take Profit (in pips)
   int               mTrailingStop;       // Trailing Stop Level (in pips)
   int               mMACDOpenLevel;      // MACD open level (in pips)
   int               mMACDCloseLevel;     // MACD close level (in pips)
   int               mMATrendPeriod;      // MA trend period
   //---
   bool              mModification;       // Values have changed
  };
//+------------------------------------------------------------------+
//| Event Handling                                                   |
このあとすぐにパネルのクラスのコンストラクタで内部変数を初期化します。
//+------------------------------------------------------------------+
//| Constructor                                                      |
//+------------------------------------------------------------------+
CControlsDialog::CControlsDialog(void) : mMail(false),
                                         mPush(false),
                                         mAlert_(true),
                                         mLots(0.1),
                                         mTakeProfit(50),
                                         mTrailingStop(30),
                                         mMACDOpenLevel(3),
                                         mMACDCloseLevel(2),
                                         mMATrendPeriod(26),
                                         mModification(false)
  {
  }
//+------------------------------------------------------------------+
//| Destructor                                                       |
CControlsDialog::Create関数に内部変数に対応するスイッチャーの要素群の設定を追加します。
if(!CreateButtonOK())
      return(false);

//---
   SetCheck(0,mMail);
   SetCheck(1,mPush);
   SetCheck(2,mAlert_);

//--- succeed
   return(true);
  }
2.6. 第三ステップ。エキスパートアドバイザへの変更。
ここまでエキスパートアドバイザとパネルは、互いのファイルから独立した二つの別個のものです。これらを組み合わせて、私達のパネルExtDialogのクラスの変数を宣言します。
#include <Trade\PositionInfo.mqh>
#include <Trade\AccountInfo.mqh>
#include "PanelDialog2Original.mqh"
//+------------------------------------------------------------------+
//| Global Variables                                                 |
//+------------------------------------------------------------------+
CControlsDialog ExtDialog;
//--- input parameters
input bool     InpMail=false;          // Notify by email
input bool     InpPush=false;          // Notify by push
パネルが動作を開始し、見えるようにする為には、これを作成し実行する必要があります。また、ChartEventイベントハンドラであるOnChartEvent()関数とOnDeinit()関数を追加する必要があります。エキスパートアドバイザのOnInit()はこのようになります。
int OnInit(void)
  {
   ExtMail=InpMail;
   ExtPush=InpPush;
   ExtAlert=InpAlert;

   ExtLots=InpLots;
   ExtTakeProfit=InpTakeProfit;
   ExtTrailingStop=InpTrailingStop;
   ExtMACDOpenLevel=InpMACDOpenLevel;
   ExtMACDCloseLevel=InpMACDCloseLevel;
   ExtMATrendPeriod=InpMATrendPeriod;
//--- create all necessary objects
   if(!ExtExpert.Init())
      return(INIT_FAILED);
//--- create application dialog
   if(!ExtDialog.Create(0,"Notification",0,100,100,360,380))
      return(INIT_FAILED);
//--- run application
   if(!ExtDialog.Run())
      return(INIT_FAILED);
//--- succeed
   return(INIT_SUCCEEDED);
  }
OnDeinit()で私達のパネルを壊し、OnDeinit()関数自体をOnInit()の後にすぐ書き込みます。
//--- succeed
   return(INIT_SUCCEEDED);
  }
//+------------------------------------------------------------------+
//| Expert deinitialization function                                 |
//+------------------------------------------------------------------+
void OnDeinit(const int reason)
  {
//---
   Comment("");
//--- destroy dialog
   ExtDialog.Destroy(reason);
  }
//+------------------------------------------------------------------+
//| Expert new tick handling function                                |
//+------------------------------------------------------------------+
void OnTick(void)
OnChartEvent()関数をエキスパートアドバイザの最後(OnTick関数の後)に追加します。
//--- change limit time by timeout in seconds if processed
         if(ExtExpert.Processing())
            limit_time=TimeCurrent()+ExtTimeOut;
        }
     }
  }
//+------------------------------------------------------------------+
//| ChartEvent function                                              |
//+------------------------------------------------------------------+
void OnChartEvent(const int id,
                  const long &lparam,
                  const double &dparam,
                  const string &sparam)
  {
   ExtDialog.ChartEvent(id,lparam,dparam,sparam);
  }
//+------------------------------------------------------------------+
これで、エキスパートアドバイザをコンパイルし、チャート上でチェックすることができます。エキスパートアドバイザはパネルと一緒に起動します。

図7. パネルを持つエキスパートアドバイザ
2.7. 第四ステップ。パネルへの変更。大統合。
初めにエキスパートアドバイザが起動し、それからユーザーがその入力パラメータを設定し、その後でパネルが起動します。これ故に、パネルでパネルとエキスパートアドバイザの間のデータ交換の為の機能を設ける必要があります。
Initialization()メソッドを追加します。このメソッドはパラメータを受け取り、これらのパラメータでパネルの内部変数を初期化します。宣言:
virtual bool      OnEvent(const int id,const long &lparam,const double &dparam,const string &sparam);
      //--- initialization
   virtual bool      Initialization(const bool Mail,const bool Push,const bool Alert_,
                                    const double Lots,const int TakeProfit,
                                    const int  TrailingStop,const int MACDOpenLevel,
                                    const int  MACDCloseLevel,const int MATrendPeriod);

protected:
   //--- create dependent controls
   bool              CreateCheckGroup(void);
メソッド自体(CControlsDialog::GetCheckの前に入れます)。
//+------------------------------------------------------------------+
//| Initialization                                                   |
//+------------------------------------------------------------------+
bool CControlsDialog::Initialization(const bool Mail,const bool Push,const bool Alert_,
                                     const double Lots,const int TakeProfit,
                                     const int  TrailingStop,const int MACDOpenLevel,
                                     const int  MACDCloseLevel,const int MATrendPeriod)
  {
   mMail=Mail;
   mPush=Push;
   mAlert_=Alert_;

   mLots=Lots;
   mTakeProfit=TakeProfit;
   mTrailingStop=TrailingStop;
   mMACDOpenLevel=MACDOpenLevel;
   mMACDCloseLevel=MACDCloseLevel;
   mMATrendPeriod=MATrendPeriod;
//---
   return(true);
  }
//+------------------------------------------------------------------+
//| Get check for element                                            |
//+------------------------------------------------------------------+
int CControlsDialog::GetCheck(const int idx)
パネルの内部変数がデータで初期化された為、パネルの制御要素(入力欄)を正確に記入する必要があります。入力欄は6つあるので、m_edit1をベースにした例を引用します。テキストが割り当てられた文字列は以下のようになります。
...
   if(!m_edit1.Text("Edit1"))
...
そしてこうなりました。
...
   if(!m_edit1.Text(DoubleToString(mLots,2)))
...
このように、各入力欄にそれぞれの内部変数があります。
次のメソッド — GetValues()は、内部変数の値を返します。
virtual bool      Initialization(const bool Mail,const bool Push,const bool Alert_,
                                    const double Lots,const int TakeProfit,
                                    const int  TrailingStop,const int MACDOpenLevel,
                                    const int  MACDCloseLevel,const int MATrendPeriod);
   //--- get values
   virtual void      GetValues(bool &Mail,bool &Push,bool &Alert_,
                               double &Lots,int &TakeProfit,
                               int &TrailingStop,int &MACDOpenLevel,
                               int &MACDCloseLevel,int &MATrendPeriod);

protected:
   //--- create dependent controls
   bool              CreateCheckGroup(void);
この本体をCControlsDialog::Initialization())の後に入れます。
//+------------------------------------------------------------------+
//| Get values                                                       |
//+------------------------------------------------------------------+
void CControlsDialog::GetValues(bool &Mail,bool &Push,bool &Alert_,
                                double &Lots,int &TakeProfit,
                                int &TrailingStop,int &MACDOpenLevel,
                                int &MACDCloseLevel,int &MATrendPeriod)
  {
   Mail=mMail;
   Push=mPush;
   Alert_=mAlert_;

   Lots=mLots;
   TakeProfit=mTakeProfit;
   TrailingStop=mTrailingStop;
   MACDOpenLevel=mMACDOpenLevel;
   MACDCloseLevel=mMACDCloseLevel;
   MATrendPeriod=mMATrendPeriod;
  }
//+------------------------------------------------------------------+
//| Get check for element                                            |
//+------------------------------------------------------------------+
int CControlsDialog::GetCheck(const int idx)
パネルがエキスパートアドバイザの任意の取引動作に応じてメッセージを送信するので、これを実行する特別なメソッドが必要になります。これを宣言します。
virtual void      GetValues(bool &Mail,bool &Push,bool &Alert_,
                               double &Lots,int &TakeProfit,
                               int &TrailingStop,int &MACDOpenLevel,
                               int &MACDCloseLevel,int &MATrendPeriod);   //--- send notifications
   virtual void      Notifications(const string text);

protected:
   //--- create dependent controls
   bool              CreateCheckGroup(void);
この本体をCControlsDialog::GetValues())の後に入れます。
//+------------------------------------------------------------------+
//|  Send notifications                                              |
//+------------------------------------------------------------------+
void CControlsDialog::Notifications(const string text)
  {
   int i=m_check_group.ControlsTotal();
   if(GetCheck(0))
      SendMail(" ",text);
   if(GetCheck(1))
      SendNotification(text);
   if(GetCheck(2))
      Alert(text);
  }
//+------------------------------------------------------------------+
//| Get check for element                                            |
//+------------------------------------------------------------------+
int CControlsDialog::GetCheck(const int idx)
mModificationは(項目2.5で述べたもの)はパネルでパラメータの変更が行われたか、内部変数が導入されたかを記録する為に使用されます。
virtual void      Notifications(const string text);
   //---
   virtual bool      Modification(void) const { return(mModification);          }
   virtual void      Modification(bool value) { mModification=value;            }

protected:
   //--- create dependent controls
   bool              CreateCheckGroup(void);
変更の制御は『変更を適用する』ボタンのクリックを処理するCControlsDialog::OnClickButtonOKで行われます。
//+------------------------------------------------------------------+
//| Event handler                                                    |
//+------------------------------------------------------------------+
void CControlsDialog::OnClickButtonOK(void)
  {
//--- verifying changes
   if(m_check_group.Check(0)!=mMail)
      mModification=true;
   if(m_check_group.Check(1)!=mPush)
      mModification=true;
   if(m_check_group.Check(2)!=mAlert_)
      mModification=true;

   if(StringToDouble(m_edit1.Text())!=mLots)
     {
      mLots=StringToDouble(m_edit1.Text());
      mModification=true;
     }
   if(StringToInteger(m_edit2.Text())!=mTakeProfit)
     {
      mTakeProfit=(int)StringToDouble(m_edit2.Text());
      mModification=true;
     }
   if(StringToInteger(m_edit3.Text())!=mTrailingStop)
     {
      mTrailingStop=(int)StringToDouble(m_edit3.Text());
      mModification=true;
     }
   if(StringToInteger(m_edit4.Text())!=mMACDOpenLevel)
     {
      mMACDOpenLevel=(int)StringToDouble(m_edit4.Text());
      mModification=true;
     }
   if(StringToInteger(m_edit5.Text())!=mMACDCloseLevel)
     {
      mMACDCloseLevel=(int)StringToDouble(m_edit5.Text());
      mModification=true;
     }
   if(StringToInteger(m_edit6.Text())!=mMATrendPeriod)
     {
      mMATrendPeriod=(int)StringToDouble(m_edit6.Text());
      mModification=true;
     }
  }
またパネルはハンドラで入力データをチェックします。
void              OnChangeCheckGroup(void);
   void              OnChangeEdit1(void);
   void              OnChangeEdit2(void);
   void              OnChangeEdit3(void);
   void              OnChangeEdit4(void);
   void              OnChangeEdit5(void);
   void              OnChangeEdit6(void);
   void              OnClickButtonOK(void);
これらの説明を記述します。
2.8. 第五ステップ。エキスパートアドバイザへの変更。最後の編集。
この時点でパネルはストラテジーテスターで動作していない為、 bool_tester内部変数を保護する必要があります。
//---
int ExtTimeOut=10; // time out in seconds between trade operations
bool           bool_tester=false;      // true - mode tester
//+------------------------------------------------------------------+
//| MACD Sample expert class                                         |
//+------------------------------------------------------------------+
class CSampleExpert
OnInit()に変更を加え、ストラテジーテスターでの起動から保護し、パネルの可視化前にパラメータを初期化します。
//--- create all necessary objects
   if(!ExtExpert.Init())
      return(INIT_FAILED);
//---
   if(!MQLInfoInteger(MQL_TESTER))
     {
      bool_tester=false;
      //---
      ExtDialog.Initialization(ExtMail,ExtPush,ExtAlert,
                               ExtLots,ExtTakeProfit,ExtTrailingStop,
                               ExtMACDOpenLevel,ExtMACDCloseLevel,ExtMATrendPeriod);
      //--- create application dialog
      if(!ExtDialog.Create(0,"Notification",0,100,100,360,380))
         return(INIT_FAILED);
      //--- run application
      if(!ExtDialog.Run())
         return(INIT_FAILED);
     }
   else
      bool_tester=true;
//--- secceed
   return(INIT_SUCCEEDED);
  }
OnChartEvent()でパネルでパラメータの変更があったかをチェックします。もし変更があった場合は、新しいパラメータを持つエキスパートアドバイザの初期化を実行する必要があります。
//+------------------------------------------------------------------+
//| ChartEvent function                                              |
//+------------------------------------------------------------------+
void OnChartEvent(const int id,
                  const long &lparam,
                  const double &dparam,
                  const string &sparam)
  {
   ExtDialog.ChartEvent(id,lparam,dparam,sparam);
// 次にパネルでbool変数を調べます(パラメータが変更されたかどうか)
// もしパラメータが変更された場合は、パネルのパラメータをリクエストし呼び出します
// CSampleExpert::Init(void)
   if(ExtDialog.Modification())
     {
      ExtDialog.GetValues(ExtMail,ExtPush,ExtAlert,
                          ExtLots,ExtTakeProfit,ExtTrailingStop,
                          ExtMACDOpenLevel,ExtMACDCloseLevel,ExtMATrendPeriod);
      if(ExtExpert.Init())
        {
         ExtDialog.Modification(false);
         Print("パラメータは変更されました, ",ExtLots,", ",ExtTakeProfit,", ",ExtTrailingStop,", ",
               ExtMACDOpenLevel,", ",ExtMACDCloseLevel,", ",ExtMATrendPeriod);
        }
      else
        {
         ExtDialog.Modification(false);
         Print("パラメータの変更エラー");
        }
     }
  }
//+------------------------------------------------------------------+
まとめ
パネルとインディケータの接続は簡単なものであることが分かりました。この為には、パネルのクラスで全機能(制御要素の位置とサイズ、イベントに対するリアクション)を実装し、インディケータで私達のパネルのクラスの変数を宣言しOnChartEvent()関数を追加する必要があります。
より複雑なパネルを持つエキスパートアドバイザとの接続は、エキスパートアドバイザとパネルの『交信』の必要性からより難しい課題となりました。多くの段階での課題の難しさは、どれだけパネルが接続への準備ができているかによって異なります。言い換えれば、パネルで機能と関数の他のプログラムとの統合が初めから実装されていればいるほど、パネルを他のプログラム(インディケータやエキスパートアドバイザ)と接続しやすくなります。
記事への添付ファイル:
- NewBarOriginal.mq5 — インディケータの初期ファイル。
- PanelDialogOriginal.mqh — パネルの初期ファイル。
- NewBar.mq5 — インディケータの変更されたファイル。
- PanelDialog.mqh — パネルの変更されたファイル。
- PanelDialog2Original.mqh — 二つ目のパネルの初期ファイル。
- PanelDialog2.mqh — 二つ目のパネルの変更されたファイル。
- MACD Sample.mq5 — エキスパートアドバイザの変更されたファイル。
MetaQuotes Ltdによってロシア語から翻訳されました。
元の記事: https://www.mql5.com/ru/articles/2171
警告: これらの資料についてのすべての権利はMetaQuotes Ltd.が保有しています。これらの資料の全部または一部の複製や再プリントは禁じられています。
この記事はサイトのユーザーによって執筆されたものであり、著者の個人的な見解を反映しています。MetaQuotes Ltdは、提示された情報の正確性や、記載されているソリューション、戦略、または推奨事項の使用によって生じたいかなる結果についても責任を負いません。

 領域法
領域法
 ビル・ウィリアムズのシステムに基づく取引システムモジュール
 トレーダーの為のライフハック:1つのバックテストは良いが、4つは更に良い
 ユニバーサルEA:シグナルの標準メタトレーダーモジュールとの統合(その7)
- 無料取引アプリ
- 8千を超えるシグナルをコピー
- 金融ニュースで金融マーケットを探索
分かってはいるんだけど!
私はずっと前の古い端末はサポートしていません。
#include <Controls\Panel.mqh>
#include <Controls\Edit.mqh>
// #include <ControlsDefines.mqh>
#include <Controls\Button.mqh>
取引、自動取引システム、取引戦略のテストに関するフォーラム
Expert Advisorの設定を更新すると、パネルが離れてしまうのはなぜですか?
Andrey Khatimlianskii, 2016.03.10 13:17
だいたいこんな感じです:
"OnCalculate()関数内で宣言されたprev_timestatictoday 変数"
タイプミス。today変数ではなく、static変数だ。