

Introduction
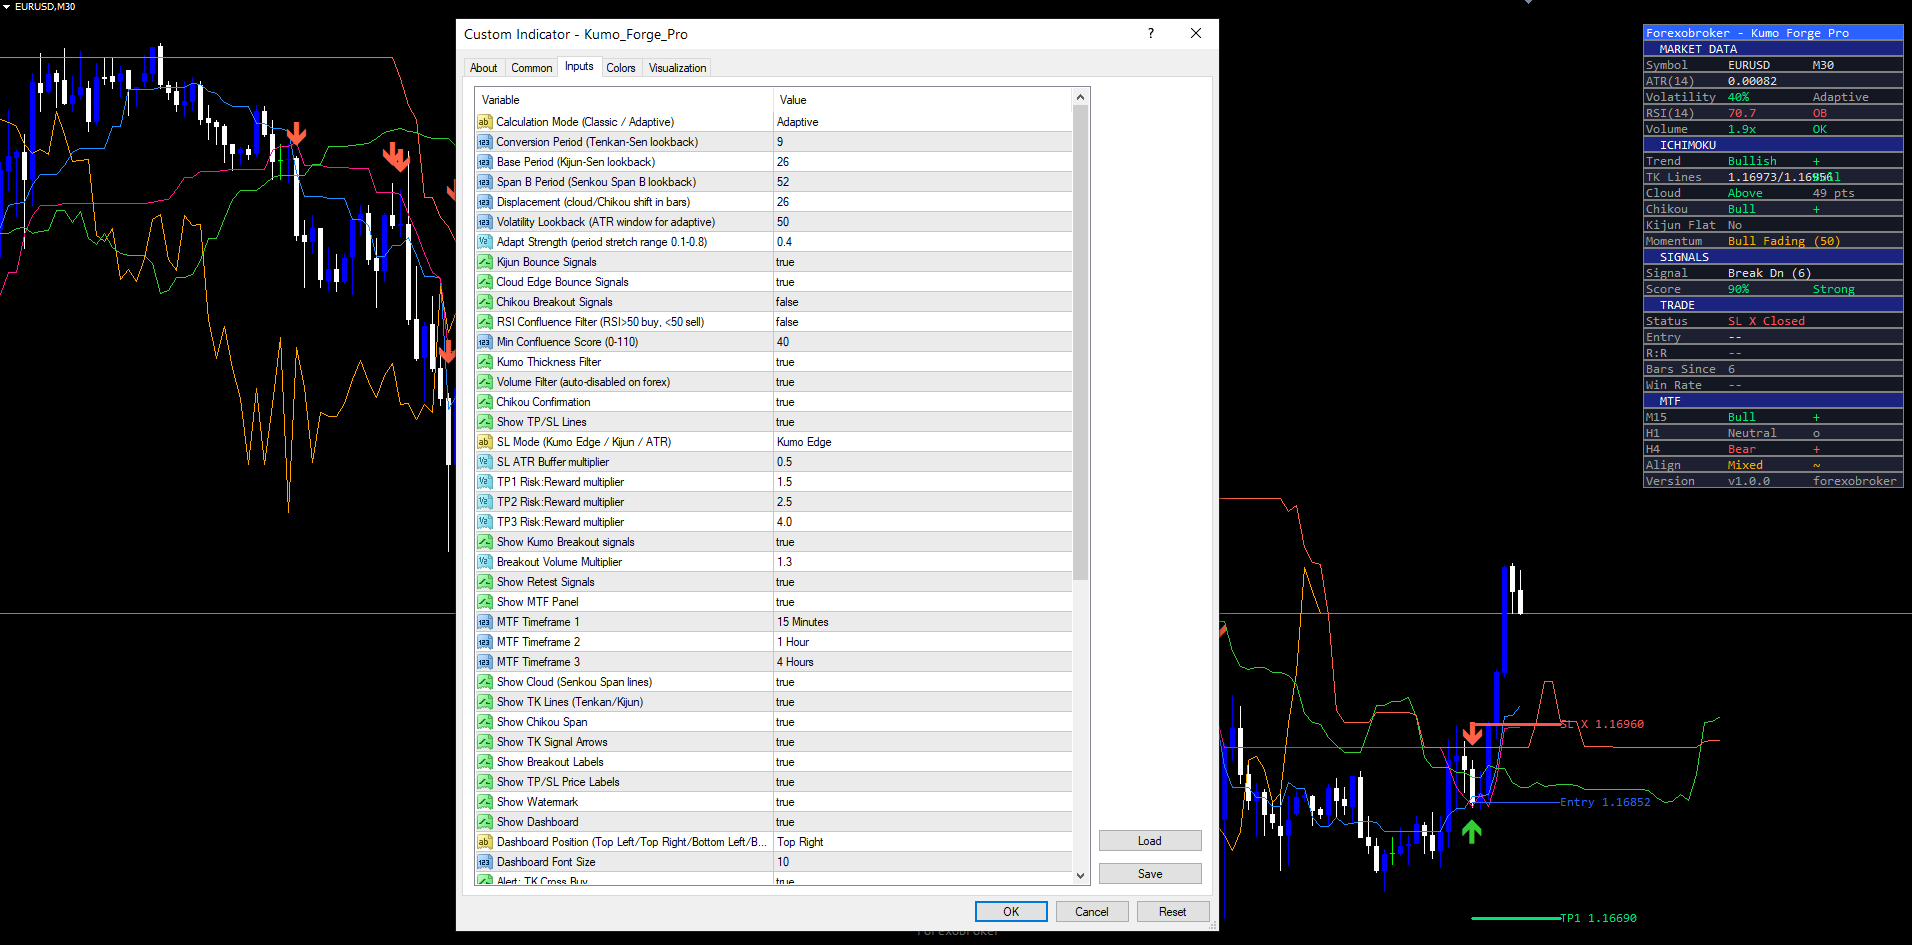
The Kumo Forge Pro indicator is a non-repainting adaptive Ichimoku trading system for MetaTrader 4 and MetaTrader 5. It combines classic and ATR-adaptive Ichimoku calculations with five distinct signal types, a 9-factor confluence scoring engine (0-110 points), a Momentum Pulse Engine, Smart TP/SL management, and a comprehensive multi-timeframe dashboard -- all in a single overlay indicator.
Key Features:
- Adaptive/Classic Ichimoku Engine: ATR-based period scaling that reacts faster in volatile markets and slower in quiet ones, with a one-click toggle to Classic mode
- 5 Signal Types: TK Cross, Kijun Bounce, Cloud Edge Bounce, Kumo Breakout, and Chikou Breakout -- each with independent enable/disable controls
- 9-Factor Confluence Scoring (0-110): Price vs Cloud, TK alignment, Chikou confirmation, Cloud direction, Kumo thickness, Volume, Momentum alignment, Momentum acceleration, and optional RSI -- combined into a single quality score with Strong/Standard/Weak grading
- Momentum Pulse Engine (-100 to +100): Real-time momentum gauge combining TK spread, TK acceleration, and cloud slope into one smoothed reading
- Smart TP/SL System: Three SL modes (Kumo Edge, Kijun, ATR), three TP levels (1.5x, 2.5x, 4.0x default), hit tracking with win rate statistics
- 22-28 Row Dashboard: Five organized sections (Market Data, Ichimoku, Signals, Trade, MTF) with color-coded real-time status
- 23 Alert Conditions + Webhook JSON: Comprehensive alert coverage for every signal type, TP/SL hits, trend changes, MTF alignment, and strong signals with optional JSON output for webhook integrations
- Non-Repainting Design: All signals fire on confirmed bar close only and never disappear or reposition
Download the indicator:
- MetaTrader 5: Kumo Forge PRO MT5
- MetaTrader 4: Kumo Forge PRO MT4
TIP: This indicator is designed for traders who want a comprehensive Ichimoku-based trading system that adapts to market volatility. It works on any symbol and any timeframe available in MetaTrader.
Understanding Adaptive Ichimoku
Traditional Ichimoku Kinko Hyo uses fixed lookback periods (9, 26, 52) originally calibrated for the Japanese six-day trading week. These static periods do not account for changes in market volatility. Kumo Forge Pro solves this with an ATR-based adaptive engine that dynamically scales all Ichimoku periods based on current market conditions.
In high-volatility environments the adaptive engine shortens lookback periods for faster reaction; in low-volatility environments it lengthens them to filter noise. The result is an Ichimoku system that automatically calibrates itself.
The 5 Ichimoku Components:
- Tenkan-Sen (Conversion Line): Midpoint of the highest high and lowest low over the Conversion Period (default 9). In Adaptive mode, scales with volatility within the range defined by Adapt Strength
- Kijun-Sen (Base Line): Midpoint over the Base Period (default 26). Serves as dynamic support/resistance and the primary trend reference
- Senkou Span A (Leading Span A): Average of Tenkan-Sen and Kijun-Sen, plotted forward by the Displacement period (default 26). Forms one edge of the Kumo cloud
- Senkou Span B (Leading Span B): Midpoint over the Span B Period (default 52), plotted forward by Displacement. Forms the other edge of the Kumo cloud
- Chikou Span (Lagging Span): Current closing price plotted backward by the Displacement period. Confirms trend direction by comparing current price to historical price
ATR Scaling Mechanism:
The adaptive engine measures ATR(14) over a configurable Volatility Lookback window (default 50 bars) and calculates where current ATR sits within its recent range (0-100%). This ratio scales each Ichimoku period within bounds set by Adapt Strength (default 0.4 = +/-40%). During a trending breakout the Conversion Period might drop from 9 to 5 for faster reaction; during consolidation it might expand to 13 to filter noise. The practical benefit is fewer false signals in choppy markets and faster reaction during genuine trends.
NOTE: You can switch to Classic mode at any time by setting Calculation Mode to "Classic." This uses the standard fixed periods with no adaptive scaling.
Installation Guide
Kumo Forge Pro is distributed through the MQL5.com Market. Installation is automatic.
- Purchase the indicator from the MQL5 Market product page
- The indicator installs automatically into your MetaTrader terminal
- Press Ctrl+N to open the Navigator panel, expand Indicators > Market
- Drag Kumo_Forge_Pro onto any chart, adjust parameters, and click OK
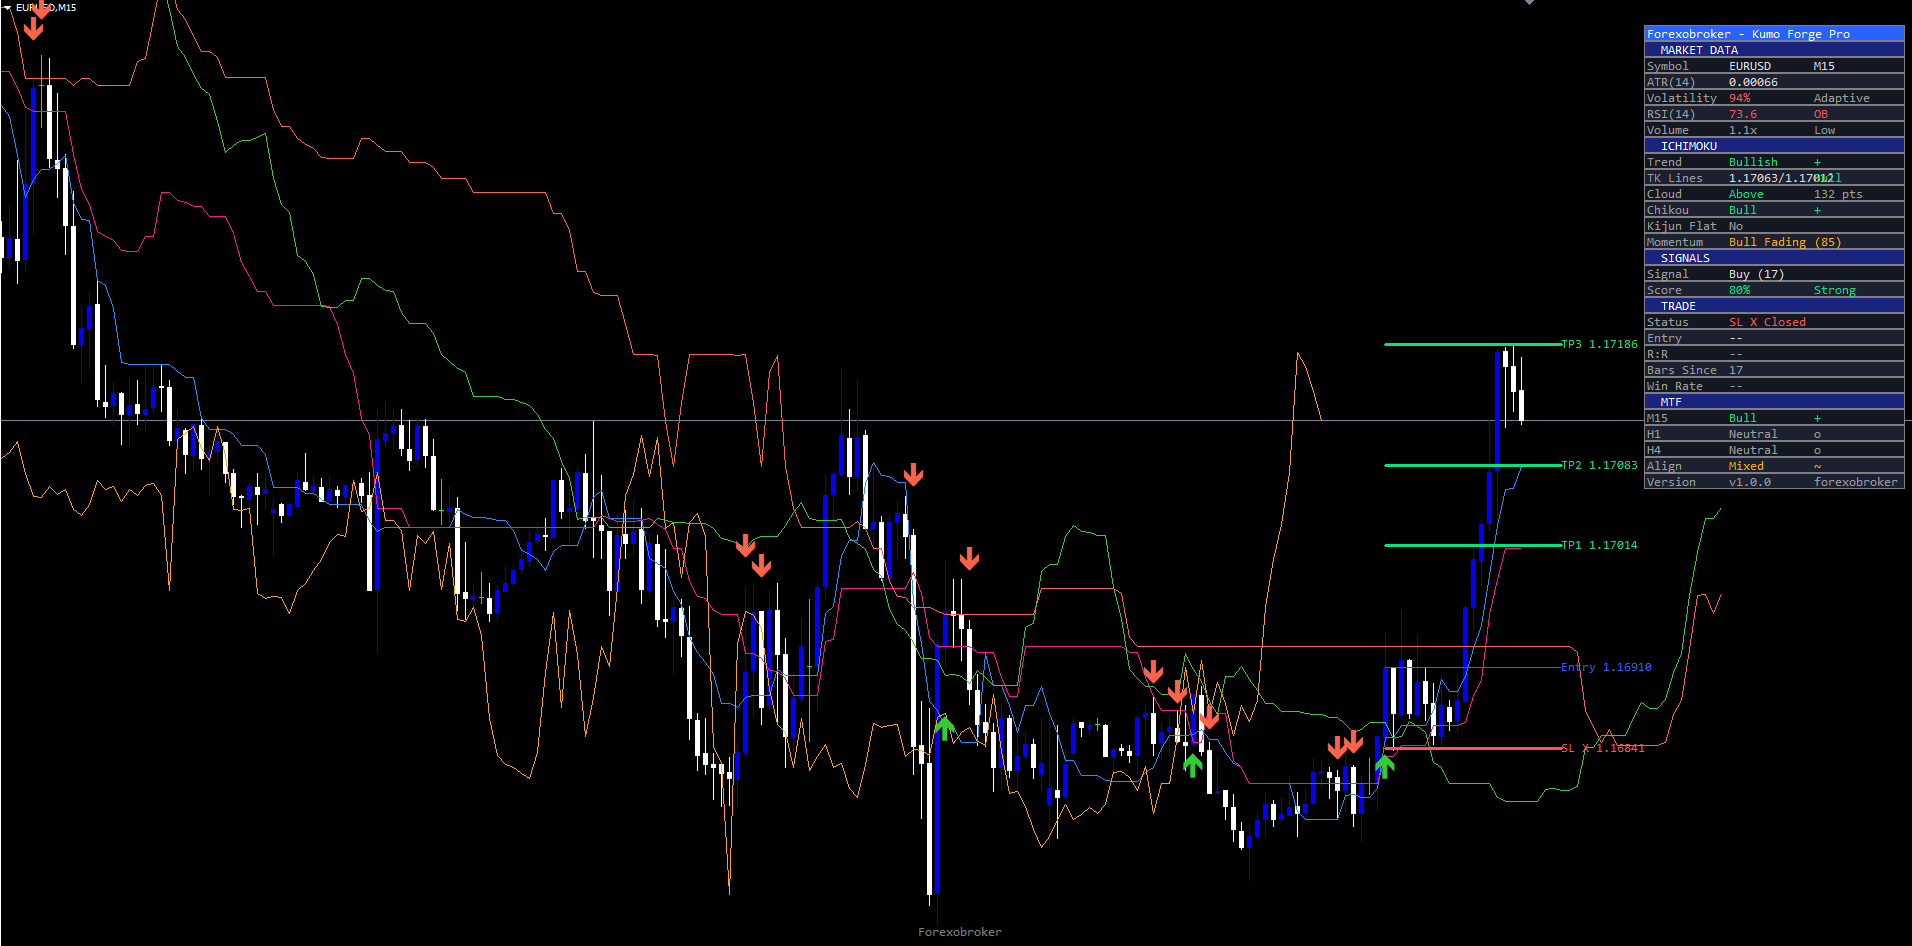
After loading you will see the Kumo Cloud fill (green bullish / red bearish), Tenkan-Sen (blue) and Kijun-Sen (pink) lines, Chikou Span (orange), signal labels with confluence scores, breakout diamonds (cyan), Kijun Bounce and Cloud Edge Bounce triangles, TP/SL horizontal lines with price labels, and the dashboard panel.
IMPORTANT: Do not manually copy files to the data folder. The MQL5 Market handles all file placement and updates automatically.
The indicator auto-detects your chart theme and adjusts colors (override via the Theme parameter). First load may take a few seconds while processing historical bars.
Signal System Overview
Kumo Forge Pro generates five distinct signal types, each capturing a different Ichimoku trading setup. All signals require confirmed bar close and must pass the confluence score threshold before appearing on the chart.
Signal Type 1: TK Cross
The primary signal type. A BUY signal fires when Tenkan-Sen crosses above Kijun-Sen with sufficient confluence. A SELL signal fires when Tenkan-Sen crosses below Kijun-Sen with sufficient confluence.
Visual: Green "Long XX%" or red "Short XX%" label. The percentage is the confluence score.
Signal Type 2: Kijun Bounce
A support/resistance bounce off the Kijun-Sen line in trending markets. BUY requires price low touching Kijun from above, close remaining above Kijun, price above cloud, TK bullish, filters pass, and confluence score meets threshold. SELL mirrors for shorts.
Visual: Small green/red triangle labeled "KB" below/above the bar.
Signal Type 3: Cloud Edge Bounce
A bounce off the Kumo cloud edge confirming the prevailing trend. BUY requires price above cloud, low touching cloud top edge (within 1% ATR tolerance), close remaining above cloud top, TK bullish, Volume filter pass.
Visual: Small cyan triangle labeled "CB" below/above the bar.
Signal Type 4: Kumo Breakout
A decisive break through the Kumo cloud, confirmed by above-average volume. BUY requires close breaking above Kumo top with previous close at or below Kumo top, and volume exceeding SMA * Breakout Vol Mult (default 1.3).
Visual: Cyan diamond labeled "BK Up" or "BK Dn". Retest detection (if enabled) identifies price returning to cloud edge within 10 bars as a secondary entry opportunity (small cyan circles).
Signal Type 5: Chikou Breakout
A breakout signal based on the Chikou Span crossing past price action. Disabled by default because it provides delayed confirmation. BUY requires Chikou crossing above historical price with price above cloud.
Visual: Small orange cross below/above the bar.
How Multiple Signal Types Interact
When multiple signal types fire on the same bar, each generates its own visual element. The Smart TP/SL engine treats them as a single trade entry -- the last signal processed determines the entry price and TP/SL levels. Signal priority: TK Cross > Kumo Breakout > Kijun Bounce > Cloud Bounce > Chikou Breakout. Alerts fire independently for each signal type.
Confluence Score Display
Each TK Cross label shows the confluence score (e.g., "Long 78%"). Grades: Strong (80+) = high probability, fewer but more reliable; Standard (50-79) = moderate, most signals fall here; Weak (<50) = low probability, consider waiting.
Non-Repainting Confirmation
All signals fire on confirmed bar close only. Once a signal appears it is permanent. The indicator requires ~78 bars warmup (Span B + Displacement). TP/SL hit tracking runs on confirmed bars only. The MTF panel uses lookahead_off equivalent logic, updating only when the higher-timeframe bar closes.
Adaptive Engine Configuration
These parameters control the adaptive volatility scaling. They are in the "Adaptive Engine" input group.
| Parameter | Default | Description |
|---|---|---|
| Calculation Mode | Adaptive | "Classic" (fixed periods) or "Adaptive" (ATR-scaled periods) |
| Conversion Period | 9 | Tenkan-Sen lookback. In Adaptive mode, scales within +/-40% (5-13 bars at default strength) |
| Base Period | 26 | Kijun-Sen lookback. Primary trend reference period |
| Span B Period | 52 | Senkou Span B lookback. Longer values produce a thicker cloud |
| Displacement | 26 | Bars to shift cloud forward and Chikou backward |
| Source | close | Price source for calculations (close, open, high, low, hl2, hlc3, etc.) |
| Volatility Lookback | 50 | ATR measurement window. Higher = smoother adaptation |
| Adapt Strength | 0.4 | Period stretch range as decimal (0.1 = minimal, 0.8 = aggressive) |
With defaults (Conversion=9, Adapt Strength=0.4): low volatility expands to 13, high volatility contracts to 5, midpoint stays at 9. Base Period ranges 16-36, Span B ranges 31-73. A safety clamp ensures no period drops below 3 bars.
The dashboard Volatility row shows the current ratio: green (<40%, low volatility, longer periods), amber (40-70%, moderate), red (>70%, high volatility, shorter periods), plus "Adaptive" or "Fixed" mode label.
TIP: If you find the adaptive mode too sensitive during news events, increase Volatility Lookback to 100 or reduce Adapt Strength to 0.2. For a more responsive system on lower timeframes, try Adapt Strength = 0.6.
Confluence Filter Configuration
The confluence scoring engine evaluates nine factors and produces a score from 0 to 110. A signal is only generated when the score meets or exceeds the Min Confluence Score threshold.
The 9 Confluence Factors
| # | Factor | Max Points | Description |
|---|---|---|---|
| 1 | Price vs Cloud | 20 | 20 if price on correct side of cloud; 8 if inside cloud; 0 if wrong side |
| 2 | TK Alignment | 15 | 15 if Tenkan-Kijun direction matches signal direction |
| 3 | Chikou Confirmation | 15 | 15 if Chikou Span confirms trend direction against historical price |
| 4 | Cloud Direction | 10 | 10 if future cloud is expanding in the trade direction (Span A slope vs Span B slope) |
| 5 | Kumo Thickness | 8 | 8 if cloud >= 30% of its 50-bar average thickness; 2 if thin |
| 6 | Volume | 10 | 10 if volume > 1.2x 20-bar SMA. Auto-awards 10 when volume data unavailable (forex) |
| 7 | Momentum Alignment | 12 | 12 if strongly aligned (>+20 / <-20); 6 for mild alignment; 0 if opposing |
| 8 | Momentum Acceleration | 10 | 10 if momentum is accelerating in trade direction (rising for BUY, falling for SELL) |
| 9 | RSI Alignment | 10 | Optional (off by default). 10 if RSI(14) > 50 for BUY or < 50 for SELL |
Maximum score is 100 without RSI, 110 with RSI enabled. Grade thresholds are based on raw score, not percentage: 80+ = Strong, 50-79 = Standard, <50 = Weak. Enabling RSI makes it slightly easier to achieve higher scores but does not change grade boundaries.
Example: BUY on EUR/USD H1 -- price above cloud (+20), TK bullish (+15), Chikou (+15), cloud expanding (+10), thick (+8), volume low (+0), momentum +35 (+12), accelerating (+10) = 90/100 = Strong.
Filter Toggles
| Parameter | Default | Description |
|---|---|---|
| Min Confluence Score | 40 | Minimum score (0-110) to generate any signal. Set to 0 to see all signals |
| Kumo Thickness Filter | true | Suppresses all signals when cloud < 30% of 50-bar average thickness |
| Volume Filter | true | Requires current volume > 1.2x the 20-bar average. Auto-disabled on forex without volume data |
| Chikou Confirmation | true | Requires Chikou Span to confirm trend direction |
| RSI Confluence Filter | false | Adds RSI(14) alignment as a 10-point factor |
| Show Kumo Breakouts | true | Enable/disable Kumo Breakout signal detection |
| Breakout Vol Mult | 1.3 | Volume must exceed SMA * this multiplier for a breakout to be valid |
| Show Retest Signals | true | Enable retest detection within 10 bars of a Kumo breakout |
Risk Management Setup
Kumo Forge Pro calculates stop loss and three take profit levels automatically for every signal. These levels are drawn on the chart as horizontal lines with price labels.
Stop Loss Modes
| SL Mode | Description | Example (BUY at 1.08500, ATR = 0.00150) |
|---|---|---|
| Kumo Edge | SL at nearest cloud boundary minus ATR buffer | Cloud bottom 1.08200 - (ATR * 0.5) = 1.08125 |
| Kijun | SL at Kijun-Sen level minus ATR buffer | Kijun 1.08300 - (ATR * 0.5) = 1.08225 |
| ATR | SL at fixed ATR multiple (2.0x) from entry | 1.08500 - (ATR * 2.0) = 1.08200 |
Key SL Parameters: SL ATR Buffer (default 0.5) adds padding beyond the SL level for Kumo Edge and Kijun modes. A minimum risk distance of 0.5x ATR prevents extremely tight stops when the cloud or Kijun is very close to entry.
Take Profit Levels
TP levels are calculated as risk-reward multiples of the SL distance. If the SL distance is 37.5 pips:
- TP1 (1.5:1 R:R) = 37.5 * 1.5 = 56.3 pips from entry
- TP2 (2.5:1 R:R) = 37.5 * 2.5 = 93.8 pips from entry
- TP3 (4.0:1 R:R) = 37.5 * 4.0 = 150.0 pips from entry
| Parameter | Default | Description |
|---|---|---|
| TP1 R:R | 1.5 | Take-profit 1 as a risk multiple |
| TP2 R:R | 2.5 | Take-profit 2 as a risk multiple |
| TP3 R:R | 4.0 | Take-profit 3 as a risk multiple |
Hit Tracking and Win Rate
The indicator tracks whether each TP level and the SL have been reached by subsequent confirmed price action. When TP1 is reached, a "+" marker appears next to the label. SL hit shows "X" and marks the trade as closed. TP3 hit also marks the trade as closed (full target reached).
The dashboard shows trade progression: "> TP1" then "TP1+ > TP2" then "TP1+ TP2+ > TP3" then "TP3 + Closed" or "SL X Closed". A running Win Rate is tracked -- TP1 hit counts as a win, SL hit as a loss (e.g., "67% (4/6)").
Kijun S/R Zones
When the Show S/R Zones parameter is enabled (default: true), the indicator highlights areas where the Kijun-Sen has been flat for 4 or more consecutive bars. These zones are drawn as semi-transparent colored boxes centered on the Kijun level, extending 0.15x ATR above and below, marking strong horizontal support/resistance levels.
Visual Conventions
- Entry line: Blue solid (1px) | SL line: Red solid (2px) | TP1: Green solid (2px) | TP2: Green dashed (2px) | TP3: Green dotted (2px)
- Lines extend from signal bar to 5 bars beyond current bar with price labels at the right end
- Trend Background (off by default): Subtle 93% transparent green/red tint when price is above/below cloud with TK alignment. No tint when price is inside the cloud.
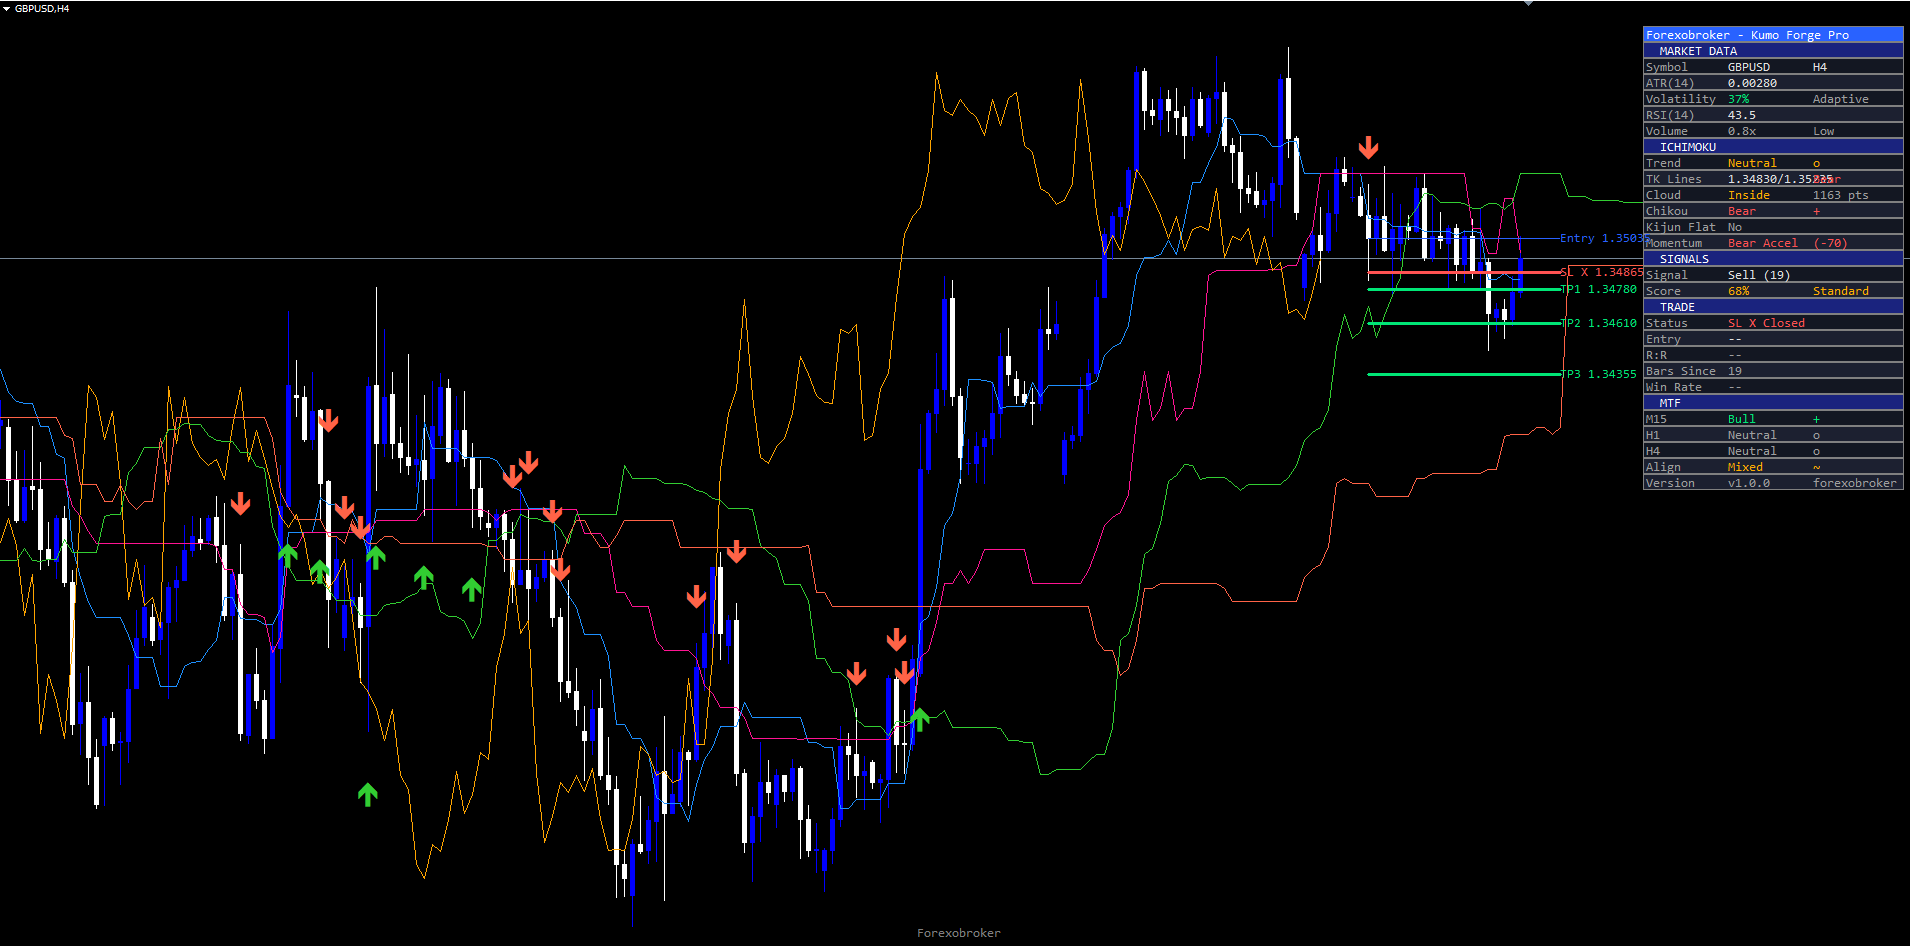
Dashboard Guide
The on-chart dashboard provides a compact, real-time summary of all indicator data organized into five sections: MARKET DATA, ICHIMOKU, SIGNALS, TRADE, and MTF. It displays 22 rows without MTF or 28 rows with MTF enabled.
Dashboard Settings: Show Dashboard (true), Position (Top Right / Top Left / Bottom Left / Bottom Right), Font Size (Tiny / Small / Normal / Large). The header shows Forexobroker -- Kumo Forge Pro and the footer shows the version number.
MARKET DATA Section
| Row | Description |
|---|---|
| Symbol | Current ticker + timeframe (e.g., "EURUSD H1") |
| ATR(14) | Current 14-period ATR value in price units |
| Volatility | Volatility ratio (0-100%), color-coded: green (<40%), amber (40-70%), red (>70%). Shows "Adaptive" or "Fixed" mode |
| RSI(14) | Current RSI value, color-coded: red when overbought (>70, "OB"), green when oversold (<30, "OS"), neutral otherwise |
| Volume | Current volume as multiple of 20-bar SMA (e.g., "1.8x"). "OK" when > 1.2x, "Low" otherwise, "N/A" when unavailable |
ICHIMOKU Section
| Row | Description |
|---|---|
| Trend | "Bullish" (green, price above cloud + TK bullish), "Bearish" (red), or "Neutral" (amber) |
| TK Lines | Tenkan/Kijun values separated by " / " with alignment status: "Bull", "Bear", or "Flat" |
| Cloud | Price position: "Above" (green), "Below" (red), "Inside" (amber), or "Thin" (amber). Also shows thickness in points |
| Chikou | Chikou vs past price: "Bull" (green), "Bear" (red), or "Neutral" (gray) |
| Kijun Flat | "Yes (S/R)" in amber when flat 4+ bars (key support/resistance). "No" otherwise |
| Momentum | Pulse state: Accelerating / Bullish / Bull Fading / Neutral / Bear Fading / Bearish / Bear Accel + smoothed value (e.g., "(+42)") |
SIGNALS Section
| Row | Description |
|---|---|
| Signal | "BUY" (green) or "SELL" (red) on signal bar. Otherwise shows last signal type + bars since (e.g., "Buy (12)") or "Wait" |
| Score | Confluence percentage, color-coded: green (>=70), amber (>=40), gray (<40). Shows grade: Strong/Standard/Weak |
TRADE Section
| Row | Description |
|---|---|
| Status | "> TP1" / "TP1+ > TP2" / "TP1+ TP2+ > TP3" / "TP3 + Closed" / "SL X Closed" / "No Active" |
| Entry | Entry price of most recent signal. "--" when no trade active |
| R:R | Current risk-reward ratio (e.g., "1.45R"). Green positive, red negative |
| Bars Since | Bars elapsed since last signal |
| Win Rate | Historical percentage and fraction (e.g., "67% (4/6)"). Green >=60%, amber >=40%, red <40% |
MTF Section
Shows Ichimoku state (Bull/Bear/Neutral) on three configurable timeframes (default M15, H1, H4) plus overall alignment: "ALL BULL" (green), "ALL BEAR" (red), or "Mixed" (amber). The MTF panel uses confirmed-bar logic -- states update only when the higher-timeframe bar closes.
Momentum Pulse Engine
Combines three components into a single smoothed reading from -100 to +100:
- TK Spread (40% weight): Tenkan-Kijun distance normalized by ATR
- TK Acceleration (100% weight, compressed): Rate of change of TK spread over 3 bars, detecting widening or narrowing
- Cloud Slope (30% weight): Span A vs Span B slope over 5 bars, normalized by ATR
The raw value is clamped to -100/+100 and smoothed with a 5-period EMA. Dashboard states: Accelerating (positive + rising, strongest bullish), Bullish (positive, stable), Bull Fading (positive but declining), Neutral (near zero), Bear Fading (negative but rising), Bearish (negative, stable), Bear Accel (negative + falling, strongest bearish).
TIP: If the dashboard overlaps with price action, change the Position to a different corner or reduce Font Size to "Small" or "Tiny".
Alert Configuration
Kumo Forge Pro provides 23 individual alert conditions covering every signal type, TP/SL hit, trend change, and MTF alignment event. Alerts can be delivered as plain text or webhook-compatible JSON.
| Parameter | Default | Description |
|---|---|---|
| Webhook JSON Format | false | When enabled, all alert messages are sent as JSON objects for webhook integrations |
In MetaTrader, alerts are delivered through popup, sound, push notification, and email channels configured in Tools > Options.
Alert Events (23 total)
| # | Alert Event | Example Message | ||||||||
|---|---|---|---|---|---|---|---|---|---|---|
| 1-2 | TK Cross Buy/Sell | `BUY \ | EURUSD \ | TF: H1 \ | Price: 1.08542 \ | Score: 78% \ | SL: 1.08125 \ | TP1: 1.09063 \ | TP2: 1.09438 \ | TP3: 1.10000` |
| 3-4 | Kumo Break Up/Down | `KUMO BREAK UP \ | EURUSD \ | TF: H1 \ | Price: 1.08542` | |||||
| 5-6 | Retest Bull/Bear | `RETEST BULL \ | EURUSD \ | TF: H1 \ | Price: 1.08542` | |||||
| 7-10 | TP1/TP2/TP3/SL Hit | `TP1 HIT \ | EURUSD \ | 1.09063` | ||||||
| 11-12 | Kijun Bounce Buy/Sell | `KIJUN BOUNCE BUY \ | EURUSD \ | TF: H1 \ | Score: 72%` | |||||
| 13-14 | Cloud Bounce Buy/Sell | `CLOUD BOUNCE BUY \ | EURUSD \ | TF: H1 \ | Score: 65%` | |||||
| 15-16 | Chikou Break Buy/Sell | `CHIKOU BREAK BUY \ | EURUSD \ | TF: H1 \ | Price: 1.08542` | |||||
| 17-18 | MTF All Bullish/Bearish | `MTF ALL BULLISH \ | EURUSD \ | TF: H1` | ||||||
| 19-21 | Trend to Bullish/Bearish/Neutral | `TREND > BULLISH \ | EURUSD \ | TF: H1` | ||||||
| 22-23 | Strong Buy/Sell (80+) | `STRONG BUY \ | EURUSD \ | Score: 92% \ | TF: H1 \ | Price: 1.08542` |
Each alert fires only once per confirmed bar to prevent duplicate notifications.
Webhook JSON Format
When enabled, alerts send structured JSON:
{"action":"buy","ticker":"EURUSD","price":1.08542,"tf":"H1","score":78,"sl":1.08125,"tp1":1.09063,"tp2":1.09438,"tp3":1.10000}
Action types: buy , sell , kumo_break_up/down , retest_bull/bear , tp1/2/3_hit , sl_hit , kijun_bounce_buy/sell , cloud_bounce_buy/sell , chikou_break_buy/sell , mtf_all_bull/bear , trend_bullish/bearish , strong_buy/sell . Signal alerts include score , sl , tp1-3 fields. Breakout and trend alerts include only ticker , price , and tf .
Push & Email Setup
Push notifications: Install the MetaTrader mobile app > Settings > Messages > copy your MetaQuotes ID > enter in desktop MetaTrader Tools > Options > Notifications > enable notifications.
Email notifications: In MetaTrader, go to Tools > Options > Email > check Enable > enter SMTP server, port, login, password, and destination email > click Test to verify.
Trading Strategies
The following three approaches demonstrate different ways to use Kumo Forge Pro. All strategies assume default settings unless stated otherwise.
WARNING: Trading involves significant risk of loss. These strategies are provided for educational purposes only. Always test on a demo account first and never trade with money you cannot afford to lose.
Strategy A: Scalping (M5 - M15)
Capture quick moves during volatile sessions. Use Adaptive mode with faster periods (Conversion=7, Base=22, Adapt Strength=0.5), higher Min Confluence Score (55), Kijun SL mode with tighter buffer (0.3), and reduced TP targets (1.0/1.5/2.5). Set MTF timeframes to 5/15/60.
Wait for a TK Cross or Kijun Bounce with score >= 55 and at least 2/3 MTF alignment. Enter at next bar open. Take full profit at TP1 or take 50% and move stop to breakeven. Monitor the Momentum row -- exit early if it shifts to "Fading".
Strategy B: Swing Trading (H1 - H4)
Ride medium-term trends using all three TP levels. Use defaults (Adaptive, Conversion=9, Base=26, SpanB=52, MinScore=40, SL Mode=Kumo Edge, TP1=1.5, TP2=2.5, TP3=4.0).
Wait for a TK Cross or Kumo Breakout aligned with dashboard Trend direction. Confirm 2/3 MTF alignment (ideally "ALL BULL"/"ALL BEAR"), prefer Strong/Standard grade, verify Cloud shows "Above"/"Below" and Momentum is supportive. Close 1/3 at TP1 (move SL to breakeven), 1/3 at TP2, trail stop behind Kijun for TP3. If Momentum drops to "Fading" between TP2 and TP3, consider closing early. Exit all if an opposite signal fires.
Strategy C: Conservative / Position Trading (H4 - D1)
Take only highest-probability setups with full multi-timeframe confirmation. Use Classic mode, Min Confluence Score = 70, enable RSI filter, Chikou Confirmation = true, SL ATR Buffer = 0.8, wider TP targets (1.5/3.0/5.0). Set MTF to 60/240/D.
Require "ALL BULL" or "ALL BEAR" MTF alignment. Verify score is 70+ and Cloud shows "Above"/"Below" (never "Inside"). Close 1/3 at each TP level, trail stop behind cloud edge. Avoid trading when MTF is "Mixed", Cloud shows "Inside", Volatility > 80%, or during major news releases.
TIP: For Strategy C, enable Strong Buy/Sell (80+) alerts to receive push notifications only for the highest-quality setups.
Parameter Tuning Presets
Scalping Preset (M5 - M15)
| Parameter | Value |
|---|---|
| Mode / Conv / Base / SpanB / Disp | Adaptive / 7 / 22 / 44 / 22 |
| Adapt Strength / Vol Lookback | 0.5 / 30 |
| Min Score / RSI Filter / Vol Filter | 55 / false / true |
| SL Mode / SL Buffer | Kijun / 0.3 |
| TP1 / TP2 / TP3 | 1.0 / 1.5 / 2.5 |
| TF 1 / TF 2 / TF 3 | 5 / 15 / 60 |
Swing Preset (H1 - H4) -- matches defaults
| Parameter | Value |
|---|---|
| Mode / Conv / Base / SpanB / Disp | Adaptive / 9 / 26 / 52 / 26 |
| Adapt Strength / Vol Lookback | 0.4 / 50 |
| Min Score / RSI Filter / Vol Filter | 40 / false / true |
| SL Mode / SL Buffer | Kumo Edge / 0.5 |
| TP1 / TP2 / TP3 | 1.5 / 2.5 / 4.0 |
| TF 1 / TF 2 / TF 3 | 15 / 60 / 240 |
Conservative Preset (H4 - D1)
| Parameter | Value |
|---|---|
| Mode / Conv / Base / SpanB / Disp | Classic / 9 / 26 / 52 / 26 |
| Min Score / RSI Filter / Chikou Confirm | 70 / true / true |
| SL Mode / SL Buffer | Kumo Edge / 0.8 |
| TP1 / TP2 / TP3 | 1.5 / 3.0 / 5.0 |
| TF 1 / TF 2 / TF 3 | 60 / 240 / D |
TIP: Start with the Swing Trading preset (which matches the defaults) and modify one parameter at a time to observe its effect on signal quality and frequency.
Troubleshooting
No signals appearing: The indicator requires ~78 bars of history (Span B + Displacement) for warmup. Check that Min Confluence Score is not too high (try 40). Verify at least one signal type is enabled. Try disabling filters individually (Kumo Thickness, Volume, Chikou) to identify which is blocking signals. Zoom out to check for signals further back in history.
Cloud not visible: Verify Show Cloud = true. Ensure enough history for cloud formation. The cloud uses 88% transparency -- try manually setting Theme to "Dark" or "Light" if hard to see. Ensure chart type is candlestick or bar.
Dashboard not showing: Confirm Show Dashboard = true. Try changing Position to a different corner if the chart window is too narrow. Reduce Font Size to "Small" or "Tiny" on smaller chart windows. If multiple indicators overlap, assign each to a different corner.
Alerts not firing: Verify push/email configuration in Tools > Options > Notifications (push) or Tools > Options > Email (email). Alerts fire only once per confirmed bar per event type. Check that relevant signal types are enabled. Strong Buy/Sell alerts only fire when score >= 80.
Dashboard shows incorrect values: Wait for warmup period to complete if Momentum shows "Neutral (0)" immediately after loading. Win Rate requires Show TP/SL Lines = true because it relies on TP/SL hit detection. Volume "N/A" means broker lacks volume data (confluence scoring auto-compensates with full 10 points).
Signals differ after chart reload: Due to ATR warmup dependencies, the first few signals in history may shift 1-2 bars between real-time and recalculated views. Signals 100+ bars into history should be identical. This does not affect non-repainting for recent signals.
MT4 vs MT5 differences: Calculation logic is identical between versions. Minor differences in tick volume data, MTF implementation (iCustom in MT4 vs indicator handles in MT5), and dashboard rendering may cause slight visual variations in early history. These differences diminish as more bars are processed.
Download the indicator:
- MetaTrader 5: Kumo Forge PRO MT5
- MetaTrader 4: Kumo Forge PRO MT4
CONTACT & SUPPORT
- Email: info@forexobroker.com
- Questions: Use the Comments section on the product page or send a private message
- Bug Reports: Please include your broker name, account type, and a screenshot
-
✅ All MQL Tools: https://www.mql5.com/en/users/forexobroker/ ✅
--------------------------------------------------------------------------------------------------------------
🏦 **Broker I use**: https://icmarkets.com/?camp=55869
🏦 **Broker For EU Traders I use 1**: https://www.ictrading.com?camp=91414
🏦 **Broker I use 2**: https://one.exnessonelink.com/boarding/sign-up/a/c_thuv62ocfq
💻 **VPS**: https://chocoping.com/processing/aff.php?aff=738
💼 **Companies I use for getting funded**:
Fundednext: https://fundednext.com/?fpr=kestutis39
The5ers: https://www.the5ers.com/?afmc=16kl
FTMO: https://trader.ftmo.com/?affiliates=nRAyOhmFRnEnFdOpdLeh


")
