
Range Brain AI V5 Optimization Guide
CCI Momentum Classifier (Continuation + Failed-Breakout Fade)
This guide gives you some recommended settings for Start / Step / End values to type into the MetaTrader 5 Strategy Tester optimizer for every tunable input, plus the order to optimize them in and how to tell a real edge from a curve-fit.
IMPORTANT: Please adjust your trading symbols sl and tp by their point size. The system is optimized for US30 by default. DO NOT BACKTEST WITH THE PANEL ON - It will slow the backtest down substantially.
HOW THE SYSTEM WORKS (so the settings make sense)
Range Brain AI trades range breakouts BOTH ways, decided by a CCI momentum classifier at the moment each breakout happens:
- Builds a price range during a session window you choose.
- When price closes beyond the range, the EA checks CCI's direction right then: still moving further the same way as the break means momentum is genuinely building, so it trades the breakout as a CONTINUATION, immediately, at market.
- CCI already turning back means the breakout looks like it's failing, so the EA arms a FADE in the opposite direction instead, and waits for CCI to reach an extreme and cross back, confirmed by a deterministic neural net (perceptron), before entering at market.
- Each side re-arms independently. A fade stays armed and can fire again on the next fresh CCI extreme-and-cross-back, with no requirement that price return inside the range first. A continuation trade locks out further attempts until price closes back at/past the boundary it broke - only then does the next breakout get classified fresh.
- UseMomentumClassifier = false runs the EA in pure fade-only mode (every breakout arms a fade, exactly like earlier versions), useful as a baseline to compare the classifier against.
Two things to remember:
- This is a range-breakout tool that needs a REAL consolidation range to classify from. Pick instruments/sessions that actually range during your chosen window - a session window too short to form a meaningful range (e.g. one bar) starves the classifier of a real momentum read and skews results toward one side.
- The neural net is DETERMINISTIC (no random numbers): same data + settings = same result every time, so the backtest reproduces live.
IMPORTANT: WHAT "POINTS" MEANS
All *Points inputs (StopLossPoints, TakeProfitPoints, etc.) are in POINTS, not pips.
- 5-digit FX (e.g. EURUSD 1.23456): 10 points = 1 pip. So StopLossPoints 150 = 15 pips.
- Indices / metals / crypto: 1 point = the last price digit; typical moves are much larger, so scale the ranges below up accordingly.
Set the point ranges to your instrument's normal bar size, not blindly.
STRATEGY TESTER SETUP
- Data: real tick data with real spreads (Dukascopy / Quant Data Manager). Garbage data = garbage results.
- Modelling: "Every tick based on real ticks".
- Period: 2+ years. Hold back the most recent ~25-30% for out-of-sample validation (or use MT5 Forward = 1/4).
- Criterion: "Balance + max Profit Factor" or a Custom/Recovery criterion.
- Optimization: "Fast (genetic)" once the grid gets large.
NOTE: in the tables below, a BOOL is optimized as Start 0, Step 1, End 1 (tests both false and true). Tick its checkbox in the optimizer.
THE OPTIMIZATION TABLES (Start / Step / End)
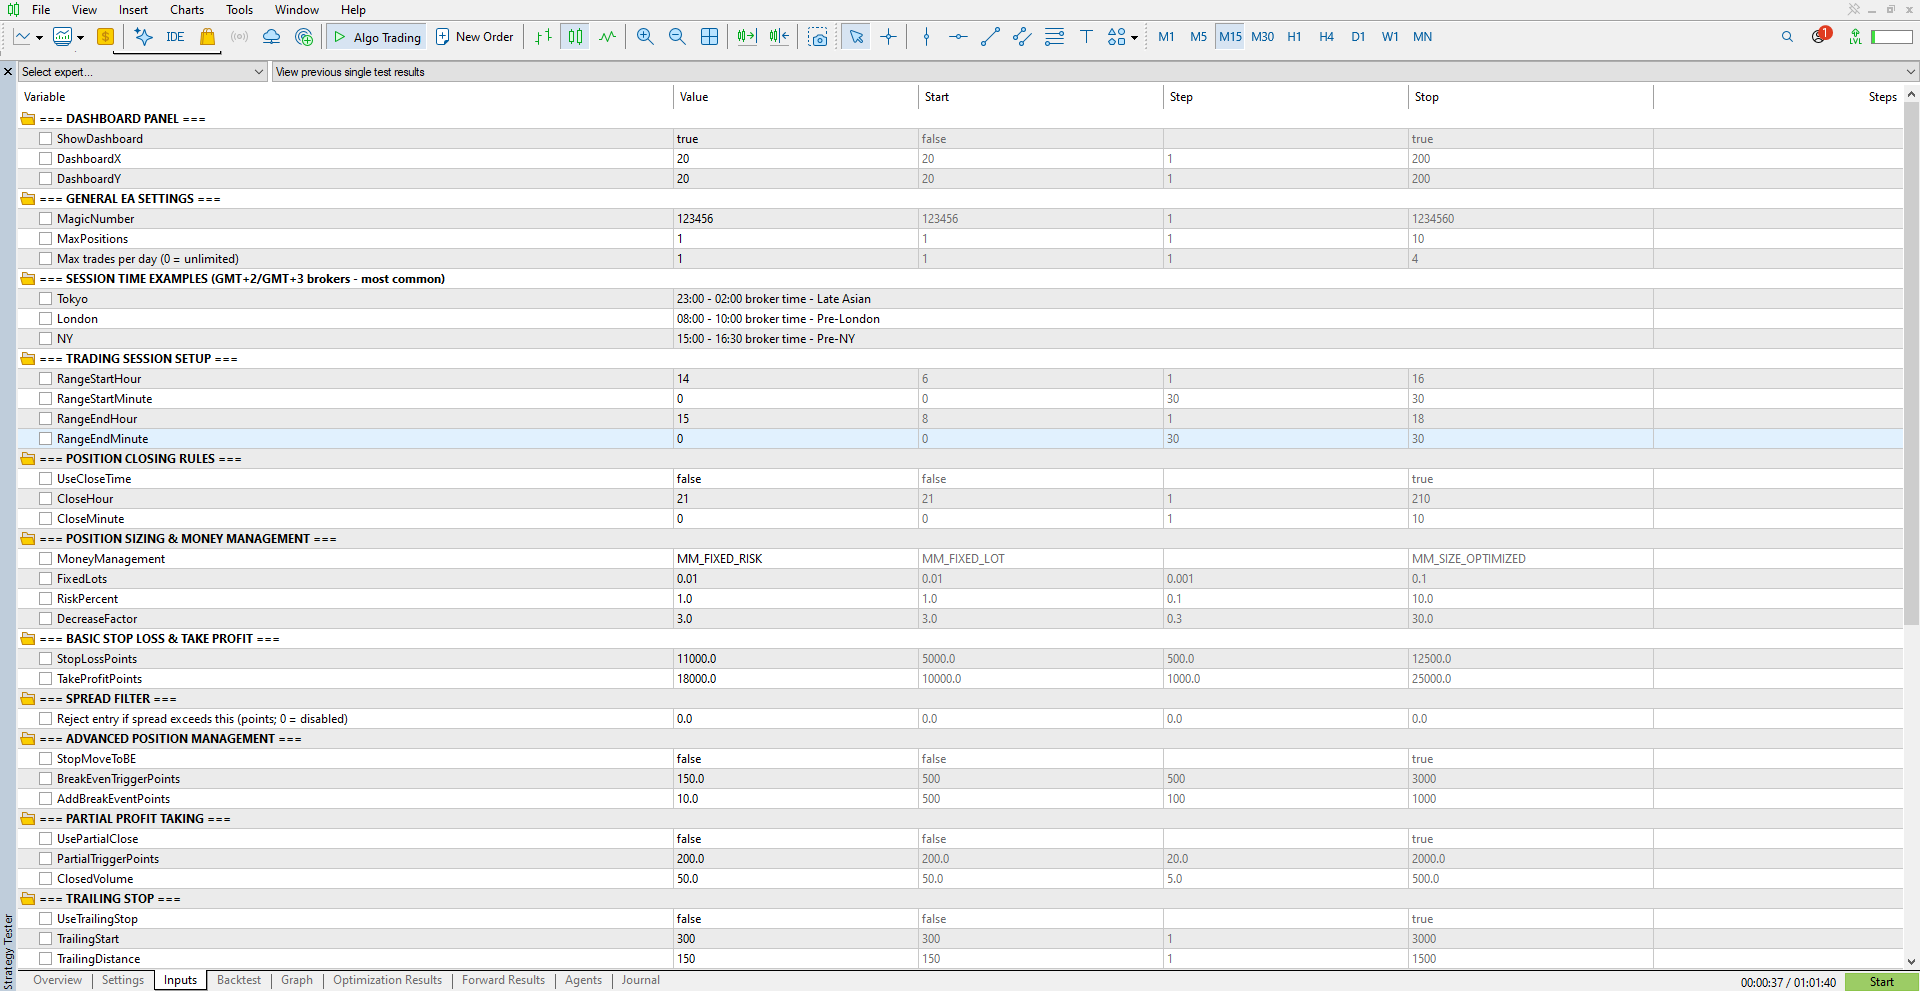
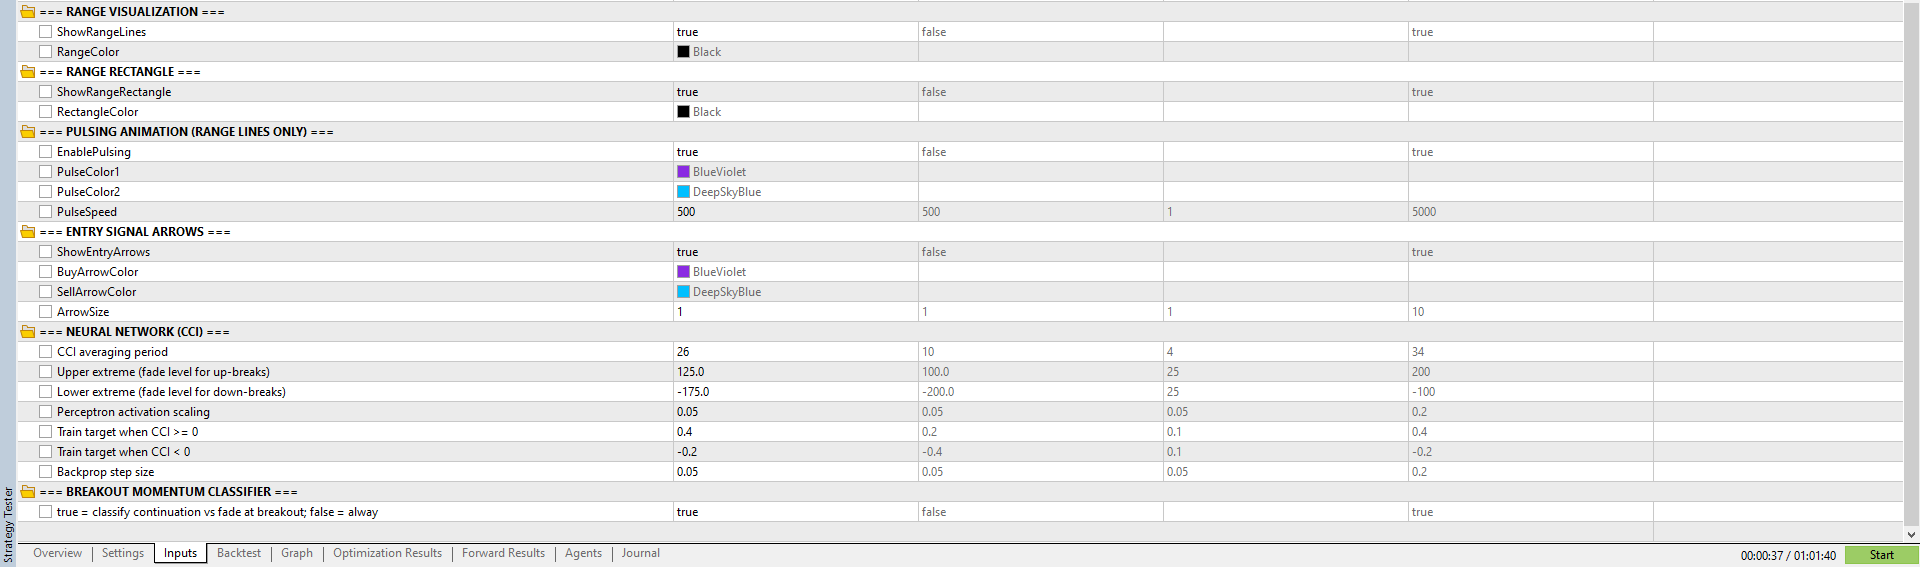
Type these into the optimizer's Start/Step/Stop columns. Don't optimize every group at once - follow the PHASES section after the tables (as a recommendation). Ranges assume 5-digit FX; scale your *Points for other instruments.
GROUP A: CORE EDGE (optimize these first)
| Input | Start | Step | End | Notes |
|---|---|---|---|---|
| RangeStartHour | 6 | 1 | 16 | broker server time |
| RangeStartMinute | 0 | 30 | 30 | on-the-hour vs half-hour |
| RangeEndHour | 8 | 1 | 18 | must be after start |
| RangeEndMinute | 0 | 15 | 45 | on-the-hour/quarter increments, incl. default 45 |
| CCIPeriod | 10 | 4 | 34 | 14/18/22/26/30/34... |
| CCIOverbought | 100 | 25 | 200 | fade trigger (up-breaks) |
| CCIOversold | -200 | 25 | -100 | keep symmetric with above |
| StopLossPoints | 250 | 250 | 1500 | the "break resumed" stop |
| TakeProfitPoints | 250 | 250 | 3000 | the reversion target |
| MaxTradesPerDay | 1 | 1 | 4 | 0 input = unlimited (don't optimize 0 here) |
(MaxPositions default is 1. Both re-arm paths respect it as a hard cap regardless of how many times they'd otherwise fire - raise it only if you deliberately want more than one open position at a time.)
GROUP B: MOMENTUM CLASSIFIER
| Input | Start | Step | End | Notes |
|---|---|---|---|---|
| UseMomentumClassifier | 0 | 1 | 1 | bool: fade-only vs classifier on |
(Compare UseMomentumClassifier=true against a locked Group A run with it forced false - that false run is your fade-only baseline from earlier versions. Keep the classifier only if it clearly improves the result over that baseline.)
GROUP C: PERCEPTRON (leave default unless clearly better)
| Input | Start | Step | End | Notes |
|---|---|---|---|---|
| Coefficient | 0.05 | 0.05 | 0.20 | activation scaling |
| LearningRate | 0.05 | 0.05 | 0.35 | backprop step |
| BuyTargetOutput | 0.30 | 0.30 | 1.50 | NN Buy Target |
| SellTargetOutput | -0.40 | 0.10 | -0.20 | NN Sell Target |
(This net is a confirmer for the fade side only - it does not affect continuation entries. Over-tuning it is a classic curve-fit. Optimize only with a tiny grid, and prefer the defaults 0.1 / 0.3 / 1.5 / -0.3 when results are close.)
GROUP D: TRADE MANAGEMENT (optional add-ons, off by default)
| Input | Start | Step | End | Notes |
|---|---|---|---|---|
| StopMoveToBE | 0 | 1 | 1 | bool: break-even move |
| BreakEvenTriggerPoints | 50 | 50 | 300 | only if StopMoveToBE on |
| AddBreakEventPoints | 0 | 5 | 20 | |
| UsePartialClose | 0 | 1 | 1 | bool: partial close |
| PartialTriggerPoints | 100 | 50 | 400 | only if UsePartialClose on |
| ClosedVolume | 25 | 25 | 75 | percent to close |
| UseTrailingStop | 0 | 1 | 1 | bool: trailing stop |
| TrailingStart | 150 | 50 | 500 | only if UseTrailingStop on |
| TrailingDistance | 50 | 50 | 300 | |
| UseCloseTime | 0 | 1 | 1 | bool: time-based exit |
| CloseHour | 16 | 1 | 23 | only if UseCloseTime on |
(CloseMinute: leave 0.)
SET, DON'T OPTIMIZE (choose to taste; they scale results, not edge)
- MoneyManagement: pick ONE (MM_FIXED_RISK recommended). Not optimized.
- RiskPercent: your risk per trade (e.g. 0.5 - 1.0). Scales P&L, not the edge - set it, don't optimize it.
- FixedLots: only used if MoneyManagement = MM_FIXED_LOT.
- DecreaseFactor: leave default.
- MaxSpreadPoints: reject entry if spread exceeds this (points; 0 = disabled). Set per symbol/broker, don't sweep.
DO NOT TOUCH (visual / identity)
MagicNumber, DashboardX/Y, ShowDashboard, all color inputs, all Show*/Enable* visual toggles, PulseSpeed, ArrowSize, the Tokyo/London/NY text examples.
PHASES (the ORDER to optimize - don't do all groups at once)
Optimizing every group together explodes the search space and curve-fits. Lock each phase's winner before the next.
PHASE 1 - CORE EDGE (Group A only) Optimize the range window + CCI + SL/TP together with UseMomentumClassifier forced false (fade-only baseline). Keep Groups C/D at defaults (all bools off). This finds where the real edge lives. Lock the winning Group A values.
PHASE 2 - MOMENTUM CLASSIFIER (Group B) With Group A locked, flip UseMomentumClassifier to true and compare against your Phase 1 (fade-only) result. Keep it only if it genuinely improves the result - it's meant to add continuation trades on top of the fade edge, not replace it.
PHASE 3 - TRADE MANAGEMENT (Group D, optional) With A+B locked, test one management feature at a time (BE, then partial, then trailing). Add a feature only if it clearly helps. Most clean systems do fine with none of these - don't force it.
PHASE 4 - PERCEPTRON (Group C, optional, light) Only if you want the last few percent on the fade side. Tiny grid, prefer defaults.
After each phase: pick from a STABLE CLUSTER (see below), then re-run a single backtest with the locked values to confirm.
READING RESULTS - CHOOSING A WINNER
Don't sort by Net Profit alone. Look at:
- Profit Factor > 1.2 (>1.5 strong)
- Recovery Factor (net profit / max DD) - rewards smooth equity
- Max Drawdown % - can you stomach it live?
- Trade count - 100+ over the test is ideal; <30 is noise
- Win rate WITH avg win/loss - 40% win + big winners can be great
THE CLUSTER TEST (most important): In the optimization results, the best settings should be SURROUNDED by other good settings. If your #1 row's neighbors are losers, it's a curve-fit - discard it and pick from a broad plateau of good results. A slightly-lower but robust setting beats a fragile peak.
OUT-OF-SAMPLE VALIDATION (the step that saves money)
- Optimize on the older data (e.g. 2022-2023).
- Take the chosen winner UNCHANGED and run it as a single backtest on the held-out recent data (e.g. 2024-now).
- If it stays profitable with similar character, it's a real edge. If it collapses, it was curve-fit - go back and pick a broader, coarser setting. MT5 Forward mode (1/4) automates this.
PER-SYMBOL / PER-TIMEFRAME + GOING LIVE
- Repeat Phases 1-2 separately for EACH symbol and timeframe. There is no universal setting - that's correct for a range-breakout tool.
- Favor instruments/sessions that form a real consolidation range; lower TF = more trades + more noise, and a range that's too short (too few bars) starves the classifier of a meaningful CCI read.
- Confirm your broker's server time matches your range window.
- Because the EA is deterministic, the validated backtest is an honest preview of live. Demo-confirm, then scale up.
- No martingale / grid / averaging. Hedges positions at your discretion. Risk is fixed by your SL and money-management settings. Keep it that way.
QUICK-START CHECKLIST
- Real tick data; broker server time known; points units checked
- Reproducibility check: same run twice = identical
- PHASE 1: optimize Group A (range, CCI, SL/TP) fade-only; lock winner
- PHASE 2: enable Group B (momentum classifier); keep only if it helps
- PHASE 3: optional Group D management, one at a time
- PHASE 4: optional Group C perceptron, light touch
- Picked from a STABLE CLUSTER, not a spike
- Healthy trade count, acceptable drawdown
- Validated OUT OF SAMPLE - it held up
- Repeated per symbol / timeframe
- Demo-confirmed, server time checked, then live