

Introduction
This blog is to provide access for all customers and potential customers to the full manual for the Market Reversal Alerts EA.
The manual is very in-depth and provides a full description of every setting in the EA and it's intended functionality. The number of settings are too numerous to place in the products description so this article will be updated on a regular basis as the EA version numbers increase and more features and functionality are added to it.
Here is a video with all the settings in detail if you dont want to read + some strategy deas.
Some set files to get you started are available in this blog post.
Here is a video of the set files in action too:
Market Reversal EA Instructions (v4)
WHAT’S NEW IN VERSION 4?
Dashboard:
Enhanced dashboard display to add additional information including, MA and HTF MA levels, trade direction, lot sizing, distance between trades (for basket trading), magic numbers in use and the trade comment.
The dashboard is now also split into multiple sections so you can choose what will be displayed.
Basket Trading Settings:
Added ability to select the distance between orders as a percentage of ADR instead of pips. You can select which you prefer now with an input.
Lot Size Multiplier:
Adjustment to logic to aid people using micro lot sizing of 0.01/0.02 as initial position with lot multipliers less than 1.5. The EA will now gradually increase by 0.01 lot until the lot multipler can round up properly for you instead of never increasing.
e.g.
0.01 with 1.3X multiplier would work as 0.01, 0.02, 0.02, 0.03, 0.03, 0.04, 0.05, 0.07, 0.09, 0.11, 0.14 etc...
0.02 with 1.3X multiplier would work as 0.01, 0.02, 0.03, 0.05, 0.07, 0.09, 0.11, 0.14 etc...
Spread Filter:
Added spread filter so the EA will not trade if the spread is too large, e.g. around news volatility or at overnight swaps.
Close Trades On Opposite Reversal Alert:
This will close your trade(s) when there is a market reversal alert in the opposite direction. This is similar to the "close trades on opposite signal" but it ignores any filters you may have active like RSI, MA or ADR and simply closes the position when an alert triggers in the opposite direction.
Disable EA After Trade:
When the pair the EA is loaded on to goes flat (all trades in all directions are closed) the EA will be removed from the chart.
Yesterdays High/Low Filter:
Two new filters added to allow you to trade using previous days high and low ranges.
Take trades ONLY when price is above/below yesterdays highs and lows.
OR
Take trades ONLY when price has pierced yesterdays highs and lows (stop hunt behaviour).
Fake SL to Calculate Lot Sizing By Percentage:
EA can now trade without using a stop loss with a set percentage of your account instead of just fixed pips. EA will place a stop loss and then remove it after the trade is placed. This is only applicable to market orders placed.
Ignore Filters After First Trade Entry:
All main filters can now be ignored after the initial trade is taken when using the basket trading settings.
e.g. If you want to get into a trade on the M15 time frame when the H4 RSI is above 70 it will enter your initial position and then ignore the H4 RSI for all additional entries after your first.
This means the EA can continue to enter positions even if price pushed your way, consolidates and then pushes against you without taking the H4 RSI to extended levels which happens on occasion.
Installation
The EA is purchased via MQL5 and can be downloaded instantly on purchase.
Product page for MT4 - https://www.mql5.com/en/market/product/65383
Product page for MT5 – https://www.mql5.com/en/market/product/74958
The EA DOES NOT require the market reversal alerts indicator to function and is a stand alone product. Once you have purchased and installed the EA it will be in your Experts/Market folder in your navigator panel. You must keep the EA in this folder for it to be validated via MQL5 and work.

IMPORTANT NOTE FOR MT5 USERS WHILE BACKTESTING
The MT5 version of the EA has an additional input called "Backtest_Mode" which needs to be set to "enable" when using the EA in the strategy tester.

Back Testing Data
You can back test using the “control points” model for speed or "every tick" for precision but not "open prices only". Control Points with certain settings produce different results especially with TP levels as the orders will not close in exactly the same place but there is not a lot of difference overall. In testing however this method is much faster and will allow you to find good settings quicker. You can then use “every tick” to verify the results of the initial back test before forward testing on a small live account or demo.
BELOW IS AN EXAMPLE OF A SIMPLE TP/SL REVERSAL ENTRY BACKTEST USING BOTH METHODS
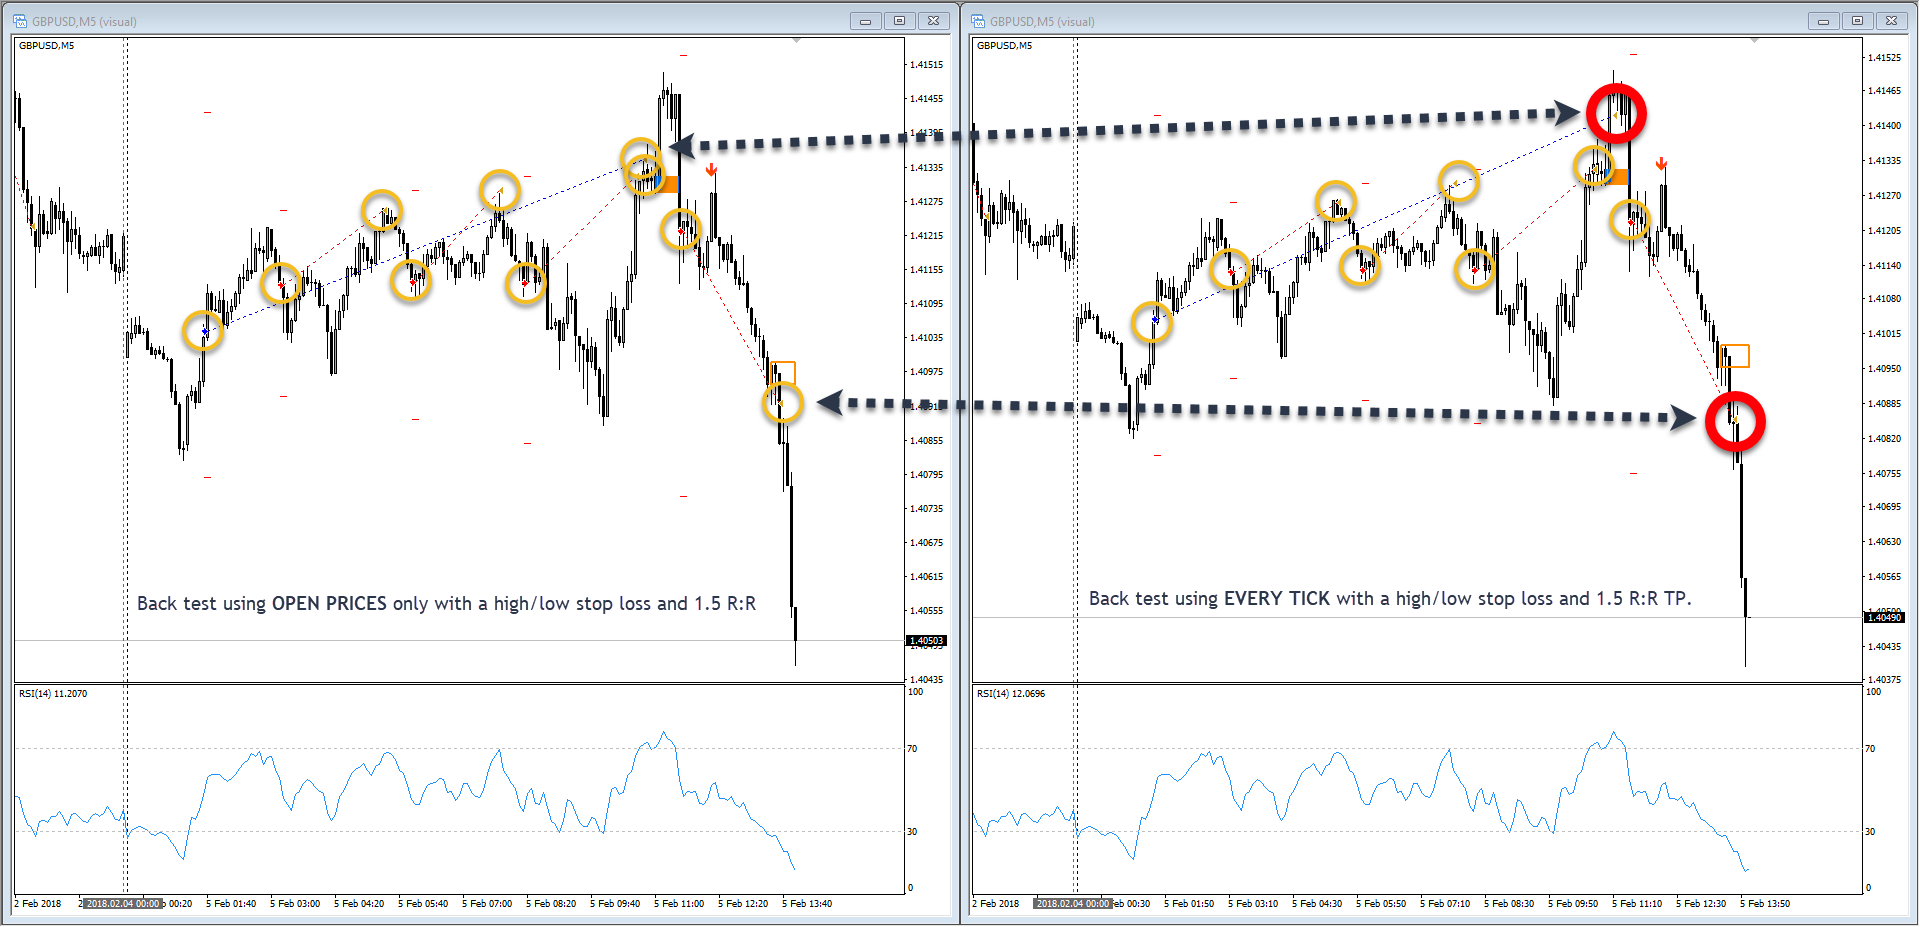
As you can see there are slight differences in exits of positions but entries will always be in the same place.
When back testing any indicator or EA in MT4 it is vital you have good quality data to work with. Your brokers data will have candles created automatically using incomplete data while MT4 was not operating and often large gaps in data if the MT or broker feed was not used for many days or months. This is not suitable to give accurate back testing results. I recommend you download data using Tick Data Suite which has a free 15-day trial. This is sufficient time to download many years of data from all the instruments you want to trade. Data is from Dukascopy which is US close data without Sunday candles and very good quality. If you also want to download data from your own broker Tick Data Suite also support this from some of the largest brokers for £80 per month. I would always recommend back testing for a minimum of 2 years and the longer the better to make sure any strategy is robust across multiple market conditions.
EA Inputs & Settings Overview

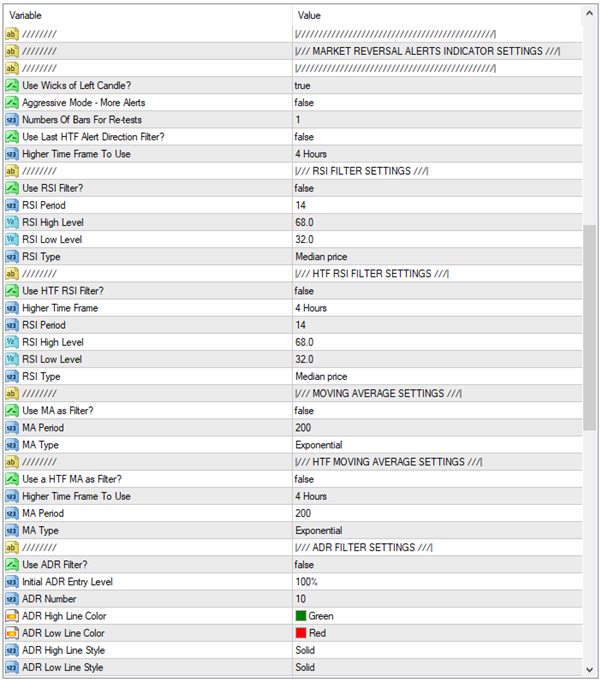
As you can see by the screenshots above there are many filters available to fine tune the indicator and various entry and exit strategies available which should suit the majority of traders using the market reversal alerts indicator. If you feel there are other standard indicators you would like added to help filter trades or features you think would benefit the indicator feel free to get in touch via the website or Telegram and I can look into the possibility of adding them in future updates.
Trade Settings
Trade Direction: Select whether the EA should take trades long, short or in both directions. This is particularly helpful if you are trading Indices like S&P500 which are geared to increase every year and you should only look for long positions. Also if you are using an MA as a filter and basket trading you may decide to put the EA on the chart when price is above the MA and use this setting rather than the MA filter which would cause issues basket trading when prices closes the opposite side of your moving average and has open positions in the opposite direction.
EA Mode: This simply sets the EA to either trading mode or alert mode. In alert mode no trades will be taken and the EA will simply alert you to conditions where it would have traded based on your filters.
Trade Comment: Enter the text you would like the EA to use as a comment when placing trades for you.
Entry Method: INITIAL REVERSAL ALERT or RVERSAL RE-TEST The EA will only trade on one of these so select whether you would like an entry on a re-test or initial reversal alert. If you select re-test there is a setting further down in the market reversal alerts indicator settings to select the number of candles before monitoring for re-tests.
Magic Number Buy: A unique number for buy trades taken by the indicator. This should be unique for every instance of the EA. If you run the EA on multiple pairs on a single MT4 this is how the EA knows which trades to manage. It is also used for the basket trading options to identify all trades in one direction to manage as a basket.
Magic Number Sell: As above but for sell orders.
Close Trades On Opposite Signal: FALSE or TRUE By default (false) the EA will just trade to the parameters you have set below and honour take profit and stop loss levels you select. If true is selected the EA will auto close the current orders when a signal in the opposite direction is detected.
NOTE: This setting requires ALL filter conditions to be met in the opposite direction. If you want the EA to exit simply when a reversal alert happens in the opposite direction there is a setting for that called "close order in opposite alert" which is in the V4 settings area at the bottom.
Style Of Trading: You can set the EA to either enter immediately when an alert is triggered (market order) or to set a pending order above price (longs) or below price (shorts) by a set pip amount.
NOTE: Do not use pending orders with basket settings and fake stop loss (position trading), the pending orders stops wil NOT be removed. This feature works with stop loss based strategies only.
Distance Pending Order: Here you enter the amount of pips above/below the entry alert you want your pending order set if using pending orders.
Money Management

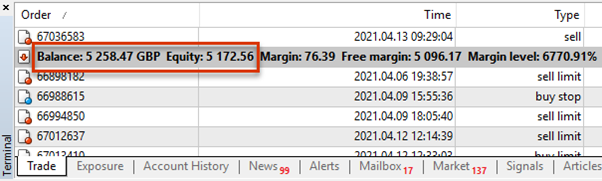
Use Balance Or Equity: ACCOUNT BALANCE or ACCOUNT EQUITY You can select to have trades that use a percentage of your account use either your total balance or current equity as the base for the calculation. Your balance is the total amount in your account, the equity is the amount +/- your current open positions.
Lot Sizing: FIXED or PERCENT Fixed lot sizing will take every trade at the set lot size you enter in the next option below. Percent lot sizing will use your stop loss and commit a percentage of your account to the trade based on the distance between your stop and the current price. This uses either the account balance or equity depending on your chosen input previously.
IMPORTANT NOTE: The percentage calculation can only work if you are using a stop loss. If you want to trade without stops and use a basket trading strategies you must ensure the "Use SL" input is set to true. You can then if you want have the EA delete your stop placed immediately using the "Use Fake SL to calculate lot sizing" input in the version 4 settings at the bottom.
Fixed Lot Size: IF you are using fixed lots which is the lot size each trade will be.
% Of Balance To Risk: IF you are using percent lot sizing this is the percent of your account to risk on each trade. Enter this as a number. E.g. 0.5, 1, 1.5 etc…
TP & SL Management
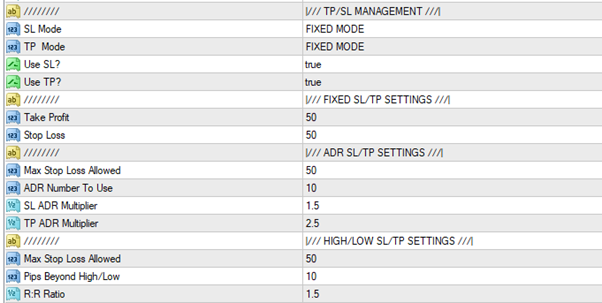
TP/SL Mode: FIXED MODE or ADR MODE or HIGH/LOW MODE There are 3 strategies for managing the take profit and stop loss of your trades with the EA. These are the most commonly used methods of calculating and placing stops and take profits. Each has its advantages and disadvantages and you should experiment with each to find what works best for you.
Use SL: Select whether the EA should use a stop loss when entering trades.
Use TP: Select whether the EA should use a take profit when entering trades.
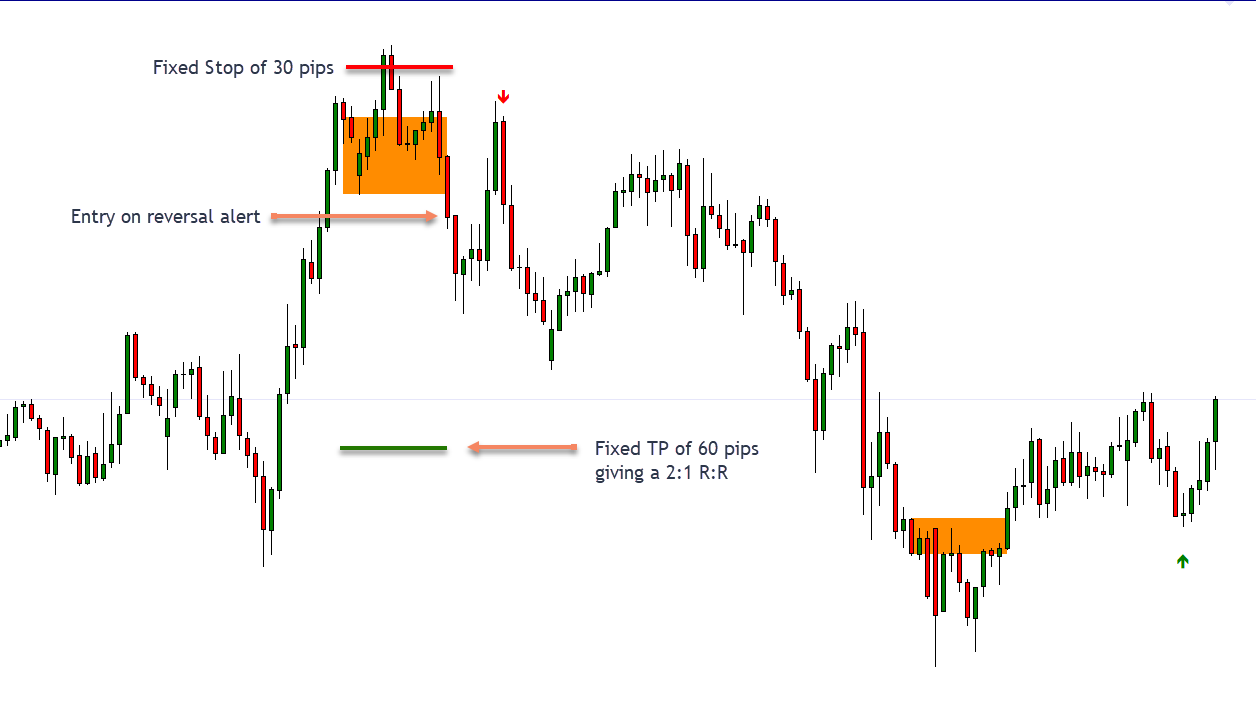
Fixed Mode: This will place a fixed TP and SL on each order at the selected pip calculation you enter in the FIXED SL/TP SETTINGS inputs. You should always try to have a positive Risk:Reward ratio here. So if you enter a stop loss of 50 pips you should aim for a take profit of at least 1.5:1 or higher, so around 75 pips minimum.
EXAMPLE OF FIXED TP/SL ENTRY
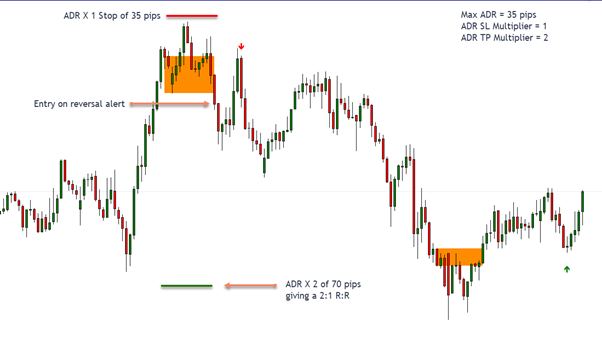
ADR Mode: This will place a stop loss at a multiplier of the instrument you are trading’s current ADR (average daily range). This entry method gives trades good breathing room as all forex pairs, metals, indices and commodities have an average movement they make on a daily basis and this average tends to be respected around 60% of the time. If this mode is selected the EA will place the stop and take profit at a multiple of the selected ADR number you choose.
This is a very common entry method used in swing trading as you are often looking for the peak formation high or low and if correct with an entry price will not often travel move than 1 X ADR beyond where the current reversal alert has happened. Using a setting of 1.5XADR here is best practice as it allows price to fluctuate and even perform a stop hunt of the most recent low or high before reversing. The downside is the stop is usually quite large and if price then goes into a consolidation, you can get stuck in a position for a number of days without taking profit.
EXAMPLE OF AN ADR TP/SL ENTRY
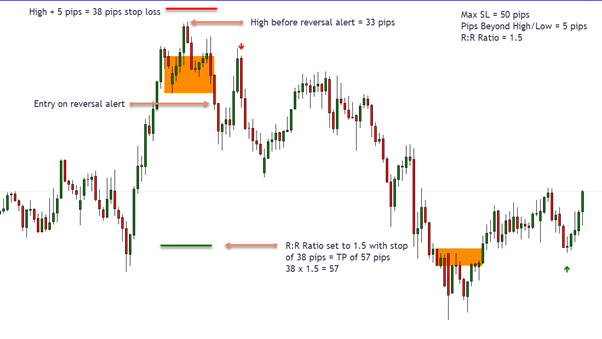
High/Low Mode:
This mode will place your stop loss above the most recent high or low before the reversal alert candle that triggered the trade. This is the most common place to put a stop loss in most trade entries. You can select the number of pips beyond the high/low so as not to place it exactly on the high/low as these are often hit again (double top or bottom or a stop hunt) and makes sure you get a tight stop on the trade with some breathing room as well. You can also set a maximum pip count for your stop so the EA will not trade if there are reversal alerts formed on large propulsion candles created on news events.
EXAMPLE OF A HIGH/LOW TP/SL ENTRY
Fixed SL/TP Settings: Enter the number of pips to set your stop loss and take profit.
ADR SL/TP Settings: Max stop loss allowed – The maximum number of pips you want the EA to use as a stop loss. This is useful for filtering out reversal alerts caused by large propulsion candles caused by news events where the stop could be extremely large. NOTE: If not using a stop set this to 9999 to ensure it does not stop trades being taken. ADR number to use – The ADR number for the calculation. This is defaulted to the last 10 days average daily range. SL ADR multiplier – This is the multiplier for your stop loss and is entered as a numerical figure, 0.5,1,1.5 etc… This will take the ADR number and multiply it by whatever you enter here. TP ADR multiplier – As above but calculates the take profit for you.
High/Low SL/TP Settings: Max stop loss allowed – The maximum number of pips you want the EA to use as a stop loss. This is useful for filtering out reversal alerts caused by large propulsion candles caused by news events where the stop could be extremely large. NOTE: If not using a stop set this to 9999 to ensure it does not stop trades being taken. Pips beyond high/low – This is the number of pips to add to the most recent high or low before the entry. R:R ratio – This is the risk:reward ratio that will be used to calculate your take profit. Whatever the stop loss is will be multiplied by the number entered here. This should be entered as a number to 1 decimal place only, for example 0.5,1,1.5 etc…
Time Of Day Filters

Trade Only Between Set Hours: FALSE or TRUE If set to true the EA will only take trades between the hours you select. This is your broker time (what appears on your charts) not your local time so make sure you adjust these as required. This is particularly helpful if you only want the EA to trigger orders in particular sessions like London, New York or both as they are the most liquid trading hours for most pairs and will not fire orders on consolidation reversal alerts.
Hour To Start: Set the start hour you would like to trade from.
Minute To Start: Set the start minute you would like to trade from, 0 is on the hour.
Hour To End: Set the end hour you would like the EA to stop trading at.
Minute To End: Set the end minute you would like to stop trading to, 0 is on the hour.
NOTE: These are only for entries and if you have selected to use basket trading it’s not advisable to limit the trading times.
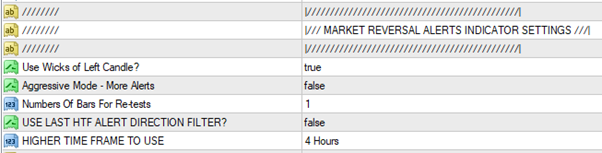
Market Reversal Alerts Indicator Settings
These settings are the common settings used by the market reversal alerts indicator that the EA is based upon. If you are not familiar with the indicator or additional dashboard for alerts you can find more details on those here:
market reversal alerts Indicator for MT4 - https://www.mql5.com/en/market/product/46295
Re-Test Dashboard for MT4 - https://www.mql5.com/en/market/product/62751
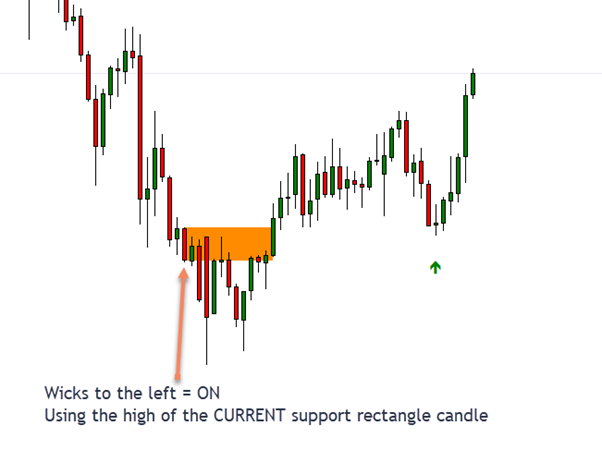
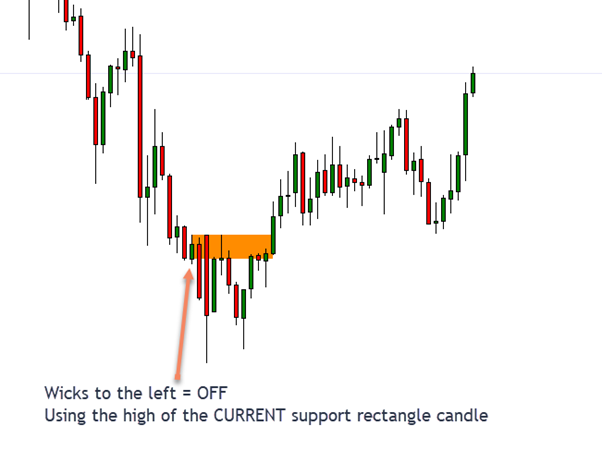
Use Wicks Of Left Candle: If set to TRUE this will draw larger support rectangles in cases where there is a wick to the left of the support candle. These wicks are often respected by price and will give a few less reversal alert signals if selected but not too many so it is optional. This does not make a big difference on timeframes of M15 or above and is only really necessary to change and test if looking to use the EA for scalping purposes.
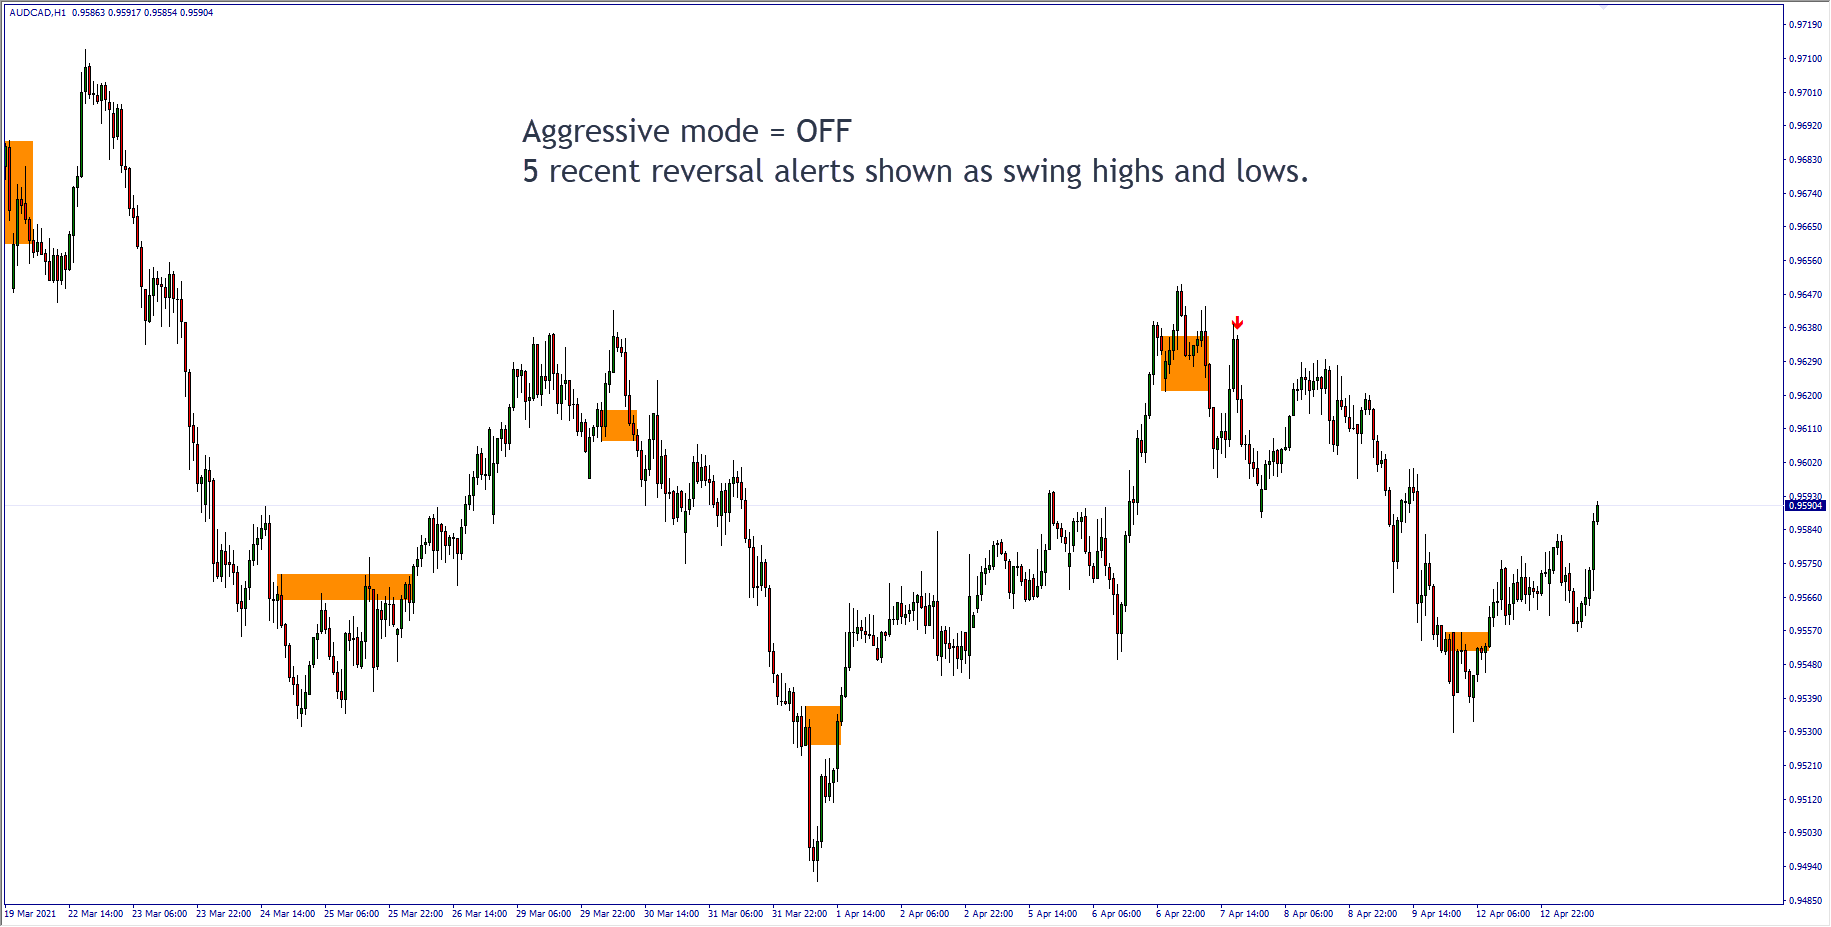
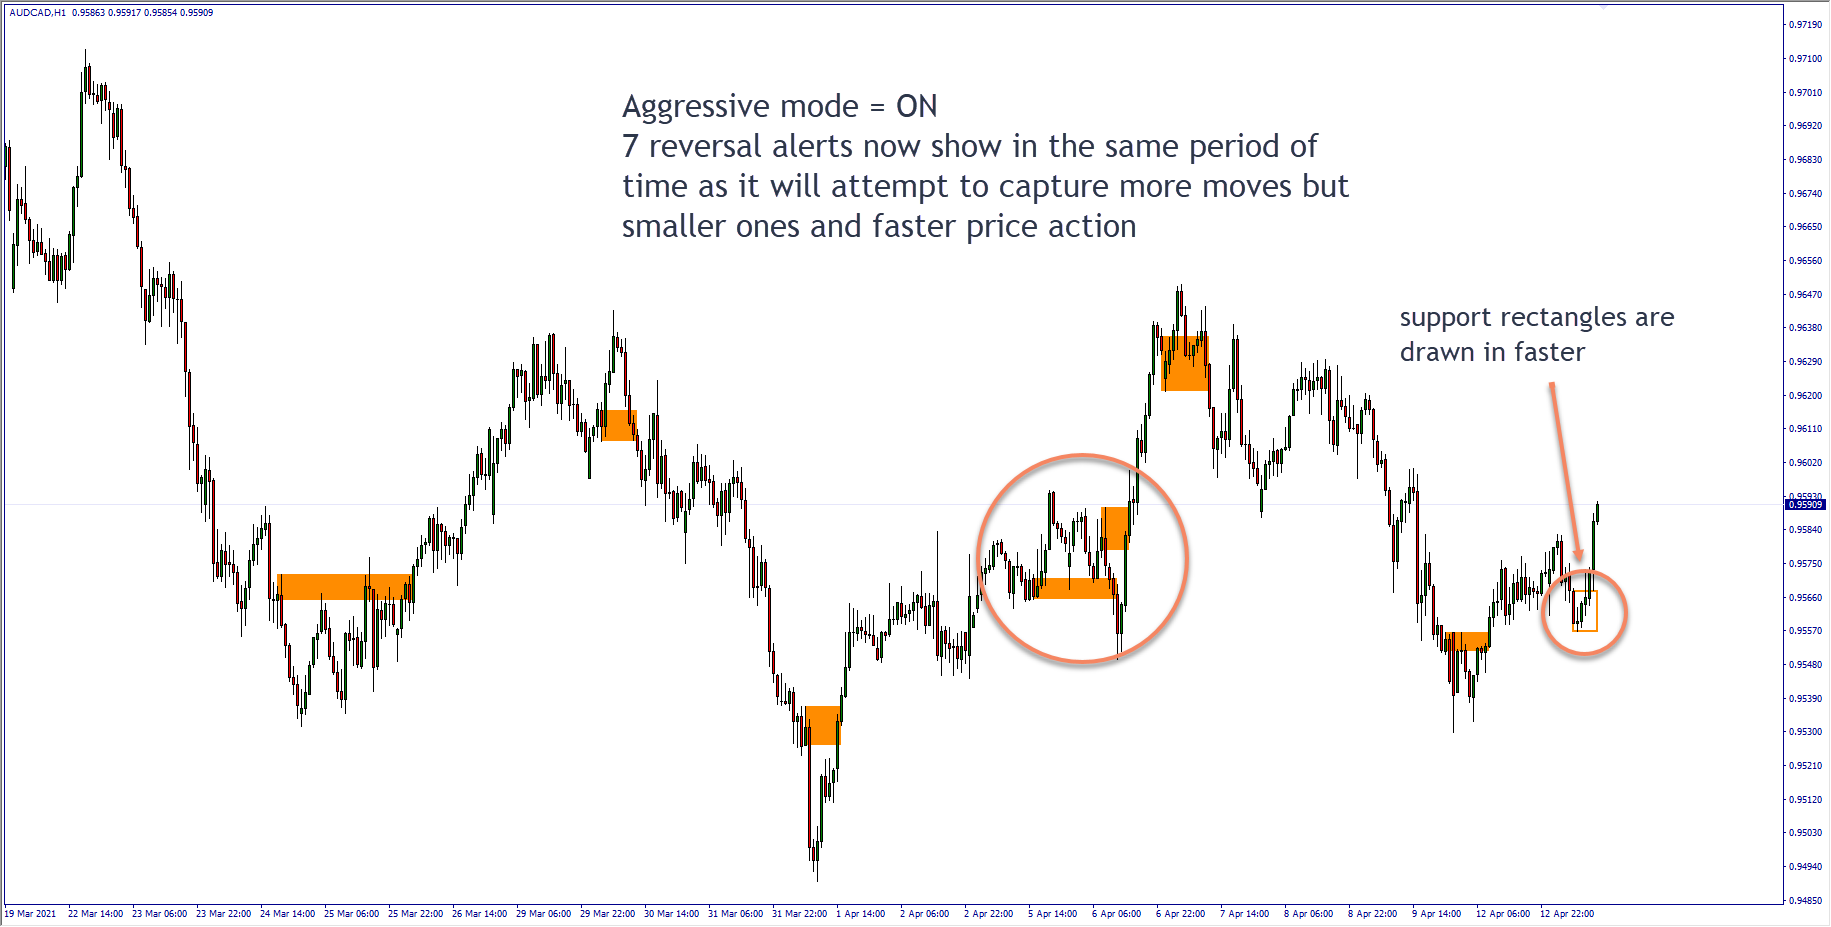
Aggressive Mode – More Alerts: If set to TRUE this will draw support rectangles faster and give reversal alerts more regularly. This setting was initially designed for “always in” trading methods where you get in and out of the market continuously on new market structure shift, specifically in scalping on lower timeframes. This setting will impact the overall performance so you can test this with different entry criteria as required. By default it is set to off as this will give more accurate reversal alerts and re-tests for higher timeframes.
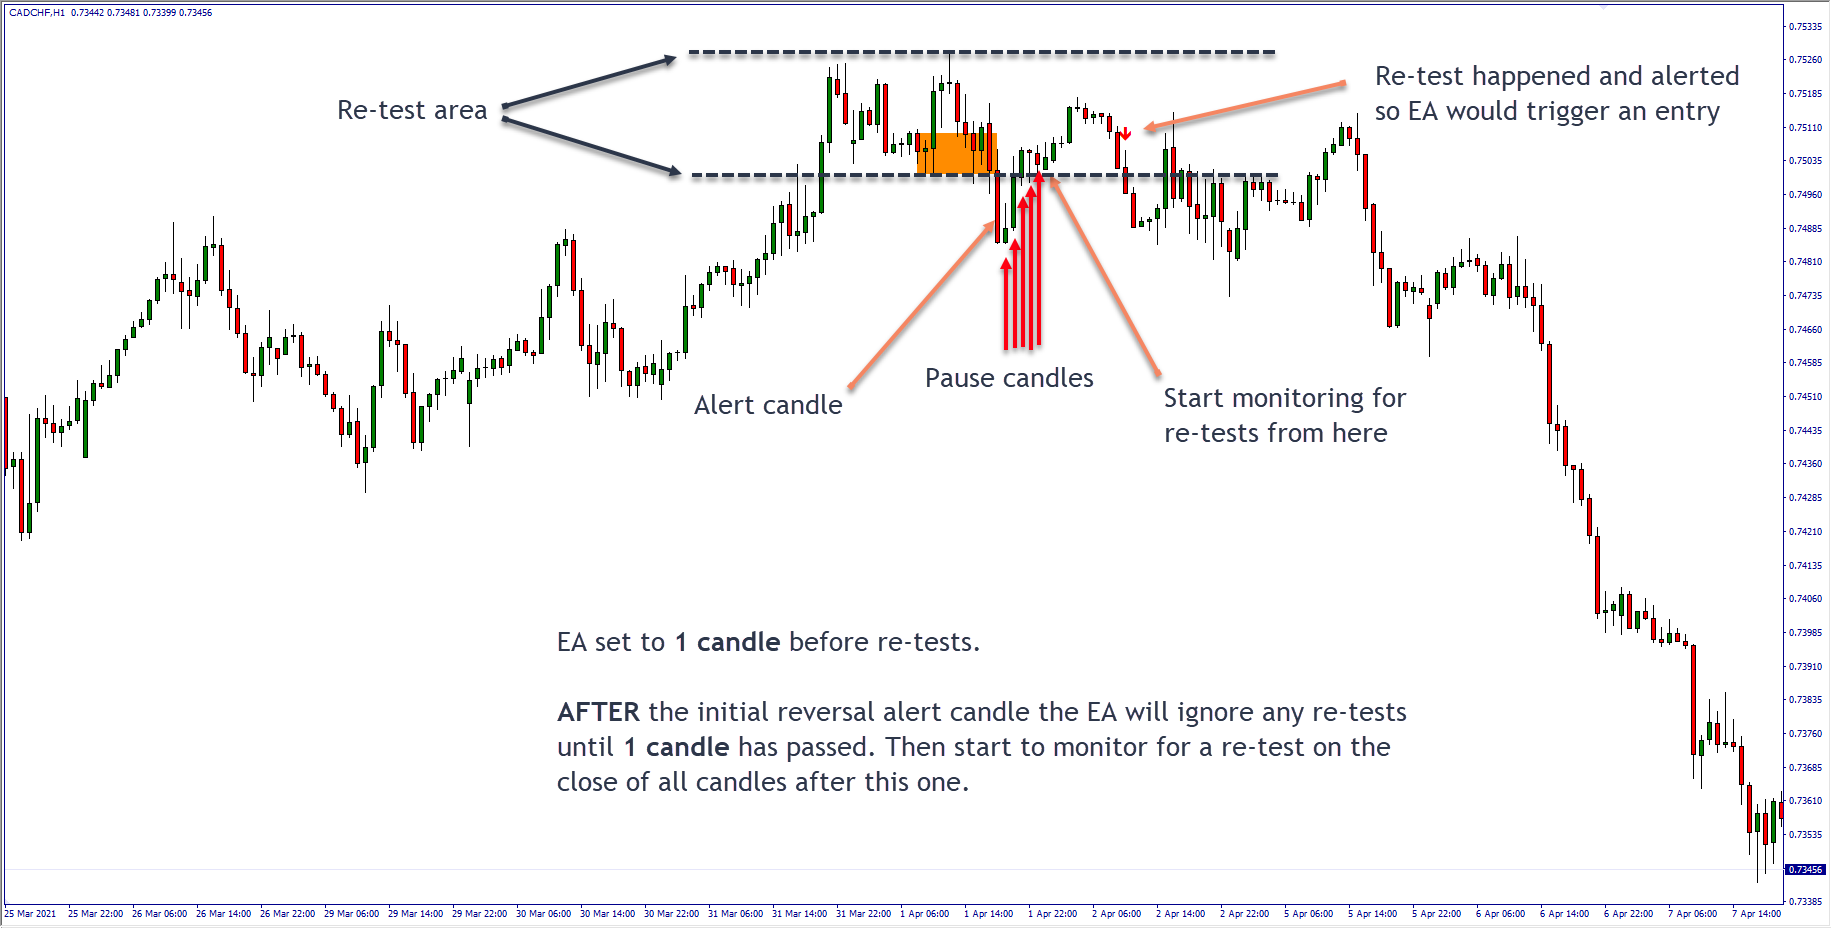
Number Of Bars For re-tests: This is only used if you have set the EA to trade using re-test entries instead of initial reversal alert entries. This is the number of candles you want the EA to wait before entering a trade on a re-test of the original reversal alert. Essentially this is the number of candles the EA will “pause for” before starting to look for an entry.
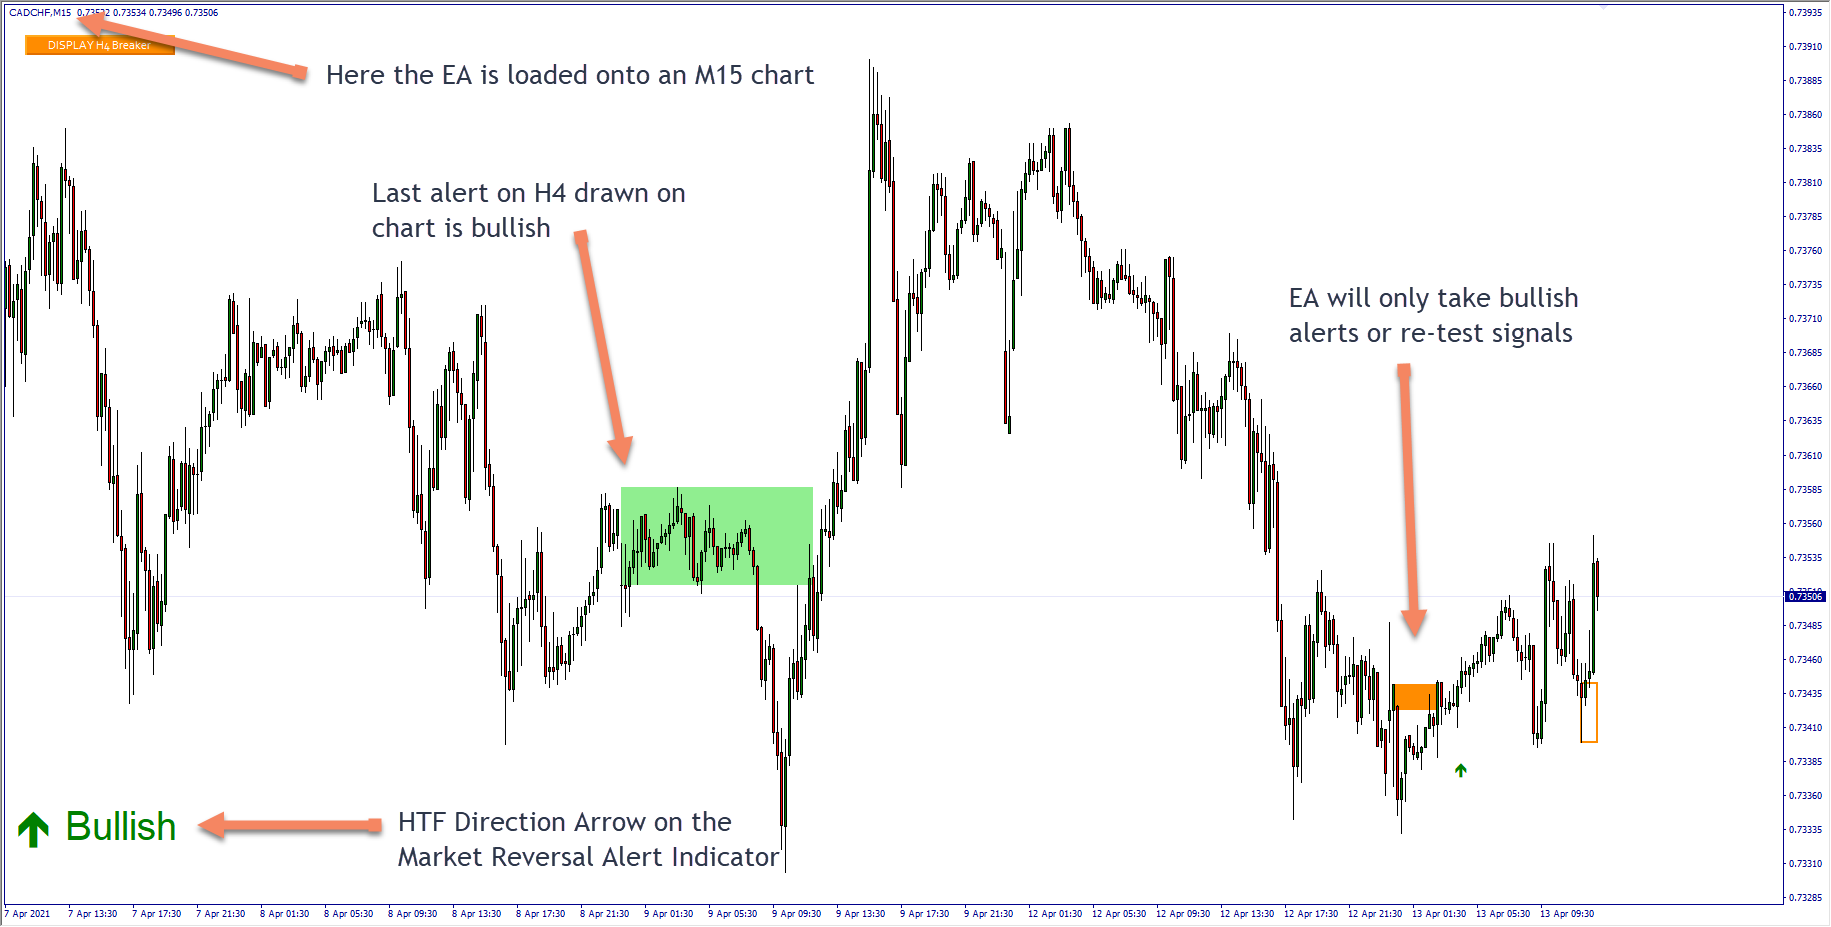
Use Last HTF Alert Direction Filter: If set to TRUE this will only take trade entries if the current signal (reversal alert or re-test) is in the same direction as the LAST alert on your selected HTF (higher time frame). So if you set this to true and select H4 as the higher timeframe the EA will look to see what direction the last alert was on that timeframe. It will only take trades in that direction.
e.g. If you select H4 as your higher time frame and you put the EA onto an M15 chart the EA will only take reversal alerts or re-tests on M15 in the same direction as the last alert on the higher timeframe.
This is the same as you will see on the indicator and is the HTF direction arrow if you are familiar with the indicator.
Higher Time Frame to Use: Here you select the timeframe of the HTF alerts to use if you are using this as a filter.
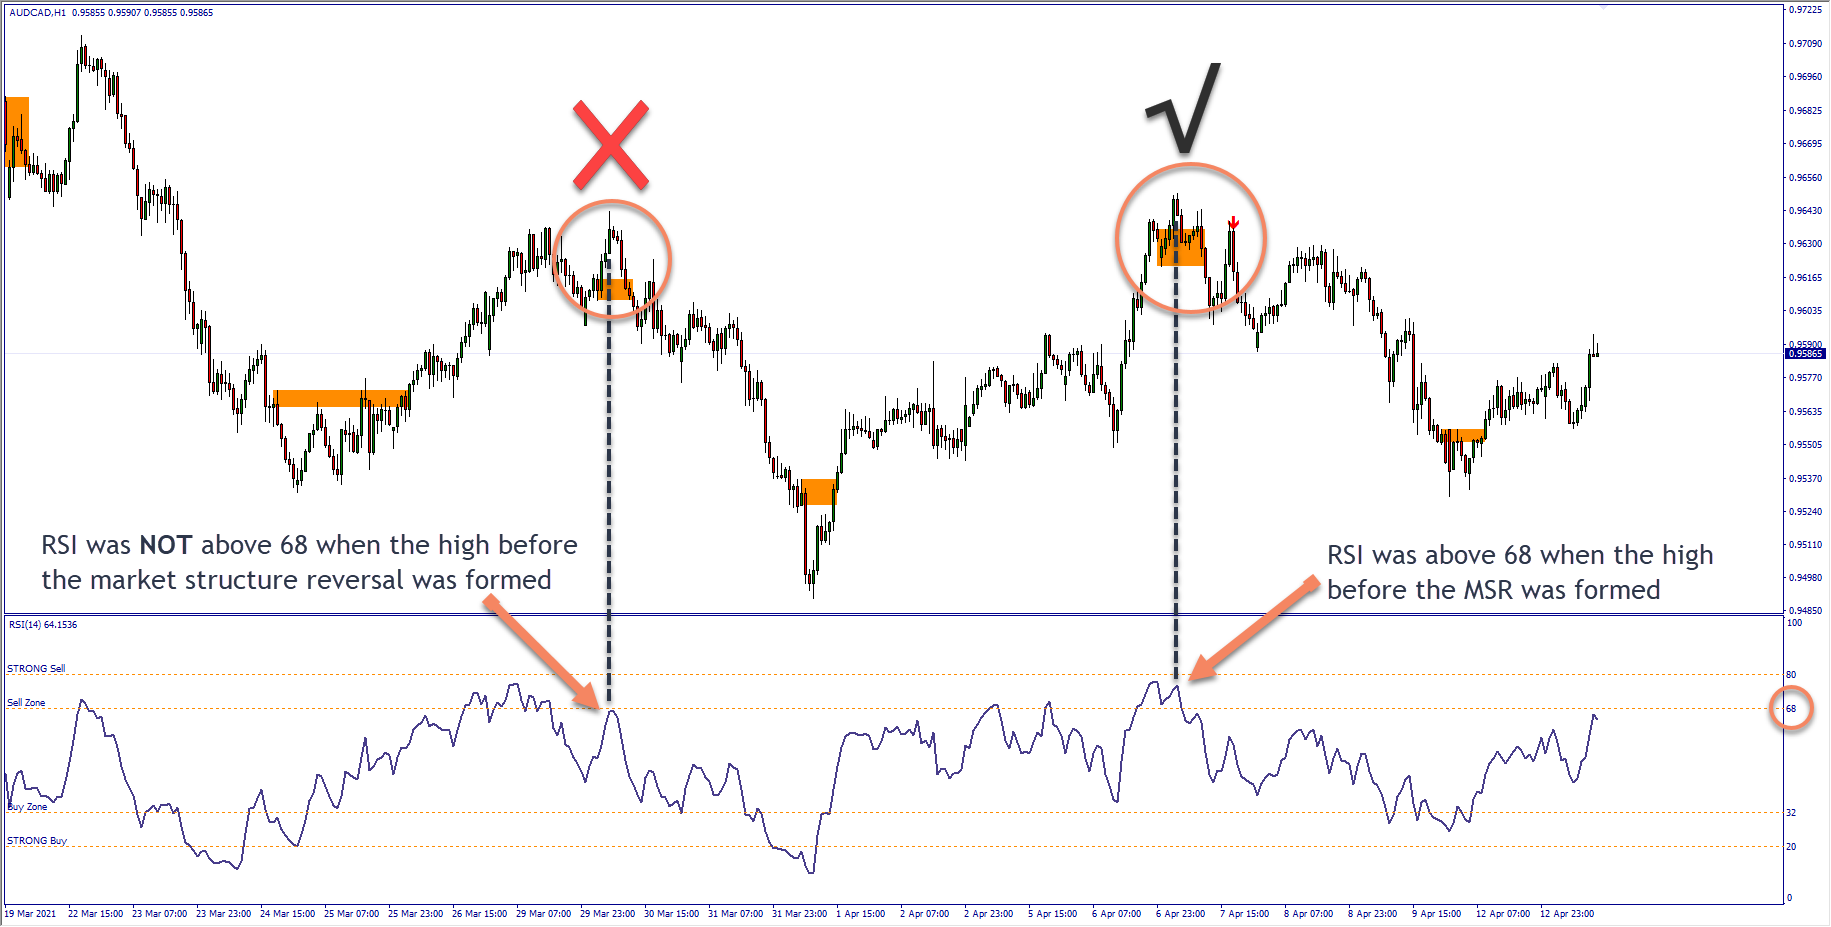
RSI Filter Settings

The RSI filter will only enter trades if a reversal alert or re-test triggered AND the high/low before the signal pushed the RSI to extreme levels beyond those that you set in the inputs below.
Use RSI Filter: TRUE or FALSE
RSI Period: Enter the RSI period you would like to use. The lower the number the faster the RSI will move and the likelihood of the signal being weaker. Recommended settings are 14 or above, the higher the stronger the move will need to be to get the indicator to extended conditions.
RSI High Level: Enter the high level that will be used for the EA to monitor and only take entries if price was pushed above this level at the high before the signal.
RSI Low Level: Enter the low level that will be used for the EA to monitor and only take entries if price was pushed below this level at the low before the signal.
RSI Type: Select the type of RSI to use. Close is the default for RSI but if you are trying to mimic the behaviour of the RSI line in the TDI (traders dynamic index) indicator then the median price setting is the closest one to use.
EXAMPLE OF THE RSI FILTER AND HOW IT WORKS
HTF (Higher Time Frame) RSI Filter Settings
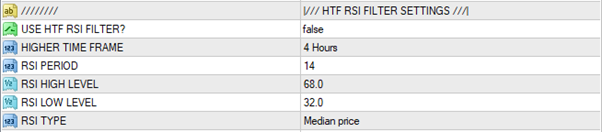
This is the same as the RSI filter but it allows you to only take trades when a higher time frame is extended. You can use this on it’s own or also with the normal RSI filter setting for greater accuracy with your entries. This is particularly useful if you want to ensure your entry is not only extended and likely to reverse or pullback on your current timeframe (previous setting) but also on a higher timeframe which would indicate the longer term move is also beginning to become exhausted.
The higher time frame RSI level is taken from the last closed candle on that time frame and is displayed on the EAs dashboard so you can see where it is.
EXAMPLE OF HOW THE HFT RSI FILTER WORKS
Use HTF RSI Filter: TRUE or FALSE
Higher Time Frame: Select the higher time frame you would like to use to monitor the RSI levels for.
RSI Period: Enter the RSI period you would like to use. The lower the number the faster the RSI will move and the likelihood of the signal being weaker. Recommended settings are 14 or above, the higher the stronger the move will need to be to get the indicator to extended conditions.
RSI High Level: Enter the high level that will be used for the EA to monitor and only take entries if price was pushed above this level at the high before the signal.
RSI Low Level: Enter the low level that will be used for the EA to monitor and only take entries if price was pushed below this level at the low before the signal.
RSI Type: Select the type of RSI to use. Close is the default for RSI but if you are trying to mimic the behaviour of the RSI line in the TDI (traders dynamic index) indicator then the median price setting is the closest one to use.
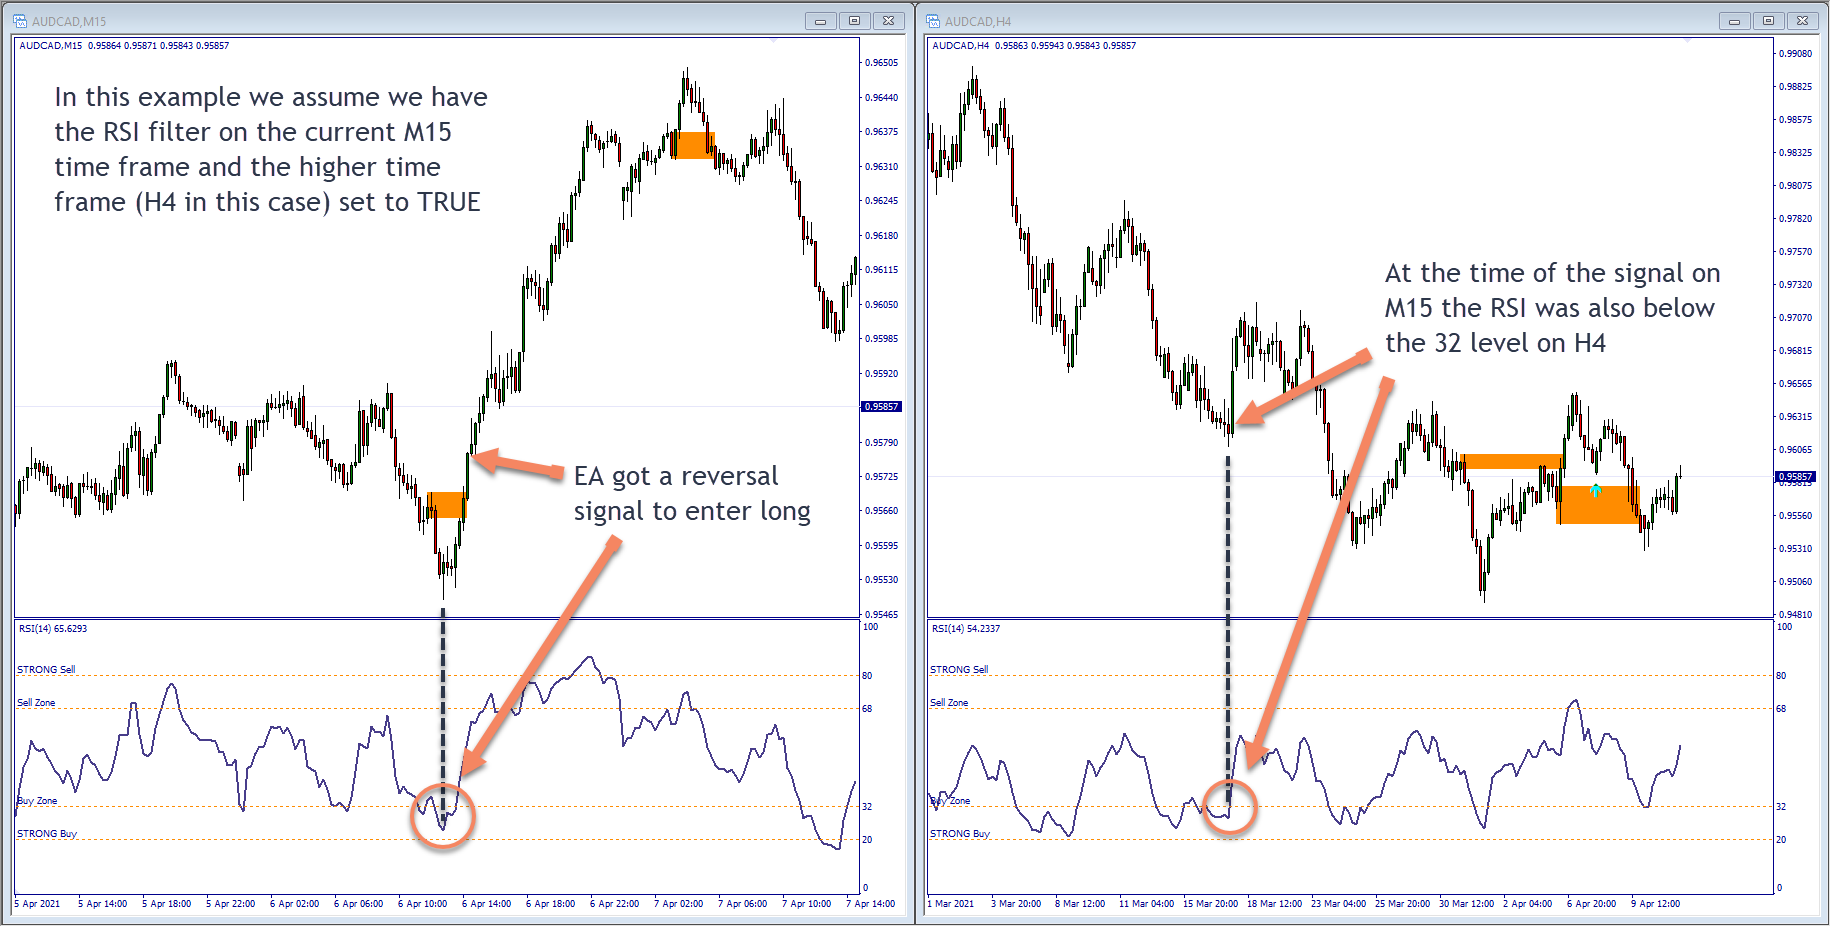
Moving Average Settings

The moving average filter will only trigger trades in line with the current trend based on the moving average of your choice on the current time frame the EA is running on. E.g., If a long signal is detected and price is ABOVE the moving average at the time of entry the trade will happen. If it is BELOW the moving average, it will not trigger the entry.
EXAMPLE OF HOW THE MOVING AVERAGE FILTER WORKS
Use MA as Filter: TRUE or FALSE
MA Period: Enter the moving average period you want to use as the filter.
MA Type: Select the type of MA you want to use. Simple, Exponential, Smoothed or Linear.
HTF (Higher Time Frame) Moving Average Settings

As with the above this filter works in the same way but allows you to use a higher time frame moving average as a filter for entries, so you only enter in line with the higher time frame trend. If the candle open of the higher time frame is above or below the moving average that is what the EA will use for directional bias.
Many people use the daily moving averages as a directional bias and only ever enter trades in the direction of the longer-term trend. This filter allows you to do that.
Use A HTF MA As Filter: TRUE or FALSE
Higher Time Frame to Use: Select the time frame you want to use for the HTF moving average filter.
MA Period: Enter the moving average period you want to use as the filter.
MA Type: Select the type of MA you want to use. Simple, Exponential, Smoothed or Linear.
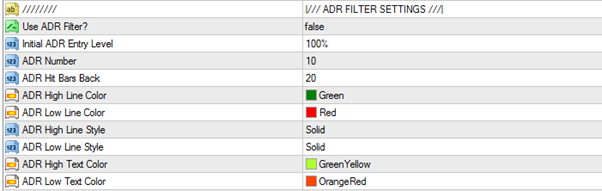
ADR (Average Daily Range) Filter Settings
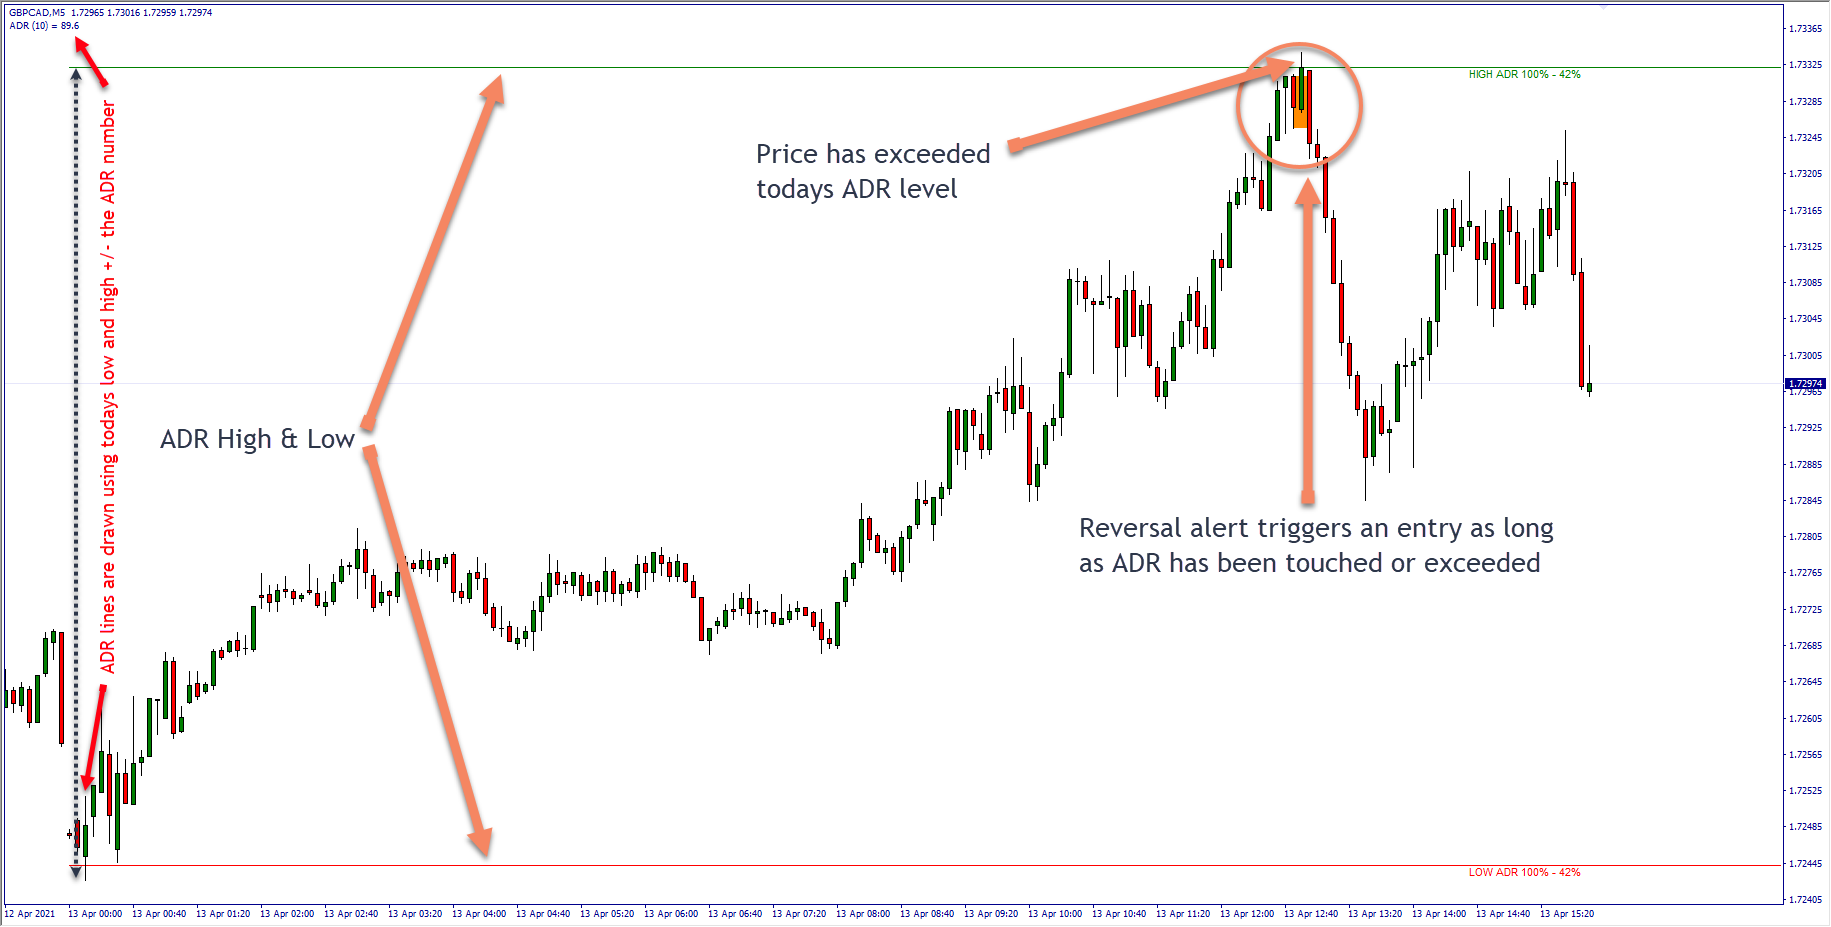
The ADR filter is designed to be used for entries on lower timeframes from M1 to M15 and will only take entries if price has EXCEEDED the ADR level today. The theory behind this filter is the price will usually (around 60% of the time) stay within its average daily range. When price moves excessively and quickly beyond this range it will often reverse or at least pull back into the range very often.
This is a particularly good filter to use with basket trading strategies as it allows you to enter multiple positions as price pushes above its ADR and gives reversal alerts. Price will very often just touch the ADR high or low levels and then reverse from there and pull back around 25-50% of its normal daily range.
There are indicators and a dashboard also available to help you trade manually with ADR extremes on MQL5s marketplace here:
ADR Reversal Indicator for MT4 - https://www.mql5.com/en/market/product/62757
ADR Reversal Dashboard for MT4 - https://www.mql5.com/en/market/product/62756
LOGIC CHANGE IN VERSION 4.0 AND ABOVE:
The logic introduced in version 2.0 to ignore ADR levels if basket trading after the first entry is now un-coded as we have seperate inputs to ignore all filters individually.
LOGIC CHANGE IN VERSION 3.4 AND ABOVE:
ADR Filter Adjustment – Logic was tweaked to better identify ADR high/low hits. There is now an input called “ADR Hit Bars Back” which defaults to 20. This input is only active when the ADR filter is set to true and measure back a set number of bars when a reversal alert happens to see if price had traded above/below the required ADR level. 20 is optimal for trading on M5 or M15 timeframes which is the ideal for ADR reversal trades but you can now fine tune if required.
LOGIC CHANGE IN VERSION 2 AND ABOVE:
When taking basket trades using the ADR filter the EA will now ignore the ADR levels after the initial entry. The EA only needs the ADR to be hit for entry one and additional entries will continue to be placed ignoring that filter in following days.
Now obsolete. See note above on version 4.0 logic.
EXAMPLE OF HOW THE ADR FILTER WORKS
Use ADR Filter: TRUE or FALSE
Initial ADR Entry Level: You can set the EA to only enter if specific extensions of ADR are reached. You can select the levels from 100% - 225%. The higher the level the fewer trades will be taken but the probability of a reversal or pullback exponentially increases.
ADR Number: The number of days range you would like to use, this is defaulted to 10 which has been proven to be the most reliable and accurate in back testing.
ADR Hit Bars Back: This input is only active when the ADR filter is set to true and measure back a set number of bars when a reversal alert happens to see if price had traded above/below the required ADR level
ADR High Line Colour: The colour of the ADR high line drawn by the EA on the chart.
ADR Low Line Colour: The colour of the ADR low line drawn by the EA on the chart.
ADR High Line Style: The style of the ADR high line drawn by the EA on the chart.
ADR Low Line Style: The style of the ADR low line drawn by the EA on the chart.
ADR High Text Color: The colour of the ADR high text drawn by the EA on the chart.
ADR Low Text Color: The colour of the ADR low text drawn by the EA on the chart.
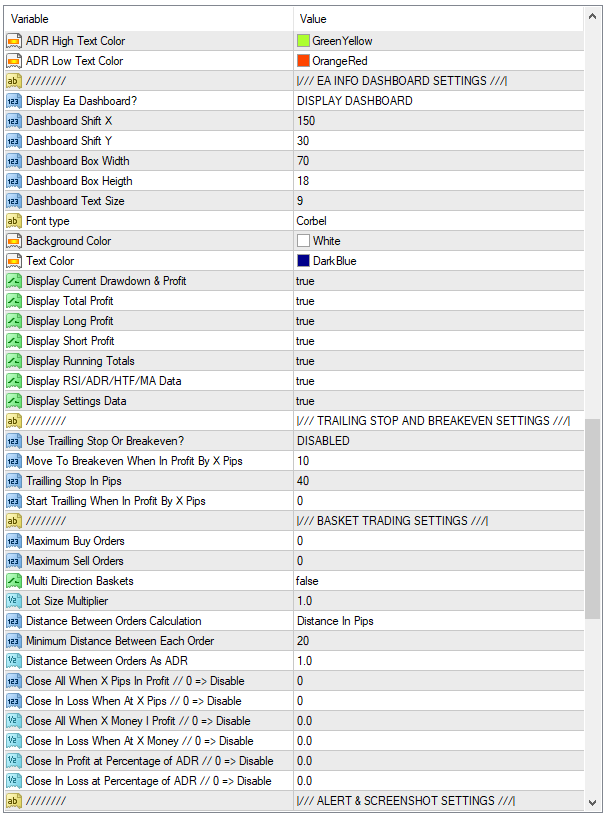
EA Info Dashboard Settings

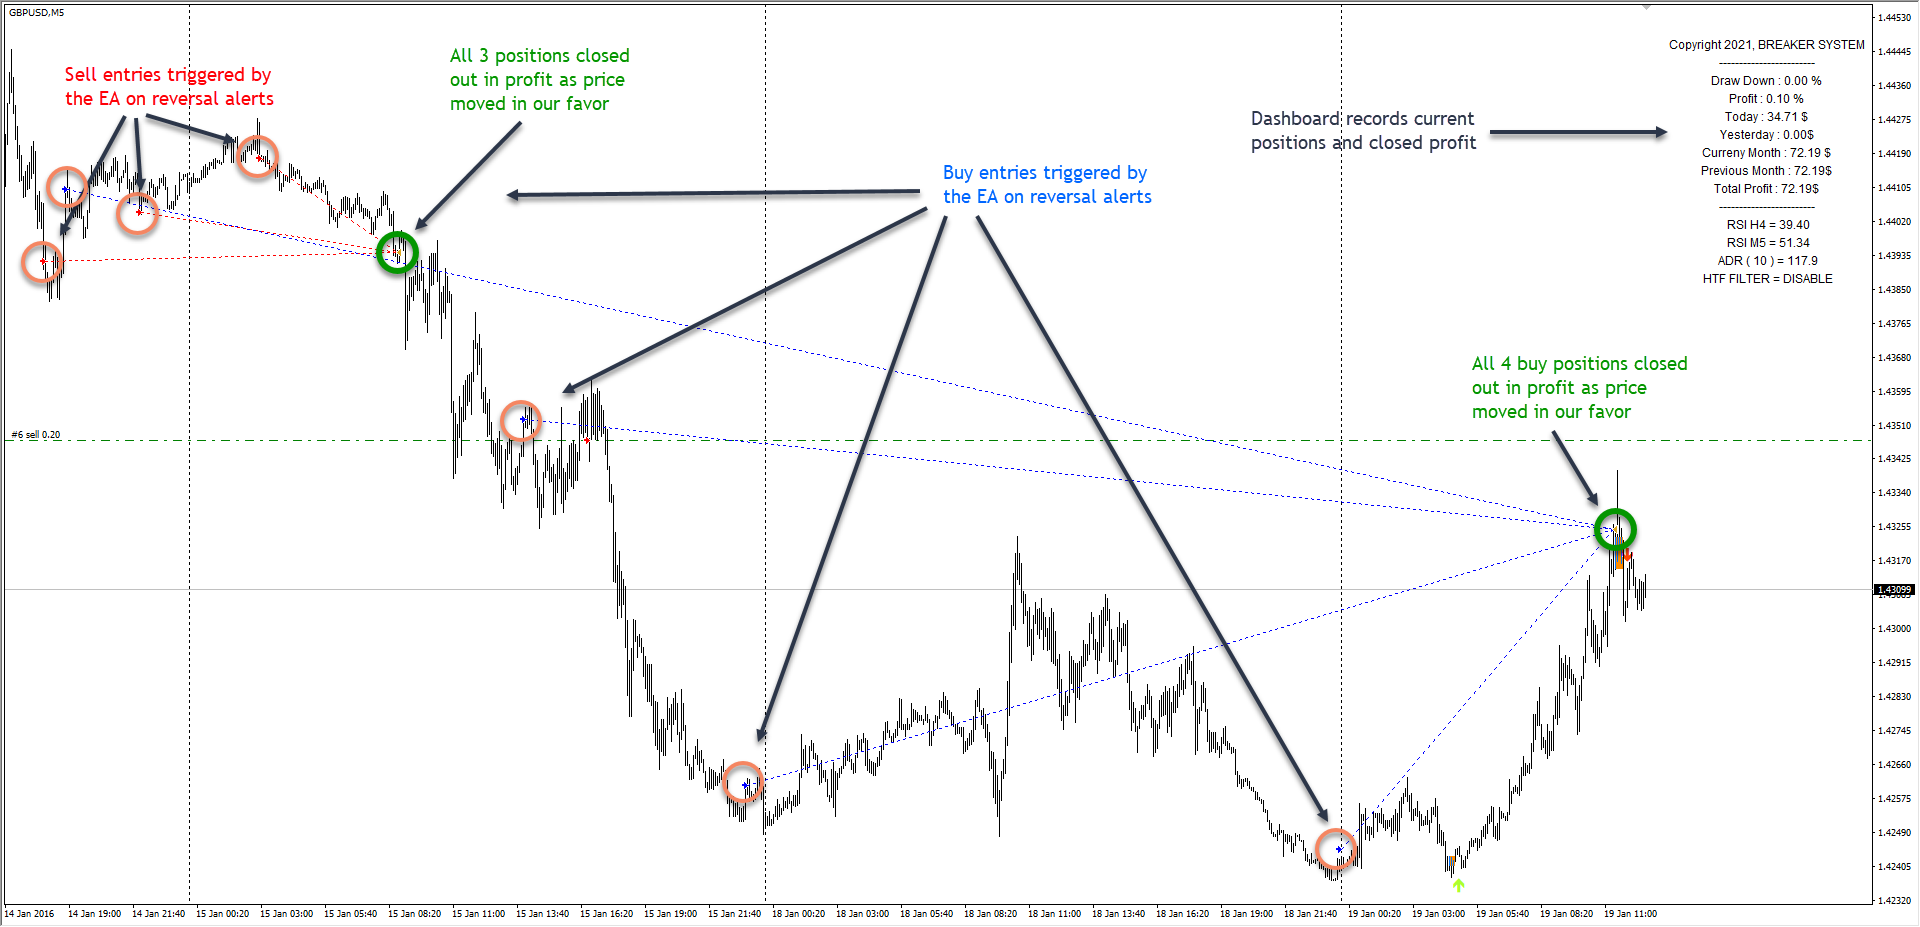
The dashboard can be turned on or off and will display current information about the account and profitability of the EA. It shows a LOT of data and from version 4 you can now choose what data is displayed so you only see what is important to you.
Play with each of the display inputs and yu will see what is shows to you but they are pretty self explanatory. For backtesting visually the "Display RSI/ADR/HTF/MA data" setting is particularly useful as you can see data about indicators used to filter out trades. You can also see the trade comment and magic numbers used for the chart you are using the EA on displayed with the "settings data" input.

Display EA Dashboard: DISPLAY DASHBOARD or HIDE DASHBOARD
Dashboard Shift X: Move the dashboard a selected distance from the left-hand edge of the screen.
Dashboard Shift Y: Move the dashboard a selected distance from the top edge of the screen.
Dashboard Box Width: Set the width of the dashboard background.
Dashboard Box Height: Set the height of the dashboard background.
Dashboard Text Size: Set the text size for the dashboard.
Font Type: Select the font you would like to use for the text.
Background Color: Select the background colour for the dashboard.
Text Color: Select the text colour for the dashboard.
Trailing Stop and Breakeven Settings

The EA has options to automatically protect profitable trades with either a even stop or a trailing stop. If you would like to move to breakeven and then trail a stop also you can just use the trailing stop feature and set it to start trailing when X pips in profit.
Use Trailing Stop or Breakeven: DISABLED or TRAILING STOP or BREAK EVEN
Move to Breakeven When in Profit By X Pips: This is just a number entry and designates the number of pips in profit a position should be before it is protected with a break even stop loss.
Trailing Stop in Pips: The is the number of pips the EA will trail price by as it moves into profit. The trailing stop kicks in straight away as price moves in your favour. If you don’t want to use a trailing stop immediately you can select the number of pips your position should be in profit by before trailing using the next setting. It is advisable to have these set to the same number.
Start Trailing Stop When in Profit By X Pips: This is the amount of pips your position needs to be in BEFORE your trailing stop is activated. i.e. If you set this to 20 and the trailing stop to 20 then as soon as price is 20 pips in profit you will get a breakeven stop that then trails with price as it moves in your favour.
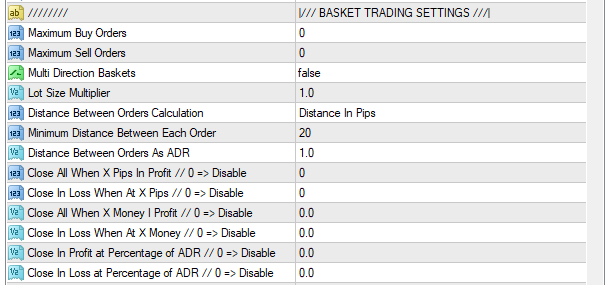
Basket Trading Settings
This is a more advanced entry strategy and is designed to be used without a stop loss. You can use a stop also but I would recommend a wide one and ADR is a good stop strategy to use with basket trading to start scaling out of baskets that are trending against you.
Basket or position trading strategies use multiple positions to average into price moves and these settings will enter on reversal alerts in line with your chosen filters constantly until your profit targets or loss targets area achieved. Additional entries are only taken if price moves against your current position in the market, i.e. if you buy and price drops the EA will take additional entries to reduce your average price helping you to exit the failed trade with a profit. This method utilises the natural swings in market structure to generate constant profits on a regular basis.
Maximum Buy Orders: The maximum number of buy trades the EA will take on the current instrument being traded. If set to 0 or 1 The EA will only take one trade. Default is 0.
Maximum Sell Orders: The maximum number of sell trades the EA will take on the current instrument being traded. If set to 0 or 1 The EA will only take one trade. Default is 0.
Multi Direction Baskets: If you have trades running in both directions (longs and shorts at the same time) you can make the EA treat all the entries as one basket. This can be useful as you can get into profit overall on a position with both directions and you can set the TP/SL basket settings to close out all positions at once when a specific TP or SL level is achieved. This setting will affect the basket trading TP and SL inputs below so experiment with different options.
Lot Size Multiplier: This will increase the lot sizing of every additional position in your basket (in the same direction) by a set percentage multiplier. The default is 1.0 which is to use the same lot sizing each entry. If you set this to 1.5 is will multiply the initial lot size by 1.5 times. E.g. a 0.05 initial entry will trade as follows: 0.05, 0.07,0.10, 0.15, 0.22 etc… Lots are rounded to the nearest they can be dependent on the initial entry size.
CAUTION: Martingale type strategies where you enter with anything larger than 2.00 as a multiplier will blow your account very quickly if not using a stop loss. This is designed to scale in gradually with the idea of accelerating the time taken to reach targets and breakeven points. Recommended multiplier should be 1.2-1.5 but try out different settings and see how it affects drawdown.
NOTE: If your initial entry is 0.01 lot the EA will not be able to multiply accurately but will gradually increase until it reaches a level the lot multiplier will be able to function properly.
Distance Between Orders Calculation: Inputs are "Distance in Pips" or Distance in ADR Percentage".
Distance in Pips - This will use the "Minimum Distance Between Each Order" input (this is default setting).
Distance in ADR Percentage - This will use the "Distance Between Each Orders as ADR" input.
Minimum Distance Between Each Order: Enter the number of pips you want as a minimum between each entry.
If price moves against your initial position this is the number of pips in drawdown from your last entry price needs to be before it will take a new entry on a reversal alert or re-test (depending on your selection). This stops the EA getting into new trades during consolidation periods which are too close to your last entry.
Distance Between Orders As ADR: Enter the percentage of ADR you want to use to calculate the minimum number of pps between each entry. Enter as a fraction, e.g. 0.75 = 75% of ADR, 1 = 100% of ADR, 1.50 = 150% of ADR.
This works as above but will calculate the distance in pips using a percentage of the current instruments ADR. e.g. If the ADR (average daily range) of GBPUSD is 100 pips and you enter 0.5 as the percentage of ADR to use the EA will make sure entries are no closer than 50 pips apart.
Close All When X Pips in Profit: When all your trades hit this amount of pips in profit the EA will close all positions to generate an overall gain.
Close in Loss When at X Pips: If the total pip count hits this amount of pips in loss the EA will close all positions at a loss.
Close All When X Money in Profit: When all your trades hit this amount of monetary profit based on your accounts base currency the EA will close all positions to generate an overall gain.
Close in Loss When At X Money: If the total monetary amount hits this amount of money in loss the EA will close all positions at a loss.
Close in Profit at Percentage of ADR: If the total pip count of all your open positions hits this percentage of the current average daily range (ADR) the EA will close all positions for a profit. NOTE: You must enter the percentage of ADR as follows: 1.0 = 1XADR, 0.50 = 50% of ADR etc…
Close in Loss at Percentage of ADR: If the total pip count of all your open positions hits this percentage of the current average daily range (ADR) the EA will close all positions for a loss. NOTE: You must enter the percentage of ADR as follows: 1.0 = 1XADR, 0.50 = 50% of ADR etc…
EXAMPLE OF BASKET TRADING ENTRIES USING STANDARD REVERSAL ALERTS
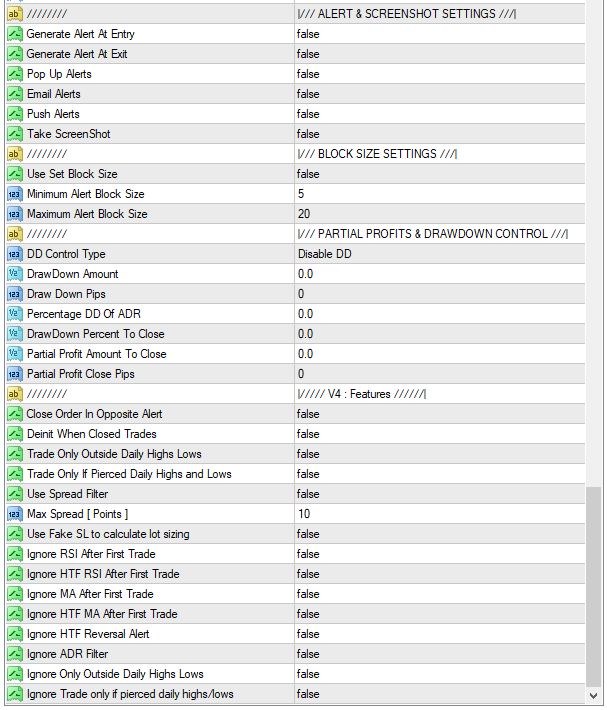
Alert & Screenshot Settings
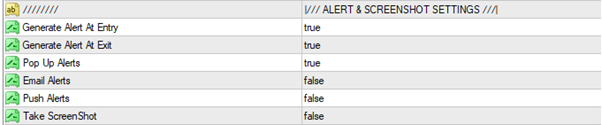
The EA has the ability to just alert you to entries if you have the EA mode set to “alert mode” and here you can set whether you want alerts by pop up, email or push. If you have the EA in “trading mode” it will also send you there alerts when a trade is taken and also when a trade is exited too.
You also have the option here to have the EA take a screenshot every time it enters or exits a trade. The screenshots will be of your actual chart including any indicators you have on it at the time. Screenshots are stored in you MT4 data folder. To find them goto “file > open data folder” in your MT4, then navigate to the “MQL4 > files” folder and you will see a folder there called screenshots. The screenshots will be stored by pairs in their own folders and the filenames are the date and time of the screenshot.
Block Size Settings

Here you can set the minimum and maximum size of the reversal alert block. This setting can be useful to filter out certain types of reversal alerts that you may spot which often do not work well.
You can see an example of how this is calculated in the screenshot below:
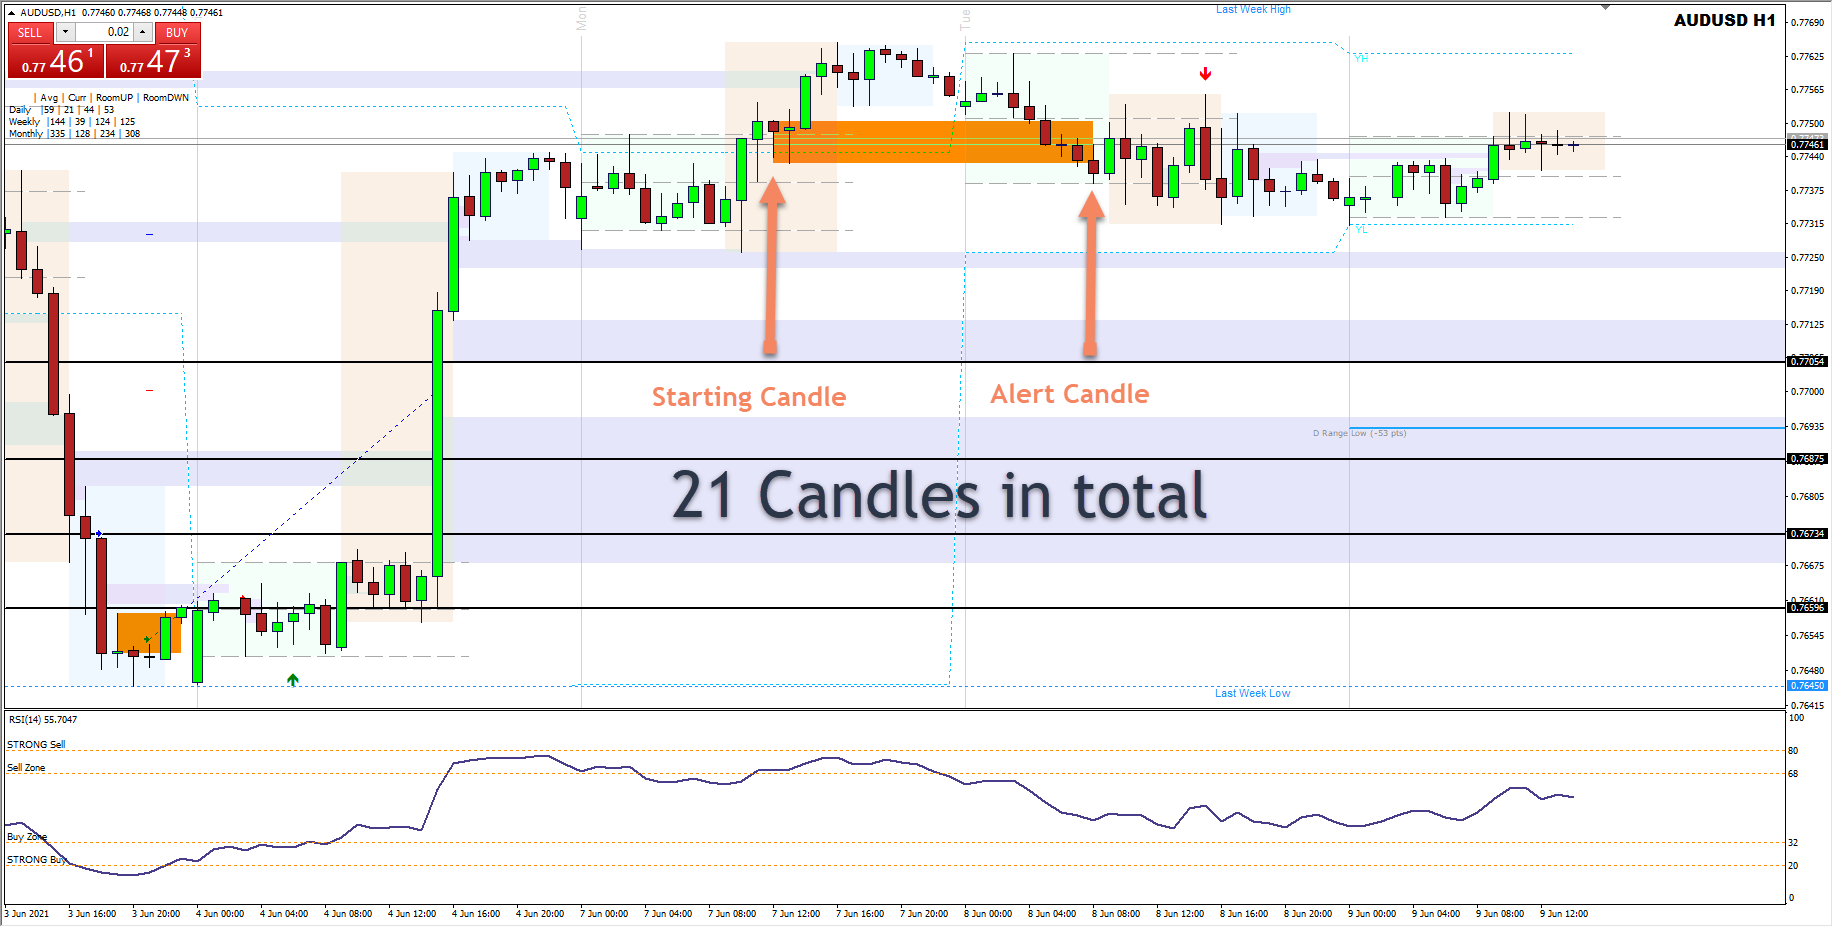
Here there are 21 candles in total from where the reversal alert started and the actual alert candle triggered the alert. Larger alert blocks like this can often be just consolidation areas.
Partial Profits & Drawdown Control
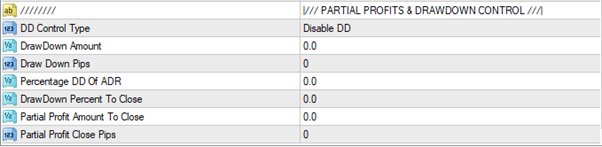
Partial Profits Settings
NOTE: The partial profits settings ONLY work on single trades. If you have more than one position open in one direction it will not take partial profits. This is designed for single trades only not baskets.
![]()
in the example above we will close out 75% of the position when we get to 50 pips
Here you can set the EA to take a partial profit for you based on a pip target. If you enter 50 in the “partial Profit Close Pips” input the EA will close out a set percentage of your open position(s) when the total reaches the set pip target.
The “Partial Profit Amount To Close” input is where you enter the percentage of your position(s) you want to close when the pip target is reached.
NOTE: You must enter the Partial Profit Amount To Close as follows: 1.0 = 100% of position, 0.50 = 50% of position etc…
If you are using the EA to just trade single positions at a time it will close out just a percentage of that one position. If you are basket trading with the EA it will wait until all your entries in the same direction hit the pip count and close out that percentage from each position.
This setting is particularly useful if you are trading with a trailing stop loss and single positions. The EA will close out that percentage EVERY time your position(s) reaches the pip target.
i.e. if you set 30 pips as a target and ask the EA to close out 50% of the position(s) it will close 50% at 30 pips, a further 50% at 60 pips, a further 50% at 90 pips and so on.
Drawdown Control Settings

Drawdown control is used to manage positions that go against you and gradually scale out of them as they move further away from the entry price. This is a method of taking losses gradually and commonly used by basket traders to help ease drawdown on positions that may temporarily move against them. This will also completely close out positions the move drastically far away from the entry if it needs to.
These settings are advised when sing basket entries and it is also advisable to use the “per trade” setting so the EA will close out each position as it get further away while leaving intact positions that are in profit and will help to accelerate the time it takes to hit profit targets.
DD Control Type = Disabled, Per Trade, Per Basket
Here we set whether we want the EA to not use drawdown control (normal for single entry trading) or whether we want it to close out a percentage of each position or the entire basket of positions in one direction. NOTE: This will not close out a percentage of ALL positions if they are in opposing directions, just all those in the same direction.
DrawDown Amount = Enter the amount of drawdown in your account currency that you would like the EA to start performing drawdown control. This figure MUST be entered as a negative figure. e.g. -50 if you want to have the EA start DD control when your trade/basket hits 50 in drawdown.
Functionality of DrawDown Amount: This will close the set percentage you have entered EVERY time a trade or basket (depending on your setting) hits this amount until the lot size gets so small it can no longer close a percentage and at this point it will close the remainder of the order completely.
Draw Down Pips = Enter the amount of drawdown in pips that you would like the EA to start performing drawdown control. This figure MUST be entered as a negative figure. e.g. -50 if you want to have the EA start DD control when your trade/basket hits 50 pips in drawdown.
Functionality of Draw Down Pips: This will close the set percentage you have entered EVERY time a trade or basket (depending on your setting) hits a multiple of this amount until the lot size gets so small it can no longer close a percentage and at this point it will close the remainder of the order completely. e.g. if you set this to -50 the EA will close out when price has moved into drawdown by 50 pips, 100 pip , 150 pips, 200 pips etc…
Percentage DD Of ADR = Enter the amount of drawdown as a percentage of the current ADR that you would like the EA to start performing drawdown control. This figure MUST be entered as a negative figure.
e.g. -0.5 if you want to have the EA start DD control when your trade/basket hits 50% of the current ADR figure in pips in drawdown.
Functionality of Percentage DD Of ADR: This will close the set percentage you have entered EVERY time a trade or basket (depending on your setting) hits a multiple of this amount in pips until the lot size gets so small it can no longer close a percentage and at this point it will close the remainder of the order completely. e.g. if you set this to -0.5 the EA will close out when price has moved into drawdown by 50% of the current ADR calculated in pips. If todays ADR is 60 pips the EA will start to close at 30 pips, 60 pips, 90 pips, 120 pips etc…
NOTE: It is advisable to ONLY USE ONE of the above and not a combination. It is normal to select the version of drawdown control that you are using to measure your stop loss and take profit. i.e. if you have selected to target a percentage of ADR for your basket of orders it is advisable to use a percentage of ADR for drawdown control also. You can use any but only one at a time or the EA will close too much position size too often and lead to very negative results.
DrawDown Percent To Close = Enter how much you want the EA to close when it gets to your chosen target level in drawdown. NOTE: You must enter the Percent To Close as follows: 1.0 = 100% of position, 0.50 = 50% of position etc…
V4 Features
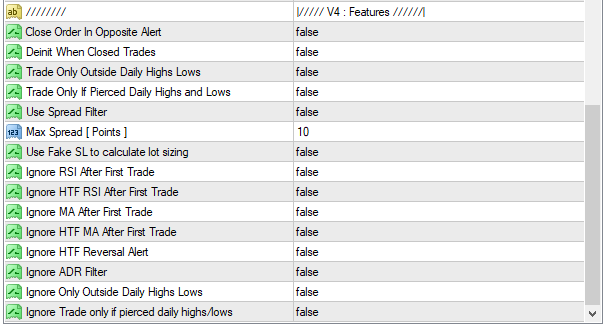
Version 4 offers many enhancements to help basket traders get into positions more effectively plus a number of additional enhancements requested by existing users of the EA.
All of these filters are defaulted to FALSE so if updating the EA you will not be affected by them, simply change to TRUE to activate as required.
NOTE: When upgrading the EA version if you are using the ADR filter you need to set the ignore filter for ADR to true so it will continue taking trades after initial entry like the old logic introduced in version 2.
NEW INPUTS IN VERSION 4:
Close Order In Opposite Alert: This is a new setting that will simply close out your position(s) as soon as there is a market reversal alert in the opposite direction. This is useful for people who want to take single trades with or without a stop loss and be "always in" the market. Whatever the reason for entry this setting will just get you out on the next reversal, regardless of whether you are in profit or not.
This is different to the setting "close traders on opposite signal" which takes into account all your filters having to be met.
Deinit When Closed Trades: "Deinit is a fancy coding term for turn off!".This is simply a setting to remove the EA from your chart once the orders are closed. i.e. turn off the EA after it's completed a trade. This setting was requested due to people wanting to place the EA on the chart when certain conditions were met and just want to take one trade or one basket and make sure the EA did not move onto further positions which may not meet their personal criteria.
Trade Only Outside Daily Highs Lows: This input makes the EA only take trades if the closing candle that causes the alert is above yesterdays high for short trades or below yesterdays low for long trades. The theory here is that price will often push outside of the previous days range to find liquidity in the market and then trade back the opposite way.
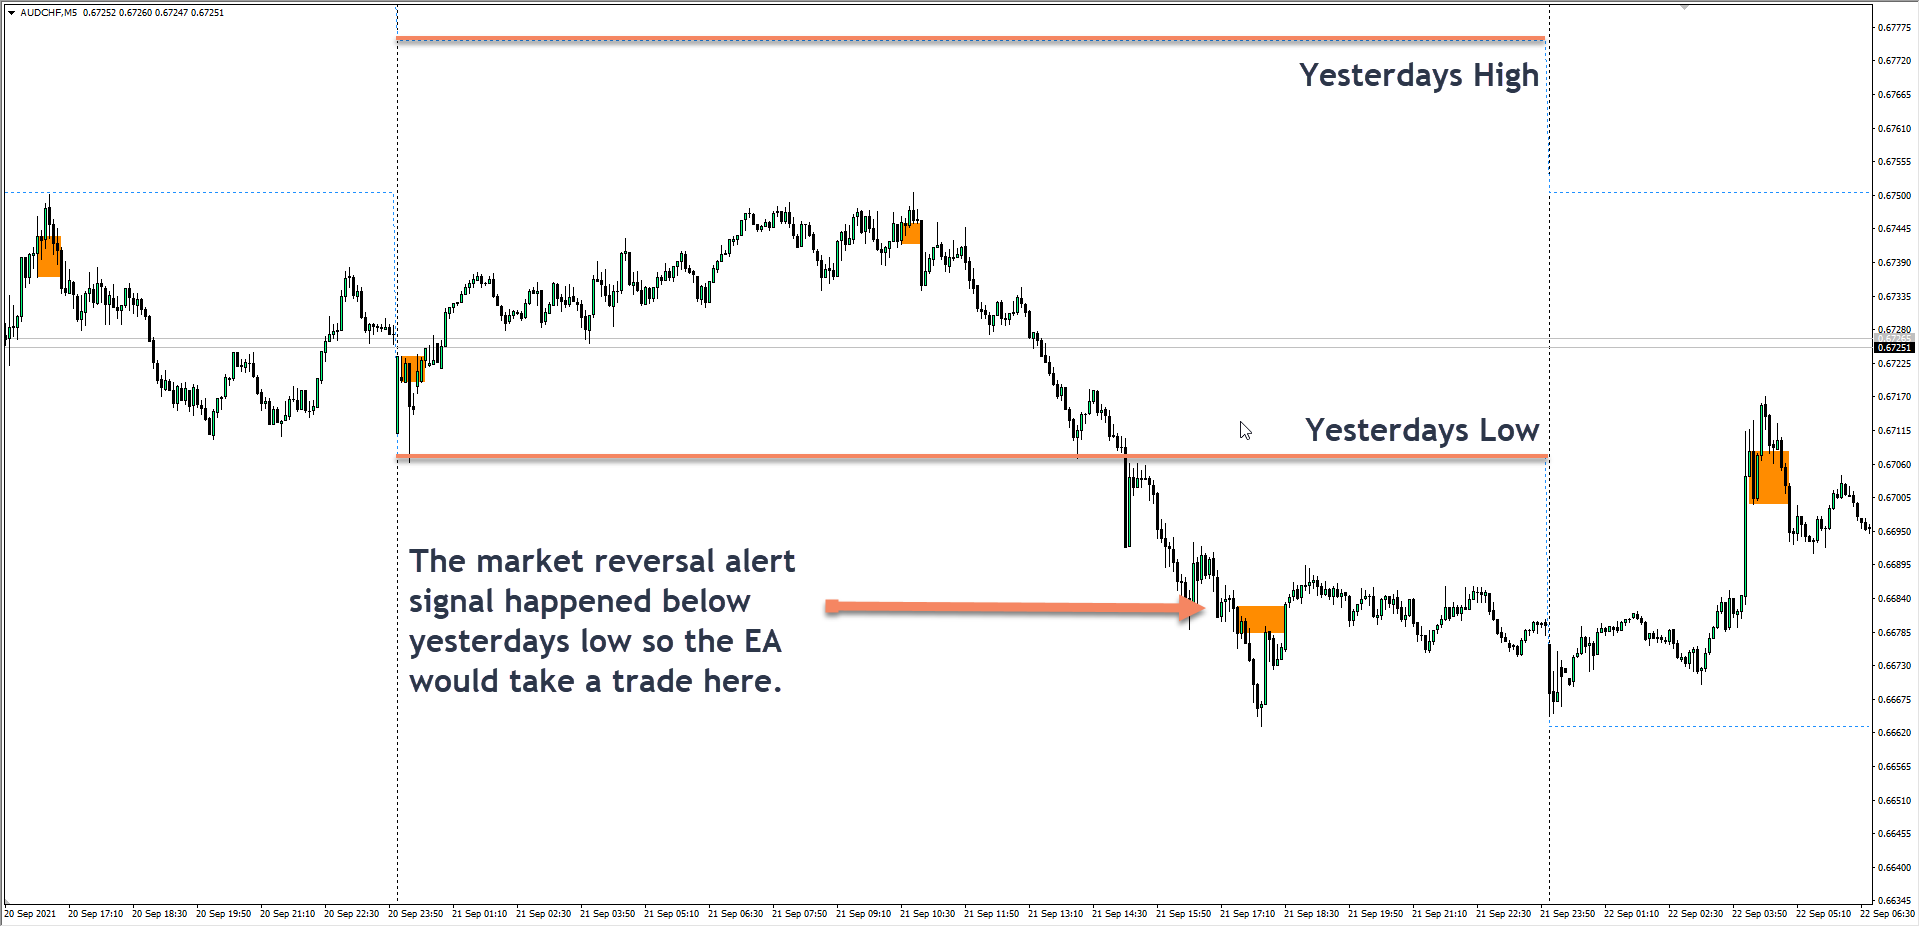
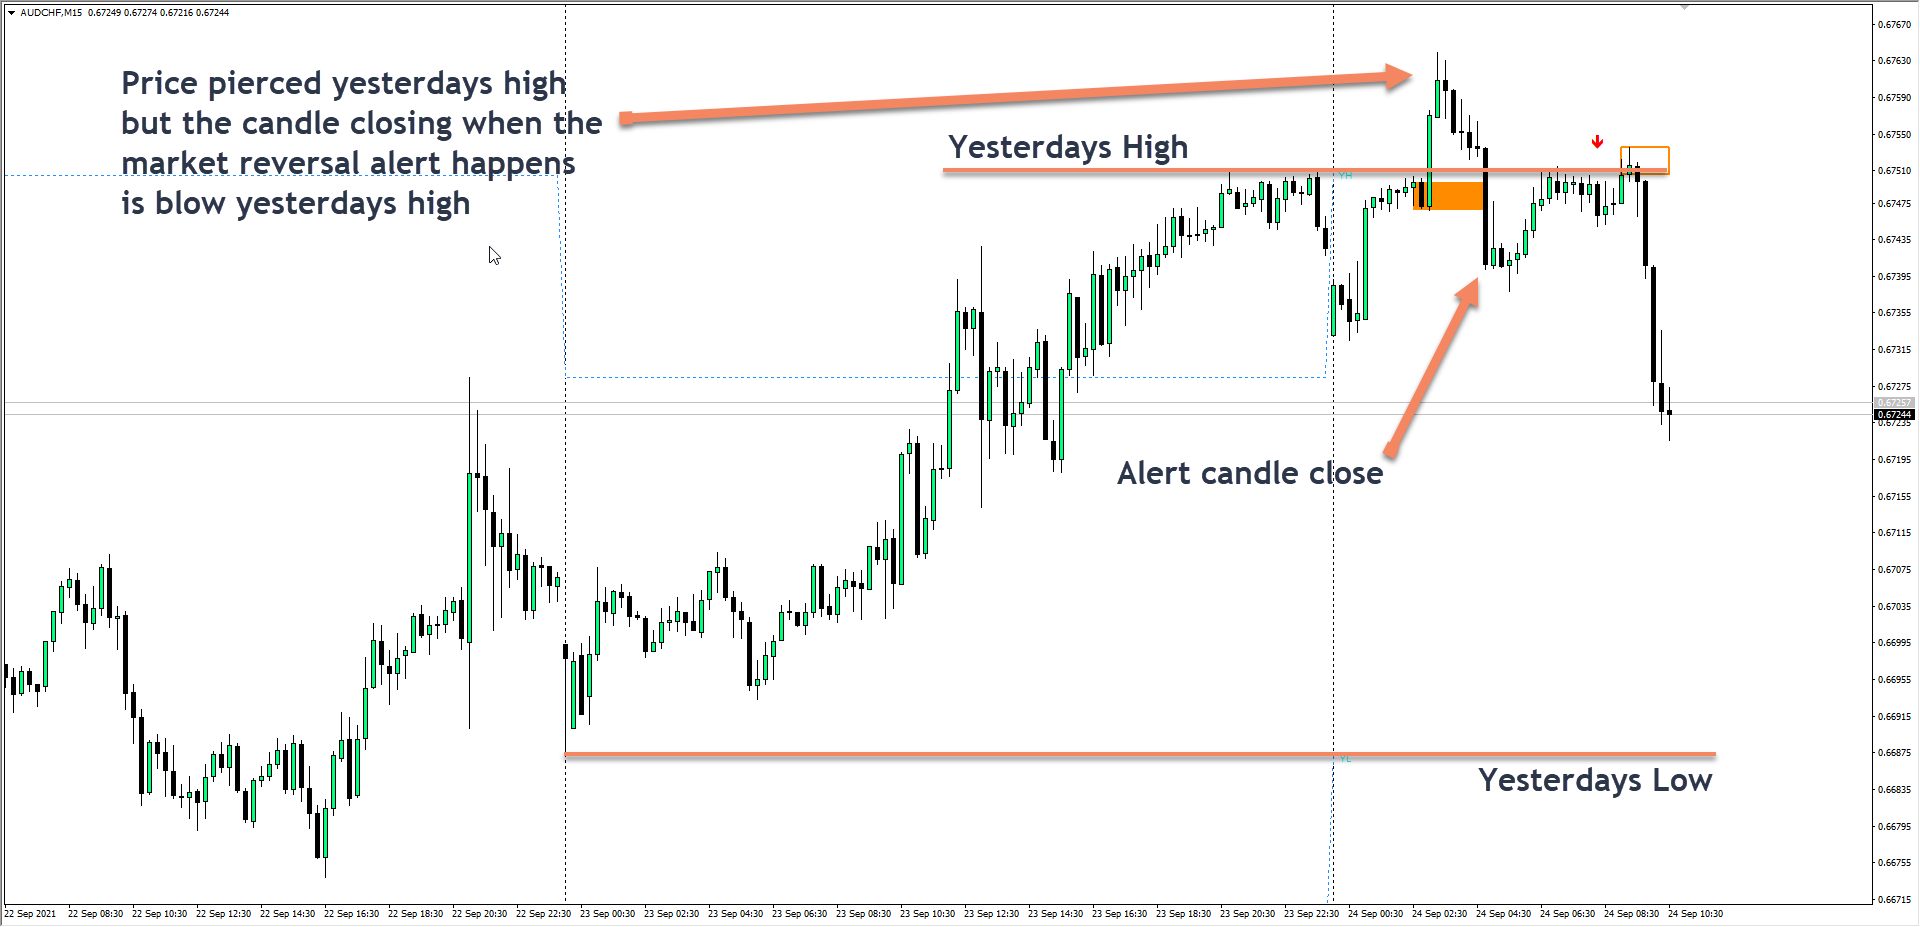
Trade Only If Pierced Daily Highs and Lows: This is almost as the setting above but with this filter the price today has to only have traded above or below the high rather than the candle that causes the market reversal alert having to be actually above or below the high. This is commonly referred to as a stop hunt where price pushes above the highs or lows only temporarily and then moves back the other way with the liquidity found there.
Use Spread Filter: When the EA gets an alerrt to take a trade it will check the current spread to see if it falls within your accepted perameters. Particularly useful if you do not want to take trades that happen just around news events or more commonly on the overnight swaps where your broker will widen the spreads particularly wide which often causes reversal alerts which are not actually valid. Helps to filter out those false signals at day changes.
Use Fake SL After First Trade: This input will delete the stop loss entered by the EA immediately after the trade is placed. This filter is particularly designed for basket trading where you typically will not use a stop loss but still want to have the EA calculate your lot sizing based on the stop distance and a percentage of your account.
IGNORE FILTERS
All of the inputs below perform the same functionality but applied to differnt filters used in the EA. These are specifically designed for basket trading where you want to get into the market on a specific set of conditions being met but if the move goes against you you enter again on the next reversal alert. When set to true the EA will use that filter to take an initial trade and then NOT use that filter for additional positions it takes.
e.g. Enter the market when the H4 RSI is below 30 AND price is above the 200 EMA.
The EA would take the initial trade when those criteria are met and a reversal alert occurs.
If you set the ignore HTF RSI and MA filters to true the EA will not require those conditions to be met the next time a reversal alert happens and simply enter another position for you.
Ignore RSI After First Trade
Ignore HTF RSI After First Trade
Ignore MA After First Trade
Ignore HTF MA After First Trade
Ignore HTF Reversal Alert
Ignore ADR After First Trade
Ignore Only Outside Daily Highs Lows
Ignore Trade Only If Pierced Daily Highs and Lows
PRICE TOUCH FEATURES:
Added specific trade levels to the EA. These inputs allow the user to enter a specific price that much be achieved (either touched or traded below) before the EA will start to trade. There is also a filter to allow you to designate the number or bars ago this price should have been either touched or exceeded. These new filters do not affect basket trading settings, they are for the initial entry only. Perfect for those traders who what to only enter when price has "stop hunted" a level or "bounced" from a support/resistance or supply/demand zone.
Price Buy Level: Enter a price LOWER than the current price that must be touched OR traded below before a reversal alert to enter a trade.
Price Sell Level: Enter a price HIGHER than the current price that must be touched OR traded above before a reversal alert to enter a trade.
Bars To Verify: Enter the number (defaulted to 10) of bars ago this touch must have happend. e.g. 10 = price must have touched that price within 10 bars to enter a trade. If price has traded beyond the level you set a trade will obviously be taken regardless of this setting so only relevant for when price has touched or swept a price level and already reversed. If you want to make sure then I would recommend setting this to a high number like 500.
Indicators This EA is Based on and Designed to Automate
Market Reversal Alerts Indicator.
https://www.mql5.com/en/market/product/46295
The market reversal alerts indicator identifies when a trend or price move is approaching exhaustion and ready to reverse. It alerts you to changes in market structure which typically occur when a reversal or major pullback are about to happen.
The indicator identifies breakouts and price momentum. Every time a new high is formed near a possible exhaustion point the indicator draws in a rectangle on the candle responsible for creating that high. It will then trail the support rectangle along with price as it moves. It then alerts you when price shifts to the opposite direction and breaks through that support area, creating a new market structure and start of a possible reversal in trend or major pullback.
Market Reversal Alerts Re-test Dashboard
https://www.mql5.com/en/market/product/62751
This dashboard is an alert tool for use with the market reversal alert indicator. It's primary purpose is to alert you to reversal alerts on specific time frames and also to the re-tests of the initial alerts (confirmation). The dashboard is designed to sit on a chart on it's own and work in the background to send you alerts reversals or re-tests happens on your chosen pairs and timeframes. It was developed after many people requested a dash to monitor multiple pairs and time frames at once rather than having the market reversal indicator running on multiple charts in one MT4. It alerts on M5, M15, M30, H1, H4 and D1 timeframes when an alert happens or a re-test of the initial alert. Higher timeframes work best of course as with anything in trading.
ADR Reversal Indicator
https://www.mql5.com/en/market/product/62757
The ADR Reversal Indicator shows you at a glance where price is currently trading in relation to it's normal average daily range. You will get instant alerts via pop-up, email or push when price exceeds it's average range and levels above it of your choosing so you can jump into pullbacks and reversals quickly.
ADR Alert Dashboard
https://www.mql5.com/en/market/product/62756
The ADR Alert Dashboard shows you at a glance where price is currently trading in relation to it's normal average daily range. You will get instant alerts via pop-up, email or push when price exceeds it's average range and levels above it of your choosing so you can jump into pullbacks and reversals quickly. The dash is designed to be placed on a blank chart and just sit in the background and alerts you when levels are hit so you do not need to sit and watch it or even look at all!
RSI & TDI Alert Dashboard
https://www.mql5.com/en/market/product/62698
The RSI / TDI alert dashboard allows you to monitor 6 main timeframes (selectable by you) at once on every major pair you trade.
The dashboard will alert you to extended conditions (overbought and oversold) at levels of your choice when a candle closes on the chosen time frame. You can have 6 separate RSI time frames monitored at once.


")
![[XAUUSD]: Weekly Liquidity Activation Points (timings), June 22-26, 2026](https://c.mql5.com/6/1013/splash-preview-771790.png "[XAUUSD]: Weekly Liquidity Activation Points (timings), June 22-26, 2026")
")