
Graphical Interfaces X: Time control, List of checkboxes control and table sorting (build 6)
Contents
- Introduction
- The Time Control
- Class for creating the Time control
- The List of checkboxes Control
- Class for creating the List of checkboxes control
- Table sorting
- Other library updates
- Application for testing the controls
- Conclusion
Introduction
In order to get a better understanding of this library's purpose, please read the first article: Graphical interfaces I: Preparation of the library structure (Chapter 1). You will find a list of articles with links at the end of each chapter. There, you can also download a complete version of the library at the current stage of development. The files must be located in the same directories as in the archive.
The library continues to grow. The Time and List of checkboxes controls will be discussed. In addition, the CTable class now provides the ability to sort data in ascending or descending order. This and other updates will be described in this article.
The Time Control
Sometimes it may be necessary to specify time ranges when creating a graphical interface for an indicator or and expert. Sometimes this necessity arises during intraday trading. The Calendar and Drop down calendar have been demonstrated, which can be used for setting the date, but not the time (hours and minutes).
Let us enumerate all components of the Time control:
- Background
- Icon
- Description
- Two Edit boxes

Fig. 1. Components of the Time control.
Let us take a closer look at the class of this control.
Class for creating the Time control
Create the TimeEdit.mqh file with the CTimeEdit class which has methods standard for all controls and include it in the library engine (the WndContainer.mqh file). Below are the control properties that are available to user for customization.
- Color of the control background
- Control icons for the active and blocked states
- Margins for icon along the two axes (x, y)
- Description text of the control
- Margins for the text label along the two axes (x, y)
- Color of the text in different states of the control
- Width of the Edit boxes
- Margins for the Edit boxes along the two axes (x, y)
- State of the control (available/blocked)
- Mode of resetting the values in the Edit boxes
//| Class for creating the Time control |
//+------------------------------------------------------------------+
class CTimeEdit : public CElement
{
private:
//--- Color of the control background
color m_area_color;
//--- Control icons in the active and blocked states
string m_icon_file_on;
string m_icon_file_off;
//--- Icon margins
int m_icon_x_gap;
int m_icon_y_gap;
//--- Description text of the control
string m_label_text;
//--- Text label margins
int m_label_x_gap;
int m_label_y_gap;
//--- Color of the text in different states
color m_label_color;
color m_label_color_hover;
color m_label_color_locked;
color m_label_color_array[];
//--- Size of the Edit box
int m_edit_x_size;
//--- Margins for the Edit box
int m_edit_x_gap;
int m_edit_y_gap;
//--- State of the control (available/blocked)
bool m_time_edit_state;
//--- The mode of resetting the value
bool m_reset_mode;
//---
public:
//--- (1) Background color, (2) margins for the icon
void AreaColor(const color clr) { m_area_color=clr; }
void IconXGap(const int x_gap) { m_icon_x_gap=x_gap; }
void IconYGap(const int y_gap) { m_icon_y_gap=y_gap; }
//--- (1) Text of the control description, (2) margins for the text label
string LabelText(void) const { return(m_label.Description()); }
void LabelText(const string text) { m_label.Description(text); }
void LabelXGap(const int x_gap) { m_label_x_gap=x_gap; }
void LabelYGap(const int y_gap) { m_label_y_gap=y_gap; }
//--- Colors of the text label in different states
void LabelColor(const color clr) { m_label_color=clr; }
void LabelColorHover(const color clr) { m_label_color_hover=clr; }
void LabelColorLocked(const color clr) { m_label_color_locked=clr; }
//--- (1) Edit box size, (2) margins for Edit boxes
void EditXSize(const int x_size) { m_edit_x_size=x_size; }
void EditXGap(const int x_gap) { m_edit_x_gap=x_gap; }
void EditYGap(const int y_gap) { m_edit_y_gap=y_gap; }
//--- (1) Reset mode when pressing the text label, (2) text selection mode
bool ResetMode(void) { return(m_reset_mode); }
void ResetMode(const bool mode) { m_reset_mode=mode; }
};
To create the Time control, five private and one public methods will be needed. This control is composite, and the ready CSpinEdit controls will be used as the edit boxes.
{
private:
//--- Objects for creating the control
CRectLabel m_area;
CBmpLabel m_icon;
CLabel m_label;
CSpinEdit m_hours;
CSpinEdit m_minutes;
//---
public:
//--- Methods for creating the control
bool CreateTimeEdit(const long chart_id,const int subwin,const string label_text,const int x_gap,const int y_gap);
//---
private:
bool CreateArea(void);
bool CreateIcon(void);
bool CreateLabel(void);
bool CreateHoursEdit(void);
bool CreateMinutesEdit(void);
//---
public:
//--- Returns pointers to edit boxes
CSpinEdit *GetHoursEditPointer(void) { return(::GetPointer(m_hours)); }
CSpinEdit *GetMinutesEditPointer(void) { return(::GetPointer(m_minutes)); }
};
In order to programmatically obtain and set the current values in the edit boxes (hours and minutes), use the methods from the code listing below:
{
public:
//--- Get and set the edit box values
int GetHours(void) const { return((int)m_hours.GetValue()); }
int GetMinutes(void) const { return((int)m_minutes.GetValue()); }
void SetHours(const uint value) { m_hours.ChangeValue(value); }
void SetMinutes(const uint value) { m_minutes.ChangeValue(value); }
};
An example of how this control looks on the terminal chart will be provided further below.
The List of checkboxes Control
One of the previous articles discussed the List View control (CListView class), which can be used for selecting one item from the provided list. But sometimes you may need to select multiple items. For example, it may be necessary to create a list of symbols or timeframes, where the user of the MQL application can choose only the ones required for his trading.
List of the components for creating the List of checkboxes control:
- Common background of the control
- Vertical scroll bar
- Checkbox group:
- Background
- Icon
- Text label
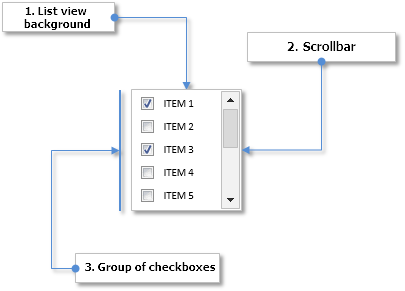
Fig. 2. Components of the List of checkboxes control
Next, let us briefly consider the differences between this type of list (CCheckBoxList) and a simple type of list (CListView), which has been discussed earlier.
Class for creating the List of checkboxes control
Create the CheckBoxList.mqh file with the CCheckBoxList class, containing the methods standard for all controls of the library. The first difference from a list of CListView type is that the list items are made of three graphical objects (see the code below). A separate private method is created for each object type.
//| Class for creating the List of checkboxes |
//+------------------------------------------------------------------+
class CCheckBoxList : public CElement
{
private:
//--- Objects for creating the list
CRectLabel m_area;
CEdit m_items[];
CBmpLabel m_checks[];
CLabel m_labels[];
CScrollV m_scrollv;
//---
public:
//--- Methods for creating the control
bool CreateCheckBoxList(const long chart_id,const int subwin,const int x_gap,const int y_gap);
//---
private:
bool CreateArea(void);
bool CreateList(void);
bool CreateItems(void);
bool CreateChecks(void);
bool CreateLabels(void);
bool CreateScrollV(void);
};
Apart from the values of item (item descriptions), an array of the checkbox states (on/off) will also be needed. The methods for setting and getting the values by the specified index in list will also be required:
{
private:
//--- Array of values and states of checkboxes in the list
string m_item_value[];
bool m_item_state[];
//---
public:
//--- Returns/stores the (1) state and (2) text of the list item at the specified index
void SetItemState(const uint item_index,const bool state);
void SetItemValue(const uint item_index,const string value);
bool GetItemState(const uint item_index);
string GetItemValue(const uint item_index);
};
//+------------------------------------------------------------------+
//| Setting the state |
//+------------------------------------------------------------------+
void CCheckBoxList::SetItemState(const uint item_index,const bool state)
{
uint array_size=::ArraySize(m_item_state);
//--- If there is no item in the list, report
if(array_size<1)
::Print(__FUNCTION__," > This method is to be called, if the list has at least one item!");
//--- Adjustment in case the range has been exceeded
uint check_index=(item_index>=array_size)? array_size-1 : item_index;
//--- Store the value
m_item_state[check_index]=state;
//--- Moves the list along the scrollbar
ShiftList();
}
//+------------------------------------------------------------------+
//| Get the state of the list checkbox |
//+------------------------------------------------------------------+
bool CCheckBoxList::GetItemState(const uint item_index)
{
uint array_size=::ArraySize(m_item_state);
//--- If there is no item in the list, report
if(array_size<1)
::Print(__FUNCTION__," > This method is to be called, if the list has at least one item!");
//--- Adjustment in case the range has been exceeded
uint check_index=(item_index>=array_size)? array_size-1 : item_index;
//--- Store the value
return(m_item_state[check_index]);
}
The appropriate changes have been made to the methods related to controlling the list. You can evaluate them yourselves.
Table sorting
If the graphical interface of an application uses tables with data, it may sometimes be needed to sort them according to user-specified column. In many implementations of the graphical interfaces this is implemented in such a way, that the data is sorted by clicking the column header. The first click on the header sorts the data in ascending order, that is from the minimum to the maximum value. The second click sorts the data in descending order, that is from the maximum to the minimum value.
The screenshot below shows the Toolbox window from the MetaEditor with a table with three columns. The table is sorted (descending) according to the third column, which contains dates.

Fig. 3. Example of a table with sorted data
An arrow is typically shown in the column header as a sign of sorted data. If it is directed downwards, as in the screenshot above, then the data is sorted in descending order, and vice versa.
So, sorting for a table of the CTable type will be done in this article. It already contains the ability to enable headers for columns, not they only need to be made interactive. First, it is necessary to make the headers change their color when hovered by mouse, and when they are clicked. To do this, add fields and methods to the CTable class for setting the colors of column headers in different states (see the code below).
{
private:
//--- Header background color
color m_headers_color;
color m_headers_color_hover;
color m_headers_color_pressed;
//---
public:
//--- Header background colors
void HeadersColor(const color clr) { m_headers_color=clr; }
void HeadersColorHover(const color clr) { m_headers_color_hover=clr; }
void HeadersColorPressed(const color clr) { m_headers_color_pressed=clr; }
};
It is up to user to decide if the sorting feature is needed in the table. The sort mode will be disabled by default. To enable it, use the CTable::IsSortMode() method:
{
private:
//--- Mode of sorting data according to columns
bool m_is_sort_mode;
//---
public:
//--- Data sorting mode
void IsSortMode(const bool flag) { m_is_sort_mode=flag; }
};
The private CTable::HeaderColorByHover() method will be used for changing the header colors when hovered by mouse cursor. It is called in the event handler of the control.
{
private:
//--- Changing the table header color when hovered by mouse cursor
void HeaderColorByHover(void);
};
//+------------------------------------------------------------------+
//| Changing the table header color when hovered by mouse cursor |
//+------------------------------------------------------------------+
void CTable::HeaderColorByHover(void)
{
//--- Leave, if the column sorting mode is disabled
if(!m_is_sort_mode || !m_fix_first_row)
return;
//---
for(uint c=0; c<m_visible_columns_total; c++)
{
//--- Check the focus on the current header
bool condition=m_mouse.X()>m_columns[c].m_rows[0].X() && m_mouse.X()<m_columns[c].m_rows[0].X2() &&
m_mouse.Y()>m_columns[c].m_rows[0].Y() && m_mouse.Y()<m_columns[c].m_rows[0].Y2();
//---
if(!condition)
m_columns[c].m_rows[0].BackColor(m_headers_color);
else
{
if(!m_mouse.LeftButtonState())
m_columns[c].m_rows[0].BackColor(m_headers_color_hover);
else
m_columns[c].m_rows[0].BackColor(m_headers_color_pressed);
}
}
}
To create a sign icon for the sorted data, it is necessary to add the private CTable::CreateSignSortedData() method. If the sorting had not been enabled before creation of the table, the icon will not be created. If the sorting mode is enabled, the icon will be hidden right after its creation, as initially the table data is not sorted.
{
private:
//--- Objects for creating a table
CBmpLabel m_sort_arrow;
//---
private:
//--- Methods for creating a table
bool CreateSignSortedData(void);
};
//+------------------------------------------------------------------+
//| Creates an arrow icon as a sign of sorted data |
//+------------------------------------------------------------------+
bool CTable::CreateSignSortedData(void)
{
//--- Leave, if the sorting mode is disabled
if(!m_is_sort_mode)
return(true);
//--- Forming the object name
string name=CElement::ProgramName()+"_table_sort_array_"+(string)CElement::Id();
//--- Coordinates
int x =(m_anchor_right_window_side)? m_columns[0].m_rows[0].X()-m_columns[0].m_rows[0].XSize()+m_sort_arrow_x_gap : m_columns[0].m_rows[0].X2()-m_sort_arrow_x_gap;
int y =(m_anchor_bottom_window_side)? CElement::Y()-m_sort_arrow_y_gap : CElement::Y()+m_sort_arrow_y_gap;
//--- If the icon for the arrow is not specified, then set the default one
if(m_sort_arrow_file_on=="")
m_sort_arrow_file_on="Images\\EasyAndFastGUI\\Controls\\SpinInc.bmp";
if(m_sort_arrow_file_off=="")
m_sort_arrow_file_off="Images\\EasyAndFastGUI\\Controls\\SpinDec.bmp";
//--- Set the object
if(!m_sort_arrow.Create(m_chart_id,name,m_subwin,x,y))
return(false);
//--- Set the properties
m_sort_arrow.BmpFileOn("::"+m_sort_arrow_file_on);
m_sort_arrow.BmpFileOff("::"+m_sort_arrow_file_off);
m_sort_arrow.Corner(m_corner);
m_sort_arrow.GetInteger(OBJPROP_ANCHOR,m_anchor);
m_sort_arrow.Selectable(false);
m_sort_arrow.Z_Order(m_zorder);
m_sort_arrow.Tooltip("\n");
//--- Store the coordinates
m_sort_arrow.X(x);
m_sort_arrow.Y(y);
//--- Store sizes (in object)
m_sort_arrow.XSize(m_sort_arrow.X_Size());
m_sort_arrow.YSize(m_sort_arrow.Y_Size());
//--- Margins from the edge
m_sort_arrow.XGap((m_anchor_right_window_side)? x : x-m_wnd.X());
m_sort_arrow.YGap((m_anchor_bottom_window_side)? y : y-m_wnd.Y());
//--- Hide the object
m_sort_arrow.Timeframes(OBJ_NO_PERIODS);
//--- Store the object pointer
CElement::AddToArray(m_sort_arrow);
return(true);
}
The structure for the values and properties of the table cells must be supplemented by an array with the number of decimal places for each cell if those are real numbers, and also by a field with the data type for each column of the table.
{
private:
//--- Array of table values and properties
struct TOptions
{
ENUM_DATATYPE m_type;
string m_vrows[];
uint m_digits[];
ENUM_ALIGN_MODE m_text_align[];
color m_text_color[];
color m_cell_color[];
};
TOptions m_vcolumns[];
};
When entering a value in a table cell, its number of decimal places is set to zero by default:
{
public:
//--- Set the value to the specified table cell
void SetValue(const uint column_index,const uint row_index,const string value="",const uint digits=0);
};
To set the data type in a particular table column, as well as to get the type, use the CTable::DataType() methods:
{
public:
//--- Get/set the data type
ENUM_DATATYPE DataType(const uint column_index) { return(m_vcolumns[column_index].m_type); }
void DataType(const uint column_index,const ENUM_DATATYPE type) { m_vcolumns[column_index].m_type=type; }
};
Before creating a table, the total number of columns and rows should be specified. The m_type field and the m_digits array are initialized with the default values. Initially, all columns have the string (TYPE_STRING) type, and the number of decimal places in all cells is zero.
//| Set the size of the table |
//+------------------------------------------------------------------+
void CTable::TableSize(const uint columns_total,const uint rows_total)
{
//--- There must be at least one column
m_columns_total=(columns_total<1) ? 1 : columns_total;
//--- There must be at least two rows
m_rows_total=(rows_total<2) ? 2 : rows_total;
//--- Set the size of the columns array
::ArrayResize(m_vcolumns,m_columns_total);
//--- Set the size of the rows arrays
for(uint i=0; i<m_columns_total; i++)
{
::ArrayResize(m_vcolumns[i].m_vrows,m_rows_total);
::ArrayResize(m_vcolumns[i].m_digits,m_rows_total);
::ArrayResize(m_vcolumns[i].m_text_align,m_rows_total);
::ArrayResize(m_vcolumns[i].m_text_color,m_rows_total);
::ArrayResize(m_vcolumns[i].m_cell_color,m_rows_total);
//--- Initialize the array of cell background colors with the default value
m_vcolumns[i].m_type=TYPE_STRING;
::ArrayInitialize(m_vcolumns[i].m_digits,0);
::ArrayInitialize(m_vcolumns[i].m_text_align,m_align_mode);
::ArrayInitialize(m_vcolumns[i].m_cell_color,m_cell_color);
::ArrayInitialize(m_vcolumns[i].m_text_color,m_cell_text_color);
}
}
Multiple private methods will be required for sorting the table arrays, where the following operations will be performed:
- The sorting algorithm.
- Comparing the values on the specified condition.
- Swapping the values of array elements.
Swapping the values of array elements is done using the CTable::Swap() method. Here, the swapping is done directly by table rows. Not only the cell values are swapped, but also the text color.
{
private:
//--- Swap the values in the specified cells
void Swap(uint c,uint r1,uint r2);
};
//+------------------------------------------------------------------+
//| Swap the elements |
//+------------------------------------------------------------------+
void CTable::Swap(uint c,uint r1,uint r2)
{
//--- Iterate over all columns in a loop
for(uint i=0; i<m_columns_total; i++)
{
//--- Swap the text
string temp_text =m_vcolumns[i].m_vrows[r1];
m_vcolumns[i].m_vrows[r1] =m_vcolumns[i].m_vrows[r2];
m_vcolumns[i].m_vrows[r2] =temp_text;
//--- Swap the text color
color temp_text_color =m_vcolumns[i].m_text_color[r1];
m_vcolumns[i].m_text_color[r1] =m_vcolumns[i].m_text_color[r2];
m_vcolumns[i].m_text_color[r2] =temp_text_color;
}
}
For sorting to be correct, the values should be compared using casting to the type specified in the m_type field. For this purpose, a separate CTable::CheckSortCondition() method has been created.
{
private:
//--- Checking the sorting conditions
bool CheckSortCondition(uint column_index,uint row_index,const string check_value,const bool direction);
};
//+------------------------------------------------------------------+
//| Comparing the values on the specified sorting condition |
//+------------------------------------------------------------------+
//| direction: true (>), false (<) |
//+------------------------------------------------------------------+
bool CTable::CheckSortCondition(uint column_index,uint row_index,const string check_value,const bool direction)
{
bool condition=false;
//---
switch(m_vcolumns[column_index].m_type)
{
case TYPE_STRING :
{
string v1=m_vcolumns[column_index].m_vrows[row_index];
string v2=check_value;
condition=(direction)? v1>v2 : v1<v2;
break;
}
//---
case TYPE_DOUBLE :
{
double v1=double(m_vcolumns[column_index].m_vrows[row_index]);
double v2=double(check_value);
condition=(direction)? v1>v2 : v1<v2;
break;
}
//---
case TYPE_DATETIME :
{
datetime v1=::StringToTime(m_vcolumns[column_index].m_vrows[row_index]);
datetime v2=::StringToTime(check_value);
condition=(direction)? v1>v2 : v1<v2;
break;
}
//---
default :
{
long v1=(long)m_vcolumns[column_index].m_vrows[row_index];
long v2=(long)check_value;
condition=(direction)? v1>v2 : v1<v2;
break;
}
}
//---
return(condition);
}
The CTable::Swap() and CTable::CheckSortCondition() methods will be used in the method with the sorting algorithm. Let us dwell on the which particular algorithm has been selected for sorting the data. Ten algorithms have been tested, including the standard MQL sorting using the ArraySort() function:
- MQL sorting
- Selection sort
- Bubble sort
- Cocktail shaker sort
- Insertion sort
- Shellsort
- Binary tree sort
- Quicksort
- Heapsort
- Mergesort
These methods have been tested on an array with size of 100,000 (one hundred thousand) elements. The array had been initialized with random numbers. The test results are shown in the histogram below:
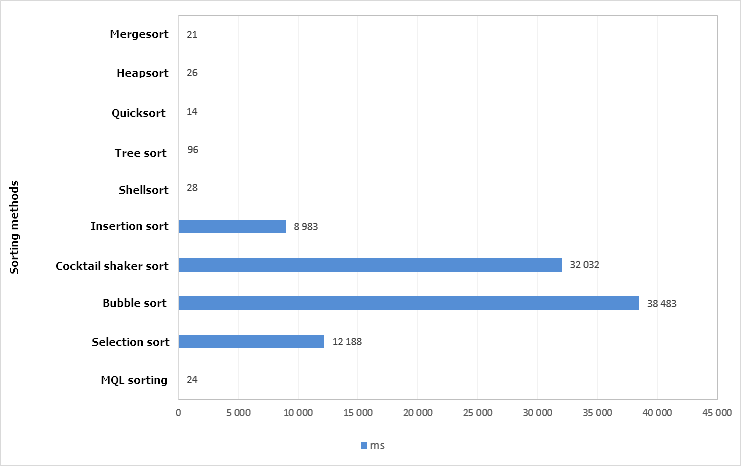
Fig. 4. Chart of test results of different sorting methods. Array size is 100,000 elements.
The quicksort method is proven to be the quickest. The code of this method has been taken from the standard library – the QuickSort() method. In this test, it has even shown a better result than the ArraySort() function. The algorithm operation times have been measured using the GetMicrosecondCount() function for greater accuracy. Let us leave only the algorithm that have shown the best results (less than one second).
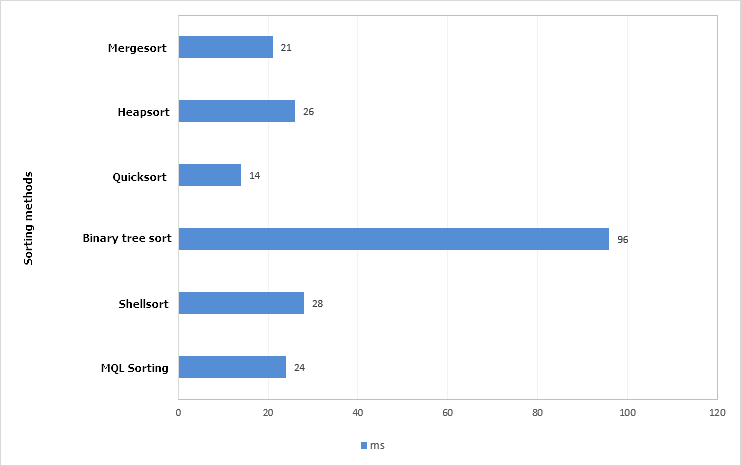
Fig. 5. Chart of the best test results of sorting methods Array size is 100,000 elements.
Increase the array size by 10 times, that is, now an array of 1000000 (one million) elements will be sorted.
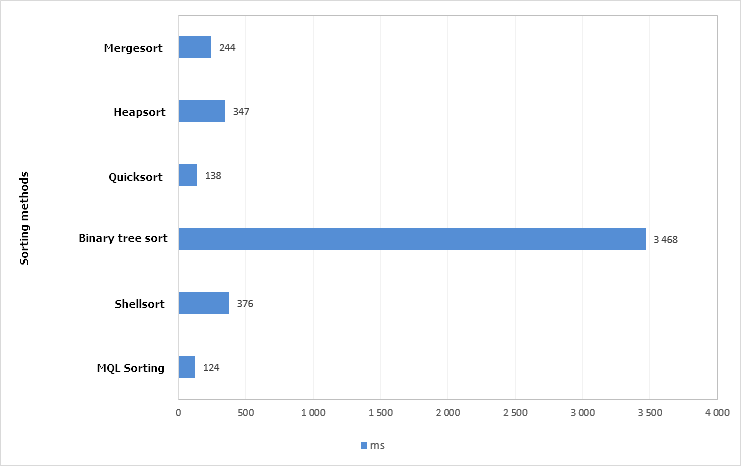
Fig. 6. Chart of the test results of sorting methods Array size is 1,000,000 elements.
The standard algorithm - the ArraySort() function was the best in this test. The quicksort method proved itself only slightly worse, therefore, it will be selected. The ArraySort() is not suitable for the task, as: (1) the ability to sort in both directions is required, (2) the CTable class uses an array of structures and (3) it is necessary to control the location of not only the values in table cells, but their other properties as well.
The ENUM_SORT_MODE enumeration should be added to the Enums.mqh file for the two directions of sorting:
- SORT_ASCEND – ascending.
- SORT_DESCEND – descending.
//| Enumeration of the sorting modes |
//+------------------------------------------------------------------+
enum ENUM_SORT_MODE
{
SORT_ASCEND =0,
SORT_DESCEND =1
};
The current version of the quicksort algorithm used in the CTable::QuickSort() method is shown in the code listing below. The CTable::Swap() and CTable::CheckSortCondition() method, previously presented in this article, are highlighted in yellow.
{
private:
//--- Quicksort method
void QuickSort(uint beg,uint end,uint column,const ENUM_SORT_MODE mode=SORT_ASCEND);
};
//+------------------------------------------------------------------+
//| Quicksort algorithm |
//+------------------------------------------------------------------+
void CTable::QuickSort(uint beg,uint end,uint column,const ENUM_SORT_MODE mode=SORT_ASCEND)
{
uint r1 =beg;
uint r2 =end;
uint c =column;
string temp =NULL;
string value =NULL;
uint data_total =m_rows_total-1;
//--- Run the algorithm while the left index is less than the rightmost index
while(r1<end)
{
//--- Get the value from the middle of the row
value=m_vcolumns[c].m_vrows[(beg+end)>>1];
//--- Run the algorithm while the left index is less than the found right index
while(r1<r2)
{
//--- Shift the index to the right while finding the value on the specified condition
while(CheckSortCondition(c,r1,value,(mode==SORT_ASCEND)? false : true))
{
//--- Checking for exceeding the array range
if(r1==data_total)
break;
r1++;
}
//--- Shift the index to the left while finding the value on the specified condition
while(CheckSortCondition(c,r2,value,(mode==SORT_ASCEND)? true : false))
{
//--- Checking for exceeding the array range
if(r2==0)
break;
r2--;
}
//--- If the left index is still not greater than the right index
if(r1<=r2)
{
//--- Swap the values
Swap(c,r1,r2);
//--- If the left limit has been reached
if(r2==0)
{
r1++;
break;
}
//---
r1++;
r2--;
}
}
//--- Recursive continuation of the algorithm, until the beginning of the range is reached
if(beg<r2)
QuickSort(beg,r2,c,mode);
//--- Narrow the range for the next iteration
beg=r1;
r2=end;
}
}
All these methods are private. Now consider the public CTable::SortData() method, designed to be called (1) when clicking the headers of the table column headers or (2) programmatically at any other time, when it may be necessary according to the author of the MQL application. The CTable::SortData() should be passed the column index, the first column is sorted by default. If the specified column is sorted for the first time, or if it was last sorted in the descending order, the values will be sorted in ascending order. After sorting the data, the table is updated. And the last line of the CTable::SortData() method sets the corresponding icon to the arrow-sign of sorted table.
{
private:
//--- Index of the sorted column (WRONG_VALUE – table is not sorted)
int m_is_sorted_column_index;
//--- Last sorting direction
ENUM_SORT_MODE m_last_sort_direction;
//---
public:
//--- Sort the data according to the specified column
void SortData(const uint column_index=0);
};
//+------------------------------------------------------------------+
//| Sort the data according to the specified column |
//+------------------------------------------------------------------+
void CTable::SortData(const uint column_index=0)
{
//--- Index (taking into account the presence of headers) to start sorting from
uint first_index=(m_fix_first_row) ? 1 : 0;
//--- The last index of the array
uint last_index=m_rows_total-1;
//--- The first time it will be sorted in ascending order, every time after that it will be sorted in the opposite direction
if(m_is_sorted_column_index==WRONG_VALUE || column_index!=m_is_sorted_column_index || m_last_sort_direction==SORT_DESCEND)
m_last_sort_direction=SORT_ASCEND;
else
m_last_sort_direction=SORT_DESCEND;
//--- Store the index of the last sorted data column
m_is_sorted_column_index=(int)column_index;
//--- Sorting
QuickSort(first_index,last_index,column_index,m_last_sort_direction);
//--- Update the table
UpdateTable();
//--- Set the icon according to the sorting direction
m_sort_arrow.State((m_last_sort_direction==SORT_ASCEND)? true : false);
}
A method for handling the clicking on the column headers will be required — CTable::OnClickTableHeaders(), for when the data sorting mode is enabled. After passing all checks for the object belonging to this control, index of the header (column) is determined in a loop and then the table is sorted. Immediately after sorting the table, an event with the new ON_SORT_DATA identifier is generated. Apart from this event identifier, the message contains (1) the control identifier, (2) index of the sorted column and (3) the data type of this column.
{
private:
//--- Handling clicking on the table headers
bool OnClickTableHeaders(const string clicked_object);
};
//+------------------------------------------------------------------+
//| Handling clicking on the table header |
//+------------------------------------------------------------------+
bool CTable::OnClickTableHeaders(const string clicked_object)
{
//--- Leave, if the sorting mode is disabled
if(!m_is_sort_mode)
return(false);
//--- Leave, if the pressing was not on the table cell
if(::StringFind(clicked_object,CElement::ProgramName()+"_table_edit_",0)<0)
return(false);
//--- Get the identifier from the object name
int id=CElement::IdFromObjectName(clicked_object);
//--- Leave, if the identifier does not match
if(id!=CElement::Id())
return(false);
//--- Leave, if this is not a table header
if(RowIndexFromObjectName(clicked_object)>0)
return(false);
//--- For determining the column index
uint column_index=0;
//--- Shift by one index, if the fixed header mode is enabled
int l=(m_fix_first_column) ? 1 : 0;
//--- Get the current position of slider of the horizontal scrollbar
int h=m_scrollh.CurrentPos()+l;
//--- Columns
for(uint c=l; c<m_visible_columns_total; c++)
{
//--- If the pressing was not on this cell
if(m_columns[c].m_rows[0].Name()==clicked_object)
{
//--- Get the index of the column
column_index=(m_fix_first_column && c==0) ? 0 : h;
break;
}
//---
h++;
}
//--- Sort the data according to the specified column
SortData(column_index);
//--- Send a message about it
::EventChartCustom(m_chart_id,ON_SORT_DATA,CElement::Id(),m_is_sorted_column_index,::EnumToString(DataType(column_index)));
return(true);
}
if the total number of columns is greater than the number of visible columns, the position of the arrow-sign of sorted table must be adjusted when moving the horizontal scrollbar. This will be done using the private CTable::ShiftSortArrow() method.
{
private:
//--- Shifting the arrow-sign of sorted data
void ShiftSortArrow(const uint column);
};
//+------------------------------------------------------------------+
//| Shifting the arrow to the sorted table column |
//+------------------------------------------------------------------+
void CTable::ShiftSortArrow(const uint column)
{
//--- Show the object if the element is not hidden
if(CElement::IsVisible())
m_sort_arrow.Timeframes(OBJ_ALL_PERIODS);
//--- Calculate and set the coordinate
int x=m_columns[column].m_rows[0].X2()-m_sort_arrow_x_gap;
m_sort_arrow.X(x);
m_sort_arrow.X_Distance(x);
//--- Margin from the edge
m_sort_arrow.XGap((m_anchor_right_window_side)? m_wnd.X2()-x : x-m_wnd.X());
}
This method will be called from within the CTable::UpdateTable() method, in the code block where the headers are shifted. Below is the shortened version of the CTable::UpdateTable() method with the added fragments. Here, if a sorted column was found in the first cycle, the flag is set and the arrow-sign is moved. After the cycle is completed, it may turn out that the sorted column exists, but it was not found in the previous cycle. This could mean that it got out of visible area and should be hidden. If this is the first column (index zero) and, at the same time, it is fixed and cannot be shifted, the arrow-sign is set to it.
//| Update table data with consideration of the recent changes |
//+------------------------------------------------------------------+
void CTable::UpdateTable(void)
{
//...
//--- Shifting the headers in the top row
if(m_fix_first_row)
{
//--- For determining the shift of the sorting icon
bool is_shift_sort_arrow=false;
//--- Columns
for(uint c=l; c<m_visible_columns_total; c++)
{
//--- If not exceeding the array range
if(h>=l && h<m_columns_total)
{
//--- If found the sorted column
if(!is_shift_sort_arrow && m_is_sort_mode && h==m_is_sorted_column_index)
{
is_shift_sort_arrow=true;
//--- Adjust the sorting icon
uint column=h-(h-c);
if(column>=l && column<m_visible_columns_total)
ShiftSortArrow(column);
}
//--- Adjusts the (1) values, (2) background color, (3) text color and (4) text alignment in cells
SetCellParameters(c,0,m_vcolumns[h].m_vrows[0],m_headers_color,m_headers_text_color,m_vcolumns[h].m_text_align[0]);
}
//---
h++;
}
//--- If the sorted table exists, but was not found
if(!is_shift_sort_arrow && m_is_sort_mode && m_is_sorted_column_index!=WRONG_VALUE)
{
//--- Hide, if the index is greater than zero
if(m_is_sorted_column_index>0 || !m_fix_first_column)
m_sort_arrow.Timeframes(OBJ_NO_PERIODS);
//--- Set to the header of the first column
else
ShiftSortArrow(0);
}
}
//...
}
The files with a test expert files can be downloaded at the end of the article. You can use them to test the operation on your own.
Other library updates
As additional features, this build includes the following library updates:
1. It is now possible to set the font and font size for each control individually. For this purpose, the appropriate fields and methods have been added to the CElement base class of controls. By default, the Calibri font is used, and the font size is 8 points.
{
protected:
//--- Font
string m_font;
int m_font_size;
//---
public:
//--- (1) Font and (2) font size
void Font(const string font) { m_font=font; }
string Font(void) const { return(m_font); }
void FontSize(const int font_size) { m_font_size=font_size; }
int FontSize(void) const { return(m_font_size); }
};
//+------------------------------------------------------------------+
//| Constructor |
//+------------------------------------------------------------------+
CElement::CElement(void) : m_font("Calibri"),
m_font_size(8)
{
}
Accordingly, the values are taken from the base class in all methods for creating controls, which require the font to be specified. Below is an example for text label of the CCheckBox class. The same has been done in all classes of the library.
//| Creates the text label of the checkbox |
//+------------------------------------------------------------------+
bool CCheckBox::CreateLabel(void)
{
//--- Forming the object name
string name=CElement::ProgramName()+"_checkbox_lable_"+(string)CElement::Id();
//--- Coordinates
int x =(m_anchor_right_window_side)? m_x-m_label_x_gap : m_x+m_label_x_gap;
int y =(m_anchor_bottom_window_side)? m_y-m_label_y_gap : m_y+m_label_y_gap;
//--- Text color according to the state
color label_color=(m_check_button_state) ? m_label_color : m_label_color_off;
//--- Set the object
if(!m_label.Create(m_chart_id,name,m_subwin,x,y))
return(false);
//--- Set the properties
m_label.Description(m_label_text);
m_label.Font(CElement::Font());
m_label.FontSize(CElement::FontSize());
m_label.Color(label_color);
m_label.Corner(m_corner);
m_label.Anchor(m_anchor);
m_label.Selectable(false);
m_label.Z_Order(m_zorder);
m_label.Tooltip("\n");
//--- Margins from the edge
m_label.XGap((m_anchor_right_window_side)? x : x-m_wnd.X());
m_label.YGap((m_anchor_bottom_window_side)? y : y-m_wnd.Y());
//--- Initializing gradient array
CElement::InitColorArray(label_color,m_label_color_hover,m_label_color_array);
//--- Store the object pointer
CElement::AddToArray(m_label);
return(true);
}
2. Margins from the edge point of the form for each control of the graphical interface now need to be passed directly to the method for creating the control. The calculation will be done automatically. As an example, the listing below shows the method for creating a drop-down calendar from the CProgram custom class.
//| Create drop down calendar |
//+------------------------------------------------------------------+
bool CProgram::CreateDropCalendar(const int x_gap,const int y_gap,const string text)
{
//--- Pass the object to the panel
m_drop_calendar.WindowPointer(m_window);
//--- Attach to the second tab
m_tabs.AddToElementsArray(1,m_drop_calendar);
//--- Set properties before creation
m_drop_calendar.XSize(140);
m_drop_calendar.YSize(20);
m_drop_calendar.AreaBackColor(clrWhite);
//--- Create control
if(!m_drop_calendar.CreateDropCalendar(m_chart_id,m_subwin,text,x_gap,y_gap))
return(false);
//--- Add the control pointer to the base
CWndContainer::AddToElementsArray(0,m_drop_calendar);
return(true);
}
Application for testing the controls
Now, let us create a test MQL application, where all new controls can be tested. Create a graphical interface containing the main menu (CMenuBar) with drop-down context menus, status bar and two tabs. The first tab will contain a table of the CTable type, with the sorting mode enabled.
The first three columns in the table will have the following data types:
- The first column - TYPE_DATETIME.
- The second column - TYPE_DOUBLE.
- The third column - TYPE_LONG.
The remaining columns will default to the TYPE_STRING type. The screenshot below shows the appearance of the graphical interface with the table on the first tab.
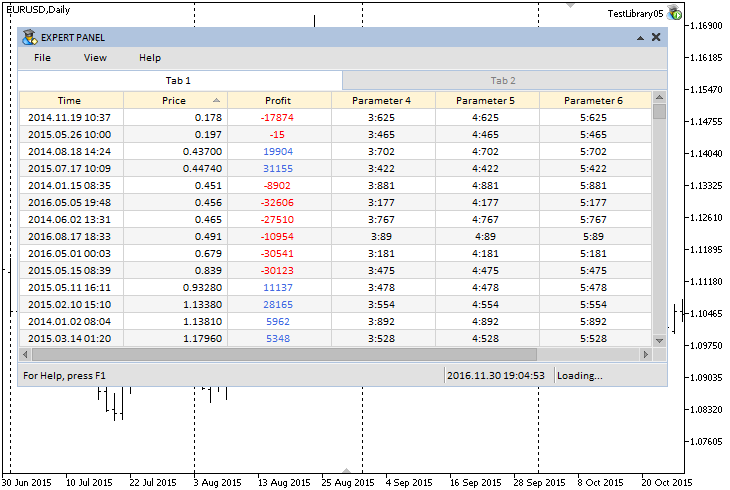
Fig. 7. Example of a sorted (ascending) table according to the second column.
Create four controls on the second tab:
- Drop-down calendar (the CDropCalendar class).
- Time control (the CTimeEdit class).
- List of checkboxes (the CCheckBoxList class).
- List view (the CListView class).
The screenshot below shows how this looks in the graphical interface of the test MQL application:
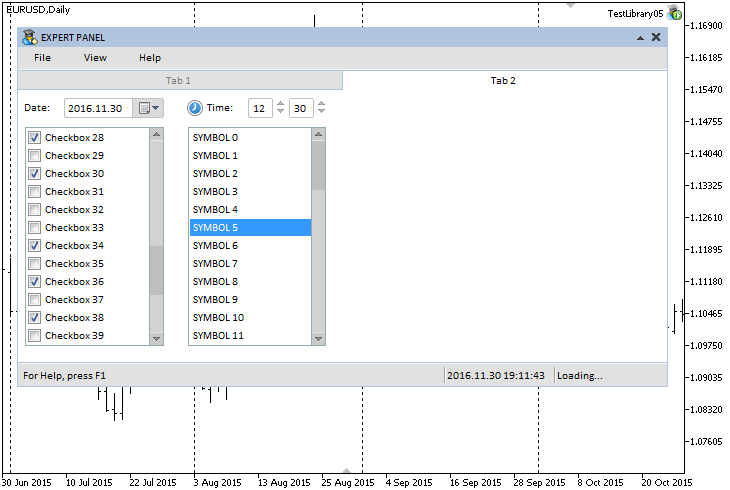
Fig. 8. Controls on the second tab.
The source code of this test application is provided at the end of the article.
Conclusion
Currently, the general schematic of the library for creating graphical interfaces looks as shown below:
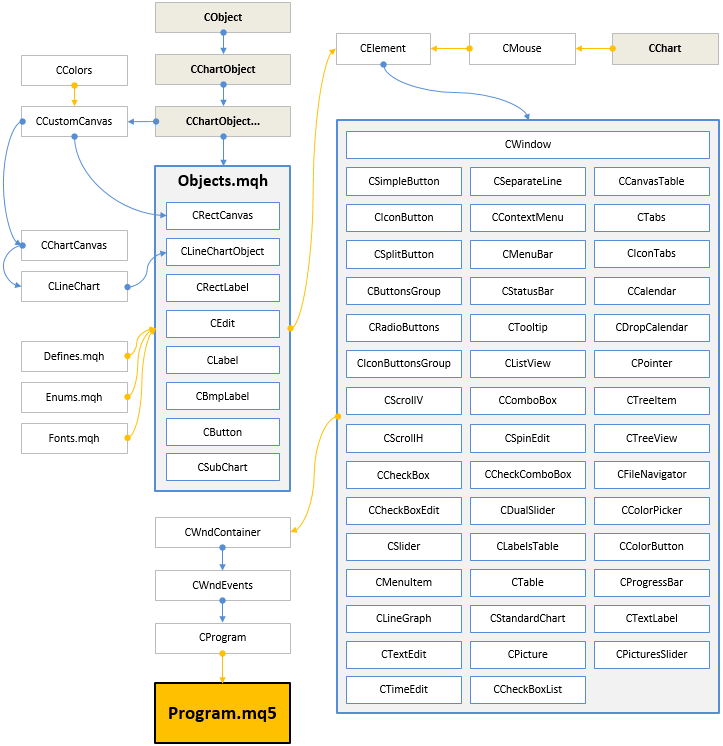
Fig. 9. Structure of the library at the current stage of development.
This is not the last article of the series about graphical interfaces. We will continue to improve it and supplement it with new features. Below you can download the latest version of the library and files for testing.
If you have questions on using the material presented in those files, you can refer to the detailed description of the library development in one of the articles of this series or ask your question in the comments of this article.
Translated from Russian by MetaQuotes Ltd.
Original article: https://www.mql5.com/ru/articles/2897
Warning: All rights to these materials are reserved by MetaQuotes Ltd. Copying or reprinting of these materials in whole or in part is prohibited.
This article was written by a user of the site and reflects their personal views. MetaQuotes Ltd is not responsible for the accuracy of the information presented, nor for any consequences resulting from the use of the solutions, strategies or recommendations described.
 An Example of Developing a Spread Strategy for Moscow Exchange Futures
 Patterns available when trading currency baskets
 Graphical interfaces X: Advanced management of lists and tables. Code optimization (build 7)
 Statistical distributions in the form of histograms without indicator buffers and arrays
- Free trading apps
- Over 8,000 signals for copying
- Economic news for exploring financial markets
You agree to website policy and terms of use
Anatoly, your work is grandiose, and I even want to put it into practice, but many things hold me back. In principle, you can modify your code to suit your needs, but it is probably better to create your own code.
For example, such an annoying little thing. The idea of dynamic window resizing has arisen, i.e. many window GUI interfaces allow you to change the window size.
As a rule, the following style, click the mouse in the lower right corner of the window, then the window is pulled to the desired size and the window is scaled.
The first thing I tried was to resize the window.
As a result for TAB1 and TAB2 there is no scalability.
...
Generally the following style has developed, click the mouse in the bottom right corner of the window, then the window is pulled to the desired size and the window is scaled.
There are plans for this, but when it will be I can't say yet.
The thing is that in order to start "conducting" all the controls that are presented in the library, they must first be raised to a certain level. Many of them are now at an intermediate stage, and some of them are just temporary variants.
...
In principle, you can modify your code to suit your needs, but it's probably better to create your own.
It would be interesting to see your version of the library if you publish it of course.
P.S. Big goals are achieved much faster by joint efforts. )It is in the plans, but when it will be I can't say yet.
The thing is that in order to start "conducting" all the controls that are presented in the library, they must first be raised to a certain level. Many of them are in an intermediate stage right now, and some of them in general, as temporary options.
It would be interesting to see your version of the library, if you publish it of course.
P.S. Big goals are achieved much faster by joint efforts. )This is if the team works with goals and for results and needs a cool real leader (manager) - not a MANAGER.
This is if the team works with goals and for results and needs a great real leader (manager) - not a MANAGER.
...
You can do it without a manager. If everyone makes, some small contribution to the solution of tasks that have not yet been touched.
If I thought I needed a leader to move things along, this library, at least at this level of development, would still not exist. I realise that this is still far from enough. )