

Building Automated Daily Trading Reports with the SendMail Function
 1 317
1 317
 0
0

Introduction
Traders often struggle to keep track of their performance at the end of each trading day, as manual review of trades in MetaTrader 5 can be time-consuming and prone to oversight. However, MetaTrader 5 does not provide a built-in system for automatically generating structured daily trading reports and sending them via email in a formatted way.
In this article, we will build a system that automates the generation of daily trading reports directly from MetaTrader 5. You will learn how to retrieve historical trade data within a specified time range, calculate key performance metrics, and dynamically construct an email subject and body based on account activity. Finally, we will automate the process by sending the report once per day using the SendMail() function, giving you a consistent and hands-free trading journal delivered directly to your inbox.
Project Overview and Implementation Plan
It is crucial to fully understand what we are doing and how it will be implemented in MQL5 before the actual programming starts. This chapter gives an organized summary of the project and describes the methodical process we will use to get the desired outcome.
What We Are Building
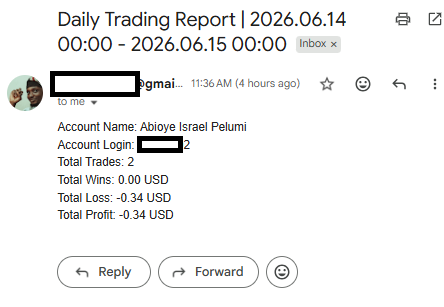
In this project, we will develop an Expert Advisor in MQL5 that automatically generates a structured daily trading report from the account’s historical trade data and sends it directly to the user’s email using the SendMail() function. The system is designed to act as a personal trading journal that runs without manual intervention. At the end of each trading day, the EA will retrieve all closed trades executed within a defined time range, typically from the previous daily candle. From this data, it will extract and organize key trading information such as total profit, number of winning trades, losing trades, and overall trade count.
The EA will format this information into an email report. It will build the subject line and message body dynamically based on that day's trading activity. Once the report is prepared, it will be automatically sent once per day, ensuring consistent tracking of trading performance and helping you evaluate your results without manually reviewing the terminal history.
Implementation Plan
In this section, we will discuss the step-by-step process that will be followed to implement the automated daily trading report system in MQL5.
Configuring the SMTP Settings:
The SMTP setup needs to be configured before sending emails with MetaTrader 5. Email servers and software programs can communicate over the web using the SMTP (Simple Mail Transfer Protocol) protocol. These settings are used by MQL5's SendMail() function to establish a connection with the mail server and send the email to the designated recipient.
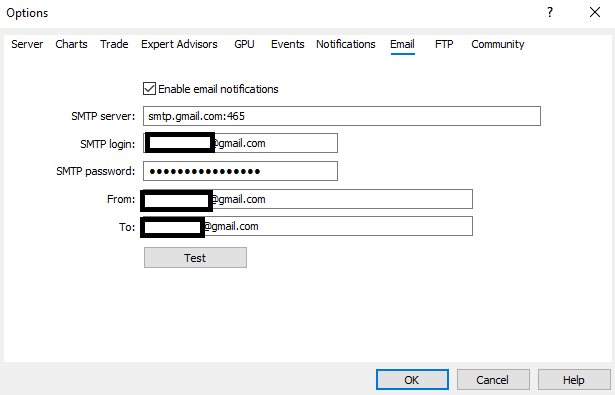
Several pieces of information are needed to make this connection. First, specify the SMTP server; it is the email server in charge of transmitting the message. Additionally, we require the SMTP login, which is usually the email address linked to the email sending account. To authenticate the connection, an SMTP password is also necessary. The process of generating this password will be discussed when we begin the implementation phase. Finally, specify the sender email address (usually the same as the SMTP login) and the recipient email address. These settings form the foundation of the email delivery system and must be configured correctly before the automated reporting functionality can operate.
Retrieving and Processing Historical Trade Data:
In this second step, we will focus on building the core logic that transforms raw trading history into meaningful performance data for the daily report. The first step in the process is to specify the precise time window that corresponds to the last trading day that was finished. This prevents overlap with the current trading session by guaranteeing that only trades completed within that particular time frame are included in the analysis.
Once the time range is established, we will retrieve all trading records that fall within it. From this full dataset, we will carefully filter out only completed trades, ensuring that open positions, partial data, or irrelevant entries are excluded. This allows us to work strictly with finalized trade outcomes that accurately reflect trading performance. After identifying valid trades, we will process each trade to determine whether it was profitable and to capture its profit/loss amount. As we iterate through the data, we will continuously accumulate overall statistics, including total profit, total number of trades executed, total winning trades, and total losing trades.
Creating the Email Subject and Message Body:
In this stage, we concentrate on creating the final email report content that will be delivered to the trader's mailbox. To do this, the previously computed trading information must be arranged in a comprehensible way that is simple to comprehend at a glance. To make sure that every email is clearly connected to a particular trade day, we start by creating a descriptive email subject that matches the reporting period. This makes it easier to monitor and assess performance over time.
Next, we retrieve essential account information such as the account name, login details, and currency. These details provide context and help identify the source of the trading report, especially when managing multiple accounts. Finally, we combine all the gathered information, including total trades, wins, losses, and overall profit, into a structured message body. This creates a complete trading summary that presents both account details and performance metrics in a clean, readable format, ready to be delivered as the final email report.
Sending the Email Report Once Per Day:
In this last stage, we put into practice the logic that determines when the trading report is sent and guarantees that it is transmitted only once every day. To determine the start of a new trading day, the system continuously tracks the change between daily candles. When a new day is recognized, the previously created topic and message body are used to initiate the email sending process.
To prevent duplicate emails, we store the time reference of the last sent report and compare it with the current daily period. If a new trading day is detected and the report has not yet been sent for that period, the email is immediately dispatched. After sending, the system updates its record to ensure that the same report is not sent multiple times within the same day. This guarantees a reliable and automated delivery of the daily trading journal without repetition or manual intervention.
Implementation in MQL5
Now that we have established the project requirements and implementation plan, we can proceed with the actual development of the system in MQL5. In this section, we will translate each step of the design into code, beginning with the configuration of the email settings and progressing through the retrieval and processing of historical trade data, the creation of the email content, and the automation of the daily delivery process.
Configuring the SMTP Settings
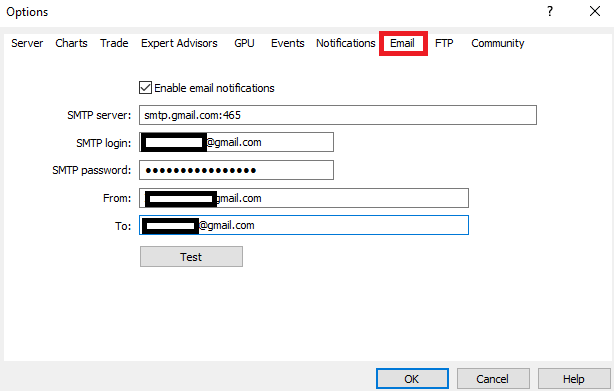
The first step is to configure MetaTrader 5 so that it can send emails through your email provider. To do this, open MetaTrader 5 and press Ctrl + O to launch the platform settings window. Next, navigate to the Email tab. Within the Email section, enable email functionality by checking the "Enable email notification" box. This tells MetaTrader 5 that it is permitted to send email notifications using the configured SMTP server.
Next, enter the required SMTP details. In the SMTP Server field, enter:
smtp.gmail.com:465
Begin by entering your Gmail address in the SMTP Login section to configure trading report delivery. Next, input the special password created for SMTP authentication in the SMTP Password field, with further details to be covered later. Because the login email defines the sender, it should also be placed in the "From" field. Then, provide the recipient’s email address in the "To" section, which may vary from the sender depending on your arrangement.
It is also important to enable 2-Step Verification on your Google account before generating an SMTP password, as Google requires this extra security step before issuing app-specific passwords for applications like MetaTrader 5.
Begin by visiting:
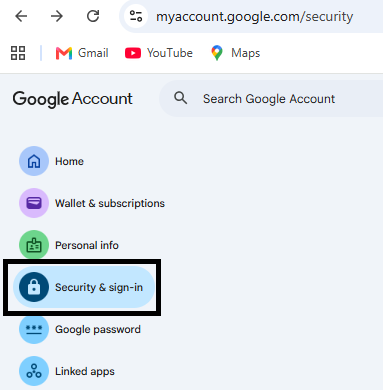
myaccount.google.com
Next, navigate to the Security section and sign in to your Google account if prompted:
Once the Security page loads, locate and click 2-Step Verification:
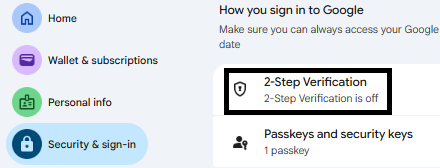
The Google two-factor authentication setup page will be displayed to you. From there, choose "Turn on 2-Step Verification" and follow the on-screen directions to continue. Depending on how your account is configured, Google may demand identification verification via a phone number, authentication app, or other approved methods.
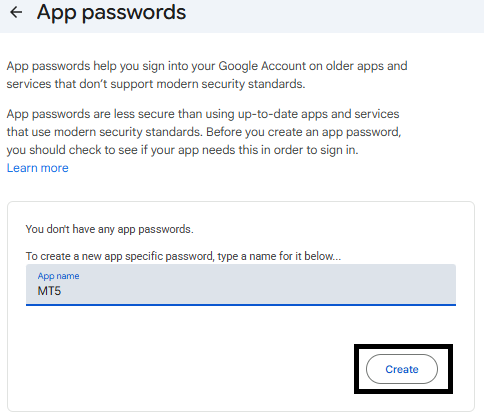
After successfully enabling 2-Step Verification, navigate to the following page:myaccount.google.com/apppasswords
This page allows you to generate application-specific passwords that can be used by software such as MetaTrader 5. Once the page loads, enter a name for the application, such as MetaTrader 5, and click Create:
Google will then generate a unique password specifically for MetaTrader 5:
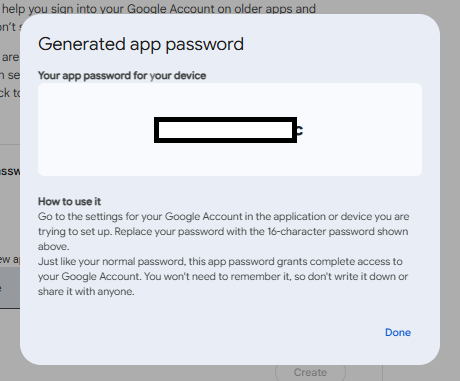
This generated password is your SMTP password. Copy the password and return to the MetaTrader 5 Email settings window. Paste the generated password into the SMTP Password field that we left blank earlier.
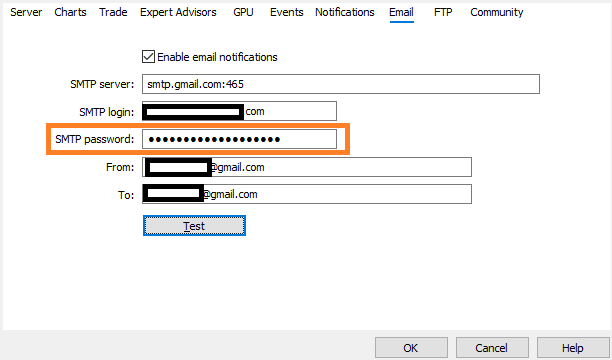
To make sure MetaTrader 5 is properly linked to the email server, click the "Test" button in the Email settings box. The platform will send a test email using your SMTP details. The test message will be sent to the recipient email listed in the "To" column if the configuration is successful.
Retrieving and Processing Historical Trade Data
Just as discussed in the implementation plan, this is the second step of the project where we focus on collecting and analyzing trade history for a defined trading period. The first thing we need to do in this step is determine the exact time range we want to analyze, which represents the completed trading day.
Example:
datetime start_time;          // Start time of the reporting period
datetime end_time;            // End time of the reporting period
bool is_time;                 // Indicates whether the history was selected successfully
ulong ticket;                 // Current deal ticket being processed
//+------------------------------------------------------------------+
//| Expert initialization function                                   |
//+------------------------------------------------------------------+
int OnInit()
  {
//---

//---
   return(INIT_SUCCEEDED);
  }
//+------------------------------------------------------------------+
//| Expert deinitialization function                                 |
//+------------------------------------------------------------------+
void OnDeinit(const int reason)
  {
//---

  }
//+------------------------------------------------------------------+
//| Expert tick function                                             |
//+------------------------------------------------------------------+
void OnTick()
  {
//---
//--- Get the start and end times of the previous trading day
   start_time = iTime(_Symbol,PERIOD_D1,1);
   end_time = iTime(_Symbol,PERIOD_D1,0);

//--- Select trade history within the specified period
   is_time = HistorySelect(start_time, end_time);

//--- Process historical deals if history selection is successful
   if(is_time)
     {
      //--- Iterate through all deals in the selected history
      for(int i = 0; i < HistoryDealsTotal(); i++)
        {
         // Get the deal ticket
         ticket = HistoryDealGetTicket(i);
        }
     }

  }
Explanation:
In this part, we determine the exact time range of the previous trading day so that we can accurately extract the relevant trade history. First, we retrieve the opening time of the previous daily candle, which represents the start of the period we want to analyze. The second line retrieves the opening time of the current daily candle, which is used as the end boundary of the previous trading period. It is important to understand that in MetaTrader 5, time series data is indexed starting from the most recent bar. Index 0 represents the current forming candle, while index 1 represents the last completed candle, index 2 the one before that, and so on. Because of this structure, using index 1 allows us to capture the exact start of the previous completed day, while index 0 gives us the start of the current active day.
However, even though the end time appears to represent the current candle, it is still in an open state because the current daily candle is still forming. This is why it is used as a boundary marker rather than a completed period. Together, these two values allow us to define a clean and accurate window for analyzing only the previous day's completed trading activity. Next, we use the HistorySelect() function to select the time range to retrieve the trading history for analysis. This stage guarantees that our report contains only trades that were completed within the specified time frame. By defining the start and finish times, the system ignores any trades that occur outside that window and only filters and concentrates on pertinent historical data.
The result of this operation is a confirmation that the trade history for that period has been successfully selected and is ready for processing. Once this selection is made, we can safely proceed to loop through the data and calculate performance metrics such as profit, losses, and total trades. After that, we check whether the trade history selection was successful. This guarantees that before any processing starts, there is reliable data accessible for the designated time period. We move on to the next phase if the selection is valid. We then loop through all the trade records available in the selected history. This allows us to go through each trade one by one so that every completed trade within the period is included in our analysis.
For each trade in the loop, we retrieve a unique identifier that represents that specific trade. This identifier allows us to access and work with the detailed information of each trade in subsequent steps of the processing logic. We can now retrieve the historical data within this selected time period, which represents the completed trading session.
Note: We will highlight the specific code sections related to each implementation stage as we progress, ensuring each part is clearly understood on its own without mixing it with previously explained sections.
//+------------------------------------------------------------------+
//| Expert tick function                                             |
//+------------------------------------------------------------------+
void OnTick()
  {
//---
//--- Get the start and end times of the previous trading day
   start_time = iTime(_Symbol,PERIOD_D1,1);
   end_time = iTime(_Symbol,PERIOD_D1,0);

//--- Select trade history within the specified period
   is_time = HistorySelect(start_time, end_time);

//--- Variables for storing trading statistics
   double total_profit = 0;
   double total_wins = 0;
   double total_loss = 0;
   int total_trades = 0;

//--- Process historical deals if history selection is successful
   if(is_time)
     {
      //--- Iterate through all deals in the selected history
      for(int i = 0; i < HistoryDealsTotal(); i++)
        {
         // Get the deal ticket
         ticket = HistoryDealGetTicket(i);

         // Process only closing deals
         if(HistoryDealGetInteger(ticket, DEAL_ENTRY) == DEAL_ENTRY_OUT)
           {
            // Add deal profit to total profit
            total_profit += HistoryDealGetDouble(ticket, DEAL_PROFIT);

            // Increment total trade count
            total_trades++;

            // Add profitable deals to total wins
            if(HistoryDealGetDouble(ticket, DEAL_PROFIT) >= 0)
              {
               total_wins += HistoryDealGetDouble(ticket, DEAL_PROFIT);
              }

            // Add losing deals to total loss
            if(HistoryDealGetDouble(ticket, DEAL_PROFIT) < 0)
              {
               total_loss += HistoryDealGetDouble(ticket, DEAL_PROFIT);
              }
           }
        }
     }

  }
//+------------------------------------------------------------------+
Explanation:
First, we ensure that we are only working with completed trades. This is done by checking the trade entry type and confirming that the trade has been fully closed. This step is important because only closed trades contain final profit or loss values that can be used for reporting. Once a closing trade is identified, we proceed to extract and process its data. Next, we add the profit or loss value of that trade to the overall total profit. This gives us a running summary of the account’s performance across all closed trades within the selected period. At the same time, we increase the total trade count by one for each valid closing trade, allowing us to track how many trades were executed in total.
We also assess the profitability of the trade. We consider a transaction to be successful and add its value to the total wins if the trade outcome is greater than or equal to zero. This helps us isolate and measure positive performance separately from overall profit. Finally, we check if the trade resulted in a loss. If the trade profit is less than zero, we classify it as a losing trade and add its value to the total losses. This allows us to clearly separate negative performance and understand drawdowns within the trading period.
Creating the Email Subject and Message Body
This is the next step in the implementation process, where we focus on preparing the final content of the daily trading report that will be sent via email.
Example:datetime start_time; // Start time of the reporting period datetime end_time; // End time of the reporting period bool is_time; // Indicates whether the history was selected successfully ulong ticket; // Current deal ticket being processed long account_login; // Trading account login number string account_name; // Trading account holder name string email_subject; // Subject line of the email report string email_body; // Body content of the email report string account_currency; // Account deposit currency //+------------------------------------------------------------------+ //| Expert initialization function | //+------------------------------------------------------------------+ int OnInit() { //--- //--- return(INIT_SUCCEEDED); } //+------------------------------------------------------------------+ //| Expert deinitialization function | //+------------------------------------------------------------------+ void OnDeinit(const int reason) { //--- } //+------------------------------------------------------------------+ //| Expert tick function | //+------------------------------------------------------------------+ void OnTick() { //--- //--- Get the start and end times of the previous trading day start_time = iTime(_Symbol,PERIOD_D1,1); end_time = iTime(_Symbol,PERIOD_D1,0); //--- Select trade history within the specified period is_time = HistorySelect(start_time, end_time); //--- Variables for storing trading statistics double total_profit = 0; double total_wins = 0; double total_loss = 0; int total_trades = 0; //--- Process historical deals if history selection is successful if(is_time) { //--- Iterate through all deals in the selected history for(int i = 0; i < HistoryDealsTotal(); i++) { // Get the deal ticket ticket = HistoryDealGetTicket(i); // Process only closing deals if(HistoryDealGetInteger(ticket, DEAL_ENTRY) == DEAL_ENTRY_OUT) { // Add deal profit to total profit total_profit += HistoryDealGetDouble(ticket, DEAL_PROFIT); // Increment total trade count total_trades++; // Add profitable deals to total wins if(HistoryDealGetDouble(ticket, DEAL_PROFIT) >= 0) { total_wins += HistoryDealGetDouble(ticket, DEAL_PROFIT); } // Add losing deals to total loss if(HistoryDealGetDouble(ticket, DEAL_PROFIT) < 0) { total_loss += HistoryDealGetDouble(ticket, DEAL_PROFIT); } } } } //--- Create the email subject containing the report period email_subject = "Daily Trading Report | " + TimeToString(start_time) + " - " + TimeToString(end_time); //--- Retrieve account information account_name = AccountInfoString(ACCOUNT_NAME); account_login = AccountInfoInteger(ACCOUNT_LOGIN); account_currency = AccountInfoString(ACCOUNT_CURRENCY); //--- Build the email body containing account and trading statistics email_body = "Account Name: " + account_name + "\nAccount Login: " + IntegerToString(account_login) + "\nTotal Trades: " + IntegerToString(total_trades) + "\nTotal Wins: " + DoubleToString(total_wins,2) + " " + account_currency + "\nTotal Loss: " + DoubleToString(total_loss,2) + " " + account_currency + "\nTotal Profit: " + DoubleToString(total_profit,2) + " " + account_currency; } //+------------------------------------------------------------------+
Explanation:
"Daily Trading Report" is the first fixed text in the subject line, which makes the email's goal quite evident. The reporting time range is then dynamically added using the start and end times of the selected trading session. The start time and finish time are both transformed into a readable date and time format using the TimeToString(start_time) function. The duration of the report is then clearly displayed by joining these two values with a hyphen. As a result, every email subject becomes distinct and time-specific, making it simple to determine the precise trade day that the report pertains to when going through several emails.
The account name is then obtained, which represents the registered name of the trading account owner. This helps identify who the report belongs to, especially when the report is viewed outside the trading platform. Next, the account login number is retrieved. This is a unique numeric identifier assigned to every trading account by the broker. It is used to distinguish one account from another, particularly in cases where multiple accounts are being managed or monitored.
The account currency is also retrieved, and this represents the base currency in which all profits, losses, and account balances are calculated. Including this ensures that all financial values in the email report are clearly understood and correctly interpreted. The final block is responsible for writing the entire email that will be sent out as the daily trading report. It creates a single structured message that includes both account details and trade performance metrics. Initializing the email body with a label for the account name and then the actual account name value is the first step in the process. At the top of the message, this establishes who owns the report. The account login is then included. It is transformed into text format because it is a numerical value to correctly incorporate it into the string.
This ensures that the login is displayed correctly in the email body. The total number of trades completed during the chosen time frame is then added. This is a brief synopsis of the day's trading action. The total wins are then added. This figure, which is presented as a decimal value with two digits following the decimal point, shows the total of all profitable trades.
The account currency is appended to clarify the profit amount. The total losses are then added using the same format. This is the total of all lost deals, and for clarity, it is presented with the correct currency and formatting. Finally, the total profit is included. This represents the net performance of the trading period and is also formatted with two decimal places and the account currency. Line breaks are used to connect all these numbers so that each item of data displays on a separate line. As a result, the email has a clear, legible format that is appropriate for daily trading performance reporting.
Sending the Email Report Once Per Day
The trading report is automatically provided via email at the final phase of deployment. All required information has now been collected and formatted, including trade statistics, account details, and the actual email message.
Example:datetime last_email_sent; // Time when the last email report was sent
//--- Create the email subject containing the report period
email_subject = "Daily Trading Report | " + TimeToString(start_time) +
                " - " + TimeToString(end_time);
//--- Retrieve account information
account_name = AccountInfoString(ACCOUNT_NAME);
account_login = AccountInfoInteger(ACCOUNT_LOGIN);
account_currency = AccountInfoString(ACCOUNT_CURRENCY);

//--- Build the email body containing account and trading statistics
email_body = "Account Name: " + account_name +
             "\nAccount Login: " + IntegerToString(account_login) +
             "\nTotal Trades: " + IntegerToString(total_trades) +
             "\nTotal Wins: " + DoubleToString(total_wins,2) + " " + account_currency +
             "\nTotal Loss: " + DoubleToString(total_loss,2) + " " + account_currency +
             "\nTotal Profit: " + DoubleToString(total_profit,2) + " " + account_currency;

//--- Get the current daily bar opening time
datetime current_email_time = iTime(_Symbol,PERIOD_D1,0);

//--- Send the report only once per daily candle
if(current_email_time != last_email_sent)
  {
//--- Send the email report
   SendMail(email_subject,email_body);

//--- Store the daily candle time to prevent duplicate emails
   last_email_sent = current_email_time;
  }
Explanation:
This section ensures that the report is sent only once per trading day and controls when it is sent. Firstly, the system collects the current daily candle's opening time, and this value indicates the precise beginning time of the current trading day since every day in MetaTrader 5 initiates a new candle on the D1 timeframe. Every time a new daily candle starts, it serves as a distinct timestamp. The previously saved email-sent time is then compared to this time value. The purpose is to see if an email regarding the current daily candle has already been issued. A new day has begun, and the report for that day has not yet been delivered if the values are different.
The system uses the prepared subject and message body to send the email when this condition is met. This guarantees that as soon as a new daily session is identified, the trading data is sent. Then the system adds the current daily candle opening time to the saved time value after sending the email. This serves as a flag to stop the same report from being provided on the same trading day. This logic prevents duplicate emails and ensures the report is generated once per day, making the system fully automated and reliable.
Conclusion
By following the steps in this article, we have successfully built a complete automated daily trading report system in MQL5 using the SendMail() function that retrieves trade history, processes performance data, and delivers a structured email report. The system:
- retrieves historical trade data from a defined daily period;
- filters and processes only closed trades for accurate results;
- calculates total profit, total wins, total losses, and total trades;
- retrieves account information such as account name, login, and currency;
- builds a structured email subject containing the reporting period;
- formats a clear email body with trading statistics and account details;
- automates email delivery once per day using daily candle detection;
- prevents duplicate emails by tracking previously sent reports.
The end product is a completely automated trading journal that operates in the background and provides reliable daily performance data without the need for manual intervention.
Warning: All rights to these materials are reserved by MetaQuotes Ltd. Copying or reprinting of these materials in whole or in part is prohibited.
This article was written by a user of the site and reflects their personal views. MetaQuotes Ltd is not responsible for the accuracy of the information presented, nor for any consequences resulting from the use of the solutions, strategies or recommendations described.

 Engineering a Self-Healing Expert Advisor in MQL5 (Part 5): Real-Time Recovery Dashboard (Final Part)
 CSV Data Analysis (Part 6): Multi-Broker Result Normalization and Cross-Platform CSV Reconciliation
 Detecting and Visualizing Outlier Bars in MQL5 Using Modified Z-Score on OHLCV Features
 Low-Frequency Quantitative Strategies in MetaTrader 5 (Part 4): A Volatility-Adjusted Momentum-Based Intraday System

- Free trading apps
- Over 8,000 signals for copying
- Economic news for exploring financial markets
You agree to website policy and terms of use