

Price Action Analysis Toolkit Development (Part 70): Turning Flag Pattern Signals into Automated Trade Execution
 6 545
6 545
 0
0

Contents
- Introduction
- Why Graphical Objects Alone Are Not Enough
- Signal Architecture
- Implementing the Indicator Communication Layer in MQL5
- Implementing the Expert Advisor Execution Layer in MQL5
- Testing and Validation
- Conclusion
Introduction
Being able to spot flag patterns on the chart is helpful, but visual recognition alone isn’t enough when we want to trade them automatically. In the previous article (Part 69), we created a real-time flag pattern detector that draws complete bullish and bearish formations using graphical objects. The problem is that while these drawings work well for a trader looking at the screen, an Expert Advisor cannot reliably read them. An Expert Advisor has no easy way to understand arrows, trendlines, or rectangles unless the indicator sends its signals in a clear, structured way that the EA can read directly.
In Part 70, we convert that detector into a signal source for automated execution. The indicator publishes breakout data through three buffers: buy, sell, and pole height. The EA then reads those buffers through CopyBuffer(), applies optional filters, and executes trades only when a confirmed signal appears.
Why Graphical Objects Alone Are Not Enough
The flag detector we built in Part 69 was designed to show completed patterns clearly on the chart. Once a bullish or bearish flag was confirmed, the indicator drew the structure with trendlines, rectangles, labels, and breakout arrows. That approach is effective for visual analysis because a trader can immediately inspect the setup and decide whether it deserves attention.
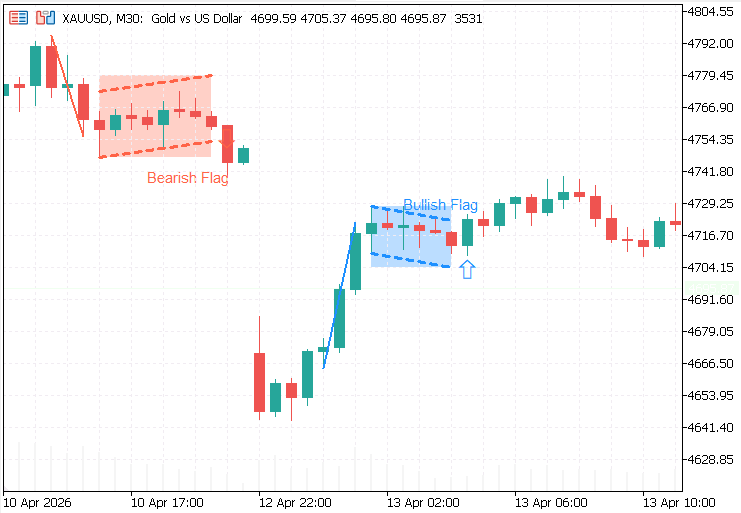
Chart objects are useful for visualization, but they are not a reliable data channel for an EA. Buffers solve that problem by giving the indicator a structured output that the EA can read directly.
Indicator buffers solve this problem more cleanly:
- It uses the standard method (CopyBuffer) that every MQL5 EA already knows.
- Reading data from buffers is fast and efficient.
- The indicator focuses on detection while the EA handles trading decisions.
- Once created, the same signal system can be used by different EAs without extra work.
This is why the updated detector now publishes its signals through dedicated arrow buffers, with an additional buffer for pole height. That small change turns the indicator from a visual tool into a reliable signal source for automation.
Signal Architecture
Before building the EA, we first needed to decide exactly how the indicator would pass information to it. The solution was to use three dedicated buffers.
- BufferBuy[] stores bullish breakout signals,
- BufferSell[] stores bearish breakout signals,
- and BufferPoleHeight[] stores the measured pole height for trade sizing.
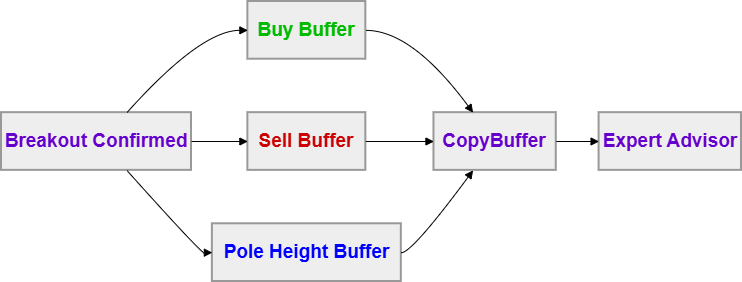
The buy and sell buffers remain empty until a breakout candle closes beyond the flag structure. At that point, the indicator writes a value into the appropriate buffer, while the pole height buffer stores the corresponding pattern measurement. This gives the EA both directional context and pattern size in a machine-readable format.
This design keeps the signals clean, avoids ambiguity, and makes the indicator usable as a structured input source for automated execution.
Implementing the Indicator Communication Layer in MQL5
Now that we have a clear plan for the signals, it’s time to update the flag detector so it can work with an Expert Advisor. We want to keep all the existing chart drawings exactly as they are, while adding clean buffer output for the EA.
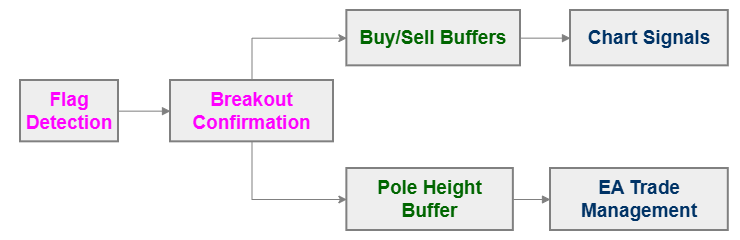
This implementation adds three things:
- buy and sell signal buffers,
- a hidden pole height buffer for trade management,
- and breakout writing logic that only acts after confirmation.
1. Converting the Indicator into a Buffer-Based Signal Provider
The first change we made was to add three indicator buffers so the EA can read the signals directly. Instead of relying entirely on graphical objects drawn on the chart, the indicator now publishes structured breakout data that the EA can access through indicator buffers.
Three buffers are introduced in the upgraded implementation. Two of them are responsible for directional breakout signals, while the third stores the measured pole height for trade management purposes. BufferBuy[] receives a value only when a bullish flag breaks out to the upside. BufferSell[] does the same for bearish breakouts. Everything else stays empty. The third buffer, BufferPoleHeight[], saves the actual height of the flagpole on that same bar so the EA can use it later for trade management.
#property copyright "Copyright 2026, Christian Benjamin."
#property link      "https://www.mql5.com/en/users/lynnchris"
#property version   "2.0"
#property indicator_chart_window
#property indicator_buffers 3
#property indicator_plots   2

//--- visible arrow plots
#property indicator_label1  "Buy arrow"
#property indicator_type1   DRAW_ARROW
#property indicator_color1  clrLime
#property indicator_width1  2

#property indicator_label2  "Sell arrow"
#property indicator_type2   DRAW_ARROW
#property indicator_color2  clrRed
#property indicator_width2  2

//--- arrow symbol codes (Wingdings)
#define ARROW_UP   233
#define ARROW_DOWN 234

//--- buffers
double BufferBuy[];          // holds bullish breakout signals (arrow placement)
double BufferSell[];         // holds bearish breakout signals
double BufferPoleHeight[];   // stores flagpole height for EA
The third buffer, BufferPoleHeight[], is not used for visualization. Its purpose is to preserve the size of the detected flagpole in price units so the EA can later calculate proportional stop-loss and take-profit levels based on the actual structure of the pattern.
The visible buffers are configured as directional arrows on the chart, with bullish signals appearing below the breakout candle and bearish signals appearing above it. This keeps the visual side of the indicator clear for manual analysis while also creating a clean numerical communication layer for automated trading.
2. Buffer Initialization and Plot Configuration
Once the buffers were declared, we set them up properly in OnInit(). This is where we prepare the calculation environment, connect the buffers to the MetaTrader plotting system, and establish the structure that the Expert Advisor will later read.
In OnInit(), we start by creating the ATR handle. This indicator needs ATR for volatility checks, so if the handle cannot be created, we stop right there with INIT_FAILED.
//+------------------------------------------------------------------+
//| Custom indicator initialization                                  |
//+------------------------------------------------------------------+
int OnInit()
  {
//--- create ATR handle (20-period)
   atrHandle=iATR(_Symbol,PERIOD_CURRENT,20);
   if(atrHandle==INVALID_HANDLE)
      return INIT_FAILED;

//--- bind buffers
   SetIndexBuffer(0,BufferBuy,INDICATOR_DATA);
   SetIndexBuffer(1,BufferSell,INDICATOR_DATA);
   SetIndexBuffer(2,BufferPoleHeight,INDICATOR_CALCULATIONS);
//--- set arrow symbols
   PlotIndexSetInteger(0,PLOT_ARROW,ARROW_UP);
   PlotIndexSetInteger(1,PLOT_ARROW,ARROW_DOWN);

//--- ensure standard indexing (oldest bar at index 0)
   ArraySetAsSeries(BufferBuy,false);
   ArraySetAsSeries(BufferSell,false);
   ArraySetAsSeries(BufferPoleHeight,false);

//--- initialize buffers with empty values
   ArrayInitialize(BufferBuy,EMPTY_VALUE);
   ArrayInitialize(BufferSell,EMPTY_VALUE);
   ArrayInitialize(BufferPoleHeight,0.0);

   if(DebugMode)
      Print("Flag Detector v2.0 ",_Symbol);
   return INIT_SUCCEEDED;
  }
Buffers are bound using SetIndexBuffer(), with pole height stored as a calculation buffer since it is not plotted. We then define the arrow symbols with PlotIndexSetInteger(), so bullish signals appear as upward arrows and bearish signals as downward arrows. This makes the breakout confirmations easy to read directly on the chart.
Another important step is the array orientation. By setting the buffers with ArraySetAsSeries(..., false), we keep the indexing in chronological order, from older bars to newer bars. This makes historical scanning, active pattern tracking, and breakout synchronization easier to manage.
Finally, we initialize the buffers with default values. The buy and sell buffers are filled with EMPTY_VALUE, so only confirmed breakouts will show a signal. The pole height buffer is initialized to 0.0, since it stores measurement data rather than plotted output. This gives the EA a clean signal structure and keeps the chart free from false or uninitialized values.
3. Breakout Confirmation and Signal Writing
The key part of the whole system is inside the UpdateActiveFlag() function. It continuously monitors each active flag structure, determines whether a breakout has occurred, and writes the signal when confirmation is valid.
The function loads the structure from activeFlags[] and skips the bar if it was already processed, preventing duplicate calculations during live updates.
We confirm the breakout only after the candle closes. For a bullish flag, price must close above the upper boundary of the flag. For a bearish flag, it must close below the lower boundary of the flag. This makes the signals more reliable because it filters out many false breakouts that appear only briefly during candle formation before price moves back into the consolidation range.
//+------------------------------------------------------------------+
//| Update an active flag – check for breakout or invalidation       |
//+------------------------------------------------------------------+
bool UpdateActiveFlag(int index,const double &high[],const double &low[],
                      const double &close[],const datetime &time[],
                      int newBar,int rates_total)
  {
   ActiveFlag af=activeFlags[index];

//--- already processed this bar
   if(newBar<=af.lastUpdate)
      return false;

   bool breakout=false;
   if(af.isBull)
     {
      if(close[newBar]>af.poleHigh)
         breakout=true;
     }
   else
     {
      if(close[newBar]<af.poleLow)
         breakout=true;
     }

   if(breakout)
     {
      if(IsTooClose(af.flagStart,newBar,af.isBull))
         return true;

      //--- draw the completed pattern
      DrawSlantedPattern(af.poleStart,af.poleEnd,af.flagStart,newBar,af.isBull,high,low,time);

      //--- fill indicator buffers (signal output)
      if(af.isBull && newBar<ArraySize(BufferBuy))
        {
         BufferBuy[newBar]=low[newBar]-10*_Point;
         if(newBar<ArraySize(BufferPoleHeight))
            BufferPoleHeight[newBar]=af.poleLength;
        }
      else
         if(!af.isBull && newBar<ArraySize(BufferSell))
           {
            BufferSell[newBar]=high[newBar]+10*_Point;
            if(newBar<ArraySize(BufferPoleHeight))
               BufferPoleHeight[newBar]=af.poleLength;
           }

      //--- alert and log
      string msg=StringFormat("Flag Detector: %s flag on %s %s at %s",
                              af.isBull?"Bull":"Bear",_Symbol,EnumToString(Period()),
                              TimeToString(time[newBar]));
      DoAlert(msg,EnableSound,EnableNotification,EnableEmail);
      if(DebugMode)
         Print((af.isBull?"BULL":"BEAR")," Flag | ",TimeToString(time[newBar]),
               " | Pole height: ",af.poleLength);

      //--- record as drawn
      RecordDrawnFlag(af.poleStart,af.poleEnd,af.flagStart,newBar,
                      time[af.flagStart],time[newBar],af.isBull);
      return true;
     }

//--- no breakout: update extremes and check invalidation
   if(af.isBull)
     {
      if(low[newBar]<af.extreme)
         af.extreme=low[newBar];
     }
   else
     {
      if(high[newBar]>af.extreme)
         af.extreme=high[newBar];
     }

   double retrace=af.isBull?(af.poleHigh-af.extreme)/af.poleLength*100
                  :(af.extreme-af.poleLow)/af.poleLength*100;
   if(retrace>MaxRetracePercent)
      return true;

   if(MaxFlagBars>0 && newBar-af.flagStart+1>MaxFlagBars)
      return true; // too long

//--- update structural counters
   if(newBar>af.flagStart)
     {
      int prev=newBar-1;
      if(af.isBull)
        {
         if(high[newBar]<high[prev])
            af.pullbacks++;
         if(low[newBar] >low[prev])
            af.pushes++;
        }
      else
        {
         if(low[newBar] >low[prev])
            af.pullbacks++;
         if(high[newBar]<high[prev])
            af.pushes++;
        }
     }

   af.lastUpdate=newBar;
   activeFlags[index]=af;
   return false;
  }
Once a breakout is confirmed, the function uses IsTooClose() to check whether the structure overlaps excessively with a previously completed pattern. This prevents repeated signals from being generated during tight consolidations where multiple formations can appear almost identical.
After validation passes, the indicator finalizes the structure visually using DrawSlantedPattern(). The completed breakout is then written directly into the signal buffers. Bullish signals populate BufferBuy[], while bearish signals populate BufferSell[]. The arrow values are shifted slightly away from the candle using _Point offsets so the plotted markers remain visually clear on the chart.
At the same time, the measured flagpole height is stored inside BufferPoleHeight[] on the exact breakout candle. Keeping the directional signal and structural measurement synchronized on the same bar allows the EA to later calculate proportional stop-loss and take-profit levels directly from the detected pattern.
We also kept the alert system active, so valid breakouts can trigger sound, push notifications, or email alerts depending on the enabled settings. Additional diagnostic information is also printed in debug mode.
If no breakout occurs, the structure remains under monitoring. The function updates retracement extremes, recalculates pullback percentages, and invalidates the setup if retracement exceeds the allowed threshold. MaxFlagBars is also used to prevent patterns from remaining active for too long after losing structural relevance.
4. Historical Stability and Non-Repainting Behavior
One of the biggest challenges in building reliable EAs is making sure signals behave the same way in backtests as they do in live trading. If signals appear differently during backtesting and real-time trading, the strategy becomes unreliable regardless of how accurate the visual detection may seem.
To maintain consistency, the indicator is designed around controlled buffer updates inside OnCalculate(). Once a breakout signal is written into a buffer on a confirmed candle, it is not modified during future recalculations.
//+------------------------------------------------------------------+
//| Main calculation loop                                            |
//+------------------------------------------------------------------+
int OnCalculate(const int32_t rates_total,
                const int32_t prev_calculated,
                const datetime &time[],
                const double   &open[],
                const double   &high[],
                const double   &low[],
                const double   &close[],
                const long     &tick_volume[],
                const long     &volume[],
                const int32_t  &spread[])
  {
//--- copy ATR buffer for all available bars
   if(CopyBuffer(atrHandle,0,0,rates_total,atrBuffer)!=rates_total)
      return 0;

//--- reset buffer values for newly arrived bars (prevents repainting)
   for(int i=prev_calculated;i<rates_total;i++)
     {
      if(i<ArraySize(BufferBuy))
         BufferBuy[i]=EMPTY_VALUE;
      if(i<ArraySize(BufferSell))
         BufferSell[i]=EMPTY_VALUE;
      if(i<ArraySize(BufferPoleHeight))
         BufferPoleHeight[i]=0.0;
     }

//--- first run: full historical scan + initial active search
   if(prev_calculated==0)
     {
      ScanHistoricalFlags(rates_total,open,high,low,close,time);
      int activeScanStart=MathMax(0,rates_total-LookbackBars);
      for(int i=activeScanStart;i<=rates_total-MinFlagBars-1;i++)
        {
         int moveStart,moveEnd;
         bool isBullMove;
         if(FindThreeBarMove(i,rates_total,open,close,atrBuffer,moveStart,moveEnd,isBullMove))
            TryAddActiveFlag(moveStart,moveEnd,isBullMove,high,low,time,rates_total);
        }
     }
   else
     {
      int newBars=rates_total-prev_calculated;
      if(newBars>0)
        {
         //--- update existing active flags (remove if broken/invalid)
         for(int i=ArraySize(activeFlags)-1;i>=0;i--)
           {
            bool remove=false;
            for(int bar=prev_calculated;bar<rates_total;bar++)
               if(UpdateActiveFlag(i,high,low,close,time,bar,rates_total))
                 {remove=true;break;}
            if(remove)
               RemoveActiveFlag(i);
           }

         //--- scan recent bars for new flagpoles (window = max(50, LookbackBars))
         int scanWindow=MathMax(50,LookbackBars);
         int newPoleScanStart=MathMax(0,rates_total-scanWindow);
         for(int i=newPoleScanStart;i<=rates_total-3;i++)
           {
            int moveStart,moveEnd;
            bool isBullMove;
            if(FindThreeBarMove(i,rates_total,open,close,atrBuffer,moveStart,moveEnd,isBullMove))
               TryAddActiveFlag(moveStart,moveEnd,isBullMove,high,low,time,rates_total);
           }
        }
     }

   return rates_total;
  }
//+------------------------------------------------------------------+
This behavior is managed using prev_calculated, which allows the indicator to separate historical processing from incremental updates. Instead of recalculating the entire dataset on every tick, the system only processes newly arrived bars between prev_calculated and rates_total.
In OnCalculate(), the code resets buffer values only for newly added bars; previously confirmed signals remain unchanged, preventing repainting. BufferBuy[] and BufferSell[] are cleared using EMPTY_VALUE, while BufferPoleHeight[] is reset to 0.0. Since confirmed signals fall outside the recalculation range, they remain unchanged during future updates.
The implementation also includes additional structural filtering to suppress duplicate formations. During volatile consolidations, price action can generate overlapping flag structures within a short period. The overlap checks ensure that only distinct and meaningful formations are allowed to generate breakout events.
Implementing the Expert Advisor Execution Layer in MQL5
Now that the indicator is sending clean signals through buffers, we can build the Expert Advisor that will actually place the trades. In this phase, the EA does not attempt to detect flag patterns on its own. That role already belongs to the indicator. Instead, the EA uses OnInit() to load the custom indicator, OnTick() to monitor new bars, PassesFilters() to validate the signal, and ExecuteTrade() to open the position when all conditions are satisfied.
This clear separation makes everything easier to maintain. The indicator takes care of finding patterns and generating signals, while the EA focuses only on filters, risk management, and executing trades. As a result, the two components remain focused, easier to maintain, and less likely to duplicate logic.
1. Loading the Indicator in OnInit()
We start the EA setup in OnInit() by loading the indicator and preparing everything else we need. The first step is loading the custom flag detector using iCustom(). This creates the indicator handle that allows the EA to access the buy, sell, and pole-height buffers generated by the indicator. If the handle fails to initialize, the EA returns INIT_FAILED because no valid signal source is available.
//+------------------------------------------------------------------+
//| Expert initialization – load indicator and filter handles        |
//+------------------------------------------------------------------+
int OnInit()
  {
//--- Load the custom flag pattern detector
   indiHandle = iCustom(_Symbol, _Period, "Flag_Pattern_Detector");
   if(indiHandle == INVALID_HANDLE)
      return INIT_FAILED;

//--- Set the magic number for trade identification
   trade.SetExpertMagicNumber(MagicNumber);

//--- Create trend filter handle (if enabled)
   if(UseTrendFilter)
      maHandle = iMA(_Symbol, MA_Timeframe, MA_Period, 0, MODE_SMA, PRICE_CLOSE);

//--- Create volume confirmation handle (if enabled)
   if(UseVolumeConfirmation)
      volMAHandle = iMA(_Symbol, _Period, VolumeMA_Period, 0, MODE_SMA, VOLUME_TICK);

//--- Create EMA exit handle (if enabled)
   if(UseEMAExit)
      emaExitHandle = iMA(_Symbol, EMAExitTimeframe, EMAExitPeriod, 0, EMAExitMethod, PRICE_CLOSE);

//--- Reset internal state
   eaStartTime = 0;
   hasPosition = false;
   return INIT_SUCCEEDED;
  }
The EA sets the magic number via trade.SetExpertMagicNumber() so it can manage its positions independently of other trades. We also create handles for the optional filters (trend and volume) and the EMA exit if they are enabled. If trend filtering is enabled, iMA() creates the moving average handle used for directional confirmation. If volume confirmation is enabled, another moving average handle is created for tick-volume averaging. The EA also initializes an EMA handle for exit management when EMA-based exits are enabled.
Finally, the initialization process resets the internal execution state by clearing variables such as eaStartTime and hasPosition. This ensures that the EA starts from a clean runtime state before monitoring live breakout signals from the indicator buffers.
2. Reading the Buffers in OnTick()
OnTick() is where the main logic runs. It starts with a one-time startup scan through ScanStartupSignals() so that any valid signal present at attachment time can still be recognized. After that, the EA switches into normal live monitoring.
If a position is already open, OnTick() does not look for new entries. Instead, it focuses on position management by verifying that the trade still exists and, if UseEMAExit is enabled, calling CheckEMAExit(). This keeps the execution flow disciplined and prevents the EA from opening new trades while an active one is still being managed.
//+------------------------------------------------------------------+
//| Main tick handler – entry signals and position management        |
//+------------------------------------------------------------------+
void OnTick()
  {
//--- One‑time startup scan to catch signals that occurred right at attachment
   if(eaStartTime == 0)
     {
      eaStartTime = iTime(_Symbol, _Period, 0);
      ScanStartupSignals();
     }

//--- If a position is open, manage it (EMA exit). No new entries.
   if(hasPosition)
     {
      //--- Check if the position still exists
      if(!PositionSelectByTicket(currentTicket))
        {
         hasPosition = false;
         return;
        }
      //--- Apply EMA exit rule if enabled
      if(UseEMAExit)
         CheckEMAExit();
      return;
     }

//--- No open position: wait for a new bar to check for entry signals
   static datetime prevBarTime = 0;
   datetime currBarTime = iTime(_Symbol, _Period, 0);
   if(currBarTime == prevBarTime)
      return;
   prevBarTime = currBarTime;

//--- Prevent trading bars before the EA started (avoids backtest future‑leak)
   if(currBarTime < eaStartTime)
      return;

//--- Copy the last two bars of each indicator buffer
   if(CopyBuffer(indiHandle, 0, 0, 2, bufBuy) != 2 ||
      CopyBuffer(indiHandle, 1, 0, 2, bufSell) != 2 ||
      CopyBuffer(indiHandle, 2, 0, 2, bufPoleHeight) != 2)
      return;

//--- Examine the just‑closed bar (index 1)
   datetime closedBarTime = iTime(_Symbol, _Period, 1);
   bool newBuy  = (bufBuy[1] != EMPTY_VALUE && bufBuy[1] != 0);
   bool newSell = (bufSell[1] != EMPTY_VALUE && bufSell[1] != 0);

//--- If a fresh signal is present and passes all filters, execute the trade
   if((newBuy || newSell) && closedBarTime >= eaStartTime)
     {
      if(newBuy && closedBarTime != lastBuyBarTime && PassesFilters(true, closedBarTime))
        {
         ExecuteTrade(true, bufPoleHeight[1]);
         lastBuyBarTime = closedBarTime;
        }
      else
         if(newSell && closedBarTime != lastSellBarTime && PassesFilters(false, closedBarTime))
           {
            ExecuteTrade(false, bufPoleHeight[1]);
            lastSellBarTime = closedBarTime;
           }
     }
  }
When no position is open, the EA waits for a new bar before checking the indicator buffers. We use a simple check with the bar time so we only process each closed candle once. It also ignores any bars that existed before the EA started, which helps avoid look-ahead bias in backtests.
On a new bar, OnTick() reads the last two values of the buy, sell, and pole-height buffers via CopyBuffer(). It evaluates the most recently closed bar (index 1) and, if the signal is new and passes PassesFilters(), calls ExecuteTrade() with the corresponding pole height.
This function is the bridge between the indicator and the execution layer. It reads the signal, validates it, and sends it into the trade logic only once per confirmed breakout.
3. Startup Scanning in ScanStartupSignals()
We added a ScanStartupSignals() function that runs once when the EA is first attached. It checks the last 50 bars in case a valid breakout happened just before we loaded the EA. This is important because the indicator may have produced a breakout signal just before the EA was attached, and the execution layer should still be able to react to that setup if it belongs to the active session.
The function first limits the scan to the most recent 50 bars, or fewer if the chart has less history available. It then switches the buffer arrays to series mode temporarily so the EA can iterate backward through recent bars more naturally. After copying the latest buffer data through indicator buffers, the function restores the normal indexing mode used elsewhere in the EA.
//+------------------------------------------------------------------+
//| Scan the last 50 bars for a signal that appeared before EA start |
//+------------------------------------------------------------------+
void ScanStartupSignals()
  {
   int bars = Bars(_Symbol, _Period);
   int lookBack = MathMin(bars - 2, 50);
   if(lookBack < 1)
      return;

//--- Temporarily reverse series order for easy backward iteration
   ArraySetAsSeries(bufBuy, true);
   ArraySetAsSeries(bufSell, true);
   ArraySetAsSeries(bufPoleHeight, true);

//--- Copy enough history
   if(CopyBuffer(indiHandle, 0, 0, lookBack+1, bufBuy) < lookBack+1 ||
      CopyBuffer(indiHandle, 1, 0, lookBack+1, bufSell) < lookBack+1 ||
      CopyBuffer(indiHandle, 2, 0, lookBack+1, bufPoleHeight) < lookBack+1)
     {
      ArraySetAsSeries(bufBuy, false);
      ArraySetAsSeries(bufSell, false);
      ArraySetAsSeries(bufPoleHeight, false);
      return;
     }

//--- Restore standard indexing
   ArraySetAsSeries(bufBuy, false);
   ArraySetAsSeries(bufSell, false);
   ArraySetAsSeries(bufPoleHeight, false);

//--- Iterate from older to newer bar (i = lookBack = oldest, down to 1 = last closed)
   for(int i = lookBack; i >= 1; i--)
     {
      datetime barTime = iTime(_Symbol, _Period, i);
      if(barTime < eaStartTime)
         continue;

      bool buySignal  = (bufBuy[i] != EMPTY_VALUE && bufBuy[i] != 0);
      bool sellSignal = (bufSell[i] != EMPTY_VALUE && bufSell[i] != 0);

      //--- Trade the most recent valid, filtered signal and stop scanning
      if(buySignal && barTime != lastBuyBarTime && PassesFilters(true, barTime))
        {
         ExecuteTrade(true, bufPoleHeight[i]);
         lastBuyBarTime = barTime;
         break;
        }
      if(sellSignal && barTime != lastSellBarTime && PassesFilters(false, barTime))
        {
         ExecuteTrade(false, bufPoleHeight[i]);
         lastSellBarTime = barTime;
         break;
        }
     }
  }
The scan then moves from the older recent bars toward the newest closed bar and checks each candle for a valid buy or sell signal. Any signal that predates eaStartTime is ignored, which prevents the EA from acting on old history that existed before attachment. When a fresh signal is found, the function passes it through PassesFilters() and, if valid, calls ExecuteTrade() using the pole-height value from the buffer.
This startup scan gives the EA a clean way to catch near-recent signals without reprocessing the full history or duplicating the indicator’s detection logic.
4. Signal Validation in PassesFilters()
Before we open any trade, we run the signal through PassesFilters() to make sure it meets our extra conditions. Its role is to make sure that a fresh breakout signal is not traded blindly, but only when it also agrees with the selected market conditions.
The first check is the trend filter. When UseTrendFilter is enabled, the EA reads the moving average value for the signal bar and compares it with the bar’s closing price. For buy signals we require price to be trading above the selected moving average. For sell signals, price should be below it. This keeps entries aligned with the broader direction of the market and helps reduce counter-trend trades.
//+------------------------------------------------------------------+
//| Entry filters (trend + volume)                                  |
//| Returns true if signal is valid                                 |
//+------------------------------------------------------------------+
bool PassesFilters(bool isBuy, datetime barTime)
  {
//--- Get bar index once (critical optimization)
   int barIdx = iBarShift(_Symbol, _Period, barTime);
   if(barIdx < 0)
      return false;

//--- 1. Trend filter (SMA alignment)
   if(UseTrendFilter)
     {
      int maShift = iBarShift(_Symbol, MA_Timeframe, barTime);
      if(maShift < 0)
         return false;

      double maVal[1];
      if(CopyBuffer(maHandle, 0, maShift, 1, maVal) != 1)
         return false;

      double closePrice = iClose(_Symbol, _Period, barIdx);

      if(isBuy && closePrice <= maVal[0])
         return false;

      if(!isBuy && closePrice >= maVal[0])
         return false;
     }

//--- 2. Volume confirmation (tick volume SMA filter)
   if(UseVolumeConfirmation)
     {
      int needBars = barIdx + VolumeMA_Period + 1;

      long vol[];
      ArraySetAsSeries(vol, true);

      if(CopyTickVolume(_Symbol, _Period, 0, needBars, vol) < needBars)
         return false;

      double sum = 0.0;

      for(int i = barIdx; i < barIdx + VolumeMA_Period; i++)
         sum += (double)vol[i];

      double avgVol = sum / VolumeMA_Period;
      double currVol = (double)vol[barIdx];

      if(currVol < avgVol * VolumeMultiplier)
         return false;
     }

//--- All filters passed
   return true;
  }
The second check is volume confirmation. When UseVolumeConfirmation is enabled, the EA compares the breakout bar’s tick volume with its average volume value. If the breakout activity is too weak, the signal is rejected. This adds another layer of discipline by requiring a stronger participation level before execution.
If both checks pass, the function returns true, and the EA is allowed to continue to ExecuteTrade(). That makes PassesFilters() a clean gatekeeper between signal recognition and order placement.
5. Trade Placement in ExecuteTrade()
Once a signal passes all checks, ExecuteTrade() opens the position. Before opening a new position, the EA first closes any existing one if hasPosition is true and currentTicket still points to an active trade. This keeps the strategy restricted to one position at a time and prevents overlapping exposure on the same symbol.
After clearing the previous trade state, the function calculates the entry price using the current ask for buys and bid for sells. It then prepares the stop-loss and take-profit levels. If dynamic stop-loss and take-profit are enabled, we calculate them based on the actual height of the flagpole that was stored in the buffer. This makes the trade protection proportional to the size of the detected pattern. Larger flags receive wider targets, while smaller flags remain tighter.
//+------------------------------------------------------------------+
//| Execute a buy or sell trade with dynamic or fixed SL/TP          |
//+------------------------------------------------------------------+
void ExecuteTrade(bool isBuy, double poleHeight)
  {
//--- Close any existing position first (only one trade at a time)
   if(hasPosition && PositionSelectByTicket(currentTicket))
      trade.PositionClose(currentTicket, Slippage);
   hasPosition = false;

//--- Determine entry price (ask for buy, bid for sell)
   double price = isBuy ? SymbolInfoDouble(_Symbol, SYMBOL_ASK) : SymbolInfoDouble(_Symbol, SYMBOL_BID);
   double sl = 0, tp = 0;

//--- Calculate dynamic stop and take profit from flagpole height
   if(UseDynamicSLTP && poleHeight > 0)
     {
      sl = isBuy ? price - poleHeight * SL_Multiplier : price + poleHeight * SL_Multiplier;
      tp = isBuy ? price + poleHeight * TP_Multiplier : price - poleHeight * TP_Multiplier;
     }
   else
     {
      //--- Fallback to fixed values if dynamic mode is off or pole data missing
      if(FixedStopLoss > 0)
         sl = isBuy ? price - FixedStopLoss * _Point : price + FixedStopLoss * _Point;
      if(FixedTakeProfit > 0)
         tp = isBuy ? price + FixedTakeProfit * _Point : price - FixedTakeProfit * _Point;
     }

//--- Send the order
   if(isBuy)
      trade.Buy(LotSize, _Symbol, price, sl, tp, "Flag Buy");
   else
      trade.Sell(LotSize, _Symbol, price, sl, tp, "Flag Sell");

//--- Store position details for the EMA exit monitor
   if(PositionSelect(_Symbol))
     {
      currentTicket = PositionGetInteger(POSITION_TICKET);
      hasPosition = true;
     }
  }
If dynamic sizing is not available or disabled, the function falls back to fixed stop-loss and take-profit inputs. That gives the EA a safe backup path even when pole data is missing or the user prefers standard point-based protection.
Once the levels are defined, the order is sent through trade.Buy() or trade.Sell() depending on the signal direction. After sending the order we save the ticket so we can manage the position later. This allows the EA to continue managing the trade later, including any EMA-based exit logic.
6. Preventing Duplicate Trades
We also keep track of the time of the last traded bar so the same signal isn’t used more than once. Before calling ExecuteTrade(), the EA checks whether the current signal belongs to a bar that has already been processed. If it does, the signal is ignored.
//--- If a fresh signal is present and passes all filters, execute the trade
   if((newBuy || newSell) && closedBarTime >= eaStartTime)
     {
      if(newBuy && closedBarTime != lastBuyBarTime && PassesFilters(true, closedBarTime))
        {
         ExecuteTrade(true, bufPoleHeight[1]);
         lastBuyBarTime = closedBarTime;
        }
      else
         if(newSell && closedBarTime != lastSellBarTime && PassesFilters(false, closedBarTime))
           {
            ExecuteTrade(false, bufPoleHeight[1]);
            lastSellBarTime = closedBarTime;
           }
     }
This bar-time memory is essential because the indicator can remain visible on the chart across many ticks, but the EA must respond only once per confirmed breakout. The combination of OnTick(), last-bar tracking, and CopyBuffer() ensures that the same signal is not traded more than once.
Execution Layer Summary
The indicator generates the signal through UpdateActiveFlag() and related detection functions. The EA receives that signal through the buffers and handles execution in a controlled and repeatable way.
Testing and Validation
The main goal of this part has been completed — we now have a working connection between the flag detector indicator and the Expert Advisor. This allowed the EA to read breakout data, apply confirmation filters, and execute trades automatically with structured risk management.
I ran the backtest on XAUUSD using high-quality tick data (98% modeling quality) in the MT5 Strategy Tester, covering the period from 11 October 2022 to 14 May 2026.
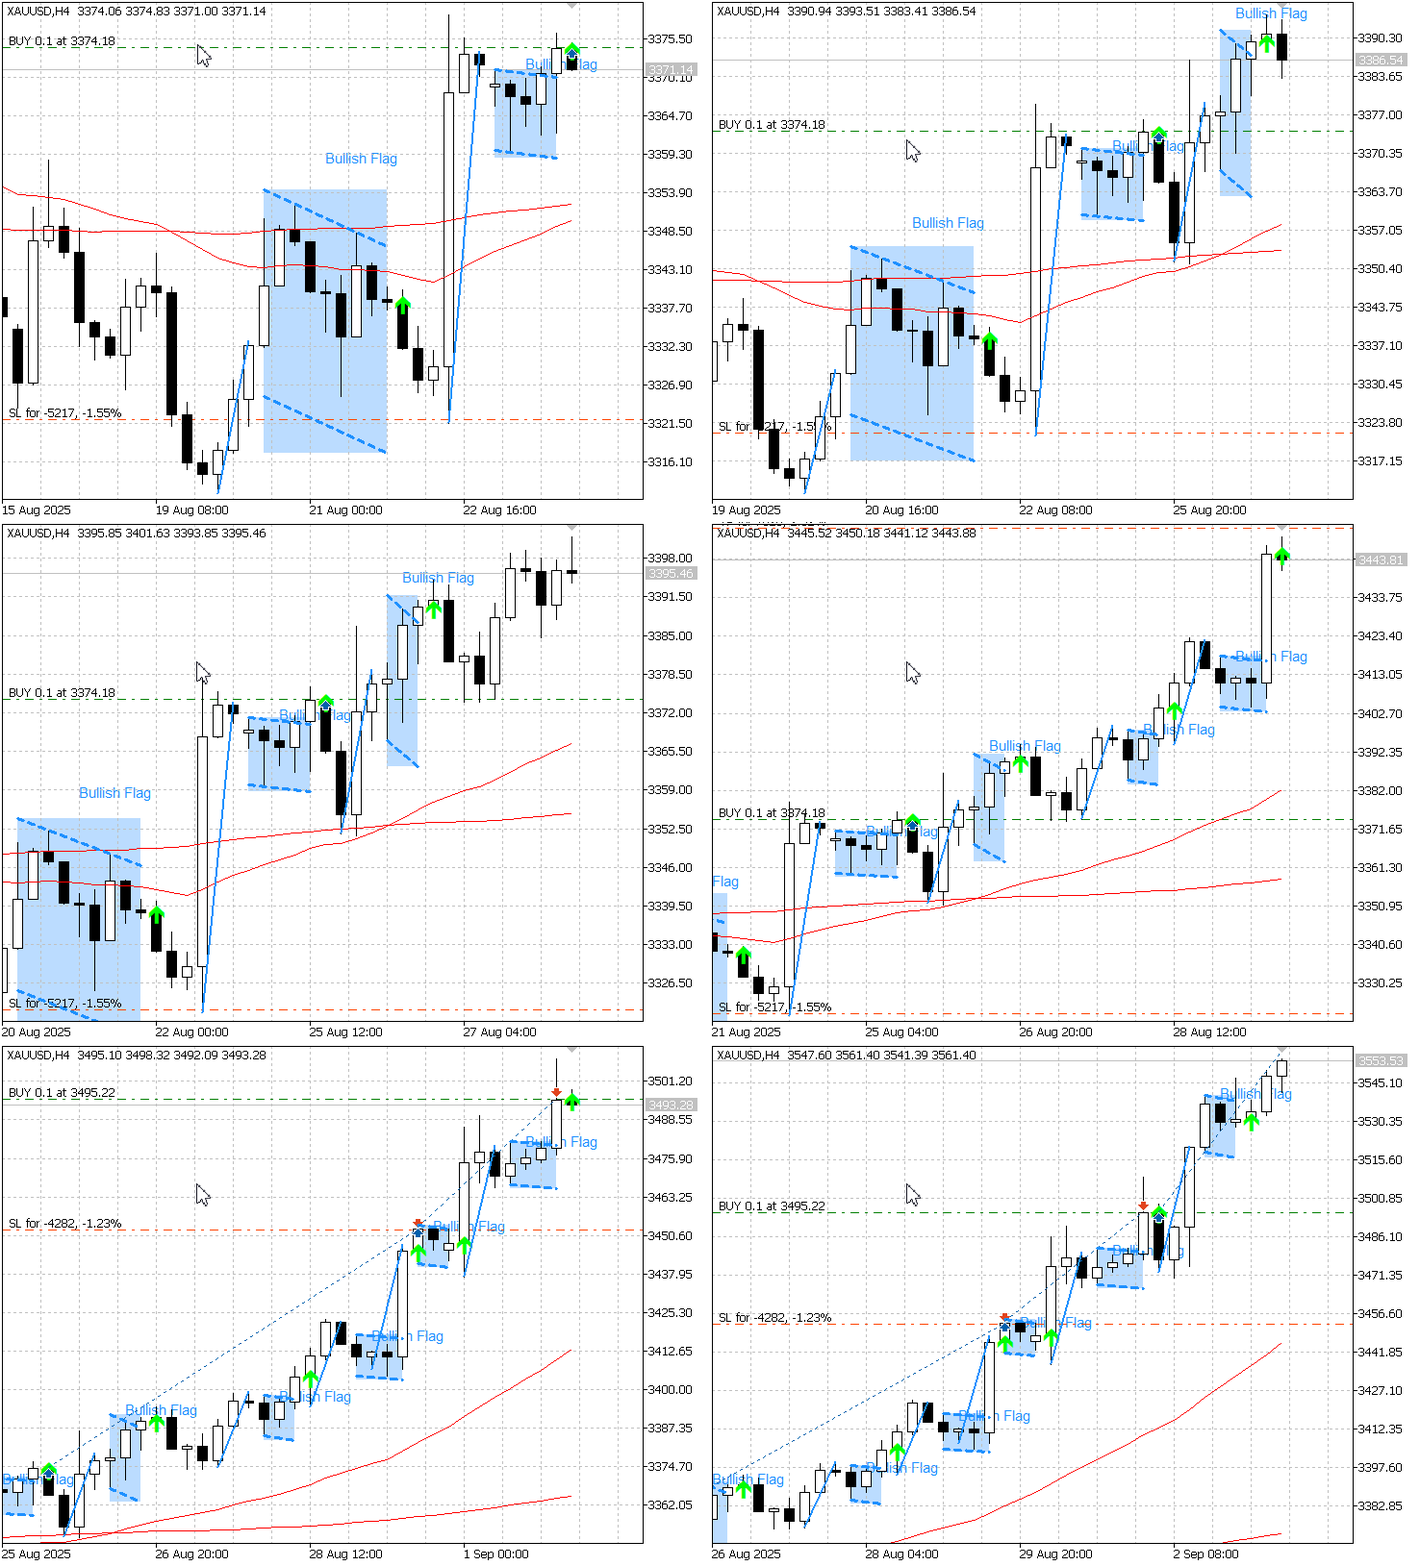
Key Results
- Initial Deposit: $10,000
- Net Profit: +$22,181.20 (+221.81%)
- Profit Factor: 1.62
- Recovery Factor: 3.85
- Sharpe Ratio: 2.10
- Total Trades: 266
- Win Rate: 42.86%
- Maximum Equity Drawdown: $5,765.60 (20.03%)
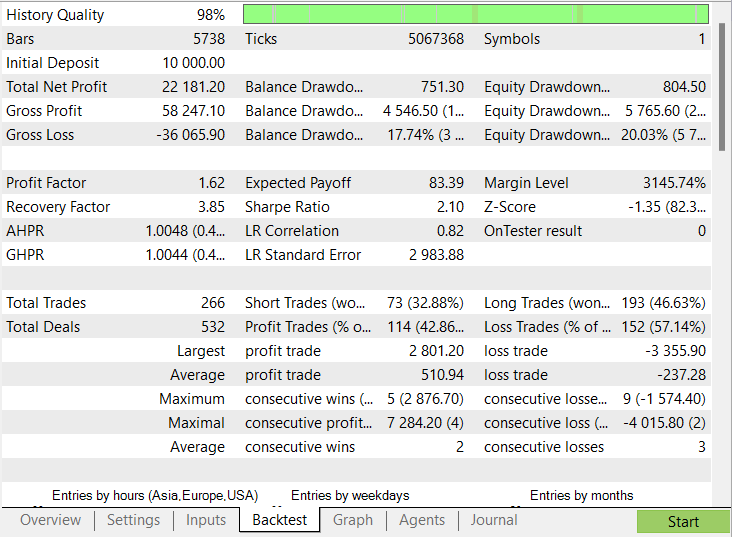
The equity curve showed steady growth overall, with reasonable drawdowns followed by good recoveries.
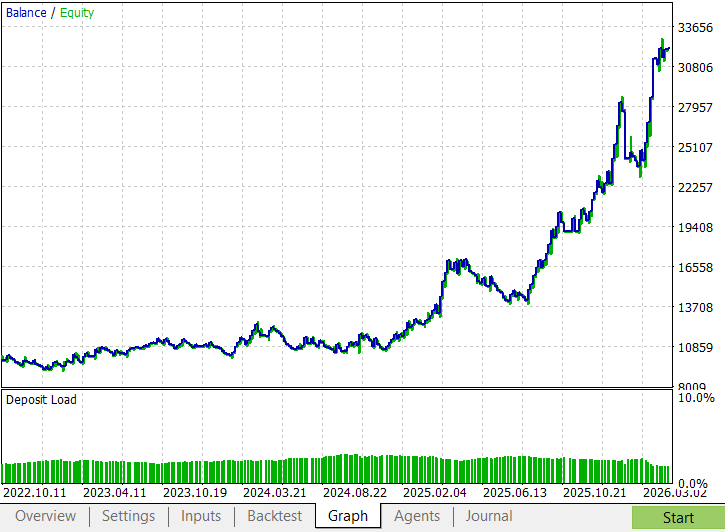
The results confirm that the indicator-to-EA integration is stable and that the buffer-based signal layer works as intended. Performance is strongest in directional markets, while ranging conditions reduce signal efficiency.
There is still room for improvement. Some areas worth exploring next include:
- ATR-based volatility filtering to reduce weak breakout conditions
- Multi-timeframe trend confirmation to improve directional accuracy
- Adaptive signal strength thresholds for changing market conditions
- Enhanced trade management using partial exits and trailing stops
- Additional confirmation layers using complementary indicators
- Extended validation through walk-forward and forward testing
Conclusion
In this article, we successfully turned the flag pattern detector into a complete automated trading system. The indicator now publishes reliable signals through buffers, and the Expert Advisor reads those signals through indicator buffers, applies its filters, and executes trades with controlled risk management.
Backtesting confirmed that the integration is stable over extended historical data. The signal layer remains non-repainting, trade triggering is consistent, and the EA responds predictably to confirmed breakouts. This gives us a solid, repeatable foundation for trading flag breakouts automatically. There is still room to add more filters and improve trade management, but the core integration is now complete and stable.
The attached files are summarized in the table below.
| File | Type | Description |
|---|---|---|
| Flag_Pattern_Detector.mq5 | Custom Indicator | Detects bullish and bearish flag patterns, validates breakouts, draws chart structures, and publishes buy/sell signals together with pole height measurements through indicator buffers |
| Flag_Pattern_EA.mq5 | Expert Advisor | Reads the indicator buffers using CopyBuffer(), applies execution filters, manages risk parameters, and executes automated trades from confirmed flag breakout signals. |
Warning: All rights to these materials are reserved by MetaQuotes Ltd. Copying or reprinting of these materials in whole or in part is prohibited.
This article was written by a user of the site and reflects their personal views. MetaQuotes Ltd is not responsible for the accuracy of the information presented, nor for any consequences resulting from the use of the solutions, strategies or recommendations described.

 Trading with the MQL5 Economic Calendar (Part 12): SQLite Storage and Deduplication
 Publish Your Article Code to MQL5 Algo Forge in 10 Minutes: A Step-by-Step Guide
 An Introduction to the Study of Fractal Market Structures Using Machine Learning
 MQL5 Wizard Techniques you should know (Part 91): Using Skip Lists and a Hopfield Network in a Custom Trailing Class

- Free trading apps
- Over 8,000 signals for copying
- Economic news for exploring financial markets
You agree to website policy and terms of use