
Market Simulation (Part 20): First steps with SQL (III)

Introduction
Greetings to everyone in another article from the series on building a replication/simulation system.
In this article, we will begin to examine a rather complex topic. But if you can understand what we will cover next, you will be able to significantly advance in your career. It will not be an easy task. Nevertheless, we will try to explain it as simply as possible.
Preparing the script
In the previous article, « Market Simulation (Part 19): First Steps with SQL (II)», we explained how to use scripts to add, modify, and even delete records in a database. However, to move forward with the explanation, we need a simple database setup to move forward with the explanation. This will allow you to truly understand what will be explained.
Although we can work with a database containing about 10 records, it will be easier to understand when we use a file with more than 15 thousand records. That is, if we tried to create such a database manually, this task would be enormous. However, it is difficult to find such a database, even for educational purposes, that is available for download. But there is no need for that: we can use MetaTrader 5 to generate it. It may not be perfect, but at least it will have many records, which is exactly what we need.
To understand how we will use MetaTrader 5 to create a database and study our topic, we need to go back in time a little.
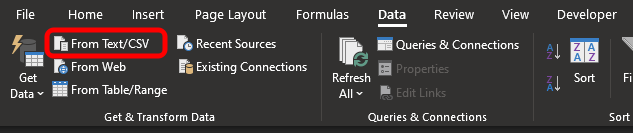
There are people and even small organizations that use Excel as a database. Many of you may not believe this or may not notice that it happens. And it's not just Excel — there are other programs that are also used this way. But for now, we will limit ourselves to Excel. When we use Excel to work with a database, an additional option appears on the settings ribbon. The image below shows what is meant.

For this tab to appear, we need to do a few things. One of them, and perhaps the simplest, is to open a file that has a specific format or structure. This is done from the location shown in the image below.
Remember that we are showing one of the ways, but it is not the only one. Now the question arises: what type of file are we going to use here? You will most likely use different types of files. When I say this, I mean that the internal structure of the file can be anything, but to simplify things and better understand the material, let's move on to MetaTrader 5. In the image below, we see what I am getting at.
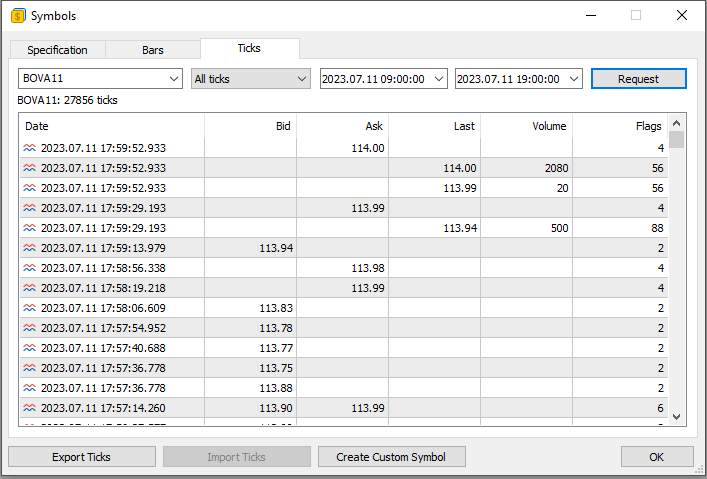
Please note that here we have sent a request to the trading server to obtain all ticks traded on a specific day for a particular symbol. What is shown in the image above is exactly a set of information from the database. However, in this window, we cannot manipulate the data as we can when using a specialized program. Nevertheless, we can export this information to a file. It can be in CSV format.
Once this file is saved on the local disk, we can use it in a program that handles database files. However — and this is important to understand before we begin processing the contents of the file and interpreting it as a data table — we need to convert it into a database. This is the magic of the process. And this is exactly what we want to achieve.
First Contact Outside WorkBench
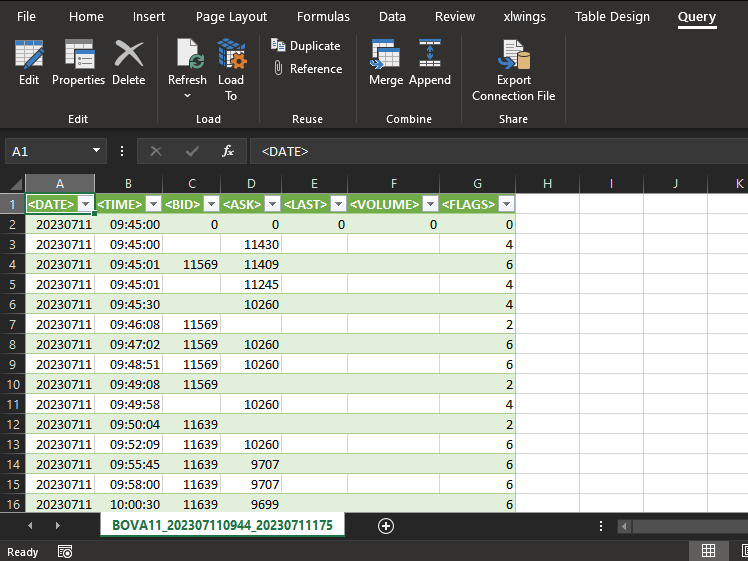
Then, after saving the information shown in the image above to a file, we can first load it into Excel. As a result, Excel will no longer process the file the way you might imagine. Excel will actually convert the file into the equivalent of a database. Thus, the Excel interface will change and look as follows:
Alright. You might think that here you will be able to work as if you were using SQL commands. In fact, that is not entirely the case when using Excel or another program that provides a certain level of access to a database. Although you can actually do a lot here, the experience will be far from that of using pure SQL. So let's forget about Excel and go in a different direction. This is necessary so that we can understand the command that will be explained.
Using MetaEditor to Explore the Database
You most likely think we have a big problem, since in most cases the file downloaded by MetaTrader 5 and saved in CSV format can take up several megabytes. And turning something like that into an acceptable format (so that you can use SQL queries on this downloaded data) seems like a very difficult task that only great computer masters can solve. However, the truth is that if you do not understand the tools at your disposal, you will always have a problem to solve, even if the solution is right in front of you.
Thus, the easiest way to transform all the data downloaded by MetaTrader 5 into a more convenient format without using programming is to use MetaEditor. This will effectively turn the downloaded CSV file into a real database file. But how do you do that? How do you convert a CSV file saved by MetaTrader 5 into a database file using MetaEditor? This seems incredibly difficult, but it is far from it, my dear readers. It's all about understanding which tool you have in your hands.
First, let's do the following: let's start by creating a new, completely clean database. We have already explained how to do this using MetaEditor. After creating this database file, we need to perform the following steps.
First, select the option shown in the image below:
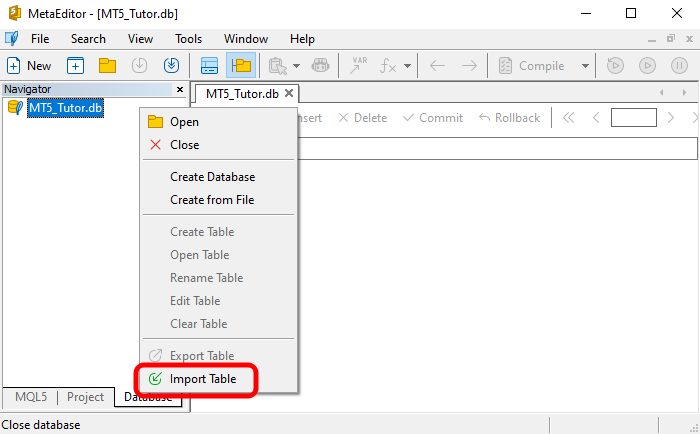
This option allows you to import a table into the database. Remember that a table is a collection of records. Since a CSV file is also a collection of records, we import it as if it were a table. After selecting the desired option, a window will open where you need to configure the data import settings for MetaEditor to create the final table. This window can be seen in the image below.
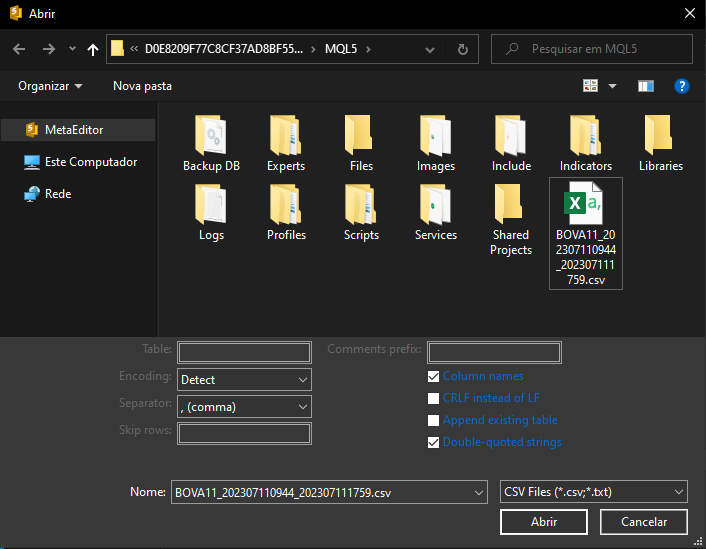
To make things as simple as possible, we placed the CSV file in the MQL5 directory. Ultimately, however, the important thing is that we select the correct file. However, if we simply select the file, as shown in the image above, and immediately click the OPEN button, MetaEditor will not display any response. This is because we have only selected the file but have not yet imported it. Some additional settings must be configured in the same window. Each of these settings depends on the specific case—there are no strict rules.
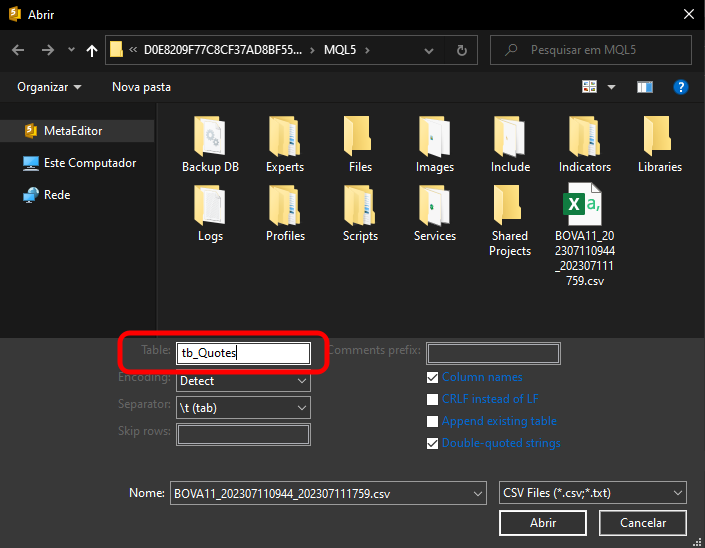
You should at least have a general understanding of what the file to be imported contains. It is useless to just open MetaEditor, request a data import, and expect it to figure out the file contents on its own. That's not how it works. So, the first thing we need to configure is the data separator. Remember that this data was generated by MetaTrader 5. If you have not changed the file format, the separator used is a tab character. After changing this setting, we get the image shown below.

Alright, this is the first item we need to configure. Now there is another point to consider, given that you have just downloaded the file and are importing it into MetaEditor. This concerns the name of the table that will be used. At this stage, many people may be confused, because in MetaEditor we do not yet have any tables included in the database. This can be seen in the images above, where no table is specified at the moment the file import is requested.
So, what information should we provide as the table name? We simply need to specify the name that will be assigned to the table when it is created. That is why we suggested using a completely clean file —this makes this step easier to understand. Next, we enter the table name, as shown in the image below, as shown in the image below.
You can give it any name. After that, we will be able to click the OPEN button. Remember that, depending on the contents of the file being imported, we may need to configure additional settings here. However, since we just downloaded the file from MetaTrader 5 and are importing it using MetaEditor, these steps will be sufficient for our purpose.
Once we click «OPEN», we need to completely forget what you may have seen when using this same file in Excel. Everything here will be quite different from what you saw before reading these articles about databases. So, when looking at the MetaEditor screen, we will first see the following image.
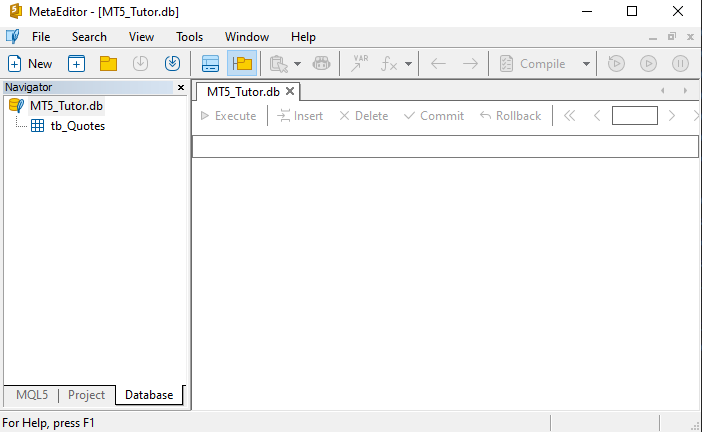
Perfect. If you see this, it means that MetaEditor has converted the CSV file into a table in a database named MT5_Tutor.db. Most likely, at this point you may feel completely confused and not understand what just happened. But let’s break it down, because this is an important concept.
All the information that was downloaded by MetaTrader 5—when we requested data from the server for a symbol on a specific date—is no longer just a disorganized set of data. Everything has been structured and presented in the form of a table. This table contains the same header as the CSV file. So, if we want the columns in our database to have different names, we only need to edit row 01 before importing the data from the CSV, so that the columns receive new names.
However, only do this if you truly understand what you are doing, because a mistake could result in a completely useless database. Even if you don’t like the current names, they can be changed later using an SQL command, since we are now dealing not with a CSV file, but with a database.
«All of this is great, but how do I access the information in this database? I thought it would be something like Excel or another spreadsheet program, but what I see in MetaEditor is completely useless and has no value to me».
Well, if you think that, it’s because you may not yet realize how powerful a database can be, and learning to work with one requires study and dedication. I don’t mean to offend or discourage you. I understand that many people, upon seeing the image above, may feel disappointed, expecting something more visually impressive or intuitive. From that perspective, it might seem pointless or not worth the effort of learning SQL.
But let me try to change your perspective a bit. Now, we will finally look at one of the commands that will undoubtedly require the most effort to learn. To keep the concepts clearly separated, let us move on to a new topic.
Finally, the SELECT command
The SELECT command, in its simplest form, has the following syntax:
SELECT * FROM table;
Please note that this is exactly the same command used in the animation below.
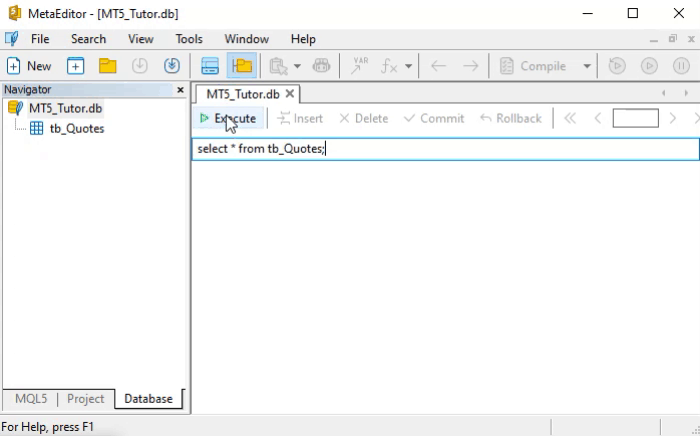
But how do we interpret the SELECT command? It's dead simple. And not just this command—SQL commands were thoughtfully designed so that their syntax is easy to understand. To grasp what we just said, let’s look at how to read the command shown earlier.
We should read it like this: select all data from the table named table. That is the literal way to interpret this command. If you truly understand how to read it, you’re probably already realizing that we can do some pretty interesting things. This is just a literal reading example, but try doing the same with other SQL commands. You’ll soon notice that learning them becomes quite fast, because each command is easy to understand.
Returning to what interests us right now, let’s look at the result of the animation. There, we have quite a large number of returned records— that’s exactly what we wanted. This is because if we use the SELECT command on a table with only a few records, we might think SQL is pointless. However, when the number of records becomes large, learning SQL becomes much more valuable.
So what is the real problem we are facing here? The issue is the volume of returned data. But if you understood how to literally read the SELECT command, you’re probably already thinking about how to reduce the amount of data by applying some kind of filter. If that thought crossed your mind, that’s a very good sign. Even more so if you considered replacing the asterisk (*) with something else, since the asterisk is a universal symbol. Anyone who has used a command line knows what this means. If you were thinking along these lines, then you’re on the right track —you just need a bit of guidance to refine your approach.
Now let’s think a little: «If we replaced the asterisk in the command, why would we need to do that in order to filter the results returned by SQL?» This is the same question the designers of SQL had to answer when the language was being developed. Think about it for a moment and ask yourself: how would you perform such filtering when dealing with a huge amount of data and many columns?
Before explaining how the designers and developers brilliantly solved this problem, I want to draw your attention to one more detail present here in MetaEditor. This detail may become important later. Take a look at the image below.

Please note that we highlighted a section of the image. The reason is that if you look at the right corner of the highlighted area, you will notice that a certain number of records has been loaded. In some cases, you may need to navigate between these records to view the retrieved data when applying more refined filtering. By clicking the arrows in the highlighted area, you can move to the next block of loaded records. Keep in mind that the blocks are loaded in increments of one thousand.
Thus, the value shown in the highlighted area represents these thousand-record blocks. So, if we want to move to the eight-thousandth block, we simply change the value from one to nine, and the block corresponding to eight thousand will be displayed in MetaEditor. But why nine? Shouldn't it be eight? The reason is that counting starts from one. However, the value «one» represents records up to «one thousand». At first, this may seem a bit confusing, but with some practice, it will make sense.
Try interacting with the MetaEditor interface to better understand how everything works—it is, in my opinion, much simpler than WorkBench. Still, we can do quite a lot without using the more powerful WorkBench, especially when we are just exploring a database.
Alright. Now let’s return to our question about filtering search results. You may still be thinking about how to implement an easy solution. In my opinion, the solution created by the designers is one of the best possible. The asterisk can be replaced with something else— we will show that another time. But for filtering, the developers added one more element to the SELECT command. There is, however, a small trick: depending on what we want to find and how we do it, the syntax of the SELECT command changes slightly.
The first thing to understand is how to use column names in a query. This might seem a bit unusual. But if you have ever filtered results in Excel, you know that you select a column and then define how to filter it—by values greater than, less than, or equal to a certain criterion. The same idea applies in SQL. The difference is that here we don’t click through menus —we send a command for SQL to execute. Thus, the filtering will be performed correctly.
For example, suppose we want SQL to show all records where the value of the FLAGS column equals 88. Then we know that in the SELECT command we need something like:
FLAGS = 88
This seems obvious, but we need to add one small detail to the command. So the previous command becomes:
SELECT * FROM tb_Quotes WHERE "<FLAGS>" = 88;
Remember that the name of our table is tb_Quotes. When executing this command, all records where the FLAGS column equals 88 will be displayed in the results area. Now notice: why is the column name in quotes? Because it is treated as a string. Whenever we use a string in SQL, it must be enclosed in quotes. In addition, please note that next to the column name there are «greater than» and «less than» symbols. Without quotes, SQL might interpret these symbols as part of its own internal syntax.
At this point, you might think: «Why should I do this in SQL? If I used Excel or a similar program, I could get the same results more easily. I don’t see the point in learning SQL». It’s true that what we just demonstrated can be done in Excel—and even more easily. But there’s something you’re missing. Right now, we are only beginning to understand how SQL works. Many of these initial tasks can indeed be done in simpler tools.
However, when working with real databases, we often use related tables and linked queries. These are things that Excel and similar tools cannot handle efficiently. It might be possible, but it would be far more complicated, time-consuming, and costly than using SQL.
There’s also another important reason why many experienced programmers choose not to implement certain features themselves —they prefer using SQL or similar technologies instead. To understand what is being discussed, we need to go back to the first article on SQL. As mentioned earlier, it is often better to use an existing tool than to build everything from scratch. So, at this stage, when you already know how to create, insert, update, delete, and view records in a database, we can delve a little deeper into what was discussed in that article.
Think about what we’ve covered so far. To achieve the same results using a programming language like Python, you would need significantly more time to create, test, and develop the necessary logic. This is because instead of SQL, you would choose to do the same thing using Python. I'm not saying you couldn't do it. I'm just saying that you would need much more time to create, test, and develop subroutines to do what we've seen so far.
And remember: we’ve only covered the very basics of SQL. Even a skilled programmer with strong Python knowledge would need days or even weeks to build something comparable to what SQL can already do efficiently. We will return to this topic, because I wouldn't want you to waste time trying to reinvent the wheel. Learning even the basics of SQL—especially how to use it properly—will show you that there’s no point in recreating functionality that SQL already provides.
Final thoughts
So far, we haven’t yet demonstrated one of the key aspects of SQL. Although we mentioned it in previous articles, we haven’t fully explored what makes databases such a vast topic. Now that we’ve introduced the basic command used to search for information, we can begin to dive deeper into the concepts that make SQL essential for becoming a strong professional. In the next article, we will talk a little more about SQL programming, because there is one concept that has yet to be learned and explained.
This concept includes primary keys and foreign keys, which is very important when creating a system of related tables. The ability to use related tables is extremely important, primarily because they are very helpful when searching a database, but they also allow us to do and create some things that would otherwise be impossible. So, if you are truly interested in the topic of databases, don't miss the next article, as the material will become a bit more serious.
| File | Description |
|---|---|
| Experts\Expert Advisor.mq5 | Demonstrates interaction between Chart Trade and an expert advisor (Mouse Study required for interaction). |
| Indicators\Chart Trade.mq5 | Creates a window for configuring the order to be sent (Mouse Study required for interaction). |
| Indicators\Market Replay.mq5 | Creates controls for interacting with the replay/simulation service (Mouse Study required for interaction). |
| Indicators\Mouse Study.mq5 | Provides interaction between graphical controls and the user (required for both the replay/simulation system and live market trading). |
| Services\Market Replay.mq5 | Creates and maintains the market replay/simulation service (main file of the entire system). |
| Code VS C++\Servidor.cpp | Creates and maintains a server socket developed in C++ (Mini Chat version). |
| Code in Python\Server.py | Creates and maintains a Python socket for communication between MetaTrader 5 and Excel. |
| Indicators\Mini Chat.mq5 | Allows implementing a mini-chat via an indicator (requires a server to function). |
| Experts\Mini Chat.mq5 | Allows implementing a mini-chat using an expert advisor (requires a server to function). |
| Scripts\SQLite.mq5 | Demonstrates the use of an SQL script with MQL5. |
| Files\Script 01.sql | Demonstrates creating a simple table with a foreign key. |
| Files\Script 02.sql | Shows adding values to a table. |
Translated from Portuguese by MetaQuotes Ltd.
Original article: https://www.mql5.com/pt/articles/12928
Warning: All rights to these materials are reserved by MetaQuotes Ltd. Copying or reprinting of these materials in whole or in part is prohibited.
This article was written by a user of the site and reflects their personal views. MetaQuotes Ltd is not responsible for the accuracy of the information presented, nor for any consequences resulting from the use of the solutions, strategies or recommendations described.

- Free trading apps
- Over 8,000 signals for copying
- Economic news for exploring financial markets
You agree to website policy and terms of use