
Market Simulation (Part 14): Sockets (VIII)

Introduction
In the previous article, "Market Simulation (Part 13): Sockets (VII)", we showed how to create a simple Python server that continues executing code even when there is no activity on the socket being monitored by the server. What's interesting about this implementation is that there is no need to use any thread.
However, nothing prevents us from combining what we saw in the last article with what we saw earlier, as the latter showed how to make a similar server, but using a thread when a client connects. Both methods work because they monitor the socket in the same way. However, neither the model using a thread nor the model using the select function is suitable for our implementation.
Neither of the above — not because they are faulty, but that they interfere with Excel due to how the code is written. This interference forces Excel and the Python script to compete for CPU usage, making Excel very impractical.
Many programmers might assume we should abandon using Excel and move directly to Python, using some packages that allow Python to generate an Excel file for later analysis of results. . And in this case, the user is always right. As programmers, we must find a way to make everything work. If you fail to achieve what you are aiming for, it is because you do not yet possess the necessary level of knowledge. Strive to continue learning and delve deeper into the principles on which your knowledge is based.
Basics alone will not make you an advanced programmer; you will remain just an average programmer. Progress happens because some people go beyond average. In today's article, I want to show you how to solve the problem between Excel and Python. So sit back, and we will now look at how to make Excel and Python work together without competing for CPU usage.
Back to the origins
Many of you have only recently started using Python. Others may have been using it for a long time. However, since most programmers actively use popular packages, I think few truly understand how and why to use Python. I'm not going to explain that here, as it's beyond the scope of this article series. The idea of this series is to demonstrate how to develop a replication/modeling system in MetaTrader 5. However, to make better use of the replication/modeling system, it is necessary to leverage certain resources, so we had to take a brief break from its development to explain other topics that, although seemingly unrelated at first glance, are in fact connected.
Alright. To achieve our goal (running a server inside Excel to transfer information between Excel and MetaTrader 5) we could use VBA. However, creating such a server using VBA is quite tedious. The issue is that the server will be completely embedded in the spreadsheet where it is created, but we need it to be usable across several different spreadsheets. The reason for this is discussed below. But don't think that creating a server in VBA is something complex. In fact, it's simple, though, as we mentioned, tedious, as we'll have to repeat the code constantly.
However, using Python, we can easily create the same server as in VBA, not to mention the possibility of using C/C++ as shown in a previous article. Undoubtedly, using Python is the easiest way to achieve this. Yet, in previous articles we showed that using straightforward programming with popular packages is not practical. The main reason is that once the server is started, it competes with Excel for CPU usage. I even demonstrated how to use threads to reduce the level of competition. However, when it comes to creating threads in VBA, things start to get tedious, as the code must be repeated each time a new spreadsheet is created.
Thus, the solution is to implement the majority of the code in Python and use as little VBA as possible. And yes, we can do that, and that is exactly what we will do. But keep in mind that everything presented from this point onward may be quite confusing. Therefore, I recommend that you study the matter calmly. Do not use the code shown here in a production system. You can do so if you wish, but remember that the provided code is for educational purposes only.
Let's take a moment to understand what COM is
Before we begin, I want to ask you a few questions: do you know what COM is, have you read about or programmed anything using OLE, do you understand anything about .NET? If the answer to any of these questions is "no", then you are still taking your first steps in programming. But for our purposes, it is enough to understand the basic concepts and be able to work with COM.
COM stands for «Component Object Model». It was created by Microsoft in the early 1990s to facilitate inter-process communication. It is something very similar to sockets, but with some advantages. It enabled the implementation of such communication independently of the language, architecture, or device used. And all of this does not require you, as developers, to understand how the internal implementation works, since you will no longer have to worry about it and will use a common, well-defined interface.
These are the basics of working with COM. But why is it important for us at this stage of development? The reason is that, using this technology, we can make Python and Excel work in complete harmony, without conflicts or competition for CPU usage during data exchange between them.
But can COM technology be used in Python? Yes, and surprisingly, we won't need to install any packages. We just need to understand a bit how things work in Python. However, if you get a grasp of this COM technology, everything will become much simpler. At the end of the article, there will be a link to start learning about COM, as well as a link to deepen your knowledge on the topic we are discussing now.
Now we will start programming in Python
The first thing we are going to do is quite simple. Many will say that the same can be done using other Python packages. And in fact, they are not wrong. The same can indeed be done with other packages. But you must understand how things actually work. We will not perform tricks to hide what we need to understand. Therefore, we will use Python in its simplest form. That is, if you download and install Python without any additional packages, you will be able to do the same thing we are showing here. Remember, Excel must be installed on your computer, but this is just a reminder—I think it's obvious.
Let's make our first Python code use this COM technology. To do this, we will have the Python script open Excel and place some information in a specific cell. It seems difficult to manage without those additional packages, doesn't it? If you thought so, it's because you are still taking your first steps in learning Python. Yes, it is possible, and without any hassle regarding the use of this or that package. Take a look at the source code of the script that does exactly that. Here is the full code:
1. from win32com import client as win32
2.
3. excel = win32.Dispatch('Excel.Application')
4. excel.Visible = True
5.
6. while True:
7.     pass
Python Code
If you run the script above, you will get the following result:
Now you might think: "But where is the spreadsheet?". Don't worry. We didn't do anything except open Excel. But please note how we did it. In line 01 of the script, we specify what we will use. In line 03, we send a request to create an Excel app. However, it will be created but remain hidden. To make it visible, we use line 04. If we don't use the loop in line 06, the application will open and close immediately. Line 07 simply ensures that Python doesn't complain about the loop being empty.
Now let's add a bit more code to this script. We could do this a bit faster, but I want you to understand what's happening. So, let's not rush. The following script can be seen just below:
1. from win32com import client as win32
2.
3. excel = win32.Dispatch('Excel.Application')
4. excel.Visible = True
5. wb = excel.Workbooks.Add()
6. wb.Activate()
7.
8. while True:
9.     pass
Python Code
The result is shown in the image below:
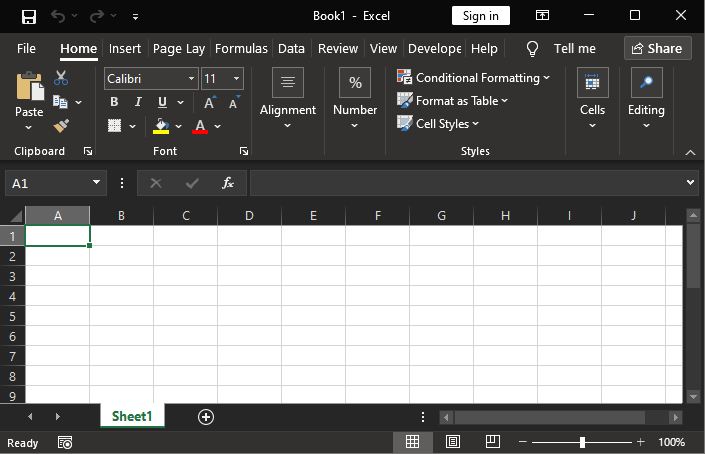
As you can see, we added two lines: 05 and 06. At this point, we are using COM technology. The links provided at the end of the article will allow you to review and study these calls to do more with COM programming technology, should you wish to go beyond what is shown here. Remember, we will only show you the basics here, sufficient to prepare you and prevent confusion at the next stage. Note that we opened Excel, made it visible, added a spreadsheet, and then activated it. Everything is still very straightforward.
Now imagine you want to rename that same spreadsheet. How can you do it using COM through Python? It's quite simple. Just use the following modified script:
01. from win32com import client as win32
02.
03. excel = win32.Dispatch('Excel.Application')
04. excel.Visible = True
05. wb = excel.Workbooks.Add()
06. wb.Activate()
07. ws = wb.Sheets('Sheet1').Name = "New Name"
08.
09. while True:
10.     pass
Python Code
The result is shown in the image below:
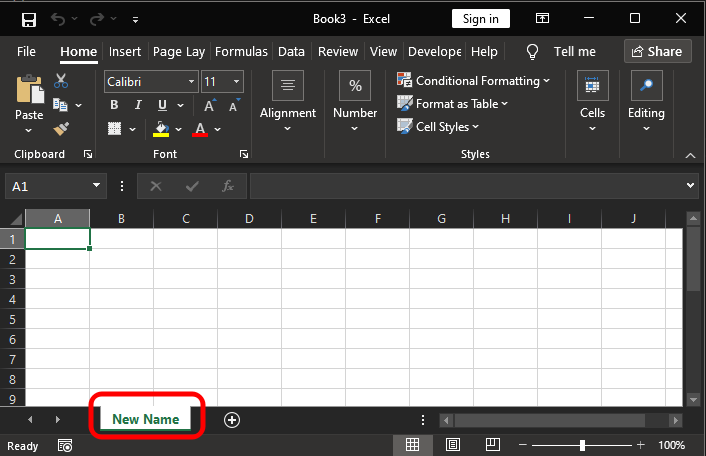
As you can see, we only added one line to the Python script - line 07. The result was exactly what we expected. But we haven't entered any information into the spreadsheet yet. How can we do that? Again, it's very simple and straightforward. We only need to specify the location and place the information there. Since this part can depend on what we want to do, we'll show one of many possible ways. It will look something like this:
01. from win32com import client as win32
02.
03. excel = win32.Dispatch('Excel.Application')
04. excel.Visible = True
05. wb = excel.Workbooks.Add()
06. wb.Activate()
07. wb.Sheets('Sheet1').Name = "New Name"
08. ws = wb.Sheets('New Name')
09. ws.Range('E6').Value = 'Checking.'
10.
11. while True:
12.     pass
Python Code
And as a result, we get exactly what you see in the figure:
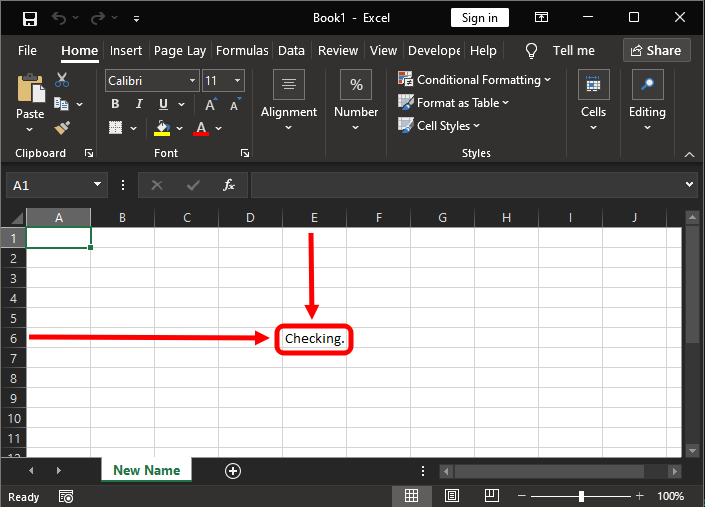
Wow, how interesting this is! Notice that if you enter a formula, it will be calculated. Now pay attention to the following: lines 08 and 09 have been added. The reason is that by adding line 08, we ensure that we don't have to repeat the tab name constantly. However, lines 08 and 09 can also be combined into one.
«But wait a minute. The code we saw in the previous script looks very familiar to me». If you are thinking the same thing, it's no coincidence. In fact, when we open Excel and make it visible, everything looks very similar to the code executed in VBA. That's the magic of the COM interface. Note that we are creating a script in Python, but much of what we are doing closely resembles a VBA script. This opens up the possibility to do far more than what we've seen up to this point.
«That's great, but everything that was done here could also be done using other packages that can be installed in Python». Yes, you are right. However, if we do it as shown, you will notice that we can use a Python script that could very well be used in VBA. «Well, I know how to do that when I want to open a blank spreadsheet. But if Excel is already open, how do I proceed?» In that case, the process will be much simpler and clearer. All you'll need to do is go into Excel and specify where to make the changes. The code will look like this:
1. from win32com import client as win32
2.
3. excel = win32.GetActiveObject('Excel.Application')
4. excel.Worksheets('Sheet1').Range('D5').Value = "Cool..."
Python Code
The result of executing this script can be seen just below:
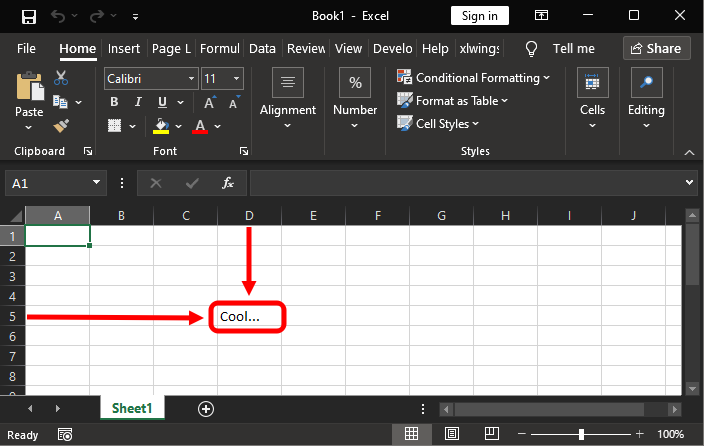
You can see that everything is much simpler and easier than it first appears. Note that in line 03 we ask the interface to provide us with an object to work with the application, which in this case is Excel. In line 04, we specify what and where we will work. It's simple. However, everything we have seen so far is the most basic. Our goal is to make you understand that it is not necessary to download and install a large number of Python packages. All you need to know is how to use what is already included by default. Besides, of course, learning a bit more about some techniques and technologies that have existed for many years.
Alright. This was the core part of what we need to run our server without interfering with users working in Excel. The next thing to understand is how to manipulate certain elements in Excel. And I don't mean formulas or anything like that. I want you to understand that we can use Python's COM technology to go far beyond what Python typically does. However, to separate the ideas and allow you to better understand what we will explain, let's move on to a new topic.
Events and even more events
Most users don't know that many programs are actually systems that respond to events. These events can be of any nature: a mouse click, text input, or something related to data exchange between processes or programs. In a multitasking OS, events are the most important thing.
And this case is no different. Although initially we don't need much for our Python server to interact with Excel without competing for CPU usage, we need to understand how to make Python observe events occurring in Excel. In fact, we need our server to know what Excel is doing to understand when it should be closed or activated.
Don't forget: the idea is to keep Excel open and receive real-time data from MetaTrader 5, which can be done via RTD or DDE. However, we also want Excel to send commands to MetaTrader 5 in such a way that a trader can send orders to MetaTrader 5 simply by «looking» at Excel. Then MetaTrader 5 will allow an Expert Advisor to interpret orders created in Excel. Thus, the EA can execute operations requested by the trader. And all of this without MetaTrader 5 being visible on the trader's screen. The trader will only look at Excel and, based on analysis—whether fundamental or some other type—they will be able to buy or sell any symbol directly from Excel, regardless of the chart.
Alright, but how can we make the Python script aware of what the user is doing in Excel? Remember, we are using Excel only as an example, but what we explain applies to any program using COM technology.
The way to do this is very simple. However, you need to understand how the program we want to monitor works. For this purpose, the links will give you access to the materials necessary to perform other tasks related to what is shown here. Don't be lazy: study the material before asking how to do this or that. After all, if you understand how everything works, you can do much more than just ask for a ready-made answer. Study the materials and documentation of the program you want to use via COM.
Now let's see how this actually works. To do this, we need to slightly modify the scripts shown above. To keep things as simple as possible—since the idea here is both didactic and practical—we will assume that Excel is already open when the Python script is executed. This way, we will have much less work and it will be easier to understand and explain what is happening.
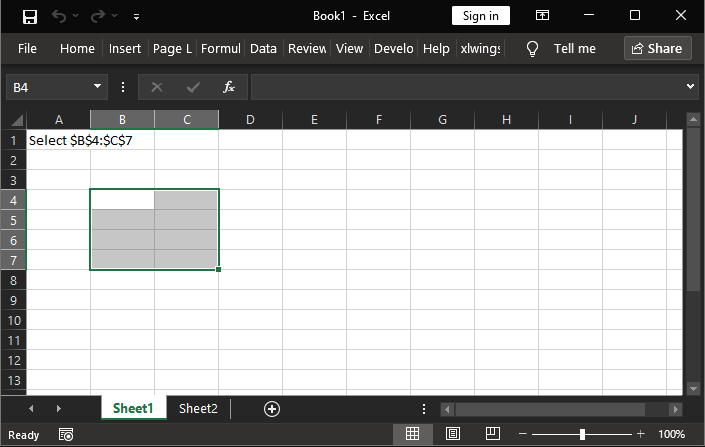
The main script can be seen below:
01. from win32com import client as win32
02. import pythoncom as pyCOM
03. import time
04.
05. class AppEvents:
06.     def OnSheetActivate(self, *arg):
07.         print('Tab ' +  str(arg[0].Name) + ' selected...')
08.
09. class SheetEvent:
10.     def OnSheetSelectionChange(self, *args):
11.         print(args[1].Address)
12.         args[0].Cells(1, 1).Value = "Select " + str(args[1].Address)
13.
14. excel = win32.GetActiveObject('Excel.Application')
15.
16. win32.WithEvents(excel, AppEvents)
17. win32.WithEvents(excel.Workbooks('Book1'), SheetEvent)
18.
19. print("Enter in loop...")
20. while True:
21.     pyCOM.PumpMessages()
22.     print('ping...')
23.     time.sleep(1)
Python Code
When we run it, we will notice two things. The first will appear directly in Excel, as shown in the figure below:
The second is observed in the terminal where the script is running. In our case, we are using Visual Studio Code, so in the area that mimics what we typically see in the command line, the following data can be observed:
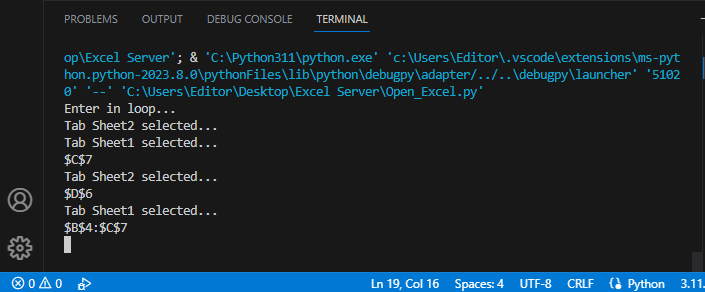
Please note: this shows what was done in Excel. «But how is this possible?» Keep in mind that this code is for educational purposes only. Much more can be done than what is shown here, but let's break down what happened so that you can do something truly interesting with this knowledge.
Before we begin, I would like to draw your attention to one detail in this code. I will point out a specific moment, but it applies to all cases, regardless of whether we want to create another such point or the one already present in the script. This is line 06, although what I will talk about also applies to line 10.
If you refer to the reference documentation for this article and search for Excel application events, you will find the following: Application.SheetActivate event. Okay, but why am I saying this? The reason is simple: WE CANNOT JUST USE ANY NAME to reference an event in a Python script. Otherwise, the script will not work when capturing the event.
Now, pay attention to something in the code. In line 05, we define a class. This class will contain all application events we want to intercept, just as in line 09, where we created another class to handle a different type of event. In this case, we are dealing with an event involving the spreadsheet itself. Note that these two activities are separate and have different purposes. The class name can be any valid name; however, the procedure name does not follow this rule. For a procedure to be linked to an event, it must have a specific name.
Now, returning to the documentation: since we want to use the Application.SheetActivate event in our Python script, we must do the following: The name of the event we want to capture must start with On, immediately followed by the event name, which in this case is SheetActivate. Thus, we get the name the procedure should have. Another aspect to consider from the documentation is the number of arguments or parameters used by each event. You can use the same structure we provide here for all events. This way, Python converts the actual arguments into a tuple, which can be used within the language itself. If you don't know what a tuple is or how to use it, refer to the Python documentation—it is the most basic resource for anyone wanting to program in this language.
But, returning to the code, we can already see how this works. In the terminal image, we removed line 22 because it produced too many messages and interfered with understanding what happened. However, for educational purposes, I advise you to keep line 21 active at the very beginning to notice something important. The call in line 21 does not block the code but makes the classes associated with events capable of receiving those events. Does this result seem unclear to you? Let's make things clear.
Note that line 14 contains something we've seen before. Its purpose is to capture the Excel session. But what actually interests us is the variable itself. Let's note right away that it will be used in two places. The first is in line 16. In this line, we specify which class will be responsible for handling application-related events. The second parameter of this call represents the class name. The second moment we use the variable is in line 17. And now, attention: here we use a specific connection. In this case, the connection refers to the name of the file opened in Excel. If we use a file with a different name, we would need to replace it at this point so the system can correctly capture events. The second parameter indicates the name of the class that will handle events occurring on the sheet.
I leave this for your personal study, dear reader: experiment and try to understand what is happening and why this script allows us to record the sheet name and the selected cells in each of them. If you take the time to understand it, you will gain the motivation to further improve the script.
Concluding thoughts
In today's article, we explained in a very simple way something many are unaware of: how Python can process information and access programs via the COM interface. I hope this material sparks greater interest in you, as aspiring professional programmers, to study how everything actually works. What we have shown here is the most basic implementation of our capabilities. Many believe it's necessary to install numerous tools and juggle many programs, but in reality, understanding and knowledge of technology are more than sufficient to produce a lot with high quality.
Although I haven't yet demonstrated how all this will be connected so that Python can maintain a live server and manipulate, write, and read data in a spreadsheet without affecting Excel's operation, those with a broader perspective and programming experience can already envision how all this will be integrated. But if this isn't your case, don't worry. In the next article, we will explore how to implement all of this. See you soon! And don't forget to study the material in the links section, as it will be very useful if you aspire to become a professional programmer.
Links:
| File | Description |
|---|---|
| Experts\Expert Advisor.mq5 | Demonstrates interaction between Chart Trade and an Expert Advisor (requires Mouse Study for interaction). |
| Indicators\Chart Trade.mq5 | Creates a window for configuring the order to be sent (requires Mouse Study for interaction). |
| Indicators\Market Replay.mq5 | Creates controls for interaction with the replay/modeling service (requires Mouse Study for interaction). |
| Indicators\Mouse Study.mq5 | Enables interaction between graphical controls and the user (required for both market replay and real market trading). |
| Servicios\Market Replay.mq5 | Creates and maintains the market replay/modeling service (the core file of the entire system). |
| Code VS C++ Server.cpp | Creates and maintains a socket server developed in C++ (mini-chat version). |
| Python Code Server.py | Creates and maintains a Python socket for communication between MetaTrader 5 and Excel. |
| ScriptsCheckSocket.mq5 | Allows testing the connection with an external socket. |
| Indicators\Mini Chat.mq5 | Enables implementation of a mini-chat via an indicator (requires the use of a server). |
| Experts\Mini Chat.mq5 | Enables implementation of a mini-chat via an Expert Advisor (requires the use of a server). |
Translated from Portuguese by MetaQuotes Ltd.
Original article: https://www.mql5.com/pt/articles/10683
Warning: All rights to these materials are reserved by MetaQuotes Ltd. Copying or reprinting of these materials in whole or in part is prohibited.
This article was written by a user of the site and reflects their personal views. MetaQuotes Ltd is not responsible for the accuracy of the information presented, nor for any consequences resulting from the use of the solutions, strategies or recommendations described.

- Free trading apps
- Over 8,000 signals for copying
- Economic news for exploring financial markets
You agree to website policy and terms of use