

MQL5中MVC范式下的表格:将模型组件集成到视图组件中
 25
 2

目录
引言
在文章《基于MQL5表格模型的表格和表头类:应用 MVC 概念》中,我们完成了表格模型类的创建(在MVC概念中,这对应于模型组件)。 接下来,我们开发了一个由简单控件组成的库,基于这些控件可以创建用途和复杂程度截然不同的控件。 其中就包括用于创建TableView控件的视图组件。
本文将介绍模型组件与视图组件之间交互的实现。 换句话说,今天我们将把表格数据与其图形化表示结合到一个控件中。
该控件将基于Panel对象类创建,并由以下几个元素组成:
- 面板作为基底,用于承载表头和表格的数据区域;
- 面板作为表头,由多个基于Button对象类创建的列标题组成;
- Container是一个带有可滚动内容的表格数据容器;
- Panel是用于排列表格行的面板(附加到第3项中的容器上,超出容器范围时可通过容器的滚动条滚动);
- Panel——表格行是用于绘制单元格的面板,附加到第 4 项中的面板上。 此类对象的数量与表格的行数相对应;
- 单元格类是一个新类,允许在指定的画布(CCanvas)上按指定坐标进行绘制。 此类的对象附加到一个表格行对象(第5项),并将该表格行对象的画布指定为绘图元素;单元格则在此面板上的指定坐标处绘制。 每个单元格的区域都在表格行对象(第5项)中通过 CBound 类的实例设置,单元格类的对象则附加到该实例上。
该算法用于构建表格中的行和单元格,其中每行被划分为若干水平区域,并向这些区域附加单元格类对象。通过将单元格重新分配到行的目标区域,可以轻松地对单元格进行排序和重新定位。
根据上述内容可知,我们需要一个新的对象类,向其传入指向控件的指针,并在该控件的画布上进行绘制。 目前,所有通过new运算符创建的库对象都会创建自己的画布对象(背景和前景)。 但我们需要的对象应支持设置和获取自身尺寸,还能在其中设置一个指向控件的指针,以便在该控件上进行绘制。
CBound类支持设置和获取所创建对象的尺寸,是所有控件基础对象的组成部分。 背景和前景画布就是在该对象中创建的。 这意味着应创建另一个中间对象,它继承基础对象的功能,并内含一个用于设置和获取尺寸的CBound类。 用于创建CCanvas对象的类将继承自这个中间类。 因此,我们可以从这个中间类派生出一个类,并向其传入指向目标控件的指针,以便在该控件上进行绘制。
让我们先完善已创建的类文件,然后再编写新的类文件。
完善库类
正在开发的库中的所有文件都位于 \MQL5\Indicators\Tables\Controls\目录下。 如果您尚未拥有这些文件,可以在前一篇文章中找到所有文件的旧版本。 该项目还需要表格类文件(即模型组件),可从我们完成其开发的那篇文章中获取。 并将Tables.mqh保存至\MQL5\Indicators\Tables\目录下。 接下来将完善Base.mqh和Control.mqh文件。
在Tables.mqh文件最开头的宏部分,写入文件标识符:
//+------------------------------------------------------------------+
//| Macros                                                           |
//+------------------------------------------------------------------+
#define  __TABLES__                 // File ID
#define  MARKER_START_DATA    -1    // Data start marker in a file
#define  MAX_STRING_LENGTH    128   // Maximum length of a string in a cell
#define  CELL_WIDTH_IN_CHARS  19    // Table cell width in characters
这样做是为了让MARKER_START_DATA宏可以在两个不同的包含文件中重复声明,且这两个文件无论单独编译还是一起编译都不会报错。
打开Base.mqh文件。在其中包含表格模型的类文件,并添加新类的前向声明:
//+------------------------------------------------------------------+
//|                                                         Base.mqh |
//|                                  Copyright 2025, MetaQuotes Ltd. |
//|                                             https://www.mql5.com |
//+------------------------------------------------------------------+
#property copyright "Copyright 2025, MetaQuotes Ltd."
#property link      "https://www.mql5.com"

//+------------------------------------------------------------------+
//| Include libraries                                                |
//+------------------------------------------------------------------+
#include <Canvas\Canvas.mqh>              // CCanvas class
#include <Arrays\List.mqh>                // CList class
#include "..\Tables.mqh"

//--- Forward declaration of control element classes
class    CBoundedObj;                     // Base class storing object dimensions
class    CCanvasBase;                     // Base class of graphical elements canvas
class    CCounter;                        // Delay counter class
class    CAutoRepeat;                     // Event auto-repeat class
class    CImagePainter;                   // Image drawing class
class    CVisualHint;                     // Hint class
class    CLabel;                          // Text label class
class    CButton;                         // Simple button class
class    CButtonTriggered;                // Two-position button class
class    CButtonArrowUp;                  // Up arrow button class
class    CButtonArrowDown;                // Down arrow button class
class    CButtonArrowLeft;                // Left arrow button class
class    CButtonArrowRight;               // Right arrow button class
class    CCheckBox;                       // CheckBox control class
class    CRadioButton;                    // RadioButton control class
class    CScrollBarThumbH;                // Horizontal scrollbar slider class
class    CScrollBarThumbV;                // Vertical scrollbar slider class
class    CScrollBarH;                     // Horizontal scrollbar class
class    CScrollBarV;                     // Vertical scrollbar class
class    CTableRowView;                   // Class for visual representation of a table row
class    CPanel;                          // Panel control class
class    CGroupBox;                       // GroupBox control class
class    CContainer;                      // Container control class

//+------------------------------------------------------------------+
//| Macro substitutions                                              |
//+------------------------------------------------------------------+
在宏替换部分,对MARKER_START_DATA宏进行声明时 ,需检验其存在性:
//+------------------------------------------------------------------+
//| Macro substitutions                                              |
//+------------------------------------------------------------------+
#define  clrNULL              0x00FFFFFF  // Transparent color for CCanvas
#ifndef  __TABLES__
#define  MARKER_START_DATA    -1          // Data start marker in a file
#endif
#define  DEF_FONTNAME         "Calibri"   // Default font
#define  DEF_FONTSIZE         10          // Default font size
#define  DEF_EDGE_THICKNESS   3           // Zone width to capture the border/corner
现在,在两个不同的文件中声明相同的宏替换,无论单独编译还是一起编译这两个文件,都不会导致编译错误。
在UI元素类型的枚举中添加新类型,并设置活动元素类型的新上限:
//+------------------------------------------------------------------+
//| Enumerations                                                     |
//+------------------------------------------------------------------+
enum ENUM_ELEMENT_TYPE                    // Enumeration of graphical element types
  {
   ELEMENT_TYPE_BASE = 0x10000,           // Basic object of graphical elements
   ELEMENT_TYPE_COLOR,                    // Color object
   ELEMENT_TYPE_COLORS_ELEMENT,           // Color object of the graphical object element
   ELEMENT_TYPE_RECTANGLE_AREA,           // Rectangular area of the element
   ELEMENT_TYPE_IMAGE_PAINTER,            // Object for drawing images
   ELEMENT_TYPE_COUNTER,                  // Counter object
   ELEMENT_TYPE_AUTOREPEAT_CONTROL,       // Event auto-repeat object
   ELEMENT_TYPE_BOUNDED_BASE,             // Basic object of graphical element sizes
   ELEMENT_TYPE_CANVAS_BASE,              // Basic canvas object for graphical elements
   ELEMENT_TYPE_ELEMENT_BASE,             // Basic object of graphical elements
   ELEMENT_TYPE_HINT,                     // Hint
   ELEMENT_TYPE_LABEL,                    // Text label
   ELEMENT_TYPE_BUTTON,                   // Simple button
   ELEMENT_TYPE_BUTTON_TRIGGERED,         // Two-position button
   ELEMENT_TYPE_BUTTON_ARROW_UP,          // Up arrow button
   ELEMENT_TYPE_BUTTON_ARROW_DOWN,        // Down arrow button
   ELEMENT_TYPE_BUTTON_ARROW_LEFT,        // Left arrow button
   ELEMENT_TYPE_BUTTON_ARROW_RIGHT,       // Right arrow button
   ELEMENT_TYPE_CHECKBOX,                 // CheckBox control
   ELEMENT_TYPE_RADIOBUTTON,              // RadioButton control
   ELEMENT_TYPE_SCROLLBAR_THUMB_H,        // Horizontal scroll bar slider
   ELEMENT_TYPE_SCROLLBAR_THUMB_V,        // Vertical scroll bar slider
   ELEMENT_TYPE_SCROLLBAR_H,              // ScrollBarHorisontal control
   ELEMENT_TYPE_SCROLLBAR_V,              // ScrollBarVertical control
   ELEMENT_TYPE_TABLE_CELL,               // Table cell (View)
   ELEMENT_TYPE_TABLE_ROW,                // Table row (View)
   ELEMENT_TYPE_TABLE_COLUMN_CAPTION,     // Table column header (View)
   ELEMENT_TYPE_TABLE_HEADER,             // Table header (View)
   ELEMENT_TYPE_TABLE,                    // Table (View)
   ELEMENT_TYPE_PANEL,                    // Panel control
   ELEMENT_TYPE_GROUPBOX,                 // GroupBox control
   ELEMENT_TYPE_CONTAINER,                // Container control
  };
#define  ACTIVE_ELEMENT_MIN   ELEMENT_TYPE_LABEL         // Minimum value of the list of active elements
#define  ACTIVE_ELEMENT_MAX   ELEMENT_TYPE_TABLE_HEADER  // Maximum value of the list of active elements
向根据类型返回元素简称的函数中添加新的返回值:
//+------------------------------------------------------------------+
//|  Return the short name of the element by type                    |
//+------------------------------------------------------------------+
string ElementShortName(const ENUM_ELEMENT_TYPE type)
  {
   switch(type)
     {
      case ELEMENT_TYPE_ELEMENT_BASE         :  return "BASE";    // Basic object of graphical elements
      case ELEMENT_TYPE_HINT                 :  return "HNT";     // Hint
      case ELEMENT_TYPE_LABEL                :  return "LBL";     // Text label
      case ELEMENT_TYPE_BUTTON               :  return "SBTN";    // Simple button
      case ELEMENT_TYPE_BUTTON_TRIGGERED     :  return "TBTN";    // Toggle button
      case ELEMENT_TYPE_BUTTON_ARROW_UP      :  return "BTARU";   // Up arrow button
      case ELEMENT_TYPE_BUTTON_ARROW_DOWN    :  return "BTARD";   // Down arrow button
      case ELEMENT_TYPE_BUTTON_ARROW_LEFT    :  return "BTARL";   // Left arrow button
      case ELEMENT_TYPE_BUTTON_ARROW_RIGHT   :  return "BTARR";   // Right arrow button
      case ELEMENT_TYPE_CHECKBOX             :  return "CHKB";    // CheckBox control
      case ELEMENT_TYPE_RADIOBUTTON          :  return "RBTN";    // RadioButton control
      case ELEMENT_TYPE_SCROLLBAR_THUMB_H    :  return "THMBH";   // Horizontal scroll bar slider
      case ELEMENT_TYPE_SCROLLBAR_THUMB_V    :  return "THMBV";   // Vertical scroll bar slider
      case ELEMENT_TYPE_SCROLLBAR_H          :  return "SCBH";    // ScrollBarHorisontal control
      case ELEMENT_TYPE_SCROLLBAR_V          :  return "SCBV";    // ScrollBarVertical control
      case ELEMENT_TYPE_TABLE_CELL           :  return "TCELL";   // Table cell (View)
      case ELEMENT_TYPE_TABLE_ROW            :  return "TROW";    // Table row (View)
      case ELEMENT_TYPE_TABLE_COLUMN_CAPTION :  return "TCAPT";   // Table column header (View)
      case ELEMENT_TYPE_TABLE_HEADER         :  return "THDR";    // Table header (View)
      case ELEMENT_TYPE_TABLE                :  return "TABLE";   // Table (View)
      case ELEMENT_TYPE_PANEL                :  return "PNL";     // Panel control
      case ELEMENT_TYPE_GROUPBOX             :  return "GRBX";    // GroupBox control
      case ELEMENT_TYPE_CONTAINER            :  return "CNTR";    // Container control
      default                                :  return "Unknown"; // Unknown
     }
  }
在UI元素的基类中,将设置标识符的方法设为虚方法,因为需要在新类中重写该方法:
//+------------------------------------------------------------------+
//| Base class of graphical elements                                 |
//+------------------------------------------------------------------+
class CBaseObj : public CObject
  {
protected:
   int               m_id;                                     // ID
   ushort            m_name[];                                 // Name

public:
//--- Set (1) name and (2) ID
   void              SetName(const string name)                { ::StringToShortArray(name,this.m_name);    }
   virtual void      SetID(const int id)                       { this.m_id=id;                              }
//--- Return (1) name and (2) ID
   string            Name(void)                          const { return ::ShortArrayToString(this.m_name);  }
   int               ID(void)                            const { return this.m_id;                          }

//--- Virtual methods of (1) comparing, (2) saving to file, (3) loading from file, (4) object type
   virtual int       Compare(const CObject *node,const int mode=0) const;
   virtual bool      Save(const int file_handle);
   virtual bool      Load(const int file_handle);
   virtual int       Type(void)                          const { return(ELEMENT_TYPE_BASE); }

//--- (1) Return and (2) display the object description in the journal
   virtual string    Description(void);
   virtual void      Print(void);

//--- Constructor/destructor
                     CBaseObj (void) : m_id(-1) { this.SetName(""); }
                    ~CBaseObj (void) {}
  };
每个对象内部都包含一个CBound矩形区域类的对象,用于返回控件的大小。 此外,每个控件都包含一个CBound对象列表。 通过此列表,您可以存储多个CBound对象,从而能够在UI元素表面上指定多个不同的区域。
每个这样的区域都可用于各种场景。 例如,您可以在UI元素内部定义一个特定区域,跟踪鼠标光标在该区域内的位置,并对该区域与鼠标光标的交互作出响应。 可以将某个控件放置在某个区域内,以便在该区域内显示该控件。 为此,必须允许将指向控件的指针写入CBound对象中。
在CBound类中实现此功能:
//+------------------------------------------------------------------+
//| Rectangular region class                                         |
//+------------------------------------------------------------------+
class CBound : public CBaseObj
  {
protected:
   CBaseObj         *m_assigned_obj;                           // Object assigned to the region
   CRect             m_bound;                                  // Rectangular area structure

public:
//--- Change the bounding rectangular (1) width, (2) height and (3) size
   void              ResizeW(const int size)                   { this.m_bound.Width(size);                                    }
   void              ResizeH(const int size)                   { this.m_bound.Height(size);                                   }
   void              Resize(const int w,const int h)           { this.m_bound.Width(w); this.m_bound.Height(h);               }

//--- Set (1) X, (2) Y and (3) both coordinates of the bounding rectangle
   void              SetX(const int x)                         { this.m_bound.left=x;                                         }
   void              SetY(const int y)                         { this.m_bound.top=y;                                          }
   void              SetXY(const int x,const int y)            { this.m_bound.LeftTop(x,y);                                   }

//--- (1) Set and (2) shift the bounding rectangle by the specified coordinates/offset size
   void              Move(const int x,const int y)             { this.m_bound.Move(x,y);                                      }
   void              Shift(const int dx,const int dy)          { this.m_bound.Shift(dx,dy);                                   }

//--- Returns the object coordinates, dimensions, and boundaries
   int               X(void)                             const { return this.m_bound.left;                                    }
   int               Y(void)                             const { return this.m_bound.top;                                     }
   int               Width(void)                         const { return this.m_bound.Width();                                 }
   int               Height(void)                        const { return this.m_bound.Height();                                }
   int               Right(void)                         const { return this.m_bound.right-(this.m_bound.Width()  >0 ? 1 : 0);}
   int               Bottom(void)                        const { return this.m_bound.bottom-(this.m_bound.Height()>0 ? 1 : 0);}

//--- Returns the flag indicating whether the cursor is inside the area
   bool              Contains(const int x,const int y)   const { return this.m_bound.Contains(x,y);                           }

//--- (1) Assign and (2) return the pointer to the assigned element
   void              AssignObject(CBaseObj *obj)               { this.m_assigned_obj=obj;                                     }
   CBaseObj         *GetAssignedObj(void)                      { return this.m_assigned_obj;                                  }

//--- Return the object description
   virtual string    Description(void);

//--- Virtual methods of (1) comparing, (2) saving to file, (3) loading from file, (4) object type
   virtual int       Compare(const CObject *node,const int mode=0) const;
   virtual bool      Save(const int file_handle);
   virtual bool      Load(const int file_handle);
   virtual int       Type(void)                          const { return(ELEMENT_TYPE_RECTANGLE_AREA);                         }

//--- Constructors/destructor
                     CBound(void) { ::ZeroMemory(this.m_bound); }
                     CBound(const int x,const int y,const int w,const int h) { this.SetXY(x,y); this.Resize(w,h);             }
                    ~CBound(void) { ::ZeroMemory(this.m_bound); }
  };
目前,CBound矩形区域对象是在CCanvasBase类中声明的,该类中创建了两个CCanvas对象,分别用于绘制UI元素的背景和前景。 也就是说,所有UI元素内部都包含两个画布。 但我们想创建一个类,以便在其中指定要使用哪个控件的画布进行绘制。 同时,既不创建自己的画布,也不偏离创建图形元素的总体思路。
这意味着,我们希望将CBound类的对象从CCanvasBase类转移到另一个父类中——该父类不会创建画布对象,而CCanvasBase类将从该父类继承而来。 而在CCanvasBase类中,我们不再声明两个CCanvas实例,而是声明指向要创建的画布的指针,并实现一个用于创建两个画布对象的方法。 此外,我们还希望声明一个标志,用于指示某个图形元素是否控制背景和前景的画布对象。 这是为了管理已创建画布对象的删除操作。
在Base.mqh文件中,紧接在CAutoRepeat类之后、CCanvasBase类之前,实现一个从CBaseObj继承的新CBoundedObj类,并将CCanvasBase类中所有用于操作CBound对象的方法全部转移到该类中:
//+------------------------------------------------------------------+
//| Base class storing object dimensions                             |
//+------------------------------------------------------------------+
class CBoundedObj : public CBaseObj
  {
protected:
   CBound            m_bound;                                  // Object boundaries
   bool              m_canvas_owner;                           // Canvas ownership flag
public:
//--- Returns the object coordinates, dimensions, and boundaries
   int               X(void)                             const { return this.m_bound.X();                                                          }
   int               Y(void)                             const { return this.m_bound.Y();                                                          }
   int               Width(void)                         const { return this.m_bound.Width();                                                      }
   int               Height(void)                        const { return this.m_bound.Height();                                                     }
   int               Right(void)                         const { return this.m_bound.Right();                                                      }
   int               Bottom(void)                        const { return this.m_bound.Bottom();                                                     }

//--- Change the bounding rectangular (1) width, (2) height and (3) size
   void              BoundResizeW(const int size)              { this.m_bound.ResizeW(size);                                                       }
   void              BoundResizeH(const int size)              { this.m_bound.ResizeH(size);                                                       }
   void              BoundResize(const int w,const int h)      { this.m_bound.Resize(w,h);                                                         }

//--- Set (1) X, (2) Y and (3) both coordinates of the bounding rectangle
   void              BoundSetX(const int x)                    { this.m_bound.SetX(x);                                                             }
   void              BoundSetY(const int y)                    { this.m_bound.SetY(y);                                                             }
   void              BoundSetXY(const int x,const int y)       { this.m_bound.SetXY(x,y);                                                          }

//--- (1) Set and (2) shift the bounding rectangle by the specified coordinates/offset size
   void              BoundMove(const int x,const int y)        { this.m_bound.Move(x,y);                                                           }
   void              BoundShift(const int dx,const int dy)     { this.m_bound.Shift(dx,dy);                                                        }

//--- Virtual methods of (1) comparing, (2) saving to file, (3) loading from file, (4) object type
   //virtual int       Compare(const CObject *node,const int mode=0) const;
   virtual bool      Save(const int file_handle);
   virtual bool      Load(const int file_handle);
   virtual int       Type(void)                          const { return(ELEMENT_TYPE_BOUNDED_BASE); }

                     CBoundedObj (void) : m_canvas_owner(true) {}
                     CBoundedObj (const string user_name,const int id,const int x,const int y,const int w,const int h);
                    ~CBoundedObj (void){}
  };
//+------------------------------------------------------------------+
//| CBoundedObj::Constructor                                         |
//+------------------------------------------------------------------+
CBoundedObj::CBoundedObj(const string user_name,const int id,const int x,const int y,const int w,const int h) : m_canvas_owner(true)
  {
//--- Get the adjusted chart ID and the distance in pixels along the vertical Y axis
   this.m_bound.SetName(user_name);
   this.m_bound.SetID(id);
   this.m_bound.SetXY(x,y);
   this.m_bound.Resize(w,h);
  }
//+------------------------------------------------------------------+
//| CBoundedObj::Save to file                                        |
//+------------------------------------------------------------------+
bool CBoundedObj::Save(const int file_handle)
  {
//--- Save the parent object data
   if(!CBaseObj::Save(file_handle))
      return false;

//--- Save the canvas ownership flag
   if(::FileWriteInteger(file_handle,this.m_canvas_owner,INT_VALUE)!=INT_VALUE)
      return false;
//--- Save the dimensions
   return this.m_bound.Save(file_handle);
  }
//+------------------------------------------------------------------+
//| CBoundedObj::Load from file                                      |
//+------------------------------------------------------------------+
bool CBoundedObj::Load(const int file_handle)
  {
//--- Load parent object data
   if(!CBaseObj::Load(file_handle))
      return false;

//--- Load the canvas ownership flag
   this.m_canvas_owner=::FileReadInteger(file_handle,INT_VALUE);
//--- Load dimensions
   return this.m_bound.Load(file_handle);
  }
该类仅继承了基类CBaseObj的属性,允许指定对象边界(CBound类),并具有一个画布管理标志。
图形元素画布的基类现在应继承自新的CBoundedObj类,而不是像以前那样继承自CBaseObj类。 此外,所有与使用CBound类对象设置和返回元素尺寸相关的内容,均已移至新的CBoundedObj类,并从CCanvasBase类中移除。 现在,画布对象不再被声明为类的实例,而是被声明为指向要创建的CCanvas对象的指针:
//+------------------------------------------------------------------+
//| Base class of graphical elements canvas                          |
//+------------------------------------------------------------------+
class CCanvasBase : public CBoundedObj
  {
private:
   bool              m_chart_mouse_wheel_flag;                 // Flag for sending mouse wheel scroll messages
   bool              m_chart_mouse_move_flag;                  // Flag for sending mouse cursor movement messages
   bool              m_chart_object_create_flag;               // Flag for sending messages about the graphical object creation event
   bool              m_chart_mouse_scroll_flag;                // Flag for scrolling the chart with the left button and mouse wheel
   bool              m_chart_context_menu_flag;                // Flag of access to the context menu using the right click
   bool              m_chart_crosshair_tool_flag;              // Flag of access to the Crosshair tool using the middle click
   bool              m_flags_state;                            // State of the flags for scrolling the chart with the wheel, the context menu, and the crosshair

//--- Set chart restrictions (wheel scrolling, context menu, and crosshair)
   void              SetFlags(const bool flag);

protected:
   CCanvas          *m_background;                             // Background canvas
   CCanvas          *m_foreground;                             // Foreground canvas

   CCanvasBase      *m_container;                              // Parent container object
   CColorElement     m_color_background;                       // Background color control object
   CColorElement     m_color_foreground;                       // Foreground color control object
   CColorElement     m_color_border;                           // Border color control object
获取画布图形对象坐标和尺寸的方法被声明为公有方法,而用于实现调整画布大小的方法则为虚方法:
//--- Return the graphical object coordinates, boundaries and dimensions
public:
   int               ObjectX(void)                       const { return this.m_obj_x;                                                              }
   int               ObjectY(void)                       const { return this.m_obj_y;                                                              }
   int               ObjectWidth(void)                   const { return this.m_background.Width();                                                 }
   int               ObjectHeight(void)                  const { return this.m_background.Height();                                                }
   int               ObjectRight(void)                   const { return this.ObjectX()+this.ObjectWidth()-1;                                       }
   int               ObjectBottom(void)                  const { return this.ObjectY()+this.ObjectHeight()-1;                                      }

//--- Change the graphical object (1) width, (2) height and (3) size
protected:
   virtual bool      ObjectResizeW(const int size);
   virtual bool      ObjectResizeH(const int size);
   bool              ObjectResize(const int w,const int h);

//--- Set the graphical object (1) X, (2) Y and (3) both coordinates
   virtual bool      ObjectSetX(const int x);
   virtual bool      ObjectSetY(const int y);
   bool              ObjectSetXY(const int x,const int y)      { return(this.ObjectSetX(x) && this.ObjectSetY(y));                                 }
在类的受保护部分声明了一个用于创建画布的方法:
//--- Set the pointer to the parent container object
   void              SetContainerObj(CCanvasBase *obj);

protected:
//--- Create background and foreground canvases
   bool              CreateCanvasObjects(void);
//--- Create OBJ_BITMAP_LABEL
   bool              Create(const long chart_id,const int wnd,const string object_name,const int x,const int y,const int w,const int h);
public:
//--- (1) Set and (2) return the state
   void              SetState(ENUM_ELEMENT_STATE state)        { this.m_state=state; this.ColorsToDefault();                                       }
   ENUM_ELEMENT_STATE State(void)                        const { return this.m_state;                                                              }
用于设置允许沿容器边界裁剪元素标志的方法被实现为虚方法:
//--- Set (1) movability, (2) main object flag for the object and (3) resizability
//--- cropping along the container borders
   void              SetMovable(const bool flag)               { this.m_movable=flag;                                                              }
   void              SetAsMain(void)                           { this.m_main=true;                                                                 }
   virtual void      SetResizable(const bool flag)             { this.m_resizable=flag;                                                            }
   void              SetAutorepeat(const bool flag)            { this.m_autorepeat_flag=flag;                                                      }
   void              SetScrollable(const bool flag)            { this.m_scroll_flag=flag;                                                          }
   virtual void      SetTrimmered(const bool flag)             { this.m_trim_flag=flag;                                                            }
在类构造函数中,现在调用了用于创建背景和前景画布对象的方法:
//+------------------------------------------------------------------+
//| CCanvasBase::Constructor                                         |
//+------------------------------------------------------------------+
CCanvasBase::CCanvasBase(const string object_name,const long chart_id,const int wnd,const int x,const int y,const int w,const int h) :
   m_program_name(::MQLInfoString(MQL_PROGRAM_NAME)), m_wnd(wnd<0 ? 0 : wnd), m_alpha_bg(0), m_alpha_fg(255),
   m_hidden(false), m_blocked(false), m_focused(false), m_movable(false), m_resizable(false), m_main(false), m_autorepeat_flag(false), m_trim_flag(true), m_scroll_flag(false),
   m_border_width_lt(0), m_border_width_rt(0), m_border_width_up(0), m_border_width_dn(0), m_z_order(0),
   m_state(0), m_cursor_delta_x(0), m_cursor_delta_y(0)
  {
//--- Get the adjusted chart ID and the distance in pixels along the vertical Y axis
//--- between the upper frame of the indicator subwindow and the upper frame of the chart main window
   this.m_chart_id=this.CorrectChartID(chart_id);

//--- If failed to create canvases, leave
   if(!this.CreateCanvasObjects())
      return;

//--- If the graphical resource and graphical object are created
   if(this.Create(this.m_chart_id,this.m_wnd,object_name,x,y,w,h))
     {
      //--- Clear the background and foreground canvases and set the initial coordinate values,
      //--- names of graphic objects and properties of text drawn in the foreground
      this.Clear(false);
      this.m_obj_x=x;
      this.m_obj_y=y;
      this.m_color_background.SetName("Background");
      this.m_color_foreground.SetName("Foreground");
      this.m_color_border.SetName("Border");
      this.m_foreground.FontSet(DEF_FONTNAME,-DEF_FONTSIZE*10,FW_MEDIUM);
      this.m_bound.SetName("Perimeter");

      //--- Remember permissions for the mouse and chart tools
      this.Init();
     }
  }
用于创建背景和前景画布的方法:
//+------------------------------------------------------------------+
//| CCanvasBase::Create background and foreground canvases           |
//+------------------------------------------------------------------+
bool CCanvasBase::CreateCanvasObjects(void)
  {
//--- If both canvases have already been created, or the class does not manage canvases, return 'true'
   if((this.m_background!=NULL && this.m_foreground!=NULL) || !this.m_canvas_owner)
      return true;
//--- Create the background canvas
   this.m_background=new CCanvas();
   if(this.m_background==NULL)
     {
      ::PrintFormat("%s: Error! Failed to create background canvas",__FUNCTION__);
      return false;
     }
//--- Create the foreground canvas
   this.m_foreground=new CCanvas();
   if(this.m_foreground==NULL)
     {
      ::PrintFormat("%s: Error! Failed to create foreground canvas",__FUNCTION__);
      return false;
     }
//--- All is successful
   return true;
  }
在销毁对象的方法中,现在检查画布管理标志:
//+------------------------------------------------------------------+
//| CCanvasBase::Destroy the object                                  |
//+------------------------------------------------------------------+
void CCanvasBase::Destroy(void)
  {
   if(this.m_canvas_owner)
     {
      this.m_background.Destroy();
      this.m_foreground.Destroy();
      delete this.m_background;
      delete this.m_foreground;
      this.m_background=NULL;
      this.m_foreground=NULL;
     }
  }
只有当某个对象管理画布时,画布才会被删除。 如果将另一个控件的画布传递给某个对象用于绘制,该对象不会删除这些画布——这些画布应仅由其所属的对象进行删除。
在类的默认初始化方法中,为该对象设置了一个画布管理标志:
//+------------------------------------------------------------------+
//| CCanvasBase::Class initialization                                |
//+------------------------------------------------------------------+
void CCanvasBase::Init(void)
  {
//--- Remember permissions for the mouse and chart tools
   this.m_chart_mouse_wheel_flag   = ::ChartGetInteger(this.m_chart_id, CHART_EVENT_MOUSE_WHEEL);
   this.m_chart_mouse_move_flag    = ::ChartGetInteger(this.m_chart_id, CHART_EVENT_MOUSE_MOVE);
   this.m_chart_object_create_flag = ::ChartGetInteger(this.m_chart_id, CHART_EVENT_OBJECT_CREATE);
   this.m_chart_mouse_scroll_flag  = ::ChartGetInteger(this.m_chart_id, CHART_MOUSE_SCROLL);
   this.m_chart_context_menu_flag  = ::ChartGetInteger(this.m_chart_id, CHART_CONTEXT_MENU);
   this.m_chart_crosshair_tool_flag= ::ChartGetInteger(this.m_chart_id, CHART_CROSSHAIR_TOOL);
//--- Set permissions for the mouse and chart
   ::ChartSetInteger(this.m_chart_id, CHART_EVENT_MOUSE_WHEEL, true);
   ::ChartSetInteger(this.m_chart_id, CHART_EVENT_MOUSE_MOVE, true);
   ::ChartSetInteger(this.m_chart_id, CHART_EVENT_OBJECT_CREATE, true);

//--- Initialize the object default colors
   this.InitColors();
//--- Initialize the millisecond timer
   ::EventSetMillisecondTimer(16);

//--- Canvas ownership flag
   this.m_canvas_owner=true;
  }
仅对于那些没有自己的画布、且将继承自CBoundedObj类的对象,才需要将此标志重置为false。
现在打开Controls.mqh文件并进行改进。
在宏替换部分,新增两个宏,分别用于定义表格行和表头的默认高度:
//+------------------------------------------------------------------+
//| Macro substitutions                                              |
//+------------------------------------------------------------------+
#define  DEF_LABEL_W                50          // Text label default width
#define  DEF_LABEL_H                16          // Text label default height
#define  DEF_BUTTON_W               60          // Default button width
#define  DEF_BUTTON_H               16          // Default button height
#define  DEF_TABLE_ROW_H            16          // Default table row height
#define  DEF_TABLE_HEADER_H         20          // Default table header height
#define  DEF_PANEL_W                80          // Default panel width
#define  DEF_PANEL_H                80          // Default panel height
#define  DEF_PANEL_MIN_W            60          // Minimum panel width
#define  DEF_PANEL_MIN_H            60          // Minimum panel height
#define  DEF_SCROLLBAR_TH           13          // Default scrollbar width
#define  DEF_THUMB_MIN_SIZE         8           // Minimum width of the scrollbar slider
#define  DEF_AUTOREPEAT_DELAY       500         // Delay before launching auto-repeat
#define  DEF_AUTOREPEAT_INTERVAL    100         // Auto-repeat frequency
该文件包含一个由CListObj对象组成的链表类,用于存储图形元素列表。 我们将其从表格模型类文件复制到了此文件中。 如果保持类名不变,将会发生命名冲突,而且存储在不同文件中这两个列表里的对象是完全不同的。 因此,这里保持类的实现逻辑不变,仅将其重命名。 这将是一个用于表示UI元素链表的类:
//+------------------------------------------------------------------+
//| Class of the linked list of graphical elements                   |
//+------------------------------------------------------------------+
class CListElm : public CList
  {
protected:
   ENUM_ELEMENT_TYPE m_element_type;   // Created object type in CreateElement()
public:
//--- Set the element type
   void              SetElementType(const ENUM_ELEMENT_TYPE type) { this.m_element_type=type;   }

//--- Virtual method (1) for loading a list from a file, (2) for creating a list element
   virtual bool      Load(const int file_handle);
   virtual CObject  *CreateElement(void);
  };
将文件中所有出现的字符串“CListObj”替换为字符串“CListElm”。
在创建列表项的方法中,添加新的UI元素类型:
//+------------------------------------------------------------------+
//| List element creation method                                     |
//+------------------------------------------------------------------+
CObject *CListElm::CreateElement(void)
  {
//--- Create a new object depending on the object type in m_element_type
   switch(this.m_element_type)
     {
      case ELEMENT_TYPE_BASE                 :  return new CBaseObj();           // Basic object of graphical elements
      case ELEMENT_TYPE_COLOR                :  return new CColor();             // Color object
      case ELEMENT_TYPE_COLORS_ELEMENT       :  return new CColorElement();      // Color object of the graphical object element
      case ELEMENT_TYPE_RECTANGLE_AREA       :  return new CBound();             // Rectangular area of the element
      case ELEMENT_TYPE_IMAGE_PAINTER        :  return new CImagePainter();      // Object for drawing images
      case ELEMENT_TYPE_CANVAS_BASE          :  return new CCanvasBase();        // Basic object of graphical elements
      case ELEMENT_TYPE_ELEMENT_BASE         :  return new CElementBase();       // Basic object of graphical elements
      case ELEMENT_TYPE_HINT                 :  return new CVisualHint();        // Hint
      case ELEMENT_TYPE_LABEL                :  return new CLabel();             // Text label
      case ELEMENT_TYPE_BUTTON               :  return new CButton();            // Simple button
      case ELEMENT_TYPE_BUTTON_TRIGGERED     :  return new CButtonTriggered();   // Toggle button
      case ELEMENT_TYPE_BUTTON_ARROW_UP      :  return new CButtonArrowUp();     // Up arrow button
      case ELEMENT_TYPE_BUTTON_ARROW_DOWN    :  return new CButtonArrowDown();   // Down arrow button
      case ELEMENT_TYPE_BUTTON_ARROW_LEFT    :  return new CButtonArrowLeft();   // Left arrow button
      case ELEMENT_TYPE_BUTTON_ARROW_RIGHT   :  return new CButtonArrowRight();  // Right arrow button
      case ELEMENT_TYPE_CHECKBOX             :  return new CCheckBox();          // CheckBox control
      case ELEMENT_TYPE_RADIOBUTTON          :  return new CRadioButton();       // RadioButton control
      case ELEMENT_TYPE_TABLE_CELL           :  return new CTableCellView();     // Table cell (View)
      case ELEMENT_TYPE_TABLE_ROW            :  return new CTableRowView();      // Table row (View)
      case ELEMENT_TYPE_TABLE_COLUMN_CAPTION :  return new CColumnCaptionView(); // Table column header (View)
      case ELEMENT_TYPE_TABLE_HEADER         :  return new CTableHeaderView();   // Table header (View)
      case ELEMENT_TYPE_TABLE                :  return new CTableView();         // Table (View)
      case ELEMENT_TYPE_PANEL                :  return new CPanel();             // Panel control
      case ELEMENT_TYPE_GROUPBOX             :  return new CGroupBox();          // GroupBox control
      case ELEMENT_TYPE_CONTAINER            :  return new CContainer();         // GroupBox control
      default                                :  return NULL;
     }
  }
在UI元素基类中,添加一个返回对象指针的方法:
public:
//--- Return itself
   CElementBase     *GetObject(void)                           { return &this;                     }
//--- Return the pointer to (1) the drawing class and (2) the list of hints
   CImagePainter    *Painter(void)                             { return &this.m_painter;           }
   CListElm         *GetListHints(void)                        { return &this.m_list_hints;        }
在文本标签类中,将用于在画布上显示文本的方法设为虚方法:
//--- Set the text (1) X and (2) Y coordinate
   void              SetTextShiftH(const int x)                { this.ClearText(); this.m_text_x=x;            }
   void              SetTextShiftV(const int y)                { this.ClearText(); this.m_text_y=y;            }

//--- Display the text
   virtual void      DrawText(const int dx, const int dy, const string text, const bool chart_redraw);

//--- Draw the appearance
   virtual void      Draw(const bool chart_redraw);
在CPanel面板类中,优化尺寸调整方法:
//+------------------------------------------------------------------+
//| CPanel::Change the object width                                  |
//+------------------------------------------------------------------+
bool CPanel::ResizeW(const int w)
  {
   if(!this.ObjectResizeW(w))
      return false;
   this.BoundResizeW(w);
   this.SetImageSize(w,this.Height());
   if(!this.ObjectTrim())
     {
      this.Update(false);
      this.Draw(false);
     }
//--- Get the pointer to the base element and, if it exists, its type is container,
//--- check the ratio of the current element dimensions to the container dimensions
//--- to display scrollbars in the container if necessary
   CContainer *base=this.GetContainer();
   if(base!=NULL && base.Type()==ELEMENT_TYPE_CONTAINER)
      base.CheckElementSizes(&this);

//--- In the loop through the attached elements, trim each element along the container boundaries
   int total=this.m_list_elm.Total();
   for(int i=0;i<total;i++)
     {
      CElementBase *elm=this.GetAttachedElementAt(i);
      if(elm!=NULL)
         elm.ObjectTrim();
     }
//--- All is successful
   return true;
  }
//+------------------------------------------------------------------+
//| CPanel::Change the object height                                 |
//+------------------------------------------------------------------+
bool CPanel::ResizeH(const int h)
  {
   if(!this.ObjectResizeH(h))
      return false;
   this.BoundResizeH(h);
   this.SetImageSize(this.Width(),h);
   if(!this.ObjectTrim())
     {
      this.Update(false);
      this.Draw(false);
     }
//--- Get the pointer to the base element and, if it exists, its type is container,
//--- check the ratio of the current element dimensions to the container dimensions
//--- to display scrollbars in the container if necessary
   CContainer *base=this.GetContainer();
   if(base!=NULL && base.Type()==ELEMENT_TYPE_CONTAINER)
      base.CheckElementSizes(&this);

//--- In the loop through the attached elements, trim each element along the container boundaries
   int total=this.m_list_elm.Total();
   for(int i=0;i<total;i++)
     {
      CElementBase *elm=this.GetAttachedElementAt(i);
      if(elm!=NULL)
         elm.ObjectTrim();
     }
//--- All is successful
   return true;
  }
//+------------------------------------------------------------------+
//| CPanel::Change the object size                                   |
//+------------------------------------------------------------------+
bool CPanel::Resize(const int w,const int h)
  {
   if(!this.ObjectResize(w,h))
      return false;
   this.BoundResize(w,h);
   this.SetImageSize(w,h);
   if(!this.ObjectTrim())
     {
      this.Update(false);
      this.Draw(false);
     }
//--- Get the pointer to the base element and, if it exists, its type is container,
//--- check the ratio of the current element dimensions to the container dimensions
//--- to display scrollbars in the container if necessary
   CContainer *base=this.GetContainer();
   if(base!=NULL && base.Type()==ELEMENT_TYPE_CONTAINER)
      base.CheckElementSizes(&this);

//--- In the loop through the attached elements, trim each element along the container boundaries
   int total=this.m_list_elm.Total();
   for(int i=0;i<total;i++)
     {
      CElementBase *elm=this.GetAttachedElementAt(i);
      if(elm!=NULL)
         elm.ObjectTrim();
     }
//--- All is successful
   return true;
  }
方法优化的核心在于:如果某个元素位于容器内,或者该元素的大小已发生变化,则必须根据容器来检查该元素的新尺寸。 如果某个元素的大小超出了容器的边界,则该元素会根据容器的大小被裁剪(此功能已实现),但容器上仍应显示滚动条。 我们通过使用容器对象的CheckElementSizes() 方法,将此检查功能添加到了用于调整UI元素大小的方法中。
在CPanel类的面板绘制方法中,仅当四条边中至少有一条边的边框宽度(BorderWidth)参数不为零时,才绘制边框。
//+------------------------------------------------------------------+
//| CPanel::Draw the appearance                                      |
//+------------------------------------------------------------------+
void CPanel::Draw(const bool chart_redraw)
  {
//--- Fill the object with background color
   this.Fill(this.BackColor(),false);

//--- Clear the drawing area
   this.m_painter.Clear(this.AdjX(this.m_painter.X()),this.AdjY(this.m_painter.Y()),this.m_painter.Width(),this.m_painter.Height(),false);
//--- Set the color for the dark and light lines and draw the panel frame
   color clr_dark =(this.BackColor()==clrNULL ? this.BackColor() : this.GetBackColorControl().NewColor(this.BackColor(),-20,-20,-20));
   color clr_light=(this.BackColor()==clrNULL ? this.BackColor() : this.GetBackColorControl().NewColor(this.BackColor(),  6,  6,  6));
   if(this.BorderWidthBottom()+this.BorderWidthLeft()+this.BorderWidthRight()+this.BorderWidthTop()!=0)
      this.m_painter.FrameGroupElements(this.AdjX(this.m_painter.X()),this.AdjY(this.m_painter.Y()),
                                        this.m_painter.Width(),this.m_painter.Height(),this.Text(),
                                        this.ForeColor(),clr_dark,clr_light,this.AlphaFG(),true);

//--- Update the background canvas without redrawing the chart
   this.m_background.Update(false);

//--- Draw the list elements
   for(int i=0;i<this.m_list_elm.Total();i++)
     {
      CElementBase *elm=this.GetAttachedElementAt(i);
      if(elm!=NULL && elm.Type()!=ELEMENT_TYPE_SCROLLBAR_H && elm.Type()!=ELEMENT_TYPE_SCROLLBAR_V)
         elm.Draw(false);
     }
//--- If specified, update the chart
   if(chart_redraw)
      ::ChartRedraw(this.m_chart_id);
  }
在面板对象类中用于创建新元素并将其添加到列表的方法中,添加创建新控件的逻辑:
//+------------------------------------------------------------------+
//| CPanel::Create and add a new element to the list                 |
//+------------------------------------------------------------------+
CElementBase *CPanel::InsertNewElement(const ENUM_ELEMENT_TYPE type,const string text,const string user_name,const int dx,const int dy,const int w,const int h)
  {
//--- Create a graphical object name
   int elm_total=this.m_list_elm.Total();
   string obj_name=this.NameFG()+"_"+ElementShortName(type)+(string)elm_total;
//--- Calculate the coordinates
   int x=this.X()+dx;
   int y=this.Y()+dy;
//--- Create a new object depending on the object type
   CElementBase *element=NULL;
   switch(type)
     {
      case ELEMENT_TYPE_LABEL                :  element = new CLabel(obj_name,text,this.m_chart_id,this.m_wnd,x,y,w,h);             break;   // Text label
      case ELEMENT_TYPE_BUTTON               :  element = new CButton(obj_name,text,this.m_chart_id,this.m_wnd,x,y,w,h);            break;   // Simple button
      case ELEMENT_TYPE_BUTTON_TRIGGERED     :  element = new CButtonTriggered(obj_name,text,this.m_chart_id,this.m_wnd,x,y,w,h);   break;   // Toggle button
      case ELEMENT_TYPE_BUTTON_ARROW_UP      :  element = new CButtonArrowUp(obj_name,text,this.m_chart_id,this.m_wnd,x,y,w,h);     break;   // Up arrow button
      case ELEMENT_TYPE_BUTTON_ARROW_DOWN    :  element = new CButtonArrowDown(obj_name,text,this.m_chart_id,this.m_wnd,x,y,w,h);   break;   // Down arrow button
      case ELEMENT_TYPE_BUTTON_ARROW_LEFT    :  element = new CButtonArrowLeft(obj_name,text,this.m_chart_id,this.m_wnd,x,y,w,h);   break;   // Left arrow button
      case ELEMENT_TYPE_BUTTON_ARROW_RIGHT   :  element = new CButtonArrowRight(obj_name,text,this.m_chart_id,this.m_wnd,x,y,w,h);  break;   // Right arrow button
      case ELEMENT_TYPE_CHECKBOX             :  element = new CCheckBox(obj_name,text,this.m_chart_id,this.m_wnd,x,y,w,h);          break;   // CheckBox control
      case ELEMENT_TYPE_RADIOBUTTON          :  element = new CRadioButton(obj_name,text,this.m_chart_id,this.m_wnd,x,y,w,h);       break;   // RadioButton control
      case ELEMENT_TYPE_SCROLLBAR_THUMB_H    :  element = new CScrollBarThumbH(obj_name,text,this.m_chart_id,this.m_wnd,x,y,w,h);   break;   // Horizontal ScrollBar
      case ELEMENT_TYPE_SCROLLBAR_THUMB_V    :  element = new CScrollBarThumbV(obj_name,text,this.m_chart_id,this.m_wnd,x,y,w,h);   break;   // Vertical ScrollBar
      case ELEMENT_TYPE_SCROLLBAR_H          :  element = new CScrollBarH(obj_name,text,this.m_chart_id,this.m_wnd,x,y,w,h);        break;   // Horizontal ScrollBar control
      case ELEMENT_TYPE_SCROLLBAR_V          :  element = new CScrollBarV(obj_name,text,this.m_chart_id,this.m_wnd,x,y,w,h);        break;   // Vertical ScrollBar control
      case ELEMENT_TYPE_TABLE_ROW            :  element = new CTableRowView(obj_name,text,this.m_chart_id,this.m_wnd,x,y,w,h);      break;   // Table row visual representation object
      case ELEMENT_TYPE_TABLE_COLUMN_CAPTION :  element = new CColumnCaptionView(obj_name,text,this.m_chart_id,this.m_wnd,x,y,w,h); break;   // Table column header visual representation object
      case ELEMENT_TYPE_TABLE_HEADER         :  element = new CTableHeaderView(obj_name,text,this.m_chart_id,this.m_wnd,x,y,w,h);   break;   // Table header visual representation object
      case ELEMENT_TYPE_TABLE                :  element = new CTableView(obj_name,text,this.m_chart_id,this.m_wnd,x,y,w,h);         break;   // Table visual representation object
      case ELEMENT_TYPE_PANEL                :  element = new CPanel(obj_name,"",this.m_chart_id,this.m_wnd,x,y,w,h);               break;   // Panel control
      case ELEMENT_TYPE_GROUPBOX             :  element = new CGroupBox(obj_name,text,this.m_chart_id,this.m_wnd,x,y,w,h);          break;   // GroupBox control
      case ELEMENT_TYPE_CONTAINER            :  element = new CContainer(obj_name,text,this.m_chart_id,this.m_wnd,x,y,w,h);         break;   // Container control
      default                                :  element = NULL;
     }

//--- If the new element is not created, report this and return NULL
   if(element==NULL)
     {
      ::PrintFormat("%s: Error. Failed to create graphic element %s",__FUNCTION__,ElementDescription(type));
      return NULL;
     }
//--- Set the element ID, name, container, and z-order
   element.SetID(elm_total);
   element.SetName(user_name);
   element.SetContainerObj(&this);
   element.ObjectSetZOrder(this.ObjectZOrder()+1);

//--- If the created element is not added to the list, report this, remove the created element and return NULL
   if(!this.AddNewElement(element))
     {
      ::PrintFormat("%s: Error. Failed to add %s element with ID %d to list",__FUNCTION__,ElementDescription(type),element.ID());
      delete element;
      return NULL;
     }
//--- Get the parent element the children ones are attached to
   CElementBase *elm=this.GetContainer();
//--- If the parent element is of Container type, then it has scrollbars
   if(elm!=NULL && elm.Type()==ELEMENT_TYPE_CONTAINER)
     {
      //--- Convert CElementBase to CContainer
      CContainer *container_obj=elm;
      //--- If the horizontal scrollbar is visible,
      if(container_obj.ScrollBarHorzIsVisible())
        {
         //--- get the pointer to the horizontal scrollbar and move it to the front
         CScrollBarH *sbh=container_obj.GetScrollBarH();
         if(sbh!=NULL)
            sbh.BringToTop(false);
        }
      //--- If the vertical scrollbar is visible,
      if(container_obj.ScrollBarVertIsVisible())
        {
         //--- get the pointer to the vertical scrollbar and move it to the front
         CScrollBarV *sbv=container_obj.GetScrollBarV();
         if(sbv!=NULL)
            sbv.BringToTop(false);
        }
     }
//--- Return the pointer to the created and attached element
   return element;
  }
在将对象置于前景的方法中,添加根据容器大小裁剪附属对象的功能:
//+------------------------------------------------------------------+
//| CPanel::Bring an object to the foreground                        |
//+------------------------------------------------------------------+
void CPanel::BringToTop(const bool chart_redraw)
  {
//--- Bring the panel to the foreground
   CCanvasBase::BringToTop(false);
//--- Bring attached objects to the foreground
   for(int i=0;i<this.m_list_elm.Total();i++)
     {
      CElementBase *elm=this.GetAttachedElementAt(i);
      if(elm!=NULL)
        {
         if(elm.Type()==ELEMENT_TYPE_SCROLLBAR_H || elm.Type()==ELEMENT_TYPE_SCROLLBAR_V)
            continue;
         elm.BringToTop(false);
         elm.ObjectTrim();
        }
     }
//--- If specified, redraw the chart
   if(chart_redraw)
      ::ChartRedraw(this.m_chart_id);
  }
水平滚动条类中有一个标志,表示该元素可以沿容器边界进行裁剪。 滚动条对象由多个对象组成,应为每个对象设置相同的标志值。 让我们把所有操作都放在一个方法中完成。在该类中,重写用于设置按容器边界裁剪标志的方法:
//+------------------------------------------------------------------+
//| Horizontal scrollbar class                                       |
//+------------------------------------------------------------------+
class CScrollBarH : public CPanel
  {
protected:
   CButtonArrowLeft *m_butt_left;                              // Left arrow button
   CButtonArrowRight*m_butt_right;                             // Right arrow button
   CScrollBarThumbH *m_thumb;                                  // Scrollbar slider

public:
//--- Return the pointer to the (1) left, (2) right button and (3) slider
   CButtonArrowLeft *GetButtonLeft(void)                       { return this.m_butt_left;                                              }
   CButtonArrowRight*GetButtonRight(void)                      { return this.m_butt_right;                                             }
   CScrollBarThumbH *GetThumb(void)                            { return this.m_thumb;                                                  }

//--- (1) Sets and (2) return the chart update flag
   void              SetChartRedrawFlag(const bool flag)       { if(this.m_thumb!=NULL) this.m_thumb.SetChartRedrawFlag(flag);         }
   bool              ChartRedrawFlag(void)               const { return(this.m_thumb!=NULL ? this.m_thumb.ChartRedrawFlag() : false);  }

//--- Return (1) the track length (2) start and (3) the slider position
   int               TrackLength(void)    const;
   int               TrackBegin(void)     const;
   int               ThumbPosition(void)  const;

//--- Set the slider position
   bool              SetThumbPosition(const int pos)     const { return(this.m_thumb!=NULL ? this.m_thumb.MoveX(pos) : false);         }
//--- Change the slider size
   bool              SetThumbSize(const uint size)       const { return(this.m_thumb!=NULL ? this.m_thumb.ResizeW(size) : false);      }

//--- Change the object width
   virtual bool      ResizeW(const int size);

//--- Set the flag of visibility in the container
   virtual void      SetVisibleInContainer(const bool flag);

//--- Set the clipping flag to the container borders
   virtual void      SetTrimmered(const bool flag);

//--- Draw the appearance
   virtual void      Draw(const bool chart_redraw);

//--- Object type
   virtual int       Type(void)                          const { return(ELEMENT_TYPE_SCROLLBAR_H);                                     }

//--- Initialize (1) the class object and (2) default object colors
   void              Init(void);
   virtual void      InitColors(void);

//--- Wheel scroll handler (Wheel)
   virtual void      OnWheelEvent(const int id, const long lparam, const double dparam, const string sparam);

//--- Constructors/destructor
                     CScrollBarH(void);
                     CScrollBarH(const string object_name, const string text, const long chart_id, const int wnd, const int x, const int y, const int w, const int h);
                    ~CScrollBarH(void) {}
  };
实现该方法:
//+------------------------------------------------------------------+
//| CScrollBarH::Set the clipping flag to the container borders      |
//+------------------------------------------------------------------+
void CScrollBarH::SetTrimmered(const bool flag)
  {
   this.m_trim_flag=flag;
   if(this.m_butt_left!=NULL)
      this.m_butt_left.SetTrimmered(flag);
   if(this.m_butt_right!=NULL)
      this.m_butt_right.SetTrimmered(flag);
   if(this.m_thumb!=NULL)
      this.m_thumb.SetTrimmered(flag);
  }
将传入该方法的标志值设置给构成滚动条的每个对象。
在对象初始化方法中,无需再逐一为各个元素设置按容器边界裁剪的标志。 只需在方法结尾处调用SetTrimmered()方法即可:
//+------------------------------------------------------------------+
//| CScrollBarH::Initialization                                      |
//+------------------------------------------------------------------+
void CScrollBarH::Init(void)
  {
//--- Initialize a parent class
   CPanel::Init();
//--- background - opaque
   this.SetAlphaBG(255);
//--- Frame width and text
   this.SetBorderWidth(0);
   this.SetText("");

//--- Create scroll buttons
   int w=this.Height();
   int h=this.Height();
   this.m_butt_left = this.InsertNewElement(ELEMENT_TYPE_BUTTON_ARROW_LEFT, "","ButtL",0,0,w,h);
   this.m_butt_right= this.InsertNewElement(ELEMENT_TYPE_BUTTON_ARROW_RIGHT,"","ButtR",this.Width()-w,0,w,h);
   if(this.m_butt_left==NULL || this.m_butt_right==NULL)
     {
      ::PrintFormat("%s: Init failed",__FUNCTION__);
      return;
     }
//--- Customize the colors and appearance of the left arrow button
   this.m_butt_left.SetImageBound(1,1,w-2,h-4);
   this.m_butt_left.InitBackColors(this.m_butt_left.BackColorFocused());
   this.m_butt_left.ColorsToDefault();
   this.m_butt_left.InitBorderColors(this.BorderColor(),this.m_butt_left.BackColorFocused(),this.m_butt_left.BackColorPressed(),this.m_butt_left.BackColorBlocked());
   this.m_butt_left.ColorsToDefault();

//--- Customize the colors and appearance of the right arrow button
   this.m_butt_right.SetImageBound(1,1,w-2,h-4);
   this.m_butt_right.InitBackColors(this.m_butt_right.BackColorFocused());
   this.m_butt_right.ColorsToDefault();
   this.m_butt_right.InitBorderColors(this.BorderColor(),this.m_butt_right.BackColorFocused(),this.m_butt_right.BackColorPressed(),this.m_butt_right.BackColorBlocked());
   this.m_butt_right.ColorsToDefault();

//--- Create a slider
   int tsz=this.Width()-w*2;
   this.m_thumb=this.InsertNewElement(ELEMENT_TYPE_SCROLLBAR_THUMB_H,"","ThumbH",w,1,tsz-w*4,h-2);
   if(this.m_thumb==NULL)
     {
      ::PrintFormat("%s: Init failed",__FUNCTION__);
      return;
     }
//--- Set the slider colors and set its movability flag
   this.m_thumb.InitBackColors(this.m_thumb.BackColorFocused());
   this.m_thumb.ColorsToDefault();
   this.m_thumb.InitBorderColors(this.m_thumb.BackColor(),this.m_thumb.BackColorFocused(),this.m_thumb.BackColorPressed(),this.m_thumb.BackColorBlocked());
   this.m_thumb.ColorsToDefault();
   this.m_thumb.SetMovable(true);

//--- Prohibit independent chart redrawing
   this.m_thumb.SetChartRedrawFlag(false);

//--- Initially not displayed in the container and not clipped to its borders
   this.SetVisibleInContainer(false);
   this.SetTrimmered(false);
  }
针对垂直滚动条类也进行了完全相同的改进。 它们与前面讨论的内容完全一致,因此我们不再赘述。
将容器对象类中的CheckElementSizes方法设置为public:
//+------------------------------------------------------------------+
//| Container class                                                  |
//+------------------------------------------------------------------+
class CContainer : public CPanel
  {
private:
   bool              m_visible_scrollbar_h;                    // Visibility flag for the horizontal scrollbar
   bool              m_visible_scrollbar_v;                    // Vertical scrollbar visibility flag
   int               m_init_border_size_top;                   // Initial border size from the top
   int               m_init_border_size_bottom;                // Initial border size from the bottom
   int               m_init_border_size_left;                  // Initial border size from the left
   int               m_init_border_size_right;                 // Initial border size from the right

//--- Return the type of the element that sent the event
   ENUM_ELEMENT_TYPE GetEventElementType(const string name);

protected:
   CScrollBarH      *m_scrollbar_h;                            // Pointer to the horizontal scrollbar
   CScrollBarV      *m_scrollbar_v;                            // Pointer to the vertical scrollbar

//--- Handler for dragging element edges and corners
   virtual void      ResizeActionDragHandler(const int x, const int y);

public:
//--- Check the dimensions of the element to display scrollbars
   void              CheckElementSizes(CElementBase *element);
protected:
//--- Calculate and return the size (1) of the slider, (2) the full size, (3) the working size of the horizontal scrollbar track
   int               ThumbSizeHorz(void);
   int               TrackLengthHorz(void)               const { return(this.m_scrollbar_h!=NULL ? this.m_scrollbar_h.TrackLength() : 0);       }
   int               TrackEffectiveLengthHorz(void)            { return(this.TrackLengthHorz()-this.ThumbSizeHorz());                           }
该方法由绑定到容器的元素调用,且必须声明为public才能被访问。
我们已经回顾了库类的主要改进之处。 一些次要的改进和修复未在此讨论。 请参阅文章附件中的完整代码。
表格模型由单元格、表格行以及最终构成表格的行列表组成。 除了上述内容外,该表格还包含由列标题组成的表头。
- 单元格是一个独立的元素,用于存储行号、列号和内容;
- 表格行是一个由单元格组成的列表,具有自身的编号;
- 表格是由表格行组成的列表,可以包含一个由列标题组成的表头。
视图组件将采用大致相同的结构,用于显示表格模型中的数据。 例如,该表格对象将基于一个数据数组和一个对应的列标题数组。 然后,我们将表格模型(模型组件)的指针传递给已创建的表格可视化显示对象(视图组件),所有数据都将写入单元格中。
在此阶段,将创建一个简单的静态表格,该表格不具备通过鼠标光标控制其显示的功能。
单元格类(视图)
该表格由一个表格行列表组成。 这些表格行又由一些对象组成,每个对象都配有两个画布,分别用于绘制背景和前景。 单元格在各自所属的表格行中水平排列。 给单元格分配各自的画布毫无意义。 只需将每个表格行“切分”为若干区域,每个区域对应一个单元格的位置。 并将单元格数据绘制到表格行对象的画布上。
正是出于这些目的,我们才在最开始创建了一个中间类。 它仅包含对象的尺寸、坐标,以及一个指向控件的指针,绘制操作将在该控件的画布上进行。 而这样的对象就是单元格。 我们将传递一个指向表格行对象的指针,以便在其画布上进行绘制。
在Controls.mqh中实现一个新类。
//+------------------------------------------------------------------+
//| Table cell visual representation class                           |
//+------------------------------------------------------------------+
class CTableCellView : public CBoundedObj
  {
protected:
   CTableCell       *m_table_cell_model;                       // Pointer to the cell model
   CImagePainter    *m_painter;                                // Pointer to the drawing object
   CTableRowView    *m_element_base;                           // Pointer to the base element (table row)
   CCanvas          *m_background;                             // Pointer to the background canvas
   CCanvas          *m_foreground;                             // Pointer to the foreground canvas
   int               m_index;                                  // Index in the cell list
   ENUM_ANCHOR_POINT m_text_anchor;                            // Text anchor point (alignment in cell)
   int               m_text_x;                                 // Text X coordinate (offset relative to the left border of the object area)
   int               m_text_y;                                 // Y text coordinate (offset relative to the top border of the object area)
   ushort            m_text[];                                 // Text

//--- Return the offsets of the initial drawing coordinates on the canvas relative to the canvas and the coordinates of the base element
   int               CanvasOffsetX(void)     const { return(this.m_element_base.ObjectX()-this.m_element_base.X());  }
   int               CanvasOffsetY(void)     const { return(this.m_element_base.ObjectY()-this.m_element_base.Y());  }

//--- Return the adjusted coordinate of a point on the canvas, taking into account the offset of the canvas relative to the base element
   int               AdjX(const int x)                            const { return(x-this.CanvasOffsetX());            }
   int               AdjY(const int y)                            const { return(y-this.CanvasOffsetY());            }

//--- Return the X and Y coordinates of the text based on the anchor point
   bool              GetTextCoordsByAnchor(int &x, int&y);

public:
//--- (1) Set and (2) return the cell text
   void              SetText(const string text)                         { ::StringToShortArray(text,this.m_text);    }
   string            Text(void)                                   const { return ::ShortArrayToString(this.m_text);  }

//--- Set the ID
   virtual void      SetID(const int id)                                { this.m_index=this.m_id=id;                 }
//--- (1) Set and (2) return the cell index
   void              SetIndex(const int index)                          { this.SetID(index);                         }
   int               Index(void)                                  const { return this.m_index;                       }

//--- (1) Set and (2) return the text offset along the X axis
   void              SetTextShiftX(const int shift)                     { this.m_text_x=shift;                       }
   int               TextShiftX(void)                             const { return this.m_text_x;                      }

//--- (1) Set and (2) return the text offset along the Y axis
   void              SetTextShiftY(const int shift)                     { this.m_text_y=shift;                       }
   int               TextShiftY(void)                             const { return this.m_text_y;                      }

//--- (1) Set and (2) return the text anchor point
   void              SetTextAnchor(const ENUM_ANCHOR_POINT anchor,const bool cell_redraw,const bool chart_redraw);
   int               TextAnchor(void)                             const { return this.m_text_anchor;                 }

//--- Sets the anchor point and text offsets
   void              SetTextPosition(const ENUM_ANCHOR_POINT anchor,const int shift_x,const int shift_y,const bool cell_redraw,const bool chart_redraw);

//--- Assign the base element (table row)
   void              RowAssign(CTableRowView *base_element);

//--- (1) Assign and (2) return the cell model
   bool              TableCellModelAssign(CTableCell *cell_model,int dx,int dy,int w,int h);
   CTableCell       *GetTableCellModel(void)                            { return this.m_table_cell_model;            }

//--- Print the assigned cell model in the journal
   void              TableCellModelPrint(void);

//--- (1) Fill the object with the background color, (2) update the object to reflect the changes and (3) draw the appearance
   virtual void      Clear(const bool chart_redraw);
   virtual void      Update(const bool chart_redraw);
   virtual void      Draw(const bool chart_redraw);

//--- Display the text
   virtual void      DrawText(const int dx, const int dy, const string text, const bool chart_redraw);

//--- Virtual methods of (1) comparing, (2) saving to file, (3) loading from file, (4) object type
   virtual int       Compare(const CObject *node,const int mode=0)const { return CBaseObj::Compare(node,mode);       }
   virtual bool      Save(const int file_handle);
   virtual bool      Load(const int file_handle);
   virtual int       Type(void)                                   const { return(ELEMENT_TYPE_TABLE_CELL);           }

//--- Initialize a class object
   void              Init(const string text);

//--- Return the object description
   virtual string    Description(void);

//--- Constructors/destructor
                     CTableCellView(void);
                     CTableCellView(const int id, const string user_name, const string text, const int x, const int y, const int w, const int h);
                    ~CTableCellView (void){}
  };
此处所有变量和方法在代码中都有注释说明。 在此处,单元格索引与其标识符是同一个概念。 因此,这里重写了SetID()虚方法,在其中将索引和标识符设置为相同的值。 让我们来看看已声明方法的实现。
在类构造函数中,会调用对象初始化方法,并设置单元格标识符及其名称:
//+------------------------------------------------------------------------+
//| CTableCellView::Default constructor. Builds an object in the main      |
//| window of the current chart at coordinates 0,0 with default dimensions |
//+------------------------------------------------------------------------+
CTableCellView::CTableCellView(void) : CBoundedObj("TableCell",-1,0,0,DEF_PANEL_W,DEF_TABLE_ROW_H), m_index(-1),m_text_anchor(ANCHOR_LEFT)
  {
//--- Initialization
   this.Init("");
   this.SetID(-1);
   this.SetName("TableCell");
  }
//+-------------------------------------------------------------------------------+
//| CTableCellView::Parametric constructor. Builds an object                      |
//| in the specified window of the specified chart with the specified text,       |
//| coordinates and dimensions                                                    |
//+-------------------------------------------------------------------------------+
CTableCellView::CTableCellView(const int id, const string user_name, const string text, const int x, const int y, const int w, const int h) :
   CBoundedObj(user_name,id,x,y,w,h), m_index(-1),m_text_anchor(ANCHOR_LEFT)
  {
//--- Initialization
   this.Init(text);
   this.SetID(id);
   this.SetName(user_name);
  }
类对象初始化方法:
//+------------------------------------------------------------------+
//| CTableCellView::Initialization                                   |
//+------------------------------------------------------------------+
void CTableCellView::Init(const string text)
  {
//--- The class does not manage canvases
   this.m_canvas_owner=false;
//--- Cell text
   this.SetText(text);
//--- Default text offsets
   this.m_text_x=2;
   this.m_text_y=0;
  }
请务必将该对象的画布管理标志设置为 false,以免在销毁该对象时误删除其他对象的画布。
返回对象描述的方法:
//+------------------------------------------------------------------+
//| CTableCellView::Return the object description                    |
//+------------------------------------------------------------------+
string CTableCellView::Description(void)
  {
   string nm=this.Name();
   string name=(nm!="" ? ::StringFormat(" \"%s\"",nm) : nm);
   return ::StringFormat("%s%s ID %d, X %d, Y %d, W %d, H %d",ElementDescription((ENUM_ELEMENT_TYPE)this.Type()),name,this.ID(),this.X(),this.Y(),this.Width(),this.Height());
  }
该方法会在日志中输出包含对象类型名称、标识符、坐标和单元格尺寸的一行信息。
为单元格分配表格行及背景和前景画布的方法:
//+---------------------------------------------------------------------+
//| CTableCellView::Assigns the row, background and foreground canvases |
//+---------------------------------------------------------------------+
void CTableCellView::RowAssign(CTableRowView *base_element)
  {
   if(base_element==NULL)
     {
      ::PrintFormat("%s: Error. Empty element passed",__FUNCTION__);
      return;
     }
   this.m_element_base=base_element;
   this.m_background=this.m_element_base.GetBackground();
   this.m_foreground=this.m_element_base.GetForeground();
   this.m_painter=this.m_element_base.Painter();
  }
向该方法传入一个指向表格行对象的指针(类的说明见下文);如果该指针无效,则报告错误并直接返回NULL。 接下来,将指向表格行的指针存入类变量,再从表格行对象中获取指向背景画布、前景画布和绘图对象的指针,并存入相应的类变量。
表格模型对象也有自己的行和单元格。 为该类分配一个单元格模型后,该类会将模型中的数据绘制到行对象的画布上。
分配单元格模型的方法:
//+------------------------------------------------------------------+
//| CTableCellView::Assigns a cell model                             |
//+------------------------------------------------------------------+
bool CTableCellView::TableCellModelAssign(CTableCell *cell_model,int dx,int dy,int w,int h)
  {
//--- If an invalid cell model object is passed, report this and return 'false'
   if(cell_model==NULL)
     {
      ::PrintFormat("%s: Error. Empty object passed",__FUNCTION__);
      return false;
     }
//--- If the base element (table row) is not assigned, report this and return 'false'
   if(this.m_element_base==NULL)
     {
      ::PrintFormat("%s: Error. Base element not assigned. Please use RowAssign() method first",__FUNCTION__);
      return false;
     }
//--- Save the cell model
   this.m_table_cell_model=cell_model;
//--- Set the coordinates and dimensions of the cell visual representation
   this.BoundSetXY(dx,dy);
   this.BoundResize(w,h);
//--- Set the dimensions of the drawing area of the cell visual representation
   this.m_painter.SetBound(dx,dy,w,h);
//--- All is successful
   return true;
  }
首先,检查传入的指向单元格模型的指针是否有效,然后检查是否已为该单元格对象分配表格行。 如果任一检查未通过,则将相关信息记录到日志中,并返回false。 接下来,将指向单元格模型的指针存储在一个变量中,并设置相应行上单元格区域的坐标和尺寸。
对表格的行和列进行排序时,只需重新分配指向单元格对象的指针;该对象在表格中的坐标已确定,会绘制新分配给它的单元格的数据。
根据锚点返回文本X和Y坐标的方法:
//+------------------------------------------------------------------+
//| CTableCellView::Return the X and Y coordinates of the text       |
//| depending on the anchor point                                    |
//+------------------------------------------------------------------+
bool CTableCellView::GetTextCoordsByAnchor(int &x,int &y)
  {
//--- Get the text size in the cell
   int text_w=0, text_h=0;
   this.m_foreground.TextSize(this.Text(),text_w,text_h);
   if(text_w==0 || text_h==0)
      return false;
//--- Depending on the text anchor point in the cell,
//--- calculate its initial coordinates (upper left corner)
   switch(this.m_text_anchor)
     {
      //--- Anchor point left centered
      case ANCHOR_LEFT :
        x=0;
        y=(this.Height()-text_h)/2;
        break;
      //--- Anchor point in the lower left corner
      case ANCHOR_LEFT_LOWER :
        x=0;
        y=this.Height()-text_h;
        break;
      //--- Anchor point at the bottom center
      case ANCHOR_LOWER :
        x=(this.Width()-text_w)/2;
        y=this.Height()-text_h;
        break;
      //--- Anchor point in the lower right corner
      case ANCHOR_RIGHT_LOWER :
        x=this.Width()-text_w;
        y=this.Height()-text_h;
        break;
      //--- Anchor point is right centered
      case ANCHOR_RIGHT :
        x=this.Width()-text_w;
        y=(this.Height()-text_h)/2;
        break;
      //--- Anchor point in the upper right corner
      case ANCHOR_RIGHT_UPPER :
        x=this.Width()-text_w;
        y=0;
        break;
      //--- Anchor point at top center
      case ANCHOR_UPPER :
        x=(this.Width()-text_w)/2;
        y=0;
        break;
      //--- Anchor point is strictly in the center of the object
      case ANCHOR_CENTER :
        x=(this.Width()-text_w)/2;
        y=(this.Height()-text_h)/2;
        break;
      //--- Anchor point in the upper left corner
      //---ANCHOR_LEFT_UPPER
      default:
        x=0;
        y=0;
        break;
     }
   return true;
  }
将变量以引用方式传入该方法,计算出的输出文本左上角坐标将写入这些变量。 如果无法获取单元格文本的尺寸,该方法将返回false。
计算出文本左上角的坐标后,将其写入相应变量,并返回true。
设置文本锚点的方法:
//+------------------------------------------------------------------+
//| CTableCellView::Set the text anchor point                        |
//+------------------------------------------------------------------+
void CTableCellView::SetTextAnchor(const ENUM_ANCHOR_POINT anchor,const bool cell_redraw,const bool chart_redraw)
  {
   if(this.m_text_anchor==anchor)
      return;
   this.m_text_anchor=anchor;
   if(cell_redraw)
      this.Draw(chart_redraw);
  }
首先,将一个新的锚点写入该变量;然后,如果该单元格已设置重绘标志,则会调用其绘制方法,并传入指定的图表重绘标志。
设置锚点和文本偏移的方法:
//+------------------------------------------------------------------+
//| CTableCellView::Set the anchor point and text offsets            |
//+------------------------------------------------------------------+
void CTableCellView::SetTextPosition(const ENUM_ANCHOR_POINT anchor,const int shift_x,const int shift_y,const bool cell_redraw,const bool chart_redraw)
  {
   this.SetTextShiftX(shift_x);
   this.SetTextShiftY(shift_y);
   this.SetTextAnchor(anchor,cell_redraw,chart_redraw);
  }
在此方法中,除了设置锚点外,还会设置文本沿X轴和Y轴的初始偏移量。
用指定颜色填充对象的方法:
//+------------------------------------------------------------------+
//| CTableCellView::Fill an object with color                        |
//+------------------------------------------------------------------+
void CTableCellView::Clear(const bool chart_redraw)
  {
//--- Set the correct coordinates of the cell corners
   int x1=this.AdjX(this.m_bound.X());
   int y1=this.AdjY(this.m_bound.Y());
   int x2=this.AdjX(this.m_bound.Right());
   int y2=this.AdjY(this.m_bound.Bottom());
//--- Erase the background and foreground inside the rectangular area of the cell location
   if(this.m_background!=NULL)
      this.m_background.FillRectangle(x1,y1,x2,y2-1,::ColorToARGB(this.m_element_base.BackColor(),this.m_element_base.AlphaBG()));
   if(this.m_foreground!=NULL)
      this.m_foreground.FillRectangle(x1,y1,x2,y2-1,clrNULL);
  }
求出矩形区域四个角点的正确坐标。 然后将背景填充为表格行的背景色,将前景填充为透明色。
更新对象以显示更改的方法:
//+------------------------------------------------------------------+
//| CTableCellView::Update the object to reflect changes             |
//+------------------------------------------------------------------+
void CTableCellView::Update(const bool chart_redraw)
  {
   if(this.m_background!=NULL)
      this.m_background.Update(false);
   if(this.m_foreground!=NULL)
      this.m_foreground.Update(chart_redraw);
  }
如果背景和前景画布有效,则会使用指定的图表重绘标志调用它们的更新方法。
绘制单元格视图的方法:
//+------------------------------------------------------------------+
//| CTableCellView::Draw the appearance                              |
//+------------------------------------------------------------------+
void CTableCellView::Draw(const bool chart_redraw)
  {
//--- Get the text coordinates depending on the anchor point
   int text_x=0, text_y=0;
   if(!this.GetTextCoordsByAnchor(text_x,text_y))
      return;
//--- Correct the text coordinates
   int x=this.AdjX(this.X()+text_x);
   int y=this.AdjY(this.Y()+text_y);

//--- Set the coordinates of the dividing line
   int x1=this.AdjX(this.X());
   int x2=this.AdjX(this.X());
   int y1=this.AdjY(this.Y());
   int y2=this.AdjY(this.Bottom());

//--- Display text on the foreground canvas without updating the chart
   this.DrawText(x+this.m_text_x,y+this.m_text_y,this.Text(),false);

//--- If this is not the rightmost cell, draw a vertical dividing line near the cell on the right
   if(this.m_element_base!=NULL && this.Index()<this.m_element_base.CellsTotal()-1)
     {
      int line_x=this.AdjX(this.Right());
      this.m_background.Line(line_x,y1,line_x,y2,::ColorToARGB(this.m_element_base.BorderColor(),this.m_element_base.AlphaBG()));
     }
//--- Update the background canvas with the specified chart redraw flag
   this.m_background.Update(chart_redraw);
  }
该方法的逻辑已在注释中说明。 如果对象沿容器边界被裁剪,则必须对坐标进行校正。 在这种情况下,初始坐标的计算并非基于画布图形对象的实际坐标,而是基于图形元素的坐标——这些坐标在逻辑上位于容器边界之外。
分隔线仅画在单元格的右侧。 而当单元格是最右侧的单元格时,其右边界已由容器边界限定,因此无需再画一条线。
显示单元格文本的方法:
//+------------------------------------------------------------------+
//| CTableCellView::Display the text                                 |
//+------------------------------------------------------------------+
void CTableCellView::DrawText(const int dx,const int dy,const string text,const bool chart_redraw)
  {
//--- Check the base element
   if(this.m_element_base==NULL)
      return;

//--- Clear the cell and set the text
   this.Clear(false);
   this.SetText(text);

//--- Display the specified text on the foreground canvas
   this.m_foreground.TextOut(dx,dy,this.Text(),::ColorToARGB(this.m_element_base.ForeColor(),this.m_element_base.AlphaFG()));

//--- If the text extends beyond the right border of the cell area
   if(this.Right()-dx<this.m_foreground.TextWidth(text))
     {
      //--- Get the dimensions of the "..." text
      int w=0,h=0;
      this.m_foreground.TextSize("... ",w,h);
      if(w>0 && h>0)
        {
         //--- Erase the text at the right edge of the object to the size of the "..." text and replace the end of the label text with "..."
         this.m_foreground.FillRectangle(this.AdjX(this.Right())-w,this.AdjY(this.Y()),this.AdjX(this.Right()),this.AdjY(this.Y())+h,clrNULL);
         this.m_foreground.TextOut(this.AdjX(this.Right())-w,this.AdjY(dy),"...",::ColorToARGB(this.m_element_base.ForeColor(),this.m_element_base.AlphaFG()));
        }
     }
//--- Update the foreground canvas with the specified chart redraw flag
   this.m_foreground.Update(chart_redraw);
  }
该方法的逻辑已在代码注释中进行了详细说明。 如果显示的文本超出单元格区域,则会沿该区域的边界进行裁剪,并将文本末尾替换为省略号("..."),以表示单元格的宽度不足以显示全部文本。
将已分配的表格行模型输出到日志的方法:
//+------------------------------------------------------------------+
//| CTableCellView::Print the assigned row model in the journal      |
//+------------------------------------------------------------------+
void CTableCellView::TableCellModelPrint(void)
  {
   if(this.m_table_cell_model!=NULL)
      this.m_table_cell_model.Print();
  }
通过此方法,您可以检查模型组件中的哪个单元格被分配给了视图组件中的单元格。
文件操作方法:
//+------------------------------------------------------------------+
//| CTableCellView::Save to file                                     |
//+------------------------------------------------------------------+
bool CTableCellView::Save(const int file_handle)
  {
//--- Save the parent object data
   if(!CBaseObj::Save(file_handle))
      return false;

//--- Save the cell number
   if(::FileWriteInteger(file_handle,this.m_index,INT_VALUE)!=INT_VALUE)
      return false;
//--- Save the text anchor point
   if(::FileWriteInteger(file_handle,this.m_text_anchor,INT_VALUE)!=INT_VALUE)
      return false;
//--- Save the text X coordinate
   if(::FileWriteInteger(file_handle,this.m_text_x,INT_VALUE)!=INT_VALUE)
      return false;
//--- Save the text Y coordinate
   if(::FileWriteInteger(file_handle,this.m_text_y,INT_VALUE)!=INT_VALUE)
      return false;
//--- Save the text
   if(::FileWriteArray(file_handle,this.m_text)!=sizeof(this.m_text))
      return false;

//--- All is successful
   return true;
  }
//+------------------------------------------------------------------+
//| CTableCellView::Load from file                                   |
//+------------------------------------------------------------------+
bool CTableCellView::Load(const int file_handle)
  {
//--- Load parent object data
   if(!CBaseObj::Load(file_handle))
      return false;

//--- Load the cell index
   this.m_id=this.m_index=::FileReadInteger(file_handle,INT_VALUE);
//--- Load the text anchor point
   this.m_text_anchor=(ENUM_ANCHOR_POINT)::FileReadInteger(file_handle,INT_VALUE);
//--- Load the text X coordinate
   this.m_text_x=::FileReadInteger(file_handle,INT_VALUE);
//--- Load the text Y coordinate
   this.m_text_y=::FileReadInteger(file_handle,INT_VALUE);
//--- Load the text
   if(::FileReadArray(file_handle,this.m_text)!=sizeof(this.m_text))
      return false;

//--- All is successful
   return true;
  }
这些方法允许您将单元格数据保存到文件中,并从文件中加载这些数据。
现在,让我们来研究表格行的视图类。
表格行类(视图)
表格行是一个继承自面板类的对象。 它包含一个由CTableCellView类的单元格对象组成的列表。
继续在Controls.mqh文件中编写代码:
//+------------------------------------------------------------------+
//| Table row visual representation class                            |
//+------------------------------------------------------------------+
class CTableRowView : public CPanel
  {
protected:
   CTableCellView    m_temp_cell;                                    // Temporary cell object for searching
   CTableRow        *m_table_row_model;                              // Pointer to the row model
   CListElm          m_list_cells;                                   // Cell list
   int               m_index;                                        // Index in the list of rows
//--- Create and add a new cell representation object to the list
   CTableCellView   *InsertNewCellView(const int index,const string text,const int dx,const int dy,const int w,const int h);

public:
//--- Reutrn the (1) list and (2) the number of cells
   CListElm         *GetListCells(void)                                 { return &this.m_list_cells;        }
   int               CellsTotal(void)                             const { return this.m_list_cells.Total(); }

//--- Set the ID
   virtual void      SetID(const int id)                                { this.m_index=this.m_id=id;        }
//--- (1) Set and (2) return the row index
   void              SetIndex(const int index)                          { this.SetID(index);                }
   int               Index(void)                                  const { return this.m_index;              }

//--- (1) Set and (2) return the row model
   bool              TableRowModelAssign(CTableRow *row_model);
   CTableRow        *GetTableRowModel(void)                             { return this.m_table_row_model;    }

//--- Print the assigned row model in the journal
   void              TableRowModelPrint(const bool detail, const bool as_table=false, const int cell_width=CELL_WIDTH_IN_CHARS);

//--- Draw the appearance
   virtual void      Draw(const bool chart_redraw);

//--- Virtual methods of (1) comparing, (2) saving to file, (3) loading from file, (4) object type
   virtual int       Compare(const CObject *node,const int mode=0)const { return CLabel::Compare(node,mode);}
   virtual bool      Save(const int file_handle);
   virtual bool      Load(const int file_handle);
   virtual int       Type(void)                                   const { return(ELEMENT_TYPE_TABLE_ROW);   }

//--- Initialize (1) the class object and (2) default object colors
   void              Init(void);
   virtual void      InitColors(void);

//--- Constructors/destructor
                     CTableRowView(void);
                     CTableRowView(const string object_name, const string text, const long chart_id, const int wnd, const int x, const int y, const int w, const int h);
                    ~CTableRowView (void){}
  };
表格行与单元格具有相同的特性,即行索引属性等于其标识符。 这里也重写了用于设置标识符的虚方法,使其同时设置索引和标识符这两个属性。
在类构造函数中,会调用对象初始化方法:
//+----------------------------------------------------------------------+
//| CTableRowView::Default constructor. Builds an object in the main     |
//| window of the current chart at coordinates 0,0 with default dimension|
//+----------------------------------------------------------------------+
CTableRowView::CTableRowView(void) : CPanel("TableRow","",::ChartID(),0,0,0,DEF_PANEL_W,DEF_TABLE_ROW_H), m_index(-1)
  {
//--- Initialization
   this.Init();
  }
//+----------------------------------------------------------------------------------+
//| CTableRowView::Parametric constructor. Builds an object in                       |
//| in the specified window of the specified chart with the specified text,          |
//| coordinates and dimensions                                                       |
//+----------------------------------------------------------------------------------+
CTableRowView::CTableRowView(const string object_name,const string text,const long chart_id,const int wnd,const int x,const int y,const int w,const int h) :
   CPanel(object_name,text,chart_id,wnd,x,y,w,h), m_index(-1)
  {
//--- Initialization
   this.Init();
  }
对象初始化:
//+------------------------------------------------------------------+
//| CTableRowView::Initialization                                    |
//+------------------------------------------------------------------+
void CTableRowView::Init(void)
  {
//--- Initialize the parent object
   CPanel::Init();
//--- background - opaque
   this.SetAlphaBG(255);
//--- Border width
   this.SetBorderWidth(1);
  }
对象默认颜色的初始化方法:
//+------------------------------------------------------------------+
//| CTableRowView::Initialize the object default colors              |
//+------------------------------------------------------------------+
void CTableRowView::InitColors(void)
  {
//--- Initialize the background colors for the normal and activated states and make it the current background color
   this.InitBackColors(clrWhiteSmoke,clrWhiteSmoke,clrWhiteSmoke,clrWhiteSmoke);
   this.InitBackColorsAct(clrWhiteSmoke,clrWhiteSmoke,clrWhiteSmoke,clrWhiteSmoke);
   this.BackColorToDefault();

//--- Initialize the foreground colors for the normal and activated states and make it the current text color
   this.InitForeColors(clrBlack,clrBlack,clrBlack,clrSilver);
   this.InitForeColorsAct(clrBlack,clrBlack,clrBlack,clrSilver);
   this.ForeColorToDefault();

//--- Initialize the border colors for the normal and activated states and make it the current border color
   this.InitBorderColors(C'200,200,200',C'200,200,200',C'200,200,200',clrSilver);
   this.InitBorderColorsAct(C'200,200,200',C'200,200,200',C'200,200,200',clrSilver);
   this.BorderColorToDefault();

//--- Initialize the border color and foreground color for the disabled element
   this.InitBorderColorBlocked(clrSilver);
   this.InitForeColorBlocked(clrSilver);
  }
创建新的单元格视图对象并将其添加到列表的方法:
//+------------------------------------------------------------------+
//| CTableRowView::Create and add a new                              |
//| cell representation object to the list                           |
//+------------------------------------------------------------------+
CTableCellView *CTableRowView::InsertNewCellView(const int index,const string text,const int dx,const int dy,const int w,const int h)
  {
//--- Check whether the list contains an object with the specified ID and, if it does, report this and return NULL
   this.m_temp_cell.SetIndex(index);
//--- Set the sorting flag for the list by ID
   this.m_list_cells.Sort(ELEMENT_SORT_BY_ID);
   if(this.m_list_cells.Search(&this.m_temp_cell)!=NULL)
     {
      ::PrintFormat("%s: Error. The TableCellView object with index %d is already in the list",__FUNCTION__,index);
      return NULL;
     }
//--- Create a name and ID for the cell object
   string name="TableCellView"+(string)this.Index()+"x"+(string)index;
   int id=this.m_list_cells.Total();
//--- Create a new TableCellView object; in case of a failure, report it and return NULL
   CTableCellView *cell_view=new CTableCellView(id,name,""+text,dx,dy,w,h);
   if(cell_view==NULL)
     {
      ::PrintFormat("%s: Error. Failed to create CTableCellView object",__FUNCTION__);
      return NULL;
     }
//--- If failed to add the new object to the list, report this, remove the object and return NULL
   if(this.m_list_cells.Add(cell_view)==-1)
     {
      ::PrintFormat("%s: Error. Failed to add CTableCellView object to list",__FUNCTION__);
      delete cell_view;
      return NULL;
     }
//--- Assign the base element and return the pointer to the object
   cell_view.RowAssign(this.GetObject());
   return cell_view;
  }
每个单元格都会被分配到表格行对象中各自对应的区域;此外,使用 new 运算符创建的对象仍须存储在列表中,否则就需要自行跟踪这些对象,并在必要时将其删除。
将它们存放在一个列表中会更方便——这样终端子系统本身就会跟踪何时需要删除它们。 该方法会创建一个新的单元格视图对象,并将其添加到行单元格列表中。 创建对象后,会为其指定所属的表格行,该对象将在该行的画布上绘制单元格模型数据。
设置行模型的方法:
//+------------------------------------------------------------------+
//| CTableRowView::Set the row model                                 |
//+------------------------------------------------------------------+
bool CTableRowView::TableRowModelAssign(CTableRow *row_model)
  {
//--- If an empty object is passed, report this and return 'false'
   if(row_model==NULL)
     {
      ::PrintFormat("%s: Error. Empty object passed",__FUNCTION__);
      return false;
     }
//--- If the passed row model does not contain a single cell, report this and return 'false'
   int total=(int)row_model.CellsTotal();
   if(total==0)
     {
      ::PrintFormat("%s: Error. Row model does not contain any cells",__FUNCTION__);
      return false;
     }
//--- Save the pointer to the passed row model and calculate the cell width
   this.m_table_row_model=row_model;
   int cell_w=(int)::round((double)this.Width()/(double)total);

//--- In the loop by the number of cells in the row model
   for(int i=0;i<total;i++)
     {
      //--- get the model of the next cell,
      CTableCell *cell_model=this.m_table_row_model.GetCell(i);
      if(cell_model==NULL)
         return false;
      //--- calculate the coordinate and create a name for the cell area
      int x=cell_w*i;
      string name="CellBound"+(string)this.m_table_row_model.Index()+"x"+(string)i;
      //--- Create a new cell area
      CBound *cell_bound=this.InsertNewBound(name,x,0,cell_w,this.Height());
      if(cell_bound==NULL)
         return false;
      //--- Create a new cell visual representation object
      CTableCellView *cell_view=this.InsertNewCellView(i,cell_model.Value(),x,0,cell_w,this.Height());
      if(cell_view==NULL)
         return false;
      //--- Assign the corresponding visual representation object of the cell to the current cell area
      cell_bound.AssignObject(cell_view);
     }
//--- All is successful
   return true;
  }
向该方法传入指向行模型的指针,然后按模型中的单元格数量循环,创建用于放置单元格视图对象的新区域,以及单元格视图对象本身(CTableCellView类)。 每个新建的单元格都会被分配到相应的新区域中。 最终,我们会得到一个单元格区域列表,其中每个区域都关联着指向相应单元格的指针。
绘制行视图的方法:
//+------------------------------------------------------------------+
//| CTableRowView::Draw the appearance                               |
//+------------------------------------------------------------------+
void CTableRowView::Draw(const bool chart_redraw)
  {
//--- Fill the object with the background color, draw the row line and update the background canvas
   this.Fill(this.BackColor(),false);
   this.m_background.Line(this.AdjX(0),this.AdjY(this.Height()-1),this.AdjX(this.Width()-1),this.AdjY(this.Height()-1),::ColorToARGB(this.BorderColor(),this.AlphaBG()));

//--- Draw the row cells
   int total=this.m_list_bounds.Total();
   for(int i=0;i<total;i++)
     {
      //--- Get the area of the next cell
      CBound *cell_bound=this.GetBoundAt(i);
      if(cell_bound==NULL)
         continue;

      //--- Get the attached cell object from the cell area
      CTableCellView *cell_view=cell_bound.GetAssignedObj();
      //--- Draw a visual representation of the cell
      if(cell_view!=NULL)
         cell_view.Draw(false);
     }
//--- Update the background and foreground canvases with the specified chart redraw flag
   this.Update(chart_redraw);
  }
首先,将该行填充为背景色,并在下方画一条线。 然后,循环遍历该行的单元格区域,依次获取每个单元格区域,再从中获取指向单元格对象的指针,并调用该对象的绘制方法。
将已分配的表格行模型输出到日志的方法:
//+------------------------------------------------------------------+
//| CTableRowView::Print the assigned row model in the journal       |
//+------------------------------------------------------------------+
void CTableRowView::TableRowModelPrint(const bool detail, const bool as_table=false, const int cell_width=CELL_WIDTH_IN_CHARS)
  {
   if(this.m_table_row_model!=NULL)
      this.m_table_row_model.Print(detail,as_table,cell_width);
  }
借助该方法,可以查看表格模型中的哪个行模型被分配给了此行视图对象。
文件操作方法:
//+------------------------------------------------------------------+
//| CTableRowView::Save to file                                      |
//+------------------------------------------------------------------+
bool CTableRowView::Save(const int file_handle)
  {
//--- Save the parent object data
   if(!CPanel::Save(file_handle))
      return false;

//--- Save the list of cells
   if(!this.m_list_cells.Save(file_handle))
      return false;
//--- Save the row index
   if(::FileWriteInteger(file_handle,this.m_index,INT_VALUE)!=INT_VALUE)
      return false;

//--- All is successful
   return true;
  }
//+------------------------------------------------------------------+
//| CTableRowView::Load from file                                    |
//+------------------------------------------------------------------+
bool CTableRowView::Load(const int file_handle)
  {
//--- Load parent object data
   if(!CPanel::Load(file_handle))
      return false;

//--- Load the list of cells
   if(!this.m_list_cells.Load(file_handle))
      return false;
//--- Load the row index
   this.m_id=this.m_index=(uchar)::FileReadInteger(file_handle,INT_VALUE);

//--- All is successful
   return true;
  }
这些方法用于将表格行数据保存到文件中,以及从文件中加载这些数据。
每个表格都必须有表头。 它能帮助您了解表格各列中显示的是哪些数据。 表头是由列标题组成的列表。 表格的每一列都有自己的列标题,用于显示该列中数据的类型和名称。
表格列标题类(视图)
表格的列标题是一个独立的对象,它继承自“Button”对象(CButton),既继承了该对象的行为,又对其进行了补充。 在当前的实现中,不会为按钮添加额外属性——我们只是更改不同状态下的颜色。 在下一篇文章中,我们将为列标题添加排序方向指示——在按钮区域右侧显示向上/向下箭头,并添加事件模型,以便通过点击按钮启动排序。
继续在Controls.mqh文件中编写代码:
//+------------------------------------------------------------------+
//| Class for visual representation of table column header           |
//+------------------------------------------------------------------+
class CColumnCaptionView : public CButton
  {
protected:
   CColumnCaption   *m_column_caption_model;                         // Pointer to the column header model
   int               m_index;                                        // Index in the column list

public:
//--- Set the ID
   virtual void      SetID(const int id)                                { this.m_index=this.m_id=id;                 }
//--- (1) Set and (2) return the cell index
   void              SetIndex(const int index)                          { this.SetID(index);                         }
   int               Index(void)                                  const { return this.m_index;                       }

//--- (1) Assign and (2) return the column header model
   bool              ColumnCaptionModelAssign(CColumnCaption *caption_model);
   CColumnCaption   *ColumnCaptionModel(void)                           { return this.m_column_caption_model;        }

//--- Print the assigned column header model in the journal
   void              ColumnCaptionModelPrint(void);

//--- Draw the appearance
   virtual void      Draw(const bool chart_redraw);

//--- Virtual methods of (1) comparing, (2) saving to file, (3) loading from file, (4) object type
   virtual int       Compare(const CObject *node,const int mode=0)const { return CButton::Compare(node,mode);        }
   virtual bool      Save(const int file_handle);
   virtual bool      Load(const int file_handle);
   virtual int       Type(void)                                   const { return(ELEMENT_TYPE_TABLE_COLUMN_CAPTION); }

//--- Initialize (1) the class object and (2) default object colors
   void              Init(const string text);
   virtual void      InitColors(void);

//--- Return the object description
   virtual string    Description(void);

//--- Constructors/destructor
                     CColumnCaptionView(void);
                     CColumnCaptionView(const string object_name, const string text, const long chart_id, const int wnd, const int x, const int y, const int w, const int h);
                    ~CColumnCaptionView (void){}
  };
该类的索引与标识符相同,这与前面讨论的两个类的情况一样。 设置标识符的方法也与前面几个类中的相应方法类似。
在类构造函数中,会调用对象初始化方法,并将标识符初始值设为0(对象创建后该值会发生变化):
//+------------------------------------------------------------------+
//| CColumnCaptionView::Default constructor. Builds an object        |
//| in the main window of the current chart at coordinates 0,0       |
//| with default dimensions                                          |
//+------------------------------------------------------------------+
CColumnCaptionView::CColumnCaptionView(void) : CButton("ColumnCaption","Caption",::ChartID(),0,0,0,DEF_PANEL_W,DEF_TABLE_ROW_H), m_index(0)
  {
//--- Initialization
   this.Init("Caption");
   this.SetID(0);
   this.SetName("ColumnCaption");
  }
//+------------------------------------------------------------------+
//| CColumnCaptionView::Parametric constructor.                      |
//| Plot an object in the specified window of the specified plot with|
//| the specified text, coordinates and dimensions                   |
//+------------------------------------------------------------------+
CColumnCaptionView::CColumnCaptionView(const string object_name, const string text, const long chart_id, const int wnd, const int x, const int y, const int w, const int h) :
   CButton(object_name,text,chart_id,wnd,x,y,w,h), m_index(0)
  {
//--- Initialization
   this.Init(text);
   this.SetID(0);
  }
对象初始化方法:
//+------------------------------------------------------------------+
//| CColumnCaptionView::Initialization                               |
//+------------------------------------------------------------------+
void CColumnCaptionView::Init(const string text)
  {
//--- Default text offsets
   this.m_text_x=4;
   this.m_text_y=2;
//--- Set the colors of different states
   this.InitColors();
  }
对象默认颜色的初始化方法:
//+------------------------------------------------------------------+
//| CColumnCaptionView::Initialize the object default colors         |
//+------------------------------------------------------------------+
void CColumnCaptionView::InitColors(void)
  {
//--- Initialize the background colors for the normal and activated states and make it the current background color
   this.InitBackColors(clrWhiteSmoke,this.GetBackColorControl().NewColor(clrWhiteSmoke,-6,-6,-6),clrWhiteSmoke,clrWhiteSmoke);
   this.InitBackColorsAct(clrWhiteSmoke,clrWhiteSmoke,clrWhiteSmoke,clrWhiteSmoke);
   this.BackColorToDefault();

//--- Initialize the foreground colors for the normal and activated states and make it the current text color
   this.InitForeColors(clrBlack,clrBlack,clrBlack,clrSilver);
   this.InitForeColorsAct(clrBlack,clrBlack,clrBlack,clrSilver);
   this.ForeColorToDefault();

//--- Initialize the border colors for the normal and activated states and make it the current border color
   this.InitBorderColors(clrLightGray,clrLightGray,clrLightGray,clrLightGray);
   this.InitBorderColorsAct(clrLightGray,clrLightGray,clrLightGray,clrLightGray);
   this.BorderColorToDefault();

//--- Initialize the border color and foreground color for the disabled element
   this.InitBorderColorBlocked(clrNULL);
   this.InitForeColorBlocked(clrSilver);
  }
绘制列标题视图的方法:
//+------------------------------------------------------------------+
//| CColumnCaptionView::Draw the appearance                          |
//+------------------------------------------------------------------+
void CColumnCaptionView::Draw(const bool chart_redraw)
  {
//--- Fill the button with the background color, draw the light vertical line on the left and the dark one on the right
   this.Fill(this.BackColor(),false);
   color clr_dark =this.BorderColor();                                                       // "Dark color"
   color clr_light=this.GetBackColorControl().NewColor(this.BorderColor(), 100, 100, 100);   // "Light color"
   this.m_background.Line(this.AdjX(0),this.AdjY(0),this.AdjX(0),this.AdjY(this.Height()-1),::ColorToARGB(clr_light,this.AlphaBG()));                          // Line on the left
   this.m_background.Line(this.AdjX(this.Width()-1),this.AdjY(0),this.AdjX(this.Width()-1),this.AdjY(this.Height()-1),::ColorToARGB(clr_dark,this.AlphaBG())); // Line on the right
//--- Update the background canvas
   this.m_background.Update(false);

//--- Display the header text
   CLabel::Draw(false);

//--- If specified, update the chart
   if(chart_redraw)
      ::ChartRedraw(this.m_chart_id);
  }
首先,用设定的颜色填充背景,然后画两条垂直线——左边画一条浅色的,右边画一条深色的。 接下来,标题文本会显示在前景画布上。
返回对象描述的方法:
//+------------------------------------------------------------------+
//| CColumnCaptionView::Return the object description                |
//+------------------------------------------------------------------+
string CColumnCaptionView::Description(void)
  {
   string nm=this.Name();
   string name=(nm!="" ? ::StringFormat(" \"%s\"",nm) : nm);
   return ::StringFormat("%s%s ID %d, X %d, Y %d, W %d, H %d",ElementDescription((ENUM_ELEMENT_TYPE)this.Type()),name,this.ID(),this.X(),this.Y(),this.Width(),this.Height());
  }
该方法返回元素类型的描述,其中包含对象的标识符、坐标和尺寸。
设置列标题模型的方法:
//+------------------------------------------------------------------+
//| CColumnCaptionView::Assign the column caption model              |
//+------------------------------------------------------------------+
bool CColumnCaptionView::ColumnCaptionModelAssign(CColumnCaption *caption_model)
  {
//--- If an invalid column header model object is passed, report this and return 'false'
   if(caption_model==NULL)
     {
      ::PrintFormat("%s: Error. Empty object passed",__FUNCTION__);
      return false;
     }
//--- Save the column header model
   this.m_column_caption_model=caption_model;
//--- Set the dimensions of the drawing area of the column header visual representation
   this.m_painter.SetBound(0,0,this.Width(),this.Height());
//--- All is successful
   return true;
  }
将指向列标题模型的指针传递给该方法,并将该指针保存到一个变量中。 接下来,为绘图对象设置绘图区域的坐标和尺寸。
将已设置的列标题模型输出到日志的方法:
//+------------------------------------------------------------------+
//| CColumnCaptionView::Print in the journal                         |
//| the assigned column header model                                 |
//+------------------------------------------------------------------+
void CColumnCaptionView::ColumnCaptionModelPrint(void)
  {
   if(this.m_column_caption_model!=NULL)
      this.m_column_caption_model.Print();
  }
此方法将分配给列标题视图对象的列标题模型的描述输出到日志中,以便检查。
文件操作方法:
//+------------------------------------------------------------------+
//| CColumnCaptionView::Save to file                                 |
//+------------------------------------------------------------------+
bool CColumnCaptionView::Save(const int file_handle)
  {
//--- Save the parent object data
   if(!CButton::Save(file_handle))
      return false;

//--- Save the header index
   if(::FileWriteInteger(file_handle,this.m_index,INT_VALUE)!=INT_VALUE)
      return false;

//--- All is successful
   return true;
  }
//+------------------------------------------------------------------+
//| CColumnCaptionView::Load from file                               |
//+------------------------------------------------------------------+
bool CColumnCaptionView::Load(const int file_handle)
  {
//--- Load parent object data
   if(!CButton::Load(file_handle))
      return false;

//--- Load the header index
   this.m_id=this.m_index=::FileReadInteger(file_handle,INT_VALUE);

//--- All is successful
   return true;
  }
它们提供将列标题参数保存到文件以及从文件加载这些参数的功能。
表头类(视图)
表头是基于Panel控件(CPanel)的普通列标题对象列表。 因此,该对象提供了用于管理表格列的工具。
在此实现中,它将是一个普通的静态对象。 所有用户交互功能将在稍后添加。
继续在同一个文件中编写代码:
//+------------------------------------------------------------------+
//| Class for visual representation of table header                  |
//+------------------------------------------------------------------+
class CTableHeaderView : public CPanel
  {
protected:
   CColumnCaptionView m_temp_caption;                                // Temporary column header object for searching
   CTableHeader     *m_table_header_model;                           // Pointer to the table header model

//--- Create and add a new column header representation object to the list
   CColumnCaptionView *InsertNewColumnCaptionView(const string text, const int x, const int y, const int w, const int h);

public:
//--- (1) Set and (2) return the table header model
   bool              TableHeaderModelAssign(CTableHeader *header_model);
   CTableHeader     *GetTableHeaderModel(void)                          { return this.m_table_header_model;    }

//--- Print the assigned table header model in the journal
   void              TableHeaderModelPrint(const bool detail, const bool as_table=false, const int cell_width=CELL_WIDTH_IN_CHARS);

//--- Draw the appearance
   virtual void      Draw(const bool chart_redraw);

//--- Virtual methods of (1) comparing, (2) saving to file, (3) loading from file, (4) object type
   virtual int       Compare(const CObject *node,const int mode=0)const { return CPanel::Compare(node,mode);   }
   virtual bool      Save(const int file_handle)                        { return CPanel::Save(file_handle);    }
   virtual bool      Load(const int file_handle)                        { return CPanel::Load(file_handle);    }
   virtual int       Type(void)                                   const { return(ELEMENT_TYPE_TABLE_HEADER);   }

//--- Initialize (1) the class object and (2) default object colors
   void              Init(void);
   virtual void      InitColors(void);

//--- Constructors/destructor
                     CTableHeaderView(void);
                     CTableHeaderView(const string object_name, const string text, const long chart_id, const int wnd, const int x, const int y, const int w, const int h);
                    ~CTableHeaderView (void){}
  };
为该对象设置表头模型,并根据模型的内容创建列标题对象,然后将这些对象添加到关联元素列表中。
在类构造函数中,会调用对象初始化方法:
//+------------------------------------------------------------------+
//| CTableHeaderView::Default constructor. Builds an object in       |
//| in the main window of the current chart at coordinates 0,0       |
//| with default dimensions                                          |
//+------------------------------------------------------------------+
CTableHeaderView::CTableHeaderView(void) : CPanel("TableHeader","",::ChartID(),0,0,0,DEF_PANEL_W,DEF_TABLE_ROW_H)
  {
//--- Initialization
   this.Init();
  }
//+----------------------------------------------------------------------------------+
//| CTableHeaderView::Parametric constructor. Builds an object in                    |
//| in the specified window of the specified chart with the specified text,          |
//| coordinates and dimensions                                                       |
//+----------------------------------------------------------------------------------+
CTableHeaderView::CTableHeaderView(const string object_name,const string text,const long chart_id,const int wnd,const int x,const int y,const int w,const int h) :
   CPanel(object_name,text,chart_id,wnd,x,y,w,h)
  {
//--- Initialization
   this.Init();
  }
对象初始化方法:
//+------------------------------------------------------------------+
//| CTableHeaderView::Initialization                                 |
//+------------------------------------------------------------------+
void CTableHeaderView::Init(void)
  {
//--- Initialize the parent object
   CPanel::Init();
//--- Background color - opaque
   this.SetAlphaBG(255);
//--- Border width
   this.SetBorderWidth(1);
  }
对象默认颜色的初始化方法:
//+------------------------------------------------------------------+
//| CTableHeaderView::Initialize the object default colors           |
//+------------------------------------------------------------------+
void CTableHeaderView::InitColors(void)
  {
//--- Initialize the background colors for the normal and activated states and make it the current background color
   this.InitBackColors(clrWhiteSmoke,clrWhiteSmoke,clrWhiteSmoke,clrWhiteSmoke);
   this.InitBackColorsAct(clrWhiteSmoke,clrWhiteSmoke,clrWhiteSmoke,clrWhiteSmoke);
   this.BackColorToDefault();

//--- Initialize the foreground colors for the normal and activated states and make it the current text color
   this.InitForeColors(clrBlack,clrBlack,clrBlack,clrSilver);
   this.InitForeColorsAct(clrBlack,clrBlack,clrBlack,clrSilver);
   this.ForeColorToDefault();

//--- Initialize the border colors for the normal and activated states and make it the current border color
   this.InitBorderColors(C'200,200,200',C'200,200,200',C'200,200,200',clrSilver);
   this.InitBorderColorsAct(C'200,200,200',C'200,200,200',C'200,200,200',clrSilver);
   this.BorderColorToDefault();

//--- Initialize the border color and foreground color for the disabled element
   this.InitBorderColorBlocked(clrSilver);
   this.InitForeColorBlocked(clrSilver);
  }
创建新的列标题视图对象并将其添加到列表的方法:
//+------------------------------------------------------------------+
//| CTableHeaderView::Create and add to the list                     |
//| new column header representation object                          |
//+------------------------------------------------------------------+
CColumnCaptionView *CTableHeaderView::InsertNewColumnCaptionView(const string text,const int x,const int y,const int w,const int h)
  {
//--- Create an object name and return the result of creating a new column header
   string user_name="ColumnCaptionView"+(string)this.m_list_elm.Total();
   CColumnCaptionView *caption_view=this.InsertNewElement(ELEMENT_TYPE_TABLE_COLUMN_CAPTION,text,user_name,x,y,w,h);
   return(caption_view!=NULL ? caption_view : NULL);
  }
列标题对象是通过库对象的标准 InsertNewElement() 方法创建的,该方法会将创建的对象放入对象的UI元素列表中。
设置表头模型的方法:
//+------------------------------------------------------------------+
//| CTableHeaderView::Set the header model                           |
//+------------------------------------------------------------------+
bool CTableHeaderView::TableHeaderModelAssign(CTableHeader *header_model)
  {
//--- If an empty object is passed, report this and return 'false'
   if(header_model==NULL)
     {
      ::PrintFormat("%s: Error. Empty object passed",__FUNCTION__);
      return false;
     }
//--- If the passed header model does not contain any column headers, report this and return 'false'
   int total=(int)header_model.ColumnsTotal();
   if(total==0)
     {
      ::PrintFormat("%s: Error. Header model does not contain any columns",__FUNCTION__);
      return false;
     }
//--- Store the pointer to the passed table header model and calculate the width of each column header
   this.m_table_header_model=header_model;
   int caption_w=(int)::round((double)this.Width()/(double)total);

//--- In the loop by the number of column headers in the table header model
   for(int i=0;i<total;i++)
     {
      //--- get the model of the next column header,
      CColumnCaption *caption_model=this.m_table_header_model.GetColumnCaption(i);
      if(caption_model==NULL)
         return false;
      //--- calculate the coordinate and create a name for the column header area
      int x=caption_w*i;
      string name="CaptionBound"+(string)i;
      //--- Create a new column header area
      CBound *caption_bound=this.InsertNewBound(name,x,0,caption_w,this.Height());
      if(caption_bound==NULL)
         return false;
      //--- Create a new column header visual representation object
      CColumnCaptionView *caption_view=this.InsertNewColumnCaptionView(caption_model.Value(),x,0,caption_w,this.Height());
      if(caption_view==NULL)
         return false;
      //--- Assign the corresponding visual representation object of the column header to the current column header area
      caption_bound.AssignObject(caption_view);
     }
//--- All is successful
   return true;
  }
将表头模型传递给该方法。 根据模型中的列标题数量进行循环,每次创建一个用于放置列标题的区域。 创建一个列标题对象,并将其分配给当前区域。 循环结束时,我们将得到一个区域列表,其中每个区域都已分配了列标题。
绘制表头视图的方法:
//+------------------------------------------------------------------+
//| CTableHeaderView::Draw the appearance                            |
//+------------------------------------------------------------------+
void CTableHeaderView::Draw(const bool chart_redraw)
  {
//--- Fill the object with the background color, draw the row line and update the background canvas
   this.Fill(this.BackColor(),false);
   this.m_background.Line(this.AdjX(0),this.AdjY(this.Height()-1),this.AdjX(this.Width()-1),this.AdjY(this.Height()-1),::ColorToARGB(this.BorderColor(),this.AlphaBG()));
   this.m_background.Update(false);

//--- Draw column headers
   int total=this.m_list_bounds.Total();
   for(int i=0;i<total;i++)
     {
      //--- Get the area of the next column header
      CBound *cell_bound=this.GetBoundAt(i);
      if(cell_bound==NULL)
         continue;

      //--- Get the attached column header object from the column header area
      CColumnCaptionView *caption_view=cell_bound.GetAssignedObj();
      //--- Draw a visual representation of the column header
      if(caption_view!=NULL)
         caption_view.Draw(false);
     }
//--- If specified, update the chart
   if(chart_redraw)
      ::ChartRedraw(this.m_chart_id);
  }
首先,用背景色填充整个表头区域,然后在底部绘制一条分隔线。 接下来,在循环中遍历表头区域列表,依次获取各个区域。 然后,从该区域获取分配给它的列标题对象。 调用该对象的绘制方法。
将分配给该对象的表头模型输出到日志的方法:
//+------------------------------------------------------------------+
//| CTableHeaderView::Print in the journal                           |
//| the assigned table header model                                  |
//+------------------------------------------------------------------+
void CTableHeaderView::TableHeaderModelPrint(const bool detail,const bool as_table=false,const int cell_width=CELL_WIDTH_IN_CHARS)
  {
   if(this.m_table_header_model!=NULL)
      this.m_table_header_model.Print(detail,as_table,cell_width);
  }
可将分配给该对象的表头模型输出到日志中。
表格的可视化表示是一个复合对象,它从模型中获取表格数据和表头,并将这些数据绘制在各个控件上。 它是一个面板,其中包含表头和一个容纳表格数据(表格行)的容器。
表格类(视图)
继续在Controls.mqh文件中编写代码:
//+------------------------------------------------------------------+
//| Table visual representation class                                |
//+------------------------------------------------------------------+
class CTableView : public CPanel
  {
protected:
//--- Obtained table data
   CTable           *m_table_obj;                  // Pointer to table object (includes table and header models)
   CTableModel      *m_table_model;                // Pointer to the table model (obtained from CTable)
   CTableHeader     *m_header_model;               // Pointer to the table header model (obtained from CTable)

//--- View component data
   CTableHeaderView *m_header_view;                // Pointer to the table header (View)
   CPanel           *m_table_area;                 // Panel for placing table rows
   CContainer       *m_table_area_container;       // Container for placing a panel with table rows

//--- (1) Set and (2) return the table model
   bool              TableModelAssign(CTableModel *table_model);
   CTableModel      *GetTableModel(void)                                { return this.m_table_model;           }

//--- (1) Set and (2) return the table header model
   bool              HeaderModelAssign(CTableHeader *header_model);
   CTableHeader     *GetHeaderModel(void)                               { return this.m_header_model;          }

//--- Create a (1) header and (2) table object from the model
   bool              CreateHeader(void);
   bool              CreateTable(void);

public:
//--- (1) Set and (2) return the table object
   bool              TableObjectAssign(CTable *table_obj);
   CTable           *GetTableObj(void)                                  { return this.m_table_obj;             }

//--- Print the assigned (1) table, (2) table header and (3) table object model in the journal
   void              TableModelPrint(const bool detail);
   void              HeaderModelPrint(const bool detail, const bool as_table=false, const int cell_width=CELL_WIDTH_IN_CHARS);
   void              TablePrint(const int column_width=CELL_WIDTH_IN_CHARS);

//--- Draw the appearance
   virtual void      Draw(const bool chart_redraw);

//--- Virtual methods of (1) comparing, (2) saving to file, (3) loading from file, (4) object type
   virtual int       Compare(const CObject *node,const int mode=0)const { return CPanel::Compare(node,mode);   }
   virtual bool      Save(const int file_handle);
   virtual bool      Load(const int file_handle);
   virtual int       Type(void)                                   const { return(ELEMENT_TYPE_TABLE);          }

//--- Initialize (1) the class object and (2) default object colors
   void              Init(void);

//--- Constructors/destructor
                     CTableView(void);
                     CTableView(const string object_name, const string text, const long chart_id, const int wnd, const int x, const int y, const int w, const int h);
                    ~CTableView (void){}
  };
该类继承自面板对象类。 可以看到三个模型组件和三个视图组件。 该类具有指向表格模型、表头模型和表格的指针。 从表格中获取指向表格数据和表头的指针。 此外,还有三个指针,分别指向表头、表格行面板以及用于放置该面板的容器。
关键在于,表格行附加到面板对象上(可附加多个元素),而该面板又附加到容器上(只能附加一个元素);容器带有滚动条,可用于移动包含表格行的面板。 因此,从视觉上看,该元素由上方的表头和下方可滚动的表格组成,表格的行和列由单元格构成。
在类构造函数中调用对象初始化方法:
//+------------------------------------------------------------------+
//| CTableView::Default constructor.                                 |
//| Builds an element in the main window of the current chart        |
//| at 0,0 coordinates with default dimensions                       |
//+------------------------------------------------------------------+
CTableView::CTableView(void) : CPanel("TableView","",::ChartID(),0,0,0,DEF_PANEL_W,DEF_PANEL_H),
   m_table_model(NULL),m_header_model(NULL),m_table_obj(NULL),m_header_view(NULL),m_table_area(NULL),m_table_area_container(NULL)
  {
//--- Initialization
   this.Init();
  }
//+------------------------------------------------------------------+
//| CTableView::Parametric constructor.                              |
//| Builds an element in the specified window of the specified chart |
//| with the specified text, coordinates and dimensions              |
//+------------------------------------------------------------------+
CTableView::CTableView(const string object_name,const string text,const long chart_id,const int wnd,const int x,const int y,const int w,const int h) :
   CPanel(object_name,text,chart_id,wnd,x,y,w,h),m_table_model(NULL),m_header_model(NULL),m_table_obj(NULL),m_header_view(NULL),m_table_area(NULL),m_table_area_container(NULL)
  {
//--- Initialization
   this.Init();
  }
在初始化方法中,在对象面板上创建所有必要的控件:
//+------------------------------------------------------------------+
//| CTableView::Initialization                                       |
//+------------------------------------------------------------------+
void CTableView::Init(void)
  {
//--- Initialize the parent object
   CPanel::Init();
//--- Border width
   this.SetBorderWidth(1);
//--- Create the table header
   this.m_header_view=this.InsertNewElement(ELEMENT_TYPE_TABLE_HEADER,"","TableHeader",0,0,this.Width(),DEF_TABLE_HEADER_H);
   if(this.m_header_view==NULL)
      return;
   this.m_header_view.SetBorderWidth(1);

//--- Create a container that will contain the table row panel
   this.m_table_area_container=this.InsertNewElement(ELEMENT_TYPE_CONTAINER,"","TableAreaContainer",0,DEF_TABLE_HEADER_H,this.Width(),this.Height()-DEF_TABLE_HEADER_H);
   if(this.m_table_area_container==NULL)
      return;
   this.m_table_area_container.SetBorderWidth(0);
   this.m_table_area_container.SetScrollable(true);

//--- Attach a panel to the container to store table rows
   int shift_y=0;
   this.m_table_area=this.m_table_area_container.InsertNewElement(ELEMENT_TYPE_PANEL,"","TableAreaPanel",0,shift_y,this.m_table_area_container.Width(),this.m_table_area_container.Height()-shift_y);
   if(m_table_area==NULL)
      return;
   this.m_table_area.SetBorderWidth(0);
  }
设置表格模型的方法:
//+------------------------------------------------------------------+
//| CTableView::Set the table model                                  |
//+------------------------------------------------------------------+
bool CTableView::TableModelAssign(CTableModel *table_model)
  {
   if(table_model==NULL)
     {
      ::PrintFormat("%s: Error. Empty object passed",__FUNCTION__);
      return false;
     }
   this.m_table_model=table_model;
   return true;
  }
我们只需将指向表格模型对象的指针传递给该方法,并将其保存到一个变量中,之后便可通过该变量访问该对象。
设置表头模型的方法:
//+------------------------------------------------------------------+
//| CTableView::Set the table header model                           |
//+------------------------------------------------------------------+
bool CTableView::HeaderModelAssign(CTableHeader *header_model)
  {
   if(header_model==NULL)
     {
      ::PrintFormat("%s: Error. Empty object passed",__FUNCTION__);
      return false;
     }
   this.m_header_model=header_model;
   return true;
  }
将指向表头模型对象的指针传递给该方法,并将其保存到一个变量中,以便通过该变量访问该对象。
设置表格对象的方法:
//+------------------------------------------------------------------+
//| CTableView::Set the table object                                 |
//+------------------------------------------------------------------+
bool CTableView::TableObjectAssign(CTable *table_obj)
  {
//--- If an empty table object is passed, report this and return 'false'
   if(table_obj==NULL)
     {
      ::PrintFormat("%s: Error. Empty object passed",__FUNCTION__);
      return false;
     }
//--- Save the pointer to a variable
   this.m_table_obj=table_obj;
//--- Set the result of assigning the table model and the header model
   bool res=this.TableModelAssign(this.m_table_obj.GetTableModel());
   res &=this.HeaderModelAssign(this.m_table_obj.GetTableHeader());

//--- If failed to assign any model, return 'false'
   if(!res)
      return false;

//--- Set the result of creating the table header from the model and the table from the model
   res=this.CreateHeader();
   res&=this.CreateTable();

//--- Return the result
   return res;
  }
将指向表格对象的指针传递给该方法。 从该对象中获取表头模型和表格模型,并赋给相应的变量。 接下来,利用表头模型和表格模型中的数据,创建用于可视化呈现表头和表格的对象。
根据模型创建表格对象的方法:
//+------------------------------------------------------------------+
//| CTableView::Create a table object from the model                 |
//+------------------------------------------------------------------+
bool CTableView::CreateTable(void)
  {
   if(this.m_table_area==NULL)
      return false;

//--- In a loop, create and attach RowsTotal rows from the TableRowView elements to the Panel (m_table_area) element
   int total=(int)this.m_table_model.RowsTotal();
   int y=1;                   // Vertical offset
   int table_height=0;        // Calculated panel height
   CTableRowView *row=NULL;
   for(int i=0;i<total;i++)
     {
      //--- Create and attach a table row object to the panel
      row=this.m_table_area.InsertNewElement(ELEMENT_TYPE_TABLE_ROW,"","TableRow"+(string)i,0,y+(row!=NULL ? row.Height()*i : 0),this.m_table_area.Width()-1,DEF_TABLE_ROW_H);
      if(row==NULL)
         return false;

      //--- Set the row ID
      row.SetID(i);
      //--- Set the row background color depending on its index (even/odd)
      if(row.ID()%2==0)
         row.InitBackColorDefault(clrWhite);
      else
         row.InitBackColorDefault(clrWhiteSmoke);
      row.BackColorToDefault();
      row.InitBackColorFocused(row.GetBackColorControl().NewColor(row.BackColor(),-4,-4,-4));

      //--- Get the row model from the table object
      CTableRow *row_model=this.m_table_model.GetRow(i);
      if(row_model==NULL)
         return false;
      //--- Assign the obtained row model to the created table row object
      row.TableRowModelAssign(row_model);
      //--- Calculate the new panel height value
      table_height+=row.Height();
     }
//--- Return the result of changing the panel size to the value calculated in the loop
   return this.m_table_area.ResizeH(table_height+y);
  }
该方法的逻辑已在代码注释中进行了说明。 按表格模型中的行数进行循环,每次创建一个新的表格行对象并将其附加到面板上,同时计算面板最终所需的高度。 完成循环并生成所有必要的行后,会根据循环中计算出的尺寸调整面板的高度。
绘制表格视图的方法:
//+------------------------------------------------------------------+
//| CTableView::Draw the appearance                                  |
//+------------------------------------------------------------------+
void CTableView::Draw(const bool chart_redraw)
  {
//--- Draw the table header and rows
   this.m_header_view.Draw(false);
   this.m_table_area_container.Draw(false);
//--- If specified, update the chart
   if(chart_redraw)
      ::ChartRedraw(this.m_chart_id);
  }
首先绘制表头,然后在其下方绘制容器中的表格行。
将已指定的表格模型输出到日志的方法:
//+------------------------------------------------------------------+
//| CTableView::Print the assigned table model in the journal        |
//+------------------------------------------------------------------+
void CTableView::TableModelPrint(const bool detail)
  {
   if(this.m_table_model!=NULL)
      this.m_table_model.Print(detail);
  }
该方法可将已指定的表格模型输出到日志中。
将分配给该对象的表头模型输出到日志的方法:
//+------------------------------------------------------------------+
//| CTableView::Print the assigned header model in the journal       |
//+------------------------------------------------------------------+
void CTableView::HeaderModelPrint(const bool detail,const bool as_table=false,const int column_width=CELL_WIDTH_IN_CHARS)
  {
   if(this.m_header_model!=NULL)
      this.m_header_model.Print(detail,as_table,column_width);
  }
该方法可将已指定的表头模型输出到日志中。
将已指定的表格对象输出到日志的方法:
//+------------------------------------------------------------------+
//| CTableView::Print the assigned table object in the journal       |
//+------------------------------------------------------------------+
void CTableView::TablePrint(const int column_width=CELL_WIDTH_IN_CHARS)
  {
   if(this.m_table_obj!=NULL)
      this.m_table_obj.Print(column_width);
  }
该方法会将指定给该对象的整个表格输出到日志中,包括表头和数据。
至此,我们已经实现了创建表格模型可视化表示所需的所有类。 下面我们来看看现在如何根据一个数据数组创建一个简单的表格。
测试结果
在终端的\MQL5\Indicators\Tables\目录下创建一个不带缓冲区且显示在图表子窗口中的新指标。
//+------------------------------------------------------------------+
//|                                                   iTestTable.mq5 |
//|                                  Copyright 2025, MetaQuotes Ltd. |
//|                                             https://www.mql5.com |
//+------------------------------------------------------------------+
#property copyright "Copyright 2025, MetaQuotes Ltd."
#property link      "https://www.mql5.com"
#property version   "1.00"
#property indicator_separate_window
#property indicator_buffers 0
#property indicator_plots   0
在指标文件中引入库,并在全局范围内声明对象指针:
//+------------------------------------------------------------------+
//|                                                   iTestTable.mq5 |
//|                                  Copyright 2025, MetaQuotes Ltd. |
//|                                             https://www.mql5.com |
//+------------------------------------------------------------------+
#property copyright "Copyright 2025, MetaQuotes Ltd."
#property link      "https://www.mql5.com"
#property version   "1.00"
#property indicator_separate_window
#property indicator_buffers 0
#property indicator_plots   0

//+------------------------------------------------------------------+
//| Include libraries                                                |
//+------------------------------------------------------------------+
#include "Controls\Controls.mqh"    // Controls library

CPanel     *panel=NULL; // Pointer to the Panel graphical element
CTable     *table;      // Pointer to table object (Model)
接下来,在指标的OnInit()处理器中编写以下代码:
//+------------------------------------------------------------------+
//| Custom indicator initialization function                         |
//+------------------------------------------------------------------+
int OnInit()
  {
//--- Search for the chart subwindow
   int wnd=ChartWindowFind();

//--- Create the Panel graphical element
   panel=new CPanel("Panel","",0,wnd,100,40,400,192);
   if(panel==NULL)
      return INIT_FAILED;
//--- Set the panel parameters
   panel.SetID(1);                     // ID
   panel.SetAsMain();                  // The chart should have one main element
   panel.SetBorderWidth(1);            // Border width (one pixel margin on each side of the container)
   panel.SetResizable(false);          // Ability to resize by dragging edges and corners
   panel.SetName("Main container");    // Name

//--- Create table data
//--- Declare and fill the array of column headers with the dimension of 4
   string captions[4]={"Column 0","Column 1","Column 2","Column 3"};

//--- Declare and fill the 10x4 data array
//--- Acceptable array types: double, long, datetime, color, string
   long array[10][4]={{ 1,  2,  3,  4},
                      { 5,  6,  7,  8},
                      { 9, 10, 11, 12},
                      {13, 14, 15, 16},
                      {17, 18, 19, 20},
                      {21, 22, 23, 24},
                      {25, 26, 27, 28},
                      {29, 30, 31, 32},
                      {33, 34, 35, 36},
                      {37, 38, 39, 40}};
//--- Create a table object from the above created 10x4 long array and a string array of column headers (Model component)
   table=new CTable(array,captions);
   if(table==NULL)
      return INIT_FAILED;
   PrintFormat("The [%s] has been successfully created:",table.Description());

//--- Create a new element on the panel - a table (View component)
   CTableView *table_view=panel.InsertNewElement(ELEMENT_TYPE_TABLE,"","TableView",4,4,panel.Width()-8,panel.Height()-8);
//--- Assign the table object (Model) to the Table graphical element (View)
   table_view.TableObjectAssign(table);
//--- Print the table model in the journal
   table_view.TablePrint();

//--- Draw a table with a panel
   panel.Draw(true);

//--- Successful
   return(INIT_SUCCEEDED);
  }
这里有三个代码块:
- 创建一个用于构建表格的面板;
- 用两个数组创建表格数据——一个是数据数组,另一个是列标题数组(模型组件);
- 在面板中创建表格(视图组件)。
事实上,创建表格需要两个步骤——构建数据(第2项)和构建表格(第3项)。 面板仅用于装饰,并作为图形元素的承载基础。
添加剩余的指标代码:
//+------------------------------------------------------------------+
//| Custom deindicator initialization function                       |
//+------------------------------------------------------------------+
void OnDeinit(const int reason)
  {
//--- Remove the Panel element and destroy the table and library's shared resource manager
   delete panel;
   delete table;
   CCommonManager::DestroyInstance();
  }
//+------------------------------------------------------------------+
//| Custom indicator iteration function                              |
//+------------------------------------------------------------------+
int OnCalculate(const int rates_total,
                const int prev_calculated,
                const datetime &time[],
                const double &open[],
                const double &high[],
                const double &low[],
                const double &close[],
                const long &tick_volume[],
                const long &volume[],
                const int &spread[])
  {
//---

//--- return value of prev_calculated for the next call
   return(rates_total);
  }
//+------------------------------------------------------------------+
//| ChartEvent function                                              |
//+------------------------------------------------------------------+
void OnChartEvent(const int id,
                  const long &lparam,
                  const double &dparam,
                  const string &sparam)
  {
//--- Call the OnChartEvent handler of the Panel element
   panel.OnChartEvent(id,lparam,dparam,sparam);
  }
//+------------------------------------------------------------------+
//| Timer                                                            |
//+------------------------------------------------------------------+
void OnTimer(void)
  {
//--- Call the OnTimer handler of the Panel element
   panel.OnTimer();
  }
编译该指标并在图表上运行:
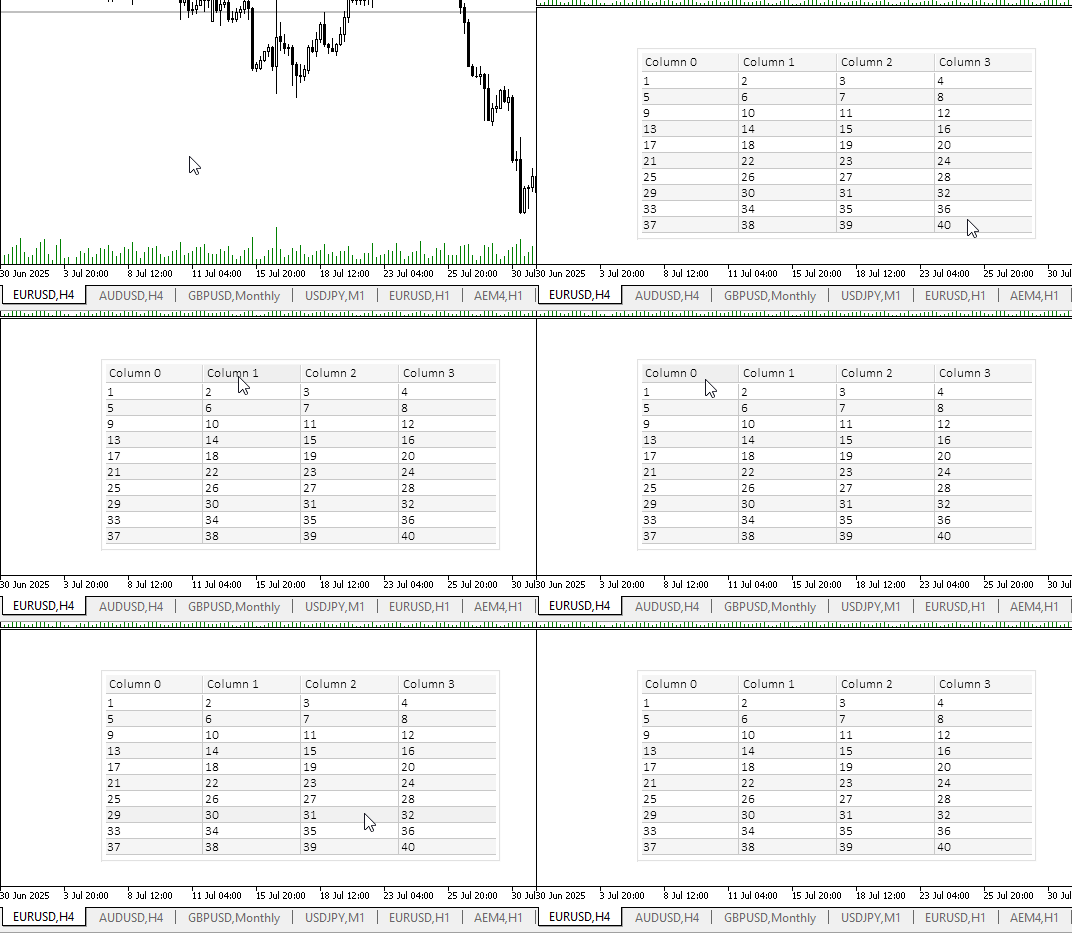
终端日志将输出一条表格创建成功的消息、表格描述以及带有表头的表格:
The [Table: Rows total: 10, Columns total: 4] has been successfully created:
Table: Rows total: 10, Columns total: 4:
|                n/n |           Column 0 |           Column 1 |           Column 2 |           Column 3 |
| 0                  |                  1 |                  2 |                  3 |                  4 |
| 1                  |                  5 |                  6 |                  7 |                  8 |
| 2                  |                  9 |                 10 |                 11 |                 12 |
| 3                  |                 13 |                 14 |                 15 |                 16 |
| 4                  |                 17 |                 18 |                 19 |                 20 |
| 5                  |                 21 |                 22 |                 23 |                 24 |
| 6                  |                 25 |                 26 |                 27 |                 28 |
| 7                  |                 29 |                 30 |                 31 |                 32 |
| 8                  |                 33 |                 34 |                 35 |                 36 |
| 9                  |                 37 |                 38 |                 39 |                 40 |
在图表中,我们可以看到列标题和表格行处于活动状态,并且会对鼠标悬停产生响应。 关于表格与用户交互的处理,将在下一篇文章中进行讨论。
结论
我们已经学会了如何创建简单的表格,并将其显示在图表上。 但到目前为止,这还只是一个静态表格,仅显示一次性接收到的数据。 下一篇文章将重点介绍表格动画——即更改和显示动态数据,并与用户交互以自定义表格中行和列的显示方式。 此外,在下一篇文章中,我们还将实现更简单的表格创建方式。
本文中使用的程序:
| # | 名称 | 类型 | 描述 |
|---|---|---|---|
| 1 | Tables.mqh | 类库 | 用于创建表格模型的类 |
| 2 | Base.mqh | 类库 | 用于创建控件基对象的类 |
| 3 | Controls.mqh | 类库 | 控件类 |
| 4 | iTestTable.mq5 | 测试指标 | 用于测试 TableView 控件操作的指标 |
| 5 | MQL5.zip | 压缩包 | 包含上述文件的压缩包,可解压到客户端终端的 MQL5 目录中 |
所有创建的文件均已作为附件随文提供,供自学参考。 可以将压缩包解压到终端文件夹中,所有文件都将位于目标文件夹:\MQL5\Indicators\Tables\。
本文由MetaQuotes Ltd译自俄文
原文地址: https://www.mql5.com/ru/articles/19288
注意: MetaQuotes Ltd.将保留所有关于这些材料的权利。全部或部分复制或者转载这些材料将被禁止。
本文由网站的一位用户撰写,反映了他们的个人观点。MetaQuotes Ltd 不对所提供信息的准确性负责,也不对因使用所述解决方案、策略或建议而产生的任何后果负责。



对MVC的解析非常精彩,但这种复杂性究竟如何改善交易——这才是我们真正关注的重点?
难道其他所有交易难题都已解决,只剩下用户界面这一道坎了吗?
有时我们会忘记一个工具的真正用途——或者当它无法按我们期望的方式工作时感到沮丧——最终试图让它去做那些它本不该做、也永远无法做到的事情
对MVC的描述非常精彩,但这种复杂性究竟如何能改善交易——这不正是我们聚在这里的目的吗?
难道交易中的其他所有问题都已解决,只剩下用户界面这一环了吗?
有时我们会忘记工具的真正用途,或者当它无法按我们期望的方式运行时感到沮丧,最终试图强迫它去做那些它从未被设计来做、也永远不会去做的事情。