TradeMux as a Quant Backbone: Connecting Institutional Python Pipelines to Different Terminals and Brokers
 128
 0

Introduction
A professional quant developer writes code in MQL5 and Python — and each language serves a specific purpose. Python is a research environment: data, models, backtests, factor pipelines, and risk calculations. MQL5 and MetaTrader 5 provide the execution environment: broker connectivity, a trading server, and native order-processing speed. There is one goal: to connect them cleanly and reliably, without duplicating the logic on both sides.
TradeMux is an infrastructure bridge between the Python pipeline and the MetaTrader 5 terminal. It does not replace either the Python research ecosystem or the MetaTrader 5 MQL5 execution engine — it bridges the operational gap between them. Python generates a signal, TradeMux sends it to the terminal, and MetaTrader 5 executes the order with the broker. In addition, TradeMux handles cross-broker normalization: the same Python code using MTClient works across MetaTrader brokers — RoboForex, IC Markets, and Alpari — without a single change to the logic. For OANDA, TradeMux provides a separate OandaClient class (with its own OANDA token): the call patterns are the same; only the client class changes.
After reading this article, you will have a fully-fledged Python execution service at your disposal. It includes:
- connection to MetaTrader 5 via the TradeMux Python SDK using an account API key;
- reading account state and open positions via a normalized interface;
- signal generation from a Python pipeline with an integrated CatBoost model using L1 features;
- execution of market orders with pre-trade risk control in Python;
- monitoring open positions and closing them in an emergency via kill_switch();
- multi-account broadcast of a single signal to multiple MetaTrader 5 terminals (each account has its own API key);
- a supervisor pattern with automatic restart after failures.
Two Environments — Two Purposes
Python and MetaTrader 5 serve different purposes, and this distinction is no accident — it reflects the actual structure of quant development.
Python is an environment for research and computation. pandas and numpy provide vectorized time series processing: loading 45,000 H1 bars across 29 instruments, causal L1 filtering via ADMM without look-ahead, and feature space construction. All of this can be implemented in a single pipeline. scikit-learn, CatBoost, LightGBM, and PyTorch are complemented by Optuna (Bayesian optimization) and SHAP (interpretability). The ecosystem of ML tools is constantly being updated. Backtesting frameworks, walk-forward validation with purging and embargo as described by López de Prado, and parametric VaR allocation for a multi-instrument portfolio — all of these are Python-native tasks handled within a single research stack.
MetaTrader 5 is a trade execution environment. MetaTrader 5 provides a direct connection to the broker's trading server, native order processing speed, built-in position management, and full access to the quote stream. It is a mature, proven platform with extensive broker coverage, used by millions of traders around the world.
TradeMux serves as a bridge between these two environments. It allows the Python system to control the MetaTrader 5 terminal via a normalized SDK, without requiring the research logic to be duplicated on the terminal side. Python calculates, TradeMux delivers, and MetaTrader 5 executes.
Practical Architecture
The production architecture for a Python-native quant system consists of four layers, each with clearly defined areas of responsibility.
Layer 1: Research & Signal Engine (Python). Jupyter notebooks and Python scripts — this is where the data, models, and backtests reside. This layer generates trading decisions: {symbol: direction, lot, confidence}. It processes historical data, builds features, trains models, and performs all calculations — from L1 filtering to VaR-based lot allocation.
Layer 2: Execution Service (Python). A lightweight Python process that receives signals from the signal engine and manages the lifecycle of positions. It encapsulates pre-trade risk checks, entry and exit logic, monitoring of open positions, and emergency safeguards. All of this code is written in Python and is under the developer's full technical control.
Layer 3: TradeMux SDK/API (bridge). A normalized interface between the execution service and the MetaTrader 5 terminal. Python calls SDK methods — TradeMux translates them into commands for the EA. This layer abstracts away broker-specific details: symbol suffixes, minimum lot sizes, lot increments, and execution modes. The same Python code works with any connected MetaTrader broker.
Layer 4: MetaTrader 5 Terminal + TradeMux EA (execution). MetaTrader 5 with the TradeMux EA attached to any chart. The EA receives commands through a WebRequest loop and executes them using MetaTrader 5's native trading functions. Zero-DLL architecture: no third-party libraries, no security issues on the VPS.
# Architecture Diagram
#
#  ┌─────────────────────────────────────────────────────┐
#  │     PYTHON — Research / Signal Engine               │
#  │     pandas · CatBoost · L1 Filter · VaR Alloc       │
#  └──────────────────────┬──────────────────────────────┘
#                         │  {symbol, direction, lots}
#  ┌──────────────────────▼──────────────────────────────┐
#  │     PYTHON — Execution Service                      │
#  │     pre-trade risk · monitor · kill_switch()        │
#  └──────────────────────┬──────────────────────────────┘
#                         │  SDK calls
#  ┌──────────────────────▼──────────────────────────────┐
#  │     TRADEMUX — SDK / API Bridge                     │
#  │     normalized schemas · broker abstraction         │
#  └──────────────────────┬──────────────────────────────┘
#                         │  WebRequest loop (zero DLL)
#  ┌──────────────────────▼──────────────────────────────┐
#  │     MetaTrader 5 — Terminal + TradeMux EA           │
#  │     native execution · full broker connectivity     │
#  └──────────────────────┬──────────────────────────────┘
#                         │
#  ┌──────────────────────▼──────────────────────────────┐
#  │     Broker A / Broker B / Broker C                  │
#  │     RoboForex · IC Markets · Alpari · …             │
#  └─────────────────────────────────────────────────────┘
MetaTrader 5 Configuration: One EA, No Trading Logic
On the MetaTrader 5 side, the setup consists of three steps. First: Download and install the TradeMux EA from the marketplace or the official website. Second: In the MetaTrader 5 settings, enable WebRequest for the TradeMux API domain — Tools → Options → Expert Advisors → Allow WebRequest for listed URL. Third: Attach the EA to any chart and enter the API key in the input parameters.
The TradeMux EA performs exactly one function: it receives commands from Python via the WebRequest loop and passes them to MetaTrader 5's native trading functions. The bridge operates entirely without DLL dependencies — a key architectural decision that ensures security on a VPS and compatibility with any broker configuration. All the strategic logic — calculations, models, risk control — remains in Python.
Connecting and Reading the Account State
Initializing the MTClient client is the single entry point to the TradeMux SDK; the client is created with an API key and a server address, and the SDK has no account_id parameter. The get_account_info() method returns a normalized structure with the following fields: balance, equity, floating_pnl, open_positions, open_trades, pending_orders, account_number, server, and updated_at — which are identical for both MetaTrader 4 and MetaTrader 5 accounts. The same Python code reads account data from RoboForex and IC Markets without any changes.
import time
import logging
import numpy as np
import pandas as pd
from trademux import MTClient

# ─── Configuration ────────────────────────────────────────────────
API_KEY          = "sb_tmux_xxxxxxxxxxxxxxxxxxxx"   # one key = one account
SERVER_URL       = "https://mux.skybluefin.tech"
TIMEOUT          = 30

MAX_DRAWDOWN_USD = 300.0   # hard stop on account drawdown
MAX_OPEN_LOTS    = 2.0     # total volume across all positions
EQUITY_HIGH_MARK = 0.0     # updated after the account is first read
MIN_EQUITY_RATIO = 0.85    # entry requires equity to be at least the required fraction of the balance
CRIT_EQUITY_RATIO= 0.80    # critical drop in equity → kill switch

SYMBOLS = [
    "EURUSD", "GBPUSD", "USDJPY", "USDCHF",
    "AUDUSD", "USDCAD", "NZDUSD", "EURGBP",
]

logging.basicConfig(
    level=logging.INFO,
    format="%(asctime)s | %(levelname)-8s | %(message)s",
    datefmt="%Y-%m-%d %H:%M:%S",
)
log = logging.getLogger("trademux_service")


def init_client() -> MTClient:
    """Create TradeMux client and output initial account status."""
    client = MTClient(
        api_key=API_KEY,
        server_url=SERVER_URL,
        timeout=TIMEOUT,
    )
    info = client.get_account_info()
    log.info(
        "Connected | #%s @ %s | Balance=%.2f | Equity=%.2f | FloatPnL=%.2f",
        info["account_number"], info["server"],
        info["balance"], info["equity"],
        info["floating_pnl"],
    )
    return client


def snapshot_account(client: MTClient) -> dict:
    """Returns the current account and open positions snapshot."""
    info      = client.get_account_info()
    resp      = client.list_positions()        # {"positions": [...], "total_count": N}
    positions = resp["positions"]
    open_lots = sum(p["volume"] for p in positions)
    return {
        "balance"     : info["balance"],
        "equity"      : info["equity"],
        "floating_pnl": info["floating_pnl"],
        "open_lots"   : open_lots,
        "positions"   : positions,
        "n_positions" : len(positions),
    }
The list_positions() method returns a structure {"positions": [...], "total_count": N}; each position is a dictionary with the fields ticket, symbol, type, volume, open_price, and profit — a normalized format that is the same for all MetaTrader brokers. This allows you to build monitoring and risk logic in Python once and apply it to any connected terminal without any modifications.
Loading Market Data via the SDK
The get_ohlc() method returns historical bars from MetaTrader 5 directly to the Python process. TradeMux forwards the request through the EA and returns a normalized OHLCV dataset. The symbol, timeframe (e.g., "1h"), and number of bars (count) are SDK parameters; note that the timeframe is specified as a string in the format "1h", not "H1" — the old format is rejected by server-side validation. By default, the method returns a dictionary {"data": [...]}; with the as_df=True flag, it returns a ready-to-use pandas.DataFrame, which is passed directly to the feature generation function: Python retrieves data from MetaTrader 5 and immediately applies a complete research pipeline to it.
def fetch_ohlc_dataframe(
    client: MTClient,
    symbol: str,
    timeframe: str = "1h",
    count: int = 200,
) -> pd.DataFrame:
    """Download OHLC from MetaTrader 5 via TradeMux SDK and return DataFrame."""
    # as_df=True — the SDK immediately returns a ready-to-use DataFrame
    df = client.get_ohlc(symbol=symbol, timeframe=timeframe, count=count, as_df=True)
    df["time"] = pd.to_datetime(df["time"], unit="s", utc=True)
    df.set_index("time", inplace=True)
    return df
If the signal logic is based on the L1 Trend Filter, the next step is causal filtering (without look-ahead) using a sliding window over the retrieved closing prices, followed by feature generation and prediction using the CatBoost model. This entire chain remains in Python. MetaTrader 5 provides quote data via TradeMux and receives execution commands — that is its role within the architecture.
Signal Logic: Python Calculates, MetaTrader 5 Executes
Trading signals are generated entirely within Python. The computational part — the ML model, the L1 filter, and the factor pipeline — remains within the Python process. TradeMux receives a trading decision that has already been made and delivers it to MetaTrader 5. Below is an example of a momentum signal based on OHLC data; in a production system, CatBoost with L1-filtered features is used here — the function's interface remains the same.
def compute_signal(df: pd.DataFrame) -> str:
    """
    Momentum signal based on MACD + trend slope.
    In production: replace with CatBoost ML forecast.
    Return: 'BUY' | 'SELL' | 'HOLD'
    """
    close    = df["close"]
    ema_fast = close.ewm(span=12, adjust=False).mean()
    ema_slow = close.ewm(span=26, adjust=False).mean()
    macd     = ema_fast - ema_slow
    signal   = macd.ewm(span=9,  adjust=False).mean()

    # Trend direction filter for the last 20 bars
    slope_20 = (close.iloc[-1] - close.iloc[-21]) / close.iloc[-21]
    macd_val = macd.iloc[-1]
    sig_val  = signal.iloc[-1]

    cross_up = macd_val > sig_val and macd.iloc[-2] <= signal.iloc[-2]
    cross_dn = macd_val < sig_val and macd.iloc[-2] >= signal.iloc[-2]

    if cross_up and slope_20 > 0:
        return "BUY"
    elif cross_dn and slope_20 < 0:
        return "SELL"
    return "HOLD"


def generate_signals(
    client: MTClient,
    symbols: list[str],
) -> dict[str, str]:
    """Generate signals for all symbols in the list."""
    signals = {}
    for sym in symbols:
        try:
            df = fetch_ohlc_dataframe(client, sym)
            signals[sym] = compute_signal(df)
        except Exception as e:
            log.warning("Signal error %s: %s", sym, e)
            signals[sym] = "HOLD"
    return signals
CatBoost Model Integration: a Drop-in Replacement for the Signal Function
In the production system, the compute_signal function is replaced with a call to the pretrained model. The wrapper class below has an identical interface — a DataFrame as input and a string as output. The model is loaded once when the service starts; the features are recalculated during each signal cycle using the latest data from get_ohlc(). Model weights, feature engineering, confidence thresholds — all of these remain within the Python code under the developer’s full control.
from catboost import CatBoostClassifier, Pool
import joblib


class CatBoostSignalEngine:
    """
    Production wrapper for a CatBoost model using L1 features.
    A drop-in replacement for compute_signal() with the same interface.
    """

    FEATURE_COLS = [
        "ret_1", "ret_3", "ret_5", "ret_10", "ret_20",
        "l1_slope", "l1_accel", "l1_trend_up", "l1_trend_chg",
        "deviation", "dev_pct",
        "vol_5", "vol_10", "vol_20",
        "rsi_l1_14", "rsi_close_14",
        "bb_pos_10", "bb_pos_20",
    ]
    LONG_THR  = 0.58   # confidence threshold for BUY
    SHORT_THR = 0.58   # confidence threshold for SELL

    def __init__(self, model_path: str):
        self.model: CatBoostClassifier = joblib.load(model_path)
        log.info("CatBoost model loaded from %s", model_path)

    def __call__(self, df: pd.DataFrame) -> str:
        """Return 'BUY' | 'SELL' | 'HOLD' based on the last row of the DataFrame."""
        row   = df[self.FEATURE_COLS].iloc[[-1]].fillna(0)
        proba = self.model.predict_proba(Pool(row))[0]
        p_up, p_dn = proba[1], proba[0]

        if   p_up >= self.LONG_THR:  return "BUY"
        elif p_dn >= self.SHORT_THR: return "SELL"
        else:                        return "HOLD"


# Usage: replace compute_signal with a single line:
# signal_fn = CatBoostSignalEngine("models/eurusd_l1_catboost.cbm")
Order Execution and Pre-Trade Risk Control
Pre-trade checks are performed in Python before the SDK is called. The validation logic — equity protection, total position volume, and drawdown from the high-water mark — is written once and works for any MetaTrader broker connected via TradeMux. Since the margin_level field does not exist in the normalized account structure, margin monitoring has been replaced by checking equity relative to the balance. The buy_market() and sell_market() methods accept a normalized lot size; TradeMux validates it against the broker's current specifications and rounds it to the allowed lot increment. MetaTrader 5 receives a command that has already been validated and executes it using native functions.
def pre_trade_checks(snap: dict, lots: float) -> tuple[bool, str]:
    """
    Set of pre-trade checks in Python.
    Returns (ok: bool, reason: str).
    """
    # 1. Equity protection (replaces margin level monitoring—the SDK has no margin_level field)
    if snap["equity"] < snap["balance"] * MIN_EQUITY_RATIO:
        return False, f"Equity {snap['equity']:.2f} < {MIN_EQUITY_RATIO:.0%} of balance {snap['balance']:.2f}"

    # 2. Total Open Volume
    if snap["open_lots"] + lots > MAX_OPEN_LOTS:
        return False, f"Lots limit: {snap['open_lots']:.2f} + {lots:.2f} > {MAX_OPEN_LOTS}"

    # 3. Equity drawdown from the high-water mark
    global EQUITY_HIGH_MARK
    EQUITY_HIGH_MARK = max(EQUITY_HIGH_MARK, snap["equity"])
    drawdown = EQUITY_HIGH_MARK - snap["equity"]
    if drawdown > MAX_DRAWDOWN_USD:
        return False, f"Drawdown ${drawdown:.2f} > limit ${MAX_DRAWDOWN_USD:.2f}"

    return True, "ok"

def execute_signal(
    client: MTClient,
    snap: dict,
    symbol: str,
    direction: str,
    lots: float,
) -> None:
    """
    Passes trading decision from Python to MetaTrader 5 via TradeMux SDK.
    Before execution: pre-trade checks in Python.
    """
    if direction == "HOLD":
        return

    # A position in the same direction is already open—skip
    existing = [
        p for p in snap["positions"]
        if p["symbol"] == symbol and p["type"] == direction
    ]
    if existing:
        log.debug("Skip %s %s — position already open", direction, symbol)
        return

    ok, reason = pre_trade_checks(snap, lots)
    if not ok:
        log.warning("Pre-trade BLOCK %s %s: %s", direction, symbol, reason)
        return

    try:
        # Python → TradeMux SDK → TradeMux EA → MetaTrader 5 → Broker
        if direction == "BUY":
            result = client.buy_market(symbol=symbol, lots=lots)
        else:
            result = client.sell_market(symbol=symbol, lots=lots)

        log.info(
            "ORDER | %s %s %.2f lots | ticket=%s | price=%.5f",
            direction, symbol, lots,
            result.get("ticket", "?"),
            result.get("price", 0.0),
        )
    except Exception as e:
        log.error("Order FAILED %s %s: %s", direction, symbol, e)
Position Monitoring and Kill Switch
The execution service continuously monitors the status of open positions using list_positions(). The most important safety mechanism is the kill switch: an emergency closure of all positions when critical conditions are violated. kill_switch() sends a single atomic command via the TradeMux API — the EA passes it to MetaTrader 5’s native trading functions, which close all positions immediately, and returns a structure containing the fields closed_positions, deleted_orders, and total_pnl. The logic behind the decision to trigger the kill switch remains entirely within Python and can be modified without touching the terminal.
def monitor_and_protect(client: MTClient, snap: dict) -> bool:
    """
    Risk monitoring in Python.
    If triggered, kill_switch() closes positions via MetaTrader 5.
    Returns True if kill_switch() has triggered.
    """
    global EQUITY_HIGH_MARK

    equity  = snap["equity"]
    balance = snap["balance"]

    EQUITY_HIGH_MARK = max(EQUITY_HIGH_MARK, equity)
    drawdown = EQUITY_HIGH_MARK - equity

    reasons = []

    # Critical equity drawdown
    if drawdown > MAX_DRAWDOWN_USD:
        reasons.append(f"equity drawdown ${drawdown:.2f}")

    # Critical decline in equity relative to the balance (replacing margin level monitoring)
    if equity < balance * CRIT_EQUITY_RATIO:
        reasons.append(f"equity {equity:.2f} < {CRIT_EQUITY_RATIO:.0%} of balance")

    # The loss exceeded 5% of the balance during the session
    session_loss = balance - equity
    if session_loss > balance * 0.05:
        reasons.append(f"session loss ${session_loss:.2f}")

    if reasons:
        log.critical("KILL SWITCH triggered: %s", ", ".join(reasons))
        try:
            # Atomic Command: Python → TradeMux → MetaTrader 5
            result = client.kill_switch()
            log.critical(
                "kill_switch() confirmed: closed %d positions, deleted %d orders, PnL=%.2f",
                result.get("closed_positions", 0),
                result.get("deleted_orders", 0),
                result.get("total_pnl", 0.0),
            )
        except Exception as e:
            log.critical("kill_switch() FAILED: %s — manual action required", e)
        return True

    return False


def log_portfolio_status(snap: dict) -> None:
    """Output the current portfolio state to log."""
    log.info(
        "Portfolio | Equity=%.2f | Float=%.2f | Pos=%d | Lots=%.2f",
        snap["equity"], snap["floating_pnl"],
        snap["n_positions"], snap["open_lots"],
    )
    for p in snap["positions"]:
        log.info(
            "  → %s %s %.2f lots | open=%.5f | profit=%.2f",
            p["type"], p["symbol"], p["volume"],
            p["open_price"], p["profit"],
        )
Main Execution Service Loop
All components are integrated into a single event loop. Python manages the schedule: it recalculates signals every SIGNAL_INTERVAL seconds, checks the portfolio every minute, and processes reversal signals. Every time a decision is made, it is transmitted to MetaTrader 5 via the TradeMux SDK with a single call. MetaTrader 5 executes, while Python monitors via normalized feedback.
SIGNAL_INTERVAL  = 3600   # signal recalculation once an hour
MONITOR_INTERVAL = 60    # portfolio check every minute
DEFAULT_LOTS     = 0.01   # base lot (overridden by VaR allocation)


def run_execution_service() -> None:
    """main loop: Python calculates, TradeMux delivers, MetaTrader 5 executes."""
    client = init_client()
    snap   = snapshot_account(client)
    global EQUITY_HIGH_MARK
    EQUITY_HIGH_MARK = snap["equity"]

    last_signal_ts  = 0.0
    last_monitor_ts = 0.0
    current_signals: dict[str, str] = {}

    log.info("Execution service started. HWM: %.2f", EQUITY_HIGH_MARK)

    while True:
        now = time.time()

        # ── Python: Signal recalculation ────────────────────────
        if now - last_signal_ts >= SIGNAL_INTERVAL:
            log.info("--- Signal update cycle ---")
            current_signals = generate_signals(client, SYMBOLS)
            last_signal_ts  = now

            snap = snapshot_account(client)
            if monitor_and_protect(client, snap):
                log.critical("Kill switch fired — service stopped")
                break

            # Pass trading decisions from Python to MetaTrader 5 via TradeMux
            for symbol, direction in current_signals.items():
                execute_signal(client, snap, symbol, direction, DEFAULT_LOTS)
                snap = snapshot_account(client)  # Read the current state from MetaTrader 5

        # ── Python: Portfolio monitoring ──────────────────────
        if now - last_monitor_ts >= MONITOR_INTERVAL:
            snap = snapshot_account(client)
            log_portfolio_status(snap)
            if monitor_and_protect(client, snap):
                log.critical("Kill switch fired during monitor — service stopped")
                break
            last_monitor_ts = now

        # ── Python: Processing reversal signals ─────────────
        if current_signals:
            snap = snapshot_account(client)
            for pos in snap["positions"]:
                new_dir = current_signals.get(pos["symbol"], "HOLD")
                if new_dir not in ("HOLD", pos["type"]):
                    log.info(
                        "Reverse signal: closing %s %s → sending to MetaTrader 5",
                        pos["type"], pos["symbol"],
                    )
                    try:
                        client.close_ticket(pos["ticket"])
                    except Exception as e:
                        log.error("Close failed %s: %s", pos["ticket"], e)

        time.sleep(10)   # The base loop interval is 10 seconds
TradeMux as a Cross-Broker Bridge
An important practical advantage of TradeMux is that it standardizes broker-specific details. Different brokers use different symbol suffixes: EURUSD.raw, EURUSD.pro, and EURUSDi all refer to the same currency pair, just with different notations. The lot increment for one broker is 0.01, and for another it is 0.1. Execution mode: "instant" for one, "market" for the other. TradeMux abstracts away all these differences: the Python code calls buy_market("EURUSD", 0.10), and TradeMux translates this into the correct request for the specific broker.
One API key corresponds to one account — there is no account_id parameter in the SDK. To support multiple accounts, multiple keys are created: each account is registered in the TradeMux console and receives its own key, which is used to create a separate MTClient instance.
# Each TradeMux account has its own API key, which is issued in the console.
# One key = one account; there is no account_id parameter in the SDK.
ACCOUNTS = {
    "RoboForex" : MTClient(api_key="sb_tmux_roboforex_key",   server_url=SERVER_URL, timeout=TIMEOUT),
    "IC Markets": MTClient(api_key="sb_tmux_icmarkets_key",   server_url=SERVER_URL, timeout=TIMEOUT),
    "Alpari"    : MTClient(api_key="sb_tmux_alpari_demo_key", server_url=SERVER_URL, timeout=TIMEOUT),
}


def broadcast_signal(
    clients: dict[str, MTClient],
    symbol: str,
    direction: str,
    lot_map: dict[str, float],
) -> None:
    """
    One signal from Python → several accounts via TradeMux.
    Each account uses its own API key.
    lot_map: {account_name: lots}
    """
    for name, client in clients.items():
        lots = lot_map.get(name, 0.01)
        log.info("[%s] %s %s %.2f lots → MetaTrader 5 via TradeMux", name, direction, symbol, lots)
        try:
            if direction == "BUY":
                client.buy_market(symbol=symbol, lots=lots)
            elif direction == "SELL":
                client.sell_market(symbol=symbol, lots=lots)
        except Exception as e:
            log.error("[%s] Broadcast failed: %s", name, e)
This enables a multi-account architecture: a single Python service manages multiple accounts simultaneously — each with its own API key issued in the TradeMux console. Each MetaTrader 5 terminal runs the same TradeMux EA. The Python logic is shared across all accounts. TradeMux standardizes communication with each broker individually.
Supervisor Pattern: Automatic Restart
A production system must handle network failures and unexpected conditions correctly. After the kill switch is triggered, the service waits for a recovery period and restarts with the same parameters. Limiting the number of restarts prevents an infinite loop in the event of a system problem.
import sys

RECOVERY_WAIT_SECONDS = 3600   # Pause after the kill switch — 1 hour
MAX_KILL_EVENTS       = 3      # After 3 events — complete shutdown


def supervised_run() -> None:
    """
    Supervisor wrapper over run_execution_service().
    Relaunches the service while limiting the number of attempts.
    """
    kill_count = 0

    while kill_count < MAX_KILL_EVENTS:
        try:
            run_execution_service()
            log.info("Service completed normally.")
            sys.exit(0)

        except KeyboardInterrupt:
            log.info("Manual shutdown.")
            sys.exit(0)

        except Exception as e:
            kill_count += 1
            log.critical(
                "Service crashed (%d/%d): %s — waiting %ds",
                kill_count, MAX_KILL_EVENTS, e, RECOVERY_WAIT_SECONDS,
            )
            if kill_count >= MAX_KILL_EVENTS:
                log.critical("Max kill events reached — full stop.")
                sys.exit(1)
            time.sleep(RECOVERY_WAIT_SECONDS)


if __name__ == "__main__":
    supervised_run()
The Path to Scaling: From PoC to Fund-Style Operations
The execution service described here runs on a single account and a single MetaTrader 5 terminal. The same Python architecture scales without having to rewrite the trading logic — only the connection configuration changes.
The first stage is a proof of concept using a demo account. Attach the TradeMux EA, create an API key, and start the execution service with DEFAULT_LOTS = 0.01. Over the course of 1–2 days, the entire chain is tested under real-world conditions: Python generates a signal → TradeMux sends the command → MetaTrader 5 executes the order → Python reads the feedback via list_positions(). The free developer workflow allows you to complete this stage in its entirety before switching to a live account.
The second stage is deployment on a VPS for a live account. The Python service is deployed on a VPS alongside the MetaTrader 5 terminal. Latency to the TradeMux API is minimal. Same code, same logic — only the account's API key and lot sizes change.
The third stage involves multiple MetaTrader 5 accounts. The clients dictionary in broadcast_signal() is expanded to the required number of accounts. The Python logic is shared across all accounts. Each account is connected using its own API key issued in the TradeMux console; each MetaTrader 5 terminal runs the same TradeMux EA.
The fourth stage is cross-platform coverage. The same Python code using MTClient works with both MetaTrader 4 and MetaTrader 5 terminals. For OANDA, TradeMux provides a separate OandaClient class (with its own OANDA token) — the call patterns are the same; only the client class changes. Diversifying across brokers reduces infrastructure risk: if one broker is temporarily unavailable, the others continue to operate. At each of these stages, the research logic and trading logic in Python remain unchanged. TradeMux provides a uniform interface for MetaTrader brokers and an OANDA client that follows the same interaction patterns.
Next Steps: From Article to Live Trading
You can test the architecture in four steps:
- Attach the TradeMux EA to any chart in MetaTrader 5 and enable WebRequest for the API domain;
- Create an API key — the free developer workflow lets you test the entire end-to-end process on a demo account with no functionality restrictions;
- Start the execution service and verify that get_account_info(), list_positions(), buy_market(), and kill_switch() are working correctly;
- Connect your own signal logic — a CatBoost model with L1-filtered features, a multi-pair pipeline, or VaR-based lot allocation — and go live.
Switching from demo to live simply means replacing the API key with the live account's key. The logic, code, and architecture remain unchanged.
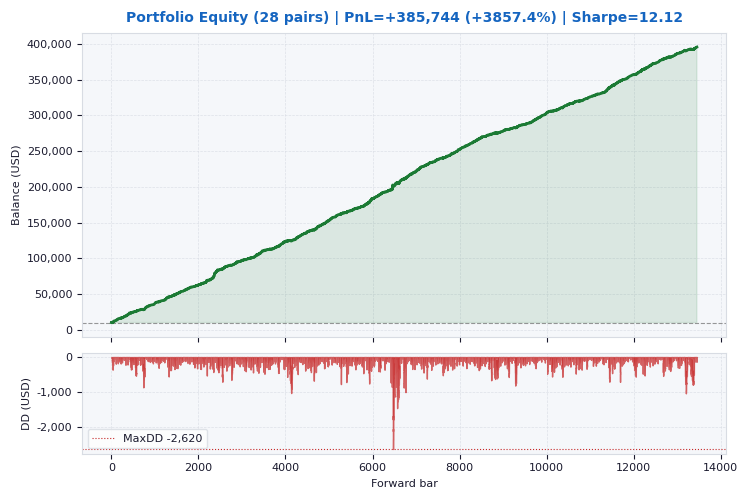
As for the pipeline itself as a trading system, an out-of-sample (OOS) evaluation free of data leakage yields the following result:
Conclusion
Python and MetaTrader 5 are two professional environments, each of which excels in its own field. Python offers an incredibly rich ecosystem for research, modeling, and computations. MetaTrader 5 is a reliable execution platform with direct broker connectivity and native-speed order processing. TradeMux integrates them into a single production architecture: Python performs calculations and makes decisions, TradeMux delivers those decisions through a normalized interface, and MetaTrader 5 executes trades with the broker.
The full trading cycle is described using seven SDK methods: get_account_info(), list_positions(), get_ohlc(), buy_market(), sell_market(), close_ticket(), and kill_switch(). The same Python code using MTClient works with both MetaTrader 4 and MetaTrader 5 through TradeMux without refactoring; for OANDA, the OandaClient class is used with the same call patterns. When scaling across multiple accounts and brokers, the connection configuration changes — each account has its own API key, while the trading logic and research logic remain unchanged. TradeMux provides a normalized cross-broker interface, MetaTrader 5 handles order execution, and Python powers the system's intelligence.
Translated from Russian by MetaQuotes Ltd.
Original article: https://www.mql5.com/ru/articles/22816
Warning: All rights to these materials are reserved by MetaQuotes Ltd. Copying or reprinting of these materials in whole or in part is prohibited.
This article was written by a user of the site and reflects their personal views. MetaQuotes Ltd is not responsible for the accuracy of the information presented, nor for any consequences resulting from the use of the solutions, strategies or recommendations described.