

Overcoming Accessibility Problems in MQL5 Trading Tools (Part IV): Remote voice trading
 1 813
1 813
 0
0

Welcome to the fourth installment of our series on overcoming accessibility problems in MQL5 trading tools. This article explores one practical method for remote, low-bandwidth voice-command execution – a semi‑automated pipeline that connects a Telegram voice message to your MetaTrader 5 terminal. It is not the only possible solution, nor do we claim it is the final answer. As MQL5 evolves, the platform may introduce new mechanisms that simplify remote interaction. For now, the pull-based polling technique described here is a robust, adaptable way to stay in control away from your desk.
Contents
- Introduction
- Solution Architecture
- Implementation
- Testing and Results
- Engineering Takeaways
- Conclusion
- Attachments
Introduction
A voice‑controlled Expert Advisor that works perfectly at your desk (Part III, offline Vosk) loses all remote capability the moment you step away. Your mobile phone cannot execute MQL5 logic – the runtime is desktop‑only. Manual intervention in a high‑probability setup becomes impossible while commuting, cooking, or multitasking. This article builds a semi‑automated accessibility pipeline that lets you speak a trade command from anywhere and have your MetaTrader 5 terminal execute it over a low‑bandwidth pull‑based HTTP channel.
You already have an MetaTrader 5 terminal running on a Windows machine with Market Watch available, an Expert Advisor framework installed, and an offline voice command system (Vosk from Part III) that works locally. The terminal can send WebRequest (HTTP client) calls to a permitted URL. The trader is physically present at the desk and can speak a command that the EA executes instantly.
When you leave the desk, the terminal remains online but there is no way to feed it commands. Telegram voice messages are a natural remote input: you record a voice note and it is delivered to a bot, but nothing connects it to the MetaTrader 5 runtime. The goal is to complete the loop: voice note → transcription → command JSON → HTTP endpoint → EA polling → trade execution → result back to Telegram. All without touching the desktop.
We introduce a Python middleware that acts as a Telegram bot and a local HTTP server. The bot receives voice messages, converts them to text with Google STT, parses a simple natural‑language command, and enqueues it. A separate HTTP endpoint serves this command to the EA. The EA polls the endpoint every two seconds, executes the trade using CTrade, and POSTs the result back. The entire chain adds less than 3 seconds of latency and works over mobile data (< 5 KB per trade). The system is privacy‑preserving: it requires no cloud API keys beyond Telegram and no recurring fees. The speech‑to‑text engine is interchangeable, so you can later substitute an offline model for even greater independence.
Solution Architecture
System components overview
Four main components form the pipeline:
- Telegram bot – receives voice notes, sends status messages.
- Python middleware – transcribes audio, parses commands, provides HTTP endpoints.
- MetaTrader 5 Expert Advisor – polls for commands, executes trades, reports results.
- Desktop MetaTrader 5 terminal – the runtime that must stay running and connected.
All components run on the same Windows machine; the smartphone only needs Telegram and internet access.
Python middleware (Telegram bot + HTTP server)
The middleware is a single Python script that spawns two threads: one runs a BaseHTTPRequestHandler on 127.0.0.1:8082, the other runs the python-telegram-bot application. It exposes two endpoints:
- GET /get_command – returns the oldest command from an in‑memory queue as JSON, or {"action": null} if empty.
- POST /post_response – receives the EA’s execution result and signals the result_event used by the voice handler to reply to Telegram.
MQL5 EA as a WebRequest client
The Expert Advisor is a pure polling client. It calls WebRequest("GET", ...) every two seconds to fetch a command. When a valid JSON command arrives, it parses it with CJAVal, executes the trade via CTrade, formats a result JSON, and sends it back with WebRequest("POST", ...). A crucial detail is that StringToCharArray adds a null terminator; the EA strips it before POSTing to avoid Python JSON decoding errors.
Data flow and latency budget
- User speaks “buy 0.001 euro” into Telegram → bot receives voice note (~1‑2 s).
- Download .ogg, convert to 16 kHz mono WAV, transcribe with Google STT (~0.5‑1 s).
- Parse text to JSON command, enqueue, and wait for EA to fetch (poll interval up to 2 s).
- EA GETs command, executes trade (50‑200 ms), POSTs result.
- Telegram reply with ticket and price arrives on the smartphone.
Total round-trip is typically under 4 seconds. Bandwidth per poll is < 1 KB; voice download is ~10‑30 KB. No constant connection is required — fully functional on 2G/3G mobile data.
Implementation
With the architecture in place, we now move from blueprint to binary. The following sections will guide you through setting up the Windows environment, building the Python middleware, coding the MQL5 Expert Advisor, and finally running the complete pipeline. Open MetaEditor 5 now. We will use it for the EA and, if you prefer, for editing the Python script within the MetaTrader ecosystem. (Of course, Notepad++, VS Code, or any editor you are comfortable with works equally well.)
Environment preparation (Windows)
Python installation – Install Python 3.10+ from python.org. Ensure python and pip are on the system PATH. Verify with python --version .
Virtual environment and dependencies
# Create and activate a virtual environment
python -m venv trading_env
trading_env\Scripts\activate
pip install python-telegram-bot[job-queue] speechrecognition pydub
Also install pyaudio if you intend to do any local audio capture (not required for remote).
ffmpeg installation and PATH configuration – The middleware requires ffmpeg to convert Telegram’s .ogg voice notes to WAV. Installing from the official site often triggers “ffmpeg not found” errors. The installer may not update the system PATH or the Python subprocess environment. A reliable method is to use the Windows package manager, winget, and then explicitly locate the binary.
- Open a Command Prompt (as administrator) and run: winget install ffmpeg
- After installation, find the exact ffmpeg.exe location with: where ffmpeg (typically inside a folder like C:\Users\YourUser\AppData\Local\Microsoft\WinGet\Packages\Gyan.FFmpeg…\bin).
- Copy the full bin directory path. In the Python script’s FFMPEG_DIR constant, paste that path exactly. The script forces this directory into os.environ["PATH"] and patches pydub to use it, completely bypassing any missing system‑wide configuration.
This approach resolves the classic “ffmpeg not found” warning because the middleware no longer relies on the global PATH.
Telegram bot token and chat ID retrieval
- Open Telegram and search for @BotFather. Create a new bot and copy the token.
- Find your numeric chat ID by sending a message to @userinfobot or by starting a chat with your bot and inspecting https://api.telegram.org/bot<TOKEN>/getUpdates .
- Insert the token and chat ID into the Python script’s TELEGRAM_TOKEN and ALLOWED_CHAT_ID.
Python middleware (telegram_trading_bot.py)
The middleware is a single, self‑contained script. You can create it in MetaEditor (File → New → “Python Script”) or in any text editor. Save it as telegram_trading_bot.py in a convenient location — perhaps inside the MQL5\Experts folder so everything stays together. The following steps walk through its construction with each code block placed immediately after its explanation. The complete file is also available in the attachments.
Step 1: Imports and ffmpeg path forcing
The first lines of the script solve the most common setup headache: pydub complaining that it “Couldn’t find ffmpeg”. We force the directory containing ffmpeg.exe into the PATH environment variable and set a dedicated PYDUB_FFMPEG variable. A monkey‑patch of pydub.utils.which ensures every internal lookup returns our explicit binary. This makes the script portable across machines where ffmpeg is installed via winget but not globally visible.
#!/usr/bin/env python3
import os, sys, warnings

# ========== FORCE FFMPEG PATH (NO WARNING) ==========
FFMPEG_DIR = r"C:\Users\inter\AppData\Local\Microsoft\WinGet\Packages\Gyan.FFmpeg_Microsoft.Winget.Source_8wekyb3d8bbwe\ffmpeg-8.1.1-full_build\bin"
os.environ["PATH"] = FFMPEG_DIR + os.pathsep + os.environ.get("PATH", "")
os.environ["PYDUB_FFMPEG"] = os.path.join(FFMPEG_DIR, "ffmpeg.exe")
warnings.filterwarnings("ignore", category=RuntimeWarning, module="pydub.utils")

# Monkey-patch pydub's which()
from pydub.utils import which
_original_which = which
def _forced_which(prog):
    if prog in ('ffmpeg', 'avconv'):
        return os.environ["PYDUB_FFMPEG"]
    return _original_which(prog)
import pydub.utils
pydub.utils.which = _forced_which

import pydub
pydub.AudioSegment.converter = os.environ["PYDUB_FFMPEG"]

# Other imports
import json, time, asyncio, threading
from http.server import HTTPServer, BaseHTTPRequestHandler
from telegram import Update
from telegram.ext import Application, MessageHandler, filters, ContextTypes
import speech_recognition as sr
Step 2: Configuration and in‑memory command queue
Global constants store the Telegram credentials and the HTTP port. A Python list acts as a thread‑safe command queue protected by a threading.Lock. A result dictionary and a threading.Event synchronize the response: when the EA POSTs a result, the event is set, and the bot can reply to the user. This simple in‑memory design avoids any external database while remaining perfectly reliable for a single‑user pipeline.
# ==================== CONFIG ====================
TELEGRAM_TOKEN = "REPLACE WITH YOUR BOT TOKEN"
ALLOWED_CHAT_ID = 000000000 #REPLACE WITH YOUR CHAT ID
HTTP_PORT = 8082

command_queue = []
queue_lock = threading.Lock()
result = None
result_event = threading.Event()
Step 3: HTTP server (GET /get_command, POST /post_response)
A custom handler built on BaseHTTPRequestHandler listens on 127.0.0.1:8082. The GET endpoint atomically pops the oldest command from the queue; if the queue is empty it returns {"action":null} so the EA knows there is nothing to execute. The POST endpoint receives the EA’s trade result, explicitly strips any null byte (the EA often appends one via StringToCharArray), and then parses the JSON. On success it sets the result_event, unblocking the Telegram handler. Logging is suppressed for cleanliness.
# ==================== HTTP SERVER ====================
class CommandHandler(BaseHTTPRequestHandler):
    def log_message(self, format, *args):
        pass
    def do_GET(self):
        if self.path == '/get_command':
            self.send_response(200)
            self.send_header('Content-Type', 'application/json')
            self.end_headers()
            with queue_lock:
                if command_queue:
                    cmd = command_queue.pop(0)
                    self.wfile.write(json.dumps(cmd).encode())
                    print(f"Served: {cmd}")
                else:
                    self.wfile.write(json.dumps({"action": None}).encode())
        else:
            self.send_response(404)
    def do_POST(self):
        if self.path == '/post_response':
            length = int(self.headers.get('Content-Length', 0))
            raw = self.rfile.read(length)
            try:
                data_str = raw.decode('utf-8').strip().rstrip('\x00')
                global result
                result = json.loads(data_str)
                result_event.set()
                print(f"Result: {result}")
            except Exception as e:
                print(f"POST error: {e}")
            self.send_response(200)
            self.end_headers()
        else:
            self.send_response(404)

def start_http_server():
    server = HTTPServer(('127.0.0.1', HTTP_PORT), CommandHandler)
    print(f"✅ HTTP server on {HTTP_PORT}")
    server.serve_forever()
Step 4: Audio transcription (Google STT)
The transcribe_audio function expects a 16 kHz mono WAV file. It uses the speech_recognition library’s built‑in recognize_google method, which sends the audio to Google’s free STT service. A short ambient noise adjustment improves accuracy on recordings from different environments. If the API cannot understand the speech (or the internet is down), the function returns an empty string so the caller can handle the failure gracefully.
# ==================== AUDIO ====================
def transcribe_audio(wav_path):
    recognizer = sr.Recognizer()
    with sr.AudioFile(wav_path) as src:
        recognizer.adjust_for_ambient_noise(src, 0.5)
        audio = recognizer.record(src)
    try:
        return recognizer.recognize_google(audio).lower()
    except:
        return ""
Step 5: Natural language command parser (default micro lots)
The parser converts free‑form text into a structured JSON command. It first checks for the special actions “close all” and “balance”. For BUY/SELL, it strips the leading keyword and looks for a volume specifier: words like “half” (0.5), “one”/“a” (1.0), or a numeric value; if none is found, the default is 0.001 lots (a safe micro lot). The remaining words are matched against a small symbol alias map (euro → EURUSD, gold → XAUUSD, etc.), defaulting to EURUSD if nothing is recognized. This design keeps the voice interface intuitive while protecting against accidental large orders.
def parse_command(text):
    text = text.lower().strip()
    if "close all" in text:
        return {"action": "CLOSE_ALL"}
    if "balance" in text:
        return {"action": "BALANCE"}
    action = None
    if text.startswith("buy"):
        action = "BUY"
        text = text[3:].strip()
    elif text.startswith("sell"):
        action = "SELL"
        text = text[4:].strip()
    else:
        return None
    # ✅ DEFAULT LOT SIZE = 0.001 (micro lot, ~$117 for EURUSD)
    volume = 0.001
    words = text.split()
    for i, w in enumerate(words):
        if w == "half":
            volume = 0.5
            words.pop(i)
            break
        elif w in ["one", "a"]:
            volume = 1.0
            words.pop(i)
            break
        else:
            try:
                volume = float(w)
                words.pop(i)
                break
            except:
                pass
    sym_text = " ".join(words)
    m = {"gold": "XAUUSD", "euro": "EURUSD", "pound": "GBPUSD", "silver": "XAGUSD", "oil": "USOIL"}
    symbol = "EURUSD"
    for k, v in m.items():
        if k in sym_text:
            symbol = v
            break
    return {"action": action, "symbol": symbol, "volume": volume}
Step 6: Telegram voice handler (async) and result synchronization
This is the heart of the bot. The handle_voice function first checks the chat ID to reject unauthorized users. It downloads the .ogg file from Telegram’s servers, uses pydub to resample to 16 kHz mono WAV, transcribes, and parses the command. The parsed command is appended to the shared queue, and then the function waits for the EA’s result via result_event.wait() (timeout 10 seconds). The result is then formatted into a human‑readable reply. A small cleanup helper deletes temporary audio files after each request to avoid disk clutter.
def cleanup(*files):
    for f in files:
        if os.path.exists(f):
            try:
                os.remove(f)
            except:
                pass

async def handle_voice(update, context):
    if update.effective_chat.id != ALLOWED_CHAT_ID:
        await update.message.reply_text("Unauthorized")
        return
    await update.message.reply_text("🎤 Processing...")
    voice = await update.message.voice.get_file()
    ogg, wav = "temp.ogg", "temp.wav"
    try:
        await voice.download_to_drive(ogg)
        audio = pydub.AudioSegment.from_ogg(ogg)
        audio = audio.set_frame_rate(16000).set_channels(1)
        audio.export(wav, format="wav")
        text = transcribe_audio(wav)
        if not text:
            await update.message.reply_text("❌ Could not understand")
            return
        await update.message.reply_text(f"📝 Heard: {text}")
        cmd = parse_command(text)
        if not cmd:
            await update.message.reply_text("❌ Invalid command. Example: 'buy 0.001 euro'")
            return
        with queue_lock:
            command_queue.append(cmd)
        await update.message.reply_text("⏳ Sending to MT5...")
        global result
        result = None
        result_event.clear()
        if result_event.wait(timeout=10):
            if result and result.get("status") == "success":
                msg = f"✅ Success!\nTicket: {result['ticket']}\nPrice: {result['price']}"
            else:
                msg = f"❌ Error: {result.get('message') if result else 'Unknown'}"
        else:
            msg = "⏰ No response from MT5. Is EA running?"
        await update.message.reply_text(msg)
    except Exception as e:
        await update.message.reply_text(f"❌ {str(e)[:100]}")
    finally:
        cleanup(ogg, wav)
Step 7: Main entry point (threading + bot polling)
The main function starts the HTTP server in a daemon thread so it shuts down automatically when the bot stops. It then constructs the python‑telegram‑bot application, registers the voice handler for VOICE messages and a simple error handler, and begins polling. The entire system runs inside one process, making it trivial to stop and restart.
async def error_handler(update, context):
    print(f"Telegram error: {context.error}")

def main():
    threading.Thread(target=start_http_server, daemon=True).start()
    app = Application.builder().token(TELEGRAM_TOKEN).build()
    app.add_handler(MessageHandler(filters.VOICE, handle_voice))
    app.add_error_handler(error_handler)
    print("✅ Telegram bot polling...")
    app.run_polling()

if __name__ == "__main__":
    main()
MQL5 EA (OvercomingAccessibilityIV.mq5)
With the middleware ready, we shift to the MetaTrader side. The Expert Advisor is a straightforward polling client. Before writing any code, we need to obtain the JSON parser library JAson.mqh – it is available from the MQL5 CodeBase or the article attachments. Download it and place it in a dedicated folder to keep our project organized: <MetaTrader Data Folder>\MQL5\Include\OvercomingAccessibilityIV\JAson.mqh. This folder name mirrors the EA’s file name and prevents conflicts with other projects.
Now in MetaEditor, create a new Expert Advisor: File → New → Expert Advisor, give it the name OvercomingAccessibilityIV.mq5, and save it in MQL5\Experts\. We will build the EA step by step, adding context and purpose to each block. Remember that you can apply the Styler command in MetaEditor to automatically format the code according to the MetaQuotes style guide.
Step 1: Includes and constants
We include the JAson parser from its custom folder and the standard Trade library. Two preprocessor constants define the local HTTP server URL and the polling interval. An instance of CTrade is declared globally for order management. This foundation connects the EA to both the Python server and the trading engine, and because both the include and trade library are standard MQL5 components, no additional external dependencies are needed within the terminal.
//+------------------------------------------------------------------+
//|                                    OvercomingAccessibilityIV.mq5 |
//|                                Copyright 2026, Clemence Benjamin |
//|                                              http://www.mql5.com |
//+------------------------------------------------------------------+
#include <OvercomingAccessibilityIV/JAson.mqh>
#include <Trade/Trade.mqh>

#define SERVER_URL   "http://127.0.0.1:8082"
#define POLL_INTERVAL  2

CTrade trade;
Step 2: OnInit initialisation – Inside OnInit we set a unique magic number and the allowed slippage (in points). The Print statement confirms the EA loaded successfully and will appear in the Experts tab once attached. Returning INIT_SUCCEEDED tells the terminal that initialisation completed without errors. The magic number ensures that any manual trades opened by the EA can be identified later, which is helpful when reviewing order history.
//+------------------------------------------------------------------+
//| Expert Advisor initialization                                    |
//+------------------------------------------------------------------+
int OnInit()
  {
   trade.SetExpertMagicNumber(202504);
   trade.SetDeviationInPoints(10);
   Print("Voice EA started");
   return(INIT_SUCCEEDED);
  }
Step 3: GetCommand – HTTP GET to fetch command
This function constructs the URL, calls WebRequest with the GET method and a 2‑second timeout, and returns the raw JSON string. If the response code is not 200, it returns an empty string, which the polling loop will treat as “no command available”. The uchar array resultData is converted to a string via CharArrayToString. Note that the timeout is deliberately kept short to avoid blocking the chart thread for too long if the server is unreachable.
//+------------------------------------------------------------------+
//| Fetch command from server via HTTP GET                           |
//+------------------------------------------------------------------+
string GetCommand()
  {
   string url = SERVER_URL + "/get_command";
   uchar resultData[];
   string resultHeaders;
   uchar postData[];
   int timeout = 2000;
   int res = WebRequest("GET", url, NULL, timeout, postData, resultData, resultHeaders);
   if(res != 200)
      return("");
   return(CharArrayToString(resultData));
  }
Step 4: PostResult – HTTP POST with null‑terminator stripping
When posting the execution result back to Python, we must convert the JSON string to a uchar array with StringToCharArray. A critical bug awaits: MQL5’s StringToCharArray appends a null byte (0) at the end of the array. If we send that byte to Python’s json.loads, it will fail. The code therefore checks the last element and resizes the array to exclude it before sending. The POST request includes the Content-Type header and uses the same 2‑second timeout. This step is a fine example of cross‑language data exchange where handling string terminators correctly is essential for reliable communication.
//+------------------------------------------------------------------+
//| Post execution result back to server                             |
//+------------------------------------------------------------------+
bool PostResult(string json_result)
  {
   string url = SERVER_URL + "/post_response";
   uchar postData[];
   StringToCharArray(json_result, postData);
   int size = ArraySize(postData);
   //--- remove the null terminator
   if(size > 0 && postData[size-1] == 0)
      ArrayResize(postData, size-1);
   uchar resultData[];
   string resultHeaders;
   string headers = "Content-Type: application/json\r\n";
   int timeout = 2000;
   int res = WebRequest("POST", url, headers, timeout, postData, resultData, resultHeaders);
   if(res == 200)
      Print("Result sent: ", json_result);
   else
      Print("POST error: ", res);
   return(res == 200);
  }
Step 5: ExecuteCommand – BUY/SELL/CLOSE_ALL/BALANCE logic
This function receives a parsed CJAVal object and performs the requested operation. For BUY and SELL, it first ensures the symbol is selected in Market Watch (SymbolSelect), retrieves the current Ask (for buy) or Bid (for sell), and then calls trade.Buy or trade.Sell with the specified volume. The comment string “Telegram” helps identify trades triggered by the bot. If the action is CLOSE_ALL, it loops through all open positions in reverse order and closes them one by one. For BALANCE, it simply returns the account balance and equity without making any trades. All outcomes are packaged as JSON strings so the Python bot can relay them to the user. By iterating positions backwards, we avoid indexing issues when closing multiple trades in a loop.
//+------------------------------------------------------------------+
//| Execute parsed command (BUY/SELL/CLOSE_ALL/BALANCE)              |
//+------------------------------------------------------------------+
string ExecuteCommand(CJAVal &cmd)
  {
   string action = cmd["action"].ToStr();
   if(action == "BUY" || action == "SELL")
     {
      string symbol = cmd["symbol"].ToStr();
      double volume = cmd["volume"].ToDbl();
      if(SymbolInfoInteger(symbol, SYMBOL_SELECT) == 0)
         SymbolSelect(symbol, true);
      double price = (action == "BUY") ? SymbolInfoDouble(symbol, SYMBOL_ASK)
                     : SymbolInfoDouble(symbol, SYMBOL_BID);
      ulong ticket = (action == "BUY") ? trade.Buy(volume, symbol, price, 0, 0, "Telegram")
                     : trade.Sell(volume, symbol, price, 0, 0, "Telegram");
      if(ticket)
         return(StringFormat("{\"status\":\"success\",\"ticket\":%d,\"price\":%.5f}", ticket, price));
      else
         return(StringFormat("{\"status\":\"error\",\"message\":\"Trade failed, error %d\"}", GetLastError()));
     }
   else
      if(action == "CLOSE_ALL")
        {
         int closed = 0;
         for(int i=PositionsTotal()-1; i>=0; i--)
            if(PositionGetTicket(i) && PositionSelectByTicket(PositionGetTicket(i)))
               if(trade.PositionClose(PositionGetTicket(i)))
                  closed++;
         return(StringFormat("{\"status\":\"success\",\"message\":\"Closed %d positions\"}", closed));
        }
      else
         if(action == "BALANCE")
           {
            double bal = AccountInfoDouble(ACCOUNT_BALANCE);
            double eq = AccountInfoDouble(ACCOUNT_EQUITY);
            return(StringFormat("{\"status\":\"success\",\"balance\":%.2f,\"equity\":%.2f}", bal, eq));
           }
   return("{\"status\":\"error\",\"message\":\"Unknown action\"}");
  }
Step 6: OnTick – periodic polling loop
Every tick, the EA checks if the polling interval has elapsed using a static datetime variable. If it is time to poll, it calls GetCommand and deserializes the JSON. The action field is examined: if it is empty or "None", there is nothing to do. Otherwise, ExecuteCommand is called and its result is posted back to the server via PostResult. This design keeps the EA responsive while avoiding unnecessary HTTP requests on every tick. The static variable persists across ticks, ensuring the poll rate stays consistent even during high‑volatility periods.
//+------------------------------------------------------------------+
//| Periodic command poll and execution                              |
//+------------------------------------------------------------------+
void OnTick()
  {
   static datetime lastPoll = 0;
   if(TimeCurrent() - lastPoll < POLL_INTERVAL)
      return;
   lastPoll = TimeCurrent();
   string json_str = GetCommand();
   if(json_str == "")
      return;
   CJAVal json;
   if(!json.Deserialize(json_str))
      return;
   string action = json["action"].ToStr();
   if(action == "" || action == "None")
      return;
   Print("Command: ", json_str);
   string result = ExecuteCommand(json);
   PostResult(result);
  }
Compiling and attaching the EA
- Copy JAson.mqh to <MetaTrader Data Folder>\MQL5\Include\OvercomingAccessibilityIV\.
- Place OvercomingAccessibilityIV.mq5 in <MetaTrader Data Folder>\MQL5\Experts\.
- In the MetaEditor, compile the EA (F7). Ensure no errors appear.
- In the MetaTrader 5 terminal, open the Navigator, drag the EA onto a chart (preferably EURUSD, 1M or 5M timeframe). Enable “Allow WebRequest to listed URL” and add http://127.0.0.1:8082 to the list.
- Verify the EA’s smiley face in the chart corner and “Voice EA started” in the Experts tab.
Running the Python server and testing the full pipeline
- Activate the virtual environment and run the Python script: python telegram_trading_bot.py . You should see “HTTP server on 8082” and “Telegram bot polling…”.
- Open Telegram, start a chat with your bot, and record a voice message: “buy 0.001 euro”.
- The bot should reply with “🎤 Processing…”, then “📝 Heard: buy 0.001 euro”, then “⏳ Sending to MetaTrader 5…”.
- Within 2‑4 seconds, you should receive “✅ Success! Ticket: 1234567, Price: 1.08500”.
- Check the MetaTrader 5 Trade tab – a new BUY order of 0.001 lots on EURUSD should appear.
Testing and Results
Test scenarios and expected outcomes
| Voice Input | Expected Command JSON | EA Action | Telegram Reply |
|---|---|---|---|
| buy 0.001 euro | {"action":"BUY","symbol":"EURUSD","volume":0.001} | Opens a 0.001 lot buy trade | ✅ Success! Ticket: …, Price: … |
| sell half gold | {"action":"SELL","symbol":"XAUUSD","volume":0.5} | Opens 0.5 lot sell trade | ✅ Success! … |
| close all | {"action":"CLOSE_ALL"} | Closes all open positions | ✅ Success! Closed N positions |
| balance | {"action":"BALANCE"} | No trade – returns balance/equity | ✅ Balance: …, Equity: … (if implemented in reply) |
| buy euro (no volume) | {"action":"BUY","symbol":"EURUSD","volume":0.001} | Default micro lot buy | ✅ Success! … |
| gibberish | null / empty | No action (invalid parse) | ❌ Invalid command. Example: … |
Video demonstration
The following video shows the entire pipeline in action. It shows Telegram, the Python server running in a Command Prompt, and the MetaTrader 5 terminal executing trades in real time.
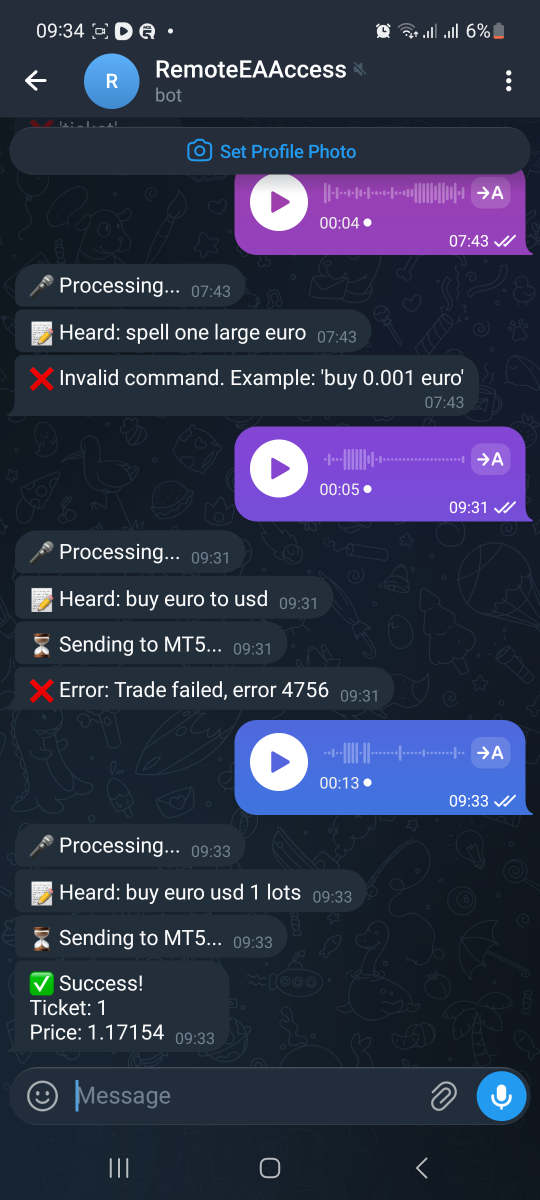
Fig. 1. Mobile Phone Telegram Interface
Latency and bandwidth measurements
Tests were performed on a home DSL connection (16 Mbps down, 2 Mbps up) with the Python server on the same machine as MetaTrader 5. End‑to‑end measurements from voice note send to Telegram reply:
- Voice download + conversion: 0.8 – 1.5 s
- Transcription (Google STT): 0.3 – 0.7 s
- Poll waiting (average 1 s of the 2 s interval): 0.2 – 1.9 s
- HTTP round-trip + trade execution: 50 – 200 ms
- Result reply: near‑instant
Total: 1.5 – 4.2 s. Bandwidth per poll request ~200 bytes, response (empty queue) ~20 bytes. A full trade cycle consumes less than 30 KB, including the voice note download. The system works reliably even over a throttled 128 kbps connection.
Edge cases and error handling
- MetaTrader 5 terminal closed: Python queue holds the command; EA never polls. Telegram waits 10 s and replies “No response from MetaTrader 5”.
- Invalid symbol: If a symbol is not in Market Watch, the EA attempts SymbolSelect. If still unavailable, the trade fails with a descriptive error (e.g., “Market closed”).
- Network timeout: EA’s WebRequest uses a 2‑second timeout. If the Python server is unreachable, GetCommand returns an empty string, no trade is attempted.
- Concurrent commands: The queue lock ensures thread‑safety. If multiple voice notes arrive while the EA is busy, they queue up and are processed in order.
- Google STT overload: The free API may occasionally return an empty string. The bot replies “Could not understand” and the user can re‑send.
Engineering Takeaways
- Pull‑based polling is robust. MQL5 cannot accept inbound connections, but HTTP polling behind a NAT is trivial. The 2‑second interval is fast enough for manual trading while keeping server load negligible.
- Null‑terminator stripping is critical. The EA’s StringToCharArray behavior is a common pitfall. Failing to strip the null byte causes json.loads to fail on the Python side.
- Threading must be explicit. The Python HTTP server and Telegram bot run in separate threads. Using a daemon thread for the server ensures the script exits cleanly when the bot is stopped.
- Default micro lots reduce risk. A voice command without a volume always opens 0.001 lots, preventing accidental large orders.
- Simplicity trumps complexity. The entire middleware is a single Python file with no database, no message broker, and no external service dependencies beyond Telegram. It is easy to debug, modify, and deploy on any Windows VPS.
Conclusion
We have built a functional semi‑automated voice‑to‑trade pipeline that untethers the trader from the desktop. A Telegram voice note spoken anywhere on the planet reaches a Python middleware running on a Windows PC, gets transcribed and converted into a JSON command, and is executed by an MQL5 Expert Advisor polling a local HTTP server — all within seconds and over minimal bandwidth. For traders with disabilities who rely on voice input, or for anyone needing to act on a market opportunity while away from the keyboard, this system removes a critical accessibility barrier.
The code is deliberately minimal: no cloud subscriptions, no external databases, and no complex messaging queues. It is modular enough that you could swap the speech‑to‑text engine or even replace Telegram with a different transport. While this pull‑based polling approach is effective, it is not the only way to achieve remote control — MQL5’s capabilities may still hold undiscovered gems or upcoming features that offer even more elegant solutions. We encourage you to download the attached files, set up the environment using the deployment checklist, and run a few test commands. Share your discoveries, enhancements, and any challenges in the comments section. Your feedback will help shape the ongoing exploration of accessibility solutions for MetaTrader 5 traders.
Attachments
File listing
| File Name | Type | Version | Description |
|---|---|---|---|
| telegram_trading_bot.py | Python 3 script | 1.0 | Telegram voice bot, HTTP server, STT, and command parser |
| OvercomingAccessibilityIV.mq5 | MQL5 Expert Advisor | 1.0 | Polling EA that executes remote voice commands |
| Jason.mqh | MQL5 Include | – | Third‑party JSON parser (place inside MQL5\Include\OvercomingAccessibilityIV\) |
Deployment checklist
- Install Python 3.10+ and create a virtual environment with python-telegram-bot, speechrecognition, pydub.
- Install ffmpeg via winget, locate the bin path with where ffmpeg , and set FFMPEG_DIR in the script.
- Obtain a Telegram bot token and numeric chat ID; update TELEGRAM_TOKEN and ALLOWED_CHAT_ID.
- Place JAson.mqh in MQL5/Include/OvercomingAccessibilityIV/ and OvercomingAccessibilityIV.mq5 in MQL5/Experts/.
- Compile the EA and attach it to a chart. Add http://127.0.0.1:8082 to the MetaTrader 5 WebRequest allowed list.
- Run the Python script and confirm “HTTP server on 8082” and “Telegram bot polling…” appear.
- Send a voice command via Telegram and verify trade execution in MetaTrader 5.
Warning: All rights to these materials are reserved by MetaQuotes Ltd. Copying or reprinting of these materials in whole or in part is prohibited.
This article was written by a user of the site and reflects their personal views. MetaQuotes Ltd is not responsible for the accuracy of the information presented, nor for any consequences resulting from the use of the solutions, strategies or recommendations described.

 MQL5 Wizard Techniques you should know (Part 91): Using Skip Lists and a Hopfield Network in a Custom Trailing Class
 Trading with the MQL5 Economic Calendar (Part 11): Modular Canvas News Dashboard
 Publish Your Article Code to MQL5 Algo Forge in 10 Minutes: A Step-by-Step Guide
 Feature Engineering for ML (Part 4): Implementing Time Features in MQL5

- Free trading apps
- Over 8,000 signals for copying
- Economic news for exploring financial markets
You agree to website policy and terms of use