

Larry Williams Market Secrets (Part 16): Detecting and Trading the Oops Gap Reversal Pattern
 2 912
2 912
 0
0

Introduction
The Oops gap reversal pattern is easy to recognize after it has formed, but applying it consistently in real time is more demanding. A trader must first determine whether the opening gap is large enough to qualify. The setup must then be tracked across later bars, confirmed before it expires, and converted into a trade with valid entry, stop-loss, take-profit, and position-size values.
Manual execution makes it difficult to apply the same rules consistently. A trader may miss the opening gap or confirm the reversal too early. They may also track a setup beyond its validity window or calculate risk inconsistently. These inconsistencies also make the pattern harder to evaluate objectively in the Strategy Tester.
This article converts the Oops pattern into a complete MQL5 Expert Advisor. The EA will detect qualifying gap-up and gap-down setups, store the required reference prices, and track each setup for a configurable number of bars. When a later completed candle confirms the reversal, the program will calculate the stop-loss, take-profit, and position size before checking whether a new trade is allowed.
The Exact Oops Rules Used in This Project
Before implementing the Expert Advisor, we need to define the trading rules in a form that can be translated into code. The Oops pattern used in this project is based on a failed opening gap. The market opens beyond the previous bar’s range, but later reverses back into that range. This project uses two setup types: bullish and bearish.
Bullish setup
A bullish setup begins when the current bar opens below the previous bar’s low. This creates a downside opening gap. The gap must be large enough to pass the minimum gap filter.

The EA will treat the setup as valid only when all the following conditions are met:
- The current bar opens below the previous bar’s low.
- The gap size is greater than or equal to "minimumGapSizePoints".
- The setup remains within "maxGapValidityBars".
- A later completed bar closes at or above the previous bar’s low.
When these conditions are satisfied, the intended trade direction is buy. The previous bar’s low becomes the confirmation level. The low of the gap bar becomes the stop-loss reference for the bullish trade.
Bearish setup
A bearish setup begins when the current bar opens above the previous bar’s high. This creates an upside opening gap. The gap must also pass the minimum gap filter.

The EA will treat the setup as valid only when all the following conditions are met:
- The current bar opens above the previous bar’s high.
- The gap size is greater than or equal to "minimumGapSizePoints".
- The setup remains within "maxGapValidityBars".
- A later completed bar closes at or below the previous bar’s high.
When these conditions are satisfied, the intended trade direction is sell. The previous bar’s high becomes the confirmation level. The high of the gap bar becomes the stop-loss reference for the bearish trade.
Trade parameters
After a setup is confirmed, the EA calculates the trade parameters from the stored setup data. The stop-loss level is taken from the gap bar, and the take-profit level is projected from the configured risk-to-reward ratio.
The trade parameters used in this project are:
- Bullish stop-loss: low of the gap bar.
- Bearish stop-loss: high of the gap bar.
- Take-profit: projected from riskRewardRatio.
- Position size: manual lot size or percentage-risk based.
- Direction filter: long only, short only, or both.
- Position rule: only one EA-managed position can remain open at a time.
The position rule prevents the EA from stacking multiple trades from the same strategy logic. If an EA-managed position already exists, the next confirmed setup is ignored until the current position is closed. The complete execution flow is:
- Detect gap
- Store setup
- Track validity
- Confirm reversal
- Calculate trade parameters
- Check existing positions
- Submit and validate the order
- Reset the setup
Project Setup
Creating the Expert Advisor
Create an Expert Advisor template named "lwOopsPatternExpert.mq5". Retain the standard OnInit(), OnDeinit(), and OnTick() event handlers, then add the program metadata, trading library, operating modes, and user inputs shown below.
Program Metadata and Trading Library
Replace the generated property declarations at the top of the file with the following block:
//+------------------------------------------------------------------+
//|                                          lwOopsPatternExpert.mq5 |
//|                                  Copyright 2026, MetaQuotes Ltd. |
//|                                             https://www.mql5.com |
//+------------------------------------------------------------------+
#property copyright "Copyright 2026, MetaQuotes Ltd. Developer: Chacha Ian"
#property link      "https://www.mql5.com/en/users/chachaian"
#property version   "1.00"
#property description "Detects and trades Larry Williams' Oops Gap Reversal pattern."
#property description "The EA tracks qualifying gaps, confirms closed-bar reversals,"
#property description " and calculates the stop loss, take profit, and position size."

//+------------------------------------------------------------------+
//| Standard Libraries                                               |
//+------------------------------------------------------------------+
#include <Trade\Trade.mqh>
The property declarations identify the program in MetaEditor and MetaTrader 5. "Trade.mqh" provides CTrade , which the EA uses to submit market orders and read the trade-server result.
Operating Modes
Add the following enumerations below the standard-library section:
//+------------------------------------------------------------------+
//| Custom Enumerations                                              |
//+------------------------------------------------------------------+
enum ENUM_OOPS_TRADE_DIRECTION
  {
   OOPS_TRADE_LONG_ONLY,
   OOPS_TRADE_SHORT_ONLY,
   OOPS_TRADE_BOTH
  };

enum ENUM_LOT_SIZE_INPUT_MODE
  {
   MODE_MANUAL,
   MODE_AUTO
  };
ENUM_OOPS_TRADE_DIRECTION controls whether the EA may trade bullish signals, bearish signals, or both. ENUM_LOT_SIZE_INPUT_MODE selects either a fixed position size or automatic volume calculation based on the configured percentage risk.
User Inputs
Add the complete input block below the enumerations:
//+------------------------------------------------------------------+
//| User Input Variables                                             |
//+------------------------------------------------------------------+
input group "Information"
input ulong           magicNumber = 254700680002;
input ENUM_TIMEFRAMES timeframe   = PERIOD_CURRENT;

input group "Oops Pattern Configurations"
input double minimumGapSizePoints = 500;
input int    maxGapValidityBars   = 3;

input group "Trade and Risk Management"
input ENUM_OOPS_TRADE_DIRECTION tradeDirection     = OOPS_TRADE_BOTH;
input double                    riskRewardRatio    = 2.5;
input ENUM_LOT_SIZE_INPUT_MODE  lotSizeMode        = MODE_AUTO;
input double                    riskPerTradePercent = 1.0;
input double                    positionSize        = 0.1;
The Information group defines the magic number used to identify the EA’s positions and the timeframe used for pattern detection.
The Oops Pattern Configurations group controls setup qualification. minimumGapSizePoints defines the minimum opening-gap distance in symbol points, while maxGapValidityBars limits how long an unconfirmed setup remains active.
The Trade and Risk Management group controls signal direction, target projection, and position sizing. The EA can trade long signals, short signals, or both. It can also use a fixed volume or calculate the position size from the selected percentage of account balance.
Compile the EA. If successful, MetaEditor should report zero errors and zero warnings. The Inputs tab should display the three configured groups in the same order.
Shared State and Safe Data Access
The EA must preserve an active Oops setup across multiple bars and reject incomplete market data before it reaches the strategy logic. This section adds the shared state model, the program-level variables, and a common set of checked data-access functions.
"OopsPatternState" Structure
Add the following structure below the user input declarations:
//+------------------------------------------------------------------+
//| Oops Pattern State                                               |
//+------------------------------------------------------------------+
//| Stores the detected gap, its lifecycle, and prepared trade data. |
//+------------------------------------------------------------------+
struct OopsPatternState
  {
   bool             gapDetected;
   bool             isGapUp;
   bool             isGapDown;
   datetime         gapBarTime;
   double           gapOpenPrice;
   double           gapBarHigh;
   double           gapBarLow;
   double           previousHigh;
   double           previousLow;
   int              barsSinceGap;
   int              maxBarsToFill;
   bool             gapFilled;
   bool             gapInvalidated;
   double           bullishTakeProfit;
   double           bearishTakeProfit;
   double           lotSize;
   ENUM_ORDER_TYPE  orderType;
   double           positionEntryPrice;
  };
"OopsPatternState" stores the active setup, including its direction, reference prices, lifecycle counters, confirmation status, and prepared trade parameters. Keeping these values in one shared structure allows detection, confirmation, risk management, and execution to operate on the same setup.
Shared Program Variables
Add the shared variables immediately below "OopsPatternState":
//+------------------------------------------------------------------+
//| Shared Program State                                             |
//+------------------------------------------------------------------+
OopsPatternState oopsState;       // Active Oops setup tracked across bars
CTrade           Trade;           // Submits orders and exposes execution results
double           askPrice;        // Latest verified price used for buy execution
double           bidPrice;        // Latest verified price used for sell execution
datetime         currentTime;     // Latest terminal time received by the EA
datetime         lastBarOpenTime; // Opening time of the last processed bar
These variables remain available throughout the EA lifecycle. The detection and confirmation functions update "oopsState", the risk-management functions prepare their trade values, and the execution functions use the shared "Trade" object and verified market prices.
Checked Symbol and Bar Access
The strategy depends on symbol properties and candle data that may be temporarily unavailable while MetaTrader 5 loads or synchronizes history. The following helpers provide a consistent checked-access pattern for every required value.
Add them below the shared program variables:
//+------------------------------------------------------------------+
//| Reads a double-valued symbol property safely                     |
//+------------------------------------------------------------------+
bool GetSymbolDoubleValue(string symbol,
                          ENUM_SYMBOL_INFO_DOUBLE property,
                          double &value,
                          string context)
  {
//--- Clear any earlier runtime error and initialize the output
   ResetLastError();
   value = 0.0;

//--- Request the selected symbol property
   if(!SymbolInfoDouble(symbol, property, value))
     {
      int errorCode = GetLastError();

      PrintFormat("%s: Failed to read symbol property %s for %s. Error %d.",
                  context,
                  EnumToString(property),
                  symbol,
                  errorCode);
      return false;
     }

   return true;
  }

//+------------------------------------------------------------------+
//| Reads the opening time of a selected bar safely                  |
//+------------------------------------------------------------------+
bool GetBarTime(string symbol,
                ENUM_TIMEFRAMES tf,
                int shift,
                datetime &value,
                string context)
  {
//--- Request the opening time of the selected bar
   ResetLastError();
   value = iTime(symbol, tf, shift);

//--- A zero value indicates that the bar data is unavailable
   if(value == 0)
     {
      int errorCode = GetLastError();

      PrintFormat("%s: Failed to read bar time for %s, timeframe %s, "
                  "shift %d. Error %d.",
                  context,
                  symbol,
                  EnumToString(tf),
                  shift,
                  errorCode);
      return false;
     }

   return true;
  }

//+------------------------------------------------------------------+
//| Reads the opening price of a selected bar safely                 |
//+------------------------------------------------------------------+
bool GetBarOpen(string symbol,
                ENUM_TIMEFRAMES tf,
                int shift,
                double &value,
                string context)
  {
//--- Request the opening price of the selected bar
   ResetLastError();
   value = iOpen(symbol, tf, shift);

//--- Reject unavailable or invalid price data
   if(value == 0.0)
     {
      int errorCode = GetLastError();

      PrintFormat("%s: Failed to read bar open for %s, timeframe %s, "
                  "shift %d. Error %d.",
                  context,
                  symbol,
                  EnumToString(tf),
                  shift,
                  errorCode);
      return false;
     }

   return true;
  }

//+------------------------------------------------------------------+
//| Reads the highest price of a selected bar safely                 |
//+------------------------------------------------------------------+
bool GetBarHigh(string symbol,
                ENUM_TIMEFRAMES tf,
                int shift,
                double &value,
                string context)
  {
//--- Request the highest price of the selected bar
   ResetLastError();
   value = iHigh(symbol, tf, shift);

//--- Reject unavailable or invalid price data
   if(value == 0.0)
     {
      int errorCode = GetLastError();

      PrintFormat("%s: Failed to read bar high for %s, timeframe %s, "
                  "shift %d. Error %d.",
                  context,
                  symbol,
                  EnumToString(tf),
                  shift,
                  errorCode);
      return false;
     }

   return true;
  }

//+------------------------------------------------------------------+
//| Reads the lowest price of a selected bar safely                  |
//+------------------------------------------------------------------+
bool GetBarLow(string symbol,
               ENUM_TIMEFRAMES tf,
               int shift,
               double &value,
               string context)
  {
//--- Request the lowest price of the selected bar
   ResetLastError();
   value = iLow(symbol, tf, shift);

//--- Reject unavailable or invalid price data
   if(value == 0.0)
     {
      int errorCode = GetLastError();

      PrintFormat("%s: Failed to read bar low for %s, timeframe %s, "
                  "shift %d. Error %d.",
                  context,
                  symbol,
                  EnumToString(tf),
                  shift,
                  errorCode);
      return false;
     }

   return true;
  }

//+------------------------------------------------------------------+
//| Reads the closing price of a selected bar safely                 |
//+------------------------------------------------------------------+
bool GetBarClose(string symbol,
                 ENUM_TIMEFRAMES tf,
                 int shift,
                 double &value,
                 string context)
  {
//--- Request the closing price of the selected bar
   ResetLastError();
   value = iClose(symbol, tf, shift);

//--- Reject unavailable or invalid price data
   if(value == 0.0)
     {
      int errorCode = GetLastError();

      PrintFormat("%s: Failed to read bar close for %s, timeframe %s, "
                  "shift %d. Error %d.",
                  context,
                  symbol,
                  EnumToString(tf),
                  shift,
                  errorCode);
      return false;
     }

   return true;
  }
These helpers request one value, validate the result, report the relevant symbol, timeframe, shift, and calling context when a request fails, and return "false" so the caller can stop safely. This keeps low-level data validation separate from the strategy functions that decide how each value should be used.
Initialization and New-Bar Control
The EA must start from a defined state and evaluate the strategy only once for each new bar. This section adds the setup reset, chart configuration, startup and shutdown handlers, and the new-bar control used by the final workflow.
Resetting the Active Setup
Add "ResetOopsPatternState()" below the market-data helpers:
//+------------------------------------------------------------------+
//| Resets the stored Oops setup to a neutral state                  |
//+------------------------------------------------------------------+
void ResetOopsPatternState()
  {
//--- Clear the identity of the previous setup
   oopsState.gapDetected    = false;
   oopsState.isGapUp        = false;
   oopsState.isGapDown      = false;
   oopsState.gapBarTime     = 0;
   oopsState.gapOpenPrice   = 0.0;

//--- Clear the stored reference prices
   oopsState.gapBarHigh     = 0.0;
   oopsState.gapBarLow      = 0.0;
   oopsState.previousHigh   = 0.0;
   oopsState.previousLow    = 0.0;

//--- Restore the setup lifecycle defaults
   oopsState.barsSinceGap   = 0;
   oopsState.maxBarsToFill  = maxGapValidityBars;
   oopsState.gapFilled      = false;
   oopsState.gapInvalidated = false;

//--- Clear prepared trade values and restore input-based defaults
   oopsState.bullishTakeProfit  = 0.0;
   oopsState.bearishTakeProfit  = 0.0;
   oopsState.lotSize            = positionSize;
   oopsState.orderType          = ORDER_TYPE_BUY;
   oopsState.positionEntryPrice = 0.0;

//--- Initialize the stored entry with a verified market price
   if(!GetSymbolDoubleValue(_Symbol,
                            SYMBOL_ASK,
                            oopsState.positionEntryPrice,
                            "ResetOopsPatternState"))
     {
      //--- Keep a neutral value when the symbol price is unavailable
      oopsState.positionEntryPrice = 0.0;
     }
  }
The function removes all data associated with the previous setup and restores values that depend on the current inputs. It will be used during initialization, after setup expiration, and after a confirmed signal completes its processing cycle.
Configuring the Chart
A consistent chart appearance makes visual testing easier. Add the following function below "ResetOopsPatternState()":
//+------------------------------------------------------------------+
//| Configures the chart for clear visual testing                    |
//+------------------------------------------------------------------+
bool ConfigureChartAppearance()
  {
//--- Apply a white background
   ResetLastError();

   if(!ChartSetInteger(0, CHART_COLOR_BACKGROUND, clrWhite))
     {
      Print("ConfigureChartAppearance: Failed to set chart background. Error ",
            GetLastError(), ".");
      return false;
     }

//--- Remove the grid to reduce visual clutter
   ResetLastError();

   if(!ChartSetInteger(0, CHART_SHOW_GRID, false))
     {
      Print("ConfigureChartAppearance: Failed to hide the chart grid. Error ",
            GetLastError(), ".");
      return false;
     }

//--- Display prices as candlesticks
   ResetLastError();

   if(!ChartSetInteger(0, CHART_MODE, CHART_CANDLES))
     {
      Print("ConfigureChartAppearance: Failed to set candle chart mode. Error ",
            GetLastError(), ".");
      return false;
     }

//--- Use black for chart labels and price-scale text
   ResetLastError();

   if(!ChartSetInteger(0, CHART_COLOR_FOREGROUND, clrBlack))
     {
      Print("ConfigureChartAppearance: Failed to set chart foreground. Error ",
            GetLastError(), ".");
      return false;
     }

//--- Keep both candle bodies white
   ResetLastError();

   if(!ChartSetInteger(0, CHART_COLOR_CANDLE_BULL, clrWhite))
     {
      Print("ConfigureChartAppearance: Failed to set the bullish candle color. Error ",
            GetLastError(), ".");
      return false;
     }

   ResetLastError();

   if(!ChartSetInteger(0, CHART_COLOR_CANDLE_BEAR, clrWhite))
     {
      Print("ConfigureChartAppearance: Failed to set the bearish candle color. Error ",
            GetLastError(), ".");
      return false;
     }

//--- Distinguish bullish and bearish candle outlines
   ResetLastError();

   if(!ChartSetInteger(0, CHART_COLOR_CHART_UP, clrSeaGreen))
     {
      Print("ConfigureChartAppearance: Failed to set the chart-up color. Error ",
            GetLastError(), ".");
      return false;
     }

   ResetLastError();

   if(!ChartSetInteger(0, CHART_COLOR_CHART_DOWN, clrBlack))
     {
      Print("ConfigureChartAppearance: Failed to set the chart-down color. Error ",
            GetLastError(), ".");
      return false;
     }

//--- Apply the queued chart-property changes
   ResetLastError();
   ChartRedraw(0);

   int redrawError = GetLastError();

   if(redrawError != 0)
     {
      Print("ConfigureChartAppearance: ChartRedraw reported error ",
            redrawError, ".");
      return false;
     }

   return true;
  }
The function applies a white background, removes the grid, enables candlestick display, and uses distinct bullish and bearish candle outlines. Each requested property is checked separately so initialization can report the exact chart setting that failed.
Initialization and Shutdown
Replace the generated "OnInit()" and "OnDeinit()" functions with the following versions:
//+------------------------------------------------------------------+
//| Expert initialization function                                   |
//+------------------------------------------------------------------+
int OnInit()
  {
//--- Stop initialization if the testing chart cannot be configured
   if(!ConfigureChartAppearance())
     {
      Print("OnInit: Failed to configure the chart appearance.");
      return INIT_FAILED;
     }

//--- Assign the identifier used to distinguish this EA's positions
   Trade.SetExpertMagicNumber(magicNumber);

//--- Allow the first verified bar time to initialize bar tracking
   lastBarOpenTime = 0;

//--- Start without an active or partially initialized setup
   ResetOopsPatternState();

   return INIT_SUCCEEDED;
  }

//+------------------------------------------------------------------+
//| Expert deinitialization function                                 |
//+------------------------------------------------------------------+
void OnDeinit(const int reason)
  {
//--- Record the reason supplied by MetaTrader 5 when the EA stops
   Print("Program terminated Reason code: ", reason);
  }
Initialization follows a fixed sequence: configure the chart; assign the magic number; reset new-bar tracking; and clear the shared setup state. "OnDeinit()" records the termination reason for diagnostic purposes.
Processing Once per Bar
The strategy uses completed bar data, so it should not repeat its calculations on every incoming tick. Add "IsNewBar()" below "ConfigureChartAppearance()":
//+------------------------------------------------------------------+
//| Returns true once when a new bar opens on the selected timeframe |
//+------------------------------------------------------------------+
bool IsNewBar(string symbol,
              ENUM_TIMEFRAMES tf,
              datetime &lastTm)
  {
   datetime currentTm = 0;

//--- Stop when the opening time of bar zero is unavailable
   if(!GetBarTime(symbol,
                  tf,
                  0,
                  currentTm,
                  "IsNewBar"))
     {
      return false;
     }

//--- Matching timestamps indicate that this bar was already processed
   if(currentTm == lastTm)
      return false;

//--- Store the verified timestamp before allowing strategy processing
   lastTm = currentTm;

   return true;
  }
"IsNewBar()" compares the opening time of bar zero with the timestamp stored in "lastBarOpenTime". The stored value changes only after the current bar time has been read successfully, preventing unavailable history data from creating a false new-bar event.
Short Diagnostic Test
For this single diagnostic checkpoint, replace the generated "OnTick()" function with the following temporary version:
//+------------------------------------------------------------------+
//| Expert tick function                                             |
//+------------------------------------------------------------------+
void OnTick()
  {
//--- Ignore repeated ticks received during the same candle
   if(!IsNewBar(_Symbol,
                timeframe,
                lastBarOpenTime))
     {
      return;
     }

//--- Report the verified opening time of the newly detected bar
   PrintFormat("New bar detected for %s on %s at %s.",
               _Symbol,
               EnumToString(timeframe),
               TimeToString(lastBarOpenTime,
                            TIME_DATE | TIME_MINUTES));
  }
Compile the EA and run it on a short timeframe or in the Strategy Tester. The Experts log should display one message when each new candle opens, regardless of how many ticks arrive during that bar.

After confirming one message per new bar, restore the standard event handler and continue with the remaining building blocks. The complete strategy workflow will be assembled later. The functions in this section preserve the initialization and bar-processing behavior of the completed EA.
Detecting and Tracking the Oops Setup
The EA can now process the strategy once per bar and preserve data between event calls. The next step is to identify a qualifying opening gap, store its reference values, and remove the setup when its confirmation window expires.
Detecting Gap Down and Gap Up
Add the following functions below "IsNewBar()":
//+------------------------------------------------------------------+
//| Returns true when the current bar opens far enough below the     |
//| previous bar's low to qualify as a gap-down setup                |
//+------------------------------------------------------------------+
bool IsGapDown()
  {
   double currentOpen = 0.0;
   double previousLow = 0.0;

//--- A gap cannot be evaluated without both reference prices
   if(!GetBarOpen(_Symbol,
                  timeframe,
                  0,
                  currentOpen,
                  "IsGapDown"))
     {
      return false;
     }

   if(!GetBarLow(_Symbol,
                 timeframe,
                 1,
                 previousLow,
                 "IsGapDown"))
     {
      return false;
     }

//--- Measure the distance from the current open to the previous low
   double gapSize = previousLow - currentOpen;

//--- Convert the configured point threshold into a price distance
   return(gapSize >= minimumGapSizePoints * _Point);
  }

//+------------------------------------------------------------------+
//| Returns true when the current bar opens far enough above the     |
//| previous bar's high to qualify as a gap-up setup                 |
//+------------------------------------------------------------------+
bool IsGapUp()
  {
   double currentOpen  = 0.0;
   double previousHigh = 0.0;

//--- A gap cannot be evaluated without both reference prices
   if(!GetBarOpen(_Symbol,
                  timeframe,
                  0,
                  currentOpen,
                  "IsGapUp"))
     {
      return false;
     }

   if(!GetBarHigh(_Symbol,
                  timeframe,
                  1,
                  previousHigh,
                  "IsGapUp"))
     {
      return false;
     }

//--- Measure the distance from the previous high to the current open
   double gapSize = currentOpen - previousHigh;

//--- Convert the configured point threshold into a price distance
   return(gapSize >= minimumGapSizePoints * _Point);
  }
The two functions apply mirrored comparisons. "IsGapDown()" compares the current opening price with the previous bar’s low, while "IsGapUp()" compares it with the previous bar’s high. In both cases, "minimumGapSizePoints" is multiplied by _Point so the user input is evaluated as a symbol-specific price distance.
Storing One Complete Setup
The Boolean gap checks identify a qualifying condition, but the EA must also preserve the prices and time required by the later confirmation and risk-management stages.
Add "DetectAndInitializeOopsGap()" below "IsGapUp()":
//+------------------------------------------------------------------+
//| Detects a qualifying gap and stores one complete Oops setup      |
//+------------------------------------------------------------------+
void DetectAndInitializeOopsGap()
  {
//--- Preserve the current setup until it confirms or expires
   if(oopsState.gapDetected)
      return;

//--- A gap up prepares a possible bearish reversal
   if(IsGapUp())
     {
      datetime gapBarTime   = 0;
      double   gapOpenPrice = 0.0;
      double   previousHigh = 0.0;
      double   previousLow  = 0.0;

//--- Collect every required value before changing shared state
      if(!GetBarTime(_Symbol,
                     timeframe,
                     0,
                     gapBarTime,
                     "DetectAndInitializeOopsGap"))
        {
         return;
        }

      if(!GetBarOpen(_Symbol,
                     timeframe,
                     0,
                     gapOpenPrice,
                     "DetectAndInitializeOopsGap"))
        {
         return;
        }

      if(!GetBarHigh(_Symbol,
                     timeframe,
                     1,
                     previousHigh,
                     "DetectAndInitializeOopsGap"))
        {
         return;
        }

      if(!GetBarLow(_Symbol,
                    timeframe,
                    1,
                    previousLow,
                    "DetectAndInitializeOopsGap"))
        {
         return;
        }

//--- Commit the bearish setup only after every data read succeeds
      oopsState.gapDetected    = true;
      oopsState.isGapUp        = true;
      oopsState.isGapDown      = false;
      oopsState.gapBarTime     = gapBarTime;
      oopsState.gapOpenPrice   = gapOpenPrice;
      oopsState.previousHigh   = previousHigh;
      oopsState.previousLow    = previousLow;
      oopsState.barsSinceGap   = 0;
      oopsState.maxBarsToFill  = maxGapValidityBars;
      oopsState.gapFilled      = false;
      oopsState.gapInvalidated = false;
      oopsState.orderType      = ORDER_TYPE_SELL;

      return;
     }

//--- A gap down prepares a possible bullish reversal
   if(IsGapDown())
     {
      datetime gapBarTime   = 0;
      double   gapOpenPrice = 0.0;
      double   previousHigh = 0.0;
      double   previousLow  = 0.0;

//--- Collect every required value before changing shared state
      if(!GetBarTime(_Symbol,
                     timeframe,
                     0,
                     gapBarTime,
                     "DetectAndInitializeOopsGap"))
        {
         return;
        }

      if(!GetBarOpen(_Symbol,
                     timeframe,
                     0,
                     gapOpenPrice,
                     "DetectAndInitializeOopsGap"))
        {
         return;
        }

      if(!GetBarHigh(_Symbol,
                     timeframe,
                     1,
                     previousHigh,
                     "DetectAndInitializeOopsGap"))
        {
         return;
        }

      if(!GetBarLow(_Symbol,
                    timeframe,
                    1,
                    previousLow,
                    "DetectAndInitializeOopsGap"))
        {
         return;
        }

//--- Commit the bullish setup only after every data read succeeds
      oopsState.gapDetected    = true;
      oopsState.isGapUp        = false;
      oopsState.isGapDown      = true;
      oopsState.gapBarTime     = gapBarTime;
      oopsState.gapOpenPrice   = gapOpenPrice;
      oopsState.previousHigh   = previousHigh;
      oopsState.previousLow    = previousLow;
      oopsState.barsSinceGap   = 0;
      oopsState.maxBarsToFill  = maxGapValidityBars;
      oopsState.gapFilled      = false;
      oopsState.gapInvalidated = false;
      oopsState.orderType      = ORDER_TYPE_BUY;
     }
  }
The function tracks only one setup at a time. A new gap cannot overwrite the current setup until it confirms or expires.
Each branch first reads the required values into local variables. The shared "oopsState" object is updated only after all requests succeed, preventing the EA from preserving an incomplete setup. A gap up prepares a sell order because the expected reversal is bearish, while a gap down prepares a buy order.
Updating the Setup Lifecycle
A detected gap remains valid only for the number of bars selected in "maxGapValidityBars". Add "UpdateOopsGapState()" below "DetectAndInitializeOopsGap()":
//+------------------------------------------------------------------+
//| Updates the age of the active Oops setup and removes it after    |
//| the configured confirmation window expires                       |
//+------------------------------------------------------------------+
void UpdateOopsGapState()
  {
//--- There is no lifecycle to update without an active setup
   if(!oopsState.gapDetected)
      return;

   datetime currentBarTime = 0;

//--- Preserve the current state when bar timing cannot be verified
   if(!GetBarTime(_Symbol,
                  timeframe,
                  0,
                  currentBarTime,
                  "UpdateOopsGapState"))
     {
      return;
     }

//--- The gap bar starts the setup but is not an elapsed fill bar
   if(currentBarTime == oopsState.gapBarTime)
      return;

//--- Count the newly opened bar once within the new-bar workflow
   oopsState.barsSinceGap++;

//--- Remove the setup after its allowed validity window is exceeded
   if(oopsState.barsSinceGap > oopsState.maxBarsToFill)
     {
      oopsState.gapInvalidated = true;
      ResetOopsPatternState();
     }
  }
The original gap bar initializes the setup but does not increase "barsSinceGap". Each later bar increments the counter once because the function will be called from the new-bar workflow. When the counter exceeds "maxBarsToFill", the setup is reset so the EA can begin tracking another qualifying gap.
The detection and lifecycle functions can be tested independently in the Strategy Tester, but the article now continues to confirmation and integrates them in the final workflow.
Confirming the Reversal
A detected gap becomes actionable only after a later completed bar closes back through the stored reference level. The confirmation functions below apply the bullish and bearish rules while preventing repeated signals from the same setup.
Add the following functions below "UpdateOopsGapState()":
//+------------------------------------------------------------------+
//| Returns true when an active gap-down setup confirms a bullish    |
//| reversal through the close of a later completed bar              |
//+------------------------------------------------------------------+
bool IsBullishSignal()
  {
//--- Accept only an active, unprocessed gap-down setup
   if(!oopsState.gapDetected ||
      !oopsState.isGapDown ||
      oopsState.gapFilled ||
      oopsState.gapInvalidated)
     {
      return false;
     }

//--- Require at least one completed bar after the original gap bar
   if(oopsState.barsSinceGap < 1)
      return false;

   double closePrice = 0.0;

//--- Bar one is the most recently completed candle
   if(!GetBarClose(_Symbol,
                   timeframe,
                   1,
                   closePrice,
                   "IsBullishSignal"))
     {
      return false;
     }

//--- Confirm only after price closes back at or above the previous low
   if(closePrice < oopsState.previousLow)
      return false;

//--- Mark the setup as filled before returning the signal
   oopsState.gapFilled = true;

   return true;
  }

//+------------------------------------------------------------------+
//| Returns true when an active gap-up setup confirms a bearish      |
//| reversal through the close of a later completed bar              |
//+------------------------------------------------------------------+
bool IsBearishSignal()
  {
//--- Accept only an active, unprocessed gap-up setup
   if(!oopsState.gapDetected ||
      !oopsState.isGapUp ||
      oopsState.gapFilled ||
      oopsState.gapInvalidated)
     {
      return false;
     }

//--- Require at least one completed bar after the original gap bar
   if(oopsState.barsSinceGap < 1)
      return false;

   double closePrice = 0.0;

//--- Bar one is the most recently completed candle
   if(!GetBarClose(_Symbol,
                   timeframe,
                   1,
                   closePrice,
                   "IsBearishSignal"))
     {
      return false;
     }

//--- Confirm only after price closes back at or below the previous high
   if(closePrice > oopsState.previousHigh)
      return false;

//--- Mark the setup as filled before returning the signal
   oopsState.gapFilled = true;

   return true;
  }
The confirmation logic is symmetrical. A gap-down setup confirms when a later completed bar closes at or above the stored previous low. A gap-up setup confirms when a later completed bar closes at or below the stored previous high. The original gap bar cannot confirm itself because at least one later bar must have elapsed.
Each function sets "gapFilled" before returning "true", preventing the same setup from producing another confirmation during a later processing cycle.
This implementation boundary is important: Part 16 supports later-bar confirmation only. Same-bar confirmation is introduced separately in the Part 17 custom indicator and is not part of this Expert Advisor.
Preparing Trade Parameters
After a reversal is confirmed, the EA must recover the structural stop level, calculate the take-profit price, and determine an executable position size. These values are prepared from the stored setup before any order request is submitted.
Recovering the Gap-Bar Stop Level
Confirmation may occur several bars after the original gap. The EA therefore uses the stored "gapBarTime" to locate that candle again and recover its relevant extreme.
Add the following functions below "IsBearishSignal()":
//+------------------------------------------------------------------+
//| Stores the gap-bar low as the stop reference for a buy setup     |
//+------------------------------------------------------------------+
void UpdateBullishGapBarStopLevel()
  {
//--- Locate the original gap bar using its stored opening time
   ResetLastError();

   int gapIndex = iBarShift(_Symbol,
                            timeframe,
                            oopsState.gapBarTime);

   if(gapIndex == -1)
     {
      Print("UpdateBullishGapBarStopLevel: Failed to locate the gap bar. Error ",
            GetLastError(), ".");
      return;
     }

   double gapBarLow = 0.0;

//--- Read the low of the recovered gap bar
   if(!GetBarLow(_Symbol,
                 timeframe,
                 gapIndex,
                 gapBarLow,
                 "UpdateBullishGapBarStopLevel"))
     {
      return;
     }

//--- Store the structural stop reference for the bullish setup
   oopsState.gapBarLow = gapBarLow;
  }

//+------------------------------------------------------------------+
//| Stores the gap-bar high as the stop reference for a sell setup   |
//+------------------------------------------------------------------+
void UpdateBearishGapBarStopLevel()
  {
//--- Locate the original gap bar using its stored opening time
   ResetLastError();

   int gapIndex = iBarShift(_Symbol,
                            timeframe,
                            oopsState.gapBarTime);

   if(gapIndex == -1)
     {
      Print("UpdateBearishGapBarStopLevel: Failed to locate the gap bar. Error ",
            GetLastError(), ".");
      return;
     }

   double gapBarHigh = 0.0;

//--- Read the high of the recovered gap bar
   if(!GetBarHigh(_Symbol,
                  timeframe,
                  gapIndex,
                  gapBarHigh,
                  "UpdateBearishGapBarStopLevel"))
     {
      return;
     }

//--- Store the structural stop reference for the bearish setup
   oopsState.gapBarHigh = gapBarHigh;
  }
"iBarShift()" converts the stored "gapBarTime" into the current bar index of the original gap bar. This is necessary because the gap bar may no longer be at shift zero when confirmation occurs. The bullish stop reference is the gap-bar low, while the bearish stop reference is the gap-bar high.
Calculating Take Profit
The target is projected from the distance between the intended entry and the structural stop:
Bullish risk = Entry − Gap-bar low
Bullish TP   = Entry + Risk × riskRewardRatio

Bearish risk = Gap-bar high − Entry
Bearish TP   = Entry − Risk × riskRewardRatio
Add the following functions below the stop-level functions:
//+------------------------------------------------------------------+
//| Calculates the take-profit level for a confirmed buy setup       |
//+------------------------------------------------------------------+
void UpdateBullishTakeProfit(double entryPrice)
  {
   double stopLoss     = oopsState.gapBarLow;
   double riskDistance = entryPrice - stopLoss;

//--- Reject a stop placed at or above the intended buy entry
   if(riskDistance <= 0.0)
     {
      PrintFormat("UpdateBullishTakeProfit: Invalid prices. Entry %.*f, "
                  "stop loss %.*f.",
                  _Digits,
                  entryPrice,
                  _Digits,
                  stopLoss);
      return;
     }

//--- Project the target above the entry by the configured risk multiple
   double projectedTP = entryPrice +
                        (riskDistance * riskRewardRatio);

//--- Store a price normalized to the symbol's number of digits
   oopsState.bullishTakeProfit = NormalizeDouble(projectedTP,
                                                _Digits);
  }

//+------------------------------------------------------------------+
//| Calculates the take-profit level for a confirmed sell setup      |
//+------------------------------------------------------------------+
void UpdateBearishTakeProfit(double entryPrice)
  {
   double stopLoss     = oopsState.gapBarHigh;
   double riskDistance = stopLoss - entryPrice;

//--- Reject a stop placed at or below the intended sell entry
   if(riskDistance <= 0.0)
     {
      PrintFormat("UpdateBearishTakeProfit: Invalid prices. Entry %.*f, "
                  "stop loss %.*f.",
                  _Digits,
                  entryPrice,
                  _Digits,
                  stopLoss);
      return;
     }

//--- Project the target below the entry by the configured risk multiple
   double projectedTP = entryPrice -
                        (riskDistance * riskRewardRatio);

//--- Store a price normalized to the symbol's number of digits
   oopsState.bearishTakeProfit = NormalizeDouble(projectedTP,
                                                _Digits);
  }
The calculations are symmetrical. A bullish target is projected above the entry, while a bearish target is projected below it. Both functions reject a nonpositive risk distance, so the EA does not prepare a target when the stop is on the wrong side of the intended entry.
Calculating Volume from Risk
Automatic position sizing converts the configured percentage risk into a broker-compatible trade volume. Add "CalculatePositionSizeByRisk()" below the take-profit functions:
//+------------------------------------------------------------------+
//| Calculates a broker-compatible volume from the configured risk   |
//+------------------------------------------------------------------+
double CalculatePositionSizeByRisk(ENUM_ORDER_TYPE orderType,
                                   double entryPrice,
                                   double stopLossPrice)
  {
//--- Use the account balance as the base for percentage risk
   ResetLastError();

   double accountBalance = AccountInfoDouble(ACCOUNT_BALANCE);

   if(accountBalance <= 0.0)
     {
      Print("CalculatePositionSizeByRisk: Invalid account balance. Error ",
            GetLastError(), ".");
      return 0.0;
     }

//--- Convert the selected percentage into a monetary risk amount
   double amountAtRisk = (riskPerTradePercent / 100.0) *
                         accountBalance;

   if(amountAtRisk <= 0.0)
     {
      Print("CalculatePositionSizeByRisk: The calculated risk amount is invalid.");
      return 0.0;
     }

//--- Estimate the loss produced by one lot at the selected stop
   double lossPerLot = 0.0;

   ResetLastError();

   if(!OrderCalcProfit(orderType,
                       _Symbol,
                       1.0,
                       entryPrice,
                       stopLossPrice,
                       lossPerLot))
     {
      Print("CalculatePositionSizeByRisk: OrderCalcProfit failed. Error ",
            GetLastError(), ".");
      return 0.0;
     }

   lossPerLot = MathAbs(lossPerLot);

   if(lossPerLot <= 0.0)
     {
      Print("CalculatePositionSizeByRisk: Loss per lot is invalid.");
      return 0.0;
     }

//--- Divide the permitted loss by the estimated one-lot loss
   double volume = amountAtRisk / lossPerLot;

//--- Read the broker's volume constraints for the current symbol
   double minLot  = 0.0;
   double maxLot  = 0.0;
   double lotStep = 0.0;

   if(!GetSymbolDoubleValue(_Symbol,
                            SYMBOL_VOLUME_MIN,
                            minLot,
                            "CalculatePositionSizeByRisk"))
     {
      return 0.0;
     }

   if(!GetSymbolDoubleValue(_Symbol,
                            SYMBOL_VOLUME_MAX,
                            maxLot,
                            "CalculatePositionSizeByRisk"))
     {
      return 0.0;
     }

   if(!GetSymbolDoubleValue(_Symbol,
                            SYMBOL_VOLUME_STEP,
                            lotStep,
                            "CalculatePositionSizeByRisk"))
     {
      return 0.0;
     }

//--- Reject inconsistent broker volume specifications
   if(minLot <= 0.0 ||
      maxLot <= 0.0 ||
      lotStep <= 0.0 ||
      minLot > maxLot)
     {
      Print("CalculatePositionSizeByRisk: Invalid broker volume constraints.");
      return 0.0;
     }

//--- Round down so normalization does not increase the intended risk
   volume = MathFloor(volume / lotStep) * lotStep;

//--- Clamp the result to the broker's permitted range
   if(volume < minLot)
      volume = minLot;

   if(volume > maxLot)
      volume = maxLot;

   return NormalizeDouble(volume, 2);
  }
The account balance determines the monetary amount at risk. "OrderCalcProfit()" then estimates the loss that one lot would produce between the intended entry and stop-loss prices. Dividing the risk amount by that one-lot loss produces the raw volume.
The result is adjusted to the symbol’s minimum, maximum, and step requirements. Rounding is performed downward before the range limits are applied so the calculated volume does not exceed the intended exposure through step normalization.
Choosing Manual or Automatic Volume
Add "UpdateOopsPositionSize()" below "CalculatePositionSizeByRisk()":
//+------------------------------------------------------------------+
//| Updates the volume prepared for the current Oops setup           |
//+------------------------------------------------------------------+
void UpdateOopsPositionSize()
  {
//--- Manual mode uses the fixed volume selected in the inputs
   if(lotSizeMode == MODE_MANUAL)
     {
      oopsState.lotSize = positionSize;
      return;
     }

//--- Select the structural stop associated with the setup direction
   double stopLossPrice = 0.0;

   if(oopsState.orderType == ORDER_TYPE_BUY)
      stopLossPrice = oopsState.gapBarLow;
   else
      if(oopsState.orderType == ORDER_TYPE_SELL)
         stopLossPrice = oopsState.gapBarHigh;

//--- Calculate the volume from the prepared entry and stop prices
   double calculatedLot = CalculatePositionSizeByRisk(
                             oopsState.orderType,
                             oopsState.positionEntryPrice,
                             stopLossPrice
                          );

//--- Fall back to the manual value when automatic sizing fails
   if(calculatedLot <= 0.0)
     {
      Print("UpdateOopsPositionSize: Falling back to manual lot size.");
      oopsState.lotSize = positionSize;
      return;
     }

   oopsState.lotSize = calculatedLot;
  }
Manual mode assigns "positionSize" directly. Automatic mode calculates the volume from the prepared entry, structural stop, and configured percentage risk. If the calculation cannot produce a valid result, the EA reports the failure and falls back to the manual lot size.
Position Control and Order Execution
Before submitting an order, the EA checks whether a position with the configured magic number is already open. It must then validate both the local "CTrade" result and the trade-server retcode.
Checking Existing Positions
Add the following functions below "UpdateOopsPositionSize()":
//+------------------------------------------------------------------+
//| Returns true when an open buy position uses the supplied magic   |
//+------------------------------------------------------------------+
bool IsThereAnActiveBuyPosition(ulong magic)
  {
   int totalPositions = PositionsTotal();

//--- Inspect every open position
   for(int i = totalPositions - 1; i >= 0; i--)
     {
      ResetLastError();

//--- PositionGetTicket() also selects the position for property access
      ulong ticket = PositionGetTicket(i);

      if(ticket == 0)
        {
         Print("IsThereAnActiveBuyPosition: Failed to select position ",
               i, ". Error ", GetLastError(), ".");
         continue;
        }

      long positionMagic = 0;
      long positionType  = -1;

//--- Read the identifier assigned by the opening Expert Advisor
      ResetLastError();

      if(!PositionGetInteger(POSITION_MAGIC, positionMagic))
        {
         Print("IsThereAnActiveBuyPosition: Failed to read POSITION_MAGIC "
               "for ticket ", ticket, ". Error ", GetLastError(), ".");
         continue;
        }

//--- Read the direction of the selected position
      ResetLastError();

      if(!PositionGetInteger(POSITION_TYPE, positionType))
        {
         Print("IsThereAnActiveBuyPosition: Failed to read POSITION_TYPE "
               "for ticket ", ticket, ". Error ", GetLastError(), ".");
         continue;
        }

//--- Stop after finding a buy position managed by this EA
      if((ulong)positionMagic == magic &&
         (ENUM_POSITION_TYPE)positionType == POSITION_TYPE_BUY)
        {
         return true;
        }
     }

   return false;
  }

//+------------------------------------------------------------------+
//| Returns true when an open sell position uses the supplied magic  |
//+------------------------------------------------------------------+
bool IsThereAnActiveSellPosition(ulong magic)
  {
   int totalPositions = PositionsTotal();

//--- Inspect every open position
   for(int i = totalPositions - 1; i >= 0; i--)
     {
      ResetLastError();

//--- Select the position and obtain its ticket
      ulong ticket = PositionGetTicket(i);

      if(ticket == 0)
        {
         Print("IsThereAnActiveSellPosition: Failed to select position ",
               i, ". Error ", GetLastError(), ".");
         continue;
        }

      long positionMagic = 0;
      long positionType  = -1;

//--- Read the identifier assigned by the opening Expert Advisor
      ResetLastError();

      if(!PositionGetInteger(POSITION_MAGIC, positionMagic))
        {
         Print("IsThereAnActiveSellPosition: Failed to read POSITION_MAGIC "
               "for ticket ", ticket, ". Error ", GetLastError(), ".");
         continue;
        }

//--- Read the direction of the selected position
      ResetLastError();

      if(!PositionGetInteger(POSITION_TYPE, positionType))
        {
         Print("IsThereAnActiveSellPosition: Failed to read POSITION_TYPE "
               "for ticket ", ticket, ". Error ", GetLastError(), ".");
         continue;
        }

//--- Stop after finding a sell position managed by this EA
      if((ulong)positionMagic == magic &&
         (ENUM_POSITION_TYPE)positionType == POSITION_TYPE_SELL)
        {
         return true;
        }
     }

   return false;
  }
Both functions scan open positions, select each ticket, read its magic number and position type, and return "true" when a matching EA-managed position is found. A new trade is permitted only when neither a buy nor a sell position with the configured magic number is active.
Validating the Trade-Server Response
A successful call to "Trade.Buy()" or "Trade.Sell()" confirms that the local request was formed and submitted, but it does not by itself prove that the trade server accepted the order. The returned retcode must therefore be checked explicitly.
Add the following function below the active-position checks:
//+------------------------------------------------------------------+
//| Checks whether the trade server accepted the submitted request   |
//+------------------------------------------------------------------+
bool IsTradeRequestSuccessful(string context)
  {
//--- Read the result code returned by the trade server
   uint retcode = Trade.ResultRetcode();

//--- Accept completed, partially completed, or placed requests
   if(retcode == TRADE_RETCODE_DONE ||
      retcode == TRADE_RETCODE_DONE_PARTIAL ||
      retcode == TRADE_RETCODE_PLACED)
     {
      PrintFormat("%s: Trade request accepted. Retcode %u (%s).",
                  context,
                  retcode,
                  Trade.ResultRetcodeDescription());
      return true;
     }

//--- Report the complete server response when the request is rejected
   PrintFormat("%s: Trade request rejected. Retcode %u (%s). Comment: %s.",
               context,
               retcode,
               Trade.ResultRetcodeDescription(),
               Trade.ResultComment());

   return false;
  }
The local request may succeed while the trade server still rejects or only partially processes it. Checking "Trade.ResultRetcode()" ensures that the EA bases its final execution result on the server response rather than on the method call alone.
Opening Buy and Sell Positions
Add the market-order functions below "IsTradeRequestSuccessful()":
//+------------------------------------------------------------------+
//| Sends a market buy request and verifies the server response      |
//+------------------------------------------------------------------+
bool OpenBuy(double entryPrice,
             double stopLoss,
             double takeProfit,
             double lotSize)
  {
   ResetLastError();

//--- Submit the market buy request with the prepared trade values
   if(!Trade.Buy(lotSize,
                 _Symbol,
                 entryPrice,
                 stopLoss,
                 takeProfit))
     {
      PrintFormat("OpenBuy: Trade.Buy failed. Error %d. Retcode %u (%s). "
                  "Comment: %s.",
                  GetLastError(),
                  Trade.ResultRetcode(),
                  Trade.ResultRetcodeDescription(),
                  Trade.ResultComment());
      return false;
     }

//--- Confirm that the trade server accepted the submitted request
   if(!IsTradeRequestSuccessful("OpenBuy"))
      return false;

   return true;
  }

//+------------------------------------------------------------------+
//| Sends a market sell request and verifies the server response     |
//+------------------------------------------------------------------+
bool OpenSell(double entryPrice,
              double stopLoss,
              double takeProfit,
              double lotSize)
  {
   ResetLastError();

//--- Submit the market sell request with the prepared trade values
   if(!Trade.Sell(lotSize,
                  _Symbol,
                  entryPrice,
                  stopLoss,
                  takeProfit))
     {
      PrintFormat("OpenSell: Trade.Sell failed. Error %d. Retcode %u (%s). "
                  "Comment: %s.",
                  GetLastError(),
                  Trade.ResultRetcode(),
                  Trade.ResultRetcodeDescription(),
                  Trade.ResultComment());
      return false;
     }

//--- Confirm that the trade server accepted the submitted request
   if(!IsTradeRequestSuccessful("OpenSell"))
      return false;

   return true;
  }
The two functions follow the same execution pattern. Each submits a market request with the prepared entry, stop-loss, take-profit, and volume values, reports any runtime failure, validates the trade-server retcode, and returns the final execution result.
Final OnTick() Workflow
The supporting functions are now ready to be assembled into the complete event workflow. The final "OnTick()" sequence is:
- Read the current Ask and Bid prices.
- Update the terminal time.
- Continue only when a new bar opens.
- Detect a new gap when no earlier setup is active.
- Age or expire the stored setup.
- Check for bullish confirmation.
- Prepare and execute the bullish trade when permitted.
- Check for bearish confirmation.
- Prepare and execute the bearish trade when permitted.
- Reset the completed setup.
Replace the temporary "OnTick()" function with the final version below:
//+------------------------------------------------------------------+
//| Expert tick function                                             |
//+------------------------------------------------------------------+
void OnTick()
  {
//--- Stop the current processing cycle when the Ask price is unavailable
   if(!GetSymbolDoubleValue(_Symbol,
                            SYMBOL_ASK,
                            askPrice,
                            "OnTick"))
     {
      return;
     }

//--- Stop the current processing cycle when the Bid price is unavailable
   if(!GetSymbolDoubleValue(_Symbol,
                            SYMBOL_BID,
                            bidPrice,
                            "OnTick"))
     {
      return;
     }

//--- Store the latest terminal time for the current event cycle
   currentTime = TimeCurrent();

//--- Evaluate the strategy only once when a new candle opens
   if(!IsNewBar(_Symbol,
                timeframe,
                lastBarOpenTime))
     {
      return;
     }

//--- Create a new setup only when no earlier gap is active
   DetectAndInitializeOopsGap();

//--- Increase the setup age or remove it after expiration
   UpdateOopsGapState();

//--- Prepare and process a confirmed bullish reversal
   if(IsBullishSignal())
     {
      Print("Bullish Signal Detected");

//--- Use the current Ask price as the intended buy entry
      oopsState.positionEntryPrice = askPrice;

//--- Prepare the stop loss, take profit, and position size
      UpdateBullishGapBarStopLevel();
      UpdateBullishTakeProfit(oopsState.positionEntryPrice);
      UpdateOopsPositionSize();

//--- Continue only when bullish trading is permitted
      if(tradeDirection == OOPS_TRADE_BOTH ||
         tradeDirection == OOPS_TRADE_LONG_ONLY)
        {
//--- Block the order when another EA-managed position is active
         if(!IsThereAnActiveBuyPosition(magicNumber) &&
            !IsThereAnActiveSellPosition(magicNumber))
           {
            if(!OpenBuy(oopsState.positionEntryPrice,
                        oopsState.gapBarLow,
                        oopsState.bullishTakeProfit,
                        oopsState.lotSize))
              {
               Print("OnTick: The bullish Oops trade was not opened.");
              }
           }
        }

//--- Complete the setup lifecycle regardless of execution outcome
      ResetOopsPatternState();
     }

//--- Prepare and process a confirmed bearish reversal
   if(IsBearishSignal())
     {
      Print("Bearish Signal Detected");

//--- Use the current Bid price as the intended sell entry
      oopsState.positionEntryPrice = bidPrice;

//--- Prepare the stop loss, take profit, and position size
      UpdateBearishGapBarStopLevel();
      UpdateBearishTakeProfit(oopsState.positionEntryPrice);
      UpdateOopsPositionSize();

//--- Continue only when bearish trading is permitted
      if(tradeDirection == OOPS_TRADE_BOTH ||
         tradeDirection == OOPS_TRADE_SHORT_ONLY)
        {
//--- Block the order when another EA-managed position is active
         if(!IsThereAnActiveBuyPosition(magicNumber) &&
            !IsThereAnActiveSellPosition(magicNumber))
           {
            if(!OpenSell(oopsState.positionEntryPrice,
                         oopsState.gapBarHigh,
                         oopsState.bearishTakeProfit,
                         oopsState.lotSize))
              {
               Print("OnTick: The bearish Oops trade was not opened.");
              }
           }
        }

//--- Clear the completed setup before tracking another gap
      ResetOopsPatternState();
     }
  }
All strategy decisions occur once per bar. The current Ask price is used for bullish entries, while the current Bid price is used for bearish entries. Direction filtering is applied only after a valid reversal has been confirmed, and its trade parameters have been prepared.
Before submitting an order, the EA checks for any existing position using the configured magic number. This prevents overlapping trades from the same strategy. The setup is reset after confirmation even when the selected direction is disabled, another position blocks execution, or the trade request fails. This ensures that one confirmed gap cannot remain active and generate another trade attempt.
Compile the complete EA. If successful, MetaEditor should report zero errors and zero warnings.
Testing and Backtest Results
The completed EA should be evaluated in two stages. Visual testing confirms that individual trades follow the coded rules, while the historical backtest checks whether the complete workflow can operate repeatedly without manual intervention.
Visual Verification
Use the following settings in the MetaTrader 5 Strategy Tester:
| Setting | Value |
|---|---|
| Expert Advisor | lwOopsPatternExpert |
| Symbol | XAUUSD |
| Timeframe | D1 |
| Date Range | From January 1, 2022 to February 28, 2026 |
| Modeling mode | Every tick based on real ticks |
| Initial balance | 10,000 |
| Trade Direction | OOPS_TRADE_BOTH |
| Minimum gap size | 500 points |
| Maximum validity | 3 bars |
| Risk-to-reward ratio | 2.5 |
| Lot-size mode | MODE_AUTO |
| Risk per trade | 1.0 |
These settings reproduce the main historical experiment used in this article. Enable Visual mode so each detected gap, later-bar confirmation, and executed position can be inspected directly on the chart.
Bullish Example
A bullish setup begins when a daily candle opens at least 500 points below the previous candle’s low. The EA stores that previous low as the confirmation boundary and waits for a later completed candle to close at or above it.
After confirmation, the current Ask price becomes the intended entry. The stop-loss is placed at the low of the original gap bar, and the take-profit is projected above the entry using the configured risk-to-reward ratio.

Bearish Example
A bearish setup begins when a daily candle opens at least 500 points above the previous candle’s high. The EA stores that previous high and waits for a later completed candle to close at or below it.
After confirmation, the current Bid price becomes the intended entry. The high of the original gap bar provides the stop-loss level, and the take-profit is projected below the entry.

These screenshots demonstrate the visible bullish and bearish execution paths. They do not prove every internal branch of the algorithm or establish the strategy’s profitability.
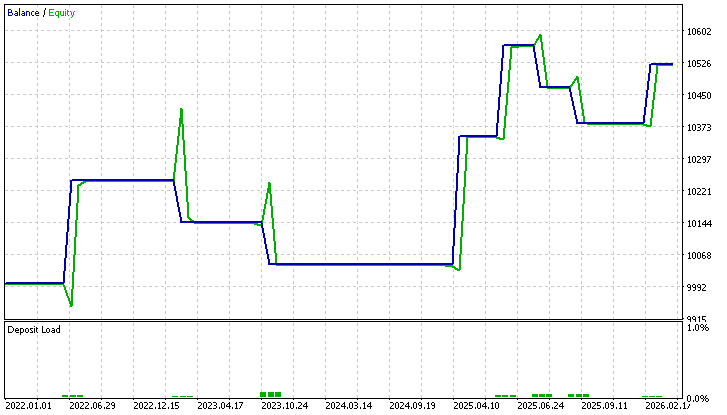
Historical Backtest
Run the complete historical test with Visual mode disabled while retaining the same symbol, timeframe, date range, deposit, and input values.
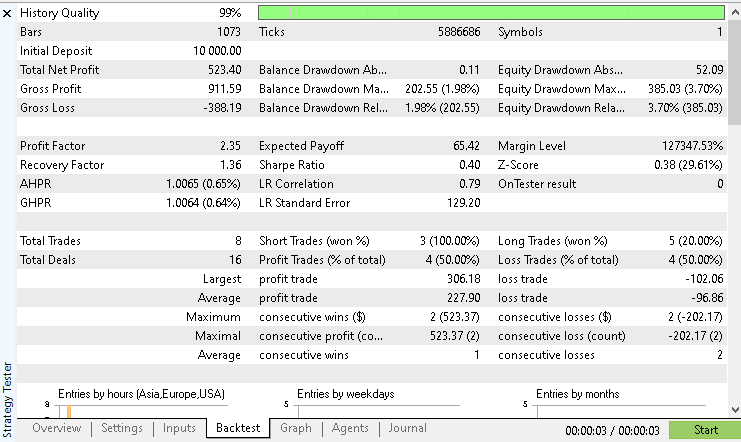
The original test produced the following results:
| Metric | Result |
|---|---|
| Initial balance | 10,000 |
| Total net profit | 523.40 |
| Total trades | 8 |
| Winning trades | 4 |
| Win rate | 50% |
| Short trades | 3 |
| Winning short trades | 3 |
| Long trades | 5 |
| Winning long trades | 1 |
The 50% win rate is calculated from four winning trades out of eight total trades. The available recorded results do not provide reliable text values for profit factor or drawdown, so those figures should be read directly from the final Strategy Tester report rather than estimated.
The 50% win rate is calculated from four winning trades out of eight total trades. The available recorded results do not provide reliable text values for profit factor or drawdown, so those figures should be read directly from the final Strategy Tester report rather than estimated.
Interpreting the Results
From an implementation perspective, the test confirms that the EA can detect qualifying gaps, preserve setup state, enforce the validity window, confirm reversals from completed bars, calculate trade parameters, check existing positions, and submit orders across several years of historical data.
However, eight trades are insufficient to establish a statistical edge. The reported result represents one symbol, timeframe, broker history, and input configuration. It should therefore be treated as an implementation baseline rather than proof that the Oops Gap Reversal pattern is profitable.
Implementation Limitations
The current EA has the following boundaries:
- Results depend on broker history and trading-session boundaries.
- Gap frequency varies by symbol and timeframe.
- Only one Oops setup is tracked at a time.
- Only one position with the configured magic number is permitted.
- Confirmation uses completed bars; same-bar confirmation is not supported.
- No trend, spread, trading-session, slippage, or news filters are applied.
- Position sizing depends on the broker’s symbol and volume specifications.
- The EA does not explicitly adjust orders for the broker's minimum stop-level requirements.
These limitations define the scope of the implementation and should be considered when comparing results across brokers or extending the EA for broader strategy research.
Conclusion
We converted the intuitive Oops Gap Reversal into a complete, reproducible MQL5 Expert Advisor with an objective and deterministic workflow. The EA implements precise gap-up and gap-down detection, maintains a persistent setup through OopsPatternState, enforces a configurable validity window, and confirms reversals only on later completed bars. Once confirmed, it uses the original gap-bar extreme as the structural stop, derives take-profit from the selected risk-to-reward ratio, and supports both manual and risk-based position sizing. It also prevents overlapping EA-managed positions and validates trade-server responses before treating an order as successfully submitted.
The result is a practical framework that can be compiled and tested immediately in the Strategy Tester for both visual and historical verification. It standardizes the detection, execution, and measurement of the Oops Gap Reversal pattern, making the strategy suitable for systematic research and further development. However, a deterministic implementation does not establish trading robustness or future profitability: results should be validated across different symbols, brokers, market conditions, and out-of-sample periods before any live use.
Attached Files
The article includes the complete Expert Advisor source code together with the Strategy Tester configuration files used for the historical experiment.
| File Name | Description |
|---|---|
| lwOopsPatternExpert.mq5 | Complete Expert Advisor developed in this article |
| configurations.ini | Strategy Tester environment used for the reported historical test |
| parameters.set | EA input values used for the reported historical test |
| MQL5.zip | Complete project archive with the MQL5 folder as its root. Extract it into the MetaTrader 5 terminal installation directory to place every file in its required project subfolder |
The archive uses the following directory structure:
MQL5
├── Experts
│   └── lwOopsPatternExpert
│       └── lwOopsPatternExpert.mq5
└── Files
    └── lwOopsPatternExpert
        ├── configurations.ini
        └── parameters.set
The archive contains source and configuration files only. No compiled .ex5 file is included. The complete project is also available in the Algo Forge repository:
Warning: All rights to these materials are reserved by MetaQuotes Ltd. Copying or reprinting of these materials in whole or in part is prohibited.
This article was written by a user of the site and reflects their personal views. MetaQuotes Ltd is not responsible for the accuracy of the information presented, nor for any consequences resulting from the use of the solutions, strategies or recommendations described.

 Implementing a Daily Loss Limit and Drawdown Circuit Breaker in MQL5
 Does This Entry Filter Really Add Edge? A Block-Permutation Test in MQL5
 Meta-Labeling the Classics (Part 3): Filtering and Sizing Bollinger Band Trades
 Automating Chart Patterns in MQL5 (Part 1): The Multi-Timeframe Swing Structure Engine

- Free trading apps
- Over 8,000 signals for copying
- Economic news for exploring financial markets
You agree to website policy and terms of use