
Creating a Trading Administrator Panel in MQL5 (Part XI): Modern feature communications interface (I)

Contents:
Introduction
The MetaTrader 5 terminal is rapidly evolving into a more efficient and compact trading workspace. With the recent integration of chat functionality, traders can now communicate privately with MQL5 friends, join groups, and subscribe to channels—all directly within the terminal. This represents a powerful step forward in securely connecting the MQL5 community through the MQL5 API.
To use these features, users must be logged into their MQL5 accounts within the terminal, have friends online, and be part of active channels or groups. These communities are valuable sources of trading insights, with experts frequently sharing ideas, screenshots, and live discussions—all seamlessly integrated without interrupting your chart view.
However, there is a current limitation: communication is confined within the MQL5 ecosystem. What’s missing is the ability to bridge MetaTrader 5 with external social platforms. Fortunately, the terminal’s API, combined with WebRequest capabilities, allows us to connect to third-party communication servers—such as Telegram, WhatsApp, and others.
Our Trading Administrator Panel aims to extend this functionality by introducing a modern Communications Panel—a user-friendly interface inspired by the messaging apps we all use daily. We're transitioning from a calculator-like prototype to a more intuitive, polished design. While the original foundation served well for initial testing, the upcoming version will support true two-way communication.
It’s no longer just the admin sending messages—recipients will also be able to reply. This shift requires implementing a proper contacts system, using unique chat IDs to manage external communication targets.
The image below demonstrates how to access the MQL5 Community and Chats from the MetaTrader 5 trading platform. The user account icon is typically located near the top-right corner of the terminal interface, as highlighted in the image.

Accessing MQL5 Community and Chats from the MetaTrader 5 terminal
If you’ve already added your MQL5 account, the terminal usually displays a summary in the startup journal, indicating that the MQL5 Community account and Chats are activated. Below is my terminal startup log from April 16, 2025.
2025.04.16 08:44:10.343 Network '40538052': previous successful authorization performed from 197.221.254.8 on 2025.04.16 03:48:48
2025.04.16 08:44:10.461 Experts expert New_Admin_Panel- (Volatility 75 (1s) Index.0,M5) loaded successfully
2025.04.16 08:44:12.323 Experts expert New_Admin_Panel- (Volatility 10 (1s) Index.0,M1) loaded successfully
2025.04.16 08:44:12.324 Network '40538052': terminal synchronized with Deriv.com Limited: 0 positions, 0 orders, 150 symbols, 0 spreads
2025.04.16 08:44:12.324 Network '40538052': trading has been enabled - hedging mode
2025.04.16 08:44:14.354 Trades  use MetaTrader VPS Hosting Service to speed up the execution: 2.26 ms via 'MQL5 Frankfurt FRA8 01' instead of 212.79 ms
2025.04.16 08:44:14.776 MQL5.community  activated for 'Billionaire2024', balance:
0.00
2025.04.16 08:44:15.826 MQL5.chats      activated for 'Billionaire2024'
In the overview below, we'll dive into the actual design and outline how we plan to achieve this next evolution in the Communications Panel.
Overview
Now, the expandability of the program is becoming more evident, thanks to our recent improvements in code organization. As you can see, we’re now able to focus specifically on the Communications Panel without being distracted by other components of the larger project. This modular approach is allowing us to maximize our creativity and productivity.
Today, we’re taking another significant step forward with the Communications Panel—similar to the progress we made when we improved and simplified the Admin Home interface. Currently, the Communications Panel lacks visual appeal and isn’t very user-friendly, which means we have some work ahead in refining and enhancing it.
While we’ll continue leveraging the MQL5 Standard Library, this iteration will also introduce new custom classes tailored to our needs. To ensure a clear path forward, we’ll begin with a conceptual design of the interface, identify the core components, and describe their individual purposes. After that, we’ll move into the coding and implementation phase.
Characteristics of a Messaging Interface based the popular messaging apps
Before we dive into designing our own interface, let’s take a moment to review the general characteristics of messaging interfaces used by today’s most popular apps. By examining these common design patterns, we can draw inspiration—adapting, adding, or removing features based on what aligns with our current goals.
I’ve compiled and outlined ten key characteristics below for us to explore. Once we go through them, we’ll take a look at some reference images I’ve prepared to visualize how these elements come together in real-world applications.
1. Clean and Minimalist Design:
- Flat UI with modern color schemes (light/dark modes)
- Consistent spacing and alignment
- Rounded message bubbles and smooth transitions
- Simple icons (paperclip, emoji, mic, etc.) with intuitive placement
2. Message Thread Area (Main Chat Window):
- Scrollable area displaying message history
- Time stamps on messages
- Message grouping by sender
- Visual feedback: delivered, read, edited, pinned
- Support for multimedia (images, video, voice, files)
3. Sidebar – Contacts or Channels:
- List of users, groups, or channels
- Online status indicators (green dots, last seen)
- Recent messages preview
- Search and filter options
4. Top Navigation Bar:
- Chat title or contact name
- User avatars or group icons
- Settings/Options dropdown (mute, archive, delete, etc.)
- Info button for viewing user or group profile
5. Message Input Area (Bottom Panel):
- Text input box with placeholder (“Type a message…”)
- Buttons:
- Send (paper plane icon)
- Attach File (paperclip)
- Emoji Picker (smiley)
- Voice Input (mic icon)
- Keyboard shortcuts (Enter to send, Shift+Enter for newline)
6. Media & Attachment Preview:
- Inline preview of images, videos, files
- Expand/collapse view
- Support for drag-and-drop uploads
7. Notifications and Alerts:
- In-app and system notifications
- Sound/vibration toggle
- Mentions with highlights (@username)
- Message popups or badges (unread count)
8. Sync Across Devices:
- Web, mobile, and desktop apps that sync in real-time
- Persistent chat history across sessions
- Support for offline mode with automatic sync when back online
9. Security & Privacy Features:
- End-to-end encryption (e.g., WhatsApp)
- Message timer/self-destruct (Telegram)
- 2FA and secure login sessions
10. Extensibility & Bots:
- Support for bots and automation
- Plugins/integrations with other tools (calendar, task manager, trading terminal)
- Rich APIs and WebSocket support
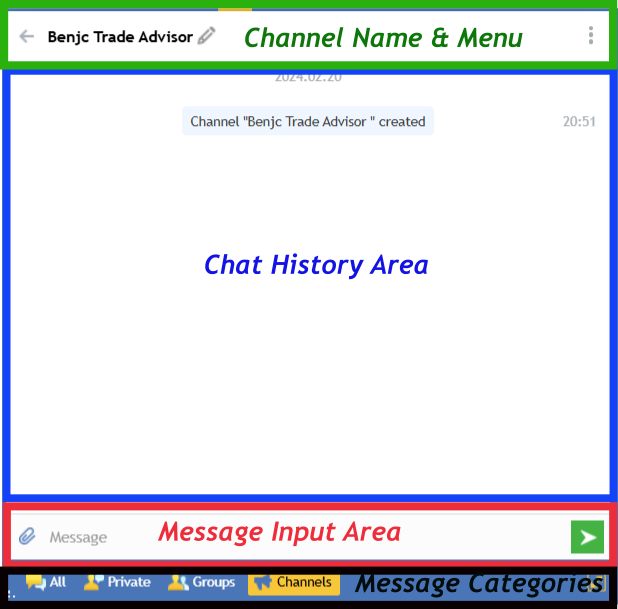
- The message input area is bordered in red.
- The chat history section is bordered in blue.
- The top portion, bordered in green, includes the contact name, the search button, and the three-dot menu.

Reference image from Telegram Chat
Another close reference is the MQL5 Messaging interface, which I had the chance to capture from an MQL5 channel I created a while back. Take a look at the layout below—you’ll notice some similarities and slight variations in the design in comparison with the previous Telegram image. We can draw some useful insights from this general messaging interface layout.
MQL5 Messaging reference
The examples we can use as references are practically inexhaustible. Many follow a similar layout—whether it's email messaging systems with reply buttons and additional features, chatbot interfaces, or others. These all offer valuable insights into what a communication interface typically requires. From these references, we can now move forward and consider the most suitable design for our trading communication panel, keeping in mind its limitations and the specific type of communication it will handle.
Design and Code Implementation
This is where the migration begins—from the current panel to the new one. But before that, we need to consider the key communication needs of the Trading Administrator when interacting with other traders. These typically include:
1. Special Instructions to Traders
We had already implemented the idea of quick message buttons to reduce the time between composing and sending a message. This ensures traders receive important information as quickly as possible. However, the Admin also needs the ability to send custom messages, and the message input area is designed to accommodate that. We will enhance how the quick messages are accessed.
2. One-Way vs. Two-Way Communication
Normally, only the admin is allowed to send messages, making it a one-way communication system. However, there are scenarios where it might be useful for the trading community to respond. We should consider supporting this kind of interaction in the new panel designs.
3. Screenshot Sharing and Visual Analysis
Sharing images—especially annotated charts or screenshots—is becoming increasingly important. The MQL5 terminal already includes a screenshot tool that allows direct uploads to MQL5 community charts. We’d like to incorporate a button that captures a screenshot and attaches it to a message for quick sharing. This will allow the admin to visually communicate trading insights more effectively.
4. Contacts Management
Since Telegram offers multiple communication modes—such as one-on-one chats, channels, and groups—we can use unique chat IDs to assign contacts and organize communications into individual and group categories. This also means we need to effectively manage how contacts are stored and retrieved within our application.
Here's our conceptual design and then we can proceed code implementation:

New Design: Communications Panel
Currently, our priority is refining the interface design. In the next sections of this article, we’ll build upon this foundation—adding new features and further enhancing the user experience.
The MQL5 standard library provides several #include directives that we will leverage to design our interface. The table below outlines the relevant header files and describes their intended usage in the project.
| Header File | Purpose |
|---|---|
| Dialog.mqh | Provides the base class for dialog windows, managing UI components, event handling, and rendering. |
| Panel.mqh | Used to group and arrange controls visually, enabling layout sections like the main area and compose panel. |
| Label.mqh | Displays non-editable text such as input field labels and section headers like "Username" or "Chat ID". |
| Edit.mqh | Provides editable text boxes for user input, including message composition and Telegram credentials. |
| Button.mqh | Enables creation of clickable buttons for user actions such as send, Attach File, Screenshot, or Theme Toggle. |
| VirtualKeys.mqh | Defines constants for handling keyboard input events, such as detecting Enter key presses in the message field. |
| Telegram.mqh | Handles the logic for sending messages via the Telegram Bot API, including URL requests and HTTP communication. |
The CommunicationsDialog Class Header (CommunicationsDialog.mqh)
In this section, I’ll break down how our code works and highlight the benefits of organizing it into focused, reusable pieces. By isolating each panel’s logic in its own header—with defines, enumerations, class declarations, and method implementations—we keep our main program simple, maintainable, and easy to share across multiple EAs. You don’t need to worry about internal GUI details when you include one of these headers; you just call its interface. Now, let’s explore the improvement of our Communications Panel step by step.
Class Header Structure
At the very top of the file, we protect against multiple includes, and pull in all necessary dependencies:
- Includes: MQL5 standard UI controls (Dialog, Panel, Edit, Button, Label) plus VirtualKeys (for key codes) and our custom Telegram.mqh.
- Constants & Enums: Panel geometry macros, UI paddings, and two enumerations for message types (OUTGOING, INCOMING, SYSTEM) and statuses (SENT, FAILED).
- Class Definition: CCommunicationDialog inherits from CAppDialog and declares:
- Private members for panels, buttons, labels, edits, and a dark-mode flag.
- Public methods including constructor, InitCredentials, CreatePanel, event handling (OnEvent), and action handlers (OnSendMessage, etc.).
- Private helpers for building each UI area, theming, history I/O, and formatting messages.
#ifndef COMMUNICATIONS_MQH
#define COMMUNICATIONS_MQH

#include <Controls\Dialog.mqh>
#include <Controls\Panel.mqh>
#include <Controls\Edit.mqh>
#include <Controls\Button.mqh>
#include <Controls\Label.mqh>
#include <VirtualKeys.mqh>
#include "Telegram.mqh"

#define COMM_PANEL_LEFT    80
…
enum ENUM_UI_CONSTANTS { UI_INDENT=10, UI_GAP=5, … };
enum ENUM_MESSAGE_TYPE   { MSG_OUTGOING, MSG_INCOMING, MSG_SYSTEM };
enum ENUM_MESSAGE_STATUS { STATUS_SENT,   STATUS_FAILED };

class CCommunicationDialog : public CAppDialog
{
private:
   CPanel  m_mainPanel, m_composePanel;
   CButton m_toggleSidebar, m_sendButton, m_attachButton, m_screenshotButton;
   CLabel  m_usernameLabel, m_chatIdLabel, m_tokenLabel, m_mainUserLabel;
   CEdit   m_usernameInput, m_chatIdInput, m_tokenInput, m_messageThread, m_messageInput;
   bool    m_isDarkMode;

public:
   CCommunicationDialog():m_isDarkMode(false){}
   bool CreatePanel(...);
   virtual bool OnEvent(...);
   void OnSendMessage();
   …
private:
   bool CreateSidebar();
   bool CreateMainContent();
   bool CreateComposeArea();
   void ApplyTheme();
   void LoadChatHistory(string);
   void SaveMessageToHistory(...);
   string FormatMessage(...);
   void AddMessageToHistory(...);
};
#endif // COMMUNICATIONS_MQH
1. CreatePanel: Assembling the Dialog
This method orchestrates the entire dialog setup. It first invokes the base dialog creation, then sequentially builds the sidebar, the main message display, and the compose area. Each step is checked for success—on any failure the dialog tears down immediately. Once all regions are in place, the current theme is applied, saved history is loaded, and the chart is redrawn to present the complete interface.
bool CCommunicationDialog::CreatePanel(const long chart,const string name,const int subwin,
                                       const int x1,const int y1,const int x2,const int y2)
{
   if(!CAppDialog::Create(chart,name,subwin,x1,y1,x2,y2)) return(false);
   if(!CreateSidebar())     { Destroy(); return(false); }
   if(!CreateMainContent()) { Destroy(); return(false); }

   Add(m_mainPanel);
   Add(m_messageThread);
   Add(m_mainUserLabel);

   if(!CreateComposeArea()){ Destroy(); return(false); }
   Add(m_composePanel);
   Add(m_messageInput);
   Add(m_screenshotButton);
   Add(m_attachButton);
   Add(m_sendButton);

   ApplyTheme();
   LoadChatHistory(m_chatIdInput.Text());
   ChartRedraw();
   return(true);
}
2. CreateSidebar: Credentials & Theme Toggle
In the sidebar setup, we place a theme-toggle button at the top, followed by three labelled input fields: username, chat ID, and bot token. These inputs allow manual entry of Telegram credentials. Although currently manual, this panel lays the groundwork for a future contact-management system where users can store and select saved chat IDs rather than retyping them.
bool CCommunicationDialog::CreateSidebar()
{
   int x=UI_INDENT, y=UI_INDENT, w=UI_SIDEBAR_WIDTH-2*UI_INDENT, h=16;

   m_toggleSidebar.Create(m_chart_id,m_name+"_Toggle",m_subwin,x,y,x+h,y+h);
   m_toggleSidebar.Text("🌙"); Add(m_toggleSidebar);
   y+=h+UI_GAP;

   m_usernameLabel.Create(...); m_usernameLabel.Text("Username:");
   m_usernameInput.Create(...); Add(m_usernameLabel); Add(m_usernameInput);
   y+=h+UI_GAP;

   m_chatIdLabel.Create(...); m_chatIdLabel.Text("Chat ID:");
   m_chatIdInput.Create(...); Add(m_chatIdLabel); Add(m_chatIdInput);
   y+=h+UI_GAP;

   m_tokenLabel.Create(...); m_tokenLabel.Text("Bot Token:");
   m_tokenInput.Create(...); Add(m_tokenLabel); Add(m_tokenInput);

   return(true);
}
3. CreateMainContent: Message History Display
This section initializes the central panel and its read-only edit control, which displays the conversation thread. A label at the top indicates the current user’s name. Users cannot edit past messages directly—new messages get appended programmatically—providing a clean, single line view of the chat history.
bool CCommunicationDialog::CreateMainContent()
{
   int x1=UI_SIDEBAR_WIDTH, y1=0;
   int x2=ClientAreaWidth(), y2=ClientAreaHeight()-UI_COMPOSE_HEIGHT;

   m_mainPanel.Create(...);
   m_messageThread.Create(...);
   m_messageThread.ReadOnly(true);
   m_messageThread.FontSize(9);
   m_messageThread.TextAlign(ALIGN_LEFT);

   m_mainUserLabel.Create(...);
   m_mainUserLabel.Text(m_usernameInput.Text());
   return(true);
}
4. CreateComposeArea: Typing & Action Buttons
Here we build the bottom compose area where users enter new messages. It includes a placeholder text field and three action buttons: screenshot, attach file, and send. The field starts with a hint text and a subdued color, guiding the user to type their message before invoking one of the action buttons.
bool CCommunicationDialog::CreateComposeArea()
{
   int caW=ClientAreaWidth(), caH=ClientAreaHeight();
   int y1=caH-UI_COMPOSE_HEIGHT, y2=caH;
   int x1=UI_SIDEBAR_WIDTH, x2=caW;

   m_composePanel.Create(...);

   m_screenshotButton.Create(...); m_screenshotButton.Text(StringFormat("%c",58));
   m_attachButton.    Create(...); m_attachButton.   Text(StringFormat("%c",49));
   m_sendButton.      Create(...); m_sendButton.     Text(StringFormat("%c",216));

   m_messageInput.Create(...);
   m_messageInput.Text("Type here...");
   m_messageInput.Color(clrGray);

   return(true);
}
5. OnCaptureScreenshot: GIF Snapshot
When the screenshot button is clicked, the method captures the current chart as a GIF file named with a timestamp, saves it into the MQL5 Files folder, and logs a system-style message indicating success or failure. This gives traders a quick way to share chart snapshots directly through Telegram.
void CCommunicationDialog::OnCaptureScreenshot()
{
   datetime ts=TimeCurrent();
   string tstr=TimeToString(ts, TIME_DATE|TIME_MINUTES|TIME_SECONDS);
   StringReplace(tstr,":","");

   string path=TerminalInfoString(TERMINAL_DATA_PATH)+"\\MQL5\\Files\\";
   string fn=path+"shot_"+tstr+".gif";

   bool ok=ChartScreenShot(m_chart_id,fn,0,0);
   m_messageThread.Text(
      FormatMessage(ok ? "Screenshot saved: "+fn : "Screenshot failed",
                    MSG_SYSTEM, ok ? STATUS_SENT : STATUS_FAILED, ts));
   ChartRedraw();
}
6. OnSendMessage: Sending & History
This handler validates that the message input isn’t empty and that credentials are provided. It calls our Telegram-sending function, records the result in a history file, and appends the new message—with a checkmark or cross icon—to the thread display. Finally, it resets the input field to its placeholder state and triggers a redraw.
void CCommunicationDialog::OnSendMessage()
{
   string txt=m_messageInput.Text();
   if(txt==""||txt=="Type here...") { /* show error */ return; }

   string chatId=m_chatIdInput.Text(), token=m_tokenInput.Text();
   if(chatId==""||token=="")        { /* show error */ return; }

   datetime ts=TimeCurrent();
   bool sent = SendMessageToTelegram(txt, chatId, token);
   SaveMessageToHistory(chatId, ts, MSG_OUTGOING,
                        sent ? STATUS_SENT : STATUS_FAILED, txt);

   m_messageThread.Text(FormatMessage(txt, MSG_OUTGOING,
                                     sent ? STATUS_SENT : STATUS_FAILED, ts));

   m_messageInput.Text("Type here...");
   m_messageInput.Color(clrGray);
   ChartRedraw();
}
7. Theming & Formatting Helpers
Supporting methods handle dynamic theming and message formatting. ApplyTheme switches background and text colors for dark or light mode. FormatMessage builds timestamped lines with user or system prefixes and sent/failed icons. The history I/O methods save and load conversations to per-chat data files, ensuring persistence across sessions.
void CCommunicationDialog::ApplyTheme()
{
   color bg = m_isDarkMode ? (color)0x2E2E35 : clrWhite;
   color txt= m_isDarkMode ? clrWhite       : clrBlack;
   m_mainPanel.ColorBackground(bg);
   m_composePanel.ColorBackground(bg);
   m_messageThread.Color(txt);
   m_messageInput.Color(txt);
   …
}

string CCommunicationDialog::FormatMessage(const string message,
                                           ENUM_MESSAGE_TYPE type,
                                           ENUM_MESSAGE_STATUS status,
                                           datetime ts)
{
   string user = (type==MSG_OUTGOING ? m_mainUserLabel.Text()
                                     : type==MSG_INCOMING ? "Them" : "System");
   string ico = (status==STATUS_SENT ? ShortToString(0x2713)
                                     : ShortToString(0x2717));
   return StringFormat("[%s] %s: %s %s",
                       TimeToString(ts,TIME_MINUTES), user, message,
                       (type==MSG_SYSTEM ? "" : ico));
}
Integration of the CommunicationsDialog class into the EA
In the main EA (New_Admin_Pane.mq5), the Communications.mqh header is brought to life in the HandleCommunications routine. When the user clicks the Communications button, the code either toggles visibility of an existing CCommunicationDialog instance or, on first use, instantiates the dialog, initializes it with the stored chat ID and bot token, and builds its UI by calling CreatePanel. Finally, it calls show() to render the panel on the chart. This pattern—lazy creation on first click, followed by simple show/hide logic—keeps resourcing usage minimal and cleanly separates the CommunicationsDialog interface from the rest of the EA.
// handle showing/hiding communications panel
void HandleCommunications()
{
   if(g_commPanel)
   {
      // toggle visibility if already created
      if(g_commPanel.IsVisible()) g_commPanel.Hide();
      else                        g_commPanel.Show();
      ChartRedraw();
      return;
   }

   // first‐time creation
   g_commPanel = new CCommunicationDialog();

   // build the UI
   if(!g_commPanel.CreatePanel(g_chart_id,
                               "CommunicationsPanel",
                               g_subwin,
                               80, 100, 430, 500))
   {
      delete g_commPanel;
      g_commPanel = NULL;
      Print("CommPanel creation failed: ", GetLastError());
      return;
   }

   // pre‐fill credentials and display
   g_commPanel.InitCredentials(TwoFactorChatID, TwoFactorBotToken);
   g_commPanel.Show();
   ChartRedraw();
}
Testing and Results
I began by compiling the EA in MetaTrader 5 with no errors or warnings. On launch, the main interface appeared as expected, complete with the toggle, Trade, Communications, Analytics, and Show All/Hide All buttons.
1. Launching the Communications Panel
Clicking the “Communications” button instantiated the CCommunicationDialog. The dialog appeared in the allocated chart area, confirming that the CreatePanel routine and its sidebar, main thread, and compose sections were built correctly.
2. Entering Credentials
I tested both methods of entering credentials: placing values in the EA input parameters (TwoFactorChatID and TwoFactorBotToken) and editing them directly via the sidebar’s Chat ID and Bot Token fields. In both cases, InitCredentials populated the fields correctly and updated the “You” label.
3. Sending a Message
With valid credentials entered, I typed a sample message into the compose box and pressed Enter or clicked the Send button. The message appeared in the thread with a ✓ icon, and I received the same message in my Telegram chat—demonstrating that the WebRequest logic and JSON escaping work as intended.
4. Theme Toggle
Clicking the moon/sun button toggled between light and dark modes instantly. The panel’s background and text colors updated, and a system message (“Dark mode enabled” or “Light mode enabled”) was appended to the thread.
5. Screenshot & Attach Buttons
Pressing the screenshot button expected to capture and save a GIF file saved to MQL5\Files, then print confirmation message and also report failure. The attachment button currently logs a placeholder system message (“Attachment TBD”), indicating that full file-upload functionality remains to be implemented.

Testing the Communcations Panel update
Conclusion
It’s absolutely feasible to build a modern feature messaging panel fully integrated into an Expert Advisor, but current standard library controls impose some constraints—most notably, the built-in CEdit supports only a single line and a limited character count. In this first phase, we’ve delivered a solid foundational layout with credential input, message composition, theming, and Telegram integration. Through research, I’ve also identified community-developed extensions that overcome these same limitations; I’ll share those references in the next update.
Looking ahead to the next article, here are our key goals:
1. Multi-line chat history
- Incoming messages aligned left; outgoing aligned right
- Automatic word-wrapping and a scroll bar when content exceeds the view area
2. Contact management system
- A simple address book with persistent storage and retrieval by username or chat ID
3. Reliable screenshot and attachment support
- Guaranteed file creation and upload workflows
- This will help traders share real-time chart insights instantly, which is critical for team collaboration and trade reviews.
4. Enhanced keyboard shortcuts
- Quick-send mappings for common messages and commands
These are just a few of the enhancements on our roadmap. Your feedback and suggestions are always welcome—this is a continuous journey of learning, collaboration, and refinement. One day soon, we’ll celebrate a fully polished external API messaging experience inside MetaTrader 5. I hope this article adds at least one new idea to your programming mindset.
Happy trading, and stay tuned for the next article!
| File | Specifications |
|---|---|
| New_Admin_Panel.mq5 | A multi-panel integrated Expert Advisor system for advanced trading administration on MetaTrader 5. |
| CommunicationsDialog.mqh | Communications Panel Module: Defines a modern message interface panel (Telegram-based) for MetaTrader 5 Expert Advisors. Place it in the terminal include folder. |
| All Modules.zip | Contains all headers needed. Add them to MQL5/Include folder. |
Warning: All rights to these materials are reserved by MetaQuotes Ltd. Copying or reprinting of these materials in whole or in part is prohibited.
This article was written by a user of the site and reflects their personal views. MetaQuotes Ltd is not responsible for the accuracy of the information presented, nor for any consequences resulting from the use of the solutions, strategies or recommendations described.

- Free trading apps
- Over 8,000 signals for copying
- Economic news for exploring financial markets
You agree to website policy and terms of use