
Mastering Log Records (Part 3): Exploring Handlers to Save Logs

Introduction
In the first article of this series, Mastering Log Records (Part 1): Fundamental Concepts and First Steps in MQL5, we embarked on the creation of a log library tailored for the development of Expert Advisors (EAs). In it, we explored the motivation behind creating such an essential tool: to overcome the limitations of MetaTrader 5's native logs and bring a robust, customizable, and powerful solution to the MQL5 universe.
To recap the main points covered, we laid the foundation for our library by establishing the following fundamental requirements:
- Robust structure using the Singleton pattern, ensuring consistency between code components.
- Advanced persistence for storing logs in databases, providing traceable history for in-depth audits and analysis.
- Flexibility in outputs, allowing logs to be stored or displayed conveniently, whether in the console, in files, in the terminal or in a database.
- Classification by log levels, differentiating informative messages from critical alerts and errors.
- Customization of the output format, to meet the unique needs of each developer or project.
With this well-established foundation, it became clear that the logging framework we are developing will be much more than a simple event log; it will be a strategic tool for understanding, monitoring and optimizing the behavior of EAs in real time.
Now, in this third article, we will take a crucial step: understanding the concept of handlers. If formatters organize the data, handlers are responsible for deciding where the logs will go. They act as “plumbers”, directing messages to the appropriate destinations, be they files, consoles, databases or even notification systems. In this article, we will understand the logic behind handlers, create practical examples to apply them in different scenarios and explore their integration with formatters. By the end, you will have all the necessary tools to build highly customizable and efficient log streams. Shall we get started?
What are Handlers?
Handlers are fundamental components that define where log messages should be sent. Think of them as “message dispatchers” that receive information from the Logger and forward it to the appropriate destination, be it the console, a file, an email, or even a remote server.
Imagine that you are managing a factory. Products (log messages) need to be transported to different destinations: some go to the warehouse, some to shipping, and some are stored as historical records. The dispatcher is the one who decides where each product goes, and this role is played by the Handlers.
Each Handler can have specific settings, such as severity levels (e.g., only send error messages), output formats (e.g., include timestamps or not), and destinations.
These components play a vital role in enabling the separation and intelligent routing of log messages, which is particularly important in medium to large applications. Handlers enable functionality such as helping developers debug errors in real-time in the console, storing detailed logs for future analysis, sending critical email alerts when something urgent occurs, or forwarding monitoring information to a central server. All of this can be achieved simultaneously without the need for complex configurations.
How Handlers Work
To understand how Handlers work in practice, let's look at an example in the library. See this diagram below, which shows the basic flow of message logging:
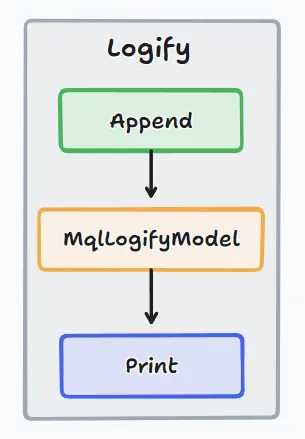
In the current flow, the main function of the CLogify class is the Append method, which is responsible for receiving log data, including severity level, message, source, and time of the log entry. With this data, the Append method creates a variable of the MqlLogifyModel type, this variable is sent to the terminal console via the native Print function.
This flow is functional, but it has limitations: all logs can only be displayed in the console, and there is no flexibility to handle or store these messages elsewhere.
Now, with the implementation of Handlers, the flow has been significantly improved. Take a look at the new diagram:
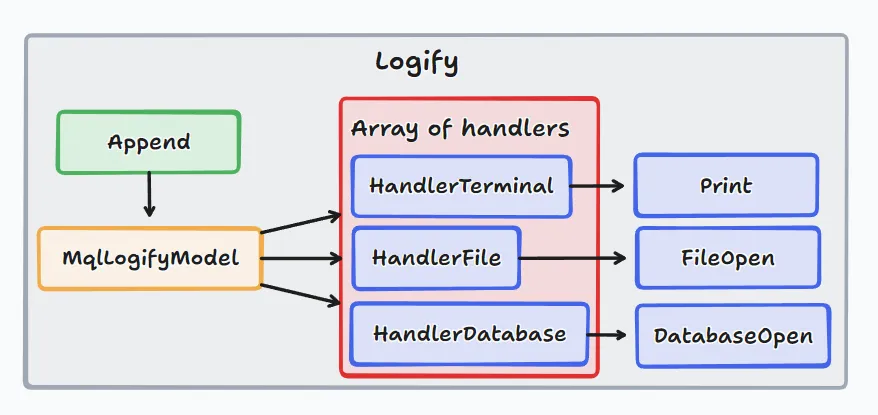
In the new flow:
- The Append method continues to receive the log information (severity, message, source, time, etc.).
- It creates the same MqlLogifyModel variable to store the data.
- Instead of sending it directly to the console, the log is now passed to a list of Handlers, represented by an Handlers array.
Each handler can process the data independently, allowing log messages to be routed to multiple destinations.
Here are three basic examples of Handlers that can be used in this system:
- HandlerTerminal: Displays log data directly in the MetaTrader 5 terminal, useful for real-time diagnostics and debugging.
- HandlerFile: Saves logs to a file in .txt or .log formats, ideal for storing execution histories or creating detailed reports for future analysis.
- HandlerDatabase: Stores logs in a database, such as SQLite, allowing advanced data queries, including trend analysis or more complex audits.
I'll give you a practical example of the usefulness of handlers. Imagine that you have developed a trading robot that needs an efficient log system to monitor its execution. You can configure the Handlers as follows:
- Save only DEBUG and INFO messages in a file to record all operations performed, including market entries and exits.
- Display logs in the terminal with WARN and ERROR messages, allowing you to track problems in real time.
- Save critical errors in the database, ensuring that relevant information can be retrieved and analyzed by engineers or analysts later.
This structure ensures a more robust, organized and efficient log system. With Handlers, you have full control over how and where logs are processed and stored.
Implementing the Handlers base class
Let's implement a base class, called CLogifyHandler , which will be the common base (parent class) for all Handlers created later. We start by creating a folder called Handlers in the root directory of the library. Inside this new folder, create a file called LogifyHandler . In the created file, the CLogifyHandler class will be defined, initially, it will only have a basic constructor and destructor. The initial code will look like this:
//+------------------------------------------------------------------+
//|                                                LogifyHandler.mqh |
//|                                                     joaopedrodev |
//|                       https://www.mql5.com/en/users/joaopedrodev |
//+------------------------------------------------------------------+
#property copyright "joaopedrodev"
#property link      "https://www.mql5.com/en/users/joaopedrodev"
//+------------------------------------------------------------------+
//| class : CLogifyHandler                                           |
//|                                                                  |
//| [PROPERTY]                                                       |
//| Name        : CLogifyHandler                                     |
//| Heritage    : No heritage                                        |
//| Description : Base class for all log handlers.                   |
//|                                                                  |
//+------------------------------------------------------------------+
class CLogifyHandler
  {
public:
                     CLogifyHandler(void);
                    ~CLogifyHandler(void);
  };
//+------------------------------------------------------------------+
//| Constructor                                                      |
//+------------------------------------------------------------------+
CLogifyHandler::CLogifyHandler(void)
  {
  }
//+------------------------------------------------------------------+
//| Destructor                                                       |
//+------------------------------------------------------------------+
CLogifyHandler::~CLogifyHandler(void)
  {
  }
//+------------------------------------------------------------------+
At this point, the CLogifyHandler class serves as a "skeleton" that will be expanded to include more functionality.
Now let's add the necessary imports, starting with the LogifyModel.mqh file, which defines the logging model that will be used by the Handlers.
//+------------------------------------------------------------------+
//| Include files                                                    |
//+------------------------------------------------------------------+
#include "../LogifyModel.mqh"
This file contains the definition of the MqlLogifyModel class or structure, which is used to encapsulate the data for each log message, such as severity level, message, and source.
The next step is to add two protected attributes to the class:
- m_name: Stores the name of the Handler, which can be useful for identification during debugging or reporting.
- m_level: Defines the severity level that the Handler will process (e.g., DEBUG, INFO, ERROR).
In addition, we will create public methods to set and retrieve these values.
class CLogifyHandler
  {
protected:
   string            m_name;
   ENUM_LOG_LEVEL    m_level;

public:
   //--- Set/Get
   void              SetLevel(ENUM_LOG_LEVEL level);
   string            GetName(void);
   ENUM_LOG_LEVEL    GetLevel(void);
  };
//+------------------------------------------------------------------+
//| Set level                                                        |
//+------------------------------------------------------------------+
void CLogifyHandler::SetLevel(ENUM_LOG_LEVEL level)
  {
   m_level = level;
  }
//+------------------------------------------------------------------+
//| Get name                                                         |
//+------------------------------------------------------------------+
string CLogifyHandler::GetName(void)
  {
   return(m_name);
  }
//+------------------------------------------------------------------+
//| Get level                                                        |
//+------------------------------------------------------------------+
ENUM_LOG_LEVEL CLogifyHandler::GetLevel(void)
  {
   return(m_level);
  }
//+------------------------------------------------------------------+
The m_name attribute can only be set in derived classes through their constructors, enforcing security and encapsulation. This is why there is no SetName method.
There are three basic methods that all Handlers must implement:
- Emit(MqlLogifyModel &data): Processes a log message and sends it to the specified destination (file, console, database, etc.).
- Flush(): Terminates or clears any pending operations.
- Close(): Closes the Handler and releases any associated resources.
At the moment, these functions will be defined as virtual, with empty default implementations. This will allow each child class to customize the behavior as needed.
class CLogifyHandler
  {
public:
   //--- Handler methods
   virtual void      Emit(MqlLogifyModel &data);         // Processes a log message and sends it to the specified destination
   virtual void      Flush(void);                        // Clears or completes any pending operations
   virtual void      Close(void);                        // Closes the handler and releases any resources
  };
//+------------------------------------------------------------------+
//| Processes a log message and sends it to the specified destination|
//+------------------------------------------------------------------+
void CLogifyHandler::Emit(MqlLogifyModel &data)
  {
  }
//+------------------------------------------------------------------+
//| Clears or completes any pending operations                       |
//+------------------------------------------------------------------+
void CLogifyHandler::Flush(void)
  {
  }
//+------------------------------------------------------------------+
//| Closes the handler and releases any resources                    |
//+------------------------------------------------------------------+
void CLogifyHandler::Close(void)
  {
  }
//+------------------------------------------------------------------+
At this stage, the methods do nothing, as it is up to the child classes (such as HandlerFile, HandlerDatabase, etc.) to implement the specific behavior of each Handler.
Implementing the Handlers
With the base class CLogifyHandler implemented, we can start creating specialized handlers that inherit from it. This approach follows the fundamental principles of object-oriented programming, such as inheritance and polymorphism, allowing modularity and flexibility in the code. Each specialized handler will be responsible for handling logs in a specific way, taking advantage of the common structure of the base class, but implementing its own particular logic for the Emit , Flush and Close methods.
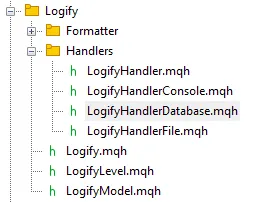
Before implementing the handlers, let's better organize our project. Create three new files inside the Handlers folder, they are: LogifyHandlerConsole.mqh , LogifyHandlerDatabase.mqh , and LogifyHandlerFile.mqh . The final structure will look like this:
In the LogifyHandlerConsole.mqh file, we will create the CLogifyHandlerConsole class, which inherits the attributes and methods of the CLogifyHandler base class. One of the first modifications will be to the value of the m_name variable, set to "console" in the class constructor. This will help to clearly identify the handler at runtime. Here is the initial definition of the class:
//+------------------------------------------------------------------+
//| Include files                                                    |
//+------------------------------------------------------------------+
#include "LogifyHandler.mqh"
//+------------------------------------------------------------------+
//| class : CLogifyHandlerConsole                                    |
//|                                                                  |
//| [PROPERTY]                                                       |
//| Name        : CLogifyHandlerConsole                              |
//| Heritage    : CLogifyHandler                                     |
//| Description : Log handler, inserts data into terminal window.    |
//|                                                                  |
//+------------------------------------------------------------------+
class CLogifyHandlerConsole : public CLogifyHandler
  {
public:
                     CLogifyHandlerConsole(void);
                    ~CLogifyHandlerConsole(void);

   virtual void      Emit(MqlLogifyModel &data);         // Processes a log message and sends it to the specified destination
   virtual void      Flush(void);                        // Clears or completes any pending operations
   virtual void      Close(void);                        // Closes the handler and releases any resources
  };
//+------------------------------------------------------------------+
//| Constructor                                                      |
//+------------------------------------------------------------------+
CLogifyHandlerConsole::CLogifyHandlerConsole(void)
  {
   m_name = "console";
  }
//+------------------------------------------------------------------+
//| Destructor                                                       |
//+------------------------------------------------------------------+
CLogifyHandlerConsole::~CLogifyHandlerConsole(void)
  {
  }
//+------------------------------------------------------------------+
The Emit function is primarily responsible for processing a log message and sending it to the appropriate destination. In the case of the console, this simply means displaying the formatted message in the MetaTrader terminal. Here is the implementation of the method:
//+------------------------------------------------------------------+
//| Processes a log message and sends it to the specified destination|
//+------------------------------------------------------------------+
void CLogifyHandlerConsole::Emit(MqlLogifyModel &data)
  {
   if(data.level >= this.GetLevel())
     {
      Print("Console handler: ",data.formated);
     }
  }
//+------------------------------------------------------------------+
Note that before displaying the message, we check whether the log level ( data.level ) matches the level configured in the handler. This ensures that only important or relevant messages are displayed.
Following the same principle as the console handler, we can create other specialized handlers, such as for databases and files. The files to change are LogifyHandlerDatabase.mqh and LogifyHandlerFile.mqh . While these handlers may share the same basic logic, their specific implementations of Emit may vary.
This handler is designed to store the logs in a database, although for now we will display a message to the console for demonstration purposes. The code for the Emit function would be:
//+------------------------------------------------------------------+
//| Processes a log message and sends it to the specified destination|
//+------------------------------------------------------------------+
void CLogifyHandlerDatabase::Emit(MqlLogifyModel &data)
  {
   if(data.level >= this.GetLevel())
     {
      Print("Database handler: ",data.formated);
     }
  }
//+------------------------------------------------------------------+
The LogifyHandlerFile handler will be used to write logs to a specific file. Here is an initial implementation for Emit:
//+------------------------------------------------------------------+
//| Processes a log message and sends it to the specified destination|
//+------------------------------------------------------------------+
void CLogifyHandlerFile::Emit(MqlLogifyModel &data)
  {
   if(data.level >= this.GetLevel())
     {
      Print("File handler: ",data.formated);
     }
  }
//+------------------------------------------------------------------+
Although we have defined the Flush and Close methods in the base class, not all handlers will need to implement them immediately.
- The Flush method can be useful in more complex handlers, such as file writing operations or real-time streaming.
- The Close method will be essential to release resources, such as database connections, or close writing streams.
In the case of the console handler, these methods are left empty, as there are no additional operations to be performed. Remember that I am only showing code snippets, the full version is available for download at the end of the article.
Adding Handlers to the CLogify class
Now that we have implemented the handlers and they are working in isolation, it is time to integrate them into the main class of the library, called CLogify. To do this, we start by importing the base class CLogifyHandler , which contains the necessary structure for all handlers:
#include "Handlers/LogifyHandler.mqh"
#include "Handlers/LogifyHandlerConsole.mqh"
#include "Handlers/LogifyHandlerDatabase.mqh"
#include "Handlers/LogifyHandlerFile.mqh"
In the implementation of the CLogify class, we will add a private attribute to store the handlers that will be used. I chose an array of pointers of the CLogifyHandler type, since the handlers will be managed dynamically.
In addition, the class will have specific methods to manage the handlers:
- AddHandler: Adds a new handler to the array.
- HasHandler: Checks if a specific handler already exists in the list, using its name as a criterion.
- GetHandler: Gets a handler, either by name or by index in the array.
- SizeHandlers: Returns the total number of handlers in the list.
Here is the updated code for the CLogify class, now with these methods:
class CLogify
  {
private:
   CLogifyHandler    *m_handlers[];

public:
   //--- Handler
   void              AddHandler(CLogifyHandler *handler);
   bool              HasHandler(string name);
   CLogifyHandler    *GetHandler(string name);
   CLogifyHandler    *GetHandler(int index);
   int               SizeHandlers(void);
  };
//+------------------------------------------------------------------+
//| Add handler to handlers array                                    |
//+------------------------------------------------------------------+
void CLogify::AddHandler(CLogifyHandler *handler)
  {
   int size = ArraySize(m_handlers);
   ArrayResize(m_handlers,size+1);
   m_handlers[size] = GetPointer(handler);
  }
//+------------------------------------------------------------------+
//| Checks if handler is already in the array by name                |
//+------------------------------------------------------------------+
bool CLogify::HasHandler(string name)
  {
   int size = ArraySize(m_handlers);
   for(int i=0;i<size;i++)
     {
      if(m_handlers[i].GetName() == name)
        {
         return(true);
        }
     }
   return(false);
  }
//+------------------------------------------------------------------+
//| Get handler by name                                              |
//+------------------------------------------------------------------+
CLogifyHandler *CLogify::GetHandler(string name)
  {
   int size = ArraySize(m_handlers);
   for(int i=0;i<size;i++)
     {
      if(m_handlers[i].GetName() == name)
        {
         return(m_handlers[i]);
        }
     }
   return(NULL);
  }
//+------------------------------------------------------------------+
//| Get handler by index                                             |
//+------------------------------------------------------------------+
CLogifyHandler *CLogify::GetHandler(int index)
  {
   return(m_handlers[index]);
  }
//+------------------------------------------------------------------+
//| Gets the total size of the handlers array                        |
//+------------------------------------------------------------------+
int CLogify::SizeHandlers(void)
  {
   return(ArraySize(m_handlers));
  }
//+------------------------------------------------------------------+
With the handler management methods ready, let's adjust the operation of the Append function so that it uses the handlers when processing logs.
The Append method will now iterate through all the available handlers in the array and call the Emit method of each one so that the log is sent to the corresponding destination (such as console, database, etc.).
Here is the updated code for the Append method:
//+------------------------------------------------------------------+
//| Generic method for adding logs                                   |
//+------------------------------------------------------------------+
bool CLogify::Append(ENUM_LOG_LEVEL level,string msg, string origin = "", string args = "",string filename="",string function="",int line=0)
  {
   //--- If the formatter is not configured, the log will not be recorded.
   if(m_formatter == NULL)
     {
      return(false);
     }

   //--- Textual name of the log level
   string levelStr = "";
   switch(level)
     {
      case LOG_LEVEL_DEBUG: levelStr = "DEBUG"; break;
      case LOG_LEVEL_INFOR: levelStr = "INFOR"; break;
      case LOG_LEVEL_ALERT: levelStr = "ALERT"; break;
      case LOG_LEVEL_ERROR: levelStr = "ERROR"; break;
      case LOG_LEVEL_FATAL: levelStr = "FATAL"; break;
     }

   //--- Creating a log template with detailed information
   datetime time_current = TimeCurrent();
   MqlLogifyModel data("",levelStr,msg,args,time_current,time_current,level,origin,filename,function,line);
   data.formated = m_formatter.FormatLog(data);

   //--- Call handlers
   int size = this.SizeHandlers();
   for(int i=0;i<size;i++)
     {
      m_handlers[i].Emit(data);
     }

   return(true);
  }
//+------------------------------------------------------------------+
Some observations:
- The formatted log is stored in data.formatted , ensuring that the complete information is available to all handlers.
- Each handler processes the log independently, calling its Emit method.
The last adjustment I will make will be to delete the array pointers in the class destructor:
//+------------------------------------------------------------------+
//| Destructor                                                       |
//+------------------------------------------------------------------+
CLogify::~CLogify()
  {
   //--- Delete formatter
   if(m_formatter != NULL)
     {
      delete m_formatter;
     }

   //--- Delete handlers
   int size_handlers = ArraySize(m_handlers);
   for(int i=0;i<size_handlers;i++)
     {
      delete m_handlers[i];
     }
  }
//+------------------------------------------------------------------+
Testing the Handlers
In this example, we will use the previously mentioned test file, called LogifyTest.mq5 . Our goal will be to demonstrate how to configure and use two log handlers, each with a different log level, and how these logs will be recorded based on their configured filters.
First, we create two handlers, which are responsible for recording logs in different places and levels:
- Console: This will be an instance of CLogifyHandlerConsole , it will be configured to record DEBUG level messages, that is, all messages, from the most detailed to critical errors.
- File: This will be an instance of CLogifyHandlerFile , it will be configured to capture only messages from INFO level, filtering out DEBUG messages.
Here is the code to configure these handlers:
int OnInit()
  {
   //--- Console
   CLogifyHandler *handler_console = new CLogifyHandlerConsole();
   handler_console.SetLevel(LOG_LEVEL_DEBUG);

   //--- File
   CLogifyHandler *handler_file = new CLogifyHandlerFile();
   handler_file.SetLevel(LOG_LEVEL_INFOR);

   return(INIT_SUCCEEDED);
  }
After configuring the handlers, the next step is to add them to our base class CLogify , which is responsible for managing all the application's logs.
In addition, we will add a formatter to define how the logs will be displayed. The formatter in this example will format the logs with the pattern: "hour:minute:second, [log level], message".
After configuring the handlers and the formatter, we will emit three log messages with different levels. Below is the complete code for this step:
int OnInit()
  {
   //--- Console
   CLogifyHandler *handler_console = new CLogifyHandlerConsole();
   handler_console.SetLevel(LOG_LEVEL_DEBUG);

   //--- File
   CLogifyHandler *handler_file = new CLogifyHandlerFile();
   handler_file.SetLevel(LOG_LEVEL_INFOR);

   //--- Config
   logify.SetFormatter(new CLogifyFormatter("hh:mm:ss","{date_time} [{levelname}] {msg}"));
   logify.AddHandler(handler_console);
   logify.AddHandler(handler_file);

   //--- Logs
   logify.Debug("Debug Message");
   logify.Infor("Information Message");
   logify.Error("Error Message");

   return(INIT_SUCCEEDED);
  }
When we run the above code, we will get the following output in the console:
Console handler: 03:20:05 [DEBUG] Debug Message
Console handler: 03:20:05 [INFOR] Information Message
File handler: 03:20:05 [INFOR] Information Message
Console handler: 03:20:05 [ERROR] Error Message
File handler: 03:20:05 [ERROR] Error Message
Understanding the result:
- Console Handler ( handler_console ): This handler captured all messages, from DEBUG to ERROR. Therefore, three entries were recorded in the console, one for each log issued.
- File Handler ( handler_file ): This handler, in turn, was configured to record only INFO level messages or higher. Thus, it ignored the DEBUG log and recorded only INFO and ERROR messages, totaling two entries in the log file.
Conclusion
Throughout this article, we have taken an important step in building our MQL5 log library. We have explored the concept of handlers, understanding their essential role as “conductors” of log messages to different destinations. We have seen how they work together with formatters, forming a cohesive and modular log handling system.
In practice, we have created the base structure of handlers, defining an abstract class that will serve as the foundation for all future implementations. We have also developed three initial handlers: Console, Database and File, responsible for directing logs to the console, a database and files, respectively. Although, for now, they all use the Print() function for simulation, this solid foundation allows us to expand and specialize each class with definitive functionality in future articles.
In the tests, we have validated the integration between handlers and our library, demonstrating how they can be added and used flexibly. This process revealed the potential of handlers as modular components that can be customized to meet different logging needs.
All the code used in this article is attached below. Here is a table with the description of each file in the library:
| File Name | Description |
|---|---|
| Experts/Logify/LogiftTest.mq5 | File where we test the library's features, containing a practical example |
| Include/Logify/Formatter/LogifyFormatter.mqh | Class responsible for formatting log records, replacing placeholders with specific values |
| Include/Logify/Handlers/LogifyHandler.mqh | Base class for managing log handlers, including level setting and log sending |
| Include/Logify/Handlers/LogifyHandlerConsole.mqh | Log handler that sends formatted logs directly to the terminal console in MetaTrader |
| Include/Logify/Handlers/LogifyHandlerDatabase.mqh | Log handler that sends formatted logs to a database (Currently it only contains a printout, but soon we will save it to a real sqlite database) |
| Include/Logify/Handlers/LogifyHandlerFile.mqh | Log handler that sends formatted logs to a file (Currently it only contains a printout, but soon we will save it to a real file) |
| Include/Logify/Logify.mqh | Core class for log management, integrating levels, models and formatting |
| Include/Logify/LogifyLevel.mqh | File that defines the log levels of the Logify library, allowing for detailed control |
| Include/Logify/LogifyModel.mqh | Structure that models log records, including details such as level, message, timestamp, and context |
Warning: All rights to these materials are reserved by MetaQuotes Ltd. Copying or reprinting of these materials in whole or in part is prohibited.
This article was written by a user of the site and reflects their personal views. MetaQuotes Ltd is not responsible for the accuracy of the information presented, nor for any consequences resulting from the use of the solutions, strategies or recommendations described.

- Free trading apps
- Over 8,000 signals for copying
- Economic news for exploring financial markets
You agree to website policy and terms of use