

From Basic to Intermediate: Classes (III)
 198
198
 0
0

Introduction
In my previous article “From Basic to Intermediate: Classes (II)”, I attempted to explain one of the most confusing topics in object-oriented programming: the concept of a destructor and the basics of how to use it. In addition, this is almost certainly one of the most difficult topics. However, there we examined only the simplest and most straightforward aspect of a much more complex issue. What was explained there applies only to a small part of what actually happens in practice.
The difficulty of object-oriented programming lies not in the programming itself, but in the vague definition of certain concepts necessary for its proper application. Many people in academia explain them superficially, or even incorrectly. You, dear reader, must master these concepts in order to understand and make use of everything that object-oriented programming has to offer. I am publishing this introductory material now because we will need the concepts it covers to continue implementing the tree mechanism. We took a short break from this implementation to clearly explain these concepts of object-oriented programming.
It is quite likely that this article will conclude the first phase of the necessary explanations. That way, we can resume implementing the tree mechanism right where we left off. Without further ado, let's move on to the main topic of this article.
Classes (III)
In the previous article, we implemented two versions of the code: a script and an indicator. Both used the same header file. Therefore, when launched in MetaTrader 5, both may behave very similarly, since they use the code of the class defined in the header file.
Let's go back to where we left off in the previous article so that what I am about to explain here will make sense. Let's do the following: take a look at the code snippets from the previous article. Below, you can see them in their entirety.
01. //+------------------------------------------------------------------+
02. class C_Regression
03. {
04.     private :
05. //+----------------+
06.     public  :
07. //+----------------+
08.         C_Regression()
09.         {
10.             datetime    dt0 = TimeCurrent(),
11.                         dt1[20];
12.
13.             CopyTime(NULL, NULL, dt0, dt1.Size(), dt1);
14.             ObjectCreate(0, def_NameChannel, OBJ_REGRESSION, 0, dt1[0], 0, dt0, 0);
15.             ChartRedraw();
16.         }
17. //+----------------+
18.         ~C_Regression()
19.         {
20.             ObjectDelete(0, def_NameChannel);
21.             ChartRedraw();
22.         }
23. //+----------------+
24. };
25. //+------------------------------------------------------------------+
Code 01
01. //+------------------------------------------------------------------+
02. #property copyright "Daniel Jose"
03. //+------------------------------------------------------------------+
04. #define def_NameChannel    "Demo"
05. //+------------------------------------------------------------------+
06. #include <Tutorial\File 01.mqh>
07. //+------------------------------------------------------------------+
08. void OnStart(void)
09. {
10.     C_Regression channel;
11.
12.     Sleep(2000);
13. }
14. //+------------------------------------------------------------------+
Code 02
01. //+------------------------------------------------------------------+
01. //+------------------------------------------------------------------+
02. #property copyright "Daniel Jose"
03. #property description "Demo"
04. //+------------------------------------------------------------------+
05. #define def_NameChannel    "Demo"
06. //+------------------------------------------------------------------+
07. #include <Tutorial\File 01.mqh>
08. //+------------------------------------------------------------------+
09. C_Regression gl_Channel;
10. //+------------------------------------------------------------------+
11. int OnInit()
12. {
13.     return INIT_SUCCEEDED;
14. };
15. //+------------------------------------------------------------------+
16. int OnCalculate(const int rates_total, const int prev_calculated, const int begin, const double &price[])
17. {
18.     return rates_total;
19. };
20. //+------------------------------------------------------------------+
21. void OnDeinit(const int reason)
22. {
23. };
24. //+------------------------------------------------------------------+
Code 03
So, Code 01 corresponds to a header file, Code 02 to a script, and Code 03 to an indicator. Both the script and the indicator behave in a similar way. Both add the object defined on line 14 of code snippet 01 to the chart: a regression line. However, they work a little differently. The script keeps the regression line on the chart for the duration specified on line 12 of code snippet 02. The indicator, however, keeps it as long as the indicator itself remains on the chart. In the case of the indicator, you decide when to remove the regression line, since it disappears as soon as you remove the indicator.
This behavior of the script and indicator is very convenient and seems ideal. However, even though everything seems to be working perfectly, there is one small problem. By using the class as shown in code snippets 02 and 03, you, as a programmer, do not properly control the object lifecycle.
Don't get me wrong, my dear reader. I am saying that you do not have that control because you cannot specify when the object should be created and when it should be destroyed. The compiler determines both moments in time. You only determine how objects of this class will behave, but not when they will be created or how long they will exist. I know that the lack of control over the object lifecycle seems rather strange and is hard to believe. It seems to you that you control what the code does and how it works. However, if you have correctly understood what was explained in the last two articles, then you are well aware that a programmer's control is not absolute.
When you declare a variable of a class type, the compiler calls the corresponding constructor to initialize the object associated with it. Similarly, when the lifecycle of a declared variable ends, the compiler calls the destructor. Thus, the destructor correctly completes the object's lifecycle in the manner you, as the programmer, intended.
However, we still cannot precisely control the moment an object is created or destroyed. If we do not control these moments, everything will start accumulating very quickly. If you did not understand the content of the previous articles, please pause and go back to them until you have fully learned the material. The following explanation might completely confuse you: it is time to learn how to use two new operators. We have already discussed them earlier, but this is where things really get complicated. I mean the new and delete operators.
Well, as far as I know, the new and delete operators are used for memory allocation. Is that right? Yes, my dear reader. However, this memory allocation role mainly applies to C++. In MQL5, the new and delete operators allow you to manage an object's lifecycle using a variable that references it. As far as I can tell, they cannot be used the same way as in C++, which, in a way, is actually for the best. This apparent limitation compared to C++ reduces some of the problems that other programmers might encounter when interpreting the code.
Let's get back to the topic. To simplify the explanation and avoid unnecessary complications, we will work exclusively with the indicator code. For now, we will focus on Code 03.
As I explained in the previous article, when line 9 of Code 03 is executed, the compiler calls the class constructor defined on line 8 of Code 01. Later, when the variable from line 9 of Code 03 is no longer in use, the compiler will call the class destructor defined on line 18 of Code 01. It is simple. However, we can change the way these calls are made. Simply replace Code 03 with the version shown below.
01. //+------------------------------------------------------------------+
02. #property copyright "Daniel Jose"
03. #property description "Demo"
04. //+------------------------------------------------------------------+
05. #define def_NameChannel    "Demo"
06. //+------------------------------------------------------------------+
07. #include <Tutorial\File 01.mqh>
08. //+------------------------------------------------------------------+
09. C_Regression *gl_Channel;
10. //+------------------------------------------------------------------+
11. int OnInit()
12. {
13.     return INIT_SUCCEEDED;
14. };
15. //+------------------------------------------------------------------+
16. int OnCalculate(const int rates_total, const int prev_calculated, const int begin, const double &price[])
17. {
18.     return rates_total;
19. };
20. //+------------------------------------------------------------------+
21. void OnDeinit(const int reason)
22. {
23. };
24. //+------------------------------------------------------------------+
Code 04
Now Code 04 will behave differently from Code 03. I cannot see any changes. Are you sure that Code 04 works differently? In my opinion, code snippets 03 and 04 are identical. There is no difference. Please pay attention, my dear reader. There really is a difference between these two code snippets. Read Code snippet 04 a little more carefully.
Have you noticed the difference yet? I still cannot see any difference, except for the asterisk you added to code snippet 04. Apart from that asterisk, everything else is the same. It is true that both code snippets look the same, but they behave differently. The added asterisk completely changed the behavior of Code 04. Now the compiler will no longer implicitly call the constructor. In other words, simply declaring the variable on line nine is no longer enough to create an object. Now we need to explicitly tell the compiler:
I want you to call the class constructor at exactly this moment.
However, if we explicitly call the constructor, we will also have to tell the compiler when it should call the destructor. This is because the compiler no longer knows when it should call the destructor. Oh, it is all so complicated. The more I read your articles, the more complicated this topic becomes. I don't think programming is for me. I give up. Relax, my dear reader—we have not even started the real game yet. Stay with me, because the topic becomes more interesting with each step. What we see right now is just child's play compared to what we can actually do. And you are already thinking of giving up? (LAUGHTER).
All right, those of you who have not given up, let's continue. Have you decided to come back? Great—I am glad to see such determination. To demonstrate that we really can control when and where in the code the constructor and destructor are called, let's make a small change to the header file. The changes are shown below.
01. //+------------------------------------------------------------------+
02. class C_Regression
03. {
04.     private :
05. //+----------------+
06.     public  :
07. //+----------------+
08.         C_Regression()
09.         {
10.             datetime    dt0 = TimeCurrent(),
11.                         dt1[20];
12.
13.             CopyTime(NULL, NULL, dt0, dt1.Size(), dt1);
14.             ObjectCreate(0, def_NameChannel, OBJ_REGRESSION, 0, dt1[0], 0, dt0, 0);
15.             ChartRedraw();
16.             Print("Running ", __FUNCTION__, " in ", __FILE__, " in line ", __LINE__);
17.         }
18. //+----------------+
19.         ~C_Regression()
20.         {
21.             ObjectDelete(0, def_NameChannel);
22.             ChartRedraw();
23.             Print("Running ", __FUNCTION__, " in ", __FILE__, " in line ", __LINE__);
24.         }
25. //+----------------+
26. };
27. //+------------------------------------------------------------------+
Code 05
All right, now we can see right in the terminal when the constructor and destructor are called. The messages generated by lines 16 and 23 of Code 05 indicate the calls to the constructor and destructor, respectively. To make this even more interesting, we will also change Code 04, which is related to the indicator. The change is shown below.
01. //+------------------------------------------------------------------+
02. #property copyright "Daniel Jose"
03. #property description "Demo"
04. //+------------------------------------------------------------------+
05. #define def_NameChannel    "Demo"
06. //+------------------------------------------------------------------+
07. #include <Tutorial\File 01.mqh>
08. //+------------------------------------------------------------------+
09. C_Regression *gl_Channel;
10. //+------------------------------------------------------------------+
11. int OnInit()
12. {
13.     Print("Running ", __FUNCTION__, " in ", __FILE__, " in line ", __LINE__);
14.     gl_Channel = new C_Regression;
15.
16.     return INIT_SUCCEEDED;
17. };
18. //+------------------------------------------------------------------+
19. int OnCalculate(const int rates_total, const int prev_calculated, const int begin, const double &price[])
20. {
21.     return rates_total;
22. };
23. //+------------------------------------------------------------------+
24. void OnDeinit(const int reason)
25. {
26.     delete gl_Channel;
27.
28.     Print("Running ", __FUNCTION__, " in ", __FILE__, " in line ", __LINE__);
29. };
30. //+------------------------------------------------------------------+
Code 06
Now pay very close attention, my dear reader. Put aside whatever you are doing right now and focus exclusively on the explanation in the article. The following explanation will be of great importance from this point on.
Pay attention to lines 14 and 26 of Code 06. We are doing something that makes no sense to most people, but it will soon start to make sense to you. I recently stated that we can control when and where an object of a class is created, as well as when and where it is destroyed. If the statement about controlling the object lifecycle is true, then the message generated on line 13 of Code 06 will appear before the constructor message generated on line 16 of Code 05. Similarly, the destructor message generated on line 23 of Code 05 will appear before the message from line 28 of Code 06. Between the constructor call and the destructor call, the object will be available for use. If I am mistaken, the messages from lines 13 and 28 of Code 06 will appear after the messages from Code 05. To check the order of calls, we need to run this indicator on the chart. The following animation shows the result.
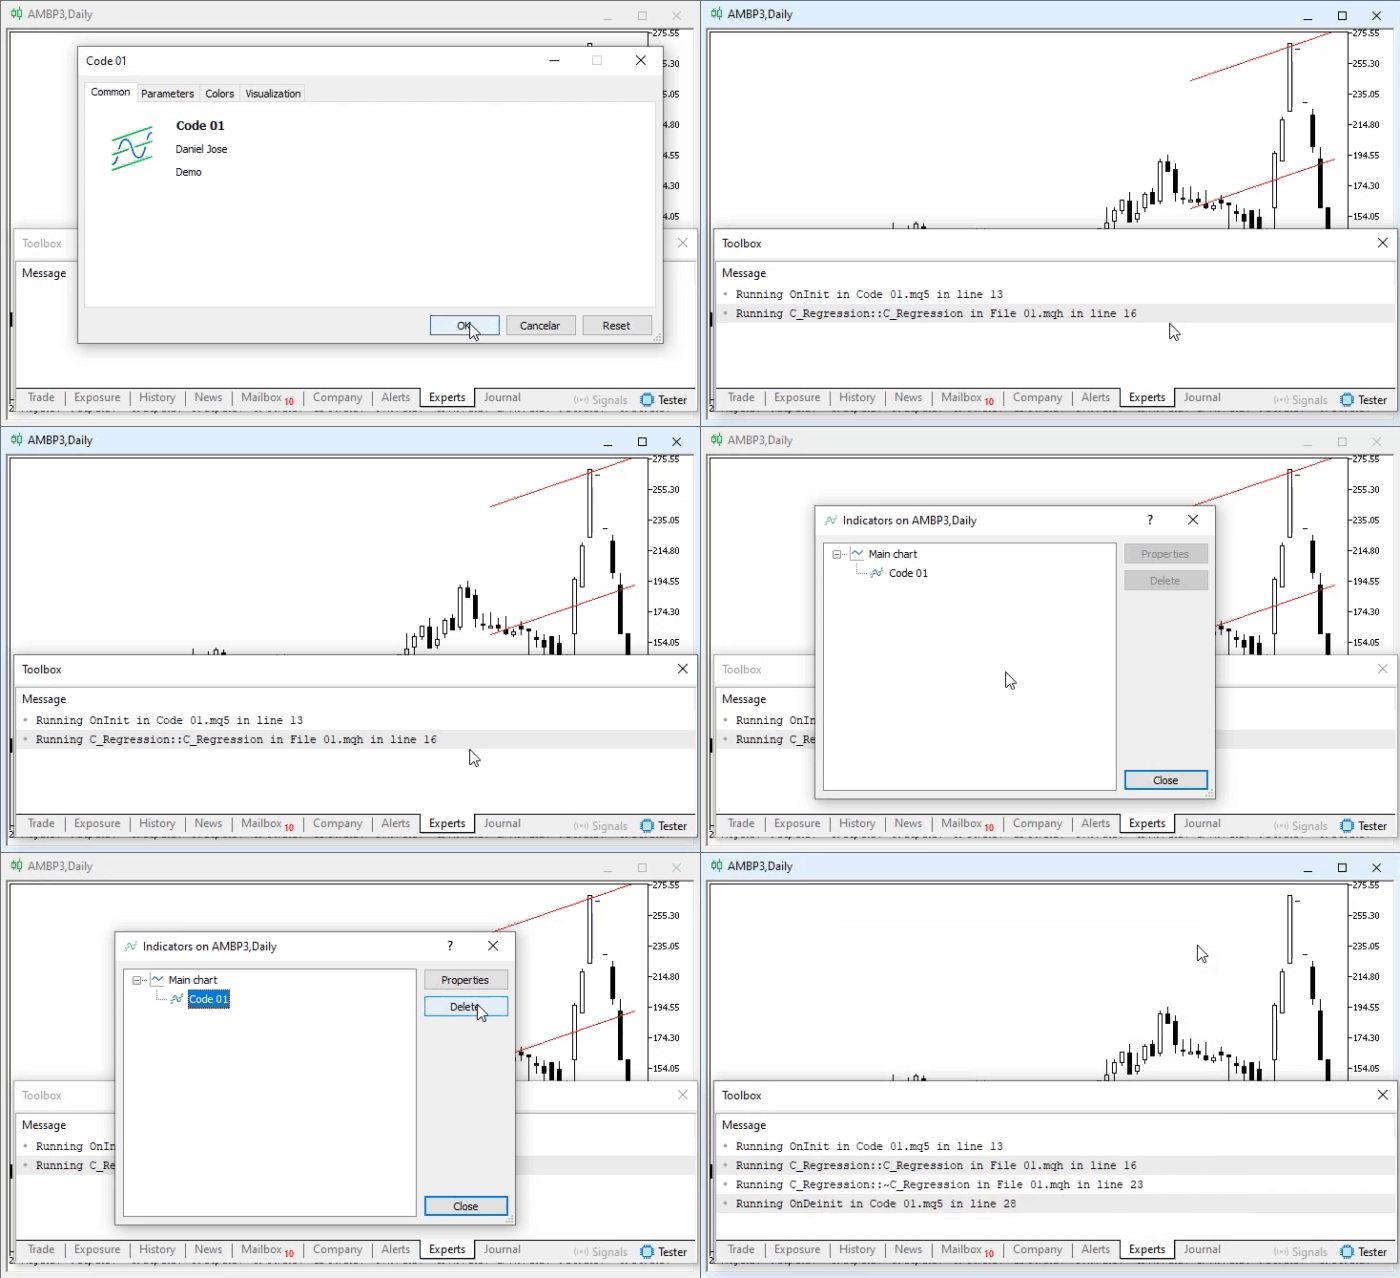
Animation 01
Since the animation went by too quickly, we will capture a specific moment. The screenshot is shown below.
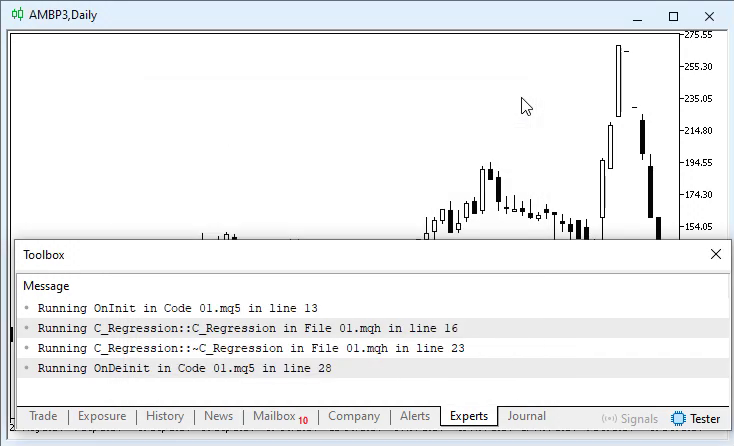
Figure 01
Now take a close look at the messages in Figure 01. The first message indicates that OnInit is being executed in the file Code 01.mq5, on line 13. The first message fully matches what we expected, since Code 06 corresponds to the Code 01.mq5 file. The second message indicates that the constructor is executed in the file File 01.mqh, on line 16. The second message also fully matches what we expected, since Code 05 corresponds to the File 01.mqh file. Thus, the object is initialized at the right time and in the right place.
Now let's take a look at object destruction. The next message indicates that the destructor is executed in the File 01.mqh file, on line 23. Great. The last message indicates that OnDeinit is executed in the Code 01.mq5 file, on line 28. Fantastic. The code worked perfectly and enabled us to determine where and when an object is created and destroyed. Previously, we had no control over when an object was created or destroyed. If you do not believe me, let's do the following: let's use Code 03, which corresponds to the original version of the indicator, and recompile it with a minor change. We will add the same messages as in Code 06. Code 03 will look as follows.
01. //+------------------------------------------------------------------+
02. #property copyright "Daniel Jose"
03. #property description "Demo"
04. //+------------------------------------------------------------------+
05. #define def_NameChannel    "Demo"
06. //+------------------------------------------------------------------+
07. #include <Tutorial\File 01.mqh>
08. //+------------------------------------------------------------------+
09. C_Regression gl_Channel;
10. //+------------------------------------------------------------------+
11. int OnInit()
12. {
13.     Print("Running ", __FUNCTION__, " in ", __FILE__, " in line ", __LINE__);
14.
15.     return INIT_SUCCEEDED;
16. };
17. //+------------------------------------------------------------------+
18. int OnCalculate(const int rates_total, const int prev_calculated, const int begin, const double &price[])
19. {
20.     return rates_total;
21. };
22. //+------------------------------------------------------------------+
23. void OnDeinit(const int reason)
24. {
25.     Print("Running ", __FUNCTION__, " in ", __FILE__, " in line ", __LINE__);
26. };
27. //+------------------------------------------------------------------+
28.
Code 07
Please note that in Code 07, unlike in Code 06, the new and delete operators are no longer used. Nevertheless, Code 07 reproduces the behavior of Code 03. That way, we will be able to see when and where an object is created and destroyed. The following animation shows Code 07 being executed.

Animation 02
Since this animation probably went by too fast as well, let's take a look at its final frame. You can take a closer look at this in the following figure.
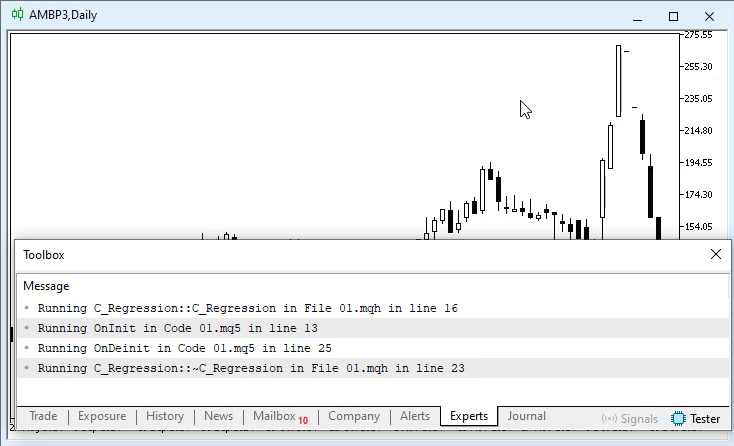
Figure 02
Now take a look at Figure 02. The behavior shown in Figure 02 is clearly different from that shown in Figure 01. In Figure 02, the constructor is called BEFORE MetaTrader 5 calls the OnInit event handler, and the destructor is called AFTER MetaTrader 5 calls the OnDeinit event handler. The difference in the order of the calls shows that even a small detail in the code implementation can completely change the final result.
Well, I think I am starting to understand how all this works and how we should go about implementing it. But what happens in the script? I am asking this because the variable that references the object is global in the indicator code and can be used from anywhere in that code. At the same time, the variable declared in the script's code snippet 02 is local. Does it matter that the variable is local, or does everything ultimately work the same way? That is a very pertinent question, my dear reader. Answering it is not easy either. Until now, we have not been able to explain this properly, because the answer depends on how you plan to use your class code.
I will try to explain this point in a simpler and clearer way. Simply stating that the script behaves the same as or differently from the indicator would not help at all; on the contrary, it would raise even more doubts. To analyze the behavior of both programs, we will need to add a few elements to the code. I will provide you with all the files used in the article so you can take your time reviewing them. In addition, we will create another header file. Essentially, this will be an almost exact copy of the header file shown in Code 01. Creating a new header file will eliminate any confusion about why the code is implemented this way and make it easier to compare the two files. The second file is shown below.
01. //+------------------------------------------------------------------+
02. class C_Regression
03. {
04.     private :
05. //+----------------+
06.     public  :
07. //+----------------+
08.         C_Regression()
09.         {
10.             datetime    dt0 = TimeCurrent(),
11.                         dt1[20];
12.
13.             CopyTime(NULL, NULL, dt0, dt1.Size(), dt1);
14.             ObjectCreate(0, def_NameChannel, OBJ_REGRESSION, 0, dt1[0], 0, dt0, 0);
15.             ChartRedraw();
16.             PrintMsg(StringFormat("Running %s in %s in line %d", __FUNCTION__, __FILE__, __LINE__));
17.         }
18. //+----------------+
19.         ~C_Regression()
20.         {
21.             ObjectDelete(0, def_NameChannel);
22.             ChartRedraw();
23.             PrintMsg(StringFormat("Running %s in %s in line %d", __FUNCTION__, __FILE__, __LINE__));
24.         }
25. //+----------------+
26.         void PrintMsg(const string msg)
27.         {
28.             Print(msg);
29.         }
30. //+----------------+
31. };
32. //+------------------------------------------------------------------+
Code 08
Please note that lines 16 and 23 of Code 08 differ slightly from lines 16 and 23 of Code 05. Because of the differences between lines 16 and 23 in the two code snippets, we will use the routine shown in line 26 of code snippet 08. Please note: file 08 included in the attachments will be different, as we will modify it later.
All right, let's move on to the file that contains the script. We will make a small change to its code, as shown below.
01. //+------------------------------------------------------------------+
02. #property copyright "Daniel Jose"
03. //+------------------------------------------------------------------+
04. #define def_NameChannel    "Demo"
05. //+------------------------------------------------------------------+
06. #include <Tutorial\File 02.mqh>
07. //+------------------------------------------------------------------+
08. void OnStart(void)
09. {
10.     C_Regression channel;
11.
12.     channel.PrintMsg(StringFormat("Running %s in %s in line %d", __FUNCTION__, __FILE__, __LINE__));
13.
14.     Sleep(2000);
15. }
16. //+------------------------------------------------------------------+
Code 09
Note that in line 12 of code snippet 09, we can send a message to the class using the method we just implemented. At this point, I assume none of you will have any doubts about what message will be output to the terminal. In any case, you can see this in the following figure.
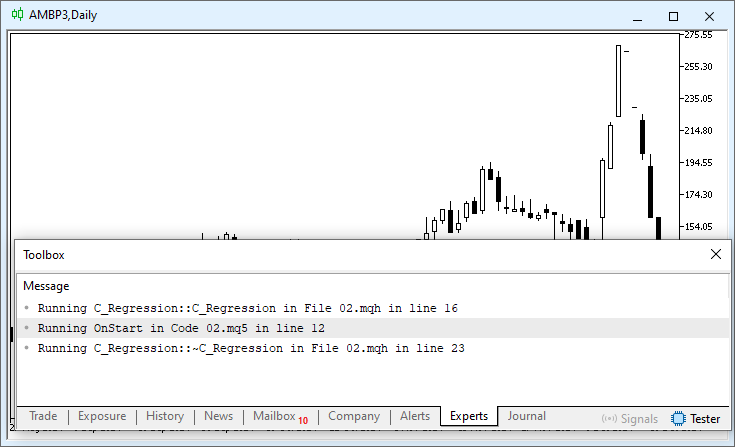
Figure 03
All right, let's move on to the first problem and see how to solve it. In the article “From Basic to Intermediate: Overloading”, I mentioned several ways to use the same routine or function while keeping its name, but for different purposes. Although that article did not attract much attention, it is important that you familiarize yourself with what it explains. Now we will apply a very similar principle. I even thought I had already mentioned in another article what we were planning to do. If I did mention it, I do not remember, since some of the material was published on my other author profile. In any case, let's see how to apply this principle.
In the article “From Basic to Intermediate: Passing by Value or by Reference”, I explained some concepts that we will explore further here, as they raise a very interesting question that is worth examining in more detail.
Now imagine the following situation, my dear reader. As you probably already know, global variables should not be your first choice; it is usually better to start with local variables. In the articles on variables, I briefly explained the use of global and local variables. The article “From Basic to Intermediate: Variables (II)” will help you better understand the choice between global and local variables. In code snippet 09, we declare a local variable that allows us to refer to an object of this class. However, suppose you need to access an object associated with a local variable from another part of the code, such as another routine.
We already have a local variable declared on line 10 of code 09; the variable declared on line 10 refers to an object. Creating another instance does not guarantee that it will replicate the state of the original object. A new instance would be identical to the previous one only as long as none of the values had been changed, but in practice that is not usually the case. Thus, the first problem arises: we need to pass the reference declared on line 10 to the routine. This will allow the function to access the original object. We can do this as shown below.
01. //+------------------------------------------------------------------+
02. #property copyright "Daniel Jose"
03. //+------------------------------------------------------------------+
04. #define def_NameChannel    "Demo"
05. //+------------------------------------------------------------------+
06. #include <Tutorial\File 02.mqh>
07. //+------------------------------------------------------------------+
08. void OnStart(void)
09. {
10.     C_Regression channel;
11.
12.     channel.PrintMsg(StringFormat("Running %s in %s in line %d", __FUNCTION__, __FILE__, __LINE__));
13.
14.     Checking(channel);
15.
16.     Sleep(2000);
17. }
18. //+------------------------------------------------------------------+
19. void Checking(C_Regression channel)
20. {
21.     channel.PrintMsg("Demonstrating the passage from a class to a procedure.");
22. }
23. //+------------------------------------------------------------------+
Code 10
Now take a closer look at the details. First, if you try to compile code snippet 10, you will see that the compiler displays the following message:

Figure 04
The compiler message indicates that the function parameter must be passed by reference. To resolve this issue, we modified the code as shown below.
01. //+------------------------------------------------------------------+
02. #property copyright "Daniel Jose"
03. //+------------------------------------------------------------------+
04. #define def_NameChannel    "Demo"
05. //+------------------------------------------------------------------+
06. #include <Tutorial\File 02.mqh>
07. //+------------------------------------------------------------------+
08. void OnStart(void)
09. {
10.     C_Regression channel;
11.
12.     channel.PrintMsg(StringFormat("Running %s in %s in line %d", __FUNCTION__, __FILE__, __LINE__));
13.
14.     Checking(channel);
15.
16.     Sleep(2000);
17. }
18. //+------------------------------------------------------------------+
19. void Checking(C_Regression &channel)
20. {
21.     channel.PrintMsg("Demonstrating the passage from a class to a procedure.");
22. }
23. //+------------------------------------------------------------------+
Code 11
The code will now compile without any problems. However, there may be a problem here. When we pass a class instance by reference to a routine or function, we run the risk that something will change without us even noticing. We do not want a routine or function to accidentally make such changes—whether due to carelessness or for any other reason. Therefore, we must limit the set of permitted operations on an instance passed by reference. This has already been discussed in previous articles, but those articles did not cover the second step, which we also need to take. First, we will modify the script again so that it looks as shown below.
01. //+------------------------------------------------------------------+
02. #property copyright "Daniel Jose"
03. //+------------------------------------------------------------------+
04. #define def_NameChannel    "Demo"
05. //+------------------------------------------------------------------+
06. #include <Tutorial\File 02.mqh>
07. //+------------------------------------------------------------------+
08. void OnStart(void)
09. {
10.     C_Regression channel;
11.
12.     channel.PrintMsg(StringFormat("Running %s in %s in line %d", __FUNCTION__, __FILE__, __LINE__));
13.
14.     Checking(channel);
15.
16.     Sleep(2000);
17. }
18. //+------------------------------------------------------------------+
19. void Checking(const C_Regression &channel)
20. {
21.     channel.PrintMsg("Demonstrating the passage from a class to a procedure.");
22. }
23. //+------------------------------------------------------------------+
Code 12
So, thanks to the changes in Code 12, we prevent any routine or function from accidentally modifying any of the class's data. However, the compiler now returns a different error, as shown below.

Figure 05
This compiler error in MQL5 is quite curious—and even amusing. In C++, on the other hand, the situation can become truly dangerous if a programmer uses certain techniques to work around this error. But these C++ mechanisms are beside the point here. The main point is that the compiler indicates that we are attempting to call a non-const method through a const reference. In this context, the const qualifier restricts the operations that can be performed on the instance being referenced: if the object cannot be modified through the reference, then the values accessible through it cannot be modified either.
We need to fix the method declaration so that the code continues to work correctly. This is exactly where overloading would come in handy. In this particular case, overloading is not required, as it will not make any significant difference in the final outcome. So, let's go back to the header file and modify it as shown below.
01. //+------------------------------------------------------------------+
02. class C_Regression
03. {
04.     private :
05. //+----------------+
06.     public  :
07. //+----------------+
08.         C_Regression()
09.         {
10.             datetime    dt0 = TimeCurrent(),
11.                         dt1[20];
12.
13.             CopyTime(NULL, NULL, dt0, dt1.Size(), dt1);
14.             ObjectCreate(0, def_NameChannel, OBJ_REGRESSION, 0, dt1[0], 0, dt0, 0);
15.             ChartRedraw();
16.             PrintMsg(StringFormat("Running %s in %s in line %d", __FUNCTION__, __FILE__, __LINE__));
17.         }
18. //+----------------+
19.         ~C_Regression()
20.         {
21.             ObjectDelete(0, def_NameChannel);
22.             ChartRedraw();
23.             PrintMsg(StringFormat("Running %s in %s in line %d", __FUNCTION__, __FILE__, __LINE__));
24.         }
25. //+----------------+
26.         void PrintMsg(const string msg) const
27.         {
28.             Print(msg);
29.         }
30. //+----------------+
31. };
32. //+------------------------------------------------------------------+
Code 13
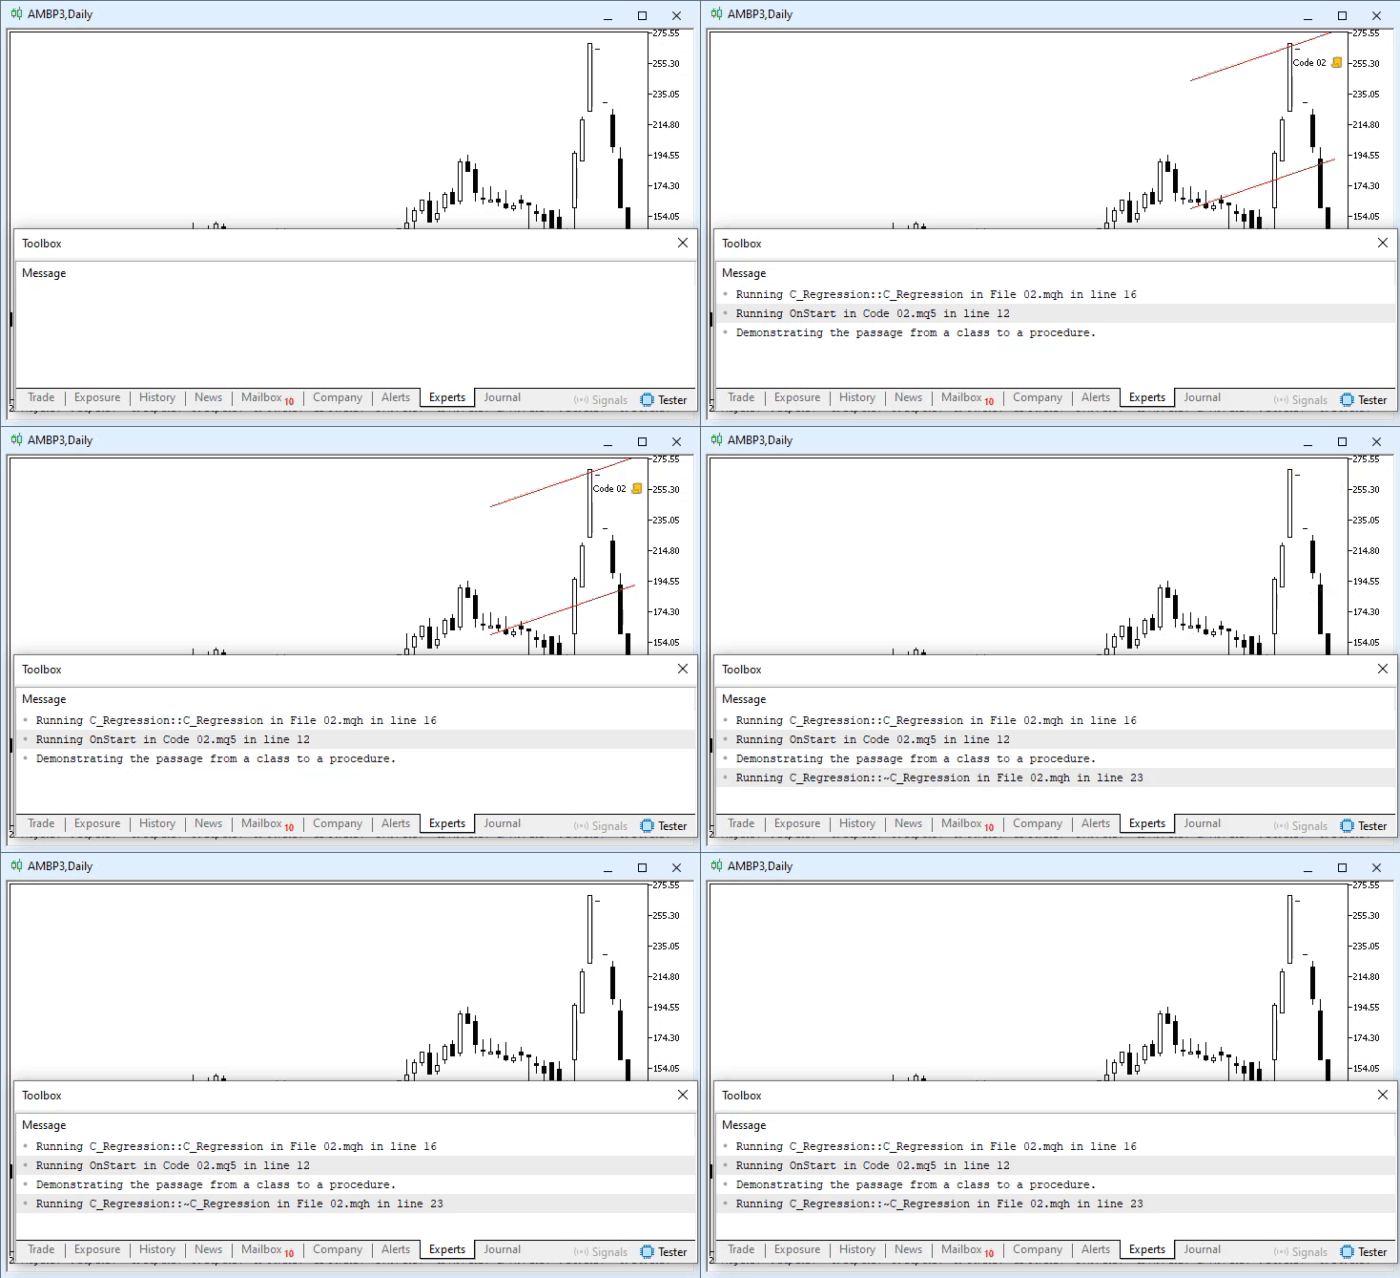
Note that we only need to make the method declared on line 26 a const method. If we declare it as a const method, the compiler will allow us to call it via a const reference and will be able to correctly interpret the code we want to write. After compiling, you will see the result in the following animation.
Animation 03
Great, now we will make one final change that fits perfectly with the content of this article. In addition, this will help us understand how to proceed in certain situations. In previous articles, we saw that we can pass arguments to the constructor to control the initialization of the system. Given everything that has been said so far, you probably already know how to handle most situations. However, what should you do if you need to use the new and delete operators to control when and where an object is created and destroyed? Few people think about this until they run into a problem, but here we'll look at how to solve it before it even arises.
First, note that in Code 12 and Code 13, you do not need to pass any arguments to the constructor. Now we will modify the example so that a value needs to be passed to the constructor. That way, we will know what to do if we need to use the new and delete operators in the future.
01. //+------------------------------------------------------------------+
02. class C_Regression
03. {
04.     private :
05. //+----------------+
06.     public  :
07. //+----------------+
08.         C_Regression(const string msg)
09.         {
10.             datetime    dt0 = TimeCurrent(),
11.                         dt1[20];
12.
13.             CopyTime(NULL, NULL, dt0, dt1.Size(), dt1);
14.             ObjectCreate(0, def_NameChannel, OBJ_REGRESSION, 0, dt1[0], 0, dt0, 0);
15.             ChartRedraw();
16.             PrintMsg(StringFormat("Running %s in %s in line %d", __FUNCTION__, __FILE__, __LINE__));
17.             PrintMsg("Message received: " + msg);
18.         }
19. //+----------------+
20.         ~C_Regression()
21.         {
22.             ObjectDelete(0, def_NameChannel);
23.             ChartRedraw();
24.             PrintMsg(StringFormat("Running %s in %s in line %d", __FUNCTION__, __FILE__, __LINE__));
25.         }
26. //+----------------+
27.         void PrintMsg(const string msg) const
28.         {
29.             Print(msg);
30.         }
31. //+----------------+
32. };
33. //+------------------------------------------------------------------+
Code 14
In Code 14, you now need to pass an argument to the constructor. The same message will be printed to the terminal on line 17. Let's take a look at what the script code looks like now.
01. //+------------------------------------------------------------------+
02. #property copyright "Daniel Jose"
03. //+------------------------------------------------------------------+
04. #define def_NameChannel    "Demo"
05. //+------------------------------------------------------------------+
06. #include <Tutorial\File 03.mqh>
07. //+------------------------------------------------------------------+
08. void OnStart(void)
09. {
10.     C_Regression channel(StringFormat("Init in line %d", __LINE__));
11.
12.     channel.PrintMsg(StringFormat("Running %s in %s in line %d", __FUNCTION__, __FILE__, __LINE__));
13.
14.     Checking(channel);
15.
16.     Sleep(2000);
17. }
18. //+------------------------------------------------------------------+
19. void Checking(const C_Regression &channel)
20. {
21.     channel.PrintMsg("Demonstrating the passage from a class to a procedure.");
22. }
23. //+------------------------------------------------------------------+
Code 15
Take a close look at line 10 in Code 15. When we run this code, we will get the result shown below.
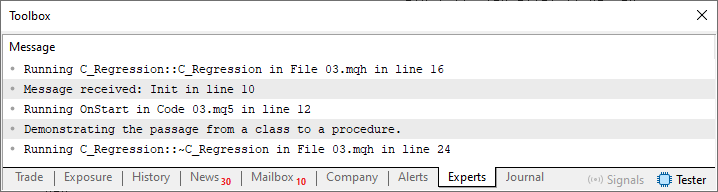
Figure 06
Just perfect. The result shows that everything is working just as we expected. Now we will add the new and delete operators to the script. This change is shown in the following code.
01. //+------------------------------------------------------------------+
02. #property copyright "Daniel Jose"
03. //+------------------------------------------------------------------+
04. #define def_NameChannel    "Demo"
05. //+------------------------------------------------------------------+
06. #include <Tutorial\File 03.mqh>
07. //+------------------------------------------------------------------+
08. void OnStart(void)
09. {
10.     C_Regression *channel(StringFormat("Init in line %d", __LINE__));
11.
12.     channel.PrintMsg(StringFormat("Running %s in %s in line %d", __FUNCTION__, __FILE__, __LINE__));
13.
14.     Checking(channel);
15.
16.     Sleep(2000);
17. }
18. //+------------------------------------------------------------------+
19. void Checking(const C_Regression &channel)
20. {
21.     channel.PrintMsg("Demonstrating the passage from a class to a procedure.");
22. }
23. //+------------------------------------------------------------------+
Code 16
When you try to compile Code 16, the compiler will display the following message.
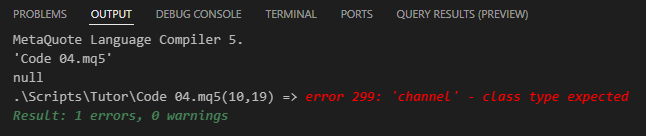
Figure 07
In other words, the declaration on line 10 of code snippet 16 is incorrect. The problem isn't that we are doing something similar to what was done in Code 04. The problem is that this is NOT THE WAY to initialize the object. The difference is this: Code 04 will compile, even though no result will be shown on the chart. By contrast, Code 16 WILL NOT COMPILE, because the declaration on line 10 attempts to initialize the object incorrectly.
To have the constructor receive an argument through a declaration similar to the one used in Code 04, you need to take a slightly different approach. For Code 16 to compile, you need to write the declaration as shown below.
01. //+------------------------------------------------------------------+
02. #property copyright "Daniel Jose"
03. //+------------------------------------------------------------------+
04. #define def_NameChannel    "Demo"
05. //+------------------------------------------------------------------+
06. #include <Tutorial\File 03.mqh>
07. //+------------------------------------------------------------------+
08. void OnStart(void)
09. {
10.     C_Regression *channel = new C_Regression(StringFormat("Init in line %d", __LINE__));
11.
12.     (*channel).PrintMsg(StringFormat("Running %s in %s in line %d", __FUNCTION__, __FILE__, __LINE__));
13.
14.     Checking(channel);
15.
16.     Sleep(2000);
17.
18.     delete channel;
19. }
20. //+------------------------------------------------------------------+
21. void Checking(const C_Regression &channel)
22. {
23.     channel.PrintMsg("Demonstrating the passage from a class to a procedure.");
24. }
25. //+------------------------------------------------------------------+
Code 17
Typically, the declaration on line 10 of Code 17 can be broken down into two steps. However, since I want to initialize the object when declaring the variable, it is easier to write the declaration as shown above. Nevertheless, we are doing something very similar to what was done in Code 06. Using the new and delete operators, we control where and how a class object is initialized and destroyed.
The way arguments are passed to the constructor remains the same. We just need to make a few more changes. After applying them, we get the result shown below.
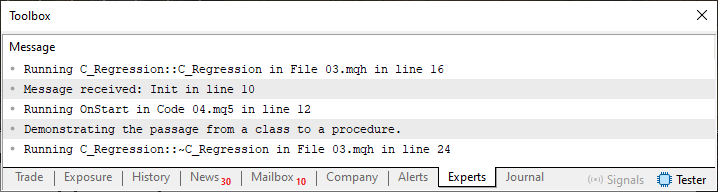
Figure 08
Concluding Thoughts
In this article, we have seen how to better control code when using object-oriented programming. We are still only at the very beginning of everything there is to learn about object-oriented programming. Nevertheless, what has been explained so far is enough for us to return to implementing trees. So, my dear reader, practice and calmly study the concepts presented in the last three articles of this series with great care and diligence. These concepts will guide you throughout your work with MQL5. In addition, they will make it easier for you if you decide to learn C++ programming later on.
Well, for now, I am saying goodbye. See you in the next article, where we will return to the topic of queues, lists, and trees.
| MQ5 file | Description |
|---|---|
| Indicator\Code 01 | Demo file |
| Indicator\Code 02 | Demo file |
| Script\Code 01 | Demo file |
| Script\Code 02 | Demo file |
| Script\Code 03 | Demo file |
| Script\Code 04 | Demo file |
Translated from Portuguese by MetaQuotes Ltd.
Original article: https://www.mql5.com/pt/articles/16765
Warning: All rights to these materials are reserved by MetaQuotes Ltd. Copying or reprinting of these materials in whole or in part is prohibited.
This article was written by a user of the site and reflects their personal views. MetaQuotes Ltd is not responsible for the accuracy of the information presented, nor for any consequences resulting from the use of the solutions, strategies or recommendations described.

 Market Simulation: Position View (XV)
 Honest Backtesting of Swing Strategies on Index CFDs: Financing Costs, Swap Modes, and What the Strategy Tester Cannot Model
 Enhanced Colliding Bodies Optimization (ECBO)
 How to Create and Adapt an RL Agent with an LLM and Quantum Encoding for Algorithmic Trading in MQL5

- Free trading apps
- Over 8,000 signals for copying
- Economic news for exploring financial markets
You agree to website policy and terms of use