
From Basic to Intermediate: Inheritance

Introduction
In the previous article, «From Basic to Intermediate: Struct (VII)», we began working with a structured program that, although it may seem quite complex at first glance, ultimately proves to be very engaging and interesting. I know this because at the beginning of my journey, I found it very difficult to understand why some codes work and others do not. After many years of struggle and persistence, I finally grasped the concepts that I am trying to convey to you in these articles. Many people believe that you can learn to program by taking a course or simply by studying other programmers' code.
However, unfortunately, to truly learn programming, practice is necessary. And only after some time, solving one problem after another, will you become a good professional. But, I repeat, this takes time. However, if I can speed up the process a little, why not share this knowledge with those who truly want to learn? Well, we have reached a key point.
Here, things will become even more interesting. It is very important to lay a solid foundation and understand everything that was explained in the previous articles. If you have not studied and put into practice what you saw earlier, you will find it very difficult to follow this and the upcoming articles.
Simple inheritance
One of the most common misconceptions is that inheritance exists only in class code or, as it is often called, in object-oriented programming. So, what is inheritance? Simply put, it is the creation of a simple data type and, based on it, the creation of other, more complex data types without the need to create elements, functions, and procedures that had already been implemented in that simpler data type.
For a better understanding, let us consider the following: In nature, there are many species of animals, plants, and minerals. Suppose we need to create code to organize all input data by categories found in nature, which in this case we will designate as animals, plants, and minerals. How would you do this? Most likely, you would need to create three different structures to divide the input data into one of these three predefined types.
By creating such structures, you will realize that by adhering to a fully structured programming style, you can make the code easier to manipulate and understand. This has already been noted in previous articles. However, animals and plants have something in common. Both are living organisms, unlike minerals. Therefore, both plants and animals share the same structural elements.
These elements can be removed and placed in a new main construct. Thus, we will have something in common with living beings, which will avoid code duplication within the data structure itself and simplify its future maintenance, implementation, and improvement.
As a rule, most code oriented toward working on the financial market, for which MetaTrader 5 and, consequently, MQL5 are used, does not require the level of abstraction that I present in this article. For our purpose, it is also not necessary to use structured or object-oriented programming.
However, due to the very nature of programming and the types of problems we may encounter, it is extremely useful and necessary for you to understand the mechanisms and concepts I am presenting here. It is not that you will need them, but rather that to work with less effort, you need to understand how certain things work. To achieve our goals, understanding these concepts, despite their apparent complexity, will greatly simplify everything in the future.
I repeat, to create an expert advisor or an indicator, it is not necessary to understand structured programming, as this can be done using traditional programming. If you doubt my words, you can check my first article: «Developing a Trading Expert Advisor from Scratch». In it, without using any structured or object-oriented programming techniques, we examined how to create a simple expert advisor that allows sending orders directly to the chart.
The same applies to indicators. In the article «From Basic to Intermediate: Indicator (IV)» , we showed how to display an indicator on the chart. All of this is simple and does not require special knowledge. To create the desired application, you will only need common sense and an understanding of the MQL5 documentation.
Once the distinction is established between what you need to know to create things and what you do not necessarily need to know, we can return to our hypothetical example. Since we know that there are common elements between living and non-living objects, we can logically and consistently separate them both in terms of implementation and in terms of ease of use and maintenance of functions and procedures.
To make this clearer, let us turn to one of the codes discussed in the previous article. A similar result can be seen below.
001. //+------------------------------------------------------------------+
002. #property copyright "Daniel Jose"
003. //+------------------------------------------------------------------+
004. struct st_Reg
005. {
006.     //+----------------+
007.     private:
008.     //+----------------+
009.         string  h_value;
010.         uint    k_value;
011.     //+----------------+
012.     public:
013.     //+----------------+
014.         void Set(const uint arg1, const string arg2)
015.         {
016.             k_value = arg1;
017.             h_value = arg2;
018.         }
019.     //+----------------+
020.         uint Get_K(void)    { return k_value; }
021.     //+----------------+
022.         string Get_H(void)  { return h_value; }
023.     //+----------------+
024. };
025. //+------------------------------------------------------------------+
026. struct st_Bio
027. {
028.     //+----------------+
029.     private:
030.     //+----------------+
031.         string  h_value;
032.         string  b_value;
033.         uint    k_value;
034.     //+----------------+
035.     public:
036.     //+----------------+
037.         void Set(const uint arg1, const string arg2, const string arg3)
038.         {
039.             k_value = arg1;
040.             h_value = arg2;
041.             b_value = arg3;
042.         }
043.     //+----------------+
044.         uint Get_K(void)    { return k_value; }
045.     //+----------------+
046.         bool Get_Bio(string &arg1, string &arg2)
047.         {
048.             arg1 = h_value;
049.             arg2 = b_value;
050.
051.             return true;
052.         }
053.     //+----------------+
054. };
055. //+------------------------------------------------------------------+
056. template <typename T>
057. struct st_Data
058. {
059.     //+----------------+
060.     private:
061.     //+----------------+
062.         T Values[];
063.     //+----------------+
064.     public:
065.     //+----------------+
066.         bool Set(const T &arg)
067.         {
068.             if (ArrayResize(Values, Values.Size() + (Values.Size() == 0 ? 2 : 1)) == INVALID_HANDLE)
069.                 return false;
070.
071.             Values[Values.Size() - 1] = arg;
072.
073.             return true;
074.         }
075.     //+----------------+
076.         T Get(const uint index)
077.         {
078.             for (uint c = 0; c < Values.Size(); c++)
079.                 if (Values[c].Get_K() == index)
080.                     return Values[c];
081.
082.             return Values[0];
083.         }
084.     //+----------------+
085. };
086. //+------------------------------------------------------------------+
087. #define PrintX(X) Print(#X, " => [", X, "]")
088. //+------------------------------------------------------------------+
089. void CheckBio(st_Data <st_Bio> &arg)
090. {
091.     string sz[2];
092.
093.     Print("Checking data in the structure...");
094.     for (uint i = 7; i < 11; i += 3)
095.     {
096.         Print("Index: ", i, " Result: ");
097.         if (arg.Get(i).Get_Bio(sz[0], sz[1]))
098.             ArrayPrint(sz);
099.         else
100.             Print("Failed.");
101.     }
102. }
103. //+------------------------------------------------------------------+
104. void OnStart(void)
105. {
106.     const string T = "possible loss of data due to type conversion";
107.     const string M[] = {"2", "cool", "4", "zero", "mad", "five", "what", "xoxo"};
108.     const uint   K[] = {2, 1, 4, 0, 7, 5, 3, 6};
109.
110.     st_Data <st_Reg> Info_1;
111.     st_Data <st_Bio> Info_2;
112.
113.     string  H[];
114.
115.     StringSplit(T, ' ', H);
116.     for (uint c = 0; c < H.Size(); c++)
117.     {
118.         st_Reg  reg;
119.         st_Bio  bio;
120.
121.         reg.Set(K[c], H[c]);
122.         bio.Set(K[c], M[c], H[c]);
123.
124.         Info_1.Set(reg);
125.         Info_2.Set(bio);
126.     }
127.
128.     PrintX(Info_1.Get(3).Get_H());
129.     PrintX(Info_1.Get(13).Get_H());
130.     CheckBio(Info_2);
131. }
132. //+------------------------------------------------------------------+
Code 01
When executing Code 01, we will obtain the result shown in the image below.
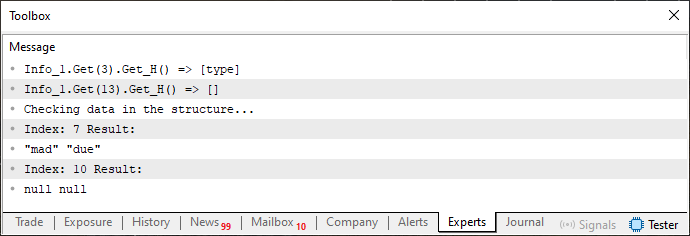
Figure 01
Now let's get to the heart of the matter. Just as animals and plants have common elements, in Code 01, k_value is a common element for st_Reg and st_Bio. However, these structures do not interact with each other and are completely different. This is shown visually below.
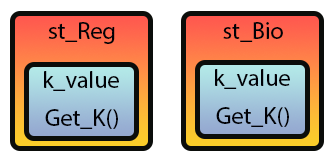
Figure 02
In other words, these are two different entities, but with common features. Such code duplication occurs when multiple structures share elements accessed and handled in the same way, because in this case there would be no need to separate them. This only complicates the code in a completely unnecessary way.
To make this clearer, imagine that for some reason you decide to improve the Get_K function present in the st_Reg structure. Thus, you notice that the common code has significantly improved, but you do not do the same in st_Bio. When using both structures simultaneously, you notice that st_Bio, despite using Get_K, behaves differently from st_Reg.
And this is where the problems begin. The Get_K code present in the st_Reg structure is copied into the st_Bio structure, and after some time, the Get_K code needs to be changed again, which implies performing this operation on both structures.
Apart from being a huge waste of time, such actions make it very difficult to improve the code. And here we are using only two structures. In real code, there could be dozens or even hundreds of structures that share something in common. Can you imagine what it would be like to debug and maintain such code? A nightmare. However, there is a simple way to simplify all this work. This method is precisely the use of inheritance.
Inheritance is simply moving this common part out of both structures and placing it into another structure. Then, somehow, making it so that the structure can use the code it inherits. I understand that this seems complicated. But in practice, you will see that it is much easier to do than you imagine.
Let us now apply this in practice, making Code 01 use inheritance. To achieve our goal, the first step is shown in the code snippet below.
01. //+------------------------------------------------------------------+
02. #property copyright "Daniel Jose"
03. //+------------------------------------------------------------------+
04. struct st_Base
05. {
06.     private:
07.         uint KeyValue;
08.     public:
09.     //+----------------+
10.         void SetKey(const uint arg) { KeyValue = arg; }
11.     //+----------------+
12.         uint GetKey(void) { return KeyValue; }
13. };
14. //+------------------------------------------------------------------+
15. struct st_Reg
16. {
17.     private:
18.         string  Value;
19.     public:
20.     //+----------------+
21.         void SetValue(const uint arg1, const string arg2)
22.         {
23.             Value = arg2;
24.         }
25.     //+----------------+
26.         string GetValue(void)  { return Value; }
27. };
28. //+------------------------------------------------------------------+
29. struct st_Bio
30. {
31.     private:
32.         string  Value[2];
33.     public:
34.     //+----------------+
35.         void SetValue(const uint arg1, const string arg2, const string arg3)
36.         {
37.             Value[0] = arg2;
38.             Value[1] = arg3;
39.         }
40.     //+----------------+
41.         bool GetValue(string &arg1, string &arg2)
42.         {
43.             arg1 = Value[0];
44.             arg2 = Value[1];
45.
46.             return true;
47.         }
48.     //+----------------+
49. };
50. //+------------------------------------------------------------------+
                   .
                   .
                   .
Code 02
In the code snippet of Code 02, we see that a new structure has been created. It is called st_Base. Now pay attention. Although we have improved the organization of variables in this snippet (Code 02), it still contains the same number and type of variables as Code 01. However, it is better organized. But the most important thing here is, essentially, the st_Base structure. After this, we get the following result.
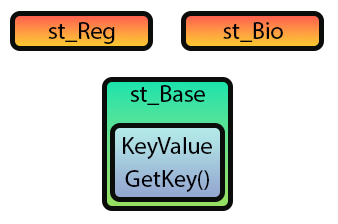
Figure 03
Please note that it is very similar to Figure 02. However, Figure 03 does not use inheritance. This is because snippet 02 does not use it either. Therefore, if we try to compile Code 01 using Code snippet 02, the compiler will generate several errors. To fix this, we need to transform Image 03 into Image 04, as shown below.
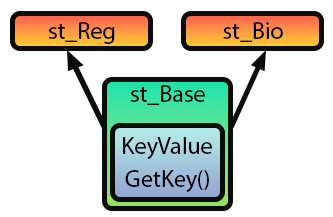
Figure 04
In Figure 04, the arrows indicate how the inheritance will be implemented. In other words, we are going to include the contents of the st_Base structure into the st_Bio and st_Reg structures without making significant changes to the code. To do this, we simply modify Code 02 into the code shown below.
01. //+------------------------------------------------------------------+
02. #property copyright "Daniel Jose"
03. //+------------------------------------------------------------------+
04. struct st_Base
05. {
06.     private:
07.         uint KeyValue;
08.     public:
09.     //+----------------+
10.         void SetKey(const uint arg) { KeyValue = arg; }
11.     //+----------------+
12.         uint GetKey(void) { return KeyValue; }
13. };
14. //+------------------------------------------------------------------+
15. struct st_Reg : public st_Base
16. {
17.     private:
18.         string  Value;
19.     public:
20.     //+----------------+
21.         void SetValue(const uint arg1, const string arg2)
22.         {
23.             Value = arg2;
24.         }
25.     //+----------------+
26.         string GetValue(void)  { return Value; }
27. };
28. //+------------------------------------------------------------------+
29. struct st_Bio : public st_Base
30. {
31.     private:
32.         string  Value[2];
33.     public:
34.     //+----------------+
35.         void SetValue(const uint arg1, const string arg2, const string arg3)
36.         {
37.             Value[0] = arg2;
38.             Value[1] = arg3;
39.         }
40.     //+----------------+
41.         bool GetValue(string &arg1, string &arg2)
42.         {
43.             arg1 = Value[0];
44.             arg2 = Value[1];
45.
46.             return true;
47.         }
48.     //+----------------+
49. };
50. //+------------------------------------------------------------------+
                   .
                   .
                   .
Code 03
Look at how difficult it was to implement inheritance in the code. However, as can be seen in Code snippet 03, there are references to values that have not yet been resolved. This is because in this snippet we have only implemented inheritance. We are not yet using it in practice in a way that applies the KeyValue information. Our goal is to allow st_Data to establish a connection between the data to construct what can be seen in Figure 01.
To resolve such issues, we need to modify the code again. As a result, it will look like this:
001. //+------------------------------------------------------------------+
002. #property copyright "Daniel Jose"
003. //+------------------------------------------------------------------+
004. struct st_Base
005. {
006.     private:
007.         uint KeyValue;
008.     public:
009.     //+----------------+
010.         void SetKey(const uint arg) { KeyValue = arg; }
011.     //+----------------+
012.         uint GetKey(void) { return KeyValue; }
013. };
014. //+------------------------------------------------------------------+
015. struct st_Reg : public st_Base
016. {
017.     private:
018.         string  Value;
019.     public:
020.     //+----------------+
021.         void SetValue(const uint arg1, const string arg2)
022.         {
023.             SetKey(arg1);
024.             Value = arg2;
025.         }
026.     //+----------------+
027.         string GetValue(void)  { return Value; }
028. };
029. //+------------------------------------------------------------------+
030. struct st_Bio : public st_Base
031. {
032.     private:
033.         string  Value[2];
034.     public:
035.     //+----------------+
036.         void SetValue(const uint arg1, const string arg2, const string arg3)
037.         {
038.             SetKey(arg1);
039.             Value[0] = arg2;
040.             Value[1] = arg3;
041.         }
042.     //+----------------+
043.         bool GetValue(string &arg1, string &arg2)
044.         {
045.             arg1 = Value[0];
046.             arg2 = Value[1];
047.
048.             return true;
049.         }
050.     //+----------------+
051. };
052. //+------------------------------------------------------------------+
053. template <typename T>
054. struct st_Data
055. {
056.     private:
057.         T Values[];
058.     public:
059.     //+----------------+
060.         bool Set(const T &arg)
061.         {
062.             if (ArrayResize(Values, Values.Size() + (Values.Size() == 0 ? 2 : 1)) == INVALID_HANDLE)
063.                 return false;
064.
065.             Values[Values.Size() - 1] = arg;
066.
067.             return true;
068.         }
069.     //+----------------+
070.         T Get(const uint index)
071.         {
072.             for (uint c = 0; c < Values.Size(); c++)
073.                 if (Values[c].GetKey() == index)
074.                     return Values[c];
075.
076.             return Values[0];
077.         }
078. };
079. //+------------------------------------------------------------------+
080. #define PrintX(X) Print(#X, " => [", X, "]")
081. //+------------------------------------------------------------------+
082. void CheckBio(st_Data <st_Bio> &arg)
083. {
084.     string sz[2];
085.
086.     Print("Checking data in the structure...");
087.     for (uint i = 7; i < 11; i += 3)
088.     {
089.         Print("Index: ", i, " Result: ");
090.         if (arg.Get(i).GetValue(sz[0], sz[1]))
091.             ArrayPrint(sz);
092.         else
093.             Print("Failed.");
094.     }
095. }
096. //+------------------------------------------------------------------+
097. void OnStart(void)
098. {
099.     const string T = "possible loss of data due to type conversion";
100.     const string M[] = {"2", "cool", "4", "zero", "mad", "five", "what", "xoxo"};
101.     const uint   K[] = {2, 1, 4, 0, 7, 5, 3, 6};
102.
103.     st_Data <st_Reg> Info_1;
104.     st_Data <st_Bio> Info_2;
105.
106.     string  H[];
107.
108.     StringSplit(T, ' ', H);
109.     for (uint c = 0; c < H.Size(); c++)
110.     {
111.         st_Reg  reg;
112.         st_Bio  bio;
113.
114.         reg.SetValue(K[c], H[c]);
115.         bio.SetValue(K[c], M[c], H[c]);
116.
117.         Info_1.Set(reg);
118.         Info_2.Set(bio);
119.     }
120.
121.     PrintX(Info_1.Get(3).GetValue());
122.     PrintX(Info_1.Get(13).GetValue());
123.     CheckBio(Info_2);
124. }
125. //+------------------------------------------------------------------+
Code 04
Code 04 has the same effect as Code 01. However, in Code 04 we are using inheritance between structures. Thus, any improvement we make to the st_Base structure will automatically benefit the entire code. In other words, any change, no matter how small, made to the st_Base structure will be automatically available to st_Reg and st_Bio.
This is, of course, provided that the procedure, function, or variable is included in the public part of the code. Of course, this applies only to members exposed through the public interface. If a member in stBase is not publicly accessible, then stReg and stBio will not be able to use it directly.
One point we did not mention in Code 04, but which may be important, is that in lines 15 and 30, inheritance is done publicly. This allows any variable of either structure type to access the public members of st_Base to also have access to any public element of the st_Base structure. If, instead of the reserved word public seen in those lines, we had used the word private, then any variable using that structure, whether st_Bio or st_Reg, would not have access to the contents of the st_Base structure. I suggest you try this later with the file that will be in the appendix to better understand.
Since the main topic of this article is inheritance, let us «play» a little with this topic, but in a somewhat more fun form. To do this, we will move on to a new topic. I do not want you to be frightened and think that I am going to show you something only within the reach of a highly qualified specialist. In fact, that is not the case. Any of you who are studying and following along with this series of articles can do something similar.
However, to do this, it is necessary to apply certain concepts that were presented in previous articles. Let us now continue with our pajama party, because the fun is just beginning.
Structures, templates, and inheritance: a noisy combination
Many are unaware of the capabilities of MQL5, even though it does not possess all the functions of C and C++. This is because, compared to C and C++, programming in MQL5 is significantly simpler. If these articles were about C and C++, I think many of you would have given up long ago. But since here we will focus only on programming in MQL5, the articles will mostly consist of very simple things. However, because they are little studied, they end up taking on an almost mystical character.
One such factor is the combination of everything we have observed up to this point. In other words, can we combine structured programming with the ability to combine structures with templates and inheritance in a single code? Yes, dear reader. And although this material may seem complex, to me it is still quite simple, only slightly more complex than everything I have shown so far.
However, if you study and reflect on the concepts we have covered, you will eventually think about how to combine all of this into truly interesting code, because we can use what for many would require writing a large amount of code. But we will do this with very simple code and leave all the work to the compiler.
Since I do not want to scare you with the code from the previous topic while using all these resources simultaneously, we will start gradually. This way, you will become accustomed to the idea and understand the importance of the concepts, rather than trying to memorize and copy random codes to make them work later.
So, our code will begin like this:
01. //+------------------------------------------------------------------+
02. #property copyright "Daniel Jose"
03. //+------------------------------------------------------------------+
04. struct st_Base
05. {
06.     private :
07.         uint KeyValue;
08.     public  :
09.     //+----------------+
10.         void SetKey(const uint arg)
11.         {
12.             KeyValue = arg;
13.         }
14.     //+----------------+
15.         uint GetKey(void)
16.         {
17.             return KeyValue;
18.         }
19.     //+----------------+
20. };
21. //+------------------------------------------------------------------+
Code 05
Alright, I think everyone will understand Code 05. Then we can move on to the next stage.
01. //+------------------------------------------------------------------+
02. #property copyright "Daniel Jose"
03. //+------------------------------------------------------------------+
04. struct st_Base
05. {
06.     private :
07.         uint KeyValue;
08.     public  :
09.     //+----------------+
10.         void SetKey(const uint arg)
11.         {
12.             KeyValue = arg;
13.         }
14.     //+----------------+
15.         uint GetKey(void)
16.         {
17.             return KeyValue;
18.         }
19.     //+----------------+
20. };
21. //+------------------------------------------------------------------+
22. struct st_Dev01 : public st_Base
23. {
24.     private :
25.         string ValueInfo;
26.     public  :
27.     //+----------------+
28.         void SetKeyInfo(uint arg1, string arg2)
29.         {
30.             SetKey(arg1);
31.             ValueInfo = arg2;
32.         }
33.     //+----------------+
34.         string GetInfo(void)
35.         {
36.             return ValueInfo;
37.         }
38.     //+----------------+
39. }
40. //+------------------------------------------------------------------+
Code 06
Excellent, we have now implemented the inheritance mechanism. We have two very simple and fairly basic structures. Now it is time for the next step. At this stage, we are going to implement what can be considered a list. This is also very simple, as can be seen below.
01. //+------------------------------------------------------------------+
02. #property copyright "Daniel Jose"
03. //+------------------------------------------------------------------+
04. struct st_Base
05. {
06.     private :
07.         uint KeyValue;
08.     public  :
09.     //+----------------+
10.         void SetKey(const uint arg)
11.         {
12.             KeyValue = arg;
13.         }
14.     //+----------------+
15.         uint GetKey(void)
16.         {
17.             return KeyValue;
18.         }
19.     //+----------------+
20. };
21. //+------------------------------------------------------------------+
22. struct st_Dev01 : public st_Base
23. {
24.     private :
25.         string ValueInfo;
26.     public  :
27.     //+----------------+
28.         void SetKeyInfo(uint arg1, string arg2)
29.         {
30.             SetKey(arg1);
31.             ValueInfo = arg2;
32.         }
33.     //+----------------+
34.         string GetInfo(void)
35.         {
36.             return ValueInfo;
37.         }
38.     //+----------------+
39. };
40. //+------------------------------------------------------------------+
41. struct st_List
42. {
43.     private :
44.         st_Dev01    List[];
45.         uint        nElements;
46.     public  :
47.     //+----------------+
48.         void Clear(void)
49.         {
50.             ArrayFree(List);
51.             nElements = 0;
52.         }
53.     //+----------------+
54.         bool AddList(const st_Dev01 &arg)
55.         {
56.             nElements += (nElements == 0 ? 2 : 1);
57.             ArrayResize(List, nElements);
58.             List[nElements - 1] = arg;
59.
60.             return true;
61.
62.         }
63.     //+----------------+
64.         st_Dev01 SearchKey(const uint arg)
65.         {
66.             for (uint c = 1; c < nElements; c++)
67.                 if (List[c].GetKey() == arg)
68.                     return List[c];
69.
70.             return List[0];
71.         }
72.     //+----------------+
73. };
74. //+------------------------------------------------------------------+
Code 07
As you can see, we haven't changed anything compared to what we did earlier. Everything remains just as simple and didactic. Now we will create a short list of data to ensure that everything is working correctly. We will do this in the code that can be seen below.
01. //+------------------------------------------------------------------+
02. #property copyright "Daniel Jose"
03. //+------------------------------------------------------------------+
04. #include "Tutorial\File 01.mqh"
05. //+------------------------------------------------------------------+
06. #define PrintX(X) Print(#X, " => [", X, "]")
07. //+------------------------------------------------------------------+
08. void OnStart(void)
09. {
10.     const string Names[] =
11.         {
12.             "Daniel Jose",
13.             "Edimarcos Alcantra",
14.             "Carlos Almeida",
15.             "Yara Alves"
16.         };
17.
18.     st_List list;
19.
20.     for (uint c = 0; c < Names.Size(); c++)
21.     {
22.         st_Dev01 info;
23.
24.         info.SetKeyInfo(c, Names[c]);
25.         list.AddList(info);
26.     }
27.
28.     PrintX(list.SearchKey(2).GetInfo());
29. }
30. //+------------------------------------------------------------------+
Code 08
Please note that all the code from Code 07 was actually a header file. It is added to Code 08 in line 04. In line 10, we created a small array that contains a few names. In line 18, a data structure is presented. In line 25, we created the structure itself. In line 28, using the key, we search for information that relates to that specific key. As a result of executing the code, we obtain what is shown below.

Figure 05
In short, nothing special. Everything meets expectations, as well as what has been demonstrated and studied up to this point. But now it is time to show something new, the real fun. The novelty is that we will now incorporate overloading into this list system. To keep things as smooth as possible, we will start from the back rows and move forward. Thus, we will modify the header file code so that it looks like what is shown below. Let us recall that the original header file code was Code 07.
01. //+------------------------------------------------------------------+
02. #property copyright "Daniel Jose"
03. //+------------------------------------------------------------------+
04. struct st_Base
05. {
06.     private :
07.         uint KeyValue;
08.     public  :
09.     //+----------------+
10.         void SetKey(const uint arg)
11.         {
12.             KeyValue = arg;
13.         }
14.     //+----------------+
15.         uint GetKey(void)
16.         {
17.             return KeyValue;
18.         }
19.     //+----------------+
20. };
21. //+------------------------------------------------------------------+
22. struct st_Dev01 : public st_Base
23. {
24.     private :
25.         string ValueInfo;
26.     public  :
27.     //+----------------+
28.         void SetKeyInfo(uint arg1, string arg2)
29.         {
30.             SetKey(arg1);
31.             ValueInfo = arg2;
32.         }
33.     //+----------------+
34.         string GetInfo(void)
35.         {
36.             return ValueInfo;
37.         }
38.     //+----------------+
39. };
40. //+------------------------------------------------------------------+
41. template <typename T>
42. struct st_List
43. {
44.     private :
45.         T    List[];
46.         uint nElements;
47.     public  :
48.     //+----------------+
49.         void Clear(void)
50.         {
51.             ArrayFree(List);
52.             nElements = 0;
53.         }
54.     //+----------------+
55.         bool AddList(const T &arg)
56.         {
57.             nElements += (nElements == 0 ? 2 : 1);
58.             ArrayResize(List, nElements);
59.             List[nElements - 1] = arg;
60.
61.             return true;
62.
63.         }
64.     //+----------------+
65.         T SearchKey(const uint arg)
66.         {
67.             for (uint c = 1; c < nElements; c++)
68.                 if (List[c].GetKey() == arg)
69.                     return List[c];
70.
71.             return List[0];
72.         }
73.     //+----------------+
74. };
75. //+------------------------------------------------------------------+
Code 09
And for Code 08 to continue working, we now need to update it to the form that can be seen below.
01. //+------------------------------------------------------------------+
02. #property copyright "Daniel Jose"
03. //+------------------------------------------------------------------+
04. #include "Tutorial\File 01.mqh"
05. //+------------------------------------------------------------------+
06. #define PrintX(X) Print(#X, " => [", X, "]")
07. //+------------------------------------------------------------------+
08. void OnStart(void)
09. {
10.     const string Names[] =
11.         {
12.             "Daniel Jose",
13.             "Edimarcos Alcantra",
14.             "Carlos Almeida",
15.             "Yara Alves"
16.         };
17.
18.     st_List <st_Dev01> list;
19.
20.     for (uint c = 0; c < Names.Size(); c++)
21.     {
22.         st_Dev01 info;
23.
24.         info.SetKeyInfo(c, Names[c]);
25.         list.AddList(info);
26.     }
27.
28.     PrintX(list.SearchKey(2).GetInfo());
29. }
30. //+------------------------------------------------------------------+
Code 10
Please note that in Code 10, we only changed line 18 compared to what was in the original Code 08.
Perfect. We now have a templated list type. Since these are exactly the kinds of situations we have been showing in recent articles, there is no reason to panic. The next step is slightly more complex. However, since there is no simple way to explain how to do this step by step, we will have to look at everything at once. Or rather, in two steps. The first focus will be on the header file, and the second on the main file. So do not be alarmed, but try not to get distracted.
First, the header file. This is now shown in the code below.
01. //+------------------------------------------------------------------+
02. #property copyright "Daniel Jose"
03. //+------------------------------------------------------------------+
04. template <typename KEY>
05. struct st_Base
06. {
07.     private :
08.         KEY KeyValue;
09.     public  :
10.     //+----------------+
11.         void SetKey(const KEY arg)
12.         {
13.             KeyValue = arg;
14.         }
15.     //+----------------+
16.         KEY GetKey(void)
17.         {
18.             return KeyValue;
19.         }
20.     //+----------------+
21. };
22. //+------------------------------------------------------------------+
23. template <typename KEY>
24. struct st_Dev01 : public st_Base <KEY>
25. {
26.     private :
27.         string ValueInfo;
28.     public  :
29.     //+----------------+
30.         void SetKeyInfo(KEY arg1, string arg2)
31.         {
32.             SetKey(arg1);
33.             ValueInfo = arg2;
34.         }
35.     //+----------------+
36.         string GetInfo(void)
37.         {
38.             return ValueInfo;
39.         }
40.     //+----------------+
41. };
42. //+------------------------------------------------------------------+
43. template <typename T, typename KEY>
44. struct st_List
45. {
46.     private :
47.         T    List[];
48.         uint nElements;
49.     public  :
50.     //+----------------+
51.         void Clear(void)
52.         {
53.             ArrayFree(List);
54.             nElements = 0;
55.         }
56.     //+----------------+
57.         bool AddList(const T &arg)
58.         {
59.             nElements += (nElements == 0 ? 2 : 1);
60.             ArrayResize(List, nElements);
61.             List[nElements - 1] = arg;
62.
63.             return true;
64.
65.         }
66.     //+----------------+
67.         T SearchKey(const KEY arg)
68.         {
69.             for (uint c = 1; c < nElements; c++)
70.                 if (List[c].GetKey() == arg)
71.                     return List[c];
72.
73.             return List[0];
74.         }
75.     //+----------------+
76. };
77. //+------------------------------------------------------------------+
Code 11
Notice what has happened in the header file of Code 11, and compare it with the previous files we have examined in this article. You will see that Code 11 is much more interesting than the previous ones. But there is no reason to panic. There is no cause for alarm, at least not in the way we have explained it. When I was learning to do this in C and C++ several years ago, I didn't get it right away, as it was difficult to find someone who could explain to me how it works. However, here you will understand how it works, my dear readers.
Please note: in line 04, the compiler will perform overloading. This happens precisely because we are defining a template for the structural code. As you may already know, the compiler will create a version for each data type that needs to be created. This is the simplest part. Now comes the confusing part, at least in my opinion.
Since the st_Dev01 structure inherits from the st_Base structure, which is a template, the st_Dev01 structure MUST ALSO be defined as a template structure. So, no matter how we think about it: the fact that one data structure inherits a template data structure forces the structure that inherits it to also be a template. This is not very complicated, since all we need to do is define line 23.
However, and here is where it gets most difficult, we need to move this type, defined in line 23, to the base structure. In other words, st_Base needs to receive this value, which will be defined later in the code. It seems simple, but believe me, it took me a long time to understand that I needed to change the declaration in line 22 of Code 09 to the declaration in line 24 of Code 11.
You have no idea how much suffering I endured until I learned this, since at that time NO ONE explained it. I suppose you always imagine that you first need to define what is shown in line 23, and then define what is shown in line 30. However, if the definition in line 24 is not fixed, the code WILL NOT COMPILE AT ALL.
Since our list will use a data structure that will be overloaded depending on the specific case, we also need to modify the declaration code of the st_List structure. But this is easily solved by simply changing line 43, and then adjusting line 57. Okay. Our header is almost ready. The only thing that still ties this to a specific data type is the declaration in line 27, but we will change that later. Now let us look at what the main file has become. It can be seen below:
01. //+------------------------------------------------------------------+
02. #property copyright "Daniel Jose"
03. //+------------------------------------------------------------------+
04. #include "Tutorial\File 01.mqh"
05. //+------------------------------------------------------------------+
06. #define PrintX(X) Print(#X, " => [", X, "]")
07. //+------------------------------------------------------------------+
08. void OnStart(void)
09. {
10.     #define def_TypeKey uint
11.
12.     const string Names[] =
13.         {
14.             "Daniel Jose",
15.             "Edimarcos Alcantra",
16.             "Carlos Almeida",
17.             "Yara Alves"
18.         };
19.
20.     st_List <st_Dev01 <def_TypeKey>, def_TypeKey> list;
21.
22.     for (uint c = 0; c < Names.Size(); c++)
23.     {
24.         st_Dev01 <def_TypeKey> info;
25.
26.         info.SetKeyInfo(c, Names[c]);
27.         list.AddList(info);
28.     }
29.
30.     PrintX(list.SearchKey(2).GetInfo());
31.
32.     #undef def_TypeKey
33. }
34. //+------------------------------------------------------------------+
Code 12
«Oh God! Have mercy upon us! This guy is insane. How dare he come here and show us the code above? Don't you care about us beginner programmers? Are you trying to kill us by showing such crazy code?»
Calm down, dear readers. Don't get worked up. Code 12 is so simple that it seems almost boring, despite being quite fun. But pay attention. Since we need to repeat certain actions in different places of the code, we use a directive in line 10 to create a definition that allows us to quickly and safely make changes across all those places. In Code 12, we only need to change two things. The first is line 20. Compare the declaration of this variable with the declaration of the same variable in Code 10.
Since overloading also affects the data structure we are creating, we need to change the declaration in line 24, where we declare the structure that will be stored in the list. Everything else in the code remains unchanged. In fact, the result will be the same as shown in Figure 05.
However, we are not yet finished discussing this topic, since we still have the opportunity to make one more improvement, which we will do now. This will allow us to create an almost perfect list of structures. I say «almost» because there is a small problem that cannot be solved without using classes, that is, without using OOP. But this will become clear later, when we show what the problem is and how OOP solves it.
In short, take a deep breath, because we are going to delve even deeper into the topic. Returning to the header file code, we will modify it again as shown below.
01. //+------------------------------------------------------------------+
02. #property copyright "Daniel Jose"
03. //+------------------------------------------------------------------+
04. template <typename KEY>
05. struct st_Base
06. {
07.     private :
08.         KEY KeyValue;
09.     public  :
10.     //+----------------+
11.         void SetKey(const KEY arg)
12.         {
13.             KeyValue = arg;
14.         }
15.     //+----------------+
16.         KEY GetKey(void)
17.         {
18.             return KeyValue;
19.         }
20.     //+----------------+
21. };
22. //+------------------------------------------------------------------+
23. template <typename KEY, typename INFO>
24. struct st_Dev01 : public st_Base <KEY>
25. {
26.     private :
27.         INFO ValueInfo;
28.     public  :
29.     //+----------------+
30.         void SetKeyInfo(KEY arg1, INFO arg2)
31.         {
32.             SetKey(arg1);
33.             ValueInfo = arg2;
34.         }
35.     //+----------------+
36.         INFO GetInfo(void)
37.         {
38.             return ValueInfo;
39.         }
40.     //+----------------+
41. };
42. //+------------------------------------------------------------------+
43. template <typename T, typename KEY>
44. struct st_List
45. {
46.     private :
47.         T    List[];
48.         uint nElements;
49.     public  :
50.     //+----------------+
51.         void Clear(void)
52.         {
53.             ArrayFree(List);
54.             nElements = 0;
55.         }
56.     //+----------------+
57.         bool AddList(const T &arg)
58.         {
59.             nElements += (nElements == 0 ? 2 : 1);
60.             ArrayResize(List, nElements);
61.             List[nElements - 1] = arg;
62.
63.             return true;
64.
65.         }
66.     //+----------------+
67.         T SearchKey(const KEY arg)
68.         {
69.             for (uint c = 1; c < nElements; c++)
70.                 if (List[c].GetKey() == arg)
71.                     return List[c];
72.
73.             return List[0];
74.         }
75.     //+----------------+
76. };
77. //+------------------------------------------------------------------+
Code 13
As you can see, the only thing I changed in this Code 13 is line 23, that's all. Now we can use any data type as a key, as well as any data type as the information associated with that key. Having understood this, we can now see what the main code looks like. It is shown just below.
01. //+------------------------------------------------------------------+
02. #property copyright "Daniel Jose"
03. //+------------------------------------------------------------------+
04. #include "Tutorial\File 01.mqh"
05. //+------------------------------------------------------------------+
06. #define PrintX(X) Print(#X, " => [", X, "]")
07. //+------------------------------------------------------------------+
08. void OnStart(void)
09. {
10.     #define def_TypeKey     string
11.     #define def_TypeInfo    string
12.
13.     const string Names[][2] =
14.         {
15.             "Daniel Jose"       , "Chief Programmer",
16.             "Edimarcos Alcantra", "Programmer",
17.             "Carlos Almeida"    , "Junior Programmer",
18.             "Yara Alves"        , "Accounting"
19.         };
20.
21.     st_List <st_Dev01 <def_TypeKey, def_TypeInfo>, def_TypeKey> list;
22.
23.     for (int c = 0; c < ArrayRange(Names, 0); c++)
24.     {
25.         st_Dev01 <def_TypeKey, def_TypeInfo> info;
26.
27.         info.SetKeyInfo(Names[c][1], Names[c][0]);
28.         list.AddList(info);
29.     }
30.
31.     PrintX(list.SearchKey("Chief Programmer").GetInfo());
32.     PrintX(list.SearchKey("Guest").GetInfo());
33.
34.     #undef def_TypeKey
35.     #undef def_TypeInfo
36. }
37. //+------------------------------------------------------------------+
Code 14
Please note that the code has hardly changed. However, these few differences are enough to obtain a very simple code that can be used with interesting results, both from a practical standpoint and in terms of its capabilities. Since the changes are very simple, we will give you the opportunity to understand how the code works. In any case, we will show you the result. This can be seen in the following image.

Figure 06
How beautiful! Image 06 is a real gem, as it shows how seemingly complex things can become incredibly simple if you apply effort to the material presented in the articles.
Final thoughts
Without a doubt, I can affirm that this article will require some time from you to digest the material. This is because everything shown here is initially oriented toward OOP. Many consider it unlikely to create something that is advertised as a type of programming but is in fact based on the principles of fully structured programming.
As we have already said, before explaining what OOP is, we need to understand what served as the original foundation of this programming model, since it arose to solve one of the difficulties of structured programming. However, many things that are considered the exclusive prerogative of OOP are actually performed not within it, but within structured programming.
So, my dear readers, try to study each item presented in these articles. Use the codes in the appendix as a means to study, practice, and correctly understand how to program properly. And in the next article, the fun will continue. See you later!
Translated from Portuguese by MetaQuotes Ltd.
Original article: https://www.mql5.com/pt/articles/15922
Warning: All rights to these materials are reserved by MetaQuotes Ltd. Copying or reprinting of these materials in whole or in part is prohibited.
This article was written by a user of the site and reflects their personal views. MetaQuotes Ltd is not responsible for the accuracy of the information presented, nor for any consequences resulting from the use of the solutions, strategies or recommendations described.

- Free trading apps
- Over 8,000 signals for copying
- Economic news for exploring financial markets
You agree to website policy and terms of use