
From Basic to Intermediate: Struct (VI)

Introduction
In the previous article, "From Basic to Intermediate: Struct (V)", we demonstrated and explained how to create simple structure templates. The goal was to enable overloading the structure for other data types without the need to reprogram the entire structural context. Although this article might be somewhat challenging to grasp, we endeavored to explain it as simply and practically as possible. Our aim is for everyone to be able to follow the topics, learn them, and practically apply the concepts demonstrated and covered in each article.
However, everything covered in that article represents only the introductory part of a broader set of concepts and information primarily aimed at grouping a broad and diverse range of actions, which a skilled programmer can perform, under a single umbrella.
The material we begin to explore today (we will show this gradually) is designed to literally expand upon what was discussed in the previous article. This is why this topic is covered in many programming and data analysis courses. So, do not expect to see everything in one article: it will take a vast number of articles to cover this subject properly. And this is even without considering object-oriented programming (OOP).
Why do I emphasize this? The reason is that I have noticed many people wanting to learn how to use classes and the like. Yet, these same individuals often lack the foundational knowledge to comprehend OOP. These concepts are born precisely from a proper understanding of structural programming. To grasp this, one needs to invest considerable time. It comes only with time and experience.
However, the goal of these articles is precisely to accelerate this learning stage. Thus, what would take years can be accomplished in a few months or even weeks, depending on our efforts and background. Believe me, having a programming background is extremely helpful for quickly absorbing the material. Without it, you can learn to create various things, but unfortunately, a moment will come when you cannot progress further. Our goal in these articles is exactly this: to show you that with calmness, patience, and determination, it does not matter whether you have a suitable background or not. Anyone can become a good programmer.
So, let's begin the new topic. This way, we will review what we did in the previous article and examine some details that might have been missed. This is crucial for understanding some aspects we will analyze very soon.
Let's think about everyday tasks
One of the simplest is searching for a contact in an address book. This is, of course, a very simple and basic task, like searching for synonyms or a word's definition in a dictionary. Even a child can learn this. However, have you ever wondered what it would be like if you didn't know how to find a contact in an address book, or a phone number in a phone directory, or how your web browser quickly finds the web page you requested? Underlying all these tasks is the same fundamental basis: structures.
Yes, the concept is the same, but the type of information stored can vary greatly. For instance, an address book might contain a name, address, or phone number. In a dictionary, however, you find a word followed by its definition. However, in the dictionary you will find a word followed by its definition. All of this can be organized in a very simple and practical way. But what is truly remarkable is implementing code that handles these different structure types without requiring massive modifications. There are ways to do this, but we won't go that far—it's not necessary. Our goal for you and me is to show how to implement simple things.
In the previous article, we explained how to work with a very simple type of structural code, which uses discrete data within the structure itself for various purposes. However, this type of solution is not suitable for solving broader tasks. For your understanding, we will create a very simple and clear code, as you can see below:
01. //+------------------------------------------------------------------+
02. #property copyright "Daniel Jose"
03. //+------------------------------------------------------------------+
04. template <typename T>
05. struct st_Data
06. {
07. //+----------------+
08.     private:
09. //+----------------+
10.         T Values[];
11. //+----------------+
12.     public:
13. //+----------------+
14.         void Set(const T &arg[])
15.         {
16.             ArrayFree(Values);
17.             ArrayCopy(Values, arg);
18.         }
19. //+----------------+
20.         T Get(const uint index)
21.         {
22.             return Values[index];
23.         }
24. //+----------------+
25. };
26. //+------------------------------------------------------------------+
27. #define PrintX(X) Print(#X, " => ", X)
28. //+------------------------------------------------------------------+
29. void OnStart(void)
30. {
31.     const double H[] = {2.05, 1.97, 1.87, 1.75, 1.99, 2.01, 1.83};
32.     const uint   K[] = {2, 1, 4, 0, 5, 3, 6};
33.
34.     st_Data <double> Info_1;
35.     st_Data <uint> Info_2;
36.
37.     Info_1.Set(H);
38.     Info_2.Set(K);
39.
40.     PrintX(Info_1.Get(Info_2.Get(3)));
41. }
42. //+------------------------------------------------------------------+
Code 01
This binary code can be very interesting, depending on how you analyze it, even before you understand what I want to explain. In it, we create a breakable relationship between two entities. However, let's not rush, as the concept we need to understand helps us figure out how everyday problems can be modeled in a way that utilizes very simple and relatively complete structural programming.
In Code 01, we attempt to create, using structural programming, a relationship between the elements of arrays K and H. Obviously, we could do the same thing the conventional way. However, if we code structurally, we will soon see how much easier it is to apply it to solving other problems. There is no need to alter the code that has already been created.
If you have studied the content of the articles, you know exactly what result this code generates. And you know why this code generates that particular result just by looking at Code 01. But for those who have not yet reached that level, we will show the result printed to the MetaTrader 5 terminal, which can be seen in the image below:

Figure 01
Question: Why does line 40 show such a value in image 01? Answer: Because we are using an element from array K to index an element in array H, but that's not exactly what we intended to do. In fact, the idea was to link a value in array K with the corresponding value in array H, but the connection didn't happen as we expected.
To clarify the idea here, you need to understand the following: array K was meant to serve as a key, where each of its values would be an index for accessing or identifying a value in array H. However, array K is unordered, and this was done intentionally so you can understand why the solution isn't always immediately apparent.
To help you understand how this relationship will develop, we will change code 01 to code 02.
01. //+------------------------------------------------------------------+
02. #property copyright "Daniel Jose"
03. //+------------------------------------------------------------------+
04. template <typename T>
05. struct st_Data
06. {
07. //+----------------+
08.     private:
09. //+----------------+
10.         T Values[];
11. //+----------------+
12.     public:
13. //+----------------+
14.         void Set(const T &arg[])
15.         {
16.             ArrayFree(Values);
17.             ArrayCopy(Values, arg);
18.         }
19. //+----------------+
20.         T Get(const uint index)
21.         {
22.             return Values[index];
23.         }
24. //+----------------+
25.         uint NumberOfElements(void)
26.         {
27.             return Values.Size();
28.         }
29. //+----------------+
30. };
31. //+------------------------------------------------------------------+
32. void OnStart(void)
33. {
34.     const double H[] = {2.05, 1.97, 1.87, 1.75, 1.99, 2.01, 1.83};
35.     const uint   K[] = {2, 1, 4, 0, 5, 3, 6};
36.
37.     st_Data <double> Info_1;
38.     st_Data <uint> Info_2;
39.
40.     Info_1.Set(H);
41.     Info_2.Set(K);
42.
43.     for (uint c = 0; c < Info_2.NumberOfElements(); c++)
44.         PrintFormat("Index [%d] => [%.2f]", Info_2.Get(c), Info_1.Get(c));
45. }
46. //+------------------------------------------------------------------+
Code 02
Perhaps now, with code 02, everything will become clearer. In line 43, we use a loop to iterate through all the elements and show how one array relates to the other. By running code 02, we get the following:
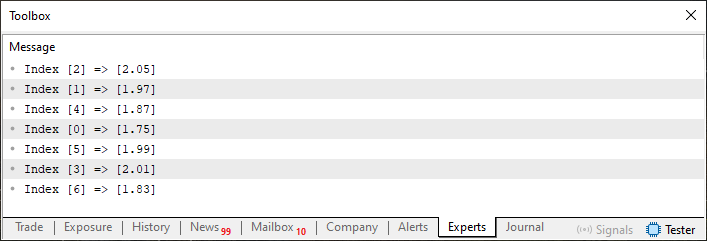
Figure 02
Alright, now we can return to the question in code 01, because based on image 02, we know that for every index declared in array K, there is a corresponding value in array H. Therefore, when in code 01 we ask for the value at index 03, we are not actually referring to the value shown in image 01. This happens because, disregarding the fact that the arrays are unordered, index 03 in array K equals zero. However, if we ask to display the corresponding value, we won't be pointing to the correct index in array H. I know this might seem complicated, but you will soon understand what I'm getting at.
So, the first problem is that the arrays are unordered, and for truly efficient searching, they need to be sorted. Remember, the relationship shown in image 02 must be preserved, as one array will serve as the search source and the other as the answer source.
Many beginners, upon hearing this, immediately come up with a solution, the most obvious being to use the ArraySort function to order the arrays or the ArrayBsearch function to search within the array itself. In any case, to achieve our goal, we need to modify code 01. This leads to the following code:
01. //+------------------------------------------------------------------+
02. #property copyright "Daniel Jose"
03. //+------------------------------------------------------------------+
04. template <typename T>
05. struct st_Data
06. {
07. //+----------------+
08.     private:
09. //+----------------+
10.         T Values[];
11. //+----------------+
12.     public:
13. //+----------------+
14.         void Set(const T &arg[])
15.         {
16.             ArrayFree(Values);
17.             ArrayCopy(Values, arg);
18.         }
19. //+----------------+
20.         T Get(const uint index)
21.         {
22.             return Values[index];
23.         }
24. //+----------------+
25.         T Search(const uint index)
26.         {
27.             return ArrayBsearch(Values, index);
28.         }
29. //+----------------+
30. };
31. //+------------------------------------------------------------------+
32. #define PrintX(X) Print(#X, " => ", X)
33. //+------------------------------------------------------------------+
34. void OnStart(void)
35. {
36.     const double H[] = {2.05, 1.97, 1.87, 1.75, 1.99, 2.01, 1.83};
37.     const uint   K[] = {2, 1, 4, 0, 5, 3, 6};
38.
39.     st_Data <double> Info_1;
40.     st_Data <uint> Info_2;
41.
42.     Info_1.Set(H);
43.     Info_2.Set(K);
44.
45.     PrintX(Info_1.Get(Info_2.Search(3)));
46. }
47. //+------------------------------------------------------------------+
Code 03
Running code 03, we have finally established the correct and necessary connection. This will produce the answer shown below:

Figure 03
Please note that the value returned as the answer actually corresponds, so to speak, to the index we were looking for in our list, as can be seen from the correspondence between arrays K and H in image 02. However, there are simpler ways to create the same type of relationship, allowing us to work more effectively by maintaining a closer connection between arrays K and H.
One such method is using multidimensional arrays. But multidimensional arrays are not very suitable for working with different types of information, so to create this type of connection, we need to use a different method. Let's recall that the idea is to create code contained within a structure.
Therefore, we need to take one step back and then two steps forward. The goal is to make the solution clearer. To avoid examining this separately, let's change the topic.
Structures of structures
One point that often confuses many beginners is when we move from using concepts that were discussed separately to a combined format. I know discussing this might seem strange, as the concept itself essentially remains intact. However, when we combine concepts and apply them more deeply, new possibilities emerge that may be completely unclear to you at first.
To explain this, we will modify code 03 (discussed in the previous topic) to create something simple to understand, yet allowing us to focus the explanation on our main goal. In other words, we will create a kind of connection between one set of values and a completely different set of values.
To do this, we will use the code implemented below:
01. //+------------------------------------------------------------------+
02. #property copyright "Daniel Jose"
03. //+------------------------------------------------------------------+
04. struct st_Data
05. {
06.     struct st_Reg
07.     {
08.         double  h_value;
09.         uint    k_value;
10.     }Values[];
11. };
12. //+------------------------------------------------------------------+
13. bool Set(st_Data &dst, const uint &arg1[], const double &arg2[])
14. {
15.     if (arg1.Size() != arg2.Size())
16.         return false;
17.
18.     ArrayResize(dst.Values, arg1.Size());
19.     for (uint c = 0; c < arg1.Size(); c++)
20.     {
21.         dst.Values[c].k_value = arg1[c];
22.         dst.Values[c].h_value = arg2[c];
23.     }
24.
25.     return true;
26. }
27. //+------------------------------------------------------------------+
28. string Get(const st_Data &src, const uint index)
29. {
30.     for (uint c = 0; c < src.Values.Size(); c++)
31.         if (src.Values[c].k_value == index)
32.             return DoubleToString(src.Values[c].h_value, 2);
33.
34.     return "-nan";
35. }
36. //+------------------------------------------------------------------+
37. #define PrintX(X) Print(#X, " => ", X)
38. //+------------------------------------------------------------------+
39. void OnStart(void)
40. {
41.     const double H[] = {2.05, 1.97, 1.87, 1.75, 1.99, 2.01, 1.83};
42.     const uint   K[] = {2, 1, 4, 0, 5, 3, 6};
43.
44.     st_Data info;
45.
46.     Set(info, K, H);
47.     PrintX(Get(info, 3));
48. }
49. //+------------------------------------------------------------------+
Code 04
Before I begin explaining the details of what code 04 does, I need you to understand the following: what we see here is simply a way to implement something with a predefined goal.
Do not under any circumstances consider the method shown below to be the only one, as there are other, simpler or more complex ones, which involve the use of multidimensional arrays. This is based on what we have already explained and demonstrated up to this point.
But there is an even better way to do this. We'll get to that later. For now, let's examine what code 04 does. First, let's look at the execution result, just below:

Figure 04
What an interesting result, isn't it? One might think: when line 47 is executed, it does something very similar to what was shown in code 01. However, if you look at the Get function present in line 28 of code 04, you can see that the index value is searched for within the set of elements of array K.
But the key point, which is of real interest, is that upon successful execution of line 31, we return not the index of the element from array K, but the value at the same index from array H, thereby creating a link. Now, pay attention to the following: since the number of elements is small, we don't need to worry about the code's execution time.
However, in a normal and real situation, the structure created in line 4 should be ordered in some way. Thus, during the search we perform in line 28, the execution time will be the smallest possible.
So, a new idea emerges: how do we create code that is closer to reality? Well, for that, we need to give this structure its own context. This is precisely where what in computer science is called data analysis begins.
When we apply data analysis to our codes, we must structure them somehow, but there is no perfect structure for all cases. In some situations, code needs to be implemented in a certain way, and in others, in a completely different way. Therefore, each problem requires an appropriate level of knowledge to achieve the best result in the shortest time.
You're probably thinking now: "Are we going to start learning data analysis?" Not yet, dear reader. Before that, we have a few more things to consider. We could start doing that soon, but at the moment, we're not. The point is, understanding that we now have a link between the set of elements in array K and the set of elements in array H, we can start thinking about how to transform the structure from line 04 into a contextual structure that contains the necessary mechanisms to maintain, manage, and ensure that this link between elements remains properly established.
For this, we will first use code 04 to build this simulation. In other words, we are not going to generalize the mechanism just yet; this allows the compiler to create type overloading. The new modified code is shown below:
01. //+------------------------------------------------------------------+
02. #property copyright "Daniel Jose"
03. //+------------------------------------------------------------------+
04. struct st_Data
05. {
06.     //+----------------+
07.     private:
08.     //+----------------+
09.         struct st_Reg
10.         {
11.             double  h_value;
12.             uint    k_value;
13.         }Values[];
14.     //+----------------+
15.     public:
16.     //+----------------+
17.         bool Set(const uint &arg1[], const double &arg2[])
18.         {
19.             if (arg1.Size() != arg2.Size())
20.                 return false;
21.
22.             ArrayResize(Values, arg1.Size());
23.             for (uint c = 0; c < arg1.Size(); c++)
24.             {
25.                 Values[c].k_value = arg1[c];
26.                 Values[c].h_value = arg2[c];
27.             }
28.
29.             return true;
30.         }
31.     //+----------------+
32.         string Get(const uint index)
33.         {
34.             for (uint c = 0; c < Values.Size(); c++)
35.                 if (Values[c].k_value == index)
36.                     return DoubleToString(Values[c].h_value, 2);
37.
38.             return "-nan";
39.         }
40.     //+----------------+
41. };
42. //+------------------------------------------------------------------+
43. #define PrintX(X) Print(#X, " => ", X)
44. //+------------------------------------------------------------------+
45. void OnStart(void)
46. {
47.     const double H[] = {2.05, 1.97, 1.87, 1.75, 1.99, 2.01, 1.83};
48.     const uint   K[] = {2, 1, 4, 0, 5, 3, 6};
49.
50.     st_Data info;
51.
52.     info.Set(K, H);
53.     PrintX(info.Get(3));
54. }
55. //+------------------------------------------------------------------+
Code 05
Now, pay close attention so as not to lose the thread of the explanation. When code 05 is executed, we will see the same basic information in the MetaTrader 5 terminal as in image 04, but with a slight difference, which can be seen just below:

Figure 05
Unlike code 04, code 05 is structural. However, due to the type declaration implemented in lines 11 and 12, we are bound to a specific type of data that can be used here. Suppose we want or need to create a different system where, instead of linking numeric values, we want to link textual values, i.e., strings, instead of the values used in code 05. How can we do this by changing as little of code 05 as possible?
If you haven't read the previous articles, that's a shame: they explain some details that I won't repeat here. However, we will examine how to generalize the structure declared in line 04 so that the compiler creates the necessary type overloading, thus covering cases that would obviously be impossible otherwise.
For simplicity, we will start by generalizing only one base type—the one defined in line 11. The new code is shown below:
01. //+------------------------------------------------------------------+
02. #property copyright "Daniel Jose"
03. //+------------------------------------------------------------------+
04. template <typename T>
05. struct st_Data
06. {
07.     //+----------------+
08.     private:
09.     //+----------------+
10.         struct st_Reg
11.         {
12.             T  h_value;
13.             uint    k_value;
14.         }Values[];
15.     //+----------------+
16.         string ConvertToString(T arg)
17.         {
18.             if ((typename(T) == "double") || (typename(T) == "float")) return DoubleToString(arg, 2);
19.             if (typename(T) == "string") return arg;
20.
21.             return IntegerToString(arg);
22.         }
23.     //+----------------+
24.     public:
25.     //+----------------+
26.         bool Set(const uint &arg1[], const T &arg2[])
27.         {
28.             if (arg1.Size() != arg2.Size())
29.                 return false;
30.
31.             ArrayResize(Values, arg1.Size());
32.             for (uint c = 0; c < arg1.Size(); c++)
33.             {
34.                 Values[c].k_value = arg1[c];
35.                 Values[c].h_value = arg2[c];
36.             }
37.
38.             return true;
39.         }
40.     //+----------------+
41.         string Get(const uint index)
42.         {
43.             for (uint c = 0; c < Values.Size(); c++)
44.                 if (Values[c].k_value == index)
45.                     return ConvertToString(Values[c].h_value);
46.
47.             return "-nan";
48.         }
49.     //+----------------+
50. };
51. //+------------------------------------------------------------------+
52. #define PrintX(X) Print(#X, " => ", X)
53. //+------------------------------------------------------------------+
54. void OnStart(void)
55. {
56.     const double H[] = {2.05, 1.97, 1.87, 1.75, 1.99, 2.01, 1.83};
57.     const uint   K[] = {2, 1, 4, 0, 5, 3, 6};
58.
59.     st_Data <double> info;
60.
61.     info.Set(K, H);
62.     PrintX(info.Get(3));
63. }
64. //+------------------------------------------------------------------+
Code 06
Now things have gotten truly interesting with the construction of code 06. This is because in code 06, we can start generalizing the structure, allowing the compiler to perform overloading when needed. Thus, we can work with different kinds of data to create a search mechanism. However, when we try to compile this code, it's noticeable that, unlike the previous ones, the message will be different.
This can be seen just below:

Figure 06
You might recall that I mentioned there are situations where compiler messages can be ignored, and others where they cannot. This is a typical example of when we can ignore the compiler warnings, and that's entirely because the compiler DOES NOT UNDERSTAND what we are doing in lines 19 and 21, which will only be executed in very specific cases, as well as in line 18 itself. There is a way to prevent these messages from being displayed, but I will show it another time, perhaps in the next article, as this one is coming to an end.
So, since we are generalizing one of the values, we need to inform the compiler what information will be used. Then we can create the appropriate code for that data type. For this, in line 59 we declare a variable that will give us access to the structure. Now, since the base type declared in line 56 is double, we must use a compatible or identical type in the declaration on line 59. Otherwise, we will have problems with data structure lookup.
«But how is that possible? I didn't understand that part. I do, of course, understand the reason for the declaration on line 59 thanks to the declaration in the structure. However, I don't understand why we need to declare a matching type, as in line 56. If we are creating something generic, there isn't much sense in this».
Well, since this is rather difficult to explain, I will dedicate the remainder of the article to this topic, leaving a significant portion of the material for the next one.
I want to draw your attention to the fact that at the beginning of the article, we used code very similar to code 06. But when we did that, the result was in a sense known in advance because we didn't care about converting or returning the correct data type.
Now consider the following: in code 01, the type of data returned depends on the type of data stored. But, and this is the whole point, in code 06, a data type will always be returned, regardless of the type of data stored. In this case, we will store data of type double. However, the answer will ALWAYS be of type string.
The very fact that this is done leads, so to speak, creating ambiguity within the system, because this conversion is not expected by the programmer using the structure we are defining. You're probably thinking: how is that possible? Of course, they will know. But that's not always the case, as we can create code libraries and use them at different times. And when we talk about a code library, we don't mean that you accumulate a lot of source code.
These libraries usually consist of executable code, like the famous DLLs. In them, we don't know exactly how the internal code works; we only have an idea of it because we pass values to the DLL, and it returns a result. It's important to know the type of data we are passing into the structure because we might need to convert them back to the original type, since the result will always be a string.
Okay. «But can't we just keep it generic? In other words, instead of converting the data to a string type, if we preserved it in its original type, we wouldn't have this problem we talked about a minute ago. Am I right?» Yes, my friend, you are right. However, remember that the goal here is learning, not creating code that could be used in a real situation.
But even so, since I want to give you the opportunity to pause for a moment and reflect on some things, we will modify code 06 in such a way that in the code shown above, only the fragment shown below is changed. And the mere fact that we have done this indicates that we are dealing with a completely different situation, posed and implemented here. Let's look at the modified fragment:
                   .
                   .
                   .
53. //+------------------------------------------------------------------+
54. void OnStart(void)
55. {
56.     const string T = "possible loss of data due to type conversion";
57.     const uint   K[] = {2, 1, 4, 0, 7, 5, 3, 6};
58.
59.     st_Data <string> info;
60.     string H[];
61.
62.     StringSplit(T, ' ', H);
63.     info.Set(K, H);
64.     PrintX(info.Get(3));
65. }
66. //+------------------------------------------------------------------+
Code 07
There's no need to worry, as in the appendix you will get full access to the codes, so you can experiment and practice every detail shown here. In any case, I want you to stop and think about what we are doing here: by changing code 06 to the fragment from code 07, the simple fact of changing the type of information that will reside in the structure will allow us to build things that many will find improbable or difficult to implement.
One tip to help you contemplate what's being done: depending on how we create and arrange the information in the variable on line 60 of code 07, we can create code that can work in any language, provided, of course, we implement and arrange the information in the variable on line 60 appropriately.
Think about how this can be done and how it will affect an entire generation of code you can create.
Concluding thoughts
In this article, we delved deeper into some programming fundamentals and explored how to begin implementing a common code base. The goal is to reduce the programming workload and leverage the full potential of the programming language itself—in this case, MQL5. What we show or explain here took me a very long time to internalize.
However, that was because, at the time I was learning these things, they were just being created. Nowadays, almost everyone says OOP is the best. And yes, it is indeed very good and useful. But why? It's pointless to see a class's code, use it, or even modify it without understanding why it works. To truly understand and learn, one must first grasp how programming languages reached this level, why OOP was created, and why it's so widely used.
This understanding can only come through practice and experimentation, using code with principles that are only discussed in OOP but which, in essence, are not created like the methods and capabilities that only OOP provides. In reality, these principles were born in structural programming—a topic hardly anyone talks about today, and which we are beginning to study right here.
Translated from Portuguese by MetaQuotes Ltd.
Original article: https://www.mql5.com/pt/articles/15889
Warning: All rights to these materials are reserved by MetaQuotes Ltd. Copying or reprinting of these materials in whole or in part is prohibited.
This article was written by a user of the site and reflects their personal views. MetaQuotes Ltd is not responsible for the accuracy of the information presented, nor for any consequences resulting from the use of the solutions, strategies or recommendations described.

- Free trading apps
- Over 8,000 signals for copying
- Economic news for exploring financial markets
You agree to website policy and terms of use