
From Basic to Intermediate: Indicator (I)

In the previous article "From Basic to Intermediate: Events (II)", we covered how to save information on a more or less permanent basis between different sessions of the MetaTrader 5 platform. I know some might think such material is unnecessary. But when you need to preserve information between sessions, you will remember this and say: "My friend, thank you for that advice. Thank you very much". In any case,
we are only just beginning our exploration. Since we already have the basic concepts that allow us to create small programs, and we've already seen how event-driven programming works, it's time to understand some basic concepts that many people try to implement themselves, even though they are already designed and, by default, don't need to be implemented but simply used as needed.
In this case, I'm referring to the tabs that are present by default in almost all MetaTrader 5 applications, although we can have more or fewer of them. However, if you, as programmers, learn how to use these tabs, you will become much more observant and demanding users of the interfaces provided to you by other programmers.
So, let's start a new topic today.
Default tabs
Any code written entirely in MQL5 can have a basic settings window. This window will not be present in all applications; in applications like scripts and services, it may or may not be present. However, in indicators and expert advisors, we are always presented with some elements, or rather, default tabs. They are not created by the programmer but are defined within the MetaTrader 5 environment, meaning we have a standard for configuring any indicator or expert advisor.
But for various reasons, many programmers often add configuration elements that are unnecessary. This is because such elements can already fit into the tabs that will be displayed to the user by default. The question is, do you know how to access the elements defined on the default tabs? I'm asking this as a programmer, not as a user.
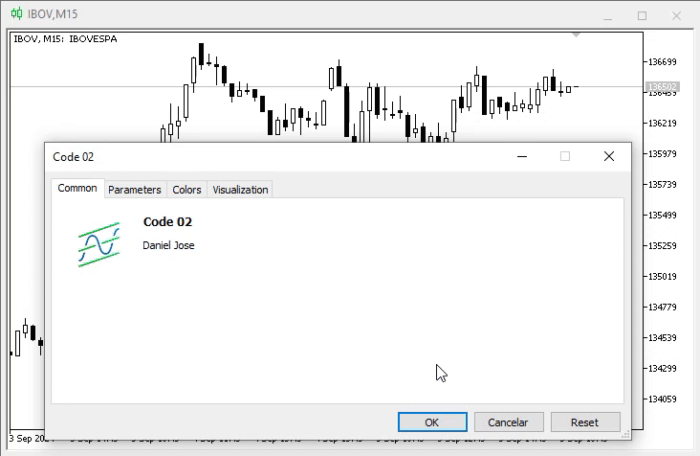
When I refer to default tabs, I mean what we see in the sequence of images below:
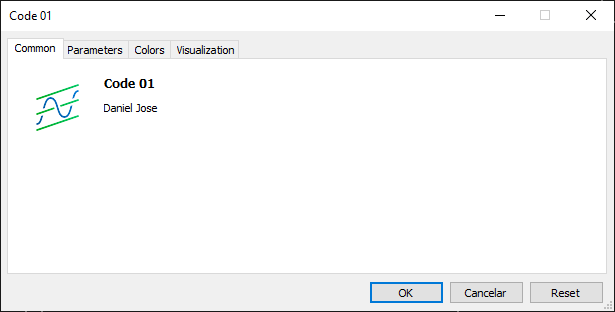
Figure 01
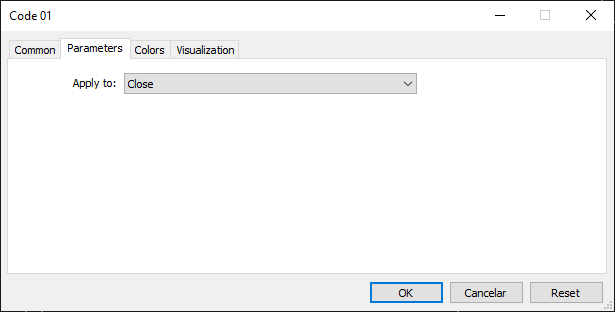
Figure 02
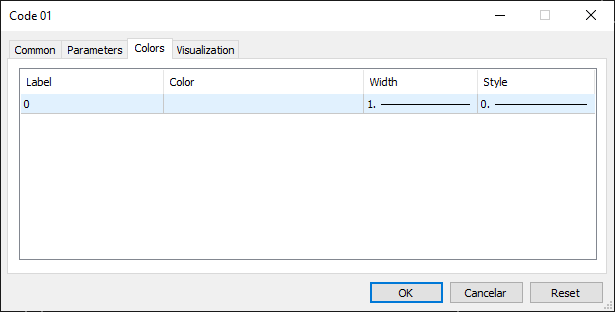
Figure 03
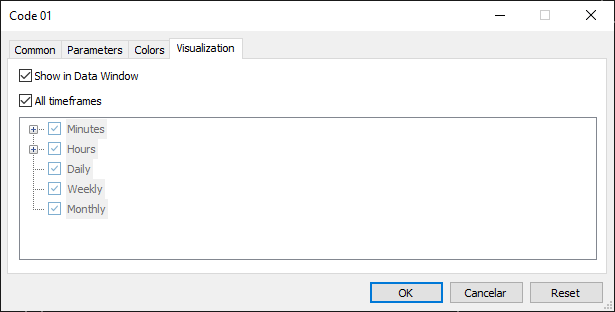
Figure 04
These are the default indicator tabs. Since we are currently focused on learning how events work in an indicator, precisely because it is simpler, we should learn as much as possible about it before moving on to more complex things. Nevertheless, this default tab system is quite interesting and well-designed, as it fits a wide variety of cases perfectly. In fact, in most situations, there is no need to implement any additional input parameters. But then why do many programmers create extra input parameters? The reason is that it becomes necessary when the default scheme provided by MetaTrader 5 cannot meet our needs. However, before starting to add all sorts of unnecessary elements, it's better to first understand how to use these tabs so that our application does not deviate from the MetaTrader 5 standard.
Essentially, the only tab that needs to be managed, if we deem it necessary, is the tab from image 01. This is because on this tab, we can add elements to make things more illustrative in terms of specifying the purpose of this application. And doing this is very simple. However, since we are going to continue focusing only on the educational aspect here, we will not add elements to this tab. In any case, you should think about how to work on this first tab, especially if you want to make your applications accessible.
To add or modify the tab shown in image 01, we need to tell the compiler what to place in it. For this, we will be using a compilation directive. This directive is used as #property. This directive allows us to define many things, from the application version to a link to a specific location on the Internet. More detailed information can be found in the documentation. You have likely already seen how this directive is applied in all my article codes. Essentially, the only thing I define by default is copyright. Let's look at how we can define another one to give you an idea of what we can do. For this, we will use the code below.
01. //+------------------------------------------------------------------+
02. #property copyright "Daniel Jose"
03. #property version "1.0"
04. #property icon "Example.ico"
05. #property description "This is a demonstration application whose purpose is only didactic.\nIt is part of a sequence of articles published in the MQL5 community."
06. #property link "https://www.mql5.com/pt/articles/15794"
07. //+------------------------------------------------------------------+
08. int OnInit()
09. {
10.    return INIT_SUCCEEDED;
11. };
12. //+------------------------------------------------------------------+
13. int OnCalculate(const int rates_total, const int prev_calculated, const int begin, const double &price[])
14. {
15.    return rates_total;
16. };
17. //+------------------------------------------------------------------+
Code 01
Thus, when executing code 01, we will see that image 01 will be displayed differently. This change can be observed below:
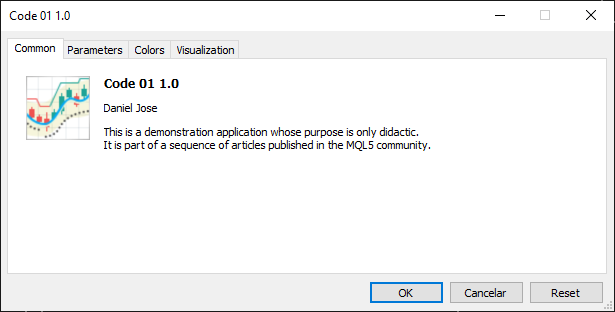
Figure 05
Please note that now we have an icon that differs from the standard one, as well as a description of the application's purpose. All of this is defined between lines 02 and 05. Note that we need to specify the directory and image file to be used as the icon. In the appendix, I set everything up so you can experiment and understand how to place the desired icon. At this point, as seen in code 01, the icon file should be located in the folder where the indicator code is placed. However, it can also be placed elsewhere; simply specify the location, and the compiler will be able to find the required file.
«But wait a second. There's a piece of information missing here: the one we declared on line 06 of code 01. Where did it go?» Actually, this information, which was previously visible on the tab, is now linked to other information. For example, by hovering the cursor over what should be the copyright information, we will see what is shown in the figure below:
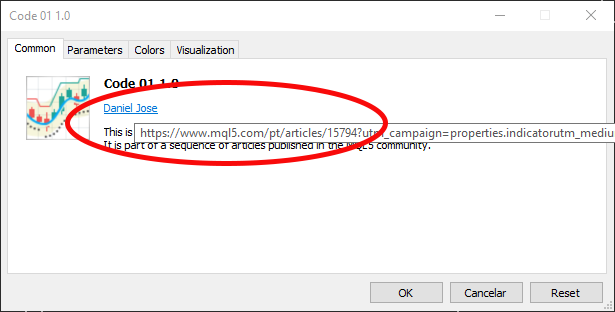
Figure 06
Thus, we can confirm that all information is present, as can be seen in image 06. If we click on the point from which the link emerged, a browser will open and take us to the location specified in line 06 of code 01. Since in most cases, as I assume, you are creating something for personal use, you can ignore these things as they don't require implementation. Although there are situations where we need to instruct the compiler on how the code should be generated, or rather (since this phrase might have been confusing) — there are special circumstances where, even when using code for personal purposes, we need to set these compilation properties.
One such case is precisely the creation of an indicator whose goal is to draw something on the chart. However, you might skip the explanation of the other tabs mentioned at the beginning of this topic. I ask you to remain calm and patient. We'll return to them shortly. But now we need to do something else to give meaning to these tabs.
Basic indicator
So far, all we've done is generate a lot of information and print it to the terminal so it could be displayed. Finally, the moment has come to see something drawn on the chart. To make it more pleasant and understandable, we will use the chart in the standard MetaTrader 5 style. I will do this only for demonstration purposes, but you can use graphics with the configuration that best suits you or that you prefer the most.
Alright. In the previous two articles, we explained how the two main events generated by MetaTrader 5 work: Deinit and Init. Both are intended to instruct our application on how to behave. However, all indicators require two events: one is the Init event, already discussed, and the other is the Calculate event.
Now pay close attention, dear readers, because this is very important. The OnCalculate function must capture the Calculate event, which must be present in the indicator code. However, we have two versions of the same function—that is, by default MQL5 offers the ability to use overloaded functions. One version is shown next, and the other is shown below.
int  OnCalculate(
   const int        rates_total,       // price[] array size
   const int        prev_calculated,   // number of handled bars at the previous call
   const int        begin,             // index number in the price[] array meaningful data starts from
   const double&    price[]            // array of values for calculation
   );
int  OnCalculate(
   const int        rates_total,       // size of input time series
   const int        prev_calculated,   // number of handled bars at the previous call
   const datetime&  time[],            // Time array
   const double&    open[],            // Open array
   const double&    high[],            // High array
   const double&    low[],             // Low array
   const double&    close[],           // Close array
   const long&      tick_volume[],     // Tick Volume array
   const long&      volume[],          // Real Volume array
   const int&       spread[]           // Spread array
   );
But why did the MQL5 developers do this? I think the main reason is to make the indicator's operation more efficient and stable. The fact is, there are several calculation methods, especially considering that indicators most often calculate an average value. Therefore, the developers, noticing they could improve the MetaTrader 5 platform's performance, decided to allow the indicator to skip some of these calculations, as the platform itself can provide us with the result in advance. This might not make much sense to you now, but I assure you that as you practice and learn, you will understand that there is great value in this.
So, which overloaded version should I use? The answer: it entirely depends on the situation. It's not about having to use one version at the expense of the other. Both versions essentially do the same thing—they receive the Calculate event. That's it. What happens next depends on what we plan and what we need to do.
However, there is an interesting point, which must be acknowledged as a successful refinement by the platform developers. Depending on which version of OnCalculate the user employs, they will either have access to the tab shown in image 02 or not. If you search for articles with images, animations, or videos of older versions of MetaTrader 5 in action, you will notice that the tab in image 02 appears almost every time, even when it is completely unnecessary.
But at some point, all of this disappeared. If you use the version with fewer arguments, the tab shown in image 02 will be accessible. If you use the version with more arguments, this tab will not be available. This is precisely why I said everything would be explained in due time. If it had been mentioned earlier, it wouldn't have made any sense. But now it will make sense, and even more so when we implement an indicator.
To start, we will create a very simple version where almost everything is done and handled by MetaTrader 5. We, as programmers, will do the bare minimum necessary for it to work and be as educational as possible. And we will do this step by step. Although the code itself is very easy to understand and execute, by taking small steps, anyone, even a beginner with basic knowledge, will be able to follow along if they study these articles.
Our code begins as follows:
01. //+------------------------------------------------------------------+
02. #property copyright "Daniel Jose"
03. //+------------------------------------------------------------------+
04. int OnInit()
05. {
06.    return INIT_SUCCEEDED;
07. };
08. //+------------------------------------------------------------------+
09. int OnCalculate(const int rates_total, const int prev_calculated, const int begin, const double &price[])
10. {
11.    return rates_total;
12. };
13. //+------------------------------------------------------------------+
Code 02
Please note that nothing has been implemented yet. The code contains only the basics so the compiler knows how to create the desired application—an indicator that will display all the tabs as explained at the beginning of this article. Next, we will describe our indicator. For this, we must tell the compiler what needs to be created. This can be done in two ways: dynamically (which is much more complex and will be explained at another time) and statically (which is significantly simpler and more straightforward). The latter is ideal for small codes and is aimed at those just starting out or simply wanting to create a simple and quick indicator. To do this, we will modify code 02 to obtain this version:
01. //+------------------------------------------------------------------+
02. #property copyright "Daniel Jose"
03. //+------------------------------------------------------------------+
04. #property indicator_type1           DRAW_LINE
05. #property indicator_color1          clrBlack
06. //+------------------------------------------------------------------+
07. int OnInit()
08. {
09.    return INIT_SUCCEEDED;
10. };
11. //+------------------------------------------------------------------+
12. int OnCalculate(const int rates_total, const int prev_calculated, const int begin, const double &price[])
13. {
14.    return rates_total;
15. };
16. //+------------------------------------------------------------------+
Code 03
This is the second step we need to take. Although the statement in line 05 relates to a minor error that still persists when using the standard MetaTrader 5 system. Without this line, YOU WILL NOT BE ABLE TO CHANGE THE COLOR of the indicator plot, even if it is a very simple indicator. However, the most important statement is made in line 04. In this line, we specify exactly what we want to display on the chart. Here, it will be a price line, but which specific price? What will be the definitions and properties of the line to be drawn? Don't worry, we will figure it out, just be patient.
After defining the type of indicator we are creating, we need to define a few more of its characteristics. For this, we must refer to the MQL5 documentation to learn how to declare the following items. Then we return to the documentation and search for the term #property to find information related to what is declared in line 04, i.e., the indicator type. When we search for this information, we see something that stands out in the image below:

Figure 07
The item shown in figure 07 is very important for us, because without it we will not be able to instruct MetaTrader 5 how the indicator should be displayed. Therefore, we search for the enumeration ENUM_DRAW_TYPE. If we look this up in the documentation, we will see a table similar to the one below:
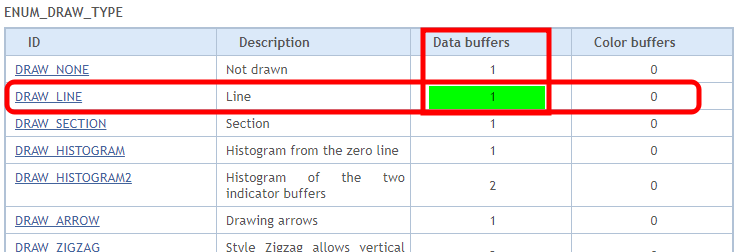
Figure 08
The information we need is exactly what is highlighted in green in image 08, i.e., we need a data buffer. Different types of indicators require different things. Since the program we are creating is very simple, we will only need a buffer. With this information, we can return to code 03 and add a few more elements to it. However, we need additional information first. This concerns the number of elements the indicator will need to draw on the screen. To find the mentioned information, we must look into the #property. It is shown below.

Figure 09
To obtain the second piece of information, we will refer to the same table. Now we need to use a value equal to the sum of these two values from image 10:
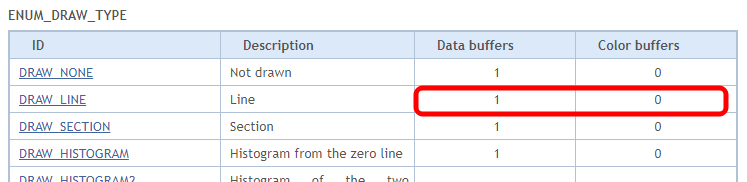
Figure 10
Having gathered all the information, we can return to code 03 and add a few more elements to it. The code looks as follows:
01. //+------------------------------------------------------------------+
02. #property copyright "Daniel Jose"
03. //+------------------------------------------------------------------+
04. #property indicator_type1           DRAW_LINE
05. #property indicator_color1          clrBlack
06. //+----------------+
07. #property indicator_buffers         1
08. #property indicator_plots           1
09. //+------------------------------------------------------------------+
10. int OnInit()
11. {
12.    return INIT_SUCCEEDED;
13. };
14. //+------------------------------------------------------------------+
15. int OnCalculate(const int rates_total, const int prev_calculated, const int begin, const double &price[])
16. {
17.    return rates_total;
18. };
19. //+------------------------------------------------------------------+
Code 04
Looking at code 04, we see in line 07 the declaration we were looking for, which we found in image 08. Line 08 specifies another piece of information, which is equal to the sum of the values in image 10. Now we can make the indicator functional. The final step is shown below:
01. //+------------------------------------------------------------------+
02. #property copyright "Daniel Jose"
03. //+------------------------------------------------------------------+
04. #property indicator_type1           DRAW_LINE
05. #property indicator_color1          clrBlack
06. //+----------------+
07. #property indicator_buffers         1
08. #property indicator_plots           1
09. //+----------------+
10. double   gl_buffer[];
11. //+------------------------------------------------------------------+
12. int OnInit()
13. {
14.    SetIndexBuffer(0, gl_buffer, INDICATOR_DATA);
15.
16.    return INIT_SUCCEEDED;
17. };
18. //+------------------------------------------------------------------+
19. int OnCalculate(const int rates_total, const int prev_calculated, const int begin, const double &price[])
20. {
21.    for (int c = prev_calculated; c < rates_total; c++)
22.       gl_buffer[c] = price[c];
23.
24.    return rates_total;
25. };
26. //+------------------------------------------------------------------+
Code 05
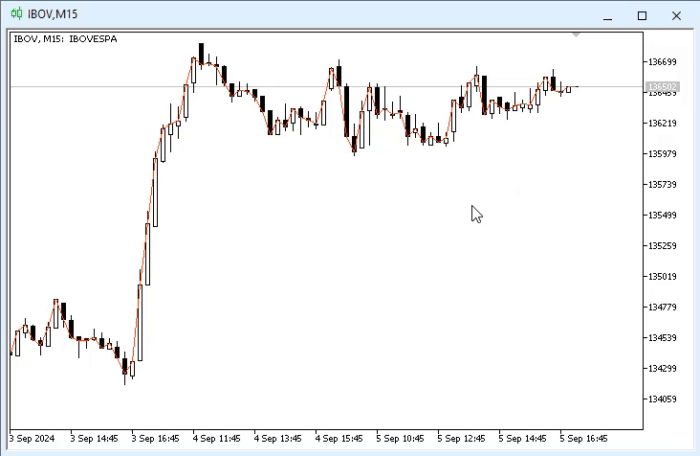
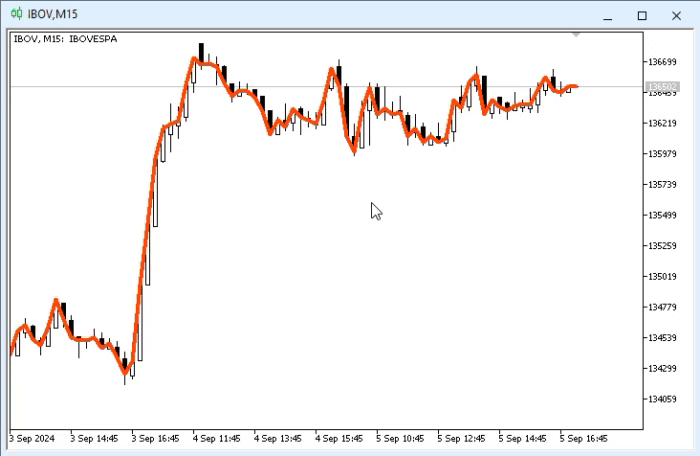
And here before you is a complete and fully functional indicator. We can ask it to display any information that MetaTrader 5 can provide us, and it will do so flawlessly. «But how is that possible? I've already seen codes of other indicators, and they are much larger. This can't be. I've already tried to create several indicators, and all of them have much more code than what you are presenting. I don't think this can work; I want to verify its functionality».
I understand your surprise, dear readers. This is because any indicator code you have studied will contain many more elements than what we are doing here. But to show you that this code works, let's look at the animation:
Animation 01
In animation 01, I demonstrate how to place the indicator and then change its color. Please note that it is quite simple and intuitive.
Animation 02
In animation 02, we will show how to change the indicator line style. Again, very intuitive.

Animation 03
In animation 03, we can see how to change the thickness of the line the indicator will use. In this instance, it would be nice if MetaTrader 5 could support line styles of varying thicknesses. Until the developers implement this feature, we will have to adapt to the current realities of MetaTrader 5.
Animation 04
Finally, in animation 04, we see how to change the type of calculation performed for the indicator. As you can see, everything is quite simple and straightforward, and it doesn't affect the indicator's operation. One can only guess how the tab from image 04 works, but since such things are very intuitive and simple, one just needs to be curious and use this tab.
I don't see the need to explain it here and now, as this tab is used only to configure the operating environment. Rarely will beginner traders try to manipulate this tab. But you, as programmers, need to understand how it works and how it can be implemented in code. Yes, it's possible to configure the indicator's operation without touching this tab—using pure MQL5—but we'll discuss that later, at a more appropriate time.
Now that we've seen how the code works, let's look at what was added in the final implementation step. What is explained here will be covered in a somewhat more advanced form later. However, you need to understand from the start why and how we need the lines implemented in the last step, starting from line 10.
As explained in the first articles of this series, using global variables is generally not recommended. However, the variable declared in line 10 is a special case: we truly need a global variable because it is necessary to implement several points we will explore later. But for now, you need to understand that this variable will contain the data that will be plotted on the chart, thereby creating the indicator visible in the animations.
To do this, we must instruct MetaTrader 5 WHICH variable to use, as multiple variables could be declared in the actual code. This kind of information is provided by what is seen in line 14. In principle, that's all. After that, we can start capturing the Calculate event and use the data provided by MetaTrader 5 to assign values to the variable declared in line 10.
This is not difficult at all; in fact, in most cases, it's quite simple. All we need to do is calculate a value and assign it to a specific position in the array declared in line 10. Now, pay attention. When explaining the topic of arrays, we said they come in two types: dynamic and static. Nevertheless, EVERY ARRAY that will be used to store data for plotting in an indicator must be dynamic. However, you MUST NOT allocate memory for it. It will be assigned by MetaTrader 5 itself as needed. Therefore, we can use the code in line 22. In line 14, we specify that this variable will be used to store indicator data to be plotted on the chart. After that, MetaTrader 5 takes full control of the memory allocation.
But there is another important aspect. Ideally, any MetaTrader 5 application should be as efficient as possible. This is necessary to avoid consuming too much time and to maintain platform stability. For this reason, note how the loop is created in line 21. You might get the impression that every time the Calculate event fires, all data in the price array is read from beginning to end. However, that's not exactly what happens, or at least, it shouldn't be.
Essentially, within MetaTrader 5, some internal values are stored to manage application actions. Then, during the first capture of the Calculate event by our indicator, the rates_total value will point to the amount of data present in the price array. The prev_calculated value may be zero or not, but it will definitely point to the first data point in the series. This can be changed, as we will see later. For now, you just need to understand what was explained: this condition will only be met the first time, if your code is correctly implemented and follows the rules.
On the next call, the prev_calculated value may equal rates_total, or it may not. If it remains the same, it means no significant changes have occurred. If it is smaller, the loop executes to update the value to be plotted.
Therefore, if we implement the code correctly, the first execution will be slow. However, in all subsequent captures of the Calculate event, a minimal number of transactions will be performed, so the platform can quickly conduct any analysis and display the result on screen.
«Alright, but I didn't understand one thing: how can a Calculate event occur if the prev_calculated and rates_total values are the same? Wouldn't that be a waste of time, since the loop in line 21 wouldn't perform any action?» Yes, that's true. However, MetaTrader 5 won't trigger the Calculate event arbitrarily. It will only fire when the symbol's price changes. Therefore, during periods of high market volatility, a real avalanche of events will occur. If your code is poorly optimized, the platform will become slow over time, but the fault lies not with it but with the poorly optimized application that consumes time and resources.
Concluding thoughts
In this article, we will create our first fully functional and practical indicator. The goal is not to show how to create an application, but to help the reader understand how to develop their own ideas safely, simply, and practically, and give you the opportunity to apply them in a safe, simple, and practical way.
Since this topic should be thoroughly understood and studied, I won't extend it beyond what's necessary, as that would make the material much denser and more complex, hindering calm study. The appendix contains two codes from those presented here. With them, you can follow the step-by-step instructions provided in the article.
In the next article, we will continue today's topic, as the second form of declaring the OnCalculate function still needs to be examined.
Translated from Portuguese by MetaQuotes Ltd.
Original article: https://www.mql5.com/pt/articles/15794
Warning: All rights to these materials are reserved by MetaQuotes Ltd. Copying or reprinting of these materials in whole or in part is prohibited.
This article was written by a user of the site and reflects their personal views. MetaQuotes Ltd is not responsible for the accuracy of the information presented, nor for any consequences resulting from the use of the solutions, strategies or recommendations described.

- Free trading apps
- Over 8,000 signals for copying
- Economic news for exploring financial markets
You agree to website policy and terms of use