
Le MQL5 Cookbook : Notifications sonores pour les événements de trading MetaTrader 5

Introduction
Dans cet article, nous examinerons des problèmes tels que l'inclusion de fichiers sonores dans le fichier de l'Expert Advisor, et ainsi l'ajout de notifications sonores aux événements de trading. Le fait que les fichiers seront inclus signifie que les fichiers sonores seront situés à l'intérieur de l'Expert Advisor. Ainsi, lorsque vous donnez la version compilée de l'Expert Advisor (*.ex5) à un autre utilisateur, vous n'aurez pas à fournir également les fichiers sonores et à expliquer où ils doivent être sauvegardés.
Développement
À des fins de test, nous prendrons l'Expert Advisor de l'article précédent "MQL5 Cookbook : Enregistrement des résultats d'optimisation d'un Expert Advisor sur la base de critères spécifiques". Pour faire plus simple, j'ai supprimé tout ce qui n'est pas pertinent au sujet actuel.
Pour ajouter une notification sonore à un événement de trading en utilisant les ressources MQL5, nous pouvons utiliser les fonctions Alert() et PlaySound(). Si vous optez pour la fonction Alert(), elle jouera toujours la même notification sonore et ouvrira une fenêtre avec le message correspondant. Vous pouvez le voir en action dans l'article intitulé "MQL5 Cookbook : Utilisation de différents modes d'impression".
Le son d'alerte peut être réglé dans les paramètres du terminal : Tools -> Options ou Ctrl+O. De plus, dans l'onglet Events, nous devons cocher l'option "Enable" pour activer les notifications sonores pour les événements et sélectionner le fichier sonore approprié dans la liste déroulante des alertes.
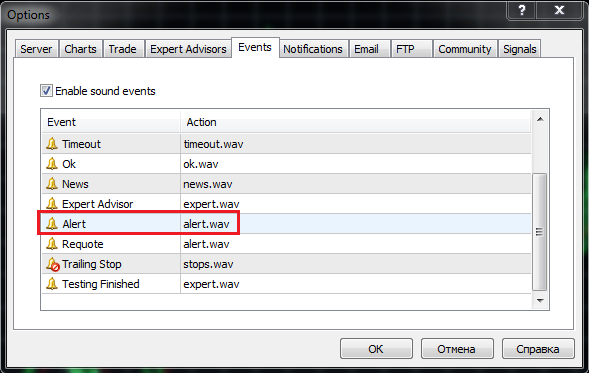
Fig. 1. L'onglet "Evénements" dans les paramètres du terminal
Cependant, vous avez également la possibilité de définir une notification sonore unique pour tout événement de programme personnalisé. Pour cela, nous utilisons la fonction PlaySound().
Avant d'ajouter des notifications sonores à l'Expert Advisor, créons un Expert Advisor à des fins de test. Implémentons une idée d'ouverture d'un panneau sonore lors du chargement d'un Expert Advisor sur le graphique. Le panneau sonore sera composé d'objets graphiques, tels que le bouton (OBJ_BUTTON). Chaque bouton aura son propre son qui lui sera attribué qui sera joué lorsque le bouton est cliqué.
Je suis allé en ligne et j'ai trouvé 25 fichiers sonores différents au format *.wav (ils sont disponibles en téléchargement à la fin de l'article). Ils doivent être placés dans le dossier MetaTrader 5\MQL5\Files\Sounds. Pour apprendre à travailler avec des fichiers sonores, nous allons maintenant créer un nouvel Expert Advisor à l'aide de l'assistant MQL5 Wizard. Au tout début, nous spécifions la taille du tableau en fonction du nombre de boutons sur le panneau sonore (il y aura 26 boutons au total).
//--- Array size
#define ARRAY_SIZE 26
Ensuite, nous devons spécifier les dossiers et les noms de fichiers qui fourniront des ressources à l'Expert Advisor. Cela peut être fait en utilisant la directive #resource. Après la directive, nous spécifions l'emplacement du fichier entre guillemets :
//--- Sound files
#resource "\\Files\\Sounds\\alert.wav"
#resource "\\Files\\Sounds\\AHOOGA.wav"
#resource "\\Files\\Sounds\\APPLAUSE.wav"
#resource "\\Files\\Sounds\\BONK.wav"
#resource "\\Files\\Sounds\\CARBRAKE.wav"
#resource "\\Files\\Sounds\\CASHREG.wav"
#resource "\\Files\\Sounds\\CLAP.wav"
#resource "\\Files\\Sounds\\CORKPOP.wav"
#resource "\\Files\\Sounds\\DOG.wav"
#resource "\\Files\\Sounds\\DRIVEBY.wav"
#resource "\\Files\\Sounds\\DRUMROLL.wav"
#resource "\\Files\\Sounds\\EXPLODE.wav"
#resource "\\Files\\Sounds\\FINALBEL.wav"
#resource "\\Files\\Sounds\\FROG.wav"
#resource "\\Files\\Sounds\\GLASS.wav"
#resource "\\Files\\Sounds\\GUNSHOT.wav"
#resource "\\Files\\Sounds\\LASER.wav"
#resource "\\Files\\Sounds\\LATNWHIS.wav"
#resource "\\Files\\Sounds\\PIG.wav"
#resource "\\Files\\Sounds\\RICOCHET.wav"
#resource "\\Files\\Sounds\\RINGIN.wav"
#resource "\\Files\\Sounds\\SIREN.wav"
#resource "\\Files\\Sounds\\TRAIN.wav"
#resource "\\Files\\Sounds\\UH_OH.wav"
#resource "\\Files\\Sounds\\VERYGOOD.wav"
#resource "\\Files\\Sounds\\WHOOSH.wav"
Maintenant, nous devons créer trois tableaux de chaînes de caractères qui contiendront les emplacements des fichiers de ressources, les noms des objets graphiques et le texte affiché sur les objets graphiques. Veuillez noter l'utilisation de deux points lors de la spécification des emplacements des fichiers - c'est une indication spéciale pour appeler la ressource par son nom.
//--- Sound file location
string sound_paths[ARRAY_SIZE]=
  {
   "::Files\\Sounds\\alert.wav",
   "::Files\\Sounds\\AHOOGA.wav",
   "::Files\\Sounds\\APPLAUSE.wav",
   "::Files\\Sounds\\BONK.wav",
   "::Files\\Sounds\\CARBRAKE.wav",
   "::Files\\Sounds\\CASHREG.wav",
   "::Files\\Sounds\\CLAP.wav",
   "::Files\\Sounds\\CORKPOP.wav",
   "::Files\\Sounds\\DOG.wav",
   "::Files\\Sounds\\DRIVEBY.wav",
   "::Files\\Sounds\\DRUMROLL.wav",
   "::Files\\Sounds\\EXPLODE.wav",
   "::Files\\Sounds\\FINALBEL.wav",
   "::Files\\Sounds\\FROG.wav",
   "::Files\\Sounds\\GLASS.wav",
   "::Files\\Sounds\\GUNSHOT.wav",
   "::Files\\Sounds\\LASER.wav",
   "::Files\\Sounds\\LATNWHIS.wav",
   "::Files\\Sounds\\PIG.wav",
   "::Files\\Sounds\\RICOCHET.wav",
   "::Files\\Sounds\\RINGIN.wav",
   "::Files\\Sounds\\SIREN.wav",
   "::Files\\Sounds\\TRAIN.wav",
   "::Files\\Sounds\\UH_OH.wav",
   "::Files\\Sounds\\VERYGOOD.wav",
   "::Files\\Sounds\\WHOOSH.wav"
  };
//--- Names of graphical objects
string sound_names[ARRAY_SIZE]=
  {
   "sound_button01","sound_button02",
   "sound_button03","sound_button04",
   "sound_button05","sound_button06",
   "sound_button07","sound_button08",
   "sound_button09","sound_button10",
   "sound_button11","sound_button12",
   "sound_button13","sound_button14",
   "sound_button15","sound_button16",
   "sound_button17","sound_button18",
   "sound_button19","sound_button20",
   "sound_button21","sound_button22",
   "sound_button23","sound_button24",
   "sound_button25","sound_button26"
  };
//--- Text displayed on graphical objects
string sound_texts[ARRAY_SIZE]=
  {
   "ALERT","AHOOGA","APPLAUSE","BONK","CARBRAKE","CASHREG",
   "CLAP","CORKPOP","DOG","DRIVEBY","DRUMROLL","EXPLODE","FINALBEL",
   "FROG","GLASS","GUNSHOT","LASER","LATNWHIS","PIG",
   "RICOCHET","RINGIN","SIREN","TRAIN","UH_OH","VERYGOOD","WHOOSH"
  };
Écrivons une fonction, CreateButton(), qui créera l'objet graphique "Button" sur un graphique avec les propriétés spécifiées :
//+------------------------------------------------------------------+
//| Creating the Button object                                       |
//+------------------------------------------------------------------+
void CreateButton(long              chart_id,         // chart id
                  int               sub_window,       // window number
                  string            name,             // object name
                  string            text,             // displayed name
                  ENUM_ANCHOR_POINT anchor,           // anchor point
                  ENUM_BASE_CORNER  corner,           // chart corner
                  string            font_name,        // font
                  int               font_size,        // font size
                  color             font_color,       // font color
                  color             background_color, // background color
                  color             border_color,     // border color
                  int               x_size,           // width
                  int               y_size,           // height
                  int               x_distance,       // X-coordinate
                  int               y_distance,       // Y-coordinate
                  long              z_order)          // Z-order
  {
//--- Creating an object
   if(ObjectCreate(chart_id,name,OBJ_BUTTON,sub_window,0,0))
     {
      ObjectSetString(chart_id,name,OBJPROP_TEXT,text);                  // setting name
      ObjectSetString(chart_id,name,OBJPROP_FONT,font_name);             // setting font
      ObjectSetInteger(chart_id,name,OBJPROP_COLOR,font_color);          // setting font color
      ObjectSetInteger(chart_id,name,OBJPROP_BGCOLOR,background_color);  // setting background color
      ObjectSetInteger(chart_id,name,OBJPROP_BORDER_COLOR,border_color); // setting border color
      ObjectSetInteger(chart_id,name,OBJPROP_ANCHOR,anchor);             // setting anchor point
      ObjectSetInteger(chart_id,name,OBJPROP_CORNER,corner);             // setting chart corner
      ObjectSetInteger(chart_id,name,OBJPROP_FONTSIZE,font_size);        // setting font size
      ObjectSetInteger(chart_id,name,OBJPROP_XSIZE,x_size);              // setting width X
      ObjectSetInteger(chart_id,name,OBJPROP_YSIZE,y_size);              // setting height Y
      ObjectSetInteger(chart_id,name,OBJPROP_XDISTANCE,x_distance);      // setting X-coordinate
      ObjectSetInteger(chart_id,name,OBJPROP_YDISTANCE,y_distance);      // setting Y-coordinate
      ObjectSetInteger(chart_id,name,OBJPROP_SELECTABLE,false);          // cannot select the object if FALSE
      ObjectSetInteger(chart_id,name,OBJPROP_STATE,false);               // button state (clicked/unclicked)
      ObjectSetInteger(chart_id,name,OBJPROP_ZORDER,z_order);            // higher/lower Z-order
      ObjectSetString(chart_id,name,OBJPROP_TOOLTIP,"\n");               // no tooltip if "\n"
     }
  }
Pour le rendre plus ludique, la couleur de chaque bouton sera choisie au hasard. Pour implémenter cela, nous écrirons une fonction simple - GetRandomColor() :
//+------------------------------------------------------------------+
//| Returning a random color                                         |
//+------------------------------------------------------------------+
color GetRandomColor()
  {
//--- Select a random color from 0 to 25
   switch(MathRand()%26)
     {
      case 0  : return(clrOrange);           break;
      case 1  : return(clrGold);             break;
      case 2  : return(clrChocolate);        break;
      case 3  : return(clrChartreuse);       break;
      case 4  : return(clrLime);             break;
      case 5  : return(clrSpringGreen);      break;
      case 6  : return(clrMediumBlue);       break;
      case 7  : return(clrDeepSkyBlue);      break;
      case 8  : return(clrBlue);             break;
      case 9  : return(clrSeaGreen);         break;
      case 10 : return(clrRed);              break;
      case 11 : return(clrSlateGray);        break;
      case 12 : return(clrPeru);             break;
      case 13 : return(clrBlueViolet);       break;
      case 14 : return(clrIndianRed);        break;
      case 15 : return(clrMediumOrchid);     break;
      case 16 : return(clrCrimson);          break;
      case 17 : return(clrMediumAquamarine); break;
      case 18 : return(clrDarkGray);         break;
      case 19 : return(clrSandyBrown);       break;
      case 20 : return(clrMediumSlateBlue);  break;
      case 21 : return(clrTan);              break;
      case 22 : return(clrDarkSalmon);       break;
      case 23 : return(clrBurlyWood);        break;
      case 24 : return(clrHotPink);          break;
      case 25 : return(clrLightSteelBlue);   break;
      //---
      default : return(clrGold);
     }
//---
   return(clrGold);
  }
Écrivons maintenant la fonction qui ajoutera le panneau sonore au graphique - SetSoundPanel() :
//+------------------------------------------------------------------+
//| Adding the sound panel to the chart                              |
//+------------------------------------------------------------------+
void SetSoundPanel()
  {
   int   column_count =0;       // Column counter
   int   x_dist       =10;      // Indent from the left side of the chart
   int   y_dist       =15;      // Indent from the top of the chart
   int   x_size       =100;     // Button width
   int   y_size       =20;      // Button height
   color button_color =clrNONE; // Button color
//--- Set the objects
   for(int i=0; i<ARRAY_SIZE; i++)
     {
      //--- Increase the column counter
      column_count++;
      //--- Get the button color
      button_color=GetRandomColor();
      //--- Draw a button
      CreateButton(0,0,sound_names[i],sound_texts[i],
                   ANCHOR_LEFT_UPPER,CORNER_LEFT_UPPER,"Arial",8,
                   clrWhite,button_color,button_color,x_size,y_size,x_dist,y_dist,1);
      //--- If two buttons have already been set in the same row
      if(column_count==2)
        {
         x_dist=10;        // Move the X-coordinate to the initial position
         y_dist+=20;       // Set the Y-coordinate for the next row
         column_count=0;   // Zero out the counter
        }
      else
      //--- Set the X-coordinate for the next button
         x_dist+=x_size;
     }
//--- Refresh the chart
   ChartRedraw(0);
  }
Pour supprimer le panneau du graphique, nous utiliserons les fonctions fournies ci-dessous :
//+------------------------------------------------------------------+
//| Deleting the info panel                                          |
//+------------------------------------------------------------------+
void DeleteSoundPanel()
  {
//--- Delete position properties and their values
   for(int i=0; i<ARRAY_SIZE; i++)
      DeleteObjectByName(name_sound_object[i]);
//--- Redraw the chart
   ChartRedraw();
  }
//+------------------------------------------------------------------+
//| Deleting objects by name                                         |
//+------------------------------------------------------------------+
void DeleteObjectByName(string name)
  {
//--- If the object is found
   if(ObjectFind(ChartID(),name)>=0)
     {
      //--- If an error occurred when deleting, print the relevant message
      if(!ObjectDelete(ChartID(),name))
         Print("Error ("+IntegerToString(GetLastError())+") when deleting the object!");
     }
  }
Ainsi, lors du chargement de l'Expert Advisor, le panneau sera défini sur le graphique à partir de la fonction OnInit() et supprimé du graphique lors de la suppression de l'Expert Advisor par la fonction OnDeinit().
//+------------------------------------------------------------------+
//| Custom indicator initialization function                         |
//+------------------------------------------------------------------+
void OnInit()
  {
//--- Set the sound panel
   SetSoundPanel();
  }
//+------------------------------------------------------------------+
//| Deinitialization function of the expert advisor                  |
//+------------------------------------------------------------------+
void OnDeinit(const int reason)
  {
//--- Delete the sound panel
   DeleteSoundPanel();
  }
Il ne nous reste plus qu'à implémenter l'interaction avec le panneau pour que le son approprié soit joué lorsqu'un certain bouton est cliqué. Pour le rendre encore plus gai, nous allons changer les couleurs des boutons lorsque l'un des boutons du panneau sonore est enfoncé. Pour implémenter cela, nous aurons besoin de la fonction ChangeColorsOnSoundPanel() dont le code est donné ci-dessous :
//+------------------------------------------------------------------+
//| Changing colors on the sound panel                               |
//+------------------------------------------------------------------+
void ChangeColorsOnSoundPanel()
  {
   color clr=clrNONE; // Button color
//--- Iterate over all buttons in a loop and change their color
   for(int i=0; i<ARRAY_SIZE; i++)
     {
      //--- Get the new color
      clr=GetRandomColor();
      //--- Set the border color
      ObjectSetInteger(0,sound_names[i],OBJPROP_BGCOLOR,clr);
      //--- Set the background color
      ObjectSetInteger(0,sound_names[i],OBJPROP_BORDER_COLOR,clr);
      //--- Unclicked button
      ObjectSetInteger(0,sound_names[i],OBJPROP_STATE,false);
      //--- Refresh the chart
      ChartRedraw(0);
      //--- Wait for 20 ms (lag)
      Sleep(20);
     }
  }
Et enfin, le code suivant doit être ajouté à la fonction OnChartEvent() :
//+------------------------------------------------------------------+
//| Event handler                                                    |
//+------------------------------------------------------------------+
void OnChartEvent(const int     id,     // Event identifier
                  const long&   lparam, // Parameter of the event of type long
                  const double& dparam, // Parameter of the event of type double
                  const string& sparam) // Parameter of the event of type string
  {
//--- If there was an event of left-clicking on the object
   if(id==CHARTEVENT_OBJECT_CLICK)
     {
      //--- If the object name contains "sound_button"
      if(StringFind(sparam,"sound_button",0)>=0)
        {
         //--- Play the sound based on the object name
         //    5019 - ERR_FILE_NOT_EXIST - The file does not exist
         if(!PlaySound(GetSoundPath(sparam)))
            Print("Error: ",GetLastError());
         //--- Change colors of all buttons
         ChangeColorsOnSoundPanel();
        }
     }
  }
La chaîne de caractères en évidence dans le code ci-dessus suggère que l'emplacement du fichier sonore est passé à la fonction PlaySound() à l'aide de la fonction personnalisée GetSoundPath(). Le code de la fonction GetSoundPath() est fourni ci-dessous :
//+------------------------------------------------------------------+
//| Returning sound file location by the object name                 |
//+------------------------------------------------------------------+
string GetSoundPath(string object_name)
  {
//--- Iterate over all sound panel objects in a loop
   for(int i=0; i<ARRAY_SIZE; i++)
     {
      //--- If the name of the object clicked in the chart
      //    matches one of those available on the panel, return the file location
      if(object_name==name_sound_object[i])
         return(path_sound_object[i]);
     }
//---
   return("");
  }
Maintenant, tout est prêt. Le panneau sonore (le programme est téléchargeable à partir des pièces jointes à l'article) sera paramétré dès que l'Expert Advisor sera rattaché au graphique :

Fig. 2. Le panneau sonore sur le graphique
Ainsi, le principe de travailler avec des fichiers sonores est maintenant clair. Nous revenons à notre Expert Advisor de l'article précédent intitulé "MQL5 Cookbook : Enregistrement des résultats de l'optimisation d'un Expert Advisor sur la base de critères spécifiés " et décider des sons que nous utiliserons dans l'Expert Advisor. Créons Resources.mqh et incluons-le dans le fichier principal de l'Expert Advisor.
//--- Include custom libraries
#include "Include/Errors.mqh"
#include "Include/Enums.mqh"
#include "Include/Resources.mqh"
#include "Include/TradeSignals.mqh"
#include "Include/TradeFunctions.mqh"
#include "Include/ToString.mqh"
#include "Include/Auxiliary.mqh"
Nous sélectionnons maintenant les fichiers des principaux événements de trading.
//--- Sound files
#resource "\\Files\\Sounds\\AHOOGA.WAV"   // Error
#resource "\\Files\\Sounds\\CASHREG.WAV"  // Position opening/position volume increase/pending order triggering
#resource "\\Files\\Sounds\\WHOOSH.WAV"   // Pending order/Stop Loss/Take Profit setting/modification
#resource "\\Files\\Sounds\\VERYGOOD.WAV" // Position closing at profit
#resource "\\Files\\Sounds\\DRIVEBY.WAV"  // Position closing at loss
//--- Sound file location
string SoundError          = "::Files\\Sounds\\AHOOGA.WAV";
string SoundOpenPosition   = "::Files\\Sounds\\CASHREG.WAV";
string SoundAdjustOrder    = "::Files\\Sounds\\WHOOSH.WAV";
string SoundCloseWithProfit= "::Files\\Sounds\\VERYGOOD.WAV";
string SoundCloseWithLoss  = "::Files\\Sounds\\DRIVEBY.WAV";
Je voudrais également mentionner qu'en dehors des fichiers sonores utilisés comme ressources, dans l'Expert Advisor, vous pouvez également stocker des images *.bmp à des fins d'interface, des fichiers texte et même des indicateurs. Les EA pour MetaTrader 5 sont désormais considérés comme des applications entièrement fonctionnelles - c'est très pratique car au lieu de plusieurs fichiers, vous n'avez qu'à en transmettre un.
Nous allons continuer. Dans les paramètres externes, il faut ajouter le paramètre UseSound pour avoir la possibilité de désactiver les sons :
//--- External parameters of the Expert Advisor
input  int        NumberOfBars =2;    // Number of one-direction bars
sinput double     Lot          =0.1;  // Lot
input  double     TakeProfit   =100;  // Take Profit
input  double     StopLoss     =50;   // Stop Loss
input  double     TrailingStop =10;   // Trailing Stop
input  bool       Reverse      =true; // Position reversal
sinput bool       UseSound     =true; // Sound notifications
Dans Include\Enums.mqh, nous créons l'énumération ENUM_SOUNDS pour les sons.
//--- Sounds
enum ENUM_SOUNDS
  {
   SOUND_ERROR             =0,   // Error
   SOUND_OPEN_POSITION     = 1,  // Position opening/position volume increase/pending order triggering
   SOUND_ADJUST_ORDER      = 2,  // Stop Loss/Take Profit/pending order setting
   SOUND_CLOSE_WITH_PROFIT = 3,  // Position closing at profit
   SOUND_CLOSE_WITH_LOSS   = 4   // Position closing at loss
  };
Ces identifiants seront requis pour la fonction personnalisée PlaySoundByID().
//+------------------------------------------------------------------+
//| Playing sounds                                                   |
//+------------------------------------------------------------------+
void PlaySoundByID(ENUM_SOUNDS id)
  {
//--- If it is the real-time mode and sounds are enabled
   if(IsRealtime() && UseSound)
     {
      //--- Play the sound based on the identifier passed
      switch(id)
        {
         case SOUND_ERROR              : PlaySound(SoundError);            break;
         case SOUND_OPEN_POSITION      : PlaySound(SoundOpenPosition);     break;
         case SOUND_ADJUST_ORDER       : PlaySound(SoundAdjustOrder);      break;
         case SOUND_CLOSE_WITH_PROFIT  : PlaySound(SoundCloseWithProfit);  break;
         case SOUND_CLOSE_WITH_LOSS    : PlaySound(SoundCloseWithLoss);    break;
        }
     }
  }
Pendant les opérations de trading effectuées par l'Expert Advisor, des effets sonores peuvent être joués en appelant PlaySoundByID() à partir des fonctions de trading appropriées. Voyons comment cela est implémenté dans la fonction OpenPosition() :
//+------------------------------------------------------------------+
//| Opening a position                                               |
//+------------------------------------------------------------------+
void OpenPosition(double lot,
                  ENUM_ORDER_TYPE order_type,
                  double price,
                  double sl,
                  double tp,
                  string comment)
  {
//--- Set the magic number in the trading structure
   trade.SetExpertMagicNumber(0);
//--- Set the slippage in points
   trade.SetDeviationInPoints(CorrectValueBySymbolDigits(10));
//--- The Instant Execution and Market Execution modes
//    *** Starting with build 803, Stop Loss and Take Profit                             ***
//    *** can be set upon opening a position in the SYMBOL_TRADE_EXECUTION_MARKET mode ***
   if(symb.execution_mode==SYMBOL_TRADE_EXECUTION_INSTANT ||
      symb.execution_mode==SYMBOL_TRADE_EXECUTION_MARKET)
     {
      //--- If the position failed to open
      if(!trade.PositionOpen(_Symbol,order_type,lot,price,sl,tp,comment))
        {
         //--- Play the error sound and print the relevant message
         PlaySoundByID(SOUND_ERROR);
         Print("Error opening the position: ",GetLastError()," - ",ErrorDescription(GetLastError()));
        }
      //--- Otherwise play the position opening sound
      else
         PlaySoundByID(SOUND_OPEN_POSITION);
     }
  }
Si toutefois une position est fermée au Stop Loss, Take Profit, manuellement ou autrement, cet événement doit être surveillé dans la fonction OnTrade(). Pour implémenter cela, nous écrirons une fonction supplémentaire, SoundNotification(), qui se chargera des vérifications nécessaires : si l'historique des transactions montre une nouvelle transaction avec l'identifiant DEAL_ENTRY_OUT ou DEAL_ENTRY_INOUT (clôture totale/partielle de la position ou un renversement ) pour le symbole actuel, le programme vérifiera si cette transaction a été conclue avec bénéfice ou perte et jouera le son approprié.
//+------------------------------------------------------------------+
//| Sound notification                                               |
//+------------------------------------------------------------------+
void SoundNotification()
  {
//--- If it is the real-time mode and sounds are enabled
   if(IsRealtime() && UseSound)
     {
      ulong        ticket      =0; // Deal ticket
      int          total       =0; // Total deals
      static ulong last_ticket =0; // Last ticket prior to this check
      //--- Get the complete history
      if(!HistorySelect(0,TimeCurrent()+1000))
         return;
      //--- Get the number of deals in the obtained list
      total=HistoryDealsTotal();
      //--- In the obtained list, iterate over all deals from the last one to the first one
      for(int i=total-1; i>=0; i--)
        {
         //--- If the deal ticket by its position in the list has been obtained
         if((ticket=HistoryDealGetTicket(i))>0)
           {
            //--- get the symbol of the deal
            GetHistoryDealProperties(ticket,D_SYMBOL);
            //--- If the symbol of the deal and the current symbol are the same
            if(deal.symbol==_Symbol)
              {
               //--- get the direction of the deal
               GetHistoryDealProperties(ticket,D_ENTRY);
               //--- If it is position closing, volume decrease or reversal
               if(deal.entry==DEAL_ENTRY_OUT || deal.entry==DEAL_ENTRY_INOUT)
                 {
                  //--- If the ticket of the current deal from the list (the last deal for the symbol) is equal to the previous ticket
                  //    or this is the initialization of the ticket of the last deal
                  if(ticket==last_ticket || last_ticket==0)
                    {
                     //--- Save the ticket and exit
                     last_ticket=ticket;
                     return;
                    }
                  //--- Get the result of the deal
                  GetHistoryDealProperties(ticket,D_PROFIT);
                  //--- In case of profit
                  if(deal.profit>=0)
                    {
                     //--- Profit sound
                     PlaySoundByID(SOUND_CLOSE_WITH_PROFIT);
                     //--- Save the ticket number
                     last_ticket=ticket;
                     return;
                    }
                  //--- In case of loss
                  if(deal.profit<0)
                    {
                     //--- Loss sound
                     PlaySoundByID(SOUND_CLOSE_WITH_LOSS);
                     //--- Save the ticket number
                     last_ticket=ticket;
                     return;
                    }
                 }
              }
           }
        }
     }
  }
La fonction SoundNotification() doit être placée dans les fonctions OnInit() et OnTrade() :
//+------------------------------------------------------------------+
//| Initialization                                                   |
//+------------------------------------------------------------------+
int OnInit()
  {
//--- Initialize the new bar
   CheckNewBar();
//--- Initialize tickets of the last deals for the symbol
   SoundNotification();
//--- Initialization completed successfully
   return(INIT_SUCCEEDED);
  }
//+------------------------------------------------------------------+
//| Monitoring trade events                                          |
//+------------------------------------------------------------------+
void OnTrade()
  {
//--- Sound notification
   SoundNotification();
  }
La notification sonore a également été ajoutée à la fin de la fonction ModifyTrailingStop() lors de la modification du niveau Trailing Stop.
Conclusion
C'est à peu près ça. Tous les fichiers à des fins de test sont disponibles en téléchargement dans les pièces jointes à l'article. En parlant de sons dans le terminal, je voudrais attirer votre attention sur une solution intéressante disponible dans Code Base sous le nom CMIDI (par Integer) : elle permet de jouer MIDI fichiers dans MetaTrader 5. Bonne chance !
Traduit du russe par MetaQuotes Ltd.
Article original : https://www.mql5.com/ru/articles/748
Avertissement: Tous les droits sur ces documents sont réservés par MetaQuotes Ltd. La copie ou la réimpression de ces documents, en tout ou en partie, est interdite.
Cet article a été rédigé par un utilisateur du site et reflète ses opinions personnelles. MetaQuotes Ltd n'est pas responsable de l'exactitude des informations présentées, ni des conséquences découlant de l'utilisation des solutions, stratégies ou recommandations décrites.

 Extension de la bibliothèque standard MQL5 et réutilisation du code
- Applications de trading gratuites
- Plus de 8 000 signaux à copier
- Actualités économiques pour explorer les marchés financiers
Vous acceptez la politique du site Web et les conditions d'utilisation
...
Par exemple, votre proposition de sons d'événements commerciaux, il serait logique de fournir des commentaires vocaux spécifiques avec les valeurs des profits, des pertes, etc., avec des recommandations et des conseils.
Les conseillers doivent un jour commencer à nous conseiller dans un langage normal et humain...).
...
L'article, comme toujours, est un exemple simple. Par exemple, j'aime le programme FL Studio 11. Vous pouvez synthétiser n'importe quel son. Ou d'abord enregistrer (y compris la voix), puis le traiter avec une grande qualité.
Merci pour cet article.
Où dois-je placer le programme ci-joint ? Dans "Script" ou "Expert" ?
D'ailleurs, quelle est la différence entre Script et Expert ? La fonction OnStart fonctionne-t-elle dans le Script (qui sera glissé sur le graphique) ?
Je ne trouve pas mon fichier de sons MT5. Je sais que vous avez indiqué l'emplacement, mais je ne le trouve nulle part dans mon dossier. Est-ce que je peux mettre les sons n'importe où et les retrouver plus tard ?
Le dossier correct est :
C:\NProgram Files\NDossier de la plate-forme\NSons
(Fichiers et dossiers - Pour les utilisateurs avancés - Premiers pas - Aide MetaTrader 5).
Merci pour cet article.
Où dois-je placer le programme ci-joint ? Dans "Script" ou "Expert" ?
D'ailleurs, quelle est la différence entre Script et Expert ? La fonction OnStart fonctionne-t-elle dans le Script (qui sera glissé sur le graphique) ?
Dans l'article de l'auteur, voir"créons un Expert Advisor..."
Il s'agit donc d'un expert et non d'un script.
Un script ne s'exécute qu'une seule fois lors de l'attachement. Un Expert s'exécute à chaque tick (ou sur un timer, un événement, etc. selon la ou les fonction(s) standard spécifique(s) contenue(s) dans son code).