Expert Advisor パラメータのユーザーパネルからの『オンザフライ』の変更
内容
はじめに
1. 明らかな問題
2. Expert Advisorのストラクチャ
3. ユーザーパネルとの連携
おわりに
はじめに
複雑な Expert Advisorsを開発するとき、外部パラメータ数はひじょうに大きくなる可能性があります。そして実に頻繁に設定をマニュアルで変更する必要があります。膨大なパラメータリストがあると全体のプロセスに時間がかなりかかります。もちろん事前に設定を準備し、保存することもできますが、それでもそれが正確に要求されるものではない場合があります。MQL5 が便利なのはその場合です。そしてそれはつねに便利なのです。
トレード中に『オンザフライ』で Expert Advisor のパラメータを変更できるユーザーパネルを作成します。これはマニュアルでトレードを行う方または半自動モードでトレードを行う方に適しているでしょう。変更が加えられるとパラメータはのちにパネルに表示される Expert Advisor によって読まれるファイルから書き込まれます。
1. 明らかな問題
説明用に JMA インディケータの方向でポジションをオープンするシンプルな EA を作成します。EA は現シンボルおよびタイムフレームにおいて完成されたバー上で動作します。外部パラメータはインディケータ期間、ストップロス、テイクプロフィット、リバース、ロットを指します。われわれの例ではこれら選択肢で十分です。
もう2個パラメータを追加してパネルのオン/オフ(On/Off Info Panel)と Expert Advisor のパラメータ設定モード(『オンザフライ』設定)の有効/無効ができるようにします。パラメータ数が大きいと、簡単に素早くアクセスするためにリストの冒頭または末尾に追加オプションを入れるのはつねにより便利です。

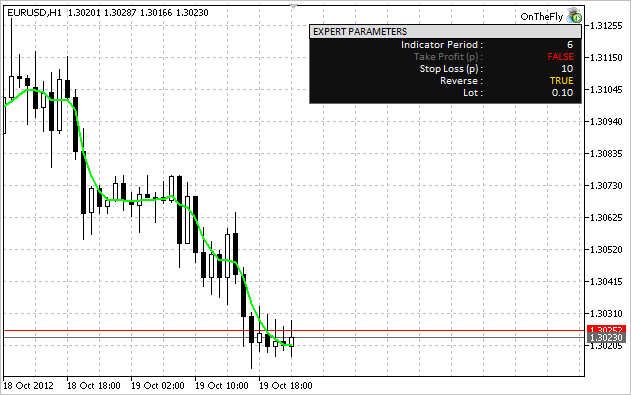
図1 Expert Advisorのパラメータを持つ情報パネル
デフォルトでは『オンザフライ』設定は無効となっています。このモードを最初に有効にするとき、Expert Advisor は現在持っているパラメータをすべて保存するためのファイルを作成します。ファイルが誤って削除されると同じことが起こります。Expert Advisor は削除を検出しファイルを再作成します。『オンザフライ』設定モードが無効であれば、Expert Advisor は外部パラメータによって導かれます。
このモードが有効ならば、Expert Advisor はファイルからパラメータを読み、情報パネルで任意のパラメータをクリックするだけで必要な値を選択するか、ポップアップするダイアログウィンドウに新しい値を入力することができます。ファイルデータは新しい値が選択されるたびに更新されます。
2. Expert Advisorのストラクチャ
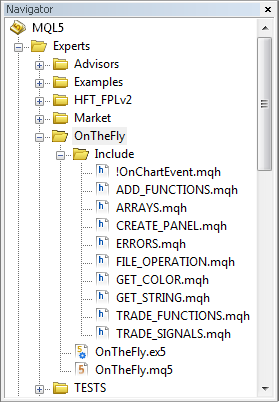
プログラムが小さく、すべての関数が簡単に1件のファイルに収まるとしても、すべてのプロジェクト情報が適切に分類されていると検索はずっとしやすいものです。よって関数をタイプ分けし、のちにマスターファイルにインクルードするため、最初から異なるファイルに入れるのがベストです。以下の図は OnTheFly Expert Advisor とすべてのインクルードファイルで共有されているプロ上くとフォルダを表示しています。インクルードファイルは個別フォルダ(Include) に入れられています。

図2 MetaEditorのナビゲータウィンドウ内のプロジェクトファイル
インクルードファイルがマスターファイルと同じフォルダにあればコードは以下のようなものとなります。
//+------------------------------------------------------------------+
//| CUSTOM LIBRARIES                                                 |
//+------------------------------------------------------------------+
#include "Include/!OnChartEvent.mqh"
#include "Include/CREATE_PANEL.mqh"
#include "Include/FILE_OPERATIONS.mqh"
#include "Include/ERRORS.mqh"
#include "Include/ARRAYS.mqh"
#include "Include/TRADE_SIGNALS.mqh"
#include "Include/TRADE_FUNCTIONS.mqh"
#include "Include/GET_STRING.mqh"
#include "Include/GET_COLOR.mqh"
#include "Include/ADD_FUNCTIONS.mqh"
ファイルのインクルード法に関する詳細情報は MQL5 参考資料にあります。
外部パラメータのコピーをするグローバル変数が必要です。その値は Expert Advisor'のモードに応じて外部パラメータまたはファイルから割り当てられます。これら変数はプログラムコード全体で使用されます。たとえば情報パネルに値を表示するとき、トレード関数内などです。
// COPY OF EXTERNAL PARAMETERS
int    gPeriod_Ind = 0;
double gTakeProfit = 0.0;
double gStopLoss   = 0.0;
bool   gReverse    = false;
double gLot        = 0.0;
他の Expert Advisorsすべてと同じようにメイン関数を持ちます。それはOnInit、OnTick 、OnDeinitです。OnTimer 関数もあります。毎秒それはパラメータファイルの有無を確認し、誤って削除された場合はそれを復元します。われわれはユーザーパネルと連携する必要があるので、OnChartEvent 関数も使用されます。この関数は他の関連する関数と共に個別のファイル(!OnChartEvent.mqh)に入れられています。
以下がマスターファイルのコード重要部です。
#define szArrIP 5 // Size of the parameter array
#define NAME_EXPERT MQL5InfoString(MQL5_PROGRAM_NAME) // Name of EA
#define TRM_DP TerminalInfoString(TERMINAL_DATA_PATH) // Folder that contains the terminal data
//+------------------------------------------------------------------+
//| STANDARD LIBRARIES                                               |
//+------------------------------------------------------------------+
#include <Trade/SymbolInfo.mqh>
#include <Trade/Trade.mqh>
//+------------------------------------------------------------------+
//| CUSTOM LIBRARIES                                                 |
//+------------------------------------------------------------------+
#include "Include/!OnChartEvent.mqh"
#include "Include/CREATE_PANEL.mqh"
#include "Include/FILE_OPERATIONS.mqh"
#include "Include/ERRORS.mqh"
#include "Include/ARRAYS.mqh"
#include "Include/TRADE_SIGNALS.mqh"
#include "Include/TRADE_FUNCTIONS.mqh"
#include "Include/GET_STRING.mqh"
#include "Include/GET_COLOR.mqh"
#include "Include/ADD_FUNCTIONS.mqh"
//+------------------------------------------------------------------+
//| CREATING CLASS INSTANCES                                         |
//+------------------------------------------------------------------+
CSymbolInfo mysymbol; // CSymbolInfo class object
CTrade      mytrade;  // CTrade class object
//+------------------------------------------------------------------+
//| EXTERNAL PARAMETERS                                              |
//+------------------------------------------------------------------+
input int    Period_Ind      = 10;    // Indicator Period
input double TakeProfit      = 100;   // Take Profit (p)
input double StopLoss        = 30;    // Stop Loss (p)
input bool   Reverse         = false; // Reverse Position
input double Lot             = 0.1;   // Lot
//---
input string slash="";       // * * * * * * * * * * * * * * * * * * *
sinput bool  InfoPanel       = true;  // On/Off Info Panel
sinput bool  SettingOnTheFly = false; // "On The Fly" Setting
//+------------------------------------------------------------------+
//| GLOBAL VARIABLES                                                 |
//+------------------------------------------------------------------+
int hdlSI=INVALID_HANDLE; // Signal indicator handle
double lcheck=0;  // For the check of parameter values
bool isPos=false; // Position availability
//--- COPY OF EXTERNAL PARAMETERS
int    gPeriod_Ind = 0;
double gTakeProfit = 0.0;
double gStopLoss   = 0.0;
bool   gReverse    = false;
double gLot        = 0.0;
//+------------------------------------------------------------------+
//| EXPERT ADVISOR INITIALIZATION                                    |
//+------------------------------------------------------------------+
void OnInit()
  {
   if(NotTest()) { EventSetTimer(1); } // If it's not the tester, set the timer
//---
   Init_arr_vparams(); // Initialization of the array of parameter values
   SetParameters(); // Set the parameters
   GetIndicatorsHandles(); // Get indicator handles
   NewBar(); // New bar initialization
   SetInfoPanel(); // Info panel
  }
//+------------------------------------------------------------------+
//| CURRENT SYMBOL TICKS                                             |
//+------------------------------------------------------------------+
void OnTick()
  {
// If the bar is not new, exit
   if(!NewBar()) { return; }
   else
     { TradingBlock(); }
  }
//+------------------------------------------------------------------+
//| TIMER                                                            |
//+------------------------------------------------------------------+
void OnTimer()
  {
   SetParameters(); SetInfoPanel();
  }
//+------------------------------------------------------------------+
//| EXPERT ADVISOR DEINITIALIZATION                                  |
//+------------------------------------------------------------------+
void OnDeinit(const int reason)
  {
// Get the deinitialization reason code
   if(NotTest()) {
     { Print(getUnitReasonText(reason)); }
//---
// When deleting from the chart
   if(reason==REASON_REMOVE)
     {
      // Delete all objects created by the Expert Advisor
      DeleteAllExpertObjects();
      //---
      if(NotTest()) { EventKillTimer(); } // Stop the timer
      IndicatorRelease(hdlSI); // Delete the indicator handle
     }
  }
私はマスターファイルにもう数個関数をインクルードしました。
- GetIndicatorsHandles -インディケータハンドルを取得します
- NewBar -新規バーイベントを決定します
- SetParameters -モードに応じたパラメータ設定を行います
- iZeroMemory -いくつかの変数と配列をゼロ設定します
//+------------------------------------------------------------------+
//| SETTING PARAMETERS IN TWO MODES                                  |
//+------------------------------------------------------------------+
// If this variable is set to false, the parameters in the file are read from the array
// where they are saved for quick access after they have been read for the first time.
// The variable is zeroed out upon the change in the value on the panel.
bool flgRead=false;
double arrParamIP[]; // Array where the parameters from the file are saved
//---
void SetParameters()
  {
// If currently in the tester or
// in real time but with the "On The Fly" Setting mode disabled
   if(!NotTest() || (NotTest() && !SettingOnTheFly))
     {
      // Zero out the variable and parameter array
      flgRead=false;
      ArrayResize(arrParamIP,0);
      //---
      // Check the Indicator Period for correctness
      if(Period_Ind<=0)
        { lcheck=10; }
      else { lcheck=Period_Ind; }
      gPeriod_Ind=(int)lcheck;
      //---
      gStopLoss=StopLoss;
      gTakeProfit=TakeProfit;
      gReverse=Reverse;
      //---
      // Check the Lot for correctness
      if(Lot<=0)
        { lcheck=0.1; }
      else { lcheck=Lot; }
      gLot=lcheck;
     }
   else // If "On The Fly" Setting mode is enabled
     {
      // Check whether there is a file to write/read parameters to/from the file
      string lpath="";
      //---
      // If the folder exists
      if((lpath=CheckCreateGetPath())!="")
        {
         // Write or read the file
         WriteReadParameters(lpath);
        }
     }
  }
SetParameters 関数のソースコードはシンプルで簡単です。WriteReadParameters 関数を詳しくみていきましょう。ここではすべてひじょうにシンプルです。まず、パラメータを持つファイルがあるかどうか確認します。ファイルがあれば、そのファイルを読み GetValuesParamsFromFile 関数を用いてパラメータ値を配列に書き込みます。ファイルがなければ、それに書かれた現在の外部パラメータを使用してファイルを作成します。
以下は上記の処理実装について詳細コメントを入れたコードです。
//+------------------------------------------------------------------+
//| WRITE DATA TO FILE                                               |
//+------------------------------------------------------------------+
void WriteReadParameters(string pth)
  {
   string nm_fl=pth+"ParametersOnTheFly.ini"; // File name and path
//---
// Get the file handle to read the file
   int hFl=FileOpen(nm_fl,FILE_READ|FILE_ANSI);
//---
   if(hFl!=INVALID_HANDLE) // If the handle has been obtained, the file exists
     {
      // Get parameters from the file
      if(!flgRead)
        {
         // Set the array size
         ArrayResize(arrParamIP,szArrIP);
         //---
         // Fill the array with values from the file
         flgRead=GetValuesParamsFromFile(hFl,arrParamIP);
        }
      //---
      // If the array size is correct,...
      if(ArraySize(arrParamIP)==szArrIP)
        {
         // ...set the parameters to the variables
         //---
         // Check the Indicator Period for correctness
         if((int)arrParamIP[0]<=0) { lcheck=10; }
         else { lcheck=(int)arrParamIP[0]; }
         gPeriod_Ind=(int)lcheck;
         //---
         gTakeProfit=arrParamIP[1];
         gStopLoss=arrParamIP[2];
         gReverse=arrParamIP[3];
         //---
         // Check the Lot for correctness
         if(arrParamIP[4]<=0)
           { lcheck=0.1; }
         else { lcheck=arrParamIP[4]; }
         gLot=lcheck;
        }
     }
   else // If the file does not exist
     {
      iZeroMemory(); // Zero out variables
      //---
      // When creating the file, write current parameters of the Expert Advisor
      //---
      // Get the file handle to write to the file
      int hFl2=FileOpen(nm_fl,FILE_WRITE|FILE_CSV|FILE_ANSI,"");
      //---
      if(hFl2!=INVALID_HANDLE) // If the handle has been obtained
        {
         string sep="=";
         //---
         // Parameter names and values are obtained from arrays in the ARRAYS.mqh file
         for(int i=0; i<szArrIP; i++)
           { FileWrite(hFl2,arr_nmparams[i],sep,arr_vparams[i]); }
         //---
         FileClose(hFl2); // Close the file
         //---
         Print("File with parameters of the "+NAME_EXPERT+" Expert Advisor created successfully.");
        }
     }
//---
   FileClose(hFl); // Close the file
  }
関数 WriteReadParameters および GetValuesParamsFromFile はFILE_OPERATIONS.mqh ファイルにあります。
関数の中にはすでに私の前稿 "How to Prepare MetaTrader 5 Quotes for Other Applications"に述べられているものがあるので、ここではそれらにこだわりません。トレード関数については何も難しいと感じることはないでしょう。ひじょうに簡単ですしコメントも広範囲につけられていますから。着目すべきは本稿のメインテーマです。
3. ユーザーパネルとの連携
!OnChartEvent.mqh ファイルにはユーザーパネルと連携するための関数があります。多くの関数で使用される変数および配列は一番初めにグローバルスコープで宣言されています。
// Current value on the panel or
// entered in the input box
string currVal="";
bool flgDialogWin=false; // Flag for panel existence
int
szArrList=0,// Size of the option list array
number=-1; // Parameter number in the panel list
string
nmMsgBx="",  // Name of the dialog window
nmValObj=""; // Name of the selected object
//---
// Option list arrays in the dialog window
string lenum[],lenmObj[];
//---
// colors of the dialog window elements
color
clrBrdBtn=clrWhite,
clrBrdFonMsg=clrDimGray,clrFonMsg=C'15,15,15',
clrChoice=clrWhiteSmoke,clrHdrBtn=clrBlack,
clrFonHdrBtn=clrGainsboro,clrFonStr=C'22,39,38';
これにイベントを処理するメイン関数が続きます。われわれの例では2件のイベントを処理する必要があります。
- CHARTEVENT_OBJECT_CLICK イベント-グラフィックオブジェクト上での左クリックです。
- CHARTEVENT_OBJECT_EDIT イベント-グラフィックオブジェクトの編集でのテキスト編集の終わりです
その他 MQL5 イベントについては MQL5 参考資料で読むことができます。
『オンザフライ』設定モードが常に有効(SettingOnTheFly)であるとしてリアルタイムでのイベント処理の確認のみ設定します。イベント処理は別々の関数で行われます。ChartEvent_ObjectClick および ChartEvent_ObjectEndEditです。
//+------------------------------------------------------------------+
//| USER EVENTS                                                      |
//+------------------------------------------------------------------+
void OnChartEvent(const int     id,
                  const long   &lparam,
                  const double &dparam,
                  const string &sparam)
  {
// If the event is real time and the "On The Fly" setting mode is enabled
   if(NotTest() && SettingOnTheFly)
     {
      //+------------------------------------------------------------------+
      //| THE CHARTEVENT_OBJECT_CLICK EVENT                                |
      //+------------------------------------------------------------------+
      if(ChartEvent_ObjectClick(id,lparam,dparam,sparam)) { return; }
      //---
      //+------------------------------------------------------------------+
      //| THE CHARTEVENT_OBJECT_ENDEDIT EVENT                              |
      //+------------------------------------------------------------------+
      if(ChartEvent_ObjectEndEdit(id,lparam,dparam,sparam)) { return; }
     }
//---
   return;
  }
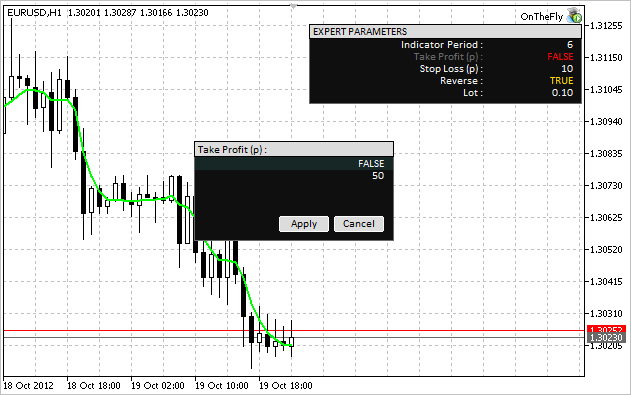
リストにあるオブジェクト上でクリックすると、情報パネル上にダイアログウィンドウが表示され、それにより別の値を選択するか入力ボックスに新しい値を入力することができるようになります。

図3 選択されたパラメータ値を変更するためのダイアログウィンドウ
それがどのように動作するか詳しく見ます。グラフィックオブジェクトがクリックされると、プログラムはまず ChartEvent_ObjectClick 関数を使ってグラフィックオブジェクトがほんとうにクリックされたかイベント識別子によって確認します。
チャートの真ん中でダイアログウィンドウを開きたければ、チャートサイズを知ることが必要です。それは ChartGetInteger 関数内でプロパティCHART_WIDTH_IN_PIXELS および CHART_HEIGHT_IN_PIXELSを指示することで取得できます。それからプログラムは DialogWindowInfoPanelに切り替えます。全チャートプロパティについては MQL5 参考資料で詳しく知ることができます。
以下は上記アクションの実装コードです。
//+------------------------------------------------------------------+
//| THE CHARTEVENT_OBJECT_CLICK EVENT                                |
//+------------------------------------------------------------------+
bool ChartEvent_ObjectClick(int id,long lparam,double dparam,string sparam)
  {
   // If there was an event of clicking on a graphical object
   if(id==CHARTEVENT_OBJECT_CLICK) // id==1
     {
      Get_STV(); // Get all data on the symbol
      //---
      string clickedChartObject=sparam; // Name of the clicked object
      //---
      // Get the chart size
      width_chart=(int)ChartGetInteger(0,CHART_WIDTH_IN_PIXELS,0);
      height_chart=(int)ChartGetInteger(0,CHART_HEIGHT_IN_PIXELS,0);
      //---
      DialogWindowInfoPanel(clickedChartObject);
     }
//---
   return(false);
  }
DialogWindowInfoPanel 関数を使用し、最初にダイアログウィンドウが現在開いているか確認します。ウィンドウがみつからなければ GetNumberClickedObjIP 関数がクリックが情報パネルのリストにあるオブジェクトに関連しているかどうか確認します。クリックされたオブジェクトがリストにあれば、この関数はオブじゅえくとの配列から適切なエレメント番号を返します。それからその番号を使って InitArraysAndDefault 関数はダイアログウィンドウの配列サイズとデフォルト値を判断します。すべての処理に問題がなければダイアログウィンドウが表示されます。
DialogWindowInfoPanel 関数がダイアログウィンドウがすでに開いていると判断しれば、プログラムはダイアログウィンドウ内のオブ上くとがクリックされたか確認します。たとえばダイアログウィンドウが開くとき、パネルに今表示されている値の線が選択されたものとして表示されます。リストの別のオプションでクリックすれば、プログラムはクリックされたダイアログウィンドウのリストを選択する SelectionOptionInDialogWindow 関数を使用します。
現在選択されているリストのオプションをクリックすると、このオブジェクトは編集対象オブジェクトとみなされ、入力ボックスが表示され、このボックスをクリックすると新しい値を入力することができます。SetEditObjInDialogWindow 関数は入力ボックスの設定を行います。
そして最後に「適用」ボタンがクリックされるとプログラムは値が変更されたか確認します。変更されていれば、新しい値がパネルに表示されそれがファイルに書き込まれます。
以下はダイアログウィンドウのメイン関数のコードです。
//+------------------------------------------------------------------+
//| DIALOG WINDOW OF THE INFO PANEL                                  |
//+------------------------------------------------------------------+
void DialogWindowInfoPanel(string clickObj)
  {
// If there is currently no dialog window
   if(!flgDialogWin)
     {
      // Get the object number in the array
      // Exit if none of the parameters displayed on the panel has been clicked
      if((number=GetNumberClickedObjIP(clickObj))==-1) { return; }
      //---
      // Initialization of default values
      //and determination of the list array size
      if(!InitArraysAndDefault()) { return; }
      //---
      // Set the dialog window
      SetDialogWindow();
      //---
      flgDialogWin=true; // Mark the dialog window as open
      ChartRedraw();
     }
   else // If the dialog window is open
     {
      // Set the input box for the modification of the value
      SetEditObjInDialogWindow(clickObj);
      //---
      // If one of the buttons in the dialog box is clicked
      if(clickObj=="btnApply" || clickObj=="btnCancel")
        {
         // If the Apply button is clicked
         if(clickObj=="btnApply")
           {
            // Compare values on the panel with the ones on the list
            // If the value on the list is different from the one that is currently displayed on the panel
            // (which means it is different from the one in the file),
            // ...change the value on the panel and update the file
            if(currVal!=ObjectGetString(0,nmValObj,OBJPROP_TEXT))
              {
               // Update the value on the panel
               ObjectSetString(0,nmValObj,OBJPROP_TEXT,currVal); ChartRedraw();
               //---
               // Read all data on the panel and write it to the file
               WriteNewData();
              }
           }
         //---
         DelDialogWindow(lenmObj); // Delete the dialog window
         iZeroMemory(); // Zero out the variables
         //---
         // Update the data
         SetParameters();
         GetHandlesIndicators();
         SetInfoPanel();
         //---
         ChartRedraw();
        }
      else // If neither Apply nor Cancel has been clicked
        {
         // Selection of the dialog window list option
         SelectionOptionInDialogWindow(clickObj);
         //---
         ChartRedraw();
        }
     }
  }
入力ボックスに新しい値が入力されるたびに CHARTEVENT_OBJECT_EDIT イベントが作成され、プログラムは ChartEvent_ObjectEndEdit 関数に切り替えます。ダイアログウィンドウの値が変更されると入力された値が格納され、正しいか確認されリストのオブ上くとに割り当てられます。以下のコードで詳しく確認することができます。
//+------------------------------------------------------------------+
//| THE CHARTEVENT_OBJECT_ENDEDIT EVENT                              |
//+------------------------------------------------------------------+
bool ChartEvent_ObjectEndEdit(int id,long lparam,double dparam,string sparam)
  {
   if(id==CHARTEVENT_OBJECT_ENDEDIT) // id==3
     {
      string editObject=sparam; // Name of the edited object
      //---
      // If the value has been entered in the input box in the dialog window
      if(editObject=="editValIP")
        {
         // Get the entered value
         currVal=ObjectGetString(0,"editValIP",OBJPROP_TEXT);
         //---
         // (0) Period Indicator
         if(number==0)
           {
            // Correct the value if it is wrong
            if(currVal=="0" || currVal=="" || SD(currVal)<=0) { currVal="1"; }
            //---
            // Set the entered value
            ObjectSetString(0,"enumMB0",OBJPROP_TEXT,currVal);
           }
         //---
         // (4) Lot
         if(number==4)
           {
            // Correct the value if it is wrong
            if(currVal=="0" || currVal=="" || SD(currVal)<=0) { currVal=DS(SS.vol_min,2); }
            //---
            // Set the entered value
            ObjectSetString(0,"enumMB0",OBJPROP_TEXT,DS2(SD(currVal)));
           }
         //---
         // (1) Take Profit (p)
         // (2) Stop Loss (p)
         if(number==1 || number==2)
           {
            // Correct the value if it is wrong
            if(currVal=="0" || currVal=="" || SD(currVal)<=0) { currVal="1"; }
            //---
            // Set the entered value
            ObjectSetString(0,"enumMB1",OBJPROP_TEXT,currVal);
           }
         //---
         DelObjbyName("editValIP"); ChartRedraw();
        }
     }
//---
   return(false);
  }
動作中の Expert Advisor は以下のビデオで確認できます。
おわりに
より詳しく調べるには添付の圧縮ファイルがダウンロード可能です。
提供されているシンプルな例によってMQL5 の学習を始めたばかりの方にとって多くの疑問に対する迅速な答えを得るのに本稿が役立つことを願っています。本稿で記述したコードのスニペットから意図的に確認をいくつか除外しています。
たとえばダイアログウィンドウが開いたときチャートの高さ/幅を変更すると、ダイアログウィンドウは自動的に中央寄せされません。またリストから別のオプションを選択して継ぎ足すと、適切なラインを選ぶ役割をするオブジェクトはかなり移動します。これはみなさんの宿題といたしましょう。プログラミングの練習をすることは重要です。より多く練習すればより上達するものです。
グッドラック!
MetaQuotes Ltdによってロシア語から翻訳されました。
元の記事: https://www.mql5.com/ru/articles/572
警告: これらの資料についてのすべての権利はMetaQuotes Ltd.が保有しています。これらの資料の全部または一部の複製や再プリントは禁じられています。
この記事はサイトのユーザーによって執筆されたものであり、著者の個人的な見解を反映しています。MetaQuotes Ltdは、提示された情報の正確性や、記載されているソリューション、戦略、または推奨事項の使用によって生じたいかなる結果についても責任を負いません。
- 無料取引アプリ
- 8千を超えるシグナルをコピー
- 金融ニュースで金融マーケットを探索
半口では収まらないよ。それにベースが空いているわけでもない。
でも、今は別の仕事だ。
いや、本当に直感的で理解しやすいインターフェイスを開発する方向で対話を進めようとしているんだ。
助けてください。カスタムインジケータの期間パラメータを "オンザフライ "で設定したいのですが、うまくいきません。
以下のコードでは動作しません!
Ext1Handle=iCustom(NULL,PERIOD_CURRENT, "xxxx",SlowEMA1);
Ext2Handle=iCustom(NULL,tf, "xxxx",SlowEMA1);
Ext3Handle=iCustom(NULL,tf1, "xxxx",SlowEMA1);
こんにちは!
なぜこのようなことが起こるのでしょうか?
左下に赤いエラー
ありがとうございます。
問題が見つかりました:
172行目が正しくありません。
正しい値はGetIndicatorsHandles() です;
ファイルは !OnChartEvent.mqh です。