DoEasy - コントロール(第27部):ProgressBar WinFormsオブジェクトの操作

内容
概念
今回の記事では、前回の記事で実装を開始したProgressBarコントロールの開発を続けます。この要素は、アンダーレイとプログレスバーの2つのコンポーネントで構成されます。将来的には、プログレスバーに加えて、アンダーレイに他のデザイン要素(テキスト、画像など)を配置できるようになります。現時点では、このコントロールは静的WinFormsオブジェクトです。今日は、オブジェクトのプログレスバーをプログラムで制御する機能を開発します。したがって、プログラムでこれを使用して、多数の同一のアクションを必要とする操作の進行状況を示すことができるようにします。
Windows環境で同様のプログレスバーに注意を払うと、プログレスバーに沿ってグレアが移動したり、バーが塗りつぶされたときにその他の視覚効果が表示されたりすることがわかります。プログレスバーの視覚効果は、プログラムインターフェイスをより魅力的にアニメーション化するという事実に加えて、プロセスの完了を追加で示す機能も備えています。プログレスバーに表示される操作の数が十分に多い場合、プログレスバーは完了した操作ごとにではなく、特定の数の操作の後に塗りつぶされます。したがって、プログレスバーが塗りつぶされても、操作が続行することがあります。このような状況で、視覚効果がプログレスバーに表示され続ける場合、プロセスはまだ完了していません。プロセスが完了すると、プログレスバーに視覚効果が表示されなくなります。
通常、プロセスが終了すると、ProgressBarコントロールも非表示になるため、上記は表示されません。しかし、プログレスバーが個別のウィンドウで作成され、すべての操作が完了したときに手動で閉じる必要がある場合は、プログレスバーの視覚効果を使用してプロセスの完了/未完了の表示を確認できます。または、1つのプロセスをサブプロセスに分割して表示するプログレスバーが同時に複数ある場合は、プロセス全体が完了するまで、既に完了したプロセスのプログレスバーが表示されます。サブプロセスを表示するProgressBarコントロールでは、二重の表示も確認できます。プログレスバーが完全に塗りつぶされているが視覚効果が引き続き表示されている場合、このサブプロセスはまだ完全には終了していません。
ProgressBarコントロールの視覚効果機能を実装すれば、その概念をライブラリ内の他のコントロールで使用できるようになります。視覚効果を持つ各オブジェクトは、アクティブな要素のリストに配置されます。ライブラリはこのリストを見て、このリストに配置された各オブジェクトのタイマーイベントハンドラをタイマーで順番に呼び出します。必要な機能は、オブジェクト自体、つまりタイマーハンドラに実装されます。
さらに、定義済みアイコンの描画を少し改良します。前回の記事で、アンチエイリアス処理された線を透明に描画するときの奇妙な動作について説明しました。実際、標準ライブラリのスムージングメソッドを使用して描画されたすべてのグラフィカルプリミティブは、透明に設定されていると正常に描画されません。つまり、そのような線を滑らかに表示または非表示にすることはできません。ただし、線の色の不透明度が特定の値(たとえば128から255)に設定されている場合はアンチエイリアス法を使用して描画して、不透明度が127から0に設定されている場合はスムージングせずに通常の方法でそのような線を描画するというトリックを使用することができます。このアプローチで、描画されたグラフィカルプリミティブは滑らかな視覚効果で表示/非表示されるようになり、アンチエイリアスなしで描画された線の「粗さ」で半透明性が隠されるようになります。
ライブラリクラスの改善
前回の記事でグレアオブジェクトを作成するときは、影オブジェクトに基づいて作成されると想定しました。つまり、そのクラスで使用可能なぼかしメソッドを使用するために、影オブジェクトから派生することになります。ただし、実践が示しているように、このアプローチ自体は正当化されていません。オブジェクトへの視覚効果の追加が複雑になるという事実に加えて、影オブジェクトの後継としてグレアを使用すると、その使用がすでに作成された概念のフレームワーク内に制限されます。
したがって、グレアオブジェクトがCWinFormBaseライブラリのすべてのWinFormsオブジェクトの基本オブジェクトクラスから派生し、補助オブジェクトのリストに含まれるようにします。そうすれば、それを使用するクラスに1行のコードで簡単に追加できます。アクティブなオブジェクトのハンドラは既に実装しています。このアプローチにより、影オブジェクト処理の機能と同じ機能を別のライブラリクラスに定期的に追加する必要がなくなります。バインドされたオブジェクトを追加して処理するために、既製のメソッドを使用するだけです。
\MQL5\Include\DoEasy\Defines.mqhで、グレアオブジェクトID文字列をグラフィカルオブジェクトのセクションから補助ライブラリコントロールのセクションに移動します。
//+-----------------------------------------------+
//| The list of graphical element types           |
//+-----------------------------------------------+
enum ENUM_GRAPH_ELEMENT_TYPE
  {
   GRAPH_ELEMENT_TYPE_STANDARD,                       // Standard graphical object
   GRAPH_ELEMENT_TYPE_STANDARD_EXTENDED,              // Extended standard graphical object
   GRAPH_ELEMENT_TYPE_SHADOW_OBJ,                     // Shadow object

   GRAPH_ELEMENT_TYPE_ELEMENT,                        // Element
   GRAPH_ELEMENT_TYPE_FORM,                           // Form
   GRAPH_ELEMENT_TYPE_WINDOW,                         // Window
   //--- WinForms
   GRAPH_ELEMENT_TYPE_WF_UNDERLAY,                    // Panel object underlay
   GRAPH_ELEMENT_TYPE_WF_BASE,                        // Windows Forms Base
   //--- 'Container' object types are to be set below
   GRAPH_ELEMENT_TYPE_WF_CONTAINER,                   // Windows Forms container base object
   GRAPH_ELEMENT_TYPE_WF_PANEL,                       // Windows Forms Panel
   GRAPH_ELEMENT_TYPE_WF_GROUPBOX,                    // Windows Forms GroupBox
   GRAPH_ELEMENT_TYPE_WF_TAB_CONTROL,                 // Windows Forms TabControl
   GRAPH_ELEMENT_TYPE_WF_SPLIT_CONTAINER,             // Windows Forms SplitContainer
   //--- 'Standard control' object types are to be set below
   GRAPH_ELEMENT_TYPE_WF_COMMON_BASE,                 // Windows Forms base standard control
   GRAPH_ELEMENT_TYPE_WF_LABEL,                       // Windows Forms Label
   GRAPH_ELEMENT_TYPE_WF_BUTTON,                      // Windows Forms Button
   GRAPH_ELEMENT_TYPE_WF_CHECKBOX,                    // Windows Forms CheckBox
   GRAPH_ELEMENT_TYPE_WF_RADIOBUTTON,                 // Windows Forms RadioButton
   GRAPH_ELEMENT_TYPE_WF_ELEMENTS_LIST_BOX,           // Base list object of Windows Forms elements
   GRAPH_ELEMENT_TYPE_WF_LIST_BOX,                    // Windows Forms ListBox
   GRAPH_ELEMENT_TYPE_WF_CHECKED_LIST_BOX,            // Windows Forms CheckedListBox
   GRAPH_ELEMENT_TYPE_WF_BUTTON_LIST_BOX,             // Windows Forms ButtonListBox
   GRAPH_ELEMENT_TYPE_WF_TOOLTIP,                     // Windows Forms ToolTip
   GRAPH_ELEMENT_TYPE_WF_PROGRESS_BAR,                // Windows Forms ProgressBar
   //--- Auxiliary elements of WinForms objects
   GRAPH_ELEMENT_TYPE_WF_LIST_BOX_ITEM,               // Windows Forms ListBoxItem
   GRAPH_ELEMENT_TYPE_WF_TAB_HEADER,                  // Windows Forms TabHeader
   GRAPH_ELEMENT_TYPE_WF_TAB_FIELD,                   // Windows Forms TabField
   GRAPH_ELEMENT_TYPE_WF_SPLIT_CONTAINER_PANEL,       // Windows Forms SplitContainerPanel
   GRAPH_ELEMENT_TYPE_WF_ARROW_BUTTON,                // Windows Forms ArrowButton
   GRAPH_ELEMENT_TYPE_WF_ARROW_BUTTON_UP,             // Windows Forms UpArrowButton
   GRAPH_ELEMENT_TYPE_WF_ARROW_BUTTON_DOWN,           // Windows Forms DownArrowButton
   GRAPH_ELEMENT_TYPE_WF_ARROW_BUTTON_LEFT,           // Windows Forms LeftArrowButton
   GRAPH_ELEMENT_TYPE_WF_ARROW_BUTTON_RIGHT,          // Windows Forms RightArrowButton
   GRAPH_ELEMENT_TYPE_WF_ARROW_BUTTONS_UD_BOX,        // Windows Forms UpDownArrowButtonsBox
   GRAPH_ELEMENT_TYPE_WF_ARROW_BUTTONS_LR_BOX,        // Windows Forms LeftRightArrowButtonsBox
   GRAPH_ELEMENT_TYPE_WF_SPLITTER,                    // Windows Forms Splitter
   GRAPH_ELEMENT_TYPE_WF_HINT_BASE,                   // Windows Forms HintBase
   GRAPH_ELEMENT_TYPE_WF_HINT_MOVE_LEFT,              // Windows Forms HintMoveLeft
   GRAPH_ELEMENT_TYPE_WF_HINT_MOVE_RIGHT,             // Windows Forms HintMoveRight
   GRAPH_ELEMENT_TYPE_WF_HINT_MOVE_UP,                // Windows Forms HintMoveUp
   GRAPH_ELEMENT_TYPE_WF_HINT_MOVE_DOWN,              // Windows Forms HintMoveDown
   GRAPH_ELEMENT_TYPE_WF_BAR_PROGRESS_BAR,            // Windows Forms BarProgressBar
   GRAPH_ELEMENT_TYPE_WF_GLARE_OBJ,                   // Glare object
  };
//+------------------------------------------------------------------+
視覚効果(この場合は強調表示)を描画するには、視覚効果スタイルのリストを設定する必要があります。
//+-----------------------------------------------+
//| List of visual effect styles                  |
//+-----------------------------------------------+
enum ENUM_CANV_ELEMENT_VISUAL_EFF_STYLE
  {
   CANV_ELEMENT_VISUAL_EFF_STYLE_RECTANGLE,           // Rectangle
   CANV_ELEMENT_VISUAL_EFF_STYLE_PARALLELOGRAMM,      // Parallelogram
  };
//+------------------------------------------------------------------+
ここでは、正四角形と平行四辺形の2種類のグレアのみを作成します。次に、定義済みのグレア形状をいくつでも描画し、それらを使用して視覚効果をデザインできます。グラフィカルプリミティブである必要はありません。特にこれらの画像はアニメーション化できるため、効果としてオブジェクトに重ね合わせた任意の画像を使用できます。これについては、後で例として説明します。
\MQL5\Include\DoEasy\Data.mqhに、ライブラリの新しいメッセージインデックスを追加します。
//--- CForm
   MSG_FORM_OBJECT_TEXT_NO_SHADOW_OBJ_FIRST_CREATE_IT,// No shadow object. Create it using the CreateShadowObj() method
   MSG_FORM_OBJECT_TEXT_NO_GLARE_OBJ_FIRST_CREATE_IT, // No glare object. We must first create it using the CreateGlareObj() method
   MSG_FORM_OBJECT_ERR_FAILED_CREATE_SHADOW_OBJ,      // Failed to create new shadow object
   MSG_FORM_OBJECT_ERR_FAILED_CREATE_GLARE_OBJ,       // Failed to create new glare object
   MSG_FORM_OBJECT_ERR_FAILED_CREATE_PC_OBJ,          // Failed to create new pixel copier object
   MSG_FORM_OBJECT_PC_OBJ_ALREADY_IN_LIST,            // Pixel copier object with ID already present in the list
また、新しく追加されたインデックスに対応するテキストメッセージも追加します。
//--- CForm
   {"Отсутствует объект тени. Необходимо сначала его создать при помощи метода CreateShadowObj()","There is no shadow object. You must first create it using the CreateShadowObj() method"},
   {"Отсутствует объект блика. Необходимо сначала его создать при помощи метода CreateGlareObj()","There is no glare object. You must first create it using the CreateGlareObj() method"},
   {"Не удалось создать новый объект для тени","Failed to create new object for shadow"},
   {"Не удалось создать новый объект для блика","Failed to create new object for glare"},
   {"Не удалось создать новый объект-копировщик пикселей","Failed to create new pixel copier object"},
   {"В списке уже есть объект-копировщик пикселей с идентификатором ","There is already a pixel copier object in the list with ID "},
「Glareオブジェクト」メッセージインデックスを標準のWinFormsオブジェクトのグループに移動します。
   MSG_GRAPH_ELEMENT_TYPE_ELEMENT,                    // Element
   MSG_GRAPH_ELEMENT_TYPE_SHADOW_OBJ,                 // Shadow object

   MSG_GRAPH_ELEMENT_TYPE_FORM,                       // Form
   MSG_GRAPH_ELEMENT_TYPE_WINDOW,                     // Window

   MSG_GRAPH_ELEMENT_TYPE_WF_BAR_PROGRESS_BAR,        // BarProgressBar control
   MSG_GRAPH_ELEMENT_TYPE_WF_PROGRESS_BAR,            // ProgressBar control
   MSG_GRAPH_ELEMENT_TYPE_WF_GLARE_OBJ,               // Glare object
//---
   MSG_GRAPH_ELEMENT_TYPE_WF_WRONG_TYPE_PASSED,       // Incorrect control type
メッセージテキストを同じ方法で移動します。
   {"Элемент","Element"},
   {"Объект тени","Shadow object"},

   {"Форма","Form"},
   {"Окно","Window"},

   {"Элемент управления BarProgressBar","Control element \"BarProgressBar\""},
   {"Элемент управления ProgressBar","Control element \"ProgressBar\""},
   {"Объект блика","Glare object"},

   {"Передан не правильный тип элемента управления","Wrong control type passed"},
各種配色のパラメータが設定されている\MQL5\Include\DoEasy\GraphINI.mqhにグレアの不透明度値を指定するプロパティを追加します。プロパティの総数を12に増やします。
//+-----------------------------------------------+
//| List of form style parameter indices          |
//+-----------------------------------------------+
enum ENUM_FORM_STYLE_PARAMS
  {
   //--- CForm
   FORM_STYLE_FRAME_GLARE_OPACITY,              // Glare opacity
   FORM_STYLE_FRAME_SHADOW_OPACITY,             // Shadow opacity
   FORM_STYLE_FRAME_SHADOW_BLUR,                // Shadow blur
   FORM_STYLE_DARKENING_COLOR_FOR_SHADOW,       // Form shadow color darkening
   FORM_STYLE_FRAME_SHADOW_X_SHIFT,             // Shadow X axis shift
   FORM_STYLE_FRAME_SHADOW_Y_SHIFT,             // Shadow Y axis shift
   FORM_STYLE_GRADIENT_V,                       // Vertical gradient filling flag
   FORM_STYLE_GRADIENT_C,                       // Cyclic gradient filling flag
   //--- CPanel
   FORM_STYLE_FRAME_WIDTH_LEFT,                 // Panel frame width to the left
   FORM_STYLE_FRAME_WIDTH_RIGHT,                // Panel frame width to the right
   FORM_STYLE_FRAME_WIDTH_TOP,                  // Panel frame width on top
   FORM_STYLE_FRAME_WIDTH_BOTTOM,               // Panel frame width below
  };
#define TOTAL_FORM_STYLE_PARAMS        (12)     // Number of form style parameters
//+------------------------------------------------------------------+
グレアの不透明度の既定値を、現在ライブラリにある2つの配色のプロパティの配列に設定します。
//+-----------------------------------------------+
//| Array containing form style parameters        |
//+-----------------------------------------------+
int array_form_style[TOTAL_FORM_STYLES][TOTAL_FORM_STYLE_PARAMS]=
  {
//--- "Flat form" style parameters
   {
      //--- CForm
      40,                                       // Glare opacity
      80,                                       // Shadow opacity
      4,                                        // Shadow blur
      80,                                       // Form shadow color darkening
      2,                                        // Shadow X axis shift
      2,                                        // Shadow Y axis shift
      false,                                    // Vertical gradient filling flag
      false,                                    // Cyclic gradient filling flag
      //--- CPanel
      3,                                        // Panel frame width to the left
      3,                                        // Panel frame width to the right
      3,                                        // Panel frame width on top
      3,                                        // Panel frame width below
   },
//--- "Embossed form" style parameters
   {
      //--- CForm
      40,                                       // Glare opacity
      80,                                       // Shadow opacity
      4,                                        // Shadow blur
      80,                                       // Form shadow color darkening
      2,                                        // Shadow X axis shift
      2,                                        // Shadow Y axis shift
      true,                                     // Vertical gradient filling flag
      false,                                    // Cyclic gradient filling flag
      //--- CPanel
      3,                                        // Panel frame width to the left
      3,                                        // Panel frame width to the right
      3,                                        // Panel frame width on top
      3,                                        // Panel frame width below
   },
  };
//+------------------------------------------------------------------+
将来的には、実装を開始するときに、さまざまな配色のこれらのプロパティ値の構成を根本的に変更して補足します。
グレアグラフィカル要素のカテゴリを変更したので、すべてのライブラリグラフィカルオブジェクトの基本オブジェクトクラスの\MQL5\Include\DoEasy\Objects\Graph\GBaseObj.mqhにある、グラフィカル要素の説明を返すそのメソッドで、メソッドに渡された「グレアオブジェクト」タイプの処理を以前の場所から適切な場所に移動します。
//+------------------------------------------------------------------+
//| Return the description of the graphical element type             |
//+------------------------------------------------------------------+
string CGBaseObj::TypeElementDescription(const ENUM_GRAPH_ELEMENT_TYPE type)
  {
   return
     (
      type==GRAPH_ELEMENT_TYPE_STANDARD                  ? CMessage::Text(MSG_GRAPH_ELEMENT_TYPE_STANDARD)                 :
      type==GRAPH_ELEMENT_TYPE_STANDARD_EXTENDED         ? CMessage::Text(MSG_GRAPH_ELEMENT_TYPE_STANDARD_EXTENDED)        :
      type==GRAPH_ELEMENT_TYPE_ELEMENT                   ? CMessage::Text(MSG_GRAPH_ELEMENT_TYPE_ELEMENT)                  :
      type==GRAPH_ELEMENT_TYPE_SHADOW_OBJ                ? CMessage::Text(MSG_GRAPH_ELEMENT_TYPE_SHADOW_OBJ)               :

      type==GRAPH_ELEMENT_TYPE_FORM                      ? CMessage::Text(MSG_GRAPH_ELEMENT_TYPE_FORM)                     :
      type==GRAPH_ELEMENT_TYPE_WINDOW                    ? CMessage::Text(MSG_GRAPH_ELEMENT_TYPE_WINDOW)                   :
      //--- WinForms
      type==GRAPH_ELEMENT_TYPE_WF_UNDERLAY               ? CMessage::Text(MSG_GRAPH_ELEMENT_TYPE_WF_UNDERLAY)              :
      type==GRAPH_ELEMENT_TYPE_WF_BASE                   ? CMessage::Text(MSG_GRAPH_ELEMENT_TYPE_WF_BASE)                  :
      //--- Containers
      type==GRAPH_ELEMENT_TYPE_WF_CONTAINER              ? CMessage::Text(MSG_GRAPH_ELEMENT_TYPE_WF_CONTAINER)             :
      type==GRAPH_ELEMENT_TYPE_WF_GROUPBOX               ? CMessage::Text(MSG_GRAPH_ELEMENT_TYPE_WF_GROUPBOX)              :
      type==GRAPH_ELEMENT_TYPE_WF_PANEL                  ? CMessage::Text(MSG_GRAPH_ELEMENT_TYPE_WF_PANEL)                 :
      type==GRAPH_ELEMENT_TYPE_WF_TAB_CONTROL            ? CMessage::Text(MSG_GRAPH_ELEMENT_TYPE_WF_TAB_CONTROL)           :
      type==GRAPH_ELEMENT_TYPE_WF_SPLIT_CONTAINER        ? CMessage::Text(MSG_GRAPH_ELEMENT_TYPE_WF_SPLIT_CONTAINER)       :
      //--- Standard controls
      type==GRAPH_ELEMENT_TYPE_WF_COMMON_BASE            ? CMessage::Text(MSG_GRAPH_ELEMENT_TYPE_WF_COMMON_BASE)           :
      type==GRAPH_ELEMENT_TYPE_WF_LABEL                  ? CMessage::Text(MSG_GRAPH_ELEMENT_TYPE_WF_LABEL)                 :
      type==GRAPH_ELEMENT_TYPE_WF_CHECKBOX               ? CMessage::Text(MSG_GRAPH_ELEMENT_TYPE_WF_CHECKBOX)              :
      type==GRAPH_ELEMENT_TYPE_WF_RADIOBUTTON            ? CMessage::Text(MSG_GRAPH_ELEMENT_TYPE_WF_RADIOBUTTON)           :
      type==GRAPH_ELEMENT_TYPE_WF_BUTTON                 ? CMessage::Text(MSG_GRAPH_ELEMENT_TYPE_WF_BUTTON)                :
      type==GRAPH_ELEMENT_TYPE_WF_ELEMENTS_LIST_BOX      ? CMessage::Text(MSG_GRAPH_ELEMENT_TYPE_WF_ELEMENTS_LIST_BOX)     :
      type==GRAPH_ELEMENT_TYPE_WF_LIST_BOX               ? CMessage::Text(MSG_GRAPH_ELEMENT_TYPE_WF_LIST_BOX)              :
      type==GRAPH_ELEMENT_TYPE_WF_LIST_BOX_ITEM          ? CMessage::Text(MSG_GRAPH_ELEMENT_TYPE_WF_LIST_BOX_ITEM)         :
      type==GRAPH_ELEMENT_TYPE_WF_CHECKED_LIST_BOX       ? CMessage::Text(MSG_GRAPH_ELEMENT_TYPE_WF_CHECKED_LIST_BOX)      :
      type==GRAPH_ELEMENT_TYPE_WF_BUTTON_LIST_BOX        ? CMessage::Text(MSG_GRAPH_ELEMENT_TYPE_WF_BUTTON_LIST_BOX)       :
      type==GRAPH_ELEMENT_TYPE_WF_TOOLTIP                ? CMessage::Text(MSG_GRAPH_ELEMENT_TYPE_WF_TOOLTIP)               :
      type==GRAPH_ELEMENT_TYPE_WF_PROGRESS_BAR           ? CMessage::Text(MSG_GRAPH_ELEMENT_TYPE_WF_PROGRESS_BAR)          :
      //--- Auxiliary control objects
      type==GRAPH_ELEMENT_TYPE_WF_TAB_HEADER             ? CMessage::Text(MSG_GRAPH_ELEMENT_TYPE_WF_TAB_HEADER)            :
      type==GRAPH_ELEMENT_TYPE_WF_TAB_FIELD              ? CMessage::Text(MSG_GRAPH_ELEMENT_TYPE_WF_TAB_FIELD)             :
      type==GRAPH_ELEMENT_TYPE_WF_ARROW_BUTTON           ? CMessage::Text(MSG_GRAPH_ELEMENT_TYPE_WF_ARROW_BUTTON)          :
      type==GRAPH_ELEMENT_TYPE_WF_ARROW_BUTTON_UP        ? CMessage::Text(MSG_GRAPH_ELEMENT_TYPE_WF_ARROW_BUTTON_UP)       :
      type==GRAPH_ELEMENT_TYPE_WF_ARROW_BUTTON_DOWN      ? CMessage::Text(MSG_GRAPH_ELEMENT_TYPE_WF_ARROW_BUTTON_DOWN)     :
      type==GRAPH_ELEMENT_TYPE_WF_ARROW_BUTTON_LEFT      ? CMessage::Text(MSG_GRAPH_ELEMENT_TYPE_WF_ARROW_BUTTON_LEFT)     :
      type==GRAPH_ELEMENT_TYPE_WF_ARROW_BUTTON_RIGHT     ? CMessage::Text(MSG_GRAPH_ELEMENT_TYPE_WF_ARROW_BUTTON_RIGHT)    :
      type==GRAPH_ELEMENT_TYPE_WF_ARROW_BUTTONS_UD_BOX   ? CMessage::Text(MSG_GRAPH_ELEMENT_TYPE_WF_ARROW_BUTTONS_UD_BOX)  :
      type==GRAPH_ELEMENT_TYPE_WF_ARROW_BUTTONS_LR_BOX   ? CMessage::Text(MSG_GRAPH_ELEMENT_TYPE_WF_ARROW_BUTTONS_LR_BOX)  :
      type==GRAPH_ELEMENT_TYPE_WF_SPLIT_CONTAINER_PANEL  ? CMessage::Text(MSG_GRAPH_ELEMENT_TYPE_WF_SPLIT_CONTAINER_PANEL) :
      type==GRAPH_ELEMENT_TYPE_WF_SPLITTER               ? CMessage::Text(MSG_GRAPH_ELEMENT_TYPE_WF_SPLITTER)              :
      type==GRAPH_ELEMENT_TYPE_WF_HINT_BASE              ? CMessage::Text(MSG_GRAPH_ELEMENT_TYPE_WF_HINT_BASE)             :
      type==GRAPH_ELEMENT_TYPE_WF_HINT_MOVE_LEFT         ? CMessage::Text(MSG_GRAPH_ELEMENT_TYPE_WF_HINT_MOVE_LEFT)        :
      type==GRAPH_ELEMENT_TYPE_WF_HINT_MOVE_RIGHT        ? CMessage::Text(MSG_GRAPH_ELEMENT_TYPE_WF_HINT_MOVE_RIGHT)       :
      type==GRAPH_ELEMENT_TYPE_WF_HINT_MOVE_UP           ? CMessage::Text(MSG_GRAPH_ELEMENT_TYPE_WF_HINT_MOVE_UP)          :
      type==GRAPH_ELEMENT_TYPE_WF_HINT_MOVE_DOWN         ? CMessage::Text(MSG_GRAPH_ELEMENT_TYPE_WF_HINT_MOVE_DOWN)        :
      type==GRAPH_ELEMENT_TYPE_WF_BAR_PROGRESS_BAR       ? CMessage::Text(MSG_GRAPH_ELEMENT_TYPE_WF_BAR_PROGRESS_BAR)      :
      type==GRAPH_ELEMENT_TYPE_WF_GLARE_OBJ              ? CMessage::Text(MSG_GRAPH_ELEMENT_TYPE_WF_GLARE_OBJ)             :
      "Unknown"
     );
  }
//+------------------------------------------------------------------+
技術的には、確認する順番に違いはありませんが、順番のために「正しい」ところに移動させましょう。もちろん、アクセス速度には違いがあります。 if-elseによる確認がここにまとめられているため、あるタイプが他のタイプよりも頻繁に確認されるが、チェックリストの最後に近い位置にある場合、少なくとも理論的には、CPUサイクルのフレームワーク内でアクセス時間が増加します。ただし、すべての要素へのアクセスが同じになるようにするには、switch演算子を使用して、ライブラリメソッドでそのようなすべての確認をおこなう必要があります。これは、ライブラリの作成の最後におこなわれます。
強調表示オブジェクトが影オブジェクトから派生することは以前から計画されていました(そして前回の記事で実行されました)。その理由は、影オブジェクトメソッドにガウスぼかしメソッドが存在するためです。ぼかしを使用してグレアを実装する必要がないため、このアイデアは放棄しました。さらに、影オブジェクトをグレアオブジェクトの親として使用すると、オブジェクトの一部として他のグラフィック要素への追加が非常に複雑になります。したがって、グレアオブジェクトは独立した補助的なWinFormsオブジェクトになります。ただし、必要なオブジェクト(影オブジェクトだけでなく)でぼかしを使用できるようにするために、ぼかしメソッドを影オブジェクトからグラフィカル要素オブジェクトに移動します。そこから、ライブラリのすべてのグラフィック要素でこれらのメソッドを使用できるようになります。
\MQL5\Include\DoEasy\Objects\Graph\ShadowObj.mqhファイルからAlgLibライブラリのインクルードを削除し、、blurメソッドの宣言を削除し、これら2つのメソッドの実装コードを削除します。
//+------------------------------------------------------------------+
//|                                                    ShadowObj.mqh |
//|                                  Copyright 2021, MetaQuotes Ltd. |
//|                             https://mql5.com/ja/users/artmedia70 |
//+------------------------------------------------------------------+
#property copyright "Copyright 2021, MetaQuotes Ltd."
#property link      "https://mql5.com/ja/users/artmedia70"
#property version   "1.00"
#property strict    // Necessary for mql4
//+-----------------------------------------------+
//| Include files                                 |
//+-----------------------------------------------+
#include "GCnvElement.mqh"
#include <Math\Alglib\alglib.mqh>
//+-----------------------------------------------+
//| Shadows object class                          |
//+-----------------------------------------------+
class CShadowObj : public CGCnvElement
  {
private:
   color             m_color;                         // Shadow color
   uchar             m_opacity;                       // Shadow opacity
   uchar             m_blur;                          // Blur
//--- Draw the object shadow form
   void              DrawShadowFigureRect(const int w,const int h);
protected:
//--- Gaussian blur
   bool              GaussianBlur(const uint radius);
//--- Return the array of weight ratios
   bool              GetQuadratureWeights(const double mu0,const int n,double &weights[]);
//--- Protected constructor with object type, chart ID and subwindow
                     CShadowObj(const ENUM_GRAPH_ELEMENT_TYPE type,
                                CGCnvElement *main_obj,CGCnvElement *base_obj,
                                const long chart_id,
                                const int subwindow,
                                const string descript,
                                const int x,
                                const int y,
                                const int w,
                                const int h);
public:
\MQL5\Include\DoEasy\Objects\Graph\GCnvElement.mqhで、AlgLibライブラリのインクルードを設定し、protectedセクションでぼかし実装のメソッドを宣言します。
//+------------------------------------------------------------------+
//|                                                  GCnvElement.mqh |
//|                                  Copyright 2021, MetaQuotes Ltd. |
//|                             https://mql5.com/ja/users/artmedia70 |
//+------------------------------------------------------------------+
#property copyright "Copyright 2021, MetaQuotes Ltd."
#property link      "https://mql5.com/ja/users/artmedia70"
#property version   "1.00"
#property strict    // Necessary for mql4
//+-----------------------------------------------+
//| Include files                                 |
//+-----------------------------------------------+
#include "GBaseObj.mqh"
#include <Math\Alglib\alglib.mqh>
//+-----------------------------------------------+
//| Class of the graphical element object         |
//+-----------------------------------------------+
class CGCnvElement : public CGBaseObj
  {
protected:
   CGCnvElement     *m_element_main;                           // Pointer to the initial parent element within all the groups of bound objects
   CGCnvElement     *m_element_base;                           // Pointer to the parent element within related objects of the current group
   CCanvas           m_canvas;                                 // CCanvas class object
   CPause            m_pause;                                  // Pause class object
   bool              m_shadow;                                 // Shadow presence
   color             m_chart_color_bg;                         // Chart background color
   uint              m_duplicate_res[];                        // Array for storing resource data copy
   color             m_array_colors_bg[];                      // Array of element background colors
   color             m_array_colors_bg_dwn[];                  // Array of control background colors when clicking on the control
   color             m_array_colors_bg_ovr[];                  // Array of control background colors when hovering the mouse over the control
   bool              m_gradient_v;                             // Vertical gradient filling flag
   bool              m_gradient_c;                             // Cyclic gradient filling flag
   int               m_init_relative_x;                        // Initial relative X coordinate
   int               m_init_relative_y;                        // Initial relative Y coordinate
   color             m_array_colors_bg_init[];                 // Array of element background colors (initial color)

//--- Create (1) the object structure and (2) the object from the structure
   virtual bool      ObjectToStruct(void);
   virtual void      StructToObject(void);
//--- Copy the color array to the specified background color array
   void              CopyArraysColors(color &array_dst[],const color &array_src[],const string source);

//--- Return the number of graphical elements (1) by type, (2) by name and type
   int               GetNumGraphElements(const ENUM_GRAPH_ELEMENT_TYPE type) const;
   int               GetNumGraphElements(const string name,const ENUM_GRAPH_ELEMENT_TYPE type) const;
//--- Create and return the graphical element name by its type
   string            CreateNameGraphElement(const ENUM_GRAPH_ELEMENT_TYPE type);

//--- Gaussian blur
   bool              GaussianBlur(const uint radius);
//--- Return the array of weight ratios
   bool              GetQuadratureWeights(const double mu0,const int n,double &weights[]);

private:
クラス本体の外に、CShadowObjクラスから削除されたぼかしメソッドの実装を追加します。
//+-----------------------------------------------+
//| Gaussian blur                                 |
//| https://www.mql5.com/ja/articles/1612#chapter4|
//+-----------------------------------------------+
bool CGCnvElement::GaussianBlur(const uint radius)
  {
//---
   int n_nodes=(int)radius*2+1;
//--- Read graphical resource data. If failed, return false
   if(!CGCnvElement::ResourceStamp(DFUN))
      return false;
//--- Check the blur amount. If the blur radius exceeds half of the width or height, return 'false'
   if((int)radius>=this.Width()/2 || (int)radius>=this.Height()/2)
     {
      ::Print(DFUN,CMessage::Text(MSG_SHADOW_OBJ_IMG_SMALL_BLUR_LARGE));
      return false;
     }

//--- Decompose image data from the resource into a, r, g, b color components
   int  size=::ArraySize(this.m_duplicate_res);
//--- arrays for storing A, R, G and B color components
//--- for horizontal and vertical blur
   uchar a_h_data[],r_h_data[],g_h_data[],b_h_data[];
   uchar a_v_data[],r_v_data[],g_v_data[],b_v_data[];

//--- Change the size of component arrays according to the array size of the graphical resource data
   if(::ArrayResize(a_h_data,size)==-1)
     {
      CMessage::ToLog(DFUN,MSG_LIB_SYS_FAILED_ARRAY_RESIZE);
      ::Print(DFUN_ERR_LINE,": \"a_h_data\"");
      return false;
     }
   if(::ArrayResize(r_h_data,size)==-1)
     {
      CMessage::ToLog(DFUN,MSG_LIB_SYS_FAILED_ARRAY_RESIZE);
      ::Print(DFUN_ERR_LINE,": \"r_h_data\"");
      return false;
     }
   if(::ArrayResize(g_h_data,size)==-1)
     {
      CMessage::ToLog(DFUN,MSG_LIB_SYS_FAILED_ARRAY_RESIZE);
      ::Print(DFUN_ERR_LINE,": \"g_h_data\"");
      return false;
     }
   if(ArrayResize(b_h_data,size)==-1)
     {
      CMessage::ToLog(DFUN,MSG_LIB_SYS_FAILED_ARRAY_RESIZE);
      ::Print(DFUN_ERR_LINE,": \"b_h_data\"");
      return false;
     }
   if(::ArrayResize(a_v_data,size)==-1)
     {
      CMessage::ToLog(DFUN,MSG_LIB_SYS_FAILED_ARRAY_RESIZE);
      ::Print(DFUN_ERR_LINE,": \"a_v_data\"");
      return false;
     }
   if(::ArrayResize(r_v_data,size)==-1)
     {
      CMessage::ToLog(DFUN,MSG_LIB_SYS_FAILED_ARRAY_RESIZE);
      ::Print(DFUN_ERR_LINE,": \"r_v_data\"");
      return false;
     }
   if(::ArrayResize(g_v_data,size)==-1)
     {
      CMessage::ToLog(DFUN,MSG_LIB_SYS_FAILED_ARRAY_RESIZE);
      ::Print(DFUN_ERR_LINE,": \"g_v_data\"");
      return false;
     }
   if(::ArrayResize(b_v_data,size)==-1)
     {
      CMessage::ToLog(DFUN,MSG_LIB_SYS_FAILED_ARRAY_RESIZE);
      ::Print(DFUN_ERR_LINE,": \"b_v_data\"");
      return false;
     }
//--- Declare the array for storing blur weight ratios and,
//--- if failed to get the array of weight ratios, return 'false'
   double weights[];
   if(!this.GetQuadratureWeights(1,n_nodes,weights))
      return false;

//--- Set components of each image pixel to the color component arrays
   for(int i=0;i<size;i++)
     {
      a_h_data[i]=GETRGBA(this.m_duplicate_res[i]);
      r_h_data[i]=GETRGBR(this.m_duplicate_res[i]);
      g_h_data[i]=GETRGBG(this.m_duplicate_res[i]);
      b_h_data[i]=GETRGBB(this.m_duplicate_res[i]);
     }

//--- Blur the image horizontally (along the X axis)
   uint XY; // Pixel coordinate in the array
   double a_temp=0.0,r_temp=0.0,g_temp=0.0,b_temp=0.0;
   int coef=0;
   int j=(int)radius;
   //--- Loop by the image width
   for(int Y=0;Y<this.Height();Y++)
     {
      //--- Loop by the image height
      for(uint X=radius;X<this.Width()-radius;X++)
        {
         XY=Y*this.Width()+X;
         a_temp=0.0; r_temp=0.0; g_temp=0.0; b_temp=0.0;
         coef=0;
         //--- Multiply each color component by the weight ratio corresponding to the current image pixel
         for(int i=-1*j;i<j+1;i=i+1)
           {
            a_temp+=a_h_data[XY+i]*weights[coef];
            r_temp+=r_h_data[XY+i]*weights[coef];
            g_temp+=g_h_data[XY+i]*weights[coef];
            b_temp+=b_h_data[XY+i]*weights[coef];
            coef++;
           }
         //--- Save each rounded color component calculated according to the ratios to the component arrays
         a_h_data[XY]=(uchar)::round(a_temp);
         r_h_data[XY]=(uchar)::round(r_temp);
         g_h_data[XY]=(uchar)::round(g_temp);
         b_h_data[XY]=(uchar)::round(b_temp);
        }
      //--- Remove blur artifacts to the left by copying adjacent pixels
      for(uint x=0;x<radius;x++)
        {
         XY=Y*this.Width()+x;
         a_h_data[XY]=a_h_data[Y*this.Width()+radius];
         r_h_data[XY]=r_h_data[Y*this.Width()+radius];
         g_h_data[XY]=g_h_data[Y*this.Width()+radius];
         b_h_data[XY]=b_h_data[Y*this.Width()+radius];
        }
      //--- Remove blur artifacts to the right by copying adjacent pixels
      for(int x=int(this.Width()-radius);x<this.Width();x++)
        {
         XY=Y*this.Width()+x;
         a_h_data[XY]=a_h_data[(Y+1)*this.Width()-radius-1];
         r_h_data[XY]=r_h_data[(Y+1)*this.Width()-radius-1];
         g_h_data[XY]=g_h_data[(Y+1)*this.Width()-radius-1];
         b_h_data[XY]=b_h_data[(Y+1)*this.Width()-radius-1];
        }
     }

//--- Blur vertically (along the Y axis) the image already blurred horizontally
   int dxdy=0;
   //--- Loop by the image height
   for(int X=0;X<this.Width();X++)
     {
      //--- Loop by the image width
      for(uint Y=radius;Y<this.Height()-radius;Y++)
        {
         XY=Y*this.Width()+X;
         a_temp=0.0; r_temp=0.0; g_temp=0.0; b_temp=0.0;
         coef=0;
         //--- Multiply each color component by the weight ratio corresponding to the current image pixel
         for(int i=-1*j;i<j+1;i=i+1)
           {
            dxdy=i*(int)this.Width();
            a_temp+=a_h_data[XY+dxdy]*weights[coef];
            r_temp+=r_h_data[XY+dxdy]*weights[coef];
            g_temp+=g_h_data[XY+dxdy]*weights[coef];
            b_temp+=b_h_data[XY+dxdy]*weights[coef];
            coef++;
           }
         //--- Save each rounded color component calculated according to the ratios to the component arrays
         a_v_data[XY]=(uchar)::round(a_temp);
         r_v_data[XY]=(uchar)::round(r_temp);
         g_v_data[XY]=(uchar)::round(g_temp);
         b_v_data[XY]=(uchar)::round(b_temp);
        }
      //--- Remove blur artifacts at the top by copying adjacent pixels
      for(uint y=0;y<radius;y++)
        {
         XY=y*this.Width()+X;
         a_v_data[XY]=a_v_data[X+radius*this.Width()];
         r_v_data[XY]=r_v_data[X+radius*this.Width()];
         g_v_data[XY]=g_v_data[X+radius*this.Width()];
         b_v_data[XY]=b_v_data[X+radius*this.Width()];
        }
      //--- Remove blur artifacts at the bottom by copying adjacent pixels
      for(int y=int(this.Height()-radius);y<this.Height();y++)
        {
         XY=y*this.Width()+X;
         a_v_data[XY]=a_v_data[X+(this.Height()-1-radius)*this.Width()];
         r_v_data[XY]=r_v_data[X+(this.Height()-1-radius)*this.Width()];
         g_v_data[XY]=g_v_data[X+(this.Height()-1-radius)*this.Width()];
         b_v_data[XY]=b_v_data[X+(this.Height()-1-radius)*this.Width()];
        }
     }

//--- Set the twice blurred (horizontally and vertically) image pixels to the graphical resource data array
   for(int i=0;i<size;i++)
      this.m_duplicate_res[i]=ARGB(a_v_data[i],r_v_data[i],g_v_data[i],b_v_data[i]);
//--- Display the image pixels on the canvas in a loop by the image height and width from the graphical resource data array
   for(int X=0;X<this.Width();X++)
     {
      for(uint Y=radius;Y<this.Height()-radius;Y++)
        {
         XY=Y*this.Width()+X;
         this.m_canvas.PixelSet(X,Y,this.m_duplicate_res[XY]);
        }
     }
//--- Done
   return true;
  }
//+------------------------------------------------------------------+
//| Return the array of weight ratios                                |
//| https://www.mql5.com/ja/articles/1612#chapter3_2                 |
//+------------------------------------------------------------------+
bool CGCnvElement::GetQuadratureWeights(const double mu0,const int n,double &weights[])
  {
   CAlglib alglib;
   double  alp[];
   double  bet[];
   ::ArrayResize(alp,n);
   ::ArrayResize(bet,n);
   ::ArrayInitialize(alp,1.0);
   ::ArrayInitialize(bet,1.0);
//---
   double out_x[];
   int    info=0;
   alglib.GQGenerateRec(alp,bet,mu0,n,info,out_x,weights);
   if(info!=1)
     {
      string txt=(info==-3 ? "internal eigenproblem solver hasn't converged" : info==-2 ? "Beta[i]<=0" : "incorrect N was passed");
      ::Print("Call error in CGaussQ::GQGenerateRec: ",txt);
      return false;
     }
   return true;
  }
//+------------------------------------------------------------------+
メソッドは、クラス間で移動されただけです。
事前定義されたグラフィカルプリミティブと画像を描画するメソッドを改良する必要があることは既に述べました。半透明の線を描画する場合、アンチエイリアシングを使用してプリミティブを描画するメソッドはうまく機能しないため、線の透明度が設定されたしきい値(完全の半分)を超えた場合は、平滑化されたプリミティブの描画を平滑化されていないものに置き換える必要があります。
改善されたメソッドを見てみましょう。描画されたグラフィカルプリミティブの不透明度の値が127を超える場合、プリミティブはアンチエイリアシングを使用するメソッドによって描画されます。それ以外の場合は、アンチエイリアシングなしのメソッドを使用して描画します。
//+-----------------------------------------------+
//| Draw the Info icon                            |
//+-----------------------------------------------+
void CGCnvElement::DrawIconInfo(const int coord_x,const int coord_y,const uchar opacity)
  {
   int x=coord_x+8;
   int y=coord_y+8;
   this.DrawCircleFill(x,y,7,C'0x00,0x77,0xD7',opacity);
   if(opacity>127)
      this.DrawCircleWu(x,y,7.5,C'0x00,0x3D,0x8C',opacity);
   else
      this.DrawCircle(x,y,8,C'0x00,0x3D,0x8C',opacity);
   this.DrawRectangle(x,y-5,x+1,y-4, C'0xFF,0xFF,0xFF',opacity);
   this.DrawRectangle(x,y-2,x+1,y+4,C'0xFF,0xFF,0xFF',opacity);
  }
//+-----------------------------------------------+
//| Draw the Warning icon                         |
//+-----------------------------------------------+
void CGCnvElement::DrawIconWarning(const int coord_x,const int coord_y,const uchar opacity)
  {
   int x=coord_x+8;
   int y=coord_y+1;
   this.DrawTriangleFill(x,y,x+8,y+14,x-8,y+14,C'0xFC,0xE1,0x00',opacity);
   if(opacity>127)
      this.DrawTriangleWu(x,y,x+8,y+14,x-7,y+14,C'0xFF,0xB9,0x00',opacity);
   else
      this.DrawTriangle(x,y,x+8,y+14,x-7,y+14,C'0xFF,0xB9,0x00',opacity);
   this.DrawRectangle(x,y+5,x+1,y+9,  C'0x00,0x00,0x00',opacity);
   this.DrawRectangle(x,y+11,x+1,y+12,C'0x00,0x00,0x00',opacity);
  }
//+-----------------------------------------------+
//| Draw the Error icon                           |
//+-----------------------------------------------+
void CGCnvElement::DrawIconError(const int coord_x,const int coord_y,const uchar opacity)
  {
   int x=coord_x+8;
   int y=coord_y+8;
   this.DrawCircleFill(x,y,7,C'0xF0,0x39,0x16',opacity);
   if(opacity>127)
     {
      this.DrawCircleWu(x,y,7.5,C'0xA5,0x25,0x12',opacity);
      this.DrawLineWu(x-3,y-3,x+3,y+3,C'0xFF,0xFF,0xFF',opacity);
      this.DrawLineWu(x+3,y-3,x-3,y+3,C'0xFF,0xFF,0xFF',opacity);
     }
   else
     {
      this.DrawCircle(x,y,8,C'0xA5,0x25,0x12',opacity);
      this.DrawLine(x-3,y-3,x+3,y+3,C'0xFF,0xFF,0xFF',opacity);
      this.DrawLine(x+3,y-3,x-3,y+3,C'0xFF,0xFF,0xFF',opacity);
     }
  }
//+------------------------------------------------------------------+
もちろん、単に問題を隠しているのですが、ここではそれが正当化されています。不透明度が255から128に減少すると、平滑化された線は多かれ少なかれ正常に見えます。線の描画をアンチエイリアシングなしの描画に置き換えると、ここでは完全に見えなくなります。線はすでに半透明であり、この状態ではピクセル化された外観は目立ちません。これは、平滑化されていない線を完全に不透明に描画した場合には当てはまりません。
このクラスの定義済み形状描画メソッドの残りの部分も、アンチエイリアス描画メソッドを使用します。ただし、透明度を変更したときにどのように見えるかはまだテストしていません。これらのメソッドにも視覚的なアーティファクトがある場合は、まったく同じ方法で改良します。
グレアオブジェクトは別個の分離したタイプ(影オブジェクトのような)ではなく、補助的なWinFormsオブジェクトのリストに属しているため、このオブジェクトのクラスファイルをパネルオブジェクトのクラスファイルにインクルードする必要があります。.このオブジェクトは、すべてのWinFormsライブラリオブジェクトのファイルが接続されるコンテナオブジェクトです。
\MQL5\Include\DoEasy\Objects\Graph\WForms\WinFormBase.mqhファイルから、グレアオブジェクトクラスの接続文字列を削除します。
//+------------------------------------------------------------------+
//|                                                  WinFormBase.mqh |
//|                                  Copyright 2022, MetaQuotes Ltd. |
//|                             https://mql5.com/ja/users/artmedia70 |
//+------------------------------------------------------------------+
#property copyright "Copyright 2022, MetaQuotes Ltd."
#property link      "https://mql5.com/ja/users/artmedia70"
#property version   "1.00"
#property strict    // Necessary for mql4
//+-----------------------------------------------+
//| Include files                                 |
//+-----------------------------------------------+
#include "GlareObj.mqh"
#include "..\Form.mqh"
#include "..\..\..\Services\Select.mqh"
//+------------------------------------------------------------------+
パネルオブジェクトクラスの\MQL5\Include\DoEasy\Objects\Graph\WForms\Containers\Panel.mqhにグレアオブジェクトクラスファイルをインクルードします。
//+------------------------------------------------------------------+
//|                                                        Panel.mqh |
//|                                  Copyright 2022, MetaQuotes Ltd. |
//|                             https://mql5.com/ja/users/artmedia70 |
//+------------------------------------------------------------------+
#property copyright "Copyright 2022, MetaQuotes Ltd."
#property link      "https://mql5.com/ja/users/artmedia70"
#property version   "1.00"
#property strict    // Necessary for mql4
//+-----------------------------------------------+
//| Include files                                 |
//+-----------------------------------------------+
#include "Container.mqh"
#include "..\Helpers\TabField.mqh"
#include "..\Helpers\ArrowUpButton.mqh"
#include "..\Helpers\ArrowDownButton.mqh"
#include "..\Helpers\ArrowLeftButton.mqh"
#include "..\Helpers\ArrowRightButton.mqh"
#include "..\Helpers\ArrowUpDownBox.mqh"
#include "..\Helpers\ArrowLeftRightBox.mqh"
#include "..\Helpers\HintMoveLeft.mqh"
#include "..\Helpers\HintMoveRight.mqh"
#include "..\Helpers\HintMoveUp.mqh"
#include "..\Helpers\HintMoveDown.mqh"
#include "GroupBox.mqh"
#include "TabControl.mqh"
#include "SplitContainer.mqh"
#include "..\..\WForms\Common Controls\ListBox.mqh"
#include "..\..\WForms\Common Controls\CheckedListBox.mqh"
#include "..\..\WForms\Common Controls\ButtonListBox.mqh"
#include "..\..\WForms\Common Controls\ToolTip.mqh"
#include "..\..\WForms\Common Controls\ProgressBar.mqh"
#include "..\..\WForms\GlareObj.mqh"
//+-----------------------------------------------+
//| Panel object class of WForms controls         |
//+-----------------------------------------------+
class CPanel : public CContainer
これで、すべてのコンテナオブジェクトでグレアオブジェクトを使用できるようになり、そこから作成して、ライブラリの他のグラフィカル要素にある接続されたオブジェクトのリストに含めることができます。独立したGUIウィンドウはアプリオリにコンテナであるため、このウィンドウに接続された任意のコントロールにグレアオブジェクト(および視覚効果オブジェクト)を追加できます。
コンテナオブジェクトクラスの\MQL5\Include\DoEasy\Objects\Graph\WForms\Containers\Container.mqhファイルにある、バインドされたオブジェクトのパラメータを設定するメソッドで、新しい作成された区切りオブジェクトのパラメータを設定する新しいコードブロックを追加します。
//+-----------------------------------------------+
//| Set parameters for the attached object        |
//+-----------------------------------------------+
void CContainer::SetObjParams(CWinFormBase *obj,const color colour)
  {
//--- Set the text color of the object to be the same as that of the base container
   obj.SetForeColor(this.ForeColor(),true);
//--- If the created object is not a container, set the same group for it as the one for its base object
   if(obj.TypeGraphElement()<GRAPH_ELEMENT_TYPE_WF_CONTAINER || obj.TypeGraphElement()>GRAPH_ELEMENT_TYPE_WF_SPLIT_CONTAINER)
      obj.SetGroup(this.Group());
//--- Depending on the object type
   switch(obj.TypeGraphElement())
     {
      //--- For the Container, Panel and GroupBox WinForms objects
      case GRAPH_ELEMENT_TYPE_WF_CONTAINER            :
      case GRAPH_ELEMENT_TYPE_WF_PANEL                :
      case GRAPH_ELEMENT_TYPE_WF_GROUPBOX             :
        obj.SetBorderColor(obj.BackgroundColor(),true);
        break;
      //--- For "Label", "CheckBox" and "RadioButton" WinForms objects

      //---...
      //---...

      //--- For ProgressBar WinForms object
      case GRAPH_ELEMENT_TYPE_WF_PROGRESS_BAR         :
        obj.SetBackgroundColor(CLR_DEF_CONTROL_PROGRESS_BAR_BACK_COLOR,true);
        obj.SetBorderColor(CLR_DEF_CONTROL_PROGRESS_BAR_BORDER_COLOR,true);
        obj.SetForeColor(CLR_DEF_CONTROL_PROGRESS_BAR_FORE_COLOR,true);
        obj.SetBorderStyle(FRAME_STYLE_SIMPLE);
        break;
      //--- For "GlareObj" WinForms object
      case GRAPH_ELEMENT_TYPE_WF_GLARE_OBJ            :
        obj.SetBackgroundColor(CLR_CANV_NULL,true);
        obj.SetBorderColor(CLR_CANV_NULL,true);
        obj.SetForeColor(CLR_CANV_NULL,true);
        obj.SetBorderStyle(FRAME_STYLE_NONE);
        break;
      default:
        break;
     }
   obj.Crop();
  }
//+------------------------------------------------------------------+
コンテナに接続されたグラフィカルコントロールを作成した後、このメソッドが呼び出され、オブジェクトが適切に機能するための最小限のプロパティが設定されます。
\MQL5\Include\DoEasy\Objects\Graph\WForms\GlareObj.mqhでグレアオブジェクトクラスを完成させましょう。
これで、クラスは基本WinFormsオブジェクトのクラスを派生させます。そのファイルをグレアオブジェクトクラスファイルにインクルードしして、親クラスを変更します。
//+------------------------------------------------------------------+
//|                                                     GlareObj.mqh |
//|                                  Copyright 2022, MetaQuotes Ltd. |
//|                             https://mql5.com/ja/users/artmedia70 |
//+------------------------------------------------------------------+
#property copyright "Copyright 2022, MetaQuotes Ltd."
#property link      "https://mql5.com/ja/users/artmedia70"
#property version   "1.00"
#property strict    // Necessary for mql4
//+-----------------------------------------------+
//| Include files                                 |
//+-----------------------------------------------+
#include "WinFormBase.mqh"
//+-----------------------------------------------+
//| Glare object class                            |
//+-----------------------------------------------+
class CGlareObj : public CWinFormBase
  {
   //---...
privateセクションでグレアスタイルを格納するための変数を宣言し、さらに別のものを宣言してグレア描画メソッドを変更します。
class CGlareObj : public CWinFormBase
  {
private:
   ENUM_CANV_ELEMENT_VISUAL_EFF_STYLE m_style;        // Glare style
   color             m_color;                         // Glare color
   uchar             m_opacity;                       // Glare opacity
   uchar             m_blur;                          // Blur
//--- Draw the object glare form
   void              DrawGlareFigure(void);
   void              DrawFigureRectangle(void);
   void              DrawFigureParallelogram(void);
protected:
グレアスタイルは、それを描画するためにどのメソッドを呼び出す必要があるかを決定します。DrawGlareFigure()メソッドは、指定されたスタイルに対応する描画メソッドを呼び出します。グレア描画メソッドには仮パラメータはありません。事前定義されたサイズのグラフィック要素で画像を正しくレンダリングするために指定するものはまだありません。描画されるグレアの色と不透明度は、適切なメソッドによって事前に設定されます。ぼかしはまだ使用されません。
クラスのpublicセクションで、グレアの描画、再描画、不透明度の設定、プロパティの初期化のメソッドを宣言し、いくつかのオブジェクトプロパティの設定と取得のメソッドを実装します。
public:
//--- Constructor indicating the main and base objects, chart ID and subwindow
                     CGlareObj(CGCnvElement *main_obj,CGCnvElement *base_obj,
                               const long chart_id,
                               const int subwindow,
                               const string descript,
                               const int x,
                               const int y,
                               const int w,
                               const int h);

//--- Supported object properties (1) integer, (2) real and (3) string ones
   virtual bool      SupportProperty(ENUM_CANV_ELEMENT_PROP_INTEGER property) { return true; }
   virtual bool      SupportProperty(ENUM_CANV_ELEMENT_PROP_DOUBLE property)  { return true; }
   virtual bool      SupportProperty(ENUM_CANV_ELEMENT_PROP_STRING property)  { return true; }

//--- Draw the object glare
   void              Draw(void);
//--- Redraw the object
   virtual void      Redraw(bool redraw);
//--- Set the element opacity
   virtual void      SetOpacity(const uchar value,const bool redraw=false);
//--- Initialize the properties
   void              Initialize(void);

//+------------------------------------------------------------------+
//| Methods of simplified access to object properties                |
//+------------------------------------------------------------------+
//--- (1) Set and (2) return the glare color
   void              SetColor(const color colour)                             { this.m_color=colour;     }
   color             Color(void)                                        const { return this.m_color;     }
//--- (1) Set and (2) return the opacity of the drawn glare
   void              SetOpacityDraw(const uchar opacity)                      { this.m_opacity=opacity;  }
   uchar             OpacityDraw(void)                                  const { return this.m_opacity;   }
//--- (1) Set and (2) return the glare blur
   void              SetBlur(const uchar blur)                                { this.m_blur=blur;        }
   uchar             Blur(void)                                         const { return this.m_blur;      }
//--- (1) Set and (2) return the glare visual effect
   void              SetVisualEffectStyle(const ENUM_CANV_ELEMENT_VISUAL_EFF_STYLE style)
                       { this.m_style=style;                                                             }
   ENUM_CANV_ELEMENT_VISUAL_EFF_STYLE VisualEffectStyle(void)           const { return this.m_style;     }
//--- Set the glare visual effect style as (1) rectangle and (2) parallelogram
   void              SetStyleRectangle(void)
                       { this.SetVisualEffectStyle(CANV_ELEMENT_VISUAL_EFF_STYLE_RECTANGLE);             }
   void              SetStyleParallelogramm(void)
                       { this.SetVisualEffectStyle(CANV_ELEMENT_VISUAL_EFF_STYLE_PARALLELOGRAMM);        }
  };
//+------------------------------------------------------------------+
オブジェクトプロパティへのアクセスを簡素化するためのメソッドのブロックは、メソッドに渡される値がprivate変数に設定され、これらの変数からの値が返されるメソッドを備えています。
クラスコンストラクタで、CShadowObj親クラスの初期化をCWinFormBaseに置き換え、変数初期化メソッドの呼び出しを追加します。
//+-----------------------------------------------+
//| Protected constructor with an object type,    |
//| chart ID and subwindow                        |
//+-----------------------------------------------+
CGlareObj::CGlareObj(const ENUM_GRAPH_ELEMENT_TYPE type,
                     CGCnvElement *main_obj,CGCnvElement *base_obj,
                     const long chart_id,
                     const int subwindow,
                     const string descript,
                     const int x,
                     const int y,
                     const int w,
                     const int h) : CWinFormBase(type,main_obj,base_obj,chart_id,subwindow,descript,x-OUTER_AREA_SIZE,y-OUTER_AREA_SIZE,w+OUTER_AREA_SIZE*2,h+OUTER_AREA_SIZE*2)
  {
//--- Set the specified graphical element type for the object and assign the library object type to the current object
   this.SetTypeElement(type);
   this.m_type=OBJECT_DE_TYPE_GGLARE;
   this.Initialize();
  }
//+------------------------------------------------------------------+
//| Constructor indicating the main and base objects,                |
//| chart ID and subwindow                                           |
//+------------------------------------------------------------------+
CGlareObj::CGlareObj(CGCnvElement *main_obj,CGCnvElement *base_obj,
                     const long chart_id,
                     const int subwindow,
                     const string descript,
                     const int x,
                     const int y,
                     const int w,
                     const int h) : CWinFormBase(GRAPH_ELEMENT_TYPE_WF_GLARE_OBJ,main_obj,base_obj,chart_id,subwindow,descript,x,y,w,h)
  {
   this.m_type=OBJECT_DE_TYPE_GGLARE;
   this.Initialize();
  }
//+------------------------------------------------------------------+
ここで、各コンストラクタに各変数の初期化文字列を書き込む代わりに(両方のコンストラクタで同じ)、オブジェクトプロパティの初期化メソッドを呼び出すだけです。
//+-----------------------------------------------+
//| Initialize the properties                     |
//+-----------------------------------------------+
void CGlareObj::Initialize(void)
  {
   CGCnvElement::SetBackgroundColor(CLR_CANV_NULL,true);
   CGCnvElement::SetActive(false);
   this.SetBlur(4);
   this.SetColor(clrWhite);
   this.SetOpacity(127);
   this.m_shadow=false;
   this.SetVisibleFlag(false,false);
   this.SetVisualEffectStyle(CANV_ELEMENT_VISUAL_EFF_STYLE_RECTANGLE);
   this.SetDisplayState(CANV_ELEMENT_DISPLAY_STATE_NORMAL);
   this.SetDisplayed(false);
  }
//+------------------------------------------------------------------+
このメソッドは、オブジェクトプロパティのデフォルト値を設定します。ぼかしは4に設定され、ぼかしの色は白です。不透明度は127に設定されています。これは半透明のオブジェクトで、影はありません。オブジェクトの非表示フラグを設定します。視覚効果のタイプは長方形のグレアです。表示フラグがリセットされている間、表示状態は通常(オブジェクトは非表示)です。オブジェクトは、表示された親オブジェクトに表示されるべきではありません。
以下は、要素の不透明度を設定するメソッドです。
//+-----------------------------------------------+
//| Set the element opacity                       |
//+-----------------------------------------------+
void CGlareObj::SetOpacity(const uchar value,const bool redraw=false)
  {
   CGCnvElement::SetOpacity(0,false);
   this.SetOpacityDraw(value>(uchar)CLR_DEF_SHADOW_OPACITY ? (uchar)CLR_DEF_SHADOW_OPACITY : value);
   this.m_canvas.Update(redraw);
  }
//+------------------------------------------------------------------+
このメソッドは、同名の影オブジェクトメソッドと同じです。ここでは、グレアが描画されるアンダーレイに完全な透明度が設定され、メソッドに渡される値はグレアの色に設定されます。メソッドに渡された不透明度の値がデフォルトの影の不透明度の値より大きい場合は、デフォルト値が使用されます。それ以外の場合は、メソッドに渡された値が適用されます。これは、オブジェクトが完全に不透明にならないようにするためです。これらの目的には非常に適しているため、影にはデフォルト値を使用します。
以下はグレア描画メソッドです。
//+-----------------------------------------------+
//| Draw the object glare                         |
//+-----------------------------------------------+
void CGlareObj::Draw(void)
  {
   if(!this.IsVisible())
      return;
//--- Draw the glare
   this.DrawGlareFigure();
  }
//+------------------------------------------------------------------+
オブジェクトが非表示の場合、何も描画されません。メソッドを終了します。
次に、描画メソッドが設定されているメソッドを呼び出します。
//+-----------------------------------------------+
//| Draw the object glare form                    |
//+-----------------------------------------------+
void CGlareObj::DrawGlareFigure()
  {
   switch(this.VisualEffectStyle())
     {
      case CANV_ELEMENT_VISUAL_EFF_STYLE_RECTANGLE       : this.DrawFigureRectangle();       break;
      case CANV_ELEMENT_VISUAL_EFF_STYLE_PARALLELOGRAMM  : this.DrawFigureParallelogram();   break;
      default:
        break;
     }
  }
//+------------------------------------------------------------------+
描画されるグレアのタイプに応じて、適切なメソッドを呼び出し、実際にグレアの形状を描画します。
以下は、オブジェクトのグレアの長方形を描画するメソッドです。
//+-----------------------------------------------+
//| Draw the rectangle object glare form          |
//+-----------------------------------------------+
void CGlareObj::DrawFigureRectangle(void)
  {
   CGCnvElement::DrawRectangleFill(0,0,this.Width()-1,this.Height()-1,this.m_color,this.OpacityDraw());
   CGCnvElement::Update();
  }
//+------------------------------------------------------------------+
ここでは、オブジェクトの色と描画の不透明度が設定されたオブジェクトのサイズ全体に塗りつぶされた四角形が描画されます。
以下は、オブジェクトのグレアの形状を平行四辺形の形で描画するメソッドです。
//+------------------------------------------------------------------+
//| Draw the shape of the object glare as a parallelogram            |
//+------------------------------------------------------------------+
void CGlareObj::DrawFigureParallelogram(void)
  {
   int array_x[]={6,this.Width()-1,this.Width()-1-6,0};
   int array_y[]={0,0,this.Height()-1,this.Height()-1};
   CGCnvElement::DrawPolygonFill(array_x,array_y,this.m_color,this.OpacityDraw());
   CGCnvElement::Update();
  }
//+------------------------------------------------------------------+
ここには「歪んだ」三角形が描かれます。最初に、多角形の頂点のX座標とY座標の配列を宣言し、配列で指定された頂点を使用して、歪んだ長方形(オブジェクトに設定された色と描画不透明度を持つ平行四辺形)の形で塗りつぶされた多角形を描画します。
オブジェクトを一度描画してから移動すると、移動したオブジェクトがプログレスバーの境界を超えても、グレアオブジェクトは表示されたままになります(つまり、この場合、オブジェクトはそれに沿って移動します)。視覚的には、グレアがプログレスバーから「ジャンプ」して、ProgressBarコントロールが接続されているパネルに描画されているように見えます。これを回避するには、コンテナを超える部分をトリミングしながら、オブジェクトを再描画する必要があります。これには、オブジェクトの再描画メソッドが必要です。
以下は、オブジェクトを再描画するメソッドです。
//+-----------------------------------------------+
//| Redraw the object                             |
//+-----------------------------------------------+
void CGlareObj::Redraw(bool redraw)
  {
   CGCnvElement::Erase(false);
   this.Draw();
   this.Crop();
   this.Update(redraw);
  }
//+------------------------------------------------------------------+
ここではまず、色と不透明度で塗りつぶされたオブジェクトを完全にクリアします。透明色が背景色として設定されているため、不透明度がゼロの間、オブジェクトは完全に透明になります。次に、インストールされたグレアシェイプを描画する前述のメソッドを呼び出し、オブジェクト領域コンテナの外側にはみ出した領域をトリミングして、キャンバスを更新します。
これで、プログレスバーに沿ってオブジェクトを移動するときにメソッドを呼び出すだけで済み、グレアはコンテナを超えません。
ProgressBarオブジェクトの機能を開発しましょう。
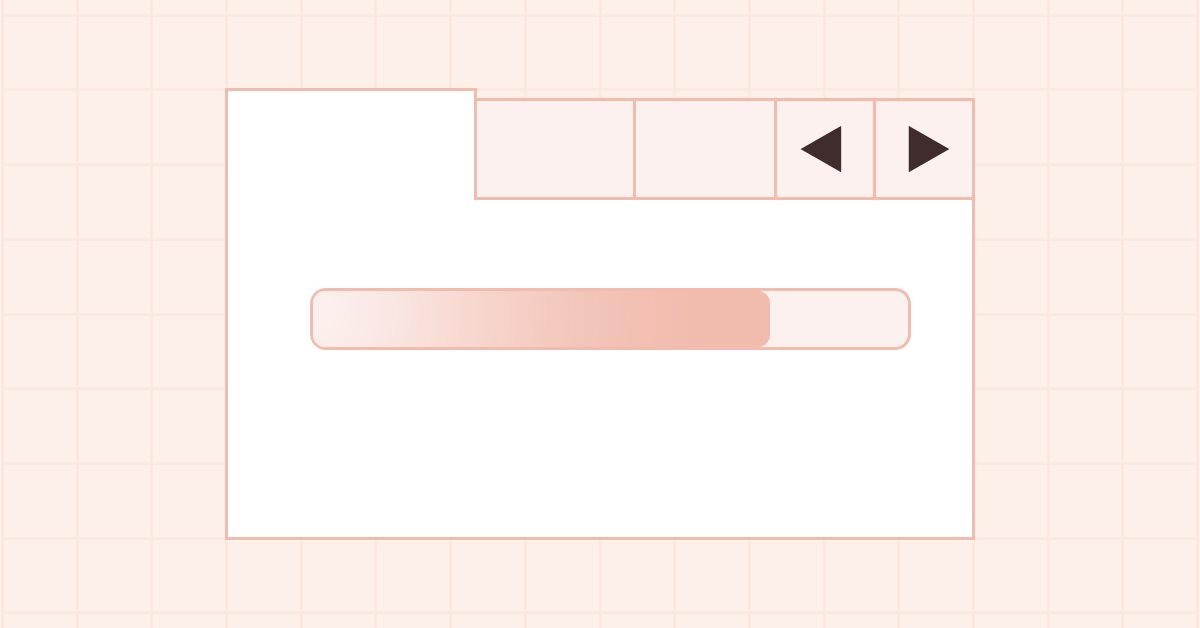
特定のプロセスの進行状況を表示するには、プログレスバーの増加ステップの量だけBarProgressBarオブジェクトの幅を増やす必要があります。一般に、プログレスバーの幅の値はすべて相対的になり、ProgressBarオブジェクトの幅の割合およびプログレスバーのValueパラメータの最大値の割合です。プログレスバーは、MinimumおよびMaximumパラメータで設定された制限内で値を変更できます。ただし、これらの値はピクセル単位ではなく、オブジェクト幅の割合として設定する必要があります。100の値は、ProgressBarが同じ幅の場合は100ピクセル幅になり、ProgressBarが200ピクセル幅の場合は200になります。この場合、値が50で、上記のオブジェクト幅の値の50および100ピクセルの値に対応します。
プログレスバーの値を簡単に制御するために、プロセスを表示する必要があるサイクルの開始前にオブジェクトを使用する前に、制限の最小値と最大値を設定して、プログレスバーの幅の値を増やすステップを設定するようにしましょう。追跡されたサイクルの次のアクションが完了したら、ProgressBarオブジェクトのPerformStep()メソッドを呼び出すだけで、指定された増加ステップに従ってプログレスバーの幅が増加します。したがって、常に次のようにする必要があります。追跡されたループの反復回数を把握して、必要な値をProgressBarオブジェクトに設定し、ループ内で次の反復が完了したら、PerformStep()メソッドを呼び出します。プログレスバーが1ステップずつ変化します。
\MQL5\Include\DoEasy\Objects\Graph\WForms\CommonControls\ProgressBar.mqhのprivateセクションで、プログレスバーの値を格納するための変数とプログレスバーの幅を計算するためのメソッドを宣言します。
//+------------------------------------------------------------------+
//| ArrowLeftRightBox object class of WForms controls                |
//+------------------------------------------------------------------+
class CProgressBar : public CContainer
  {
private:
   int               m_progress_bar_max;  // Maximum progress bar width
   int               m_value_by_max;      // Value relative to Maximum
   int               m_steps_skipped;     // Number of skipped steps of increasing the width of the progress bar
//--- Create a new graphical object
   virtual CGCnvElement *CreateNewGObject(const ENUM_GRAPH_ELEMENT_TYPE type,
                                          const int element_num,
                                          const string descript,
                                          const int x,
                                          const int y,
                                          const int w,
                                          const int h,
                                          const color colour,
                                          const uchar opacity,
                                          const bool movable,
                                          const bool activity);
//--- Create the progress bar object
   void              CreateProgressBar(void);
//--- Calculate the progress bar width
   int               CalculateProgressBarWidth(void);
//--- Initialize the element properties
   void              Initialize(void);

protected:
SetValue()publicメソッドの実装をクラス本体の外に移動し、本体にその宣言のみを残します。
//--- (1) Set and (2) return the progress bar increment to redraw it
   void              SetStep(const int value)
                       {
                        this.SetProperty(CANV_ELEMENT_PROP_PROGRESS_BAR_STEP,value);
                        CBarProgressBar *bar=this.GetProgressBar();
                        if(bar!=NULL)
                           bar.SetStep(value);
                       }
   int               Step(void)                          const { return (int)this.GetProperty(CANV_ELEMENT_PROP_PROGRESS_BAR_STEP);    }

//--- (1) Set and (2) return the current value of the progress bar in the range from Min to Max
   void              SetValue(const int value);
   int               Value(void)                         const { return (int)this.GetProperty(CANV_ELEMENT_PROP_PROGRESS_BAR_VALUE);   }

//--- (1) Set and (2) return the upper bound of the ProgressBar operating range
   void              SetMaximum(const int value)               { this.SetProperty(CANV_ELEMENT_PROP_PROGRESS_BAR_MAXIMUM,value);       }
   int               Maximum(void)                       const { return (int)this.GetProperty(CANV_ELEMENT_PROP_PROGRESS_BAR_MAXIMUM); }
メソッドを他にも宣言します。
//--- Return the pointer to the progress bar object
   CBarProgressBar  *GetProgressBar(void)                { return this.GetElementByType(GRAPH_ELEMENT_TYPE_WF_BAR_PROGRESS_BAR,0);     }

//--- Resets the progress bar values to the set minimum
   void              ResetProgressBar(void)              { this.SetValue(this.Minimum());    }
//--- Set the element width
   virtual bool      SetWidth(const int width);
//--- Initialize values for handling in PerformStep
   void              SetValuesForProcessing(const int minimum,const int maximum,const int step,const int steps_skipped);
//--- Increase the current position of the progress bar by the step value
   void              PerformStep();

//--- Supported object properties (1) integer, (2) real and (3) string ones
   virtual bool      SupportProperty(ENUM_CANV_ELEMENT_PROP_INTEGER property) { return true; }
   virtual bool      SupportProperty(ENUM_CANV_ELEMENT_PROP_DOUBLE property)  { return true; }
   virtual bool      SupportProperty(ENUM_CANV_ELEMENT_PROP_STRING property)  { return true; }
ResetProgressBar()メソッドは、クラスの本体に直接実装され、プログレスバーのValueをMinimumプロパティで設定された値に設定します。これにより、プログレスバーを元の状態に戻すことができます。
デフォルト値の初期化メソッドで、プログレスバーの値をオブジェクト幅の50%に設定し、BarProgressBarオブジェクトの最大幅をピクセル単位で計算し、オブジェクト幅の%単位で値を計算します。
//+-----------------------------------------------+
//| Initialize the element properties             |
//+-----------------------------------------------+
void CProgressBar::Initialize(void)
  {
   this.SetBorderSizeAll(1);
   this.SetBorderStyle(FRAME_STYLE_SIMPLE);
   this.SetBackgroundColor(CLR_DEF_CONTROL_PROGRESS_BAR_BACK_COLOR,true);
   this.SetBorderColor(CLR_DEF_CONTROL_PROGRESS_BAR_BORDER_COLOR,true);
   this.SetForeColor(CLR_DEF_CONTROL_PROGRESS_BAR_FORE_COLOR,true);
   this.SetMarqueeAnimationSpeed(10);
   this.SetMaximum(100);
   this.SetMinimum(0);
   this.SetValue(50);
   this.SetStep(10);
   this.SetStyle(CANV_ELEMENT_PROGRESS_BAR_STYLE_CONTINUOUS);
   this.m_progress_bar_max=this.Width()-this.BorderSizeLeft()-this.BorderSizeRight();
   this.m_value_by_max=this.Value()*100/this.Maximum();
   this.m_steps_skipped=0;
  }
//+------------------------------------------------------------------+
プログレスバーオブジェクトの最大幅は、背景の幅から左右のフレームのサイズを引いた値以下にする必要がありますこうすればプログレスバーは背景に描画されたフレーム内に収まり、それを超えることはありません。
プログレスバーオブジェクトを作成するメソッドで、CalculateProgressBarWidth()メソッドによって計算された値から作成されたオブジェクトの幅を設定し、グレアオブジェクトの作成を追加します。
//+-----------------------------------------------+
//| Create the progress bar object                |
//+-----------------------------------------------+
void CProgressBar::CreateProgressBar(void)
  {
//--- Set the length of the progress bar equal to the object Value()
//--- The height of the progress bar is equal to the height of the object minus the top and bottom frame sizes
   int w=this.CalculateProgressBarWidth();
   int h=this.Height()-this.BorderSizeTop()-this.BorderSizeBottom();
//--- Create the progress bar object
   this.CreateNewElement(GRAPH_ELEMENT_TYPE_WF_BAR_PROGRESS_BAR,0,0,w,h,clrNONE,255,false,false);
//--- Create the glare object
   this.CreateNewElement(GRAPH_ELEMENT_TYPE_WF_GLARE_OBJ,0,0,w,h,CLR_CANV_NULL,0,true,false);
//--- Add the current CProgressBar object to the list of active elements of the collection
   this.AddObjToListActiveElements();
  }
//+------------------------------------------------------------------+
メソッドのロジックは、コードのコメントで説明されています。ここではすべて簡単です。プログレスバーの幅を計算し、計算された幅でオブジェクトを作成します。デフォルトは、ProgressBarオブジェクトの幅の50%です。次に、グレアオブジェクトを作成し、現在のオブジェクトをアクティブなオブジェクトのリストに追加します。アクティブな要素のリスト内のすべてのオブジェクトは、ライブラリタイマーで処理され、これらのオブジェクトのタイマーハンドラに実装されているいくつかの独立したアクションを実行できます。このコントロールでは、タイマーがプログレスバーのグレアの外観を処理します。
以下は、PerformStepで処理する値を初期化するメソッドです。
//+-----------------------------------------------+
//| Initialize values for handling in PerformStep |
//+-----------------------------------------------+
void CProgressBar::SetValuesForProcessing(const int minimum,const int maximum,const int step,const int steps_skipped)
  {
   this.SetMinimum(minimum<0 ? 0 : minimum);
   this.SetMaximum(maximum<this.Minimum() ? this.Minimum() : maximum);
   this.SetStep(step<0 ? 0 : step);
   this.m_steps_skipped=steps_skipped;
  }
//+------------------------------------------------------------------+
ここでは、最小値と最大値の値がメソッドに渡され、値、変更のステップ、およびスキップされたステップの数が変更される可能性があります。次に、最小値、最大値、およびステップの値が正しいかどうかが確認され、スキップされたステップの値が変数に設定されます。プログレスバーの値はProgressBarオブジェクトの幅の割合として計算されるため、スキップされたステップの値は使用されない可能性が高くなります。これは、準備が整った後の一連のオブジェクトテストから明らかです。.現在の実装では、この値はどこにも使用されていません。
以下は、プログレスバーの現在値を設定するメソッドです。
//+-----------------------------------------------+
//| Set the current value of the progress bar     |
//+-----------------------------------------------+
void CProgressBar::SetValue(const int value)
  {
//--- Correct the value passed to the method and set it to the object property
   int v=(value<this.Minimum() ? this.Minimum() : value>this.Maximum() ? this.Maximum() : value);
   this.SetProperty(CANV_ELEMENT_PROP_PROGRESS_BAR_VALUE,v);
//--- Get the progress bar object
   CBarProgressBar *bar=this.GetProgressBar();
   if(bar!=NULL)
     {
      //--- Set 'value' for the progress bar
      bar.SetValue(v);
      //--- Calculate the width of the progress bar object
      int w=this.CalculateProgressBarWidth();
      //--- If the calculated width is greater than the maximum possible value, set the maximum width
      if(w>this.m_progress_bar_max)
         w=this.m_progress_bar_max;
      //--- If the width is less than 1, then
      if(w<1)
        {
         //--- hide the progress bar and redraw the chart to display changes immediately
         bar.Hide();
         ::ChartRedraw(bar.ChartID());
        }
      //--- If the width value is not less than 1
      else
        {
         //--- If the progress bar is hidden, display it and
         if(!bar.IsVisible())
            bar.Show();
         //--- change its size according to the received width
         bar.Resize(w,bar.Height(),true);
        }
     }
  }
//+------------------------------------------------------------------+
メソッドのロジックはコードのコメントで完全に説明されています。オブジェクトの幅を計算するときに、その幅が1ピクセル未満であることが判明した場合、そのような値はオブジェクトに設定できません。したがって、1ピクセルの幅が与えられ、オブジェクトが非表示になるため、幅がゼロのプログレスバーがシミュレートされます。
以下は、プログレスバーの現在の位置をステップ値だけ増やすメソッドです。
//+----------------------------------------------------------------------+
//| Increase the current position of the progress bar by the step value  |
//+----------------------------------------------------------------------+
void CProgressBar::PerformStep(void)
  {
   this.SetValue(this.Value()+this.Step());
  }
//+------------------------------------------------------------------+
ここでは、オブジェクトのValueプロパティを、その過去の値に加えて、この値の増分として以前に指定した値に設定するだけです。したがって、このメソッドが呼び出されるたびに、Valueの値はStepに記録された増分だけ増加します。
以下は、プログレスバーの幅を計算するメソッドです。
//+-----------------------------------------------+
//| Calculate the width of the progress bar       |
//+-----------------------------------------------+
int CProgressBar::CalculateProgressBarWidth(void)

  {
   this.m_value_by_max=this.Value()*100/this.Maximum();
   return this.m_progress_bar_max*this.m_value_by_max/100;
  }
//+------------------------------------------------------------------+
ここでは、まず値を可能な最大値の割合として計算してから、プログレスバーの最大幅の相対的な幅を上で計算した値の割合として返します。
以下は、新しいオブジェクトの幅を設定するメソッドです。
//+-----------------------------------------------+
//| Set a new width                               |
//+-----------------------------------------------+
bool CProgressBar::SetWidth(const int width)
  {
   if(!CGCnvElement::SetWidth(width))
      return false;
   this.m_progress_bar_max=this.Width()-this.BorderSizeLeft()-this.BorderSizeRight();
   CBarProgressBar *bar=this.GetProgressBar();
   if(bar==NULL)
      return false;
   int w=this.CalculateProgressBarWidth();
   bar.SetWidth(w);
   return true;
  }
//+------------------------------------------------------------------+
ここでは、まず新しいアンダーレイの幅を設定してから、プログレスバーの最大幅をピクセル単位で計算します。
次に、プログレスバーの相対的な幅を%で取得し、それをCBarProgressBarオブジェクトに設定します。
プログレスバーに表示されるすべての視覚効果は、BarProgressBarオブジェクトのタイマーで処理する必要があります。グレアは、一時停止した後、プログレスバーに沿って実行する必要があります(一時停止 - グレア - 一時停止 - グレア、など)。この動作を実装するには、オブジェクトが既に持っているプロパティにいくつかの値を設定する必要があります。このようなプロパティを設定して、以前の記事でツールチップを滑らかに表示/非表示するような実装をおこないました。これらのプロパティは、グレアオブジェクトにも適しています。
プログレスバーオブジェクトクラスの\MQL5\Include\DoEasy\Objects\Graph\WForms\Helpers\BarProgressBar.mqhファイルにグレアオブジェクトファイルをインクルードします。privateセクションで、遅延を設定するメソッドと返すメソッドを記述し、オブジェクトプロパティを初期化するメソッドを宣言します。
//+------------------------------------------------------------------+
//|                                               BarProgressBar.mqh |
//|                                  Copyright 2022, MetaQuotes Ltd. |
//|                             https://mql5.com/ja/users/artmedia70 |
//+------------------------------------------------------------------+
#property copyright "Copyright 2022, MetaQuotes Ltd."
#property link      "https://mql5.com/ja/users/artmedia70"
#property version   "1.00"
#property strict    // Necessary for mql4
//+-----------------------------------------------+
//| Include files                                 |
//+-----------------------------------------------+
#include "..\WinFormBase.mqh"
#include "..\GlareObj.mqh"
//+------------------------------------------------------------------+
//| BarProgressBar object class of the ProgressBar control           |
//+------------------------------------------------------------------+
class CBarProgressBar : public CWinFormBase
  {
private:
//--- (1) Set and (2) return a pause before displaying the effect
   void              SetShowDelay(const long delay)               { this.SetProperty(CANV_ELEMENT_PROP_TOOLTIP_RESHOW_DELAY,delay);             }
   ulong             ShowDelay(void)                              { return this.GetProperty(CANV_ELEMENT_PROP_TOOLTIP_RESHOW_DELAY);            }
//--- Initialize the properties
   void              Initialize(void);
protected:
両方のクラスコンストラクタで、同様のプロパティ設定文字列の代わりに、プロパティを設定するメソッドの呼び出しを実装します。
//+------------------------------------------------------------------+
//| Protected constructor with an object type,                       |
//| chart ID and subwindow                                           |
//+------------------------------------------------------------------+
CBarProgressBar::CBarProgressBar(const ENUM_GRAPH_ELEMENT_TYPE type,
                                 CGCnvElement *main_obj,CGCnvElement *base_obj,
                                 const long chart_id,
                                 const int subwindow,
                                 const string descript,
                                 const int x,
                                 const int y,
                                 const int w,
                                 const int h) : CWinFormBase(type,main_obj,base_obj,chart_id,subwindow,descript,x,y,w,h)
  {
//--- Set the specified graphical element type for the object and assign the library object type to the current object
   this.SetTypeElement(type);
   this.m_type=OBJECT_DE_TYPE_GWF_HELPER;
   this.Initialize();
  }
//+------------------------------------------------------------------+
//| Constructor indicating the main and base objects,                |
//| chart ID and subwindow                                           |
//+------------------------------------------------------------------+
CBarProgressBar::CBarProgressBar(CGCnvElement *main_obj,CGCnvElement *base_obj,
                                 const long chart_id,
                                 const int subwindow,
                                 const string descript,
                                 const int x,
                                 const int y,
                                 const int w,
                                 const int h) : CWinFormBase(GRAPH_ELEMENT_TYPE_WF_BAR_PROGRESS_BAR,main_obj,base_obj,chart_id,subwindow,descript,x,y,w,h)
  {
   this.SetTypeElement(GRAPH_ELEMENT_TYPE_WF_BAR_PROGRESS_BAR);
   this.m_type=OBJECT_DE_TYPE_GWF_HELPER;
   this.Initialize();
  }
//+------------------------------------------------------------------+
コンストラクタから削除されたプロパティ初期化文字列を初期化メソッドに移動します。
//+-----------------------------------------------+
//| Initialize the properties                     |
//+-----------------------------------------------+
void CBarProgressBar::Initialize(void)
  {
   this.SetPaddingAll(0);
   this.SetMarginAll(0);
   this.SetBorderSizeAll(0);
   this.SetBackgroundColor(CLR_DEF_CONTROL_PROGRESS_BAR_BAR_COLOR,true);
   this.SetBorderColor(CLR_DEF_CONTROL_PROGRESS_BAR_BAR_COLOR,true);
   this.SetForeColor(CLR_DEF_CONTROL_PROGRESS_BAR_FORE_COLOR,true);
   this.SetShowDelay(2000);
  }
//+------------------------------------------------------------------+
移動された文字列に加えて、ここではプログレスバーのグレアの間に2秒間の一時停止を実装しました。
以前は、オブジェクトタイマーで、GetTickCount()関数からの値をコメントでチャートに単純に送信していました。
それでは、本格的なハンドラを書きましょう。
以下は、タイマーのイベントハンドラです。
//+-----------------------------------------------+
//| Timer                                         |
//+-----------------------------------------------+
void CBarProgressBar::OnTimer(void)
  {
   CWinFormBase *base=this.GetBase();
   if(base==NULL)
      return;
   CWinFormBase *glare=base.GetElementByType(GRAPH_ELEMENT_TYPE_WF_GLARE_OBJ,0);
   if(glare==NULL)
      return;

//--- If the object is in the normal state (hidden)
   if(glare.DisplayState()==CANV_ELEMENT_DISPLAY_STATE_NORMAL)
     {
      //--- set the state of waiting for fading in to the object (in our case, waiting for a shift along the progress bar),
      //--- set the waiting duration and set the countdown time
      glare.SetDisplayState(CANV_ELEMENT_DISPLAY_STATE_WAITING_FADE_IN);
      this.m_pause.SetWaitingMSC(this.ShowDelay());
      this.m_pause.SetTimeBegin();
      //--- If the right edge of the glare object is to the right of the left edge of the progress bar object
      if(glare.RightEdge()>=this.CoordX())
        {
         //--- Hide the glare object and move it beyond the right edge of the progress bar
         glare.Hide();
         if(glare.Move(this.CoordX()-glare.Width(),this.CoordY()))
           {
            //--- Set the relative coordinates of the glare object
            glare.SetCoordXRelative(glare.CoordX()-this.CoordX());
            glare.SetCoordYRelative(glare.CoordY()-this.CoordY());
            //--- and its visibility scope equal to the entire object
            glare.SetVisibleArea(0,0,glare.Width(),glare.Height());
           }
        }
      return;
     }
//--- If the object is in the state of waiting for fading in (in our case, waiting for a shift along the progress bar)
   if(glare.DisplayState()==CANV_ELEMENT_DISPLAY_STATE_WAITING_FADE_IN)
     {
      //--- If the waiting time has not yet passed, leave
      if(this.m_pause.Passed()<this.ShowDelay())
         return;
      //--- Set the state of the object being in the process of shifting along the progress bar and
      //---  set the process start countdown time
      glare.SetDisplayState(CANV_ELEMENT_DISPLAY_STATE_PROCESS_FADE_IN);
      this.m_pause.SetTimeBegin();
      return;
     }
//--- If the object is in the state of a shift along the progress bar
   if(glare.DisplayState()==CANV_ELEMENT_DISPLAY_STATE_PROCESS_FADE_IN)
     {
      //--- If the glare object X coordinate still has not gone beyond the right edge of the progress bar
      if(glare.CoordX()<=this.RightEdge())
        {
         //--- set the display flag and show the object
         if(!glare.Displayed())
            glare.SetDisplayed(true);
         if(!glare.IsVisible())
            glare.Show();
         //--- bring the highlight object to the foreground
         glare.BringToTop();
         //--- Shift the highlight by 16 pixels to the right
         if(glare.Move(glare.CoordX()+16,this.CoordY()))
           {
            //--- Set the relative coordinates of the highlight object and redraw it
            glare.SetCoordXRelative(glare.CoordX()-this.CoordX());
            glare.SetCoordYRelative(glare.CoordY()-this.CoordY());
            glare.Redraw(true);
           }
         return;
        }
      //--- Set the completion state of the shift along the progress bar
      glare.SetDisplayState(CANV_ELEMENT_DISPLAY_STATE_COMPLETED_FADE_IN);
     }
//--- If the object is in the state of completion of shifting along the progress bar
   if(glare.DisplayState()==CANV_ELEMENT_DISPLAY_STATE_COMPLETED_FADE_IN)
     {
      //--- set the object to its normal state (invisible),
      //--- hide the object and set its invisibility flag
      glare.SetDisplayState(CANV_ELEMENT_DISPLAY_STATE_NORMAL);
      glare.Hide();
      glare.SetDisplayed(false);
      return;
     }
  }
//+------------------------------------------------------------------+
メソッドのロジックは、コードのコメントで詳しく説明されており、前回の記事でツールチップオブジェクト用に実装したタイマーイベントハンドラと同じです。これは、よりトリミングされたバージョンです。ツールチップオブジェクトでは、オブジェクトが表示されるのを待ち(ここでも)、次にオブジェクトがフェードインし(ここではプログレスバーに沿って実行)、フェードアウトしてフェードアウトするのを待ちます(現在のケースではおこないません)。それが全体の違いです。しかし、まぶしさを表示してプログレスバーに沿って実行するには、ツールチップオブジェクトと同じENUM_CANV_ELEMENT_DISPLAY_STATE列挙値を使用します。
//+-----------------------------------------------+
//| List of control display states                |
//+-----------------------------------------------+
enum ENUM_CANV_ELEMENT_DISPLAY_STATE
  {
   CANV_ELEMENT_DISPLAY_STATE_NORMAL,                 // Normal
   CANV_ELEMENT_DISPLAY_STATE_WAITING_FADE_IN,        // Wait for fading in
   CANV_ELEMENT_DISPLAY_STATE_PROCESS_FADE_IN,        // Fading in
   CANV_ELEMENT_DISPLAY_STATE_COMPLETED_FADE_IN,      // Fading in end
   CANV_ELEMENT_DISPLAY_STATE_WAITING_FADE_OUT,       // Wait for fading out
   CANV_ELEMENT_DISPLAY_STATE_PROCESS_FADE_OUT,       // Fading out
   CANV_ELEMENT_DISPLAY_STATE_COMPLETED_FADE_OUT,     // Fading out end
   CANV_ELEMENT_DISPLAY_STATE_COMPLETED,              // Complete processing
  };
//+------------------------------------------------------------------+
この列挙型の定数は、さまざまなオブジェクトのさまざまなイベントを処理するために使用できるほど普遍的です。必要に応じて、さらに発生する可能性のあるイベントを記述した定数をこのリストに追加できます。
すべてをテストする準備ができました。
検証
テストを実行するには、前の記事のEAを\MQL5\Experts\TestDoEasy\Part127\でTestDoEasy127.mq5として保存します。
TabControlの最初のタブにあるSplitContainerコントロールの2番目のバーに静的なProgressBarオブジェクトを作成しました。ここで、ProgressBarオブジェクトへのポインタを取得し、まずループ内でそのサイズを大きくして、ProgressBar幅の50%に設定されたプログレスバーの相対的なサイズがどのように変化するかを視覚的に確認する必要があります。次に、ループ内で、PerformStepメソッドを使用してプログレスバーの値を増やします。メソッドを機能させるには、事前に必要なパラメータを設定します(minimum = 0、maximum = 350,、step = 1.)。両方のループが完了したら、グレアオブジェクトへのポインタを取得し、その表示パラメータを設定します。
これらすべてを実装するには、OnInit()ハンドラの最後に次のコードブロックを設定します。:
//--- Display and redraw all created panels
   for(int i=0;i<FORMS_TOTAL;i++)
     {
      //--- Get the panel object
      pnl=engine.GetWFPanel("WinForms Panel"+(string)i);
      if(pnl!=NULL)
        {
         //--- display and redraw the panel
         pnl.Show();
         pnl.Redraw(true);
         //--- Get the TabControl object from the panel
         CTabControl *tc=pnl.GetElementByType(GRAPH_ELEMENT_TYPE_WF_TAB_CONTROL,0);
         //--- Get the SplitContainer object from the first tab of the TabControl object
         CSplitContainer *sc=tc.GetTabElementByType(0,GRAPH_ELEMENT_TYPE_WF_SPLIT_CONTAINER,0);
         //--- Get the second panel from the SplitContainer object
         CSplitContainerPanel *scp=sc.GetPanel(1);
         //--- Get the ProgressBar object from the received panel
         CProgressBar *pb=scp.GetElementByType(GRAPH_ELEMENT_TYPE_WF_PROGRESS_BAR,0);
         //--- Wait for 1/10 of a second
         Sleep(100);
         //--- Get the width of the ProgressBar object
         int w=pb.Width();
         //--- In the loop, increase the width of the ProgressBar by 180 pixels with a delay of 1/50
         for(int n=0;n<180;n++)
           {
            Sleep(20);
            pb.Resize(w+n,pb.Height(),true);
           }
         //--- Set the values for PerformStep of the ProgressBar object
         pb.SetValuesForProcessing(0,350,1,0);
         //--- Reset ProgressBar to minimum
         pb.ResetProgressBar();
         //--- Wait for 1/5 second
         Sleep(200);
         //--- In the loop from the minimum to the maximum value of ProgressBar
         for(int n=0;n<=pb.Maximum();n++)
           {
            //--- call the method for increasing the progress bar by a given step with a wait of 1/5 second
            pb.PerformStep();
            Sleep(20);
           }
         //--- Get the glare object
         CGlareObj *gl=pb.GetElementByType(GRAPH_ELEMENT_TYPE_WF_GLARE_OBJ,0);
         if(gl!=NULL)
           {
            //--- Set the glare type - rectangle, opacity 40, color - white
            gl.SetStyleRectangle();
            gl.SetOpacity(40);
            gl.SetColor(clrWhite);
           }
        }
     }

//---
   return(INIT_SUCCEEDED);
  }
//+------------------------------------------------------------------+
チャート上でEAをコンパイルして起動します。
最初のループでは、ProgressBarオブジェクトの幅がどのように増加するかを確認し、プログレスバーの幅もそれに比例して増加します。同時に、Valueは最初は50に設定されており、プログレスバーの幅が相対値で設定されているため、そのままです。
2番目のループでは、PerformStepメソッドを毎回呼び出します。このメソッドは、各ステップで(相対)Valueを増加ステップの値だけ増加します。350の増分がありますが、プログレスバーが一度に1ピクセル以上増加していることがわかります。これは、すべての値が相対的であり、ProgressBarの幅の割合として計算されるためです。各ステップで1ピクセル増加することは不可能であるため、これは正しいことです。ProgressBarの幅が100ピクセルで、ステップ数が1000の場合、1ピクセルあたり10の増加ステップがあります。相対値を計算するときはスキップされます。
プログレスバーの増加ループが完了すると、2秒ごとにグレアが発生します。デモにはこれで十分です。しかし、これは通常の外観には不十分です。まず、グレアは、完了したものではなく、移動するプログレスバーに沿って実行する必要があります。次に、「効果」が単純すぎることが判明しました。これらすべては徐々に改善していきます。
ツールチップオブジェクトのアイコンが正常にフェードアウトするようになりました。
次の段階
次回の記事では、引き続きWinFormsライブラリオブジェクトとProgressBarオブジェクトに取り組みます。
連載のこれまでの記事
DoEasy-コントロール(第20部):SplitContainerWinFormsオブジェクト
DoEasy-コントロール(第21部):SplitContainerコントロール。パネル区切り
DoEasy-コントロール(第22部):SplitContainer。作成したオブジェクトのプロパティを変更する
DoEasy-コントロール(第23部):TabControlとSplitContainerのWinFormsオブジェクトの改善
DoEasy-コントロール(第24部):ヒント補助WinFormsオブジェクト
DoEasy-コントロール(第25部):TooltipWinFormsオブジェクト
DoEasy - コントロール(第26部):ToolTipWinFormsオブジェクトの最終確認とProgressBarの開発開始スムーズ
MetaQuotes Ltdによってロシア語から翻訳されました。
元の記事: https://www.mql5.com/ru/articles/11764
警告: これらの資料についてのすべての権利はMetaQuotes Ltd.が保有しています。これらの資料の全部または一部の複製や再プリントは禁じられています。
この記事はサイトのユーザーによって執筆されたものであり、著者の個人的な見解を反映しています。MetaQuotes Ltdは、提示された情報の正確性や、記載されているソリューション、戦略、または推奨事項の使用によって生じたいかなる結果についても責任を負いません。

- 無料取引アプリ
- 8千を超えるシグナルをコピー
- 金融ニュースで金融マーケットを探索