
Implementing indicator calculations into an Expert Advisor code

Contents
- Introduction
- 1. Code relocation principles
- 2. Creating the indicator calculation class
- 3. Example of adding an indicator class into an EA
- 4. "Cost" of using a relocated indicator
- Conclusion
Introduction
When programmers create an EA receiving signals from indicators, they should always decide on whether to use a reference to the indicator or relocate the indicator code to the EA? Reasons may vary. Programmers might want to keep applied indicators and the whole strategy in secret, distribute the EA as a single file, reduce the number of performed operations in case not all indicator signals/buffers are used, etc. Of course, I am not the first and, I believe, not the last one to ask this question. Nikolay Kositsin already considered a similar topic for MetaTrader 4. Let's see how this can be achieved on the MetaTrader 5 platform.
1. Code relocation principles
Before we get to work, let's figure out the differences between the work of indicators and EAs. Consider an empty indicator template.
//+------------------------------------------------------------------+
//|                                                        Blanc.mq5 |
//|                                             Copyright 2018, DNG® |
//|                                 http://www.mql5.com/ru/users/dng |
//+------------------------------------------------------------------+
#property copyright "Copyright 2018, DNG®"
#property link      "http://www.mql5.com/ru/users/dng"
#property version   "1.00"
#property indicator_chart_window
#property indicator_buffers 1
#property indicator_plots   1
//--- plot Buffer
#property indicator_label1  "Buffer"
#property indicator_type1   DRAW_LINE
#property indicator_color1  clrRed
#property indicator_style1  STYLE_SOLID
#property indicator_width1  1
//--- indicator buffers
double         BufferBuffer[];
//+------------------------------------------------------------------+
//| Custom indicator initialization function                         |
//+------------------------------------------------------------------+
int OnInit()
  {
//--- indicator buffers mapping
   SetIndexBuffer(0,BufferBuffer,INDICATOR_DATA);

//---
   return(INIT_SUCCEEDED);
  }
//+------------------------------------------------------------------+
//| Custom indicator iteration function                              |
//+------------------------------------------------------------------+
int OnCalculate(const int rates_total,
                const int prev_calculated,
                const datetime &time[],
                const double &open[],
                const double &high[],
                const double &low[],
                const double &close[],
                const long &tick_volume[],
                const long &volume[],
                const int &spread[])
  {
//---

//--- return value of prev_calculated for next call
   return(rates_total);
  }
//+------------------------------------------------------------------+
At the beginning of the indicator code, buffer arrays are declared to exchange data with other programs. These arrays are timeseries, and their elements are linked to price bars. This connection is supported directly by the terminal. The indicator stores the results of the calculations in these arrays not caring about changing their size and moving data when a new candle appears. There are no such arrays in an EA, so if you transfer the indicator code to the EA, you will need to create them. In addition to the calculation part itself, you also need to arrange a link between the array elements and the price chart bars. The other side of the coin though is that it is possible not to perform calculations on the entire history (which happens in the indicator). Recalculating the depth of the data used is enough.
So, you need to create indicator buffers in the EA. Keep in mind that the indicator can have not only buffers for displaying information on the chart, but also auxiliary buffers for intermediate calculations. They should also be created. Drawing color buffers may be ignored if the EA strategy features no change of the indicator line color.
Another architectural difference between the indicators and EAs is the tick handling function. Unlike MetaTrader 4, MetaTrader 5 separates incoming tick handlers for indicators and EAs. When a new tick arrives, the OnCalculate function is called in the indicator. In the parameters, it receives the total number of bars on the chart, the number of bars in the previous call and the timeseries needed to calculate the indicator. In an EA, the new ticks are processed in the OnTick function, which has no parameters. Therefore, we will have to establish access to timeseries and ensure tracking of changes on the chart.
2. Creating the indicator calculation class
A single indicator with different parameters is often used in EA strategies, therefore it is reasonable to apply OOP features and wrap our indicator in the CIndicator class.
Let's sum everything up. Below is what we are going to do to relocate the indicator calculations to an EA.
- Arrange the operation of indicator buffers. To do this, create the CArrayBuffer class with methods for data storage and convenient access. Later, create the array of such classes by the number of buffers in the indicator.
- Relocate the indicator calculation part from the OnCalculate function to the Calculate function of our class.
- The indicator receives access to timeseries from the OnCalculate function parameters (unlike the EA functions). Therefore, let's arrange the download of necessary timeseries in the LoadHistory function.
- To unify access to the recalculated indicator data, let's create the CopyBuffer function with all necessary parameters in the CIndicator class.
All the work can be visually summarized as follows.
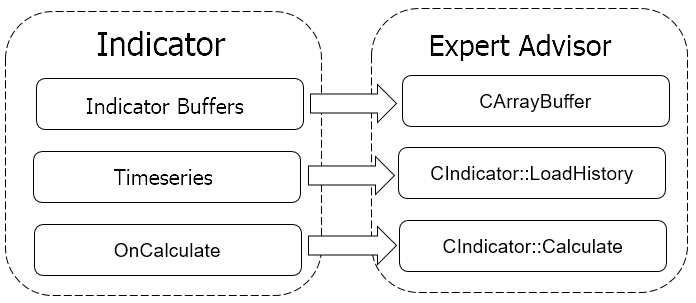
Further, speaking of the indicator, I will mean the copy of the indicator created in the EA code.
2.1. Creating the indicator buffer
Let's use the CArrayDouble class to create the indicator buffers. Create a new CArrayBuffer class on its basis.
class CArrayBuffer   :  public CArrayDouble
  {
public:
                     CArrayBuffer(void);
                    ~CArrayBuffer(void);
//---
   int               CopyBuffer(const int start, const int count, double &double_array[]);
   int               Initilize(void);
   virtual bool      Shift(const int shift);
  };
Create the CopyBuffer method, so that receiving data is similar to a standard reference to the indicator. Also, add two utility methods: Initilize — for clearing the buffer data and Shift — for moving data inside the buffer when a new candle appears. The function code is provided in the attachment.
2.2. Parent class for future indicators
The next step is to create the "skeleton" of the indicator in the CIndicator base class.
class CIndicator
  {
private:
//---
   datetime             m_last_load;
public:
                        CIndicator(void);
                       ~CIndicator(void);
   virtual bool         Create(const string symbol=NULL, const ENUM_TIMEFRAMES timeframe=PERIOD_CURRENT, const ENUM_APPLIED_PRICE price=PRICE_CLOSE);
//--- Set indicator's main settings
   virtual bool         SetBufferSize(const int bars);
//--- Get indicator's data
   virtual int          CopyBuffer(const uint buffer_num,const uint start, const uint count, double &double_array[]);
   virtual double       GetData(const uint buffer_num,const uint shift);

protected:
   double               m_source_data[];
   CArrayBuffer         ar_IndBuffers[];
   int                  m_buffers;
   int                  m_history_len;
   int                  m_data_len;
//---
   string               m_Symbol;
   ENUM_TIMEFRAMES      m_Timeframe;
   ENUM_APPLIED_PRICE   m_Price;
//--- Set indicator's main settings
   virtual bool         SetHistoryLen(const int bars=-1);
//---
   virtual bool         LoadHistory(void);
   virtual bool         Calculate()                         {  return true;   }
  };
The class contains six public methods:
- constructor,
- destructor,
- class initialization method,
- method for specifying the indicator buffer size
- two methods for accessing the indicator data: the first one is for the bulk data download, while the second one is for targeted access to specific elements.
The main part of the class members is declared in the 'protected' zone. Here we declare:
- array of the initial data for calculation (m_source_data);
- array of the indicator buffers (ar_IndBuffers);
- variables for storing the number of indicator buffers (m_buffers), the depth of required initial data history (m_history_len) and the depth of the required indicator values history (m_data_len);
- applied symbol (m_Symbol) and timeframe (m_Timeframe);
- type of price for the indicator calculation (m_Price);
- methods for setting: the initial data depth (SetHistoryLen); timeseries data history download (LoadHistory); the indicator recalculation (Calculate).
All methods are created to be virtual, so that they can later be adjusted to the needs of a specific indicator. Initialize the variables and release the arrays in the class constructor.
CIndicator::CIndicator()   :  m_buffers(0),
                              m_Symbol(_Symbol),
                              m_Timeframe(PERIOD_CURRENT),
                              m_Price(PRICE_CLOSE),
                              m_last_load(0)
  {
   m_data_len=m_history_len  =  Bars(m_Symbol,m_Timeframe)-1;
   ArrayFree(ar_IndBuffers);
   ArrayFree(m_source_data);
  }
In the class initialization function, first check if a specified symbol can be used. To do this, check whether it is active in the Market Watch. If not, try to select it. If the symbol cannot be used, the function returns 'false'. If the check is successful, save the symbol, the timeframe and the calculation price to the relevant variables.
bool CIndicator::Create(const string symbol=NULL,const ENUM_TIMEFRAMES timeframe=0,const ENUM_APPLIED_PRICE price=1)
  {
   m_Symbol=(symbol==NULL ? _Symbol : symbol);
   if(!SymbolInfoInteger(m_Symbol,SYMBOL_SELECT))
      if(!SymbolSelect(m_Symbol,true))
         return false;
//---
   m_Timeframe=timeframe;
   m_Price=price;
//---
   return true;
  }
The method that sets the size of the indicator buffer has only one parameter — the size itself. In this case, if we want to use the entire available history, we only have to pass a number equal to or less than 0 to the function. In the function itself, we first save the value of the passed parameter to the corresponding variable. Then we check the sufficiency of the historical data of the timeseries to obtain the indicated history of the indicator. If the initial values are insufficient, the downloaded data volume increases. At the end of the function, clear and change the size of all the indicator buffers.
bool CIndicator::SetBufferSize(const int bars)
  {
   if(bars>0)
      m_data_len  =  bars;
   else
      m_data_len  =  Bars(m_Symbol,m_Timeframe);
//---
   if(m_data_len<=0)
     {
      for(int i=0;i<m_buffers;i++)
         ar_IndBuffers[i].Shutdown();
      return false;
     }
//---
   if(m_history_len<m_data_len)
      if(!SetHistoryLen(m_data_len))
         return false;
//---
   for(int i=0;i<m_buffers;i++)
     {
      ar_IndBuffers[i].Shutdown();
      if(!ar_IndBuffers[i].Resize(m_data_len))
         return false;
     }
//---
   return true;
  }
To get historical data of the timeseries, use the LoadHistory function. It does not have parameters, and it derives the initial values from the data stored in the previous functions.
The current indicator value often changes during a candle formation. This may lead to false signals. For this reason, many indicator strategies use data of closed candles. Concerning this logic, it is enough to load historical data once when a new candle forms for the indicator needs. Therefore, at the beginning of the function, we set the check of opening a new bar. If the new bar does not open, while the data are already loaded, we exit the function. If we need to load the data, go to the next function block. If one timeseries is sufficient for the indicator calculation, download all necessary data to our array of initial data. When the indicator uses a median, typical or weighted-average price, we first load the historical data into an array of MqlRates structures, and then arrange the necessary price calculation in the loop. The calculation results are stored in an array of initial data for later use.
bool CIndicator::LoadHistory(void)
  {
   datetime cur_date=(datetime)SeriesInfoInteger(m_Symbol,m_Timeframe,SERIES_LASTBAR_DATE);
   if(m_last_load>=cur_date && ArraySize(m_source_data)>=m_history_len)
      return true;
//---
   MqlRates rates[];
   int total=0,i;
   switch(m_Price)
     {
      case PRICE_CLOSE:
        total=CopyClose(m_Symbol,m_Timeframe,1,m_history_len,m_source_data);
        break;
      case PRICE_OPEN:
        total=CopyOpen(m_Symbol,m_Timeframe,1,m_history_len,m_source_data);
      case PRICE_HIGH:
        total=CopyHigh(m_Symbol,m_Timeframe,1,m_history_len,m_source_data);
      case PRICE_LOW:
        total=CopyLow(m_Symbol,m_Timeframe,1,m_history_len,m_source_data);
      case PRICE_MEDIAN:
        total=CopyRates(m_Symbol,m_Timeframe,1,m_history_len,rates);
        if(total!=ArraySize(m_source_data))
           total=ArrayResize(m_source_data,total);
        for(i=0;i<total;i++)
           m_source_data[i]=(rates[i].high+rates[i].low)/2;
        break;
      case PRICE_TYPICAL:
        total=CopyRates(m_Symbol,m_Timeframe,1,m_history_len,rates);
        if(total!=ArraySize(m_source_data))
           total=ArrayResize(m_source_data,total);
        for(i=0;i<total;i++)
           m_source_data[i]=(rates[i].high+rates[i].low+rates[i].close)/3;
        break;
      case PRICE_WEIGHTED:
        total=CopyRates(m_Symbol,m_Timeframe,1,m_history_len,rates);
        if(total!=ArraySize(m_source_data))
           total=ArrayResize(m_source_data,total);
        for(i=0;i<total;i++)
           m_source_data[i]=(rates[i].high+rates[i].low+2*rates[i].close)/4;
        break;
     }
//---
   if(total<=0)
      return false;
//---
   m_last_load=cur_date;
   return (total>0);
  }
If no data are detected during the function execution, the function returns 'false'.
The method of obtaining the indicator data is made similar to the standard access to the indicator buffers. To do this, create the CopyBuffer function. The buffer number, position for starting data copying, the number of required elements and the array for receiving data are passed in its parameters. After the execution, the function returns the number of copied elements.
int CIndicator::CopyBuffer(const uint buffer_num,const uint start,const uint count,double &double_array[])
  {
   if(!Calculate())
      return -1;
//---
   if((int)buffer_num>=m_buffers)
     {
      ArrayFree(double_array);
      return -1;
     }
//---
   return ar_IndBuffers[buffer_num].CopyBuffer(start,count,double_array);
  }
In order for the user to always get the actual data, call the indicator recalculation function at the beginning of the function (in this class, we only declare the virtual function, while the calculation is performed directly in the indicator final class). After recalculating the indicator values, check if it features the specified buffer. If the buffer number is specified incorrectly, clear the recipient array and exit the function with the result "-1". If the buffer number is successfully verified, call the CopyBuffer method of the appropriate buffer array.
The function for targeted access to data is constructed similarly.
The complete class code and all its functions are provided in the attachment.
2.3. Indicator class of the moving average
To demonstrate the method, I chose the moving average indicator (MA). This technical analysis indicator is not only popular among traders in its classical form but is also widely used for developing other indicators, including MACD, Alligator, etc. Besides, the standard delivery has a sample МА, from which we can get data via the iCustom function to compare the speed of access to the indicator with the speed of data calculation in the EA.
We will calculate МА in the CMA class. The class receives four public methods: constructor, destructor, initialization method (Create) and the method of setting the depth of the indicator history depth (we are to rewrite). The class inherits the methods of accessing the indicator data from the parent one.
class CMA : public CIndicator
  {
private:
   int               m_Period;
   int               m_Shift;
   ENUM_MA_METHOD    m_Method;
   datetime          m_last_calculate;

public:
                     CMA();
                    ~CMA();
   bool              Create(const string symbol, const ENUM_TIMEFRAMES timeframe, const int ma_period, const int ma_shift, const ENUM_MA_METHOD ma_method, const ENUM_APPLIED_PRICE price=PRICE_CLOSE);
   virtual bool      SetBufferSize(const int bars);

protected:
   virtual bool      Calculate();
   virtual double    CalculateSMA(const int shift);
   virtual double    CalculateEMA(const int shift);
   virtual double    CalculateLWMA(const int shift);
   virtual double    CalculateSMMA(const int shift);
  };
As you can see on the above class heading, elements for direct indicator calculation appear at this stage. These custom variables are for storing the indicator period, shift and calculation method. In the 'protected' block, we rewrite the Calculate virtual function for the indicator calculation. Depending on the specified indicator calculation method, it calls the CalculateSMA, CalculateEMA, CalculateLWMA or CalculateSMMA sub-functions.
In the class constructor, we initialize the variables, specify the number of the indicator buffers and create the indicator buffer.
CMA::CMA()  :  m_Period(25),
               m_Shift(0),
               m_Method(MODE_SMA)
  {
   m_buffers=1;
   ArrayResize(ar_IndBuffers,1);
  }
Specify the required symbol, timeframe and parameters for the indicator calculation in the class initialization function parameters. In the function itself, we first call the parent class initialization function. Next, check the validity of a specified averaging period (it should be positive). After that, save the indicator parameters to the appropriate class variables and set the depth of the history for the indicator buffer and loaded data of the timeseries. If an error occurs, the function returns 'false'. After successful initialization, it returns 'true'.
bool CMA::Create(const string symbol,const ENUM_TIMEFRAMES timeframe,const int ma_period,const int ma_shift,const ENUM_MA_METHOD ma_method,const ENUM_APPLIED_PRICE price=1)
  {
   if(!CIndicator::Create(symbol,timeframe,price))
      return false;
//---
   if(ma_period<=0)
      return false;
//---
   m_Period=ma_period;
   m_Shift=ma_shift;
   m_Method=ma_method;
//---
   if(!SetBufferSize(ma_period))
      return false;
   if(!SetHistoryLen(2*ma_period+(m_Shift>0 ? m_Shift : 0)))
      return false;
//---
   return true;
  }
The Calculate function will directly calculate the indicator. While creating a parent class, we decided that we would load the historical data of the timeseries when opening a new candle. Therefore, we will recalculate the indicator data with the same frequency. To do this, we check the opening of a new candle at the start of the function. If the calculation has already been performed on the current bar, exit the function with the 'true' result.
If a new bar is opened, call the function of loading the timeseries data. If the historical data is successfully downloaded, check the number of candles generated after the last indicator recalculation. If the number of new candles is larger than the size of your indicator buffer, then initialize it again. If there are fewer new candles, shift the data inside your buffer by the number of bars that appeared. Further on, recalculate new elements only.
Now, arrange a cycle for recalculation of new elements of the indicator buffer. Note: If the recalculated element exceeds the size of the current indicator buffer (this is possible when the calculation is first started or during the calculation after a disconnect when the number of new candles exceeds the buffer size), the data are added to the buffer by the Add method. If the recalculated element falls within the size of an existing buffer, the value of the element is updated by the Update method. The calculation of the indicator values is performed in sub-functions corresponding to the averaging method. The calculation logic is taken from the Custom Moving Average.mq5 indicator included into the MetaTrader 5 standard delivery.
After successful recalculation of the indicator buffer, save the time of the last recalculation and exit the function with the 'true' result.
bool CMA::Calculate(void)
  {
   datetime cur_date=(datetime)SeriesInfoInteger(m_Symbol,m_Timeframe,SERIES_LASTBAR_DATE);
   if(m_last_calculate==cur_date && ArraySize(m_source_data)==m_history_len)
      return true;
//---
   if(!LoadHistory())
      return false;
//---
   int shift=Bars(m_Symbol,m_Timeframe,m_last_calculate,cur_date)-1;
   if(shift>m_data_len)
     {
      ar_IndBuffers[0].Initilize();
      shift=m_data_len;
     }
   else
      ar_IndBuffers[0].Shift(shift);
//---
   for(int i=(m_data_len-shift);i<m_data_len;i++)
     {
      int data_total=ar_IndBuffers[0].Total();
      switch(m_Method)
        {
         case MODE_SMA:
           if(i>=data_total)
              ar_IndBuffers[0].Add(CalculateSMA(i+m_Shift));
           else
              ar_IndBuffers[0].Update(i,CalculateSMA(i+m_Shift));
           break;
         case MODE_EMA:
           if(i>=data_total)
              ar_IndBuffers[0].Add(CalculateEMA(i+m_Shift));
           else
              ar_IndBuffers[0].Update(i,CalculateEMA(i+m_Shift));
           break;
         case MODE_SMMA:
           if(i>=data_total)
              ar_IndBuffers[0].Add(CalculateSMMA(i+m_Shift));
           else
              ar_IndBuffers[0].Update(i,CalculateSMMA(i+m_Shift));
           break;
         case MODE_LWMA:
           if(i>=data_total)
              ar_IndBuffers[0].Add(CalculateLWMA(i+m_Shift));
           else
              ar_IndBuffers[0].Update(i,CalculateLWMA(i+m_Shift));
           break;
        }
     }
//---
   m_last_calculate=cur_date;
   m_data_len=ar_IndBuffers[0].Total();
//---
   return true;
  }
In addition, we will rewrite the virtual function of the parent class, which sets the required size of the indicator buffer. This is necessary due to the verification of the correspondence between the depth of the indicator buffer and the depth of the timeseries historical data. In the parent class, we specified that the number of elements in the timeseries should not be less than the elements in the indicator buffer. In order to calculate the MA, the number of elements in the timeseries should be greater than the size of the indicator buffer, at least by the averaging period.
3. Example of adding an indicator class into an EA
When I planned this article, one of my goals was to compare the speed of data processing inside the EA and the speed of getting data from the indicator. Therefore, I decided not to create a full-fledged trading robot in order to demonstrate the work of the class. Instead, I offer an EA blank allowing you to add your own logic of handling indicator signals.
Let's create a new file of the Test_Class.mq5 EA. Its inputs are similar to the parameters of the used indicator.
input int                  MA_Period   =  25;
input int                  MA_Shift    =  0;
input ENUM_MA_METHOD       MA_Method   =  MODE_SMA;
input ENUM_APPLIED_PRICE   MA_Price    =  PRICE_CLOSE;
Declare an instance of the indicator class and the array for receiving the indicator data globally.
CMA   *MA;
double c_data[];
In the OnInit function, we should initialize an instance of the indicator class and pass initial data to it.
int OnInit()
  {
//---
   MA=new CMA;
   if(CheckPointer(MA)==POINTER_INVALID)
      return INIT_FAILED;
//---
   if(!MA.Create(_Symbol,PERIOD_CURRENT,MA_Period,MA_Shift,MA_Method,MA_Price))
      return INIT_FAILED;
   MA.SetBufferSize(3);
//---
   return(INIT_SUCCEEDED);
  }
Upon EA work completion, clear the memory and delete the class instance in the OnDeinit function.
void OnDeinit(const int reason)
  {
//---
   if(CheckPointer(MA)!=POINTER_INVALID)
      delete MA;
  }
Now, the class is ready for work. We only need to add receiving the indicator data in the OnTick function. At the beginning of the function, check opening a new bar, then call the CopyBuffer method of the class. Your own code for signals handling and performing trades goes next.
void OnTick()
  {
//---
   static datetime last_bar=0;
   datetime cur_date=(datetime)SeriesInfoInteger(_Symbol,PERIOD_CURRENT,SERIES_LASTBAR_DATE);
   if(last_bar==cur_date)
      return;
   last_bar=cur_date;
//---
   if(!MA.CopyBuffer(MAIN_LINE,0,3,c_data))
      return;

//---
//     Add your code of processing signals and trading operations here
//---
   return;
  }
Find the entire code of all programs and classes in the attachment.
4. "Cost" of using a relocated indicator
Another important question is how does the indicator code relocation affect the EA operation? To answer it, we should conduct a number of experiments.
4.1. Experiment 1
As I have already mentioned, my choice of the MA indicator was not accidental. Now we can check the speed of obtaining the same data in three ways:
- via the function of the indicator (iMA) built into the terminal;
- by calling the similar custom indicator (iCustom);
- by calculating directly within the EA.
The first thing that comes to mind is to use the MetaEditor's profiling function. To do this, let's create a non-trading EA, which will simultaneously receive data from all three sources. I think, there is no need to give a full description of the EA operation here. Its code is provided in the attachment. To maintain the experimental integrity, all three sources were accessed only when a new candle was opened.
Profiling was conducted in the strategy tester for 15 months on the M15 timeframe. The experiment yielded the following data.
| Function | Average execution time, microseconds | Share of total time |
|---|---|---|
| OnTick | 99.14% | |
| Check if a new bar is opened | 0.528 | 67.23% |
| Internal calculation |
21.524 | 2.36% |
| including CopyClose | 1.729 | 0.19% |
| iMA | 2.231 | 0.24% |
| iCustom | 0.748 | 0.08% |
| OnInit | 241439 | 0.86% |
| Receiving the iCustom handle | 235676 | 0.84% |
The first thing that catches our eye is the fact that receiving the indicator handle via the iCustom function takes a long time. It takes ten times more time as compared to initializing the indicator class and receiving the indicator handle via the iMA function. At the same time, receiving data from the indicator initialized by the iCustom function occurs 3 times faster than receiving data from the iMA indicator and 30 times faster than calculating the indicator value in the class.

Let's consider the execution time of various functions of our indicator class in more detail. Note that the time of receiving historical data by the CopyClose function is comparable with the time of obtaining the indicator data. Does this mean that the indicator spends almost no time for calculation? Reality disproves that. MetaTrader 5 architecture arranges asynchronous access to the indicator values. In other words, when an indicator handle is received, it is attached to the chart. Further on, this indicator performs its calculations outside of the EA flow. They interact only at the stage of data transfer similar to receiving timeseries data. Therefore, the time for performing these operations is comparable.
Let's sum up our achievements in this experiment: we proved that using the MetaEditor profiling function to estimate the time spent on calculating the indicators used in the EAs is flawed.
4.2. Experiment 2
Create four separate EAs.
- A specimen blank EA performing no functions for estimating time spent by the terminal for iterating over the quotes history.
- An EA receiving data by calculating the values in the indicator class.
- An EA receiving data from the iMA indicator.
- An EA receiving data from a custom indicator.
After that, start their optimization in the strategy tester on 11 passes and compare the average time of one pass.


The test results showed saving time when using calculations within the EA. The most time-consuming task was to obtain data from the custom indicator.

Note that МА was calculated by a close price in the experiment. The calculation of such an indicator is quite simple. How does the situation change in case of more complex calculations? Let's find this out by conducting yet another experiment.
4.3. Experiment 3
This experiment repeats the previous one, but in order to increase the load on the calculation, the indicators were calculated for linear-weighted averaging of the weighted average price.


As we can see, the time spent has increased with all methods of obtaining data. The time spent for a single pass is increased proportionally confirming the results of the previous experiment.

Conclusion
This article described the method of relocating the indicator calculations to an EA. Applying OOP makes access to the final indicator data as similar as possible to the standard retrieval of data from indicator buffers. This requires minimal intervention in the source code of the EA when it is reworked.
Based on the results of the conducted experiments, such an approach can also save time during testing and optimization of EAs. But when an EA works in real time, this advantage can be nullified by the multi-threaded MetaTrader 5 architecture.
Programs used in the article
| # |
Name |
Type |
Description |
|---|---|---|---|
| 1 | Indicarot.mqh | Class library | Basic class for relocating indicators |
| 2 | MA.mqh | Class library | Class for calculating MA indicator inside the EA |
| 3 | Test.mq5 | EA | The EA for conducting the experiment 1 |
| 4 | Test_Class.mq5 | EA | The EA with the indicator calculation inside the trading robot (experiments 2 and 3) |
| 5 | Test_iMA.mq5 | EA | The EA featuring obtaining the indicator data via iMA |
| 6 | Test_iCustom.mq5 | EA | The EA featuring obtaining the indicator data via iCustom |
Translated from Russian by MetaQuotes Ltd.
Original article: https://www.mql5.com/ru/articles/4602
Warning: All rights to these materials are reserved by MetaQuotes Ltd. Copying or reprinting of these materials in whole or in part is prohibited.
This article was written by a user of the site and reflects their personal views. MetaQuotes Ltd is not responsible for the accuracy of the information presented, nor for any consequences resulting from the use of the solutions, strategies or recommendations described.

 How to create Requirements Specification for ordering a trading robot
 Comparative analysis of 10 flat trading strategies
 Deep Neural Networks (Part VII). Ensemble of neural networks: stacking
 Applying the Monte Carlo method for optimizing trading strategies
- Free trading apps
- Over 8,000 signals for copying
- Economic news for exploring financial markets
You agree to website policy and terms of use
If you look in the standard indicator class, it uses the CopyBuffer function when updating data. I.e. it fills the whole buffer from the terminal history, not some part of it.
And recalculation of the whole history at each new bar?
Isn't it too costly then? Why not determine the date of the last calculation and copy the data for this particular piece of time?
And recalculating the whole story on every new bar?
Isn't that too costly then? Why not determine the date of the last calculation and copy the data for this particular slice of time?
I apologise, the previous post was not about the article, but about the standard library.
In the article, the indicator is calculated in the Calculate method. Here we first determine the number of bars from the last recalculation and only then recalculate the remaining part.
I apologise, the previous post was not about the article, but about the standard library.
In the article, the indicator is calculated in the Calculate method. Here we first determine the number of bars from the last recalculation and only then recalculate the remaining part.
Thanks for the clarification!
thanks alot
Very nice concept , but if I want to write a price action indicator with multiple prices (high,low,close,open)which calculates indicator value based on i.e difference of high and low there is a problem of having only one array of data (m_source_data in CIndicator class),is there a way to work around this or do you suggest to modify the CIndicator class and make the m_source_data an array of (mqlRates or CArrayBuffer ,...)?
Yes, you can modify CIndicator to create m_source_data as array of MqlRates. I recommend MqlRates because other ways you will need some actions to synchronize data in different arrays.