
GUI: Tips and Tricks for creating your own Graphic Library in MQL
Introduction
Developing a GUI library is one of the biggest non-specific projects that anyone could think of in the context of MetaTrader 5, aside from very advanced things like AI, (good) neural networks and... getting fluent in using a GUI library that you haven't developed.
I was half joking with the last point, of course it's easier to learn how to use an already made library (even though there are really big GUI libraries out here)! But if I can learn how to use a library that is already better than something I could make myself, why bother creating one from scratch?
Well, there are a few good reasons. You may consider it to be too slow for your specific project, you may need to extend it if you need something very specific that is not included in the library (some libraries can get harder to extend than others) or functionality that is not possible with that implementation, it could have a bug (excluding those that arise from misusing the library)... or you could just want to learn about it. Most of these problems can be solved by the authors of any specific library, but you would be relying on them noticing or be willing to do it (in the case of expanding functionality).
In this article our goal isn't to teach you how to make an interface or show the steps to develop a fully functional library. Instead, we will provide examples how some specific pieces of GUI libraries can be made, so that they can serve as a starting point to make one, to solve a specific issue that you may have found or to get an initial understanding about is even happening inside of some huge codebase for an already complete GUI library.
In conclusion... let's get making a "GUI library".
Program structure and object hierarchy
Before we start making a GUI library, we should ask: What is a GUI library? In short, it's a glorified hierarchy of objects that track other (chart) objects and modify its properties to generate different effects and trigger events such as moving, clicking or changing color. How this hierarchy is organized may vary from implementation to implementation, however the most common (and one I like most) is a tree structure of elements, where one element can have other subelements.
To create this we'll start with a basic implementation of an element:
class CElement
{
private:
   //Variable to generate names
   static int        m_element_count;

   void              AddChild(CElement* child);

protected:
   //Chart object name
   string            m_name;

   //Element relations
   CElement*         m_parent;
   CElement*         m_children[];
   int               m_child_count;

   //Position and size
   int               m_x;
   int               m_y;
   int               m_size_x;
   int               m_size_y;

public:
                     CElement();
                    ~CElement();

   void              SetPosition(int x, int y);
   void              SetSize(int x, int y);
   void              SetParent(CElement* parent);

   int               GetGlobalX();
   int               GetGlobalY();

   void              CreateChildren();
   virtual void      Create(){}
};
The basic element class, for now, only contains information about position, size, and relations with other elements.
Position variables m_x and m_y are local positions within the context of its parent object. That creates a need for a global position function to determine the real position in the screen the object should be in. Below you can see how we can get the global position recursively (for X in this case):
int CElement::GetGlobalX(void)
{
   if (CheckPointer(m_parent)==POINTER_INVALID)
      return m_x;

   return m_x + m_parent.GetGlobalX();
}
In the constructor, we need to determine a unique name for each object. For that, we can use a static variable. For reasons we are not going to discuss in this article I prefer having that variable in the program class that we will see later, but for the sake of simplicity we will have it inside of the element class.
It's very important that you remember to delete the children elements in the destructor to avoid memory leaks!
int CElement::m_element_count = 0;

//+------------------------------------------------------------------+
//| Base Element class constructor                                   |
//+------------------------------------------------------------------+
CElement::CElement(void) : m_child_count(0), m_x(0), m_y(0), m_size_x(100), m_size_y(100)
{
   m_name = "element_"+IntegerToString(m_element_count++);
}

//+------------------------------------------------------------------+
//| Base Element class destructor (delete child objects)             |
//+------------------------------------------------------------------+
CElement::~CElement(void)
{
   for (int i=0; i<m_child_count; i++)
      delete m_children[i];
}
Lastly, we define the relation functions AddChild and SetParent, since we will need both references to communicate between elements: for instance, to get global position a child needs to know the position of the parent, but when changing position the parent needs to notify the children about that (we will implement this last part later on). To avoid redundances we have marked AddChild as private.
In the create functions, we'll create the chart objects themselves (and change other properties). It's important that we make sure the children are created after the parent, that's why a separate function is used for this purpose (since create can be overriden, and that could change the order of execution). In the base element class, create is empty.
//+------------------------------------------------------------------+
//| Set parent object (in element hierarchy)                         |
//+------------------------------------------------------------------+
void CElement::SetParent(CElement *parent)
{
   m_parent = parent;
   parent.AddChild(GetPointer(this));
}

//+------------------------------------------------------------------+
//| Add child object reference (function not exposed)                |
//+------------------------------------------------------------------+
void CElement::AddChild(CElement *child)
{
   if (CheckPointer(child)==POINTER_INVALID)
      return;

   ArrayResize(m_children, m_child_count+1);
   m_children[m_child_count] = child;
   m_child_count++;
}
//+------------------------------------------------------------------+
//| First creation of elements (children after)                      |
//+------------------------------------------------------------------+
void CElement::CreateChildren(void)
{
   for (int i=0; i<m_child_count; i++)
   {
      m_children[i].Create();
      m_children[i].CreateChildren();
   }
}
We will now create a program class. For now it's just a placeholder to interact indirectly with an empty element used as holder, but in the future it will perform other centralized operations that affect all of the elements (and which you don't want performed multiple times). Using an empty element holder to store other elements will avoid us remaking any function that needs us to iterate children recursively. For now we won't need constructor/destructor for this class since we aren't storing the holder as a pointer.
class CProgram
{
protected:
   CElement          m_element_holder;

public:

   void              CreateGUI() { m_element_holder.CreateChildren(); }
   void              AddMainElement(CElement* element) { element.SetParent(GetPointer(m_element_holder)); }
};
Before making our first test, we still need to expand the Element class since now it is empty. That way, we can manage different types of objects differently. First we will create a canvas element using CCanvas (which really is a bitmap label). Canvas objects are the most versatile objects for making custom GUIs, and we could make almost everything entirely from canvases:
#include <Canvas/Canvas.mqh>
//+------------------------------------------------------------------+
//| Generic Bitmap label element (Canvas)                            |
//+------------------------------------------------------------------+
class CCanvasElement : public CElement
{
protected:
   CCanvas           m_canvas;

public:
                    ~CCanvasElement();

   virtual void      Create();
};

//+------------------------------------------------------------------+
//| Canvas Element destructor (destroy canvas)                       |
//+------------------------------------------------------------------+
CCanvasElement::~CCanvasElement(void)
{
   m_canvas.Destroy();
}

//+------------------------------------------------------------------+
//| Create bitmap label (override)                                   |
//+------------------------------------------------------------------+
void CCanvasElement::Create()
{
   CElement::Create();

   m_canvas.CreateBitmapLabel(0, 0, m_name, GetGlobalX(), GetGlobalY(), m_size_x, m_size_y, COLOR_FORMAT_ARGB_NORMALIZE);
}
We will add these 2 lines at the end of Create to fill the canvas with a random color. A more correct way would be to expand the canvas class to create this specific type of object, but there is no need to add that much complications for now.
m_canvas.Erase(ARGB(255, MathRand()%256, MathRand()%256, MathRand()%256));
m_canvas.Update(false);
We will also create an edit object class. But why specifically this one? Why don't we make our own edits drawing directly on canvas, tracking keyboard events to write in it? Well, there is one thing that can't be done with canvas, and it is copying and pasting text (at least to and from outside of the application itself, without DLLs). If you don't require this functionality for your library, you could add the canvas directly to the Element class and use it for every type of object. As you will notice, some things are done differently in relation to the canvas...
class CEditElement : public CElement
{
public:
                    ~CEditElement();

   virtual void      Create();

   string            GetEditText() { return ObjectGetString(0, m_name, OBJPROP_TEXT); }
   void              SetEditText(string text) { ObjectSetString(0, m_name, OBJPROP_TEXT, text); }

};

//+------------------------------------------------------------------+
//| Edit element destructor (remove object from chart)               |
//+------------------------------------------------------------------+
CEditElement::~CEditElement(void)
{
   ObjectDelete(0, m_name);
}

//+------------------------------------------------------------------+
//| Create edit element (override) and set size/position             |
//+------------------------------------------------------------------+
void CEditElement::Create()
{
   CElement::Create();

   ObjectCreate(0, m_name, OBJ_EDIT, 0, 0, 0);

   ObjectSetInteger(0, m_name, OBJPROP_XDISTANCE, GetGlobalX());
   ObjectSetInteger(0, m_name, OBJPROP_YDISTANCE, GetGlobalY());
   ObjectSetInteger(0, m_name, OBJPROP_XSIZE, m_size_x);
   ObjectSetInteger(0, m_name, OBJPROP_YSIZE, m_size_y);
}
In this case, we need to set position and size properties explicitly (in Canvas they are done inside CreateBitmapLabel).
With all of these changes, we can finally make a first test:
#include "Basis.mqh"
#include "CanvasElement.mqh"
#include "EditElement.mqh"

input int squares = 5; //Amount of squares
input bool add_edits = true; //Add edits to half of the squares

CProgram program;

//+------------------------------------------------------------------+
//| Expert initialization function                                   |
//+------------------------------------------------------------------+
int OnInit()
{
   MathSrand((uint)TimeLocal());

   //100 is element size by default
   int max_x = (int)ChartGetInteger(0, CHART_WIDTH_IN_PIXELS) - 100;
   int max_y = (int)ChartGetInteger(0, CHART_HEIGHT_IN_PIXELS) - 100;

   for (int i=0; i<squares; i++)
   {
      CCanvasElement* drawing = new CCanvasElement();
      drawing.SetPosition(MathRand()%max_x, MathRand()%max_y);
      program.AddMainElement(drawing);

      if (add_edits && i<=squares/2)
      {
         CEditElement* edit = new CEditElement();
         edit.SetParent(drawing);
         edit.SetPosition(10, 10);
         edit.SetSize(80, 20);
      }
   }

   program.CreateGUI();
   ChartRedraw(0);

   return(INIT_SUCCEEDED);
}
This program will spawn a few squares, and delete them when it's removed from the chart. Notice that each edit element is positioned relative to its parent in the same location.
For now, these squares don't do much, they just "are there". In the following sections, we will talk about how we can add some behavior to them.
Mouse inputs
If you've ever worked with chart events, you'll know that using click events is not enough to create any complex behavior. The trick to create better interfaces is to use mouse move events. These events need to be activated when the Expert Advisor starts, so we'll activate them before creating the GUI:
void CProgram::CreateGUI(void)
{
   ::ChartSetInteger(0, CHART_EVENT_MOUSE_MOVE, true);
   m_element_holder.CreateChildren();
}
They provide the mouse position (x,y) and the state of mouse buttons, ctrl and shift. Each time at least one of the states or the position changes, an event is triggered.
First, we'll define the phases a button can go through: inactive when it's not used and active when it's clicked. We'll also add down and up, which represent the first active and inactive states, respectively (the changes in click state). Since we can detect each phase using only mouse events, we shouldn't even need to use click events.
enum EInputState
{
   INPUT_STATE_INACTIVE=0,
   INPUT_STATE_UP=1,
   INPUT_STATE_DOWN=2,
   INPUT_STATE_ACTIVE=3
};
To make things easier, we will centralize the processing of mouse events instead of doing it within each object, that way we can access mouse data more easily and keep track of it, which would allow to use it even on other types of events and avoid repeating calculations. We'll call this class "CInputs", as it also includes ctrl and shift buttons aside from mouse inputs.
//+------------------------------------------------------------------+
//| Mouse input processing class                                     |
//+------------------------------------------------------------------+
class CInputs
{
private:
   EInputState m_left_mouse_state;
   EInputState m_ctrl_state;
   EInputState m_shift_state;

   int m_pos_x;
   int m_pos_y;

   void UpdateState(EInputState &state, bool current);

public:
   CInputs();

   void OnEvent(const int id, const long &lparam, const double &dparam, const string &sparam);

   EInputState GetLeftMouseState() { return m_left_mouse_state; }
   EInputState GetCtrlState() { return m_ctrl_state; }
   EInputState GetShiftState() { return m_shift_state; }

   int X() { return m_pos_x; }
   int Y() { return m_pos_y; }
};

//+------------------------------------------------------------------+
//| Inputs constructor (initialize variables)                        |
//+------------------------------------------------------------------+
CInputs::CInputs(void) : m_left_mouse_state(INPUT_STATE_INACTIVE), m_ctrl_state(INPUT_STATE_INACTIVE),
   m_shift_state(INPUT_STATE_INACTIVE), m_pos_x(0), m_pos_y(0)
{
}

//+------------------------------------------------------------------+
//| Mouse input event processing                                     |
//+------------------------------------------------------------------+
void CInputs::OnEvent(const int id, const long &lparam, const double &dparam, const string &sparam)
{
   if(id!=CHARTEVENT_MOUSE_MOVE)
      return;

   m_pos_x = (int)lparam;
   m_pos_y = (int)dparam;

   uint state = uint(sparam);

   UpdateState(m_left_mouse_state, ((state & 1) == 1));
   UpdateState(m_ctrl_state, ((state & 8) == 8));
   UpdateState(m_shift_state, ((state & 4) == 4));
}

//+------------------------------------------------------------------+
//| Update state of a button (up, down, active, inactive)            |
//+------------------------------------------------------------------+
void CInputs::UpdateState(EInputState &state, bool current)
{
   if (current)
      state = (state>=INPUT_STATE_DOWN) ? INPUT_STATE_ACTIVE : INPUT_STATE_DOWN;
   else
      state = (state>=INPUT_STATE_DOWN) ? INPUT_STATE_UP : INPUT_STATE_INACTIVE;
}
//+------------------------------------------------------------------+
In UpdateState we check the current state (boolean) and last state to determine if an input is active/inactive, and if it's the first event after a change in state (up/down). We get ctrl and shift information "for free" in sparam, and also middle, right and 2 more extra mouse buttons. We haven't added those to the code but it's easy to make the changes needed to add them if you want to use them.
We will add a mouse inputs instance to the program, and make it accessible for each object with a pointer. With each event, the inputs instance is updated. The type of event is filtered inside of the inputs class (only mouse move events are used).
class CProgram
{
//...

protected:
   CInputs           m_inputs;

//...

public:
   void              OnChartEvent(const int id, const long &lparam, const double &dparam, const string &sparam);

//...
};

//+------------------------------------------------------------------+
//| Program constructor (pass inputs reference to holder)            |
//+------------------------------------------------------------------+
CProgram::CProgram(void)
{
   m_element_holder.SetInputs(GetPointer(m_inputs));
}

//+------------------------------------------------------------------+
//| Process chart event                                              |
//+------------------------------------------------------------------+
void CProgram::OnChartEvent(const int id, const long &lparam, const double &dparam, const string &sparam)
{
   m_inputs.OnEvent(id, lparam, dparam, sparam);

   m_element_holder.OnChartEvent(id, lparam, dparam, sparam);
}
In the next section, we will provide a more detailed explanation of how OnChartEvent will be used.
When setting inputs for the global element, they are recursively passed to its child elements. However, we must not forget that they need to get passed down also when adding childs later (after first SetInputs call):
//+------------------------------------------------------------------+
//| Set mouse inputs reference                                       |
//+------------------------------------------------------------------+
void CElement::SetInputs(CInputs* inputs)
{
   m_inputs = inputs;

   for (int i = 0; i < m_child_count; i++)
      m_children[i].SetInputs(inputs);
}

//+------------------------------------------------------------------+
//| Add child object reference (function not exposed)                |
//+------------------------------------------------------------------+
void CElement::AddChild(CElement *child)
{
   if (CheckPointer(child) == POINTER_INVALID)
      return;

   ArrayResize(m_children, m_child_count + 1);
   m_children[m_child_count] = child;
   m_child_count++;

   child.SetInputs(m_inputs);
}
In the next section, we will make the event handling functions and add some mouse events to every object.
Event handling
Before we handle the events themselves, we need to acknowledge one thing we will need if we want to have smooth movement in the interface, and that is chart redraws. Whenever an object property changes, such as its position or if it's redrawn, we need to redraw the chart for those changes to appear instantly. Nonetheless, calling ChartRedraw too often may cause flickering of the GUI, that's why I prefer to centralize its execution:
class CProgram
{
private:
   bool              m_needs_redraw;

//...

public:
   CProgram();

   void              OnTimer();

//...

   void              RequestRedraw()
   {
      m_needs_redraw = true;
   }
};

void CProgram::OnTimer(void)
{
   if (m_needs_redraw)
   {
      ChartRedraw(0);
      m_needs_redraw = false;
   }
}
As you may expect, OnTimer needs to be called in the event handling function with the same name, and each element will need to have a reference to the program to be able to call RequestRedraw. That function will set a flag which when activated redraws all elements in the next timer call. We also need to set the timer first:
#define TIMER_STEP_MSC (16)

void CProgram::CreateGUI(void)
{
   ::ChartSetInteger(0, CHART_EVENT_MOUSE_MOVE, true);
   m_element_holder.CreateChildren();
   ::EventSetMillisecondTimer(TIMER_STEP_MSC);
}
16 milliseconds is the limit (or near the limit) interval at which timers can be executed reliably. However, heavy programs may block timer execution.
Next, here's how chart events are implemented in each element:
//+------------------------------------------------------------------+
//| Send event recursively and respond to it (for this element)      |
//+------------------------------------------------------------------+
void CElement::OnChartEvent(const int id, const long &lparam, const double &dparam, const string &sparam)
{
   for (int i = m_child_count - 1; i >= 0; i--)
      m_children[i].OnChartEvent(id, lparam, dparam, sparam);

   OnEvent(id, lparam, dparam, sparam);
}
In this library, we have opted to pass events recursively from parent to childs. This is a design choice (it could be made differently, for example using listeners or calling all objects sequentially) but as we'll see later it has some advantages. OnEvent is an overridable protected function. It's separated from OnChartEvent (which is public) so that the user cannot override the passing of events to child objects, and to choose how to execute the parent's class OnEvent (before, after or not executing it).
As an example of handling of events, we will implement a dragging functionality for the squares. Click and hover events could be implemented more trivially too, but we won't need them for this example. For now, events only get passed through objects but they do nothing. There is a problem though in the current state: if you try dragging an object, the charts behind move as if it wasn't there. We should not expect it to move for now, but charts shouldn't move too!

To avoid this issue, first we'll check if the mouse is hovering any object. If it is, then we block chart scrolling. For performance reasons we'll only check the objects that are direct childs of the global holder (the program would work always if other subobjects are kept within the bounds of its parent).
//+------------------------------------------------------------------+
//| Check if mouse is hovering any child element of this object      |
//+------------------------------------------------------------------+
bool CElement::CheckHovers(void)
{
   for (int i = 0; i < m_child_count; i++)
   {
      if (m_children[i].IsMouseHovering())
         return true;
   }
   return false;
}

//+------------------------------------------------------------------+
//| Process chart event                                              |
//+------------------------------------------------------------------+
void CProgram::OnChartEvent(const int id, const long &lparam, const double &dparam, const string &sparam)
{
   m_inputs.OnEvent(id, lparam, dparam, sparam);

   if (id == CHARTEVENT_MOUSE_MOVE)
      EnableControls(!m_element_holder.CheckHovers());

   m_element_holder.OnChartEvent(id, lparam, dparam, sparam);
}

//+------------------------------------------------------------------+
//| Enable/Disable chart scroll responses                            |
//+------------------------------------------------------------------+
void CProgram::EnableControls(bool enable)
{
   //Allow or disallow displacing chart
   ::ChartSetInteger(0, CHART_MOUSE_SCROLL, enable);
}
Now they avoid displacements... but only when the mouse is over the object. If we drag it outside of its bounds, charts will still move.
We will have to add 2 more checks for that and a private bool variable to CElement (m_dragging):
//+------------------------------------------------------------------+
//| Send event recursively and respond to it (for this element)      |
//+------------------------------------------------------------------+
void CElement::OnChartEvent(const int id, const long &lparam, const double &dparam, const string &sparam)
{
   for (int i = m_child_count - 1; i >= 0; i--)
      m_children[i].OnChartEvent(id, lparam, dparam, sparam);

   //Check dragging start
   if (id == CHARTEVENT_MOUSE_MOVE)
   {
      if (IsMouseHovering() && m_inputs.GetLeftMouseState() == INPUT_STATE_DOWN)
         m_dragging = true;

      else if (m_dragging && m_inputs.GetLeftMouseState() == INPUT_STATE_UP)
         m_dragging = false;
   }

   OnEvent(id, lparam, dparam, sparam);
}

//+------------------------------------------------------------------+
//| Check if mouse hovers/drags any child element of this object     |
//+------------------------------------------------------------------+
bool CElement::CheckHovers(void)
{
   for (int i = 0; i < m_child_count; i++)
   {
      if (m_children[i].IsMouseHovering() || m_children[i].IsMouseDragging())
         return true;
   }
   return false;
}
Now everything works fine when dragging objects, but there is a subtle correction missing... when dragging charts, if the mouse goes over an object it would stop dragging them. We need to filter draggings that start outside of an object.

Luckily, that's not very difficult to fix:
//+------------------------------------------------------------------+
//| Check if mouse hovers/drags any child element of this object     |
//+------------------------------------------------------------------+
bool CElement::CheckHovers(void)
{
   EInputState state = m_inputs.GetLeftMouseState();
   bool state_check = state != INPUT_STATE_ACTIVE; //Filter drags that start in chart

   for (int i = 0; i < m_child_count; i++)
   {
      if ((m_children[i].IsMouseHovering() && state_check)
            || m_children[i].IsMouseDragging())
         return true;
   }
   return false;
}
Now, if the mouse is hovering an object but the mouse is active, it may be dragging the charts so it's ignored (and if it's dragging an object, that object would be the one returning true). Mouse hovering check is still needed since if it wasn't there the events would be disabled one frame late.

With everything in place, we can add the dragging functionality to the square class. However, instead of adding it to CCanvasElement, we will extend the class with inheritance. We will also extract the drawing lines from last example so that it will be empty by default. Since we already added dragging checks, we can use them to handle the event and move objects. To change an object's position in chart we need to modify its variables, then update its position properties, update its children's position and redraw the chart.
class CElement
{
//...

public:
   void              UpdatePosition();
};

//+------------------------------------------------------------------+
//| Update element (and children) position properties                |
//+------------------------------------------------------------------+
void CElement::UpdatePosition(void)
{
   ObjectSetInteger(0, m_name, OBJPROP_XDISTANCE, GetGlobalX());
   ObjectSetInteger(0, m_name, OBJPROP_YDISTANCE, GetGlobalY());

   for (int i = 0; i < m_child_count; i++)
      m_children[i].UpdatePosition();
}
class CCanvasElement : public CElement
{
protected:
   CCanvas           m_canvas;
   virtual void      DrawCanvas() {}

//...
};

//+------------------------------------------------------------------+
//| Create bitmap label (override)                                   |
//+------------------------------------------------------------------+
void CCanvasElement::Create()
{
//...

   DrawCanvas();
}
//+------------------------------------------------------------------+
//| Canvas class which responds to mouse drag events                 |
//+------------------------------------------------------------------+
class CDragElement : public CCanvasElement
{
private:
   int m_rel_mouse_x, m_rel_mouse_y;

protected:
   virtual void      DrawCanvas();

protected:
   virtual bool      OnEvent(const int id, const long &lparam, const double &dparam, const string &sparam);
};

//+------------------------------------------------------------------+
//| Check mouse drag events                                          |
//+------------------------------------------------------------------+
bool CDragElement::OnEvent(const int id, const long &lparam, const double &dparam, const string &sparam)
{
   if (id != CHARTEVENT_MOUSE_MOVE)
      return false;

   if (!IsMouseDragging())
      return false;

   if (m_inputs.GetLeftMouseState() == INPUT_STATE_DOWN) //First click
   {
      m_rel_mouse_x = m_inputs.X() - m_x;
      m_rel_mouse_y = m_inputs.Y() - m_y;
      return true;
   }

   //Move object
   m_x = m_inputs.X() - m_rel_mouse_x;
   m_y = m_inputs.Y() - m_rel_mouse_y;
   UpdatePosition();
   m_program.RequestRedraw();

   return true;
}

//+------------------------------------------------------------------+
//| Custom canvas draw function (fill with random color)             |
//+------------------------------------------------------------------+
void CDragElement::DrawCanvas(void)
{
   m_canvas.Erase(ARGB(255, MathRand() % 256, MathRand() % 256, MathRand() % 256));
   m_canvas.Update(false);
}
Notice that we need to set the object's position to its global position: chart objects don't know anything about the hierarchy in them. If we try and move an object now, it will work and it will also update its children position, however, you can move objects that are behind what we click:

Since every event is recursively sent to all objects, they receive it even when located behind another object. We need to find a way to filter events if one object receives it first, in other words, we need to occlude them.
We'll create a boolean variable to track whether or not an object is occluded:
class CElement
{
private:

   //...
   bool              m_occluded;

   //...

public:

   //...
   void              SetOccluded(bool occluded)
   {
      m_occluded = occluded;
   }
   bool              IsOccluded()
   {
      return m_occluded;
   }
   //...
};
Then, we can use OnChartEvent as a way of "communicating" between objects. For that, we return a bool which would be true if the object received an event. If the object has been dragged (even if it doesn't respond to it) or if the object is occluded (by a child object, for instance), it would also return true since that would also block events for objects below them.
bool CElement::OnChartEvent(const int id, const long &lparam, const double &dparam, const string &sparam)
{
   for (int i = m_child_count - 1; i >= 0; i--)
   {
      m_children[i].SetOccluded(IsOccluded());
      if (m_children[i].OnChartEvent(id, lparam, dparam, sparam))
         SetOccluded(true);
   }
   //Check dragging start
   if (id == CHARTEVENT_MOUSE_MOVE && !IsOccluded())
   {
      if (IsMouseHovering() && m_inputs.GetLeftMouseState() == INPUT_STATE_DOWN)
         m_dragging = true;

      else if (m_dragging && m_inputs.GetLeftMouseState() == INPUT_STATE_UP)
         m_dragging = false;
   }

   return OnEvent(id, lparam, dparam, sparam) || IsMouseDragging() || IsOccluded();
}
OnEvent for an object is executed after its childs' events to account for occlusions. Last, we have to add the event filtering to our custom draggable object:
bool CDragElement::OnEvent(const int id, const long &lparam, const double &dparam, const string &sparam)
{
   if (IsOccluded()) return false;

   if (id != CHARTEVENT_MOUSE_MOVE)
      return false;

   //...
}
Notice that we don't filter events when sending them. That's because some elements could respond to events even when being occluded (some events that respond to hovers or only mouse position, for instance).
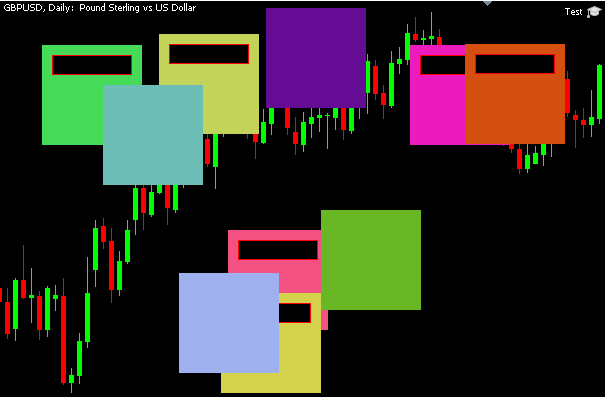
With all of these elements in place, we have achieved the desired behavior in this second example: each object can be dragged while also being blocked by other objects above:

However, it should be noted that, even though this structure works for this case, other interfaces with more complexity may need a few refinements. We'll leave them out of this article since the increase in complexity in code would not be worth it for such specific cases. For instance, occlusions from child objects and sibling objects (at the same level of the hierarchy but before in order) could be differentiated; or it could be useful to track which object received an event and check it first in the next frame (to avoid unexpected occlusions).
Showing and hiding objects
Another crucial feature required in any graphics library is the capability to hide and show objects: for instance, this would be used when opening and closing windows, altering its content such as with navigator tabs, or when removing buttons that are not available on specific conditions.
The naive ways of achieving this would be deleting and creating objects each time you want to hide or show them, or just avoiding this feature altogether. However, there is one way to hide objects using its properties natively (even though it's not obvious by its name):
ObjectSetInteger(0, m_name, OBJPROP_TIMEFRAMES, OBJ_ALL_PERIODS); //Show
ObjectSetInteger(0, m_name, OBJPROP_TIMEFRAMES, OBJ_NO_PERIODS); //Hide
What this property means is "in which timeframes does an object show and in which it doesn't". You can show objects only in some timeframes, but I don't think that is really needed in this context.
Given the ObjectSetInteger function calls described above, we can implement the functionality to show and hide objects in our GUI objects hierarchy:
class CElement
{
private:
   //...
   bool              m_hidden;
   bool              m_hidden_parent;

   void              HideObject();
   void              HideByParent();
   void              HideChildren();

   void              ShowObject();
   void              ShowByParent();
   void              ShowChildren();
   //...

public:

   //...
   void              Hide();
   void              Show();
   bool              IsHidden()
   {
      return m_hidden || m_hidden_parent;
   }
};

//+------------------------------------------------------------------+
//| Display element (if parent is also visible)                      |
//+------------------------------------------------------------------+
void CElement::Show(void)
{

   if (!IsHidden())

      return;

   m_hidden = false;
   ShowObject();


   if (CheckPointer(m_program) != POINTER_INVALID)
      m_program.RequestRedraw();
}

//+------------------------------------------------------------------+
//| Hide element                                                     |
//+------------------------------------------------------------------+
void CElement::Hide(void)
{
   m_hidden = true;

   if (m_hidden_parent)
      return;

   HideObject();

   if (CheckPointer(m_program) != POINTER_INVALID)
      m_program.RequestRedraw();
}

//+------------------------------------------------------------------+
//| Change visibility property to show (not exposed)                 |
//+------------------------------------------------------------------+
void CElement::ShowObject(void)
{
   if (IsHidden()) //Parent or self
      return;

   ObjectSetInteger(0, m_name, OBJPROP_TIMEFRAMES, OBJ_ALL_PERIODS);
   ShowChildren();
}

//+------------------------------------------------------------------+
//| Show object when not hidden and parent is shown (not exposed)    |
//+------------------------------------------------------------------+
void CElement::ShowByParent(void)
{
   m_hidden_parent = false;
   ShowObject();
}

//+------------------------------------------------------------------+
//| Show child objects recursively (not exposed)                     |
//+------------------------------------------------------------------+
void CElement::ShowChildren(void)
{
   for (int i = 0; i < m_child_count; i++)
      m_children[i].ShowByParent();
}

//+------------------------------------------------------------------+
//| Change visibility property to hide (not exposed)                                                                  |
//+------------------------------------------------------------------+
void CElement::HideObject(void)
{
   ObjectSetInteger(0, m_name, OBJPROP_TIMEFRAMES, OBJ_NO_PERIODS);
   HideChildren();
}

//+------------------------------------------------------------------+
//| Hide element when parent is hidden (not exposed)                 |
//+------------------------------------------------------------------+
void CElement::HideByParent(void)
{
   m_hidden_parent = true;
   if (m_hidden)
      return;

   HideObject();
}

//+------------------------------------------------------------------+
//| Hide child objects recursively (not exposed)                     |
//+------------------------------------------------------------------+
void CElement::HideChildren(void)
{
   for (int i = 0; i < m_child_count; i++)
      m_children[i].HideByParent();
}
It's important to make a distinction between an object which is hidden and an object which is hidden by its parent. If we didn't make it, objects that are hidden by default would show up when its parent is hidden and then shown (since these functions apply recursively), or you could have objects showing with its parent hidden (like buttons without a window behind).
In this design, Show and Hide are the only functions visible from the outside to change an object visibility. Basically, the functions are used to change the visibility flags and call ObjectSetProperty if needed. Also, the children objects get their flags changed recursively. There are other guard checks that avoid unnecessary function calls (like hiding a children object when its already hidden). Lastly, it should be noted that a chart redraw is needed for visibility changes to appear, so we call RequestRedraw in both cases.
We also need to hide objects on creation, since they could in theory be marked as hidden before they are created:
void CElement::CreateChildren(void)
{
   for (int i = 0; i < m_child_count; i++)
   {
      m_children[i].Create();
      m_children[i].CreateChildren();
   }

   if (IsHidden()) HideObject();
}
With all these components in place, we can create a small demo to test the hide and show functions. We will take advantage of the custom class from last part (draggable objects) and derive a new class from it. Our new class will respond to the dragging events from before but also to keyboard events to toggle its hiding state:
class CHideElement : public CDragElement
{
private:
   int               key_id;

protected:
   virtual void      DrawCanvas();

protected:
   virtual bool      OnEvent(const int id, const long &lparam, const double &dparam, const string &sparam);

public:
   CHideElement(int id);
};

//+------------------------------------------------------------------+
//| Hide element constructor (set keyboard ID)                       |
//+------------------------------------------------------------------+
CHideElement::CHideElement(int id) : key_id(id)
{
}

//+------------------------------------------------------------------+
//| Hide element when its key is pressed (inherit drag events)       |
//+------------------------------------------------------------------+
bool CHideElement::OnEvent(const int id, const long &lparam, const double &dparam, const string &sparam)
{

   bool drag = CDragElement::OnEvent(id, lparam, dparam, sparam);

   if (id != CHARTEVENT_KEYDOWN)
      return drag;

   if (lparam == '0' + key_id) //Toggle hide/show
   {
      if (IsHidden())
         Show();
      else
         Hide();
   }

   return true;
}

//+------------------------------------------------------------------+
//| Draw canvas function (fill with color and display number ID)     |
//+------------------------------------------------------------------+
void CHideElement::DrawCanvas(void)
{
   m_canvas.Erase(ARGB(255, MathRand() % 256, MathRand() % 256, MathRand() % 256));
   m_canvas.FontSet("Arial", 50);
   m_canvas.TextOut(25, 25, IntegerToString(key_id), ColorToARGB(clrWhite));
   m_canvas.Update(false);
}
When creating the objects, we will set them an unique number ID (from 0 to 9) to toggle its visibility when pressing that key. Also, to make things easier we will also display that ID in the objects themselves. The dragging events are also called first (they would be completely overriden if not done).
int OnInit()
{
   MathSrand((uint)TimeLocal());

   //100 is element size by default
   int max_x = (int)ChartGetInteger(0, CHART_WIDTH_IN_PIXELS) - 100;
   int max_y = (int)ChartGetInteger(0, CHART_HEIGHT_IN_PIXELS) - 100;

   for (int i = 0; i < 10; i++)
   {
      CHideElement* drawing = new CHideElement(i);
      drawing.SetPosition(MathRand() % max_x, MathRand() % max_y);
      program.AddMainElement(drawing);
   }

   program.CreateGUI();
   ChartRedraw(0);

   return(INIT_SUCCEEDED);
}
Now, if we run the program, we can verify that objects hide and show correctly when pressing their corresponding number on the keyboard.

Z Order (and reorder)
Z-order refers to the sequence in which objects are displayed. Simply put, while X-Y coordinates determine an object's position on the screen, the Z-coordinate determines its depth or stacking order. Objects with lower Z-values are drawn above those with higher values
You may already know that there is no way to modify Z-order at will in MetaTrader 5, since the property with that name is used to determine which object receives click events when they are in top of one another (but it has nothing to do with visual Z-order), and we also don't need to check for click events as specified earlier (at least in this implementation). In MetaTrader 5, the objects more recently created are placed on top always (unless they are set to be in the background).
However, if you play around with the last example you may notice something...

If you hide and show an object, it will reappear above all of the rest! Does that mean that we can hide and show an object instantly and it would appear above all of the rest? Yes it does!
To make a test for this, we will only need to modify slightly our last derived class (CHideElement) so that instead of toggling visibility, with each keyboard input it will raise the Z order of that specific object. We will also change the name of the class...
bool CRaiseElement::OnEvent(const int id, const long &lparam, const double &dparam, const string &sparam)
{

   bool drag = CDragElement::OnEvent(id, lparam, dparam, sparam);

   if (id != CHARTEVENT_KEYDOWN)
      return drag;

   if (lparam == '0' + key_id)
   {
      ObjectSetInteger(0, m_name, OBJPROP_TIMEFRAMES, OBJ_NO_PERIODS);
      ObjectSetInteger(0, m_name, OBJPROP_TIMEFRAMES, OBJ_ALL_PERIODS);
      if (CheckPointer(m_program) != POINTER_INVALID)
         m_program.RequestRedraw();
   }

   return true;
}
And as always, we must not forget that a redraw is needed after a Z-order is changed. If we run the test, this is what we'll see:

As you can see, we can raise objects at will seamlessly. We won't implement this specific function in the library to avoid adding more complexity to the codes in the article (and also, that effect can be obtained by calling Hide and then Show immediately after instead). Moreover, there are more things that could be done using Z-Orders: what if we want to raise an object only one level? Or if we want to drop its Z-order to the bottom? In all cases, the solution is to call raise Z order in as many objects as needed in the expected correct order (from bottom to top). In the first case, you would call the function for the object you want to raise one level and then for all the ones above it, in the order they are sorted. In the second case, you would do that but for all objects (even though you could ignore the one that gets to the bottom Z order).
Nonetheless, there is a catch when implementing these Z-order systems that should be commented about, even though it won't be solved explicitly here ("left as an exercise for the reader", as some would say): you can't show an object that is hidden and change its Z order in the same frame. For instance, let's say you show a button inside of a window, but at the same time you want to raise that window which contains the button: if you call show for the button (which sets OBJPROP_TIMEFRAMES to all periods for that button) and after that raise Z for the window (which sets OBJPROP_TIMEFRAMES to no periods and then to all periods, for the window and then for all the objects in the window in correct order), then the button would stay behind of the window. The reason for this seems to be that only the first modifications to the OBJPROP_TIMEFRAMES property have effect, so the button object is only effectively raised when shown (and not in the next raise Z).
One solution to this problem could involve maintaining a queue of objects and checking for changes in visibility or Z-order. Then, execute all of them only once per frame. That way, you too would need to modify the Show function to "mark" that object instead of showing it directly. If you are starting out yet, I would recommend not worrying about this too much, since it doesn't happen very often and it's not something critical (even though you should avoid the situations where this issue may arise at that point).
Conclusion
In this article we've gone through a few key functions that need to be known to create a GUI library effectively when combined, and provided small examples to prove each point. It should offer a fundamental understanding of how things work inside a GUI library in general. The resulting library is by no means a completely functional one, but rather the minimum that was needed to demonstrate some of the functions used in many other GUI libraries.
While the resulting code is relatively simple, it should be noted that GUI libraries can (and will) get much more complex once you start adding more functionality or making ready object types (especially if they have sub-objects with event relations between each other). Also, the structure of other libraries may have various differences with the one outlined here, depending on design decisions or desired performance/specific functionality.
Warning: All rights to these materials are reserved by MetaQuotes Ltd. Copying or reprinting of these materials in whole or in part is prohibited.
This article was written by a user of the site and reflects their personal views. MetaQuotes Ltd is not responsible for the accuracy of the information presented, nor for any consequences resulting from the use of the solutions, strategies or recommendations described.


- Free trading apps
- Over 8,000 signals for copying
- Economic news for exploring financial markets
You agree to website policy and terms of use