
Market Simulation (Part 10): Sockets (IV)

Introduction
In the previous article Market Simulation (Part 09): Sockets (III), I explained the final step we needed in order to create a mini chat. The purpose was to allow you to start exploring how to work with sockets in MQL5. While this is quite interesting and may be used in the future, here in the context of the replay/simulator application, I have not yet decided exactly how I will implement the order system. The use of sockets is often just a viable alternative for transferring information between different applications, and even across different operating systems. In other words, you can transfer data from a Windows system to a macOS or Linux system without actually needing to know the source or destination system. Because of this, we could even use an apparently modest system to build something more elaborate, such as using a set of Raspberry Pis for dedicated computations. But this is beyond the scope of this article series. The main idea here is to prepare readers for the next stage of development that the replay/simulator will eventually undergo.
However, in the article Market Simulation (Part 06): Transferring Information from MetaTrader 5 to Excel, I showed how you could transfer information between MetaTrader 5 and Excel. And why Excel? The reason is purely educational. We could have used any other program. However, Excel makes it easier to explain what we want to achieve. It is very common to use RTD or DDE to transfer data to Excel, but this type of communication is always unidirectional. In other words, we can only send data to Excel, never quickly read data calculated there, which would allow MetaTrader 5 to use it. Imagine the possibilities this opens: you could use a simple Expert Advisor while placing all calculation logic in Excel to control it. This would enable the Expert Advisor to operate fully automatically, without having to make adjustments and modifications through MQL5. In that case, we would do that directly in VBA. This may seem complex, but with the proper knowledge and willingness to study, you will see that it is relatively straightforward. However, it does require dedication and learning.
This brings us to another question. An RTD system is essentially just a socket. But it is configured to allow only one-way communication. With the knowledge explained in the last three articles on sockets, it becomes clearer that we can implement something a bit more sophisticated. Again, I will use Excel here purely for educational purposes. In fact, you could use any program, application, or method to achieve the same results. However, before showing the actual implementation, I want you to understand the possibilities available to achieve the results that will be presented later.
Here, we will do something more advanced. I believe many readers are unfamiliar with what I'm about to present. The topic is very interesting but extremely extensive. Therefore, I recommend also reviewing the references provided at the end of this article. They will be very helpful. What we will use is still under development. But that does not mean it should not be studied.
Since I do not want to add DLLs to the MQL5 code (at least not yet), we will explore something quite curious. I will present it gradually so you can follow along and understand how we will make Excel communicate with MetaTrader 5.
This will be done without using the approach from Market Simulation (Part 06): Transferring Information from MetaTrader 5 to Excel. Although that method works, it is not very flexible, forcing us to do certain things that become unnecessary when using sockets. Ultimately, the goal is to show how to transfer data from Excel to MetaTrader 5 and vice versa.
Starting to Use Python in Tasks
Wait a moment, you just said we would be using Excel. I thought we would be programming directly in VBA. Whatэs this about using Python? Calm down, dear reader. We will indeed use Excel, but we will not program everything directly in VBA. Technically, we could use VBA to build the communication between Excel and MetaTrader 5. However, if we did, we would be limited by what these two programs can do. If you wanted to use another program instead of Excel to assist MetaTrader 5 in market operations, you would have to rebuild the entire communication system. By using Python as an intermediary layer, things become much more flexible. Python also simplifies certain tasks, allowing you to to do everything even without Excel and work only within Python. But that's not our purpose here. I want to use Excel for reasons that will become clear later. That's why we need Python. What we are doing is shown in the image below:

Notice that Python is at the center, with all information passing through it. Our actual goal is to use MetaTrader 5 with Excel. But by placing Python at the center, we can also do without Excel or replace it with any other application.
Why Python, and not C/C++? The reason is practicality. There is no point in coding in C/C++ if we can achieve excellent results much more simply using Python. Because Python continues to evolve, offering us more and more practicality. So, we will use Python to communicate with MetaTrader 5 via sockets.
Now, it is important to explain one thing. MetaTrader 5 allows you to execute Python scripts directly on charts, provided you configure it properly. This configuration is not complicated. On the contrary, everything is extremely simple and straightforward. You just need to download and install the latest stable Python version. Then, in MetaEditor, set the directory for the Python executable as shown below:
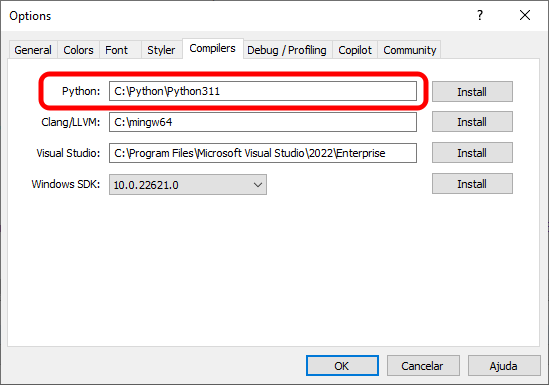
Note that you only need to point to the directory containing the Python executable. At the time of writing, the most stable version is 3.11.3, but a newer version is likely available. You can download the latest version from Python.org.
Once installed, you are ready to start creating Python scripts. Although various tools and editors exist to assist in coding, you do not strictly need them. You can use MetaEditor or any editor of your choice. Optionally, you may download some tools to help with coding, but I will not recommend any specific one here.
Returning to the topic of using Python in MetaTrader 5, we will not actually do this here. However, if you wish, you may use it in whatever way you see fit. What we will actually do is build the communication code purely in MQL5, just as was done in the previous articles, and use Python to simplify the task of creating the socket for Excel. Once again, it is possible to create the socket directly in VBA, but it is much simpler to do this via Python, especially because what we will be doing is creating the server side. In MQL5, we cannot truly create a server using pure MQL5 alone.
There is, however, an important detail here. Simply downloading and installing Python on your operating system is not enough for you to use Python as shown in the image above, where communication between Excel and MetaTrader 5 via Python is illustrated. We need one additional component installed on our machine - of course, in addition to Excel. And it is precisely this extra component that will make all the difference.
Getting to Know xlwings
Here is that extra component we need to add. This xlwings is a module that allows us to run Python scripts as a replacement for the VBA present in Excel. Yes, you can perform tasks directly in Python within Excel instead of doing the same things using VBA. However, VBA still has its usefulness, as xlwings does not fully replace VBA. It simply extends the possibilities, allowing us to perform many tasks via Python.
One detail worth mentioning is that there are other modules that do the same thing as xlwings. Yes, they do exist. However, in some cases they are licensed. In the case of xlwings, for non-commercial use it can be used at no extra cost. Since most of the time you will be learning while experimenting, and not actually creating something commercial, xlwings is a good alternative at the beginning of the learning process. Especially because it is quite simple, as you will see.
Installing xlwings
In the references section, I will indicate how you can access the documentation and better understand xlwings. However, to make things easier, in this article I will show how you should proceed in this first stage. To begin with, we need to install Python. During the Python installation, you must check the option indicated in the image below.
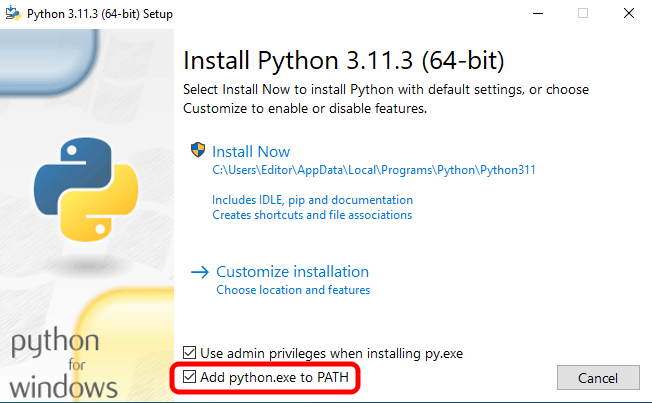
If you do not do this, you will need to manually add Python path later to the Windows environment variables to make things work. If you already have more experience using Python, adding the path variable is unnecessary. But here we will proceed assuming that you have no prior experience with Python at all. Therefore, we will do everything using the default settings. Wait for the Python installation to complete.
The following screen will appear.
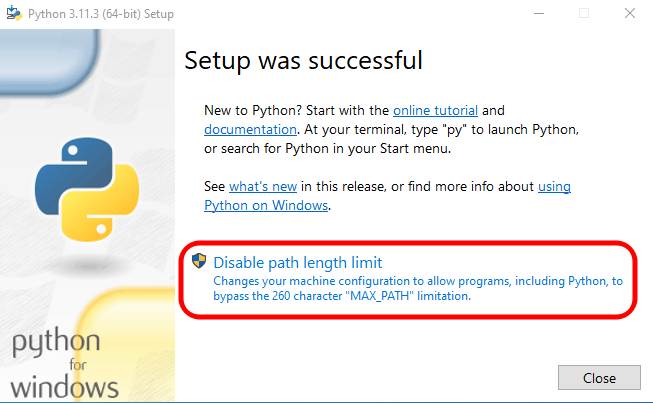
If you click on the highlighted option, you will be able to use long file names. Its a personal choice. Some people do not like to use very long file names. If that is your case, simply click CLOSE and we are done. However, if you prefer to use names longer than 256 characters (or in the case of Python, 260 characters) it is advisable to click the highlighted option. This way, Python will be able to handle such names.
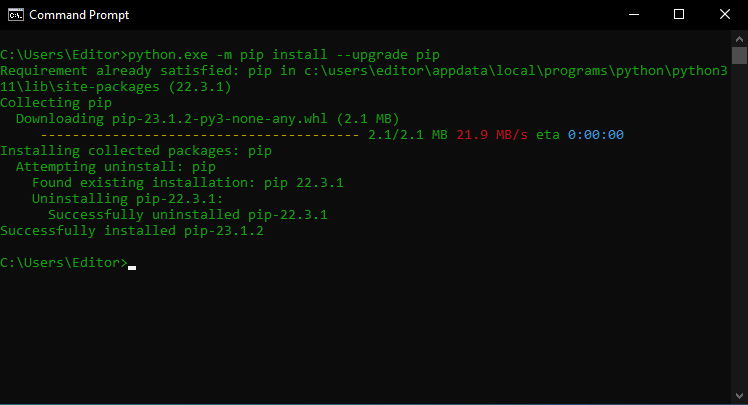
After this, we will open a command prompt. You may use PowerShell, but I personally prefer the good old CMD. The first thing I recommend you do in the prompt is to type the command shown below.
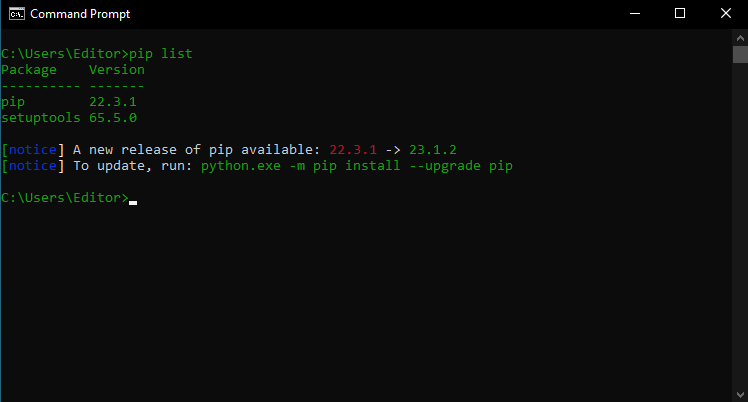
I will try to present things in this manner: command by command, along with the result, so that it is clear what is being done. As a result of the command entered, you can see that Python has installed two packages by default. One of these packages already needs to be upgraded. So type the command. The result can be seen below.
Good. Now that the system is updated, we can move on to xlwings. xlwings is an add-in that connects to Excel. However, as you will see in the documentation, it does not strictly require Excel. In any case, we will proceed in a way that actually uses Excel. After Excel is installed, it will appear as shown below.

Note that there is nothing different in the Excel ribbon at this point. So, returning to the command prompt/PowerShell, enter the following command as shown in the image below.
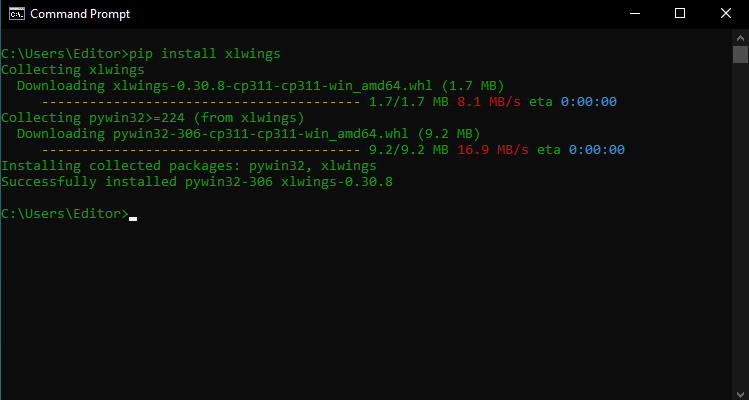
As you can see, this command downloads xlwings and installs it as a Python package. When you check the installed packages again, you will see the result shown below:
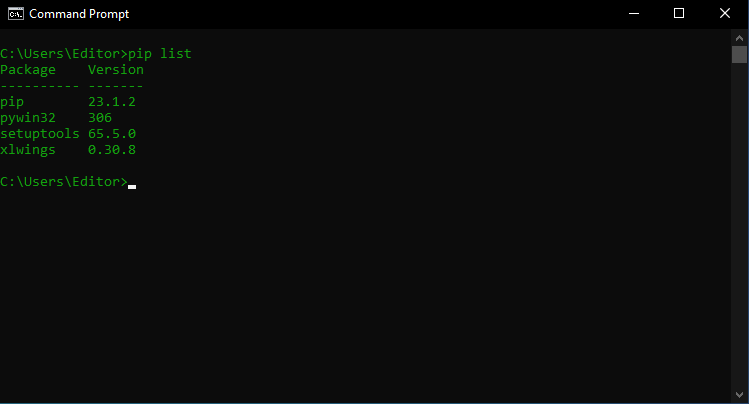
The xlwings version may be different, as it is updated from time to time. However, note that along with xlwings, another package was also installed: pywin32. Do not worry, it is simply a dependency of xlwings.
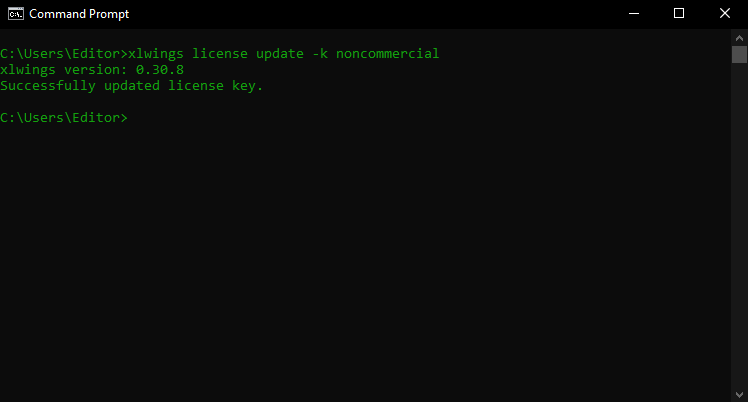
The next step is to license xlwings. But do not worry. Since we will be using it in a non-commercial way, that is, we will not be selling or commercializing what is done here, we can use a license specifically for this purpose. Simply follow what is shown in the image below, and xlwings will be licensed.
Very well. Very well. Now we are almost ready. The only thing left is to integrate xlwings with Excel. At this point, there are a few questions to consider. The first question is: do you really want to run Python applications via Excel, or do you want to replace VBA with Python in terms of how Excel operates? I mention this because if you only want to create macros for Excel that are written in Python, you do not actually need to add the xlwings add-in to Excel. You only need to perform a small step during macro editing. This allows you to integrate both VBA and Python into Excel.
However, if you truly want to run Python scripts inside Excel, it is a good idea to add xlwings as an Excel add-in. By doing so, a new area will be created in the ribbon that allows you to run Python scripts directly from Excel, without problems or complications. Although you will still need to perform a few additional steps to ensure everything works properly.
All of this is well explained in the xlwings documentation. So if you have any doubts, consult the xlwings documentation to see how to proceed. At the end of this article, I will provide references so you can go directly to the relevant material.
Here, however, I will make the following assumption: readers still know nothing about xlwings and are just beginning to study Python. In this case, the ideal approach is to add xlwings both as an add-in and make it available for use in macros. Over time, you will be able to determine which approach works best for you.
Adding xlwings to Excel as an Add-In
Adding xlwings as an add-in is not one of the most complicated tasks that exist. In fact, it is quite simple. There are two paths you can follow. Keep in mind that here we are using the standard installation. If you are more experienced, you may configure this in other ways.
The first path is to go directly through Excel and add xlwings as an add-in from within Excel itself. To do this, you must select the option shown below:

Then, select the option indicated in the following image:
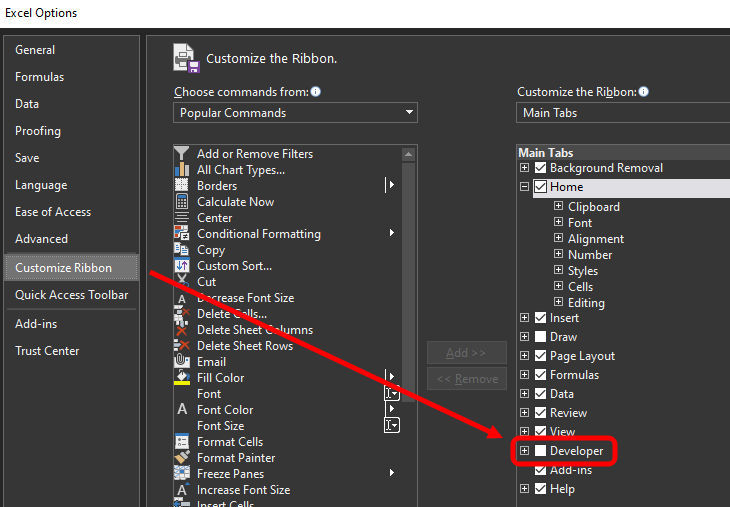
This will add the Developer tab to the ribbon. In the Developer tab, select the item indicated in the next image:
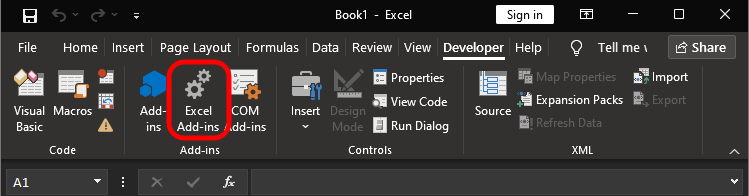
This will open the following window:
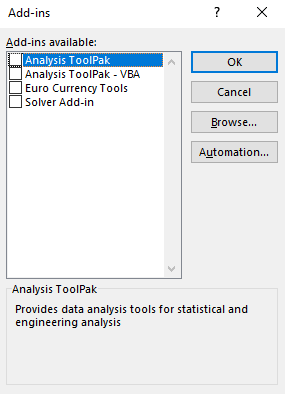
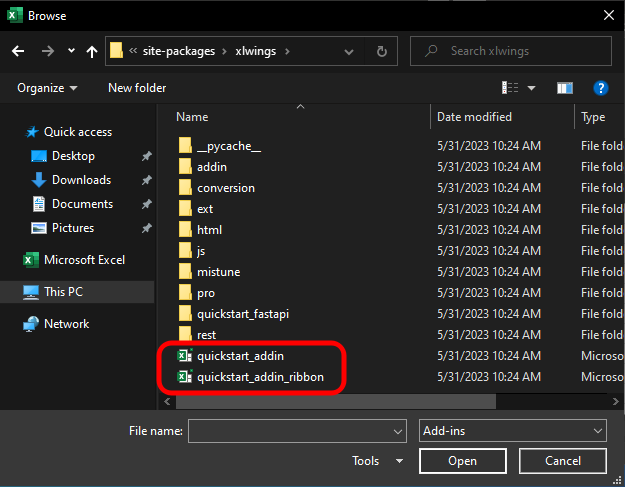
Here we have the default add-ins from the Excel installation. To add xlwings from this window, you must click the Browse button and navigate to the following path:
C:\Users\{USERNAME}\AppData\Local\Programs\Python\Python311\Lib\site-packages\xlwings\addin
Remember that this path refers to the default Python installation. The {USERNAME} value indicates the Windows username under which Python was installed. The Python311 value indicates the currently installed Python version. This is why it is important to know what you are doing during program installation. If you change anything during installation, these values will be different. In any case, the idea is to locate the file shown in the image immediately below:
After adding these files, you will be able to access the add-in directly from the Excel ribbon. However, I personally prefer the second method of performing this same addition. This is because we already have the command prompt open. All we need to do is type the command shown below:
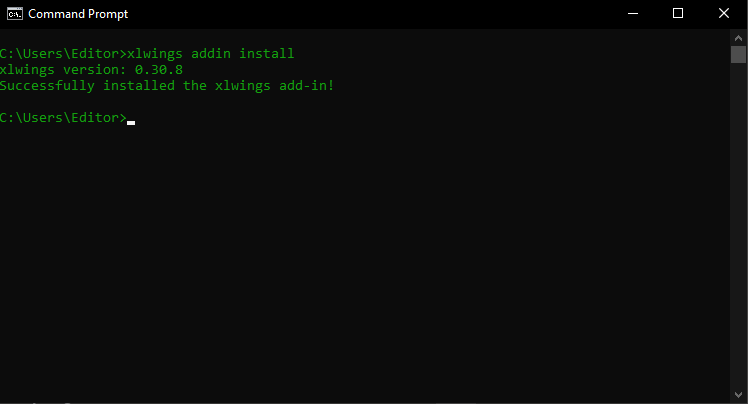
In both cases, the result will be the same, as shown in the image below. There is one detail that may influence your choice of which procedure is better for adding the add-in. This detail relates to the fact that all commands executed in the prompt can be placed into a batch file. This allows you to automate all of these typed commands, making the entire integration process much faster and easier.
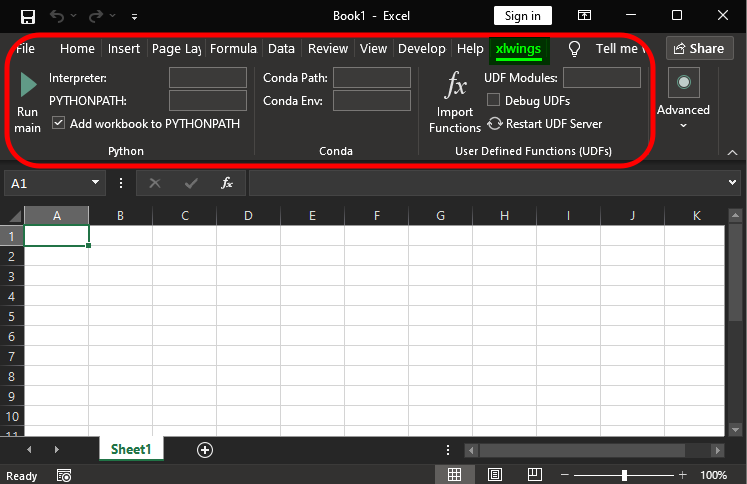
Note that a new tab called xlwings has been added to Excel. Here, you can make use of scripts written in Python. However, there are a few details required for this to work perfectly. Once again, study the xlwings documentation to learn how to do this properly, as you may attempt to do things in a way that xlwings does not expect. In such cases, you will always receive an error message, even when everything appears to be functioning correctly.
But in fact, another point is important. Making the Python script execute as if it were a macro written in VBA. In my view, what is most interesting is to combine both: using VBA together with Python. However, this is up to you. The intent of this article is simply to present a solution to a problem. The problem is how to easily transfer information between Excel and MetaTrader 5. We have not reached that point yet, but we are very close.
Further explanation relates to VBA. To keep things organized, let's move on to a new topic.
Integrating Python with VBA
In order for you to use Python directly within code written in VBA, there are a few different approaches besides the one we will actually use here. One of these approaches is to make a SHELL call. This does work, but it comes with some inconveniences that we will not face when using xlwings, or even another tool that performs the same role as xlwings.
An example of a SHELL call that allows Python scripts to be executed from within VBA code can be seen below:
Sub CallPythonInVBA()
        Dim vbaShell as Object

        Set vbaShell = VBA.CreateObject("WScript.Shell")
        vbaShell.Run """<PATH OF PYTHON>\python.exe""" & """<PATH OF SCRIPT>\Script.py"""

End Sub
VBA macro
The fragment above allows VBA to execute a Python script. It does work. However, note that the value indicated as <PATH OF PYTHON> must point to the location of the Python executable, just as <PATH OF SCRIPT> must point to the correct path of the file to be executed - in this case, the file named Script.py.
This kind of work does not make much sense when you can integrate Python directly into VBA. This is because the same code shown above can be replaced by a single line of command, and with several advantages. One of these advantages is that you do not need to worry about where Python is installed. Another advantage (which I will not go into detail here, as it goes beyond the scope of this article) is that the Python script can be part of a project in which Excel itself is included with VBA code. When integration occurs, the entire project can be organized within a single folder or directory, and xlwings will handle path resolution as well as other related issues. This ensures that the Python script works seamlessly together with VBA. Afain, it is better for you to read the documentation listed in the references of this article.
Now, let us return to our main topic. When you open the VBA editor in Excel, you will see the following screen:
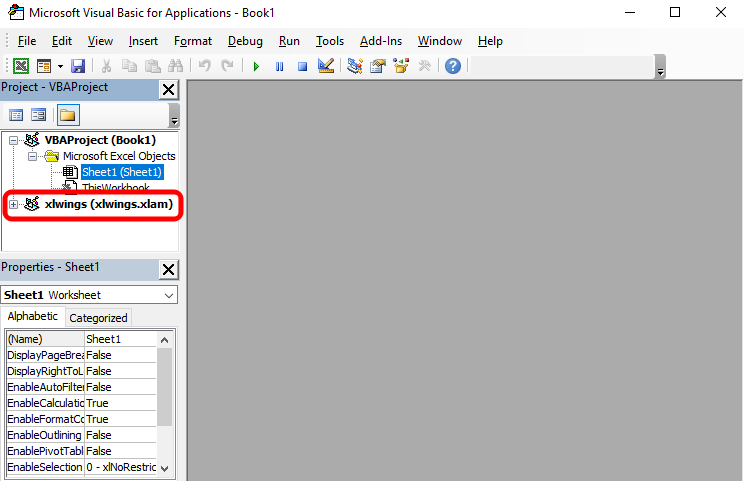
Note that I have highlighted something in the image. This highlighted item is protected by a password. However, this should not cause you any concern or inconvenience. The password required to open this highlighted file can be found in the xlwings documentation, which is accessible via the link provided in the references section. I could state it here, but I want you to consult the documentation yourself. In any case, at this point we need to tell VBA to make use of xlwings. This is done by adding the xlwings reference to the VBA code we will write. To add this reference, go to the location shown below.
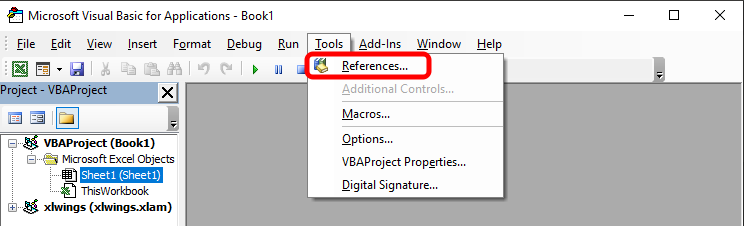
After selecting the highlighted item in the image above, you will be taken to the following screen:
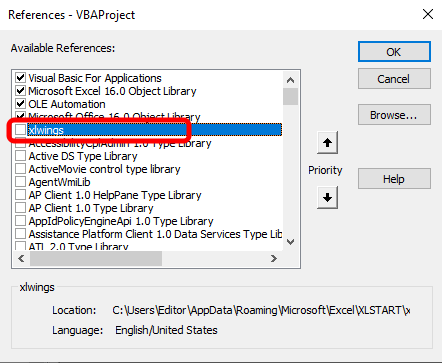
You must check the reference indicated in the image above. If you have NEVER seen or used this window before, know that it tells VBA which references it should use as support when it cannot internally resolve something in the code. When this happens, VBA will search through the referenced libraries to determine how to resolve the call in the code. VBA will search among available references. If it cannot resolve it, VBA will report this unresolved call as an error. This is precisely why many people search for VBA macro code on the web and then fail to make it work. The problem is often related to missing references that VBA cannot resolve.
In our case, one of the calls that will exist in the VBA code and that is not part of native VBA is RunPython. If you do not check the option highlighted in the image above, when VBA encounters a call to RunPython, it will report it as an error.
So do not forget: whenever you create a macro or script in VBA that calls Python code, make sure to check this box in the references section. By doing so, your code will work correctly.
Final Thoughts
In this article, I only presented the procedure required for a Python script to be executed from within Excel. Although this may seem unusual or even strange, it opens many doors, especially because many things are easier to implement in Python than in VBA. More importantly, it allows us to create a very flexible and elegant way to transfer information between Excel and MetaTrader 5. Even if we do not make intensive use of Excel and instead use Python directly with MetaTrader 5, once you truly understand what can be done, you will not want to rely solely on Python and MetaTrader 5. You will definitely want to sue Excel or another spreadsheet application.
In the next article, we will finally see how the code that makes all of this work is actually implemented. So, I will see you in the next article.
References
| File | Description |
|---|---|
| Experts\Expert Advisor.mq5 | Demonstrates the interaction between Chart Trade and the Expert Advisor (Mouse Study is required for interaction) |
| Indicators\Chart Trade.mq5 | Creates the window for configuring the order to be sent (Mouse Study is required for interaction) |
| Indicators\Market Replay.mq5 | Creates controls for interacting with the replay/simulator service (Mouse Study is required for interaction) |
| Indicators\Mouse Study.mq5 | Enables interaction between graphical controls and the user (Required for operating both the replay simulator and live market trading) |
| Servicios\Market Replay.mq5 | Creates and maintains the market replay and simulation service (Main file of the entire system) |
| VS C++ Server.cpp | Creates and maintains a socket server in C++ (mini chat version) |
| Python code Server.py | Creates and maintains a Python socket for communication between MetaTrader 5 and Excel |
| ScriptsCheckSocket.mq5 | Checks connection with an external socket |
| Indicators\Mini Chat.mq5 | Implements a mini chat as an indicator (requires a server) |
| Experts\Mini Chat.mq5 | Implements a mini chat as an Expert Advisor (requires a server) |
Translated from Portuguese by MetaQuotes Ltd.
Original article: https://www.mql5.com/pt/articles/12743
Warning: All rights to these materials are reserved by MetaQuotes Ltd. Copying or reprinting of these materials in whole or in part is prohibited.
This article was written by a user of the site and reflects their personal views. MetaQuotes Ltd is not responsible for the accuracy of the information presented, nor for any consequences resulting from the use of the solutions, strategies or recommendations described.

- Free trading apps
- Over 8,000 signals for copying
- Economic news for exploring financial markets
You agree to website policy and terms of use