
From Entry Zone to Execution: Building a Structured Multi-Entry Risk Plan with GAM Risk Manager

Trading with a single entry is relatively simple from a risk-management perspective.
You define an entry price, place a Stop Loss, determine how much you are willing to risk, and calculate the appropriate position size.
But what happens when the strategy does not use one exact entry?
Many traders work with an entry zone instead.
They may want to enter gradually as price moves through that zone, distributing the position across several price levels rather than committing the entire position at one price.
This creates a more complex risk-management problem.
If every entry is located at a different price, then every entry also has a different distance from the Stop Loss. Simply calculating one lot size and dividing it equally between several orders may not represent the intended total risk accurately.
This is the problem that GAM Risk Manager is designed to address.
Rather than treating position sizing, entry distribution, Stop Loss placement, Take Profit planning, and execution as separate tasks, the tool combines them into one structured workflow directly inside MetaTrader 5.
1. The Challenge of Multi-Entry Risk Management
Consider a trader who identifies an attractive buying area.
Instead of entering at one price, the trader defines an entry zone:
Z1: 3355
Z2: 3330
with:
Stop Loss: 3300
The trader wants to risk a maximum planned amount of:
$100
and divide the setup into:
4 entries
At first glance, the obvious solution might seem to be:
Calculate the total lot size and divide it into four equal orders.
However, there is an important problem.
The four entries do not have the same distance from the Stop Loss.
An entry near 3355 carries a larger price distance to 3300 than an entry closer to 3330.
Therefore, the risk represented by a particular volume is not necessarily identical across all four entry prices.
A multi-entry risk calculation should consider the complete structure, not simply the number of orders.
2. One Entry Zone, Multiple Entry Levels
GAM Risk Manager begins with one defined entry zone.
The trader specifies two boundaries:
Z1 → Z2
These prices represent the range in which the position will be constructed.
The trader can then choose between:
1 and 10 entries
The system distributes the selected number of entry levels across the defined zone.
For example:
1 Entry
One execution level inside the planned structure.
3 Entries
Three distributed entry levels across the zone.
5 Entries
Five distributed entry levels.
10 Entries
Ten distributed entry levels across the complete range.
This distinction is important.
GAM Risk Manager does not create ten independent trading zones.
It creates one entry zone containing multiple structured entry levels.
This allows the trader to define the market area first and then determine how granular the execution should be.
3. Why Position Size Cannot Be Treated as a Simple Division
Suppose four entries are distributed across our example zone:
3355 → 3330
with the Stop Loss at:
3300
Each entry has a different distance from the Stop Loss.
Conceptually:
Risk per Entry = Price Distance to Stop Loss × Position Size × Symbol Value
The exact monetary calculation depends on the specifications of the instrument being traded.
This means that simply taking a total position size and dividing it by four does not necessarily produce the intended risk structure.
GAM Risk Manager evaluates the distributed entry levels together with the Stop Loss and the trading specifications of the selected symbol.
It then calculates the position structure while attempting to keep the resulting exposure aligned with the risk amount defined by the trader.
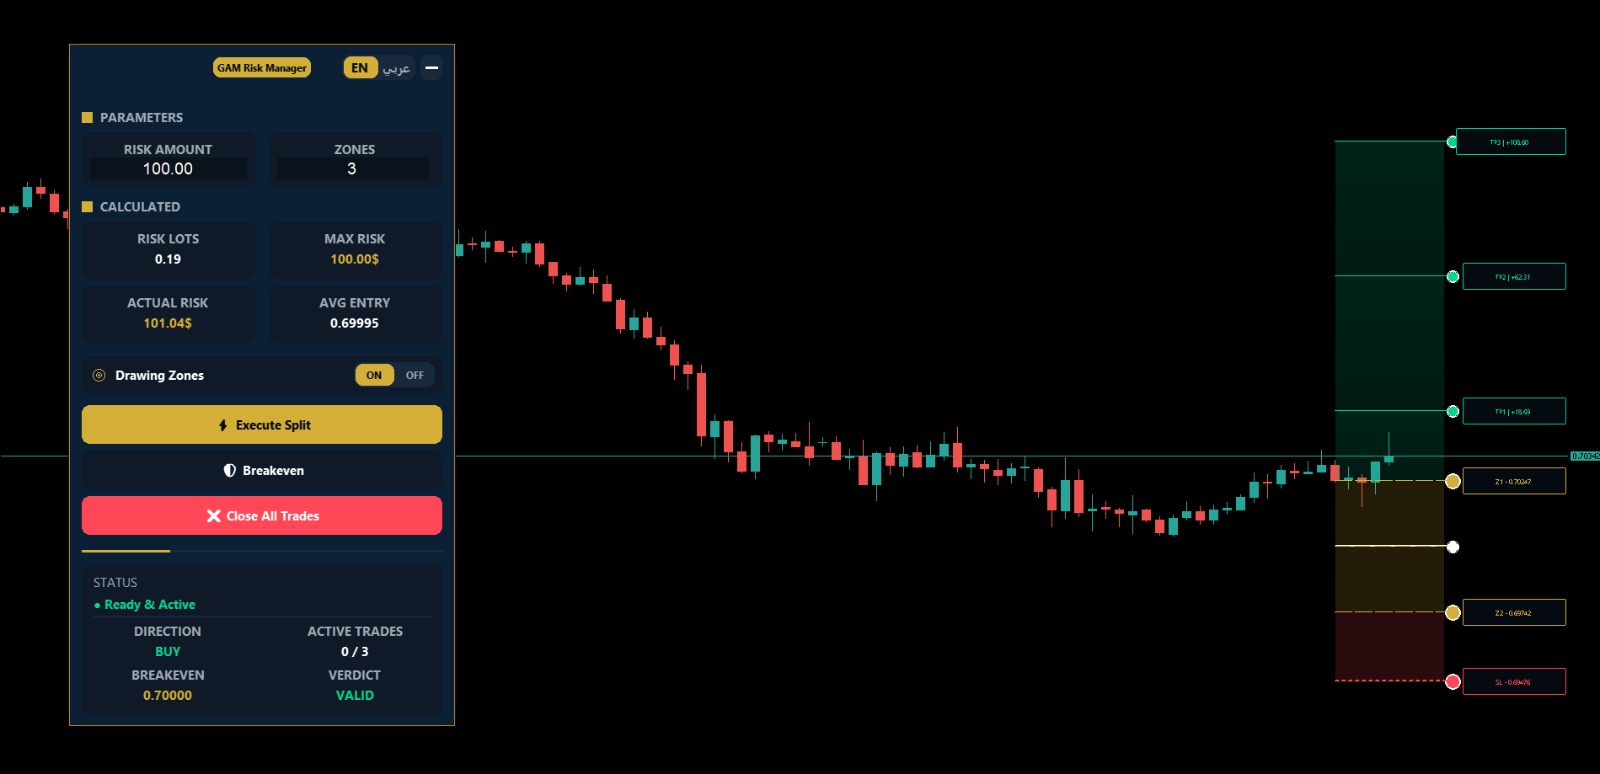
The control panel provides information such as:
- Total position size
- Maximum planned risk
- Actual calculated risk
- Average entry price
This makes the difference between the requested risk and the actual executable structure visible before execution.
4. Requested Risk vs Actual Risk
An important concept in position sizing is that the requested risk and the final calculated risk may not always be identical.
For example, a trader may request:
Risk Amount: $100
But a broker may only allow volume increments such as:
0.01 lots
The mathematically perfect position size might fall between two permitted volume values.
The trading platform must therefore work within the specifications allowed for that symbol.
GAM Risk Manager displays the resulting Actual Risk, allowing the trader to see the calculated exposure rather than assuming that the requested amount can always be reproduced exactly.
This becomes particularly important when several entries are involved.
5. Understanding Average Entry
When scaling into a position, looking at only Z1 or Z2 does not describe the complete position.
Once several entry levels are combined, another price becomes important:
Average Entry
GAM Risk Manager calculates the average entry of the planned position structure and displays it directly in the interface.
This gives the trader a central reference for evaluating the complete setup.
The average entry can then be used to better understand:
- Overall position structure
- Distance to Stop Loss
- Risk/Reward relationships
- Target placement
- Combined exposure
Instead of evaluating several orders independently, the trader can see how they behave as one planned position.
6. Building the Take-Profit Structure
Entry planning is only one side of the trade.
The exit structure must also be considered.
GAM Risk Manager connects the number of available Take Profit levels to the selected number of entries.
For example:
3 Entries → TP1, TP2, TP3
5 Entries → TP1 through TP5
10 Entries → TP1 through TP10
The initial targets are generated according to the Risk/Reward structure calculated from the planned trade.
However, the trader is not locked into those initial prices.
Individual Take Profit levels can be edited directly.
This creates a useful combination:
Calculated structure + manual control
The tool can establish the initial framework, while the trader can adapt the final targets to the market analysis being used.
7. Editing Prices Directly From the Chart
Trade planning frequently requires precise price levels.
For this reason, GAM Risk Manager allows important values to be entered and adjusted directly from the chart interface.
The trader can modify:
Z1
Z2
Stop Loss
TP1, TP2, TP3...
Instead of repeatedly opening separate dialogs or recalculating the complete position externally, the trader can enter the desired price and allow the structure to update.
This is particularly useful when the levels originate from an existing analysis.
For example, a trader may already have identified:
- A specific support or resistance range
- A liquidity area
- A structural invalidation price
- Individual target levels
The Risk Manager is not responsible for deciding whether those levels represent a good trade.
Its role is to help transform those selected prices into a structured risk and execution plan.
8. A Practical Example
Let us examine a practical four-entry setup directly from GAM Risk Manager.
In this example, the trader defines:
Risk Amount: $500
Number of Entries: 4
Direction: BUY
After the entry zone and Stop Loss are defined, GAM Risk Manager distributes four entry levels across the selected price range and calculates the complete position structure.
The resulting calculation displays:
Total Risk Lots: 0.97
Maximum Planned Risk: $500.00
Actual Calculated Risk: $502.10
Average Entry: 0.69995
The small difference between the requested $500 risk and the calculated $502.10 actual risk illustrates an important aspect of executable position sizing: the final volume must respect the volume increments and trading specifications available for the selected symbol.
Four Entries — Four Targets
Because this setup uses four distributed entries, GAM Risk Manager creates a corresponding four-target structure:
TP1 → TP2 → TP3 → TP4
The chart visually displays the entry zone, distributed entry levels, Stop Loss, and the four Take Profit levels.
The trader can review this complete structure before pressing Execute Split.
Adjusting the Structure
The displayed levels are not simply static graphics.
The trader can directly modify the relevant price values, including:
Z1 • Z2 • Stop Loss • TP1 • TP2 • TP3 • TP4
GAM Risk Manager then updates the structure according to the new values.
This allows the trader's own market analysis to determine the prices while the Risk Manager handles the position-sizing, risk and execution structure.

9. Visualizing Risk Before Execution
One of the advantages of planning directly on the chart is the ability to see the relationship between all important levels.
GAM Risk Manager displays the planned structure visually, including elements such as:
- Entry zone
- Individual entry levels
- Stop Loss
- Take Profit levels
- Risk area
- Reward area
- Average entry
This makes it easier to identify structural problems before execution.
For example, the trader may decide that:
- The Stop Loss is too far away
- The zone is too wide
- Too many entries are being used
- The targets do not fit the current analysis
The structure can then be adjusted and recalculated before orders are sent.
10. From Planning to Execution
Once the trader is satisfied with the structure, GAM Risk Manager provides the Execute Split function.
The system evaluates each planned entry relative to the current market price and trade direction.
Depending on those conditions, the appropriate pending-order type can be used:
- Buy Limit
- Buy Stop
- Sell Limit
- Sell Stop
Each planned order contains its corresponding:
- Entry price
- Position size
- Stop Loss
- Take Profit
This connects the planning stage with execution without requiring the trader to manually recreate every calculated order.
For a structure containing several entries, this can significantly simplify the operational side of placing the trade.
11. Manual Breakeven Management
Trade management does not end when the orders are placed.
GAM Risk Manager includes a dedicated Breakeven control for active positions.
An important distinction is that this function is manual.
The tool does not automatically decide when the market has moved far enough to activate breakeven.
Instead, the trader decides when the action should be performed and presses the Breakeven button.
This preserves trader control over the management decision rather than applying an automatic trigger that may not suit every market condition or strategy.
12. Closing the Trade Structure
The interface also includes a Close All Trades control.
This provides a centralized management function for the trade structure handled by GAM Risk Manager.
For multi-entry trading, centralized controls can be particularly useful because the position may consist of several individual components rather than one single order.
13. Why Symbol Specifications Matter
A risk manager should not assume that every instrument behaves identically.
Different symbols and brokers can have different:
- Tick sizes
- Tick values
- Minimum volumes
- Maximum volumes
- Volume steps
- Contract specifications
GAM Risk Manager uses the available specifications of the selected MetaTrader 5 symbol when calculating its position structure.
This is important when moving between markets such as:
Forex, Gold, Indices, Commodities and CFDs.
A volume calculation suitable for one symbol cannot simply be assumed to work identically on another.
It also explains why Actual Risk is an important value to display.
The executable result must respect the specifications provided for the instrument.
14. Risk Management Is a Structure, Not Just a Percentage
Traders often reduce risk management to one statement:
“I risk 1% per trade.”
But that percentage alone does not describe the complete trade.
A structured plan also needs to answer:
Where does the position begin?
Where is the invalidation point?
How many entries will be used?
How is position size distributed?
What is the combined average entry?
What is the actual monetary exposure?
Where are profits planned to be taken?
When multiple entries are involved, these questions become interconnected.
Changing the Stop Loss affects risk.
Changing the zone affects entry distances.
Changing the number of entries changes the execution structure.
Changing position size changes monetary exposure.
The objective of GAM Risk Manager is to keep these components visible within one workflow.
15. What GAM Risk Manager Does — and What It Does Not Do
GAM Risk Manager is designed as a:
Risk Management + Trade Planning + Execution Utility
It helps transform a trader's selected levels and risk parameters into a structured trade plan.
It does not determine whether the market should rise or fall.
It does not replace market analysis.
It does not guarantee that a trade will be profitable.
And it does not eliminate trading risk.
The trader remains responsible for determining:
- Market direction
- Entry zone
- Stop Loss
- Risk amount
- Target structure
- Whether and when to execute
- When to apply manual trade management
The tool handles the structural calculations and execution workflow around those decisions.
Final Thoughts
Multi-entry trading introduces a problem that does not exist in the same way with a single entry.
Once several prices contribute to one position, risk becomes a structure rather than a single calculation.
The entry zone, distributed entry prices, Stop Loss, individual position sizes, average entry, Take Profit levels and symbol specifications all interact with each other.
GAM Risk Manager brings those components together inside MetaTrader 5 so the trader can build and inspect the complete structure before execution.
The principle behind the workflow is simple:
One Entry Zone. Multiple Entries. Defined Risk. Structured Execution.
Plan the risk. Structure the trade. Execute with precision.
GAM Risk Manager for MetaTrader 5
Product: GAM Risk Manager
Developer: GAMFOREX LTD
Platform: MetaTrader 5
Explore GAM Risk Manager on the MQL5 Market:
https://www.mql5.com/en/market/product/190506?source=Site
GAMFOREX LTD | GAMFOREX.COM
Important Notice
GAM Risk Manager is a risk-management, trade-planning and execution utility.
It does not guarantee profits, predict future market movements, or provide guaranteed trading signals.
Trading financial markets involves significant risk. Broker specifications, spreads, commissions, slippage, execution conditions and other factors can affect actual trading results.
Users should understand the tool and test its functionality on a demo account before using it in live trading.