Session Range Breakout EA — Trading the Retest, Not the Break

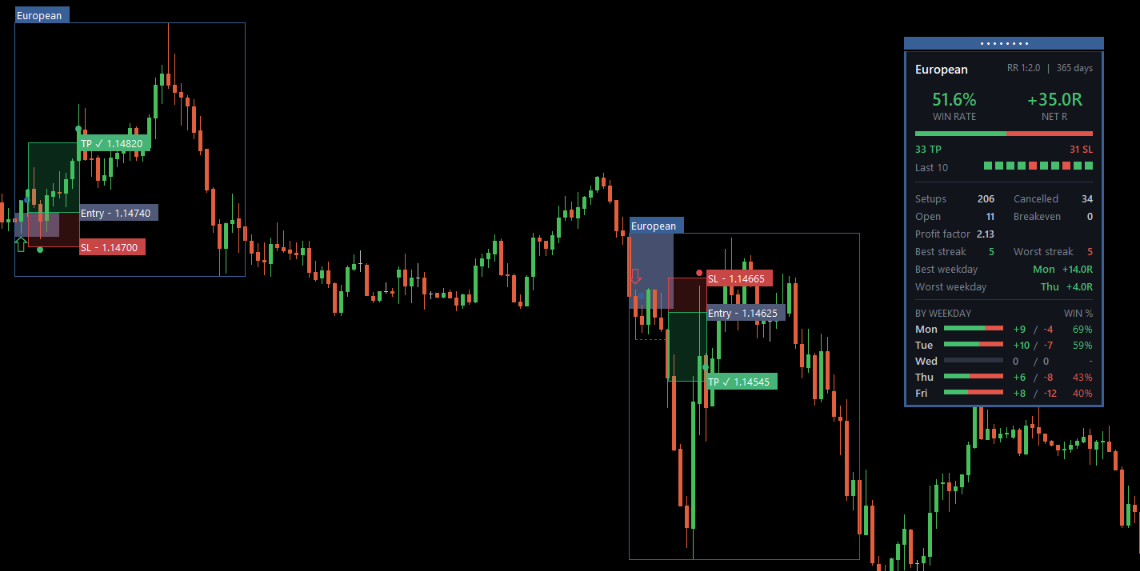
Most breakout robots have the same problem. Price pokes out of a range, the robot buys, and price walks straight back inside. You've paid the spread to buy the high of a move that was already over.
Session Range Breakout EA does the opposite. It watches the break, marks the level, and then does nothing until price comes back. The entry is a pending limit order sitting on the level that just broke. If price never returns, there's no trade.
🎯 How the model works
1️⃣ Build the opening range. At the session open the EA takes the first candle of your chosen timeframe and draws a box around it. That's the range everything is measured against.
2️⃣ Wait for displacement. A close beyond the range — not a wick — counts as the break. The extreme of that impulse leg is recorded and marked with a dotted line.
3️⃣ Arm the order. A pending limit goes in, either at the opening range level itself or at the impulse extreme. An entry buffer can sit it a fraction in front so a shallow retest still fills.
4️⃣ One of three things happens.
| Outcome | What it means |
|---|---|
| ✅ Filled | Price retested the level. The trade runs to its stop or target. |
| ⏳ Cancelled | Price never came back. The unfilled order dies at the session end. |
| ❌ Invalidated | Price closed back through the opposite side of the range. Order pulled, candle marked. |
Once a trade is filled it is never closed by the session end. It runs to its stop or its target, even if that's tomorrow.
🖼️ What you see on the chart
The EA draws its full reasoning as it trades — not just arrows:
- 🟦 Session and opening range boxes, one per session, labelled
- ⬆️ Breakout arrows in the direction of the displacement
- ┅ Impulse level line, hidden once a setup is invalidated
- ⚪ Retest marker where price returned to the level
- 🔴 Entry and exit dots on the filling and closing candles
- 🟥🟩 Risk and reward zones as shaded areas with live price labels
- ❌ A cross on any candle that killed a setup
Drawing is skipped entirely in non-visual testing, so optimisation runs at full speed.
📊 The statistics card
One card per session, draggable anywhere on the chart:
| Metric | What it tells you |
|---|---|
| 🎯 Win rate | Targets hit ÷ (targets + stops). Breakeven exits excluded. |
| 💰 Net R | Total result in R, so it's comparable across symbols |
| ✅ TP / ❌ SL | Closed trade counts |
| 🤝 Breakeven | Scratches — counted separately so they don't flatter the win rate |
| 📋 Setups | Every breakout on a trading day, including ones that never filled |
| 🚫 Cancelled | Armed but never filled |
| ⏳ Open | Still running |
| ⚖️ Profit factor | R won ÷ R lost |
| 🔥 Best / worst streak | Consecutive wins and losses |
| 🔟 Last 10 | A colour strip of your recent form |
| 📅 By weekday | Wins, losses and win % per day — this is how you find your dead day |
⚙️ All the settings
🖥️ Display
| Setting | Default | What it does |
|---|---|---|
| Opening range timeframe | M15 | Timeframe the range is built from. Independent of your chart timeframe. |
| Days of history to show | 365 | How far back the EA draws and counts statistics |
| Hide chart grid | true | Cleaner background |
| Apply candle colours | true | Recolours candles to the EA's palette |
| Show session range box | true | The outer session box |
| Show ORB box | true | The opening range box |
| Show stats table | true | The statistics cards |
| Extend ORB box past break | 5 | Bars the range box continues after the breakout |
| SL/TP zone width | 20 | Bars wide for a trade still open or waiting |
| SL/TP zone opacity | 20% | Transparency of the shaded zones |
| Debug log | false | Per-setup lines in the Experts tab |
| Entry price | ORB level | Where the limit sits: the broken range level, or the impulse extreme |
| Entry buffer | 0.22 pips | Sits the order in front of the level so shallow retests fill. 0 = exactly on the level |
| Invalidate on close | true | Kill the setup if price closes back through the opposite side |
🛡️ Risk
| Setting | Default | What it does |
|---|---|---|
| Stop loss method | Entry candle | From the entry candle's high/low, or from ATR |
| Stop loss buffer | 2.2 pips | Added beyond the chosen stop reference |
| ATR period | 115 | ⚠️ Only used when the method is ATR |
| ATR multiplier | 3.2 | ⚠️ Only used when the method is ATR |
| Minimum stop loss | 4.0 pips | Floor on stop distance. Stops a quiet market producing a stop inside spread. 0 = off |
| Risk to reward ratio | 2.0 | Target distance as a multiple of risk |
💡 The minimum stop is the input most worth tuning per symbol. A 4-pip floor suits EURUSD; gold needs far more.
🤝 Breakeven
| Setting | Default | What it does |
|---|---|---|
| Move stop to breakeven | false | Master switch. Works in both exit modes |
| Breakeven trigger | 7.9 R | How far the trade must run before the stop moves |
| Breakeven buffer | 8.0 pips | How far past entry the stop lands, covering spread and commission |
⚠️ With a fixed target at 2.0 R, a trigger above 2.0 R can never fire — the target is reached first. Set the trigger below your R:R for it to do anything.
🚪 Exit
| Setting | Default | What it does |
|---|---|---|
| Exit mode | Fixed TP | Fixed target from the R:R, or a trailing stop with no target at all |
| Trail method | Swing structure | R-step, previous candle, swing structure, or ATR |
| Trail step | 0.5 R | Increment locked in by the R-step method |
| Swing strength | 2 | Bars each side needed to confirm a swing (lags by this many) |
| ATR trail multiplier | 2.0 | Distance behind the best close |
💼 Trading
| Setting | Default | What it does |
|---|---|---|
| Enable trading | true | Off = the EA draws and tracks but places nothing |
| Lot mode | Risk % | Size from a balance percentage, or a fixed lot |
| Risk per trade | 1.0% | Percentage of balance risked per trade |
| Fixed lot | 0.01 | Used when lot mode is Fixed |
| Magic number | 20260917 | Identifies this EA's orders |
| Max spread | 0 | Points. Blocks entries in thin conditions. 0 = off |
| Order comment | ORB | Appears on the order ticket |
🕐 Sessions
| Setting | Session 1 | Session 2 |
|---|---|---|
| Enabled | ✅ true | ❌ false |
| Name | European | New York |
| Start | 09:00 | 15:00 |
| End | 18:00 | 23:00 |
🕐 All times are broker server time, not your local clock. Check your broker's server offset before copying these.
📅 Trading days
| Mon | Tue | Wed | Thu | Fri |
|---|---|---|---|---|
| ✅ | ✅ | ❌ | ✅ | ✅ |
A day switched off still draws its session box, labelled as a no-trade day, so you can see what you skipped.
🔔 Alerts
| Setting | Default |
|---|---|
| Popup with sound | ✅ |
| Push to phone | ✅ |
| Setup armed | ✅ |
| Order filled | ✅ |
| Order cancelled | ✅ |
| Target reached | ✅ |
| Stop hit | ✅ |
Alerts are de-duplicated across charts, so running the EA on several windows won't fire the same notification repeatedly.
🏦 Built with funded accounts in mind
- 🛡️ Every trade carries a stop from the moment the order is placed
- 📏 Fixed percentage sizing, so exposure stays constant as the account moves
- 🚫 No grid, no martingale, no averaging into losers
- 📅 Session windows and the day filter keep you out of restricted periods
- 📊 A spread filter and a minimum stop keep trades from dying to noise
⚠️ Be honest about the gap: daily and total drawdown limits — the rules that actually fail people — are not enforced by the EA. Manage those yourself, or use a firm's own dashboard.
🚀 Getting started
- Attach the EA to a EURUSD chart. Defaults are built around an M15 opening range.
- Convert the session times to your broker's server time.
- Run it in the Strategy Tester in visual mode first — you'll see every box, zone and dot, and the stats card fills in as it goes.
- Adjust the minimum stop and the stop buffer to the symbol before going live.
- Start on a demo account. Always.
📌 The opening range timeframe is an input, not the chart you attach to. You can run an M15 opening range while watching an H1 chart.
⚠️ What it won't do
No robot is a substitute for understanding the market you're trading. This one takes a small number of trades — a handful per month per session — and a quiet stretch is normal, not a malfunction. Backtest results are historical, and your broker's spread, execution and server times will differ from whoever's data you're reading.
Test it yourself, on your own broker, before you risk anything real. 🎯