
Supreme Momentum Confluence User Manual for MetaTrader 4 and MetaTrader 5

1. What Supreme Momentum Confluence Is
Supreme Momentum Confluence is an indicator for MetaTrader 4 and MetaTrader 5. It blends six momentum and money-flow readings into one score from -100 to +100, follows it with a signal line, and draws a BULL or BEAR marker when a cross passes its filters. Each signal maps an ATR stop and three targets, the candles take the score's colour, and a dashboard shows the state of everything.
It does not place trades and has no access to your account. The stop and the targets are reference levels, not a forecast. For how to read it, see the trading guide.
2. Installation
The steps are the same on both platforms; the MetaTrader 5 and MetaTrader 4 versions are separate products.
- Buy or rent the indicator on its MQL5 Market page with your MQL5 account.
- In MetaTrader, log in to the same MQL5 account (Tools, Options, Community).
- Open the Toolbox (Ctrl+T; the Terminal window on MetaTrader 4), go to the Market tab, find Supreme Momentum Confluence under Purchased and click Install.
- In the Navigator (Ctrl+N), open Indicators, then Market, and drag Supreme Momentum Confluence onto a chart.
- Click OK to start with the defaults. Change any input later with Ctrl+I on the chart.
It runs on any symbol and any timeframe from M1 to monthly, needs no DLL, no internet access and no files, and removes everything it drew when you remove it.
On attaching, it calculates the newest 20,000 bars (Bars To Calculate) before it draws, so the first picture can take a few seconds. A chart that holds fewer bars uses all it has; the terminal's own limit is in Tools, Options, Charts, Max bars in chart.
3. What You See on the Chart
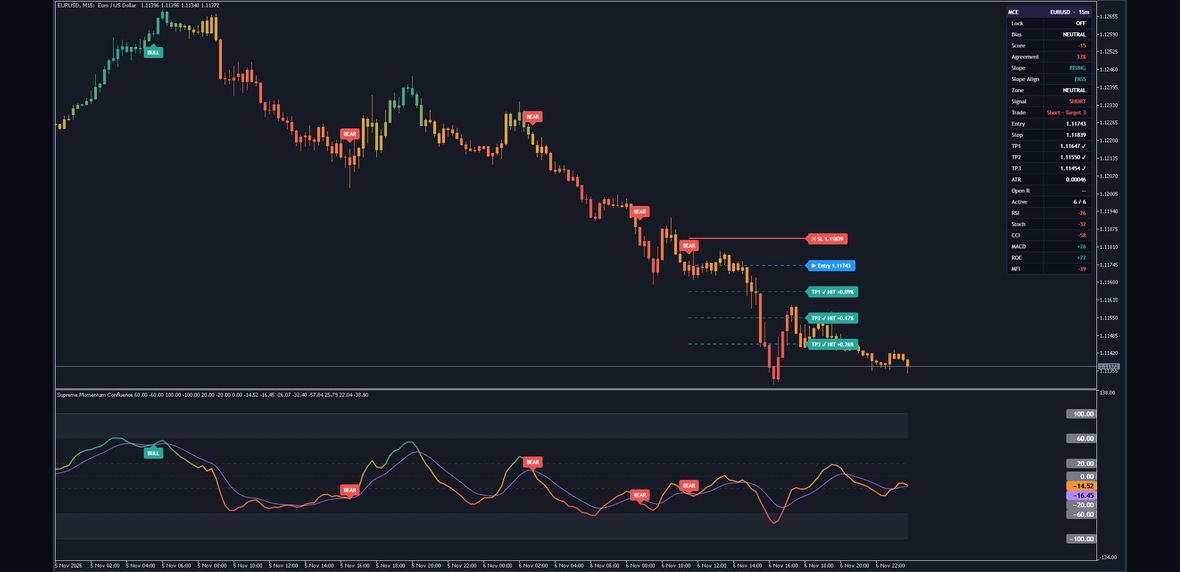
Figure 1. The indicator on a MetaTrader chart: the score and its signal line in the indicator's own window, and on the price chart the coloured candles, the markers, the current trade's levels and the dashboard.
In the indicator's window:
- The Momentum Score, coloured from Neutral at zero toward Bull at OB Lvl and toward Bear at OS Lvl, and the signal line in violet.
- The zones, shaded from OB Lvl to +100 and from OS Lvl to -100, with dotted lines at OB Lvl, OS Lvl and zero, dashed lines at Bull Thr and Bear Thr, and solid lines at +100 and -100.
- BULL and BEAR markers at the score's value on accepted signals, and optional lines for the six components.
- Value tags with two decimals for every level, the score and the signal line, at the indicator window's right edge.
On the price chart:
- Candles in the score's colour: body, border and wick.
- BULL and BEAR markers, below and above the signal bars. About 500 labels are kept, two per signal, and the oldest markers go first.
- The current trade: a solid stop line 2 px wide, dashed entry and target lines, and a label on each that prints its price. A touched target's label changes to a check mark, HIT and the distance from the entry in percent; so does the stop's label after a close beyond it. Targets that would print the same price share one label.
- The dashboard, described row by row in the trading guide. Hover a row for its tooltip.
The Data Window (Ctrl+D) lists fifteen values for any bar, among them Momentum Score, Signal Line and each component's score.
4. When Things Are Calculated
- On the closed bar: signals are decided on the closed bar, as are their markers, a new trade with its levels, the stop being hit and a trade being replaced. None of them changes afterwards. A bar counts as closed when the next bar's first tick arrives.
- On the forming bar: the score and the dashboard move with every tick, with the signal line and the newest candle's colour, and a target can be touched on any tick of a bar after the signal bar. The bar is worked out as if it closed now, at most four times a second. When it closes, it is calculated once more, for good.
- Again from the start: everything is calculated once more from the newest bars when older history is scrolled into the chart, or after a gap of more than 1,000 new bars. No alert is sent for bars calculated again.
- Higher TF Confirm: the indicator reads up to the newest 5,000 bars of Higher TF, as far as your broker offers them, and uses the Bias of the last closed one, so it never looks ahead.
5. Inputs
There are 112 inputs in 10 groups. On MetaTrader 4 each group starts with a separator line in the list of inputs; it is a label and changes nothing. A value outside its allowed range is held at the nearest end of it.
1. Core
| Input | Default | Allowed | What it changes |
|---|---|---|---|
| Source | close | open, high, low, close, hl2, hlc3, ohlc4 or hlcc4 | The price RSI, Stoch, CCI, MACD and ROC read. MFI always reads the bar's high-low-close average. |
| Smooth | 3 | 1 to 50 | EMA length that smooths the blend into the score. |
| Signal Len | 9 | 1 to 100 | EMA length of the signal line. |
| Bull Thr | 20 | 0 to 100 | At or above this, Bias reads BULL. |
| Bear Thr | -20 | -100 to 0 | At or below this, Bias reads BEAR. |
| OB Lvl | 60 | 0 to 100 | At or above this, Zone reads OVERBOUGHT. The upper zone and the gradient's Bull end. |
| OS Lvl | -60 | -100 to 0 | At or below this, Zone reads OVERSOLD. The lower zone and the gradient's Bear end. |
| Norm Len | 100 | 20 to 500 | Bars of the z-scores of MACD and ROC. Neither reads until this and its own lengths have filled. |
| Z Sat | 2.5 | 1.0 to 5.0 | The z-score at which MACD and ROC reach 100. |
2. Filters
| Input | Default | Allowed | What it changes |
|---|---|---|---|
| Min Agree % | 60 | 0 to 100 | The share of the component weight a signal needs on its side. |
| Slope Align | true | true or false | A BULL also needs the score rising, a BEAR falling. |
| Slope Len | 3 | 1 to 50 | Bars the score's change is measured over. |
| Higher TF Confirm | false | true or false | A signal also needs Higher TF's Bias on its side. NEUTRAL blocks both. |
| Higher TF | D1 | any timeframe | The chart's own timeframe reads the chart's Bias; a lower one is skipped and every signal passes. |
| Strength Filter | false | true or false | A signal also needs the ADX at or above ADX Threshold. |
| ADX Threshold | 20.0 | 0 to 100 | The ADX that filter asks for. |
| ADX Length | 14 | 1 to 100,000 | Its length in bars. |
| Smoothing | None | None, SMA, EMA, RMA, WMA or HMA | Smooths the blend before Smooth. |
| Smoothing Length | 20 | 2 to 100,000 | Its length in bars. Not used while Smoothing is None. |
3. Components
| Input | Default | Allowed | What it changes |
|---|---|---|---|
| RSI | true | true or false | RSI in the blend. |
| RSI Len | 14 | 2 to 500 | Its length in bars. |
| RSI W | 1.0 | 0 to 10 | Its weight. At 0 it leaves the blend. |
| Stoch | true | true or false | The smoothed stochastic in the blend. |
| Stoch Len | 14 | 2 to 500 | Its lookback in bars. |
| Stoch Sm | 3 | 1 to 50 | The average that smooths it. |
| Stoch W | 1.0 | 0 to 10 | Its weight. |
| CCI | true | true or false | CCI in the blend. |
| CCI Len | 20 | 2 to 500 | Its length in bars. |
| CCI Sat | 200.0 | 50 to 500 | The CCI value that maps to 100; beyond it the score is held. |
| CCI W | 1.0 | 0 to 10 | Its weight. |
| MACD | true | true or false | The MACD histogram, as a z-score, in the blend. |
| MACD W | 1.0 | 0 to 10 | Its weight. |
| MACD Fast | 12 | 1 to 500 | Fast EMA. Above MACD Slow, the two are used swapped. |
| MACD Slow | 26 | 2 to 500 | Slow EMA. |
| MACD Sig | 9 | 1 to 500 | Signal EMA. |
| ROC | true | true or false | Rate of change, as a z-score, in the blend. |
| ROC Len | 14 | 1 to 500 | Its lookback in bars. |
| ROC W | 1.0 | 0 to 10 | Its weight. |
| MFI | true | true or false | MFI, on tick volume, in the blend. |
| MFI Len | 14 | 2 to 500 | Its length in bars. |
| MFI W | 1.0 | 0 to 10 | Its weight. |
4. Trade Tools
| Input | Default | Allowed | What it changes |
|---|---|---|---|
| Lock Signal | false | true or false | Blocks new signals on bars closing live. A recalculation draws what it blocked. |
| ATR Length | 14 | 1 to 500 | Bars of the ATR that sets the stop distance. |
| SL ATR x | 1.5 | 0.1 to 100,000 | The stop's distance from the entry, in ATR. |
| TP1 R | 1.0 | 0.1 to 100,000 | First target, in stop distances. Targets out of order are sorted. |
| TP2 R | 2.0 | 0.1 to 100,000 | Second target. |
| TP3 R | 3.0 | 0.1 to 100,000 | Third target; a touch closes the trade. |
5. Visuals
| Input | Default | Allowed | What it changes |
|---|---|---|---|
| Markers | true | true or false | BULL and BEAR in both windows. Alerts fire either way. |
| Trade Levels | true | true or false | The trade's lines and labels. Tracking and alerts run either way. |
| Candle Color | true | true or false | Candles in the score's colour. |
| OB/OS Zones | true | true or false | The zones' shading. |
| Components | false | true or false | A line for each component with a reading. |
6. Dashboard
| Input | Default | Allowed | What it changes |
|---|---|---|---|
| Show Dash | true | true or false | The dashboard. Off, only warning rows remain. |
| Position | Top Right | Top Right, Top Left, Bottom Right or Bottom Left | Its corner. |
| Show on Price Chart | true | true or false | On the price chart, or off in the indicator's window. |
7. Alert Messages
Words used in the JSON messages (section 6). Quotation marks and backslashes are escaped.
| Input | Default | Allowed | What it changes |
|---|---|---|---|
| Long Action | long | any text | A long entry. |
| Short Action | short | any text | A short entry. |
| Close Long Action | closelong | any text | A long trade closes. |
| Close Short Action | closeshort | any text | A short trade closes. |
| Partial Close Long Action | partialcloselong | any text | A long trade reaches TP1 or TP2. |
| Partial Close Short Action | partialcloseshort | any text | A short trade reaches TP1 or TP2. |
8. Colors
| Input | Default | Allowed | What it changes |
|---|---|---|---|
| Bull | 38,166,154 | any colour | Gradient's top, BULL markers, bullish rows. |
| Bear | 239,83,80 | any colour | Gradient's bottom, BEAR markers, bearish rows. |
| Neutral | 249,168,37 | any colour | Gradient's middle. |
| Signal Line | 179,136,255 | any colour | The signal line. |
| Marker Txt | 255,255,255 | any colour | Marker text. |
| Mid Line | 120,123,134 | any colour | The zero line. |
| Mid Line Transparency % | 40 | 0 to 100 | Its transparency. |
| Level Lines | 120,123,134 | any colour | The other level lines. |
| Level Lines Transparency % | 65 | 0 to 100 | Their transparency. |
| Zone Fill | 120,123,134 | any colour | The zones. |
| Zone Fill Transparency % | 88 | 0 to 100 | Their transparency. |
| RSI Line | 66,165,245 | any colour | RSI's line. |
| Stoch Line | 171,71,188 | any colour | The stochastic's line. |
| CCI Line | 255,167,38 | any colour | CCI's line. |
| MACD Line | 38,198,218 | any colour | MACD's line. |
| ROC Line | 156,204,101 | any colour | ROC's line. |
| MFI Line | 236,64,122 | any colour | MFI's line. |
| Dash Hdr | 58,42,109 | any colour | Dashboard header. |
| Dash Hdr Transparency % | 55 | 0 to 100 | Its transparency. |
| Dash BG | 10,15,26 | any colour | Dashboard background. |
| Dash BG Transparency % | 10 | 0 to 100 | Its transparency. |
| Dash Txt | 255,255,255 | any colour | Dashboard text. |
| Warn Fill | 249,168,37 | any colour | Warning rows. |
| Warn Fill Transparency % | 80 | 0 to 100 | Their transparency. |
| SL | 239,83,80 | any colour | Stop line and label. |
| Entry | 33,150,243 | any colour | Entry line and label. |
| TP1 | 38,166,154 | any colour | TP1 line and label. |
| TP1 Transparency % | 40 | 0 to 100 | The line's transparency. |
| TP2 | 38,166,154 | any colour | TP2 line and label. |
| TP2 Transparency % | 20 | 0 to 100 | The line's transparency. |
| TP3 | 38,166,154 | any colour | TP3 line and label. |
| Label Text | 255,255,255 | any colour | Trade label text. |
9. MetaTrader
| Input | Default | Allowed | What it changes |
|---|---|---|---|
| Bars To Calculate (0 = all) | 20,000 | 0 or more | How many of the newest bars are worked through. |
| Pin Labels Inside Chart | false | true or false | Pulls a trade's labels inside the chart. |
10. Alerts
| Input | Default | Allowed | What it changes |
|---|---|---|---|
| Alert: Any alert() function call | false | true or false | The JSON trade messages. |
| Alert: BUY Signal | true | true or false | A BULL, on the closed bar. |
| Alert: SELL Signal | true | true or false | A BEAR, on the closed bar. |
| Alert: Close Long Signal | false | true or false | A long ends: TP3 on the touch; a stop or a new signal on the closed bar. |
| Alert: Close Short Signal | false | true or false | The same for a short. |
| Alert: Partial Close Long | false | true or false | A long reaches TP1 or TP2, on the touch. |
| Alert: Partial Close Short | false | true or false | The same for a short. |
| Alert: SL Hit | false | true or false | A close beyond the stop. |
| Alert: TP1 Hit | false | true or false | TP1, on the touch. |
| Alert: TP2 Hit | false | true or false | TP2, on the touch. |
| Alert: TP3 Hit | false | true or false | TP3, on the touch. |
| Alert Pop-up | true | true or false | The terminal's alert window. |
| Alert Sound | false | true or false | Plays a sound. |
| Alert Sound File (in the terminal's Sounds folder) | alert.wav | a file name | The sound to play. |
| Alert Push Notification | false | true or false | To the MetaTrader app on your phone. |
| Alert E-mail | false | true or false | Sends an e-mail. |
| Test Alerts on Start | false | true or false | One test through every channel that is on. |
6. Setting Up Alerts
- Choose the conditions. BUY Signal and SELL Signal are on by default.
- Choose the channels. The popup window is on by default.
- Sound: switch it on and name a .wav file from the Sounds folder of the terminal's installation folder.
- Push notification: in Tools, Options, Notifications, enable push notifications, enter the MetaQuotes ID shown in the MetaTrader app on your phone and click Test; then switch the channel on. A message is cut at 255 characters.
- E-mail: in Tools, Options, Email, enable e-mail, enter your mail server, login, password and addresses and click Test; then switch the channel on. The subject names the indicator, the condition, the symbol and the timeframe.
- Test: switch on Test Alerts on Start to check all of this without waiting for a signal. Every change of an input sends one more, so switch it off afterwards.
The messages, followed by the chart's symbol and timeframe:
Supreme Momentum Confluence - BUY Signal Fired | EURUSD H1 Supreme Momentum Confluence - SELL Signal Fired | EURUSD H1 Supreme Momentum Confluence - Close Long | EURUSD H1 Supreme Momentum Confluence - Close Short | EURUSD H1 Supreme Momentum Confluence - Partial Close Long | EURUSD H1 Supreme Momentum Confluence - Partial Close Short | EURUSD H1 Supreme Momentum Confluence - SL Hit | EURUSD H1 Supreme Momentum Confluence - TP1 Hit | EURUSD H1 Supreme Momentum Confluence - TP2 Hit | EURUSD H1 Supreme Momentum Confluence - TP3 Hit | EURUSD H1 Supreme Momentum Confluence - test alert on EURUSD (1H) @ 1.10000 | EURUSD H1
Any alert() function call sends JSON instead, with your action words: an entry, a target (tp is 1 or 2), and a close, whose reason is target, stop, replaced (a same-side signal) or reverse (an opposite signal). The ticker carries your broker's name as the terminal reports it, and time is the signal bar's close in milliseconds:
{"action":"long","ticker":"Your Broker:EURUSD","tf":"60","direction":"long","entry":"1.10000","sl":"1.09700","tp1":"1.10300","tp2":"1.10600","tp3":"1.10900","time":"1767225600000","score":"8.40","agreement":"66.7","components":"6"}
{"action":"partialcloselong","ticker":"Your Broker:EURUSD","tf":"60","direction":"long","tp":"1","price":"1.10300","sl":"1.09700"}
{"action":"closelong","ticker":"Your Broker:EURUSD","tf":"60","direction":"long","reason":"target","price":"1.10900"}
Targets alert on the touch. Entries, the stop and a replaced trade alert on the closed bar. Each fires once for its bar, and never for history or in the Strategy Tester; attaching in the middle of a bar counts what is already true on it as sent. The drawing switches change what you see, not what fires. Nothing fires for a refused cross, for the score entering a zone, or for Bias or Slope changing.
7. Bars To Calculate and Pin Labels Inside Chart
Bars To Calculate (20,000 by default; 0 = the whole chart) limits the work to the newest bars. The markers and the trade state depend on where history starts, so a different setting can change the earliest signals.
Pin Labels Inside Chart (off by default). A trade's labels sit ten bars past the last bar, so give the chart some room on the right with the chart shift. Switched on, while the last bar is on screen, it compresses the space after that bar and slides the labels so they stay inside the chart. A closed trade's labels sit ten bars past its closing bar.
8. MetaTrader 5 and MetaTrader 4: How the Drawing Works
On both platforms each window is painted as one image over the chart, with real transparency, following every scroll, zoom and price-scale change. The calculation, the levels and the alerts are the same. MetaTrader 4 draws on the terminal's interface thread, so it repaints the forming bar at most once a second; a new bar is repainted at once.
9. Performance Notes
- After the first calculation each closed bar is calculated once, and the forming bar at most four times a second.
- A lower Bars To Calculate starts faster, but it can change the earliest signals.
10. Troubleshooting
I cannot see the trade's labels. They sit ten bars past the last bar. Use the chart shift or Pin Labels Inside Chart; the dashboard lists the same levels.
The score crossed its signal line but there is no marker. A cross also needs Min Agree % and, with it on, Slope Align; Higher TF Confirm and Strength Filter can refuse it too. The dashboard shows the newest bar's state.
The marker appeared one bar after the cross. It sits on the bar that closed, and the next bar's first tick confirms that close.
Too few or too many signals. A lower Min Agree %, Slope Align off, or a lower Smooth or Signal Len give more. Higher TF Confirm, Strength Filter and a Smoothing method give fewer.
A stop or a target was reached but the trade is still open. The stop counts only on a close beyond it, and only TP3 closes a trade.
The last trade's lines disappeared. A new signal replaces the old trade.
The Higher TF row says SKIPPED. Higher TF is lower than the chart's timeframe. Choose a higher one, or the chart's own.
Higher TF Confirm blocks every signal. A NEUTRAL higher timeframe blocks both sides, and so does one without enough bars yet for a Bias.
A row is amber. MACD Lengths means MACD Fast is above MACD Slow, so they are used swapped. Targets means the multiples were out of order and were sorted.
Active reads 5 / 6, or fewer. A component counts only when it is on and has a reading. MACD and ROC need their own lengths plus Norm Len bars.
The score differs from another chart of the same symbol. Every component reads your broker's candles and MFI its tick volume, so another feed can give a slightly different score.
No alerts arrive. Check the condition's switch (only BUY Signal and SELL Signal are on by default) and a channel. Alerts fire only for bars that close, or targets touched, while the indicator runs; push and e-mail also need the terminal's settings. Test Alerts on Start checks them.
11. Frequently Asked Questions
Does it repaint? Signals, markers and the stop never change after their bar closes. The score, the newest candle's colour and the dashboard move until then. A new calculation can differ from what you saw live: Lock Signal blocks only bars that close live, and Bars To Calculate sets where history starts.
Can I use it in the Strategy Tester? Yes, in visual mode. A non-visual run draws nothing, and alerts never fire there.
12. Support
Ask in the Comments (Discussion) section of the product's page on mql5.com. Give the platform and its build, the symbol and timeframe, your broker, any inputs you changed, a screenshot, and the lines of the Experts and Journal tabs from that time.
13. Version History
- 1.00: first release for MetaTrader 4 and MetaTrader 5.
Risk Disclaimer
Trading leveraged products carries a high level of risk and may not be suitable for all investors. Supreme Momentum Confluence is an analysis tool, not financial advice. Test it on a demo account first.