

3
827
Ultimate SMC Indicator v2.20 — Complete Smart Money Trading System
━━━━━━━━━━━━━━━━━━━━━━━━━━
01 — THE CONCEPT
━━━━━━━━━━━━━━━━━━━━━━━━━━
How Institutional Money Moves Markets
Markets don't move randomly. Banks and institutions leave clear footprints — and Ultimate SMC reads every one of them automatically. Version 2.20 goes beyond basic detection: it finds where multiple institutional footprints converge, scans multiple pairs simultaneously, and sends signals directly to your Telegram channel.
| Step | What Happens |
|------|-------------|
| 01 Build Positions | Institutions accumulate orders — creating Order Blocks and Supply & Demand zones |
| 02 Hunt Liquidity | Price sweeps Equal Highs/Lows — triggering retail stop losses |
| 03 Break Structure | BOS or CHoCH confirms the new institutional direction |
| 04 Price Expands | Price moves aggressively — Fair Value Gaps form in the move |
| 05 We Follow | POI confluence confirmed — we enter aligned with institutional flow |
━━━━━━━━━━━━━━━━━━━━━━━━━━
02 — WHAT'S INSIDE (15 Tools. One Indicator.)
━━━━━━━━━━━━━━━━━━━━━━━━━━
Core SMC Detection
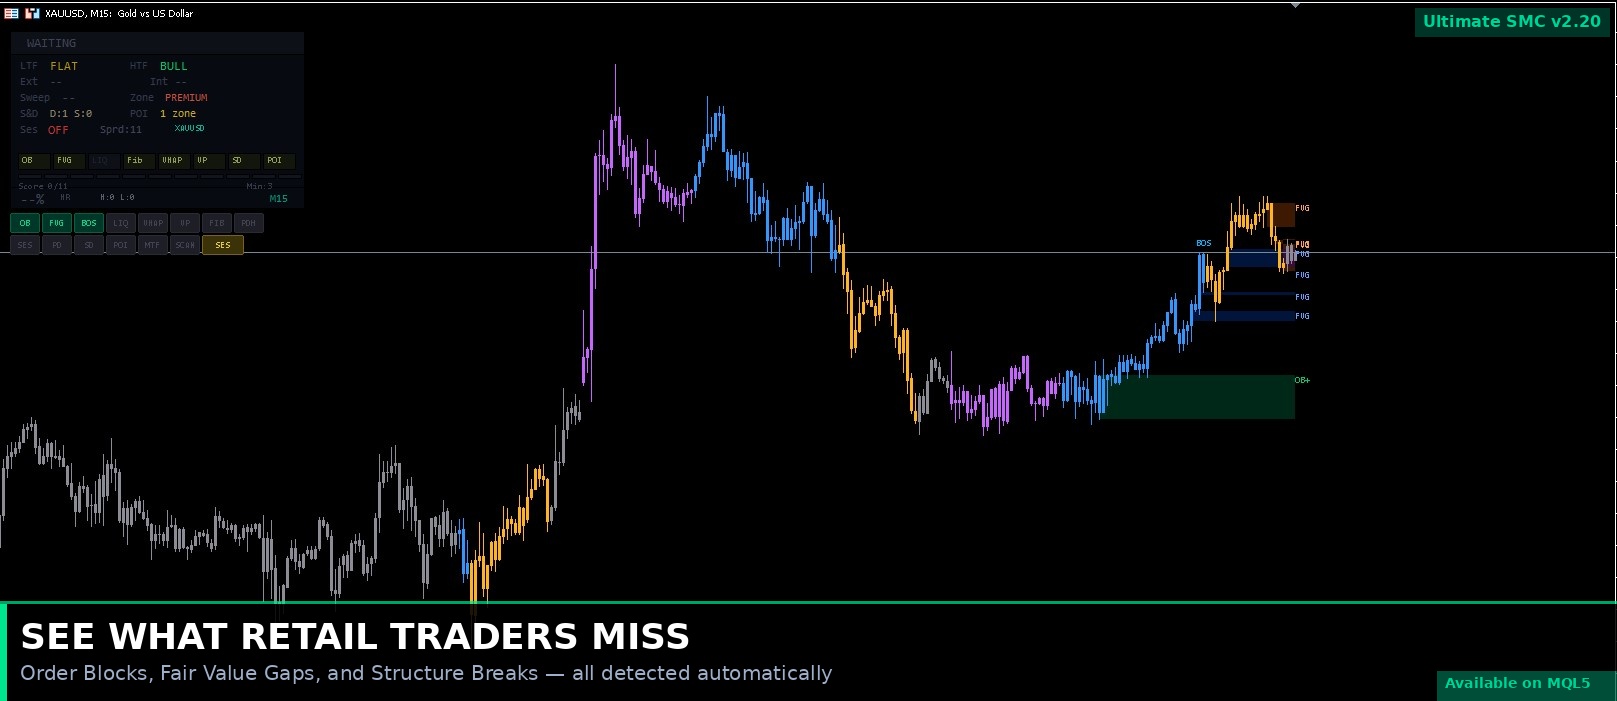
ORDER BLOCKS
Colored rectangles marking zones where institutions placed large orders. Green = demand, Red = supply. Price returns to test these before continuing.
FAIR VALUE GAPS
Three-candle imbalance where price moved too fast, leaving an unfilled gap. Price retraces to fill FVGs before resuming — ideal for precision entries.
BOS / CHoCH (External + Internal)
BOS = Break of Structure (trend continuation). CHoCH = Change of Character (potential reversal). V2.20 adds internal structure (mBOS/mCHoCH) for even more precise timing.
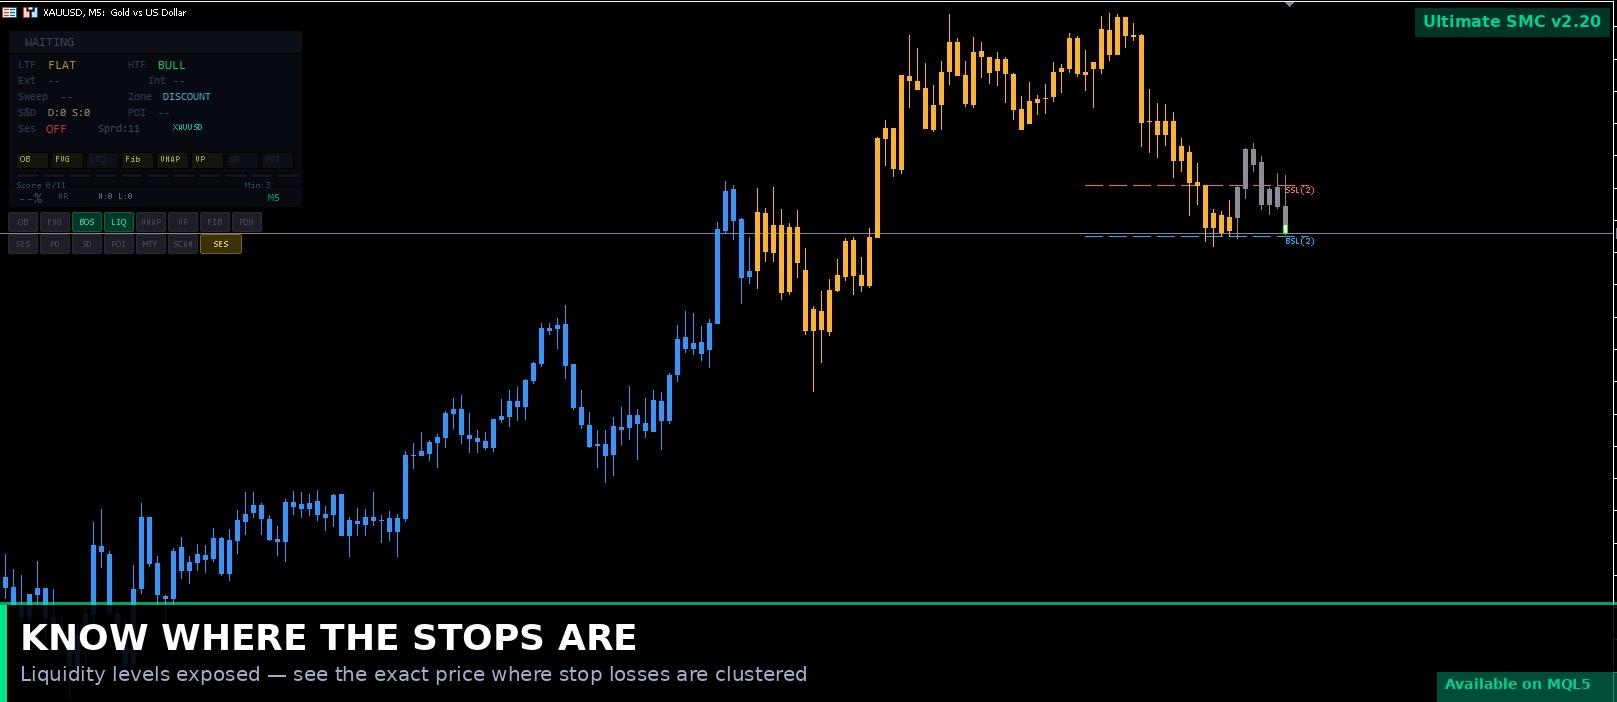
LIQUIDITY LEVELS
Equal Highs and Lows where stop orders cluster. Institutions sweep these zones before reversing — the most common manipulation pattern in any market.
SUPPLY & DEMAND ZONES [NEW in v2.20]
Different from Order Blocks. Detects the consolidation base before an explosive impulse move. These zones represent where institutions loaded their positions quietly — before the big move.
━━━━━━━━━━━━━━━━━━━━━━━━━━
Advanced Confluence Tools
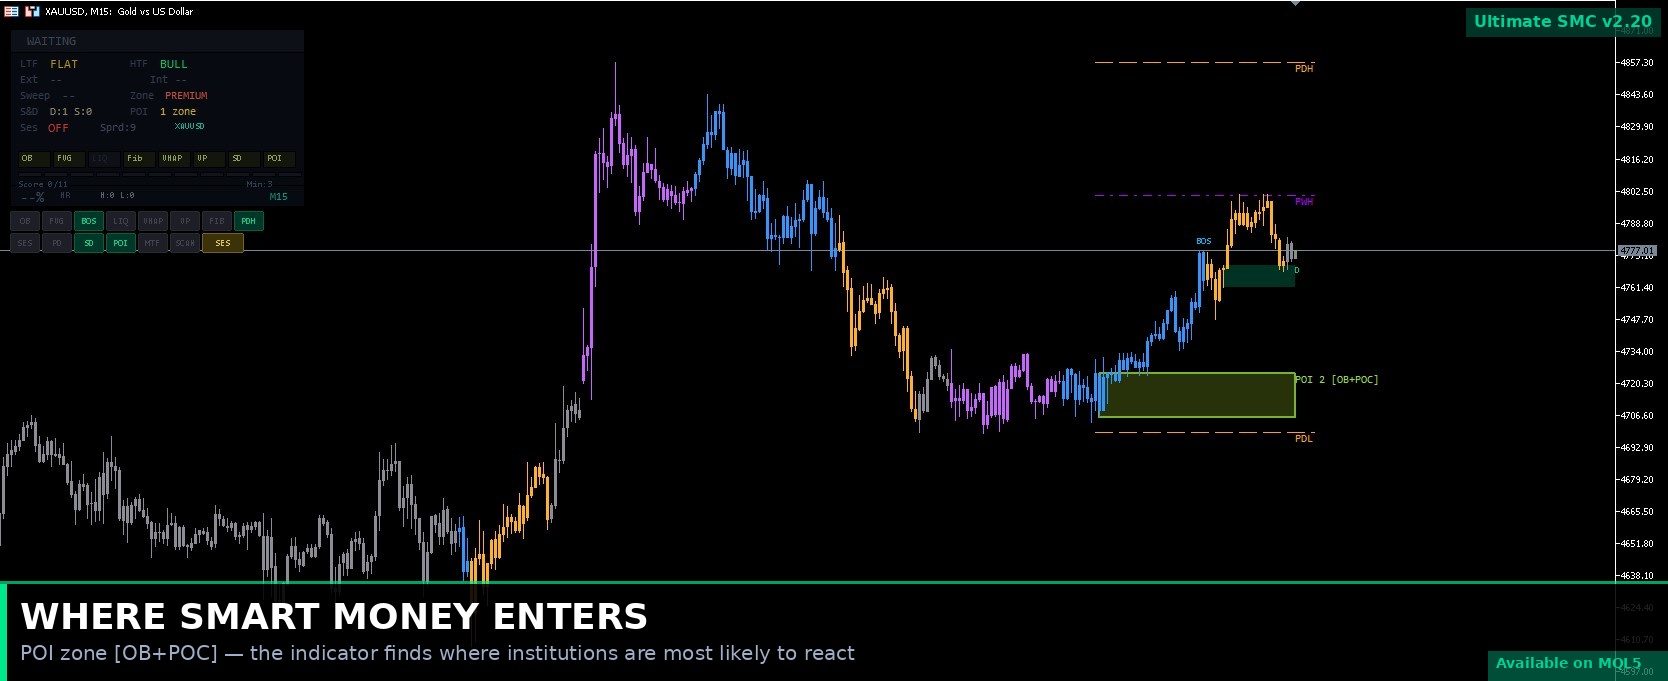
POINT OF INTEREST — POI [NEW in v2.20]
This is what separates Ultimate SMC from every other indicator. The POI system scans every Order Block and checks how many other factors overlap with it:
- FVG overlapping? +1
- Supply/Demand zone overlapping? +1
- Liquidity level nearby? +1
- Fibonacci level inside the zone? +1
- VWAP or Volume POC nearby? +1
Result: POI 4 [OB+FVG+LIQ+Fib] — you instantly know this zone has 4 converging factors. Higher score = higher probability.
MULTI-TIMEFRAME CONFLUENCE [NEW in v2.20]
Overlays Order Blocks, FVGs, and Supply & Demand zones from your chosen higher timeframe (e.g. H4) directly on your current chart. When an M15 Order Block sits inside an H4 Order Block — that is a high-probability institutional setup.
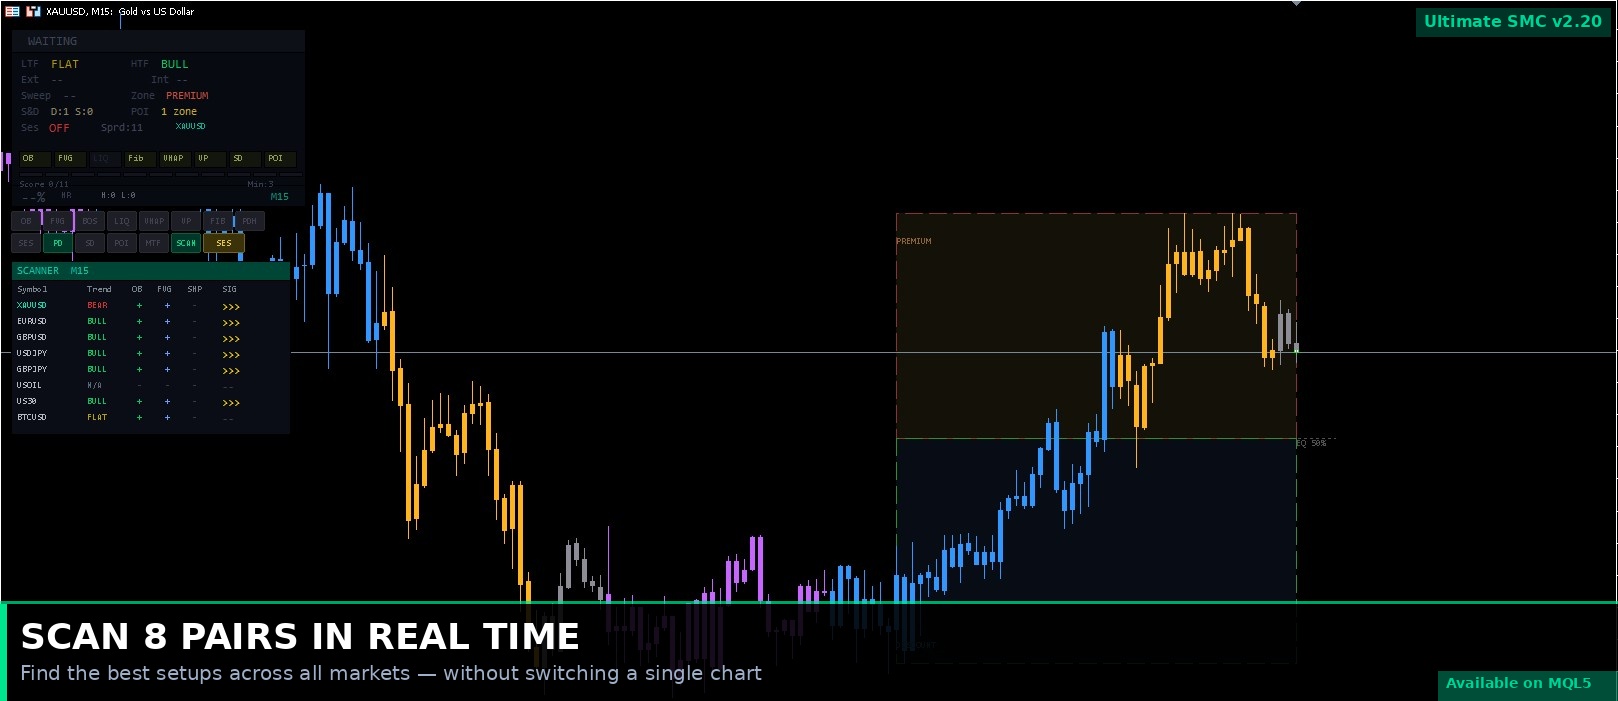
MULTI-SYMBOL SCANNER [NEW in v2.20]
Scans up to 8 symbols simultaneously on your current timeframe. Shows Trend, OB, FVG, Sweep, and Signal status for each pair. Find the best setups across all your markets without switching a single chart.
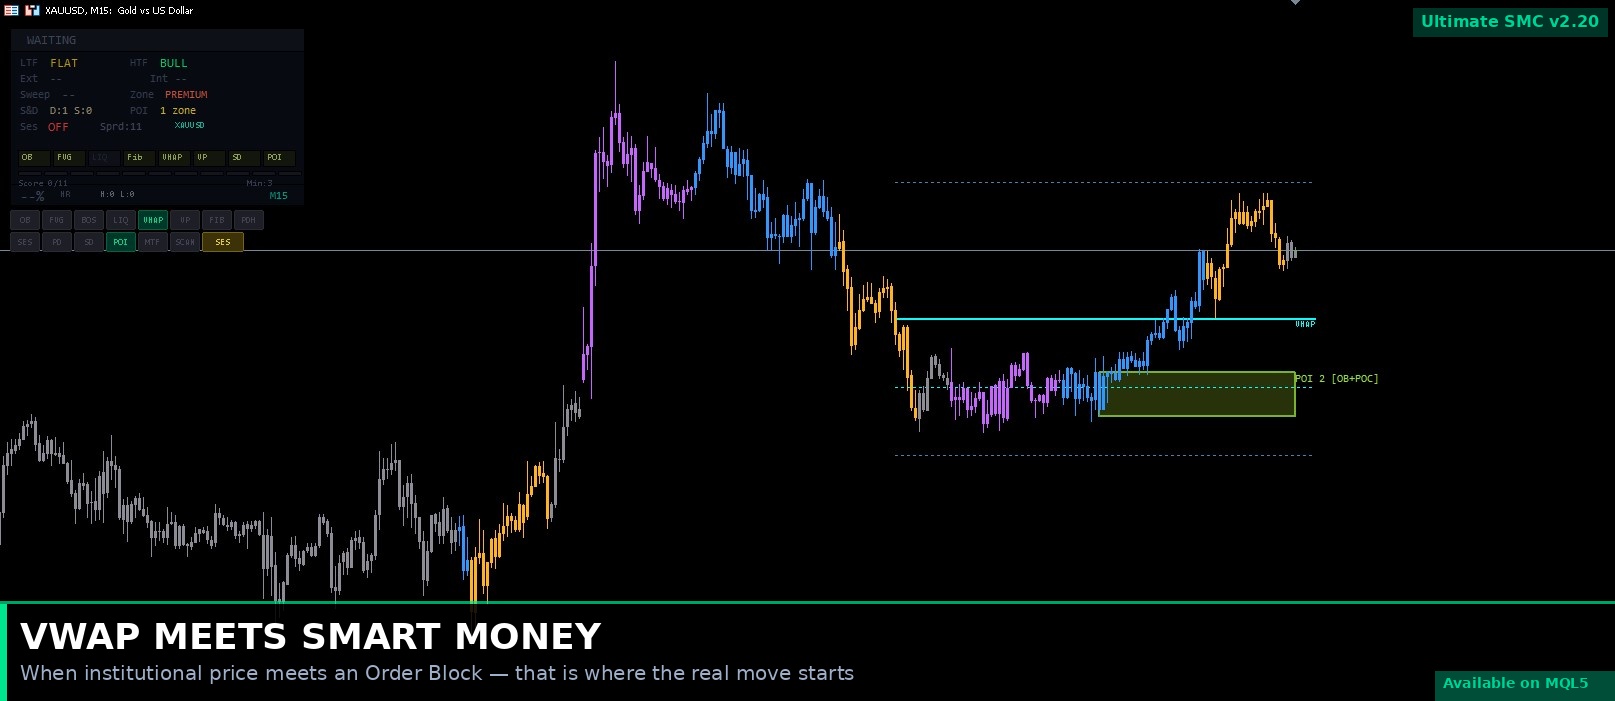
ANCHORED VWAP
Volume-weighted average price with standard deviation bands. Identifies institutional fair value and filters weak signals from high-probability setups.
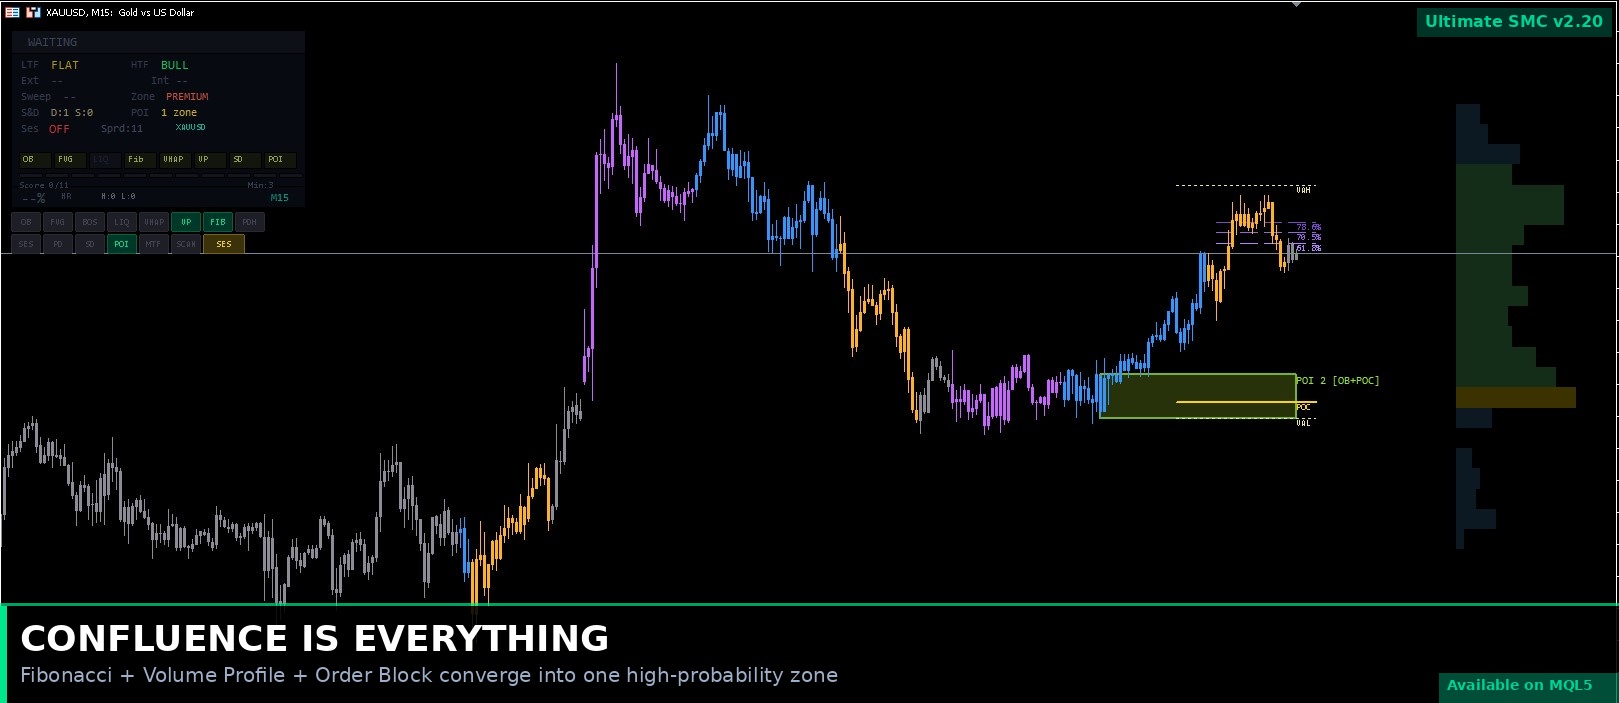
VOLUME PROFILE
Displays POC (Point of Control), VAH, and VAL. When POC aligns with an Order Block — institutions are defending that level.
AUTO FIBONACCI
Auto-plots 61.8%, 70.5% and 78.6% retracement levels. OB + FVG + Fibonacci convergence = highest-probability entry zone.
PREMIUM & DISCOUNT ZONES
Automatically draws Premium (above equilibrium) and Discount (below equilibrium) zones. Buy in Discount, Sell in Premium — aligned with institutional logic.
PDH/PDL + PWH/PWL
Previous Day and Week High/Low levels — key institutional reference points drawn automatically.
SESSION BOXES
London, New York, and Asian session rectangles — see exactly when each session's volatility window opens and closes.
━━━━━━━━━━━━━━━━━━━━━━━━━━
CANDLE COLORING — 6 Modes [NEW in v2.20]
Cycle through 6 different candle coloring modes with the CLR button:
| Mode | What It Shows |
|------|--------------|
| TRD (Trend) | Green in uptrend, red in downtrend, gray in ranging |
| VOL (Volume) | Bright = high volume activity, dim = low volume |
| HTF (Alignment) | Bright = aligned with higher TF, dim = against it |
| SES (Session) | Blue = London, Orange = New York, Purple = Asian |
| RSI (Momentum) | RSI gradient — green above 55, red below 45 |
| SMC (Phases) | Gray = accumulation, Orange = manipulation, Bright = distribution |
━━━━━━━━━━━━━━━━━━━━━━━━━━
03 — 15 INTERACTIVE BUTTONS
━━━━━━━━━━━━━━━━━━━━━━━━━━
Toggle any feature on or off with a single click — no need to open settings. States are saved across chart changes.
Row 1: OB | FVG | BOS | LIQ | VWAP | VP | FIB | PDH
Row 2: SES | PD | SD | POI | MTF | SCAN | CLR
Every button lights up green when active, stays dark when off. The CLR button cycles through candle coloring modes and shows the current mode name (OFF → TRD → VOL → HTF → SES → RSI → SMC).
━━━━━━━━━━━━━━━━━━━━━━━━━━
04 — TRADE EXECUTION
━━━━━━━━━━━━━━━━━━━━━━━━━━
BUY Setup — Step by Step
1. Confirm HTF Trend Bullish — H4 or D1 in clear uptrend
2. Liquidity Sweep Below Equal Lows — stop losses hunted
3. Bullish Order Block appears in Discount zone
4. POI score >= MinConfluence — multiple factors converge
5. BOS to the Upside — structure confirms direction
6. BUY arrow confirmed — signal locked after candle close. No repaint.
7. Execute at next candle open
| Detail | Value |
|--------|-------|
| ENTRY | Market — next candle open |
| STOP LOSS | Below the OB / S&D zone |
| TP1 | 1:2 R:R — close 50%, move SL to breakeven |
| TP2 | 1:3 R:R — let remainder run |
SELL Setup follows the inverse logic — Premium zone, bearish OB, sweep above Equal Highs, CHoCH or bearish BOS confirmation.

━━━━━━━━━━━━━━━━━━━━━━━━━━
05 — TELEGRAM SIGNALS
━━━━━━━━━━━━━━━━━━━━━━━━━━
Automatic Signals to Your Telegram Channel
Every time the indicator detects a high-confluence signal, it sends automatically to your Telegram channel via the free Bridge EA:
Signal includes:
- BUY/SELL direction
- Entry price
- Stop Loss
- TP1 and TP2
- Confluence score (e.g. 5/11)
- Active factors (e.g. OB+FVG+LIQ+Fib+SD)
- Win Rate percentage
Works on multiple charts simultaneously — attach the indicator to XAUUSD, EURUSD, GBPJPY on separate charts and all signals go to the same Telegram channel. Your followers see every signal the moment it fires.
Setup takes 5 minutes:
1. Message @BotFather on Telegram → /newbot → copy Bot Token
2. Message @userinfobot → copy Chat ID
3. Attach SMC_TelegramBridge EA to the same chart → paste Token + Chat ID
4. Done — signals flow automatically 24/7
━━━━━━━━━━━━━━━━━━━━━━━━━━
06 — RECOMMENDED SETTINGS (XAUUSD)
━━━━━━━━━━━━━━━━━━━━━━━━━━
| Parameter | Recommended | Why |
|-----------|-------------|-----|
| MinConfluence | 4 or 5 | Higher = fewer but sharper signals |
| RequiredConsecutive | 2 | Prevents premature entries |
| UseHTF_Filter | ON | Only trade with the higher TF trend |
| SL_ATR_Mult | 1.5 | Scales stop loss with current volatility |
| TP1_RR | 1:2 | Close 50% here, move SL to breakeven |
| TP2_RR | 1:3 | Let the rest ride |
| POI_MinScore | 2 | Minimum factors for a POI zone to appear |
| MTF_Timeframe | H4 | Higher timeframe for confluence overlay |
| CandleMode | TRD or SES | Start with Trend or Session coloring |
━━━━━━━━━━━━━━━━━━━━━━━━━━
07 — DISCIPLINE
━━━━━━━━━━━━━━━━━━━━━━━━━━
Do This:
- Wait for BOS/CHoCH after OB — an Order Block alone is not an entry
- Use HTF Filter — trading against the higher TF is the fastest way to lose
- Stack confluence: OB + FVG + Fib + S&D = strongest setup
- Check the POI score — higher score means institutions agree
- Scale out at TP1, trail the rest to TP2
Don't Do This:
- Enter on OB alone — all MinConfluence conditions must be met
- Trade around NFP, CPI, FOMC — stay flat 30 min before/after
- Override MinConfluence — if you set it to 4, respect it
- Trade without a Stop Loss — non-negotiable
━━━━━━━━━━━━━━━━━━━━━━━━━━
RISK DISCLOSURE
━━━━━━━━━━━━━━━━━━━━━━━━━━
This content is for educational purposes only. Trading financial markets involves substantial risk and you may lose some or all of your invested capital. Past performance is not indicative of future results. Always test thoroughly on a demo account before trading live.
━━━━━━━━━━━━━━━━━━━━━━━━━━
Tags: gold, xauusd, metatrader 5, liquidity, ORDER BLOCK, SMC, SMART MONEY CONCEPTS, FVG, BOS, CHOCH, supply demand, POI, multi timeframe, scanner


")
