")

(click on the link to open the version in your language)
Русский English 中国的 Español Português 한국의 Deutsch 日本の Français Italiano Türk
In this post you will find an extended version of the guide for more successful operation of the Neon Trade MT4/MT5 advisor
Plan
- Graphical Panel Indication
- Advisor Settings
- Testing the Advisor on Historical Quotes in MetaTrader 4/5 Strategy Tester
- Some Operational Nuances of the Advisor
Graphical Panel Indication
Here I will not explain the meaning of the intuitive indication. Let's analyze only the last two blocks. This indication is very important, including for understanding how the robot works and for identifying hidden or unaccounted situations that may be the cause of exotic errors. Screenshots of this panel will also help me in case buyers experience problems.
| Interface Element | Description |
|---|---|
| Days remaining | How many trading days remain until the end of optimization. Calculated using the "Days To Future" variable. The setting whose end optimization date is closest to the current moment is selected. |
| Outdated instruments-timeframes | Shows how many settings have already exceeded the allowable range for opening new positions. Will help promptly detect outdated settings and update them. |
| Optimization finished | End date of optimization for the most recent setting. |
| Will trade until | Date when trading permission will be lost for all settings in the list (if settings are not updated). Neon Trade automatically updates settings, shifting the optimization date closer to the present time. |
| Magics | Range of magics reserved for all advisor positions. All numbers outside this range can be used for other advisors. |
| Last readed | When the setting was last successfully read from the file. Works only for DYNAMIC mode. By default, reading occurs every 5 minutes. |
| Last API sync | Time of the last file request from the server for settings synchronization. |
| Symbols | How many unique instruments (currency pairs) are among all our settings. |
| Instruments-timeframes | How many settings (virtual charts or advisors) are running simultaneously. |
| Active Instruments-Timeframes | Number of active settings. If the number is less than Instruments-timeframes, some instruments are not found with the broker or prefixes/suffixes are incorrectly specified. |
| Active Symbols | Will help understand if some instruments are not available with your broker. Compare with Symbols, if the number is less — some instrument is redundant. |
Buttons:
| Button | Purpose |
|---|---|
| Close Own Orders | Closes all own positions. Be careful. |
| Close All Orders | Closes all positions in the terminal. Be careful. |
| actualize | Shifts the end optimization date to the current one in .txt settings located in the working folder (if DYNAMIC mode is enabled). |
Advisor Settings
Basic Settings:
All settings in the advisor, both in the MetaTrader 4 version and in the MetaTrader 5 version, are identical, as is the operating algorithm.
| Parameter | Description |
|---|---|
| API DOMEN (add in terminal settings!) | Server address for settings synchronization. This setting cannot be changed. |
| Sync with API | Permission to synchronize with the server for automatic settings updates (only works when "DYNAMIC" mode is enabled). |
| Instruments | Sectors that the advisor will use for trading (e.g., 28 currency pairs, cryptocurrencies, or US stocks, as well as their combinations). |
| Read From Common Directory | Read and write files to a shared folder for all terminals or the local folder of the current terminal (defaults to "true" to enable synchronization across multiple terminals). |
| Mode (static settings/dynamic settings) | Advisor operation mode: "STATIC" (hardcoded settings) or "DYNAMIC" (automatic download from the server). |
| Subfolder In Files Folder | Folder from which the "DYNAMIC" mode retrieves settings and where the synchronization module downloads them. |
Settings for Adapting to Instrument Naming Rules:
| Parameter | Description |
|---|---|
| Symbol Postfix | String that starts every instrument name. There are separate implementations for several types of instruments (regular currency pairs and exotic/cryptocurrency/stocks). |
| Symbol Prefix | String that ends every instrument name. There are separate implementations for several types of instruments (regular currency pairs and exotic/cryptocurrency/stocks). |
This block is very important, since initially the advisor is configured to work with instruments that use the classic naming scheme, for example, as used by the broker "RoboForex". It is such that all instruments are written in capital letters and do not have initial and final special characters in the name (postfix and prefix). For example - "EURUSD". But there are also brokers that name, for example, like this - "EURUSD!" or ".eurusd_". In the first case you need to do this: "Symbol Postfix = '!'", and in the second case: To Lower Symbol = true, Symbol Postfix = "_", Symbol Prefix = "."
If you don't do this, your advisor will not open positions. If your broker has the same instrument naming rules, then you don't need to do anything, and the advisor will work immediately.
Time Zones:
| Parameter | Description |
|---|---|
| Source Shift Hours | Time window shift relative to the quote source, on which I conduct machine learning (broker Roboforex). As a rule, all major brokers have the same time as Roboforex broker, but if there are differences — determine this shift empirically. |
Entry Volumes and Automatic Adaptation to Deposit:
| Parameter | Description |
|---|---|
| Auto Lot | Enable automatic adaptation to deposit (if disabled, it will be very similar to fixed lot mode). |
| Middle % of Delta Equity Per M1 Bar (For ONE! Symbol) | Variable managing risk (used similarly to lot, the larger it is, the larger the volumes of our trades). There are separate implementations for several types of instruments. |
| Deposit For ONE! Symbol | Deposit amount for which risks are adapted (used when automatic adaptation to deposit is disabled). |
How to Properly Configure Risks:
- For real trading, use only "Auto Lot = true" mode. Disabled "Auto Lot = false" is suitable only for testing.
- With auto lot disabled, the "Deposit For ONE! Symbol" variable is used instead of the real deposit.
- With auto lot enabled, your real deposit is used, which ensures exponential growth of the curve.
- Risks are divided taking into account both the number of active instruments (M) and the number of timeframes involved within each instrument (N).
Martingale:
| Parameter | Description |
|---|---|
| Lot Mode | Lot operation mode: "SIMPLE_LOT" (by default) or "MARTINGALE" (martingale). |
| Martin Multiplier Steps Max | Number of losing trades from history, whose lots are summed to add to the volume of a new position when "MARTINGALE" is enabled. The higher the number, the higher the risks, but also higher chances to exit with profit. |
Loss Waiting Mode:
| Parameter | Description |
|---|---|
| Linearization | Waiting for a losing position to close in profit. |
| Minutes Hold For Linearization | How many minutes we wait for profit on a losing position (if time expires, the position is forcibly closed). |
By default, all these options are disabled, but combined application of these options is possible. This can positively affect trading quality and even risks.
Combating Loss of Settings Relevance:
| Parameter | Description |
|---|---|
| Days To Clear Outdated Files | After this number of days, outdated instruments from the current portfolio will be automatically deleted, and active positions on these instruments will be closed (only for DYNAMIC mode). |
| Days To Future | How many days, starting from the end of the optimization period, positions are allowed to be opened (this does not affect closing). It is not recommended to set above 30 days. |
Effects:
| Parameter | Description |
|---|---|
| Effect | Ability to enable special operation modes (filtering portfolio entries). |
| First % Of Price Step | Minimum distance to the next position opening point in percent. Allows regulating the distance between nearest trades when using the repurchase mode. |
| Next Step Multiplier | Increase or decrease of the minimum repurchase/resale step. 1.0 — keep the step. Applicable only to repurchase effects. |
Types of Effects:
| Effect | Description |
|---|---|
| WEAKENING_OF_THE_CURRENCIES | Weakening the influence of individual currencies. Prevents opening positions containing the same currencies in the instrument composition in one direction. Designed to reduce drawdowns. |
| COLLECTIVE_REINFORCEMENT | Effect opposite to the previous one. |
| SAFE_REPURCHASE | Hybrid averaging due to different timeframes of one instrument, without increasing risks. Closes profitable positions singly or in a fan pattern. |
| CLASSIC_REPURCHASE | Classic averaging due to different timeframes of one instrument, without increasing risks. Closes all positions in a fan pattern to profit. |
| SAFE_REPURCHASE_WEAKENING | Merger of WEAKENING_OF_THE_CURRENCIES and SAFE_REPURCHASE. |
| SAFE_REPURCHASE_REINFORCEMENT | Merger of COLLECTIVE_REINFORCEMENT and SAFE_REPURCHASE. |
| CLASSIC_REPURCHASE_WEAKENING | Merger of WEAKENING_OF_THE_CURRENCIES and CLASSIC_REPURCHASE. |
| CLASSIC_REPURCHASE_REINFORCEMENT | Merger of COLLECTIVE_REINFORCEMENT and CLASSIC_REPURCHASE. |
| COST_MINIMIZATION | Works equally on NETTING and HEDGING accounts. Opens only one position per instrument and uses signals from all timeframes to close it. Universalization of trading and improvement of entry/exit quality. |
Other:
| Parameter | Description |
|---|---|
| Stop Loss % Of Average M1 | Stop-loss for all instruments in points (not pips). Value "0" — trading without stop-loss. |
| Take Profit % Of Average M1 | Take-profit for all instruments in points (not pips). Value "0" — trading without take-profit. |
| MAX Spread % Of Average M1 | Spread in points (not pips), above which positions are not opened or closed. |
| Swaps | Allow trading only on those instruments and in that direction where positive swaps are given. |
| History Days Window | Size of order history used in some calculations (maximum balance, martingale). Better not to change. |
| Additional Profit Per Lot | Works for Linearization and all REPURCHASE effects. Adds mandatory additional profit to the position that has the requirement to close it in profit. |
Filters:
| Parameter | Description |
|---|---|
| Include Instruments [EURUSD,GBPCHF ... etc] | Trade only specified instruments (inactive instruments close their trades and stop working). |
| Exclude Instruments [EURUSD,GBPCHF ... etc] | Exclude specified instruments (inactive instruments close their trades and stop working). |
| Exclude Currencies [EUR,JPY ... etc] | Exclude instruments containing specified currencies in their names (inactive instruments close their trades and stop working). |
| Direction For Instruments [EURUSD:long,GBPCHF:short ... etc] | You can separately require for a specific currency pair in which direction to trade (long/short). |
| Start Hour Of The Forbidden Interval For Opening And Closing | Hour of the start of the time interval for prohibiting trading operations. |
| Start Minute Of The Forbidden Interval For Opening And Closing | Minute of the start of the time interval for prohibiting trading operations. |
| End Hour Of The Forbidden Interval For Opening And Closing | Hour of the end of the time interval for prohibiting trading operations. |
| End Minute Of The Forbidden Interval For Opening And Closing | Minute of the end of the time interval for prohibiting trading operations. |
| Allow Trading With H4 Chart Period | Allow trading on H4. |
| Allow Trading With H1 Chart Period | Allow trading on H1. |
| Allow Trading With M30 Chart Period | Allow trading on M30. |
| Allow Trading With M15 Chart Period | Allow trading on M15. |
| Allow Trading With M5 Chart Period | Allow trading on M5. |
| Allow BUY Trades | Allow long. |
| Allow SELL Trades | Allow short. |
Instrument and currency names can be listed separated by comma or period, in any case. Instrument names must be cleared of prefixes and postfixes. For example, if you want to exclude the instrument "EURUSD.p", you must write it as "EURUSD" or "eurusd", ignoring the postfix.
For the forbidden window, crossing midnight is possible, for example (23:50 - 1:15). If all 4 corresponding variables are equal to 0, the window is disabled and trading is conducted without restrictions.
Trading with Multiple Advisors Within One Account:
| Parameter | Description |
|---|---|
| EA Index [0..1..2...n] | Advisor index for allocating a unique Magic number window. Unique for each advisor on its own chart. |
| EA Count [1..2..3...n+1] | Total number of advisors that each copy of the advisor launched within this terminal should know. |
If launching one advisor on one terminal — default settings are correct. If launching multiple advisors (for example, 3), give them unique identifiers from 0 to 2. Set the second variable equal to "3" in all advisor copies. The first variable generates a unique Magic number window, the second allows "AutoLot" mode to divide risks correctly.
Testing the Advisor on Historical Quotes in MetaTrader 4/5 Strategy Tester
Additionally, it should be added that the "OHLC M1" testing mode is suitable for our advisor. With it, testing speed is maximized without changes in the profit chart. This is possible because our advisor works on bars, and it turns out that M1 is the lowest timeframe. And this, in turn, means that all timeframes that are higher or equal to M1 will have practically the same entry and exit points. You can try testing on ticks or with delays, but you will see that there is no difference. This, by the way, is one of the big advantages of the system. This is what it will look like in your terminal:
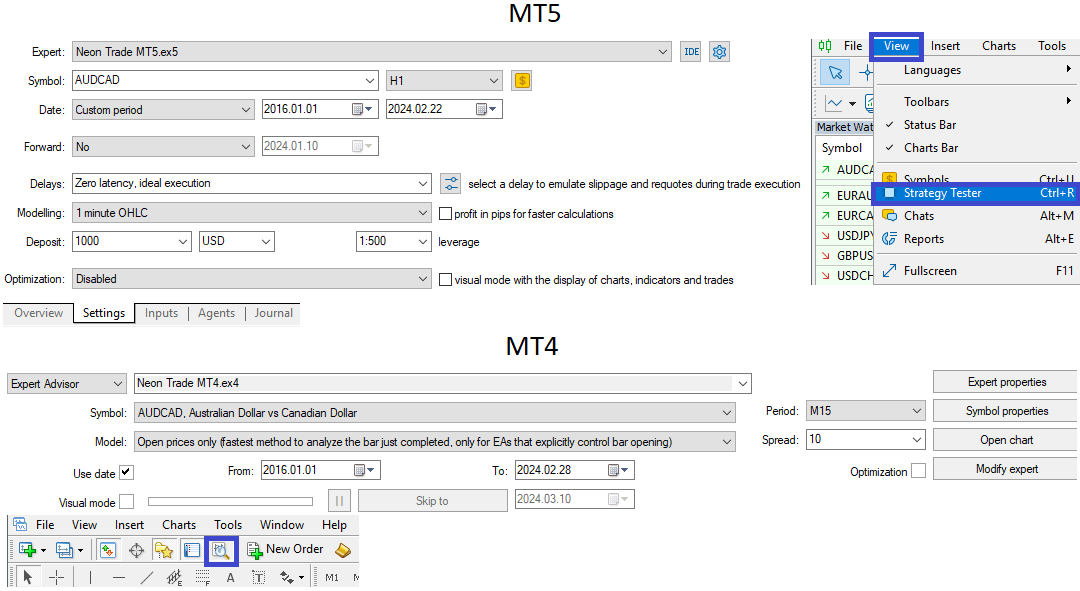
It is better to choose either "OHLC M1" or "every tick" testing mode. In MetaTrader 4, the analog of this mode will be "Open prices only". If we consider the example with MetaTrader 5, the selected instrument and chart period do not matter. If we consider MetaTrader 4, testing will go only on those virtual charts that correspond to the selected instrument and have a period greater than or equal to the selected one.
So, for example, if in MetaTrader 4 you choose "EURUSD M1" chart for testing, then, say, in case of having settings like "EURUSD M15, EURUSD H1, EURUSD H4", they will all be processed, since they all have a higher period than the one you chose for the test (these are simply some platform nuances that are better to know). Other settings related to other instruments will not be processed in this test, and tests will need to be conducted separately for them. Unfortunately, this is a limitation of the MetaTrader 4 platform.
In MetaTrader 5, everything is simpler — you can choose any instrument and any period, all settings will be processed in one test.
Some Operational Nuances of the Advisor
Important Requirements:
- Be sure to add API DOMEN (add in terminal settings!) to the list of allowed URLs in terminal settings
- It is recommended to restart the terminal once a week and monitor its updates
- In case of emergency situations, it is better to inform me immediately so that I can localize the problem as soon as possible (feedback helps improve the product)
- If you don't know what you're doing, it's better not to engage in amateur activities, but rather ask me, and you will definitely be helped as soon as I have a free window.


![[XAUUSD]: Weekly Liquidity Activation Points (timings), June 29 - July 3, 2026](https://c.mql5.com/6/1014/splash-preview-772062.png "[XAUUSD]: Weekly Liquidity Activation Points (timings), June 29 - July 3, 2026")
