

Swing Extremes and Pullbacks (Part 5): Filtering Weak Swings Using Candle Imbalance
 119
119
 0
0

Table of contents
- Introduction
- System Overview
- Getting Started
- Inputs
- Structures and Globals
- Initialization and Tick Handler
- Swing Detection with Enforced Alternation
- The Candle Imbalance Engine
- Arming the Setup
- Managing the Setup
- Executing the Trade
- The Trailing Stop Module
- Visualization and the Dashboard
- Backtest
- Conclusion
Introduction
Anyone who has traded pullbacks off swing extremes for long enough knows the pattern that quietly bleeds an account. The swing looks valid, the retracement arrives where it should, the entry fires by the book—and price slices through the level as if it were never there. The swing detection was not wrong. The pullback measurement was not wrong. What was wrong was the swing itself—it was never backed by real displacement in the first place. A swing high carved out by five overlapping, indecisive candles is structurally worthless, yet to a pivot detector it looks identical to a swing high produced by three full-bodied candles that left an imbalance gap behind them. Both register as extremes. Only one of them deserves to be defended.
In the previous part of this series, we built the machinery around swing extremes and pullbacks: detection, structural validation, and depth analysis of the retracement itself. But all of that machinery still shares one blind spot. It evaluates the pullback, and it evaluates the extreme, while taking the impulse leg that created the extreme entirely on faith. In this fifth part, we are closing that gap. We build a Candle Imbalance Engine that reads the candles inside every impulse leg and asks a simple mechanical question: did this leg actually displace price, or did it merely wander to a new extreme? Legs that displaced get scored strongly and are allowed to arm pullback setups. Legs that wandered get scored weak, are painted gray and dotted on the chart, and can never become a trade anchor no matter how textbook the retracement into them looks.
We deliberately keep the filter deterministic and fully rule-based. There are no fitted distributions, no confidence intervals, and no machine-learned weights. The score is built from four quantities any trader can verify by eye on a chart: how dominant the candle bodies were, how consistently the candles closed in the leg's direction, how efficiently the leg travelled from origin to extreme, and how much Fair Value Gap the leg left behind. Each component has a clear mechanical meaning, each is bounded, and each contributes to a composite that either clears the threshold or does not. We also complete the trade lifecycle in this part by adding a trailing stop module with three selectable modes, so the system that filters its entries this carefully no longer manages its exits with a static stop.
System Overview
The Expert Advisor operates entirely on closed bars for its structural logic and on every tick for exit management. On each new bar, it runs a pivot-based swing detector with separate left and right lookbacks, and it enforces strict alternation: a swing high must follow a swing low and vice versa. When two same-type swings appear in a row, the more extreme of the two replaces its predecessor in place. This alternation rule matters more here than in earlier parts, because it guarantees that every confirmed swing has a well-defined impulse leg—the run of candles from the previous opposite swing to the new extreme. That leg is the object the imbalance engine grades.
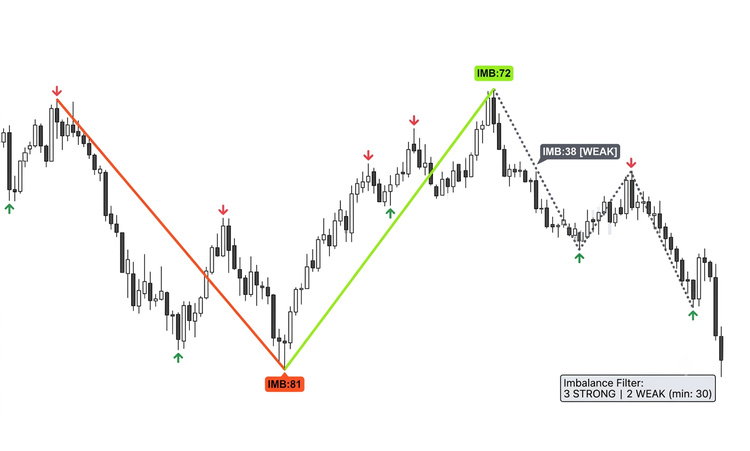
The moment a swing is confirmed, its leg is scored. Body dominance averages the body-to-range ratio of every candle in the leg, rewarding full-bodied displacement candles and punishing wicks and dojis. Directional consistency counts the fraction of leg candles that closed in the leg's direction. Leg efficiency divides the net close-to-close travel of the leg by the gross close-to-close travel, a Kaufman-style ratio that punishes overlapping, back-and-forth price action even when it eventually reaches a new extreme. FVG coverage sums the size of every Fair Value Gap inside the leg and normalizes it by the leg's height, since genuine imbalance leaves gaps that choppy legs never produce. The four components are combined by adjustable weights into a 0–100 score, and a single input decides the pass mark. A swing that passes is drawn as a solid colored leg with its score printed at the extreme; a swing that fails is drawn gray and dotted, labeled with its score, and is never allowed to arm a pullback setup.
Swing Confirmation and Leg Imbalance Grading
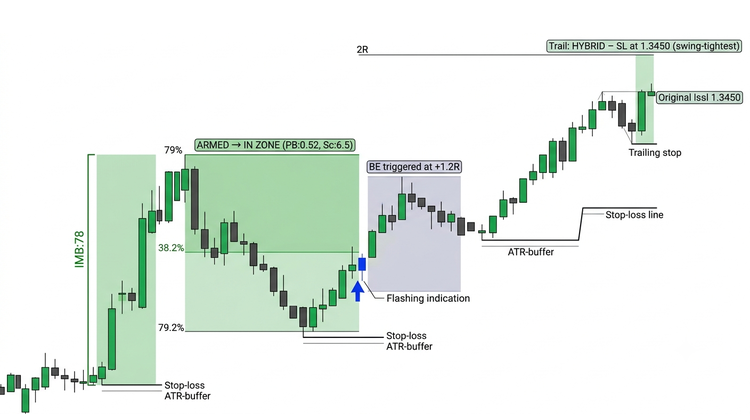
Only a strong swing arms a pullback setup. The setup is a small state machine: ARMED while waiting for price to return, IN ZONE once price enters the retracement band (38.2%–79% by default); and DONE after a trade fires or the setup is invalidated. Entry requires a confirmation candle closing in the trade direction inside the zone. Invalidation is uncompromising: a close beyond the leg origin kills the setup outright, and with first-clean-retest-only enabled—which it is by default—a close through the deep side of the zone without confirmation spends the setup permanently. There is no second chance on a level that has already been tested and failed. After entry, the trailing module takes over on every tick. It first moves the stop to breakeven once the position reaches a configurable R-multiple of open profit, then trails using one of three modes: behind confirmed swing points with an ATR buffer, behind a chandelier-style ATR line, or—in the default hybrid mode—behind whichever of the two candidates is tighter at that moment.
Pullback Setup State Machine and Trailing Stop
Getting Started
Inputs
//+------------------------------------------------------------------+
//|                                             Candle Imbalance.mq5 |
//|                                  Copyright 2026, MetaQuotes Ltd. |
//|                     https://www.mql5.com/en/users/johnhlomohang/ |
//+------------------------------------------------------------------+
#property copyright "Copyright 2026, MetaQuotes Ltd."
#property link      "https://www.mql5.com/en/users/johnhlomohang/"
#property version   "1.00"

#include <Trade\Trade.mqh>

//+------------------------------------------------------------------+
//| Inputs                                                           |
//+------------------------------------------------------------------+
input group "=== Swing Detection ==="
input int      InpSwingLeft         = 3;       // Left bars for pivot
input int      InpSwingRight        = 3;       // Right bars for pivot confirmation
input int      InpMaxLegBars        = 60;      // Max bars allowed in one impulse leg

input group "=== Candle Imbalance Score ==="
input double   InpMinImbalanceScore = 55.0;    // Minimum score to accept a swing (0-100)
input double   InpWeightBody        = 1.0;     // Weight: body dominance
input double   InpWeightDirection   = 1.0;     // Weight: directional consistency
input double   InpWeightEfficiency  = 1.0;     // Weight: leg efficiency (net/gross travel)
input double   InpWeightFVG         = 1.0;     // Weight: FVG (imbalance gap) coverage

input group "=== Pullback Zone ==="
input double   InpZoneShallow       = 38.2;    // Shallow retracement bound (%)
input double   InpZoneDeep          = 79.0;    // Deep retracement bound (%)
input bool     InpFirstRetestOnly   = true;    // Invalidate after first clean retest

input group "=== Risk & Trade Management ==="
input double   InpLots              = 0.10;    // Fixed lot size
input double   InpRiskRewardRatio   = 2.0;     // Take profit = RR x stop distance
input int      InpATRPeriod         = 14;      // ATR period for SL buffer
input double   InpATRBufferMult     = 0.5;     // SL buffer = ATR x this multiplier
input int      InpMaxOpenTrades     = 1;       // Max simultaneous positions
input ulong    InpMagic             = 50505;   // Magic number

//--- Trailing stop mode
enum TRAIL_MODE
  {
   TRAIL_SWING,     // Trail behind confirmed swing points
   TRAIL_ATR,       // Chandelier-style ATR trail
   TRAIL_HYBRID     // Tightest of swing and ATR candidates
  };

input group "=== Trailing Stop ==="
input bool       InpUseTrailing          = true;         // Enable trailing stop
input TRAIL_MODE InpTrailMode            = TRAIL_HYBRID; // Trailing mode
input double     InpTrailATRMult         = 2.0;          // ATR multiplier for ATR trail
input double     InpTrailActivationRR    = 1.0;          // Start trailing after this R multiple
input bool       InpMoveToBreakeven      = true;         // Move SL to breakeven first
input double     InpBreakevenTriggerRR   = 1.0;          // Breakeven trigger (R multiple)
input int        InpBreakevenBufferPts   = 50;           // Breakeven buffer (points)

input group "=== Visualization ==="
input bool     InpDrawObjects       = true;           // Draw swings, legs and zones
input color    InpStrongBullColor   = clrLimeGreen;   // Strong bullish leg
input color    InpStrongBearColor   = clrOrangeRed;   // Strong bearish leg
input color    InpWeakColor         = clrDarkGray;    // Filtered weak swing
input color    InpZoneColor         = clrDodgerBlue;  // Pullback zone
We begin by defining the swing pivot geometry. The 'InpSwingLeft' and 'InpSwingRight' parameters are independent, allowing us to detect asymmetric pivots when required. We also use 'InpMaxLegBars' to limit the maximum duration of an impulse leg. If a leg takes too many bars to form, we treat it as market drift rather than genuine displacement. For example, a leg that develops over sixty bars is unlikely to represent strong momentum. Instead of assigning it a misleading score, we simply grade its imbalance as zero.
The imbalance group forms the core of this part of the system. The 'InpMinImbalanceScore' parameter defines the minimum score a swing must achieve before it is considered significant. Any swing that falls below this threshold is filtered out as weak market structure. The four weighting parameters allow us to adjust the contribution of each imbalance component without modifying the source code. For example, traders who prioritize strong displacement candles can increase 'InpWeightBody,' while those who focus on imbalance zones can increase 'InpWeightFVG.' When all four weights remain equal, each component contributes twenty-five percent of the final imbalance score.
The pullback zone is defined using retracement percentages of the impulse leg. By default, the range extends from 38.2% to 79%, covering the traditional golden-pocket area while providing flexibility on either side. We also introduce 'InpFirstRetestOnly' to enforce disciplined trade selection. This setting allows only the first clean retest of the pullback zone to qualify as a valid trading opportunity. Once that opportunity has passed, the setup is considered invalid.
This part also introduces a new trailing stop management module. Instead of using fixed point distances, both the breakeven trigger and the trailing stop activation are measured in multiples of the initial risk (R). As a result, the trade management logic automatically adapts to instruments with different price scales and volatility. Because the triggers scale with each trader's own risk distance, the same defaults port more sensibly across symbols such as XAUUSD and GBPUSD. Monetary risk, tick value, spread and stop levels still differ per symbol, so this normalizes the exit triggers rather than the full risk profile.
Structures and Globals
//+------------------------------------------------------------------+
//| Swing point structure                                            |
//+------------------------------------------------------------------+
struct SwingPoint
  {
   datetime time;         // Bar time of the extreme
   double   price;        // Extreme price
   bool     isHigh;       // true = swing high, false = swing low
   double   score;        // Candle Imbalance Score of the leg into this swing
   bool     strong;       // Passed the imbalance filter
   datetime originTime;   // Time of the opposite swing that started the leg
   double   originPrice;  // Price of the opposite swing that started the leg
  };
Compared with earlier parts, SwingPoint carries three new pieces of information: the score, the strong flag, and the origin of the leg that created it. Storing the origin directly on the swing means every swing knows its own impulse leg, and the scoring function never has to search for it.
//+------------------------------------------------------------------+
//| Pullback setup state                                             |
//+------------------------------------------------------------------+
enum SETUP_STATE
  {
   SETUP_NONE,        // No armed setup
   SETUP_ARMED,       // Strong swing confirmed, waiting for pullback
   SETUP_IN_ZONE,     // Price has entered the retracement zone
   SETUP_DONE         // Traded or invalidated
  };

struct PullbackSetup
  {
   SETUP_STATE state;
   bool        bullish;      // true = buy pullback (anchored on strong swing HIGH)
   double      legHigh;      // Impulse leg extreme high
   double      legLow;       // Impulse leg extreme low
   double      zoneUpper;    // Pullback zone upper price
   double      zoneLower;    // Pullback zone lower price
   datetime    swingTime;    // Anchor swing time (unique id)
   bool        enteredZone;  // Price has touched the zone at least once
  };

//+------------------------------------------------------------------+
//| Globals                                                          |
//+------------------------------------------------------------------+
CTrade        trade;
SwingPoint    g_swings[];          // Confirmed swings, newest at end
PullbackSetup g_setup;
datetime      g_lastBarTime = 0;
int           g_atrHandle   = INVALID_HANDLE;
double        g_initialRiskPoints = 0;   // Risk at entry, drives trailing activation
The pullback setup structure maintains exactly one active setup at any time. This is deliberate: the most recently confirmed strong swing reflects the current market structure. Retaining older setups would increase the likelihood of trading pullback levels that are no longer relevant after price has already established a new impulse. To support this workflow, the 'SETUP_STATE' enumeration tracks the setup through each stage, beginning with 'SETUP_NONE,' progressing to 'SETUP_ARMED' when a strong swing is confirmed, moving to 'SETUP_IN_ZONE' once price reaches the predefined retracement area, and finally ending at 'SETUP_DONE' after the trade has been executed or the setup has been invalidated.
Then, the 'PullbackSetup' structure stores all information required to manage this process, including the trade direction, impulse leg boundaries, pullback zone limits, swing timestamp, and whether price has already entered the retracement zone. The global variables maintain swing history, the trade object, the ATR handle, and the initial entry risk. Together, these elements support one high‑quality pullback setup from identification through execution.
Initialization and Tick Handler
//+------------------------------------------------------------------+
//| Expert initialization                                            |
//+------------------------------------------------------------------+
int OnInit()
  {
   trade.SetExpertMagicNumber(InpMagic);
   trade.SetDeviationInPoints(20);

   g_atrHandle = iATR(_Symbol, _Period, InpATRPeriod);
   if(g_atrHandle == INVALID_HANDLE)
     {
      Print("Failed to create ATR handle");
      return INIT_FAILED;
     }

   ArrayResize(g_swings, 0);
   ResetSetup();

   if(InpZoneDeep <= InpZoneShallow)
     {
      Print("Invalid zone bounds: deep % must exceed shallow %");
      return INIT_PARAMETERS_INCORRECT;
     }

   return INIT_SUCCEEDED;
  }

//+------------------------------------------------------------------+
//| Expert deinitialization                                          |
//+------------------------------------------------------------------+
void OnDeinit(const int reason)
  {
   if(g_atrHandle != INVALID_HANDLE)
      IndicatorRelease(g_atrHandle);
   ObjectsDeleteAll(0, "SPB5_");
   Comment("");
  }

//+------------------------------------------------------------------+
//| Expert tick                                                      |
//+------------------------------------------------------------------+
void OnTick()
  {
   //--- Trailing runs on every tick so exits stay responsive
   if(InpUseTrailing || InpMoveToBreakeven)
      ManageTrailing();

   if(!IsNewBar())
      return;

   DetectSwing();
   ManageSetup();
   UpdateDashboard();
  }
The 'OnInit()' function performs all the initialization required before the Expert Advisor begins processing market data. We start by configuring the trading object with the user-defined magic number and the maximum permitted price deviation for order execution. Next, we create the ATR indicator handle, which will later be used for volatility measurements and trailing stop management. If the ATR handle cannot be created, we immediately terminate the initialization process because the strategy depends on this indicator. We then clear the confirmed swing buffer, reset the pullback setup to its initial state, and verify that the deep retracement percentage is greater than the shallow percentage. This validation prevents invalid pullback zones from being created and returns 'INIT_PARAMETERS_INCORRECT' if the user accidentally reverses the two values.
The 'OnDeinit()' function performs the necessary cleanup by releasing the ATR indicator handle, removing all chart objects created with the 'SPB5_' prefix, and clearing the chart comment. The 'OnTick()' function demonstrates the split responsibilities of the Expert Advisor. We execute the trailing stop and breakeven logic on every incoming tick so that open positions remain responsive to rapid price movements. In contrast, all structural analysis is performed only after a new bar has formed. This includes detecting new swings, managing pullback setups, and updating the dashboard. We follow this approach because market structure should always be evaluated using completed candles, which prevents repainting decisions and ensures that every detected swing and trading setup is based on confirmed price action rather than temporary intrabar fluctuations.
Swing Detection with Enforced Alternation
//+------------------------------------------------------------------+
//| Detect a newly confirmed swing extreme                           |
//+------------------------------------------------------------------+
void DetectSwing()
  {
   //--- Candidate pivot bar: fully closed with InpSwingRight closed bars after it
   int c = InpSwingRight + 1;
   int need = c + InpSwingLeft + 1;
   if(Bars(_Symbol, _Period) < need + InpMaxLegBars)
      return;

   double candHigh = iHigh(_Symbol, _Period, c);
   double candLow  = iLow(_Symbol, _Period, c);
   datetime candTime = iTime(_Symbol, _Period, c);

   //--- Skip if this bar is already registered as a swing
   int total = ArraySize(g_swings);
   if(total > 0 && g_swings[total - 1].time == candTime)
      return;

   bool isHigh = true;
   bool isLow  = true;

   for(int k = 1; k <= InpSwingLeft; k++)
     {
      if(iHigh(_Symbol, _Period, c + k) >= candHigh)
         isHigh = false;
      if(iLow(_Symbol, _Period, c + k)  <= candLow)
         isLow  = false;
     }
   for(int k = 1; k <= InpSwingRight; k++)
     {
      if(iHigh(_Symbol, _Period, c - k) >= candHigh)
         isHigh = false;
      if(iLow(_Symbol, _Period, c - k)  <= candLow)
         isLow  = false;
     }

   if(!isHigh && !isLow)
      return;
The candidate pivot bar is positioned at shift 'InpSwingRight + 1,' which guarantees that every bar on its right-hand side has fully closed before we attempt to classify it as a swing. This is the standard defense against the classic pivot repainting problem because a swing is confirmed only after enough future bars exist to validate it, ensuring that it cannot vanish as later bars arrive. A subsequent, more extreme same-type pivot can still extend this swing through ReplaceLastSwing() before an opposite swing appears, so the stored extreme may deepen until alternation completes. Before performing any analysis, we verify that the chart contains enough historical bars to evaluate both sides of the candidate swing and the maximum permitted impulse leg. We then retrieve the candidate bar's high, low, and timestamp, and immediately skip the evaluation if that swing has already been recorded. Finally, we compare the candidate's high and low against the surrounding bars defined by 'InpSwingLeft' and 'InpSwingRight.'
   //--- Enforce alternation: a swing high must follow a swing low and vice versa.
   bool lastWasHigh = (total > 0) ? g_swings[total - 1].isHigh : false;
   bool takeHigh;

   if(isHigh && isLow)
      takeHigh = !lastWasHigh;
   else
      takeHigh = isHigh;

   if(total > 0 && takeHigh == lastWasHigh)
     {
      //--- Same-type swing in a row: keep the more extreme one
      if(takeHigh && candHigh > g_swings[total - 1].price)
         ReplaceLastSwing(candTime, candHigh, true);
      else
         if(!takeHigh && candLow < g_swings[total - 1].price)
            ReplaceLastSwing(candTime, candLow, false);
      return;
     }

   RegisterSwing(candTime, takeHigh ? candHigh : candLow, takeHigh);
  }
The alternation logic handles the two awkward cases a raw pivot detector produces. When one bar qualifies as both a high and a low, we take whichever type alternates with the last stored swing. When two same-type swings arrive in a row—two highs, say—we keep only the more extreme one, replacing the previous swing in place through ReplaceLastSwing(), which also re-scores the extended leg against its origin. The result is a swing array that is always strictly alternating, which is precisely what makes every leg well-defined.
//+------------------------------------------------------------------+
//| Replace the last stored swing with a more extreme same-type one  |
//+------------------------------------------------------------------+
void ReplaceLastSwing(datetime t, double price, bool isHigh)
  {
   int total = ArraySize(g_swings);
   if(total == 0)
      return;

   g_swings[total - 1].time  = t;
   g_swings[total - 1].price = price;
   g_swings[total - 1].isHigh = isHigh;

   //--- Re-score against its origin (previous opposite swing)
   if(total >= 2)
     {
      g_swings[total - 1].originTime  = g_swings[total - 2].time;
      g_swings[total - 1].originPrice = g_swings[total - 2].price;
      ScoreSwing(g_swings[total - 1]);
      DrawSwing(g_swings[total - 1]);
      ArmSetupFromSwing(g_swings[total - 1]);
     }
  }

//+------------------------------------------------------------------+
//| Register a new confirmed swing and score its impulse leg         |
//+------------------------------------------------------------------+
void RegisterSwing(datetime t, double price, bool isHigh)
  {
   int total = ArraySize(g_swings);
   ArrayResize(g_swings, total + 1);

   g_swings[total].time   = t;
   g_swings[total].price  = price;
   g_swings[total].isHigh = isHigh;
   g_swings[total].score  = 0.0;
   g_swings[total].strong = false;

   if(total >= 1)
     {
      g_swings[total].originTime  = g_swings[total - 1].time;
      g_swings[total].originPrice = g_swings[total - 1].price;
      ScoreSwing(g_swings[total]);
      DrawSwing(g_swings[total]);
      ArmSetupFromSwing(g_swings[total]);
     }
   else
     {
      g_swings[total].originTime  = 0;
      g_swings[total].originPrice = 0.0;
     }

   //--- Keep the buffer bounded
   if(ArraySize(g_swings) > 200)
     {
      for(int i = 0; i < ArraySize(g_swings) - 1; i++)
         g_swings[i] = g_swings[i + 1];
      ArrayResize(g_swings, ArraySize(g_swings) - 1);
     }
  }
The system provides two complementary functions for managing confirmed market structure. We use 'ReplaceLastSwing()' when a newly detected swing is more extreme than the most recently stored swing of the same type. Instead of creating a duplicate swing, we simply update the existing record with the new time, price, and swing direction. This ensures that the latest structural extreme is always preserved without cluttering the swing history with consecutive highs or lows that represent the same market move. Once the replacement is complete, we reconnect the updated swing to its originating opposite swing, recalculate its imbalance score, redraw the swing on the chart, and determine whether it qualifies to arm a new pullback setup.
We use 'RegisterSwing()' whenever an entirely new confirmed swing is identified.
The function expands the swing buffer, stores the swing's properties, and initializes its score and strength status before linking it to the previous confirmed swing. This previous swing becomes the origin of the impulse leg, allowing us to evaluate the quality of the movement between the two turning points. We then calculate the swing's imbalance score, display the result on the chart, and determine whether it is strong enough to create a pullback trading setup. For the very first swing, no origin exists, so the origin values are initialized to zero until another swing appears.
The Candle Imbalance Engine
//+------------------------------------------------------------------+
//| Candle Imbalance Score for the leg into a swing                  |
//+------------------------------------------------------------------+
void ScoreSwing(SwingPoint &sp)
  {
   int startShift = iBarShift(_Symbol, _Period, sp.originTime, true);
   int endShift   = iBarShift(_Symbol, _Period, sp.time, true);

   if(startShift < 0 || endShift < 0 || startShift <= endShift)
      return;

   int n = startShift - endShift;   // bars travelled in the leg
   if(n < 1 || n > InpMaxLegBars)
     {
      sp.score  = 0.0;
      sp.strong = false;
      return;
     }

   bool legUp = sp.isHigh;          // leg into a swing high is an up-leg
   double legHeight = MathAbs(sp.price - sp.originPrice);
   if(legHeight <= 0.0)
      return;

   //--- Component 1: Body dominance
   //--- Average body-to-range ratio across leg candles.
   double bodySum = 0.0;
   int    counted = 0;

   //--- Component 2: Directional consistency
   int dirCount = 0;

   //--- Component 3: Leg efficiency (net travel / gross travel)
   double gross = 0.0;

   for(int s = startShift; s > endShift; s--)
     {
      double op = iOpen(_Symbol, _Period, s);
      double cl = iClose(_Symbol, _Period, s);
      double hi = iHigh(_Symbol, _Period, s);
      double lo = iLow(_Symbol, _Period, s);

      double range = hi - lo;
      if(range > 0.0)
        {
         bodySum += MathAbs(cl - op) / range;
         counted++;
        }

      if(legUp  && cl > op)
         dirCount++;
      if(!legUp && cl < op)
         dirCount++;

      if(s < startShift)
         gross += MathAbs(cl - iClose(_Symbol, _Period, s + 1));
     }

   double bodyDominance = (counted > 0) ? bodySum / counted : 0.0;
   double dirRatio      = (double)dirCount / (double)n;
'ScoreSwing()' is where this part earns its title. The function locates the leg's bar range through iBarShift on the stored origin and extreme times, rejects legs that are empty or longer than InpMaxLegBars, and then computes the four components in a single pass over the leg's candles. Body dominance is the average of each candle's body divided by its full range. A leg of marubozu-style candles scores near 1.0; a leg of long-wicked dojis scores near 0.0. Directional consistency is even simpler: the fraction of candles that closed in the leg's direction. Both quantities are bounded to the unit interval by construction, which is what makes the weighted composite meaningful. The single pass runs from the origin candle up to the bar before the extreme, so the score grades the body of the move rather than the extreme candle itself.
   double net = MathAbs(iClose(_Symbol, _Period, endShift + 1) -
                        iClose(_Symbol, _Period, startShift));
   double efficiency = (gross > 0.0) ? MathMin(net / gross, 1.0) : 0.0;
Leg efficiency divides net travel by gross travel, accumulated close-to-close during the same loop. A leg that walks straight from origin to extreme has efficiency near 1.0. A leg that covers the same distance while zig-zagging back and forth has a large gross for the same net, and its efficiency collapses. This is the component that catches legs that reach a new extreme through pure meandering—body dominance and direction count can both look respectable on such legs, but efficiency exposes them.
   //--- Component 4: FVG (imbalance gap) coverage
   //--- Bullish FVG at bar m: low[m] > high[m+2]. Bearish: high[m] < low[m+2].
   double fvgTotal = 0.0;
   for(int m = endShift + 1; m <= startShift - 2; m++)
     {
      if(legUp)
        {
         double gap = iLow(_Symbol, _Period, m) - iHigh(_Symbol, _Period, m + 2);
         if(gap > 0.0)
            fvgTotal += gap;
        }
      else
        {
         double gap = iLow(_Symbol, _Period, m + 2) - iHigh(_Symbol, _Period, m);
         if(gap > 0.0)
            fvgTotal += gap;
        }
     }
   double fvgCoverage = MathMin(fvgTotal / legHeight, 1.0);

   //--- Composite score
   double wSum = InpWeightBody + InpWeightDirection +
                 InpWeightEfficiency + InpWeightFVG;
   if(wSum <= 0.0)
      wSum = 1.0;
The fourth component uses the standard three-candle Fair Value Gap definition: in an up-leg, a bullish FVG exists at bar m when its low sits above the high two bars earlier. We sum every gap found inside the leg and normalize by the leg's height, capping at 1.0. Displacement legs leave gaps because price moved faster than the market could fill; grinding legs leave none. This ties the filter directly to the imbalance concept.
   sp.score = 100.0 * (InpWeightBody       * bodyDominance +
                       InpWeightDirection  * dirRatio +
                       InpWeightEfficiency * efficiency +
                       InpWeightFVG        * fvgCoverage) / wSum;

   sp.strong = (sp.score >= InpMinImbalanceScore);

   PrintFormat("Swing %s @ %s | score=%.1f (body=%.2f dir=%.2f eff=%.2f fvg=%.2f) -> %s",
               sp.isHigh ? "HIGH" : "LOW",
               TimeToString(sp.time),
               sp.score, bodyDominance, dirRatio, efficiency, fvgCoverage,
               sp.strong ? "STRONG" : "WEAK (filtered)");
  }
The composite is a plain weighted average scaled to 0–100, and the verdict is a single comparison against the threshold. Every scored swing also prints a full component breakdown to the journal, which is invaluable both for tuning the threshold on a new symbol and for auditing exactly why any particular swing was accepted or rejected. Because each component is bounded to [0, 1], the weighted average stays in the 0–100 range as long as the weights are non-negative.
Arming the Setup
//+------------------------------------------------------------------+
//| Arm a pullback setup from a freshly scored swing                 |
//+------------------------------------------------------------------+
void ArmSetupFromSwing(const SwingPoint &sp)
  {
   //--- Weak swings never arm setups
   if(!sp.strong)
      return;

   ResetSetup();

   g_setup.state     = SETUP_ARMED;
   g_setup.bullish   = sp.isHigh;   // strong up-leg -> buy the pullback
   g_setup.swingTime = sp.time;
   g_setup.enteredZone = false;

   if(sp.isHigh)
     {
      g_setup.legHigh = sp.price;
      g_setup.legLow  = sp.originPrice;
     }
   else
     {
      g_setup.legHigh = sp.originPrice;
      g_setup.legLow  = sp.price;
     }

   double height = g_setup.legHigh - g_setup.legLow;

   if(g_setup.bullish)
     {
      g_setup.zoneUpper = g_setup.legHigh - height * (InpZoneShallow / 100.0);
      g_setup.zoneLower = g_setup.legHigh - height * (InpZoneDeep    / 100.0);
     }
   else
     {
      g_setup.zoneLower = g_setup.legLow + height * (InpZoneShallow / 100.0);
      g_setup.zoneUpper = g_setup.legLow + height * (InpZoneDeep    / 100.0);
     }

   DrawZone();
  }
The first condition in 'ArmSetupFromSwing()' applies the system's most important filter by immediately rejecting weak swings before they can generate a trading opportunity. If a swing is not classified as strong, the function exits without creating a pullback zone, advancing the setup state, or preparing a trade. A weak swing therefore leaves any existing armed setup untouched; only the next strong swing calls ResetSetup() and replaces it, so "one active setup" always refers to the most recent strong structure. For a strong swing, we first reset any existing setup to ensure that only the most recent market structure is considered. We then initialize the setup state as 'SETUP_ARMED,' record the swing's direction and anchor time, and determine the impulse leg by assigning its high and low boundaries according to whether the swing is bullish or bearish.
Using the height of this impulse leg, we calculate the pullback zone from the user-defined shallow and deep retracement percentages. A strong bullish impulse creates a buy zone measured downward from the swing high, while a strong bearish impulse creates a sell zone measured upward from the swing low. Finally, we draw the retracement zone on the chart, providing a clear visual representation of the area where we expect a high-probability pullback to develop.
Managing the Setup
//+------------------------------------------------------------------+
//| Manage the armed setup on each closed bar                        |
//+------------------------------------------------------------------+
void ManageSetup()
  {
   if(g_setup.state == SETUP_NONE || g_setup.state == SETUP_DONE)
      return;

   double closed = iClose(_Symbol, _Period, 1);
   double hi1    = iHigh(_Symbol, _Period, 1);
   double lo1    = iLow(_Symbol, _Period, 1);
   double op1    = iOpen(_Symbol, _Period, 1);

   //--- Hard invalidation: price closes beyond the leg origin (100% retrace)
   if(g_setup.bullish && closed < g_setup.legLow)
     {
      Invalidate("full retrace");
      return;
     }
   if(!g_setup.bullish && closed > g_setup.legHigh)
     {
      Invalidate("full retrace");
      return;
     }
'ManageSetup()' runs once per closed bar and reads the last completed candle. It checks hard invalidation first. A close beyond the leg origin means the impulse has been fully unwound, and no amount of zone logic can save a setup whose premise no longer exists. In the SETUP_IN_ZONE state, the first-retest rule applies next.
   bool inZone = (lo1 <= g_setup.zoneUpper && hi1 >= g_setup.zoneLower);

   if(g_setup.state == SETUP_ARMED)
     {
      if(inZone)
        {
         g_setup.state = SETUP_IN_ZONE;
         g_setup.enteredZone = true;
        }
      return;
     }

   //--- SETUP_IN_ZONE: look for the confirmation candle
   if(g_setup.state == SETUP_IN_ZONE)
     {
      //--- First-clean-retest-only: if price leaves the zone against us
      //--- without confirming, the setup is spent.
      if(InpFirstRetestOnly)
        {
         if(g_setup.bullish && closed < g_setup.zoneLower)
           {
            Invalidate("zone break");
            return;
           }
         if(!g_setup.bullish && closed > g_setup.zoneUpper)
           {
            Invalidate("zone break");
            return;
           }
        }

      bool confirm = false;
      if(g_setup.bullish)
         confirm = (closed > op1) && (closed >= g_setup.zoneLower) && (closed <= g_setup.zoneUpper * 1.001);
      else
         confirm = (closed < op1) && (closed <= g_setup.zoneUpper) && (closed >= g_setup.zoneLower * 0.999);

      if(confirm)
        {
         if(OpenTrade())
            g_setup.state = SETUP_DONE;
        }
      else
         if(!inZone)
           {
            //--- Drifted out toward the extreme without confirming: re-arm and
            //--- allow a second touch only if first-retest-only is disabled.
            if(!InpFirstRetestOnly)
               g_setup.state = SETUP_ARMED;
           }
     }
  }
Confirmation is a candle that closes in the trade direction while still inside the zone; that far bound carries a small tolerance so a close sitting exactly on the boundary is not rejected by rounding. A fixed points-based tolerance would behave more consistently across instruments, but here we keep a small relative margin for simplicity. If the price drifts out of the zone toward the extreme without confirming, the setup re-arms only when first-retest-only is disabled—with the default settings, that drift is not fatal, but a clean break through the deep side is. Because the ARMED branch only moves the setup into the zone, a bar that both enters the zone and closes beyond its deep side is invalidated on the following bar rather than on that same bar.
Executing the Trade
//+------------------------------------------------------------------+
//| Open the pullback trade                                          |
//+------------------------------------------------------------------+
bool OpenTrade()
  {
   if(CountOpenPositions() >= InpMaxOpenTrades)
      return false;

   double atr[1];
   if(CopyBuffer(g_atrHandle, 0, 1, 1, atr) != 1)
      return false;
   double buffer = atr[0] * InpATRBufferMult;

   double ask = SymbolInfoDouble(_Symbol, SYMBOL_ASK);
   double bid = SymbolInfoDouble(_Symbol, SYMBOL_BID);
   int    digits = (int)SymbolInfoInteger(_Symbol, SYMBOL_DIGITS);

   double sl, tp, entry;
   bool ok = false;

   if(g_setup.bullish)
     {
      entry = ask;
      sl = NormalizeDouble(g_setup.legLow - buffer, digits);
      double dist = entry - sl;
      if(dist <= 0.0)
         return false;
      tp = NormalizeDouble(entry + dist * InpRiskRewardRatio, digits);
      ok = trade.Buy(InpLots, _Symbol, 0.0, sl, tp, "SPB5 buy pullback");
     }
   else
     {
      entry = bid;
      sl = NormalizeDouble(g_setup.legHigh + buffer, digits);
      double dist = sl - entry;
      if(dist <= 0.0)
         return false;
      tp = NormalizeDouble(entry - dist * InpRiskRewardRatio, digits);
      ok = trade.Sell(InpLots, _Symbol, 0.0, sl, tp, "SPB5 sell pullback");
     }

   if(ok)
     {
      //--- Anchor for trailing activation (R-multiple measurement)
      double riskDist = g_setup.bullish ? (entry - sl) : (sl - entry);
      g_initialRiskPoints = riskDist / _Point;
      PrintFormat("Opened %s | SL=%.5f TP=%.5f | Risk=%.0f pts",
                  g_setup.bullish ? "BUY" : "SELL", sl, tp, g_initialRiskPoints);
     }
   else
      PrintFormat("Trade failed: %d - %s", trade.ResultRetcode(), trade.ResultRetcodeDescription());

   return ok;
  }
The 'OpenTrade()' function begins by enforcing the maximum number of simultaneously open positions before retrieving the latest ATR value to calculate a volatility-based stop-loss buffer. We use this buffer to place the stop loss beyond the impulse leg origin, giving the trade additional room to withstand normal market fluctuations. Depending on whether the active setup is bullish or bearish, we determine the entry price using the current ask or bid, calculate the stop-loss distance, and verify that the resulting risk is valid before computing the take-profit level using the user-defined risk-to-reward ratio. If the trade is successfully opened, we record the initial entry risk in points by measuring the distance between the entry price and the stop loss.
The Trailing Stop Module
//+------------------------------------------------------------------+
//| Trailing Stop Module                                             |
//+------------------------------------------------------------------+
void ManageTrailing()
  {
   double atr[1];
   if(CopyBuffer(g_atrHandle, 0, 1, 1, atr) != 1)
      return;
   if(atr[0] <= 0)
      return;

   double buffer = atr[0] * InpATRBufferMult;
   double bid    = SymbolInfoDouble(_Symbol, SYMBOL_BID);
   double ask    = SymbolInfoDouble(_Symbol, SYMBOL_ASK);
   int    digits = (int)SymbolInfoInteger(_Symbol, SYMBOL_DIGITS);

   for(int i = PositionsTotal() - 1; i >= 0; i--)
     {
      ulong ticket = PositionGetTicket(i);
      if(ticket == 0)
         continue;
      if(PositionGetString(POSITION_SYMBOL) != _Symbol)
         continue;
      if((ulong)PositionGetInteger(POSITION_MAGIC) != InpMagic)
         continue;

      double openPrice = PositionGetDouble(POSITION_PRICE_OPEN);
      double curSL     = PositionGetDouble(POSITION_SL);
      double curTP     = PositionGetDouble(POSITION_TP);
      long   type      = PositionGetInteger(POSITION_TYPE);

      //--- Risk anchor: entry risk if known, ATR proxy otherwise
      //--- (proxy covers EA restarts mid-position)
      double riskPts = (g_initialRiskPoints > 0) ? g_initialRiskPoints
                       : atr[0] * InpTrailATRMult / _Point;
      if(riskPts <= 0)
         continue;
'ManageTrailing()' iterates every position owned by this EA—filtered by symbol and magic number. With the default single-position cap, the stored entry risk maps to exactly one trade; if that cap is raised, all positions share this single risk anchor, so per-ticket risk should be stored before relying on multi-position trailing. The risk anchor is the recorded entry risk when available, with an ATR-based proxy as a fallback. The fallback exists for one specific scenario: the EA is restarted while a position is open, the global is back at zero, and without a proxy, the module would silently never activate. Step one is the breakeven move. Once open profit reaches 'InpBreakevenTriggerRR' times the risk, the stop moves to entry plus (or minus, for sells) the buffer in 'InpBreakevenBufferPts,' provided that there is an improvement on the current stop and does not violate the current price.
      if(type == POSITION_TYPE_BUY)
        {
         double profitPts = (bid - openPrice) / _Point;

         //--- Step 1: Breakeven
         if(InpMoveToBreakeven && profitPts >= InpBreakevenTriggerRR * riskPts)
           {
            double be = NormalizeDouble(openPrice + InpBreakevenBufferPts * _Point, digits);
            if(curSL < be && be < bid)
              {
               if(trade.PositionModify(ticket, be, curTP))
                 {
                  curSL = be;
                  PrintFormat("Breakeven SL -> %.5f (#%I64u)", be, ticket);
                 }
              }
           }

         //--- Step 2: Trailing
         if(!InpUseTrailing)
            continue;
         if(profitPts < InpTrailActivationRR * riskPts)
            continue;

         double swingSL = 0.0;
         if(InpTrailMode == TRAIL_SWING || InpTrailMode == TRAIL_HYBRID)
           {
            //--- Highest confirmed swing low between entry and current price
            for(int s = 0; s < ArraySize(g_swings); s++)
               if(!g_swings[s].isHigh &&
                  g_swings[s].price > openPrice &&
                  g_swings[s].price < bid)
                  if(g_swings[s].price > swingSL)
                     swingSL = g_swings[s].price;

            if(swingSL > 0.0)
               swingSL -= buffer;
           }

         double atrSL = 0.0;
         if(InpTrailMode == TRAIL_ATR || InpTrailMode == TRAIL_HYBRID)
            atrSL = bid - atr[0] * InpTrailATRMult;

         //--- Tightest = highest candidate for a buy
         double newSL = NormalizeDouble(MathMax(swingSL, atrSL), digits);

         if(newSL > 0.0 && newSL > curSL + _Point && newSL < bid)
           {
            if(trade.PositionModify(ticket, newSL, curTP))
               PrintFormat("Trail SL -> %.5f (#%I64u | mode: %s)",
                           newSL, ticket, TrailModeToString(InpTrailMode));
           }
        }
      else
         if(type == POSITION_TYPE_SELL)
           {
            double profitPts = (openPrice - ask) / _Point;

            //--- Step 1: Breakeven
            if(InpMoveToBreakeven && profitPts >= InpBreakevenTriggerRR * riskPts)
              {
               double be = NormalizeDouble(openPrice - InpBreakevenBufferPts * _Point, digits);
               if((curSL > be || curSL == 0.0) && be > ask)
                 {
                  if(trade.PositionModify(ticket, be, curTP))
                    {
                     curSL = be;
                     PrintFormat("Breakeven SL -> %.5f (#%I64u)", be, ticket);
                    }
                 }
              }

            //--- Step 2: Trailing
            if(!InpUseTrailing)
               continue;
            if(profitPts < InpTrailActivationRR * riskPts)
               continue;

            double swingSL = 0.0;
            if(InpTrailMode == TRAIL_SWING || InpTrailMode == TRAIL_HYBRID)
              {
               //--- Lowest confirmed swing high between entry and current price
               for(int s = 0; s < ArraySize(g_swings); s++)
                  if(g_swings[s].isHigh &&
                     g_swings[s].price < openPrice &&
                     g_swings[s].price > ask)
                     if(swingSL == 0.0 || g_swings[s].price < swingSL)
                        swingSL = g_swings[s].price;

               if(swingSL > 0.0)
                  swingSL += buffer;
              }

            double atrSL = 0.0;
            if(InpTrailMode == TRAIL_ATR || InpTrailMode == TRAIL_HYBRID)
               atrSL = ask + atr[0] * InpTrailATRMult;

            //--- Tightest = lowest candidate for a sell
            double newSL = 0.0;
            if(swingSL > 0.0 && atrSL > 0.0)
               newSL = MathMin(swingSL, atrSL);
            else
               if(swingSL > 0.0)
                  newSL = swingSL;
               else
                  newSL = atrSL;
            newSL = NormalizeDouble(newSL, digits);

            if(newSL > 0.0 && (curSL == 0.0 || newSL < curSL - _Point) && newSL > ask)
              {
               if(trade.PositionModify(ticket, newSL, curTP))
                  PrintFormat("Trail SL -> %.5f (#%I64u | mode: %s)",
                              newSL, ticket, TrailModeToString(InpTrailMode));
              }
           }
     }
  }
For a buy, the swing candidate is the highest confirmed swing low that has formed between the entry price and the current bid, pushed down by the ATR buffer so the stop sits behind the structure rather than on it. The ATR candidate is a chandelier line trailing the bid. Hybrid mode takes the maximum of the two—the tighter, more protective stop for a long position—and the final guard, 'newSL > curSL + _Point,' is the ratchet: the stop can only ever advance. The sell branch mirrors all of this with the comparisons inverted, taking the minimum of the candidates and handling the case where the current stop is zero. The swing candidates it trails behind come from 'g_swings,' and while weak swings do remain in that array for reference, in practice the alternation-enforced structure means the levels the trail respects are the same levels the market respects. Structure-in produces structure-out.
Visualization and the Dashboard
//+------------------------------------------------------------------+
//| Draw a scored swing (leg line + label)                           |
//+------------------------------------------------------------------+
void DrawSwing(const SwingPoint &sp)
  {
   if(!InpDrawObjects)
      return;

   string id = "SPB5_LEG_" + TimeToString(sp.time, TIME_DATE | TIME_MINUTES);
   color clr = sp.strong ? (sp.isHigh ? InpStrongBullColor : InpStrongBearColor)
               : InpWeakColor;

   ObjectDelete(0, id);
   ObjectCreate(0, id, OBJ_TREND, 0, sp.originTime, sp.originPrice, sp.time, sp.price);
   ObjectSetInteger(0, id, OBJPROP_COLOR, clr);
   ObjectSetInteger(0, id, OBJPROP_WIDTH, sp.strong ? 2 : 1);
   ObjectSetInteger(0, id, OBJPROP_STYLE, sp.strong ? STYLE_SOLID : STYLE_DOT);
   ObjectSetInteger(0, id, OBJPROP_RAY_RIGHT, false);
   ObjectSetInteger(0, id, OBJPROP_SELECTABLE, false);

   string lbl = "SPB5_LBL_" + TimeToString(sp.time, TIME_DATE | TIME_MINUTES);
   ObjectDelete(0, lbl);
   ObjectCreate(0, lbl, OBJ_TEXT, 0, sp.time, sp.price);
   ObjectSetString(0, lbl, OBJPROP_TEXT, StringFormat("%.0f", sp.score));
   ObjectSetInteger(0, lbl, OBJPROP_COLOR, clr);
   ObjectSetInteger(0, lbl, OBJPROP_FONTSIZE, 8);
   ObjectSetInteger(0, lbl, OBJPROP_ANCHOR, sp.isHigh ? ANCHOR_LOWER : ANCHOR_UPPER);
   ObjectSetInteger(0, lbl, OBJPROP_SELECTABLE, false);
  }

//+------------------------------------------------------------------+
//| Draw the active pullback zone                                    |
//+------------------------------------------------------------------+
void DrawZone()
  {
   if(!InpDrawObjects)
      return;

   string id = "SPB5_ZONE";
   ObjectDelete(0, id);
   datetime t1 = g_setup.swingTime;
   datetime t2 = TimeCurrent() + PeriodSeconds(_Period) * 30;

   ObjectCreate(0, id, OBJ_RECTANGLE, 0, t1, g_setup.zoneUpper, t2, g_setup.zoneLower);
   ObjectSetInteger(0, id, OBJPROP_COLOR, InpZoneColor);
   ObjectSetInteger(0, id, OBJPROP_FILL, true);
   ObjectSetInteger(0, id, OBJPROP_BACK, true);
   ObjectSetInteger(0, id, OBJPROP_SELECTABLE, false);
  }
'DrawSwing()' renders every scored leg as a trend line from origin to extreme: solid and colored (lime green for bullish, orange-red for bearish) with width two when strong, gray and dotted with width one when weak, and always labeled with the rounded score at the extreme. 'DrawZone()' draws the active retracement band as a filled rectangle projected thirty bars forward. The visual grammar is deliberate—on any chart, one glance separates the swings the system will defend from the swings it has dismissed.
//+------------------------------------------------------------------+
//| Reset setup state                                                |
//+------------------------------------------------------------------+
void ResetSetup()
  {
   g_setup.state       = SETUP_NONE;
   g_setup.bullish     = false;
   g_setup.legHigh     = 0.0;
   g_setup.legLow      = 0.0;
   g_setup.zoneUpper   = 0.0;
   g_setup.zoneLower   = 0.0;
   g_setup.swingTime   = 0;
   g_setup.enteredZone = false;
  }

//+------------------------------------------------------------------+
//| Chart comment dashboard                                          |
//+------------------------------------------------------------------+
void UpdateDashboard()
  {
   int total  = ArraySize(g_swings);
   int strong = 0, weak = 0;
   for(int i = 0; i < total; i++)
     {
      if(g_swings[i].originTime == 0)
         continue;
      if(g_swings[i].strong)
         strong++;
      else
         weak++;
     }

   string state = "NONE";
   switch(g_setup.state)
     {
      case SETUP_ARMED:
         state = "ARMED (" + (g_setup.bullish ? "BUY" : "SELL") + ")";
         break;
      case SETUP_IN_ZONE:
         state = "IN ZONE (" + (g_setup.bullish ? "BUY" : "SELL") + ")";
         break;
      case SETUP_DONE:
         state = "DONE";
         break;
     }

   Comment(StringFormat(
              "Swing Pullback Part 5 - Candle Imbalance Filter\n" +
              "Swings scored: %d | Strong: %d | Weak filtered: %d\n" +
              "Min score: %.1f | Setup: %s\n" +
              "Trailing: %s | BE: %s\n" +
              "Open positions: %d / %d",
              strong + weak, strong, weak,
              InpMinImbalanceScore, state,
              InpUseTrailing ? TrailModeToString(InpTrailMode) : "OFF",
              InpMoveToBreakeven ? "ON" : "OFF",
              CountOpenPositions(), InpMaxOpenTrades));
  }
//+------------------------------------------------------------------+
The dashboard summarizes the engine's state in a chart comment: how many swings have been scored, the running strong-versus-weak split, the threshold in force, the current setup state with its direction, the trailing configuration, and the open position count against the cap. During a backtest, the strong/weak counter is the fastest sanity check available: if it reads all-weak, the threshold is too strict for the symbol; if it reads all-strong, the filter is not filtering.
Backtest
The backtest was conducted across a roughly 7-months testing window, on the M10 timeframe, from 01 January 2026 to 31 July 2026, with the default settings, except for 'InpMinImbalanceScore' the first run we set the filter to 55 (ON), and on the second run we set it to 0 (OFF):
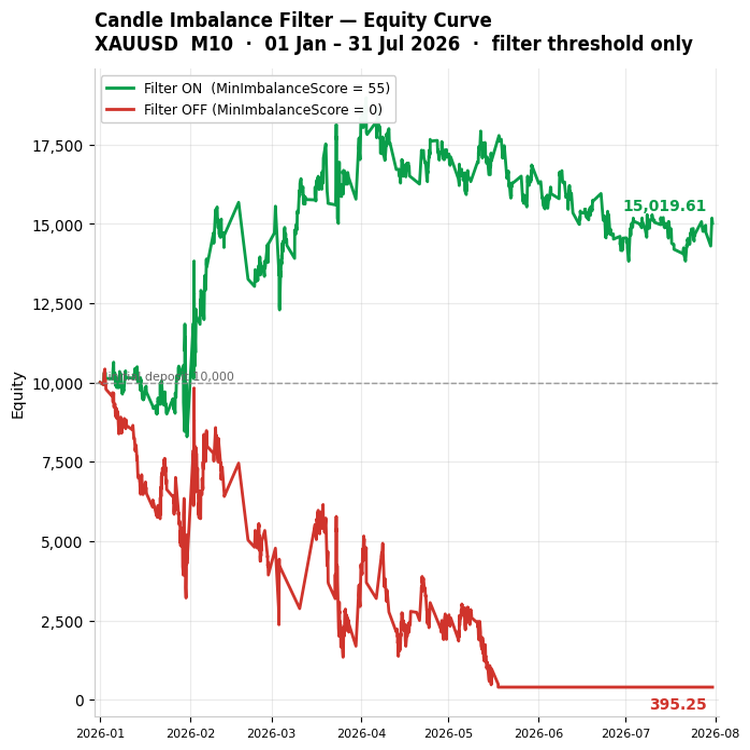
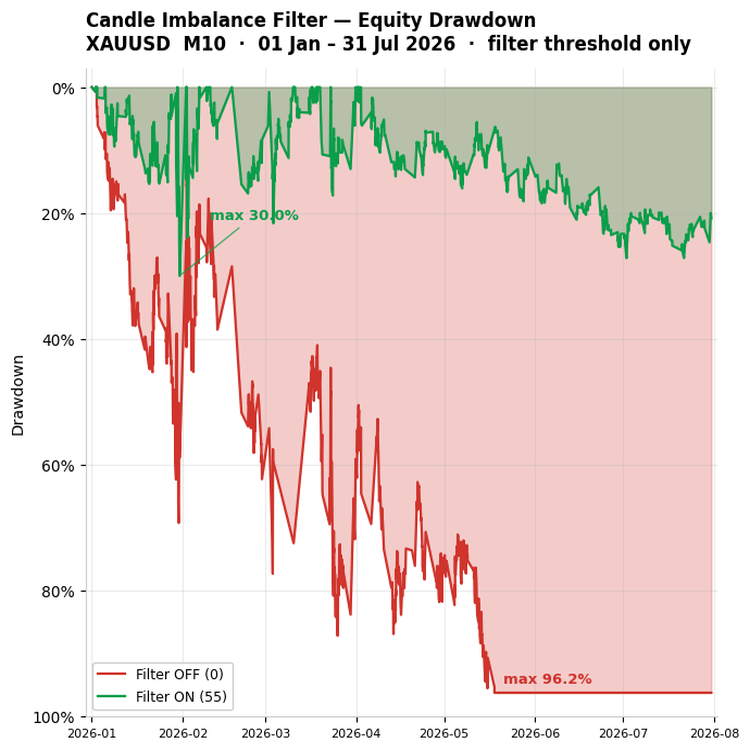
Below is the backtest summary table of both runs:
| Metric | Filter ON (55) | Filter OFF (0) |
|---|---|---|
| Final balance | 15,019.61 | 395.25 |
| Total net profit | 5,019.61 | −9,604.75 |
| Gross profit | 50,281.31 | 37,294.06 |
| Gross loss | −45,261.70 | −46,898.81 |
| Profit factor | 1.11 | 0.80 |
| Expected payoff | 16.51 | −42.31 |
| Total trades | 304 | 227 |
| Win rate | 52.63% | 44.93% |
| Average win | 314.26 | 365.63 |
| Average loss | −314.32 | −375.19 |
| Max balance DD | 4,548.88 (24.47%) | 9,887.45 (96.16%) |
| Max equity DD | 5,153.34 (29.99%) | 10,025.25 (96.21%) |
| Recovery factor | 0.97 | −0.96 |
To reproduce the results above, please refer to the table below:
| Settings | Value |
|---|---|
| Symbol | XAUUSD |
| Period/Timeframe | M10 |
| Test interval | 01 Jan 2026 – 31 Jul 2026 |
| Modeling | Every tick based on real ticks |
| History quality | 100% |
| Initial deposit | $10,000 |
| Leverage | 1:100 |
| Inputs | Default, except for (InpMinImbalanceScore) |
Conclusion
Throughout this article, we closed one of the blind spots in our swing-and-pullback framework. We built a Candle Imbalance Engine that grades every impulse leg on four bounded, mechanical components—body dominance, directional consistency, leg efficiency, and FVG coverage—and composited them into a single 0–100 score with adjustable weights. We wired that score into the swing lifecycle so that weak swings are demoted visually and excluded from trade candidacy at the earliest possible point, before a zone or a setup ever exists. Around the surviving strong swings, we ran a strict pullback state machine with first-clean-retest-only invalidation, and we completed the trade lifecycle with a three-mode trailing stop module that measures its triggers in R-multiples and only ever ratchets in the position's favor.
This article delivers more than a single Expert Advisor. The imbalance score is a portable idea: any system that anchors decisions to swing extremes—order block strategies, liquidity sweep models, structure-break entries—can bolt this engine in front of its anchor selection and immediately stop defending levels that were never defended by displacement in the first place. Because every component is bounded and every weight is an input, the filter can be tuned per symbol from the journal's component breakdowns rather than by blind optimization. And because it is deterministic, every accepted and rejected swing can be audited candle by candle on the chart. That is interpretability, which we value but treat as separate from a statistical edge.
A strong imbalance score is a filter on structure, not a guarantee that the pullback will hold; whether it improves entry statistics is a question for the before/after test below, not for the score alone. And the portability to order blocks, liquidity models and structure-break entries is a direction we expect to hold, not something this single window backtest establishes—you should validate it on your own systems and markets before relying on it.
Warning: All rights to these materials are reserved by MetaQuotes Ltd. Copying or reprinting of these materials in whole or in part is prohibited.
This article was written by a user of the site and reflects their personal views. MetaQuotes Ltd is not responsible for the accuracy of the information presented, nor for any consequences resulting from the use of the solutions, strategies or recommendations described.

 The Deflated Sharpe Ratio in MQL5: Telling a Real Edge from a Lucky Backtest
 Neural Networks in Trading: Robust Trading Signals in Any Market Regime (Conclusion)
 Features of Experts Advisors
 How MQL5 Lite MCP AI Assistant Changed My Debugging Approach on Generated MQL5 Codes

- Free trading apps
- Over 8,000 signals for copying
- Economic news for exploring financial markets
You agree to website policy and terms of use