
Self Optimizing Expert Advisors in MQL5 (Part 8): Multiple Strategy Analysis (2)

In this series, we're exploring creative ways to combine different trading strategies into a single, cohesive ensemble. The goal is to overcome the limitations of individual strategies by merging them into something more powerful.
In our last discussion, we built a superclass to serve as the foundation for all our trading strategies. This superclass allowed us to implement our first strategy, a moving average crossover, in MQL5. Afterward, we compared our flexible strategy class with a hard-coded version of the same strategy to verify that the performance matched.
Using the MetaTrader 5 strategy tester, we were able to find strong parameter settings for it. Finding good parameters on your own can be challenging. That’s why the genetic optimizer in MetaTrader 5 is such a valuable tool. It helps automate the process, saving time and effort.
We also used forward testing techniques to filter out stable parameter sets from our results. This confirmed that our implementation was accurate and efficient.
Today, we’re going a step further. We’ll create a second strategy based on the Relative Strength Index (RSI) and then merge it with our moving average crossover strategy. By combining them, we aim to create a more robust and potentially more profitable ensemble strategy. We'll also use the MetaTrader 5 strategy tester to optimize this new combined strategy. But before we dive in, it’s important to talk about a key concept: parameter minimization.
As we add more components to our strategy, the number of parameters can grow quickly. A strategy with too many moving parts becomes harder, and sometimes nearly impossible, to optimize effectively. That’s why it's crucial to limit the number of parameters where possible. Often, fixing certain parameters at constant values allows us to focus on optimizing the most impactful ones.
To put things into perspective, our original moving average strategy achieved a Sharpe ratio of 1.29 in forward testing, with a profit of $133.51 across 101 trades. In contrast, the new RSI-based strategy we'll build today achieved a Sharpe ratio of 2.68 and a profit of $214.08—with only 52 trades.
That means the new strategy not only made more money but did so with fewer trades, lower market exposure, and less risk. This is precisely the kind of performance we aim for in trading strategy design.
By working closely with the strategy tester and using it wisely, we can uncover more profitable settings. That said, it's important to manage expectations. The MetaTrader 5 strategy tester can’t magically fix a poor strategy. If a strategy is fundamentally flawed, no amount of optimization will make it profitable.
Even with a good strategy, optimization doesn’t guarantee better results—but it can significantly improve your chances if used properly. With a solid foundation and the right tools, there’s no limit to how much performance we can extract.
Getting Started in MQL5
Our discussion begins by first building the class for our RSI midpoint strategy. The first goal we need to achieve is loading the dependencies that our strategy class requires. The first dependency is the RSI class that we created for our single buffer indicators. Additionally, we will also need the superclass for all our strategies, also called the parent class.
//+------------------------------------------------------------------+
//|                                                  RSIMidPoint.mqh |
//|                                               Gamuchirai Ndawana |
//|                    https://www.mql5.com/en/users/gamuchiraindawa |
//+------------------------------------------------------------------+
#property copyright "Gamuchirai Ndawana"
#property link      "https://www.mql5.com/en/users/gamuchiraindawa"
#property version   "1.00"

//+------------------------------------------------------------------+
//| Dependencies                                                     |
//+------------------------------------------------------------------+
#include <VolatilityDoctor\Indicators\RSI.mqh>
#include <VolatilityDoctor\Strategies\Parent\Strategy.mqh>
Now that we have loaded our dependencies, we can begin defining the RSI midpoint strategy class and its members. Note that this midpoint strategy inherits from the base class for all our strategies, which we denote using the colon syntax. From there, we define the members of our midpoint strategy class. Notice that we only have a few members to define. Also, note that all the virtual methods that we created in the parent strategy class must be listed again as virtual in our RSI midpoint class.
class RSIMidPoint : public Strategy
  {
private:
                     //--- The instance of the RSI used in this strategy
                     RSI *my_rsi;

public:
                     //--- Class constructor
                     RSIMidPoint(string user_symbol,ENUM_TIMEFRAMES user_timeframe,int user_period,ENUM_APPLIED_PRICE user_price);

                     //--- Class destructor
                    ~RSIMidPoint();

                    //--- Class overrides
                    virtual bool Update(void);
                    virtual bool BuySignal(void);
                    virtual bool SellSignal(void);
  };
We can now start considering how each method will be implemented specifically for our RSI strategy. The update method only needs to update the RSI indicator value and then ensure that the current reading from the RSI indicator is not zero. If that is the case, then everything went fine; otherwise, something went wrong.
//+------------------------------------------------------------------+
//| Our strategy update method                                       |
//+------------------------------------------------------------------+
bool RSIMidPoint::Update(void)
   {
      //--- Set the indicator value
      my_rsi.SetIndicatorValues(Strategy::GetIndicatorBufferSize(),true);

      //--- Check readings are valid
      if(my_rsi.GetCurrentReading() != 0) return(true);

      //--- Something went wrong
      return(false);
   }
Next, we will consider the cases for our buy and sell signals. Our buy signals are generated when our RSI reading is below 50, while, on the other hand, our sell signals are generated when the RSI is above 50.
//+------------------------------------------------------------------+
//| Check for our buy signal                                         |
//+------------------------------------------------------------------+
bool RSIMidPoint::BuySignal(void)
   {
      //--- Buy signals when the RSI is below 50
      return(my_rsi.GetCurrentReading()<50);
   }

//+------------------------------------------------------------------+
//| Check for our sell signal                                        |
//+------------------------------------------------------------------+
bool RSIMidPoint::SellSignal(void)
   {
      //--- Sell signals when the RSI is above 50
      return(my_rsi.GetCurrentReading()>50);
   }
Lastly, we need to consider the class constructor and destructor. The class constructor will take in the details required by our RSI indicator. In particular, our constructor requires the user to specify which symbol, which timeframe, which period, and which price the RSI should be applied on. Once all of that has been specified, we load those details and create a new instance of our RSI indicator.
However, note that this particular instance of the RSI indicator we use is not the same RSI instance that comes loaded with MetaTrader 5. This is a custom type that we have defined, which has many other useful functions that we will be using. Nevertheless, the overall functionality is the same, and readers should feel free to implement some of these methods from scratch if needed.
//+------------------------------------------------------------------+
//| Our class constructor                                            |
//+------------------------------------------------------------------+
RSIMidPoint::RSIMidPoint(string user_symbol,ENUM_TIMEFRAMES user_timeframe,int user_period,ENUM_APPLIED_PRICE user_price)
  {
   my_rsi = new RSI(user_symbol,user_timeframe,user_period,user_price);
   Print("RSI-Mid-Point Strategy Loaded.");
  }
Finally, in our class destructor, we delete the pointer to the custom RSI object that we created.
//+------------------------------------------------------------------+
//| Our class destructor                                             |
//+------------------------------------------------------------------+
RSIMidPoint::~RSIMidPoint()
  {
   delete my_rsi;
  }
//+------------------------------------------------------------------+
Now that we have defined the class that encapsulates our RSI midpoint strategy, we need to ensure that the class has been built without errors. Therefore, we have to first establish a baseline performance level using a hard-coded version of the strategy so that we can test our class to see if the class can recover the same performance levels that were obtained by the hard-coded version.
If these two strategies are equivalent, then they should have the same profitability levels and produce the same statistics when they are tested over the same period. So, in defining our baseline, the first order of business is to first list system constants that we need. For example, the price that the RSI should be applied on, the RSI period, and time frame. All of these constants need to be fixed across both our tests to ensure that we're making fair comparisons.
//+------------------------------------------------------------------+
//|                                          MSA Test 2 Baseline.mq5 |
//|                                               Gamuchirai Ndawana |
//|                    https://www.mql5.com/en/users/gamuchiraindawa |
//+------------------------------------------------------------------+
#property copyright "Gamuchirai Ndawana"
#property link      "https://www.mql5.com/en/users/gamuchiraindawa"
#property version   "1.00"

//+------------------------------------------------------------------+
//| Define system constants                                          |
//+------------------------------------------------------------------+
#define RSI_PRICE        PRICE_CLOSE
#define RSI_PERIOD       15
#define RSI_TIME_FRAME   PERIOD_D1
#define HOLDING_PERIOD   5
Afterward, we will load the dependencies that we need. In this case, we only need about three libraries.
//+------------------------------------------------------------------+
//| Dependencies                                                     |
//+------------------------------------------------------------------+
#include <Trade\Trade.mqh>
#include <VolatilityDoctor\Trade\TradeInfo.mqh>
#include <VolatilityDoctor\Time\Time.mqh>
Additionally, we will also need to define some global variables. Notice that we can split our global variables into two types: custom types and system types. Custom types are user-defined. System-defined types are available in every installation of MetaTrader 5, types such as doubles and floats. This is one way we can group our global variables, just so that our code is easier to maintain.
//+------------------------------------------------------------------+
//| Global Variables                                                 |
//+------------------------------------------------------------------+

//--- Custom Types
CTrade    Trade;
TradeInfo *TradeInformation;
Time      *TradeTime;

//--- System Types
double rsi[],ma_close[];
int    rsi_handler;
int    position_timer;
From there, we now move on to building the initialization process for our expert advisor. When our expert advisor is first initialized, notice that we will create the RSI handler ourselves, and then we will also create dynamic instances of some of the custom types that we need. We need these custom types particularly for keeping track of time and getting vital trade information such as the smallest lot size allowed. And then from there, we will ensure that the RSI handler was loaded safely.
//+------------------------------------------------------------------+
//| Expert initialization function                                   |
//+------------------------------------------------------------------+
int OnInit()
  {
//--- Our technical indicator
   rsi_handler = iRSI(Symbol(),RSI_TIME_FRAME,RSI_PERIOD,RSI_PRICE);

//--- Create dynamic instances of our custom types
   TradeTime        = new Time(Symbol(),RSI_TIME_FRAME);
   TradeInformation = new TradeInfo(Symbol(),RSI_TIME_FRAME);


//--- Safety checks
   if(rsi_handler == INVALID_HANDLE)
      return(false);

//--- Everything was fine
   return(INIT_SUCCEEDED);
  }
//--- End of OnInit Scope
When our expert advisor is no longer in use, we will release the indicator that we are no longer using and also delete the dynamic objects that we created.
//+------------------------------------------------------------------+
//| Expert deinitialization function                                 |
//+------------------------------------------------------------------+
void OnDeinit(const int reason)
  {
//--- Delete the indicators and dynamic objects
   IndicatorRelease(rsi_handler);

   delete TradeTime;
   delete TradeInformation;

  }
//--- End of Deinit Scope
During the OnTick function, we will first check if a new daily candle has been formed, using the library that we wrote for that. If a new candle has indeed been formed, we will update our technical indicators and then check if we have any positions open. If that's the case that we do not have any positions open, we will ensure that our position time has been reset and then check for a trading signal. Otherwise, if we do have trades open, we will then check whether our trade has reached maturity and should be closed. Otherwise, we will continue holding.
//+------------------------------------------------------------------+
//| Expert tick function                                             |
//+------------------------------------------------------------------+
void OnTick()
  {
//--- Check if a new daily candle has formed
   if(TradeTime.NewCandle())
     {

      //--- Update our technical indicators
      Update();

      //--- If we have no open positions
      if(PositionsTotal() == 0)
        {
         //--- Reset the position timer
         position_timer = 0;

         //--- Check for a trading signal
         CheckSignal();
        }

      //--- Otherwise
      else
        {
         //--- The position has reached maturity
         if(position_timer == HOLDING_PERIOD)
            Trade.PositionClose(Symbol());

         //--- Otherwise keep holding
         else
            position_timer++;
        }
     }
  }
//--- End of OnTick Scope
We also need to consider the implementation of some of the methods that we discussed. For example, the update method simply calls copy buffer, and it copies the indicator values from our RSI handler into the array that we specified for this purpose. We are only copying the current reading of the RSI indicator. We don't need the previous readings.
//+------------------------------------------------------------------+
//| Update our technical indicators                                  |
//+------------------------------------------------------------------+
void Update(void)
  {
//--- Call the CopyBuffer method to get updated indicator values
   CopyBuffer(rsi_handler,0,0,1,rsi);
  }
//--- End of Update Scope
Again, the check signal method—the check signal method simply is looking for the trading signals that we defined before—that our RSI will buy when the reading is below 50; otherwise, we will sell if our reading is above 50.
//+------------------------------------------------------------------+
//| Check for a trading signal using our cross-over strategy         |
//+------------------------------------------------------------------+
void CheckSignal(void)
  {
//--- Buy signals when the RSI is below 50
   if(rsi[0] < 50)
     {
      Trade.Buy(TradeInformation.MinVolume(),Symbol(),TradeInformation.GetAsk(),0,0,"");
      return;
     }

//--- Sell signals when the RSI is above 50
   else
      if(rsi[0] > 50)
        {
         Trade.Sell(TradeInformation.MinVolume(),Symbol(),TradeInformation.GetBid(),0,0,"");
         return;
        }

  }
//--- End of CheckSignal Scope
Lastly, we will unify our system constants that we define at the beginning.
//+------------------------------------------------------------------+
//| Undefine system constants                                        |
//+------------------------------------------------------------------+
#undef RSI_PRICE
#undef RSI_PERIOD
#undef RSI_TIME_FRAME
#undef HOLDING_PERIOD
//+------------------------------------------------------------------+
Getting started with our back test, we will first select the training period. Our test will run from the first of January 2022, until the first of May 2025. Note that, we will run this exercise on the Daily time-frame.
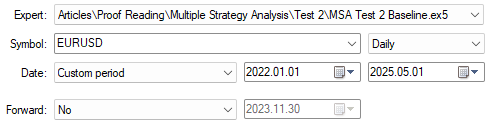
Figure 1: The back test days that we selected for our baseline measurement.
Our simulation will give us robust tests if we set our Delays to "Random delay". This simulates real-market latency, slippage and other factors that cause tension when trading real accounts.
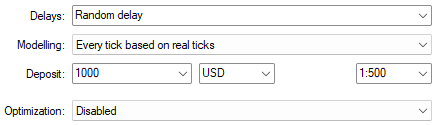
Figure 2: The test settings that we used for our back test.
The equity curve produced in Fig 3 below, is the target to be reproduced by the RSI trading strategy class.
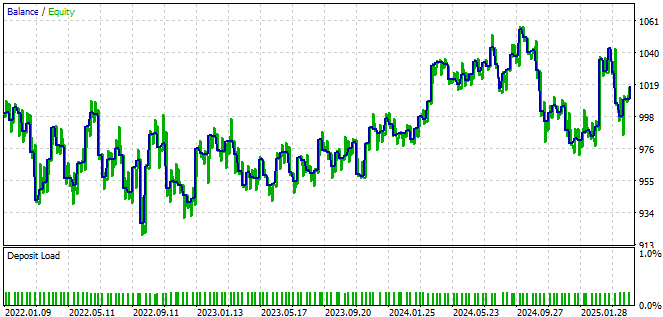
Figure 3: The equity curve produced by the hard-coded version of our trading strategy.
We can view detailed statistics about the performance of our baseline strategy. We want our class to obtain the same statistics when tested over the same period, to prove that it is sound.
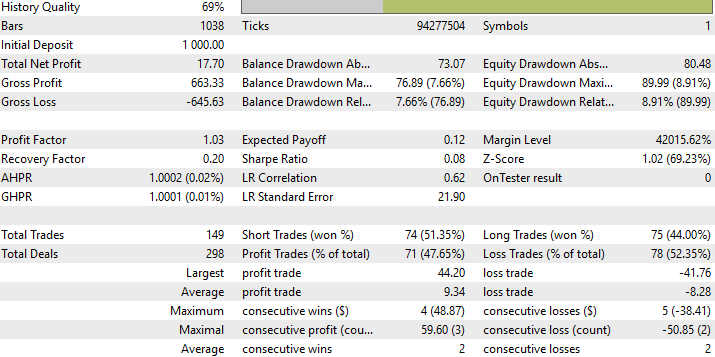
Figure 4: Detailed statistics of the performance of our trading strategy.
Moving forward, we now need to implement the same test to determine whether our RSI strategy class is valid. As such, most of the previously defined global elements, such as system constants and global variables, will remain largely unchanged. The primary modifications we will introduce to the application include initializing our strategy class during the Expert Advisor's initialization phase.
//+------------------------------------------------------------------+
//| Dependencies                                                     |
//+------------------------------------------------------------------+
#include <Trade\Trade.mqh>
#include <VolatilityDoctor\Time\Time.mqh>
#include <VolatilityDoctor\Trade\TradeInfo.mqh>
#include <VolatilityDoctor\Strategies\RSIMidPoint.mqh>

//+------------------------------------------------------------------+
//| Global Variables                                                 |
//+------------------------------------------------------------------+

//--- Custom Types
CTrade               Trade;
TradeInfo            *TradeInformation;
Time                 *TradeTime;
RSIMidPoint          *RSIMid;

//--- System Types
int    position_timer;

//+------------------------------------------------------------------+
//| Expert initialization function                                   |
//+------------------------------------------------------------------+
int OnInit()
  {
//--- Create dynamic instances of our custom types
   TradeTime        = new Time(Symbol(),RSI_TIME_FRAME);
   TradeInformation = new TradeInfo(Symbol(),RSI_TIME_FRAME);
   RSIMid           = new RSIMidPoint(Symbol(),RSI_TIME_FRAME,RSI_PERIOD,RSI_PRICE);

//--- Everything was fine
   return(INIT_SUCCEEDED);
  }
//--- End of OnInit Scope
Additionally, we must update the OnDeinit function to ensure that the newly created object is properly deleted.
//+------------------------------------------------------------------+
//| Expert deinitialization function                                 |
//+------------------------------------------------------------------+
void OnDeinit(const int reason)
  {
//--- Delete the dynamic objects
   delete TradeTime;
   delete TradeInformation;
   delete RSIMid;
  }
//--- End of Deinit Scope
Lastly, we need to ensure that the CheckSignal method is invoked appropriately.
//+------------------------------------------------------------------+
//| Check for a trading signal using our cross-over strategy         |
//+------------------------------------------------------------------+
void CheckSignal(void)
  {
//--- Long positions when RSI is below 50
   if(RSIMid.BuySignal())
     {
      Trade.Buy(TradeInformation.MinVolume(),Symbol(),TradeInformation.GetAsk(),0,0,"");
      return;
     }

//--- Otherwise short positions when the RSI is above 50
   else
      if(RSIMid.SellSignal())
        {
         Trade.Sell(TradeInformation.MinVolume(),Symbol(),TradeInformation.GetBid(),0,0,"");
         return;
        }
  }
//--- End of CheckSignal Scope
We will now proceed to test the RSI strategy class we built, over the same period we used in our earlier baseline test.
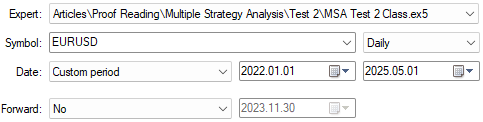
Figure 5: Selecting the test dates for our class version of the RSI trading strategy.
Both tests were performed under "Random Delay" conditions as specified in Fig 2, and produced similar equity curves under the back test settings.

Figure 6: The equity curve obtained by the class version of our trading strategy matches the hard-coded baseline
Additionally, both tests scored the same statistics in the detailed analysis. This is an indication that we have successfully implemented the class without errors. Therefore, we will now proceed with merging the Moving Average and the Relative Strength Index strategy classes.

Figure 7: Detailed statistics analyzing the performance of the class version of our trading strategy matches the baseline.
Now that we have validated that our class-based and hard-coded versions of the trading strategy produce identical results, we can proceed to merge the moving average crossover strategy with the RSI-based strategy to create a new ensemble strategy. First, we must select a few parameters to keep fixed. It is important to control the growth of the parameter space, as an overly large parameter space can make meaningful optimization nearly impossible.
//+------------------------------------------------------------------+
//|                                                   MSA Test 1.mq5 |
//|                                               Gamuchirai Ndawana |
//|                    https://www.mql5.com/en/users/gamuchiraindawa |
//+------------------------------------------------------------------+
#property copyright "Gamuchirai Ndawana"
#property link      "https://www.mql5.com/en/users/gamuchiraindawa"
#property version   "1.00"

//+------------------------------------------------------------------+
//| System constants                                                 |
//+------------------------------------------------------------------+
//--- Fix any parameters that can afford to remain fixed
#define MA_SHIFT         0
#define MA_TYPE          MODE_EMA
#define RSI_PRICE        PRICE_CLOSE
Additionally, now that we are running two strategies concurrently, we must define how these strategies will interact within MQL5. To manage this, we can use an enumeration to define logic that can exist in several related states.
Accordingly, we have created an enumerator named Strategy Mode, which has three possible settings. The first setting, represented by 0, is the voting policy. Under this policy, a trade is only placed if both the moving average and RSI strategies agree on the same direction. In other words, both strategies must signal a long position for a long trade to be opened.
The first alternative mode assigns responsibility to the RSI strategy for opening long positions, while the moving average strategy handles short positions. The final mode reverses this assignment, giving long trade responsibility to the moving average strategy and short trade responsibility to the RSI strategy.
//+------------------------------------------------------------------+
//| User defined enumerator                                          |
//+------------------------------------------------------------------+

enum STRATEGY_MODE
  {
   MODE_ONE   = 0, //Voting Policy
   MODE_TWO   = 1, //RSI Buy & MA Sell
   MODE_THREE = 2  //MA Sell & RSI Buy
  };
By structuring the strategy in this way, we have reduced the total number of input parameters to a manageable set of five. From there, we load the dependencies previously discussed and initialize the variables we are already familiar with.
//+------------------------------------------------------------------+
//| User Inputs                                                      |
//+------------------------------------------------------------------+
input   group          "Moving Average Strategy Parameters"
input   int             MA_PERIOD                       =        10;//Moving Average Period


input   group          "RSI Strategy Parameters"
input   int             RSI_PERIOD                      =         15;//RSI Period

input   group          "Global Strategy Parameters"
input   ENUM_TIMEFRAMES STRATEGY_TIME_FRAME             = PERIOD_D1;//Strategy Timeframe
input   int             HOLDING_PERIOD                  =         5;//Position Maturity Period
input   STRATEGY_MODE   USER_MODE                       =         0;//Operation Mode For Our Strategy

//+------------------------------------------------------------------+
//| Dependencies                                                     |
//+------------------------------------------------------------------+
#include <Trade\Trade.mqh>
#include <VolatilityDoctor\Time\Time.mqh>
#include <VolatilityDoctor\Trade\TradeInfo.mqh>
#include <VolatilityDoctor\Strategies\OpenCloseMACrossover.mqh>
#include <VolatilityDoctor\Strategies\RSIMidPoint.mqh>

//+------------------------------------------------------------------+
//| Global Variables                                                 |
//+------------------------------------------------------------------+

//--- Custom Types
CTrade               Trade;
Time                 *TradeTime;
TradeInfo            *TradeInformation;
RSIMidPoint          *RSIMid;
OpenCloseMACrossover *MACross;

//--- System Types
int                  position_timer;
During the initialization function, we load the same classes used throughout the development process. When the Expert Advisor is terminated, we ensure that all dynamically created objects are properly deleted.
//+------------------------------------------------------------------+
//| Expert initialization function                                   |
//+------------------------------------------------------------------+
int OnInit()
  {
//--- Create dynamic instances of our custom types
   TradeTime        = new Time(Symbol(),STRATEGY_TIME_FRAME);
   TradeInformation = new TradeInfo(Symbol(),STRATEGY_TIME_FRAME);
   MACross          = new OpenCloseMACrossover(Symbol(),STRATEGY_TIME_FRAME,MA_PERIOD,MA_SHIFT,MA_TYPE);
   RSIMid           = new RSIMidPoint(Symbol(),STRATEGY_TIME_FRAME,RSI_PERIOD,RSI_PRICE);
//--- Everything was fine
   return(INIT_SUCCEEDED);
  }
//--- End of OnInit Scope

//+------------------------------------------------------------------+
//| Expert deinitialization function                                 |
//+------------------------------------------------------------------+
void OnDeinit(const int reason)
  {
//--- Delete the dynamic objects
   delete TradeTime;
   delete TradeInformation;
   delete MACross;
   delete RSIMid;
  }
//--- End of Deinit Scope
In the OnTick function, we apply the same logic introduced earlier. As this logic has already been thoroughly covered, the OnTick function is omitted from this section of the discussion. The update function has been slightly modified, as it now calls two separate update methods—one for each strategy. Lastly, the CheckSignal method has undergone the most significant change. It must now first determine the current strategy mode before initiating any trades.
//+------------------------------------------------------------------+
//| Update our technical indicators                                  |
//+------------------------------------------------------------------+
void Update(void)
  {
//--- Update the strategy
   RSIMid.Update();
   MACross.Update();
  }
//--- End of Update Scope

//+------------------------------------------------------------------+
//| Check for a trading signal using our cross-over strategy         |
//+------------------------------------------------------------------+
void CheckSignal(void)
  {

//--- Both Stratetgies Should Cast The Same Vote
   if(USER_MODE == 0)
     {
      //--- Long positions when the close moving average is above the open
      if(MACross.BuySignal() && RSIMid.BuySignal())
        {
         Trade.Buy(TradeInformation.MinVolume(),Symbol(),TradeInformation.GetAsk(),0,0,"");
         return;
        }

      //--- Otherwise short
      else
         if(MACross.SellSignal()  && RSIMid.SellSignal())
           {
            Trade.Sell(TradeInformation.MinVolume(),Symbol(),TradeInformation.GetBid(),0,0,"");
            return;
           }
     }

//--- RSI Opens All Long Positions & The Moving Average Opens Short Positions
   else
      if(USER_MODE == 1)
        {

         if(RSIMid.BuySignal())
           {
            Trade.Buy(TradeInformation.MinVolume(),Symbol(),TradeInformation.GetAsk(),0,0,"");
            return;
           }

         //--- Otherwise short
         else
            if(MACross.SellSignal())
              {
               Trade.Sell(TradeInformation.MinVolume(),Symbol(),TradeInformation.GetBid(),0,0,"");
               return;
              }
        }

      //--- RSI Opens All Short Positions & The Moving Average Opens Long Positions
      else
         if(USER_MODE == 2)
           {

            if(MACross.BuySignal())
              {
               Trade.Buy(TradeInformation.MinVolume(),Symbol(),TradeInformation.GetAsk(),0,0,"");
               return;
              }

            //--- Otherwise short
            else
               if(RSIMid.SellSignal())
                 {
                  Trade.Sell(TradeInformation.MinVolume(),Symbol(),TradeInformation.GetBid(),0,0,"");
                  return;
                 }
           }

  }
//--- End of CheckSignal Scope
Finally, once all logic has been executed, we undefine all system constants to conclude the program cleanly.
//+------------------------------------------------------------------+
//| Undefine system constants                                        |
//+------------------------------------------------------------------+
#undef MA_SHIFT
#undef RSI_PRICE
#undef MA_TYPE
//+------------------------------------------------------------------+
Let us now get started searching for good parameter settings to use with our application. Select the application we have just built, and then set the Forward field to "1/2". This will allow our genetic optimizer to use half of the historical data we have for learning good parameters, and then the latter half, will be hidden from the optimizer and used to validate the settings the optimizer thought would be viable.
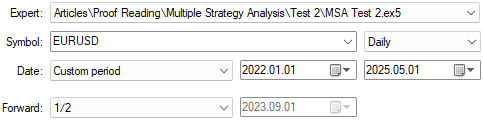
Figure 8: Setting up our forward test.
After setting "Random delay" as we did in the previous 2 tests, recall that this time around we also we want to select an optimizer. If you have more computational power available at your disposal, then feel free to also try out the other optimizers offered, such as the "Slow Complete" setting.
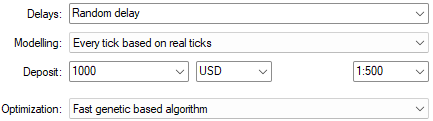
Figure 9: Select the "Fast Genetic Based Algorithm" setting in the Optimization field.
Select the 'inputs' tab at the bottom of the screen to bring up the panel controlling our strategy parameters to be tested. Select the tick box next to each parameter, and then pick a starting and ending location for the values to be searched over. Note that the step parameter is also crucial to watch. If you picked a step size of 1, your results will indeed be very detailed, however, the total number of steps required could be astronomical as a consequence. Generally, intervals such as 2, 4, 5 or even 10 for especially large searches are advised.
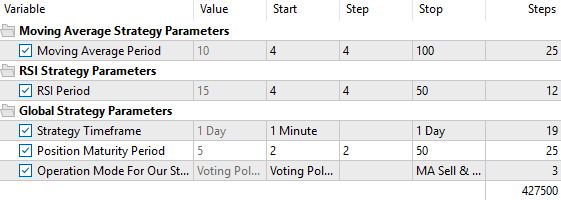
Figure 10: Selecting the intervals of settings our parameters should be searched over.
When you start the test, the results of the Forward test will pop up as a scatter plot, where each point on the plot represents a full test that was performed with a unique set of strategy parameters.
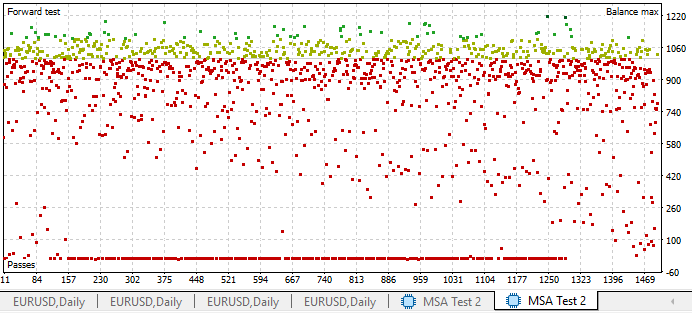
Figure 11: We can visualize the results produced by the strategy tester as a 2-dimensional scatter plot with profit off the y-axis.
Our strategy remained profitable even outside the training sample our genetic algorithm used to pick these settings. This is a good indicator of possible future stability if we decide to deploy the algorithm on real capital.
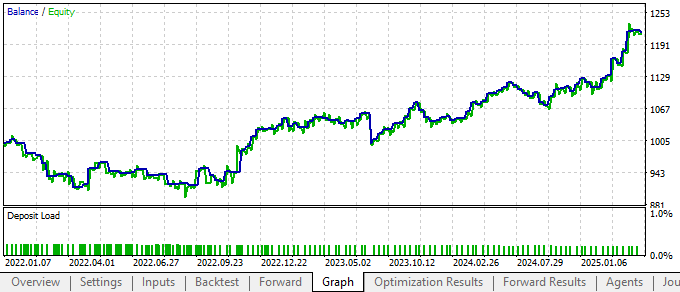
Fig 12: The equity curve produced by our trading strategy has a positive trend out of sample.
Our new system is far more profitable than the prior iteration. We can clearly see that the "Voting Policy" combination appears most stable
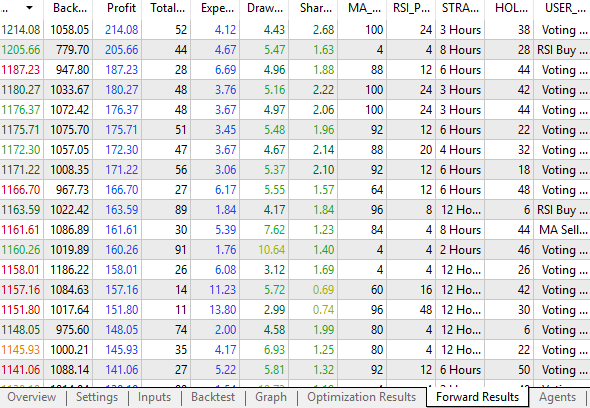
Fig 13: Our application's performance improved after giving it an additional strategy to work with.
These were the best results we obtained from the Forward results in our first discussion. Our new system is outperforming this prior version we had that only had awareness of 1 strategy.
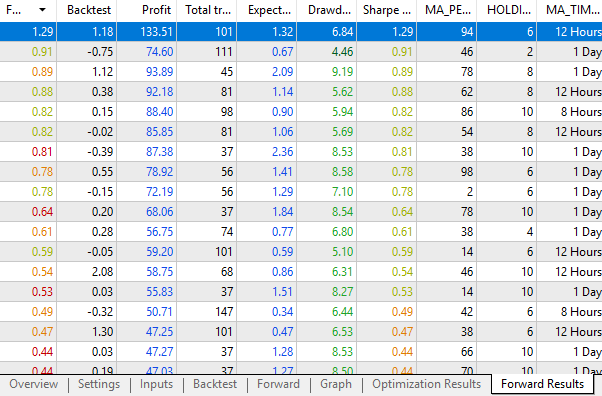
Fig 14: The best results we obtained when our application only had one strategy.
Conclusion
This article has guided the reader through the many benefits of applying the principles of object-oriented programming (OOP) in MQL5, combined with human creativity. It has demonstrated that there are multiple ways to integrate different strategies into one cohesive system. Object-oriented programming is a powerful and versatile tool for such creative undertakings, as it enables structured, controlled, and predictable development.
By building on the foundational concepts introduced here, readers are now empowered to refine and optimize their own private trading strategies. With the use of the built-in Strategy Tester in MetaTrader 5, readers can begin testing and improving their implementations.
This discussion has also emphasized the importance of minimizing the number of input parameters in a strategy. A strategy with too many parameters becomes increasingly difficult to optimize effectively. While it is possible to offload some of the computational burden to MQL5 Cloud Network services, maintaining simplicity in design often leads to better results and more robust strategies.
By applying the principles discussed in this article, readers should now have actionable insights for constructing their own ensemble trading systems. We look forward to your continued participation in future discussions, where we will introduce a third layer to our trading strategy. This next step will help us build a solid foundation for future statistical models.
| File Name | File Description |
|---|---|
| MSA Test 2 Baseline.mq5 | Hard-coded test version of our RSI trading strategy. |
| MSA Test 2 Class.mq5 | Test version of our RSI Strategy Class. |
| MSA Test 2.ex5 | Compiled version of our ensemble trading strategy. |
| MSA Test 2.mq5 | Source code for the ensemble MA and RSI application we developed. |
| RSIMidPoint.mqh | MQL5 Class for our RSI midpoint strategy. |
Warning: All rights to these materials are reserved by MetaQuotes Ltd. Copying or reprinting of these materials in whole or in part is prohibited.
This article was written by a user of the site and reflects their personal views. MetaQuotes Ltd is not responsible for the accuracy of the information presented, nor for any consequences resulting from the use of the solutions, strategies or recommendations described.

- Free trading apps
- Over 8,000 signals for copying
- Economic news for exploring financial markets
You agree to website policy and terms of use