
Creating a Trading Administrator Panel in MQL5 (Part IX): Code Organization (IV): Trade Management Panel class

Contents
- Introduction
- Discussion Overview
- Trade Management Panel class (CTradeManagementPanel)
- Integration with (New_Admin_Panel)
- Testing
- Conclusion
Introduction
In our previous discussions, we introduced code organization as a crucial strategy for enabling a smooth and scalable expansion of the Trading Administrator Panel project, following the principle of separation of concerns. This approach has allowed me to focus on each sub-panel within the NewAdminPanel, ensuring that our program remains modular and well-structured. By developing each feature independently, we can refine them to deliver the best possible functionality.
Previously, our Trading Panel had limited capabilities, but now, it is more powerful than ever. It provides the flexibility to execute quick trades while incorporating built-in risk management—all within the same interface. Pending orders can also be set up directly from the panel, streamlining the trading process.
This update addresses two major challenges:
- Building large, well-organized programs that are easier to develop and maintain.
- Ensuring quick access to trading operations within an all-in-one EA that integrates a communication interface, a trade management interface, and, in the near future, an analytics interface.
Below, I’ll provide an overview of this discussion, outlining how we will navigate these improvements to the end.
Discussion Overview
The primary goal of our articles is to make practical the use of MQL5 by applying it to various projects. Today, we will explore the development of a Trade Management Panel class, keeping in mind that, in MQL5, a class header contains declarations of similar variables. In this context, all the trading features we intend to include in our panel will inherit from built-in class headers such as CTrade, CDialog, CLabel, and CEdit.
Once the class is fully developed, we will integrate its methods into the main program—the NewAdminPanel EA. Our discussion wouldn’t be complete without sharing the test results and providing the source files, allowing you to review the implementation, borrow ideas, and experiment with the code to enhance your own projects.
At this stage, I decided to centralize the creation of the home panel within the main program, as it did not significantly increase the code length. Although the previous approach had its advantages, I opted for this structure to simplify development by reducing dependencies. My goal is to keep the main program focused while using a dedicated class for each specific feature. The core interface elements are now created directly within the main program, resulting in a more streamlined and efficient design. As a result, we are no longer calling the methods of the AdminHomeDialog class in NewAdminPanel.
The image below illustrates what we will create by the end of our discussion. But this is just the beginning—once it's built, it serves as a solid foundation for future enhancements and improvements.
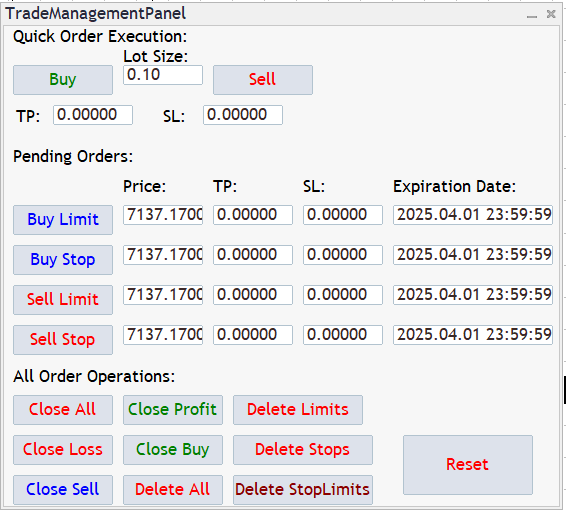
Trade Management Panel (by discussion end)
Advantages of This Project
The tools we are developing here offer several key benefits:
- Quick trading – Execute trades efficiently.
- Risk management – Set Stop Loss (S/L) and Take Profit (T/P) before placing orders, as well plan your trades in advance using pending orders.
- Communication features – Send messages to other traders through the communications panel we built earlier.
- Learn advanced MQL5 – Gain more in-depth insights into object-oriented programming in MQL5.
- Community engagement – Share your insights and experiences in the comments section.
- Re-usability - The CTradeManagementPanel can be used in other projects.
Trade Management Panel class (CTradeManagementPanel)
1. Setting Up the Foundation with Headers and Macros
Before building anything, we need to bring in the right tools. The first step is including header files that handle trade execution, user interface elements, and event management. Instead of scattering layout values like button sizes and spacing throughout the code, we define macros at the beginning. This ensures consistency in the UI design and makes it easy to adjust dimensions later without hunting through multiple files.
#include <Trade\Trade.mqh>
#include <Controls\Dialog.mqh>
#include <Controls\Button.mqh>
#include <Controls\Edit.mqh>
#include <Controls\Label.mqh>

//+------------------------------------------------------------------+
//| Defines for dimensions and spacing                               |
//+------------------------------------------------------------------+
#define BUTTON_WIDTH          100
#define BUTTON_HEIGHT         30
#define DELETE_BUTTON_WIDTH   130
#define EDIT_WIDTH            80
#define EDIT_HEIGHT           20
#define DEFAULT_LABEL_HEIGHT  20
#define SECTION_LABEL_WIDTH   250
#define GAP                   10
#define INPUT_LABEL_GAP       3
2. Defining the Core Class and Its Components
The core of the trading panel is a class that manages both the interface and the trade execution logic. By inheriting from a base dialog class, it gains built-in UI management capabilities while allowing us to focus on customizing the behavior.
Inside this class, we define important member variables. These include a reference to the trading chart, a trade execution object, and a structured collection of UI controls. Organizing these elements separately ensures that the UI remains cleanly divided from the logic that handles orders.
//+------------------------------------------------------------------+
//| Trade Management Panel class                                     |
//+------------------------------------------------------------------+
class CTradeManagementPanel : public CAppDialog
{
protected:
   // Store chart and subwindow values for helper functions.
   long m_chart;
   int  m_subwin;

   CTrade m_trade;  // Trade object for executing trades

   // Section Labels
   CLabel m_secQuickLabel;
   CLabel m_secPendingLabel;
   CLabel m_secAllOpsLabel;

   // Section 1: Quick Execution
   CButton m_buyButton;      // Market Buy button
   CButton m_sellButton;     // Market Sell button
   CEdit   m_volumeEdit;     // Volume input
   CLabel  m_lotLabel;       // "Lot:" label above volume input
   // TP and SL for market orders—with a label to their right
   CEdit   m_tpEdit;
   CLabel  m_tpRightLabel;   // "TP:" label
   CLabel  m_tpErrorLabel;
   CEdit   m_slEdit;
   CLabel  m_slRightLabel;   // "SL:" label
   CLabel  m_slErrorLabel;

   // Section 2: Pending Orders
   // Column Headers for pending orders
   CLabel  m_pendingPriceHeader;
   CLabel  m_pendingTPHeader;
   CLabel  m_pendingSLHeader;
   CLabel  m_pendingExpHeader;

   // Buy pending orders
   CButton m_buyLimitButton;
   CEdit   m_buyLimitPriceEdit;
   CEdit   m_buyLimitTPEdit;
   CEdit   m_buyLimitSLEdit;
   CEdit   m_buyLimitExpEdit;   // Expiration input for Buy Limit
   CButton m_buyStopButton;
   CEdit   m_buyStopPriceEdit;
   CEdit   m_buyStopTPEdit;
   CEdit   m_buyStopSLEdit;
   CEdit   m_buyStopExpEdit;    // Expiration input for Buy Stop

   // Sell pending orders
   CButton m_sellLimitButton;
   CEdit   m_sellLimitPriceEdit;
   CEdit   m_sellLimitTPEdit;
   CEdit   m_sellLimitSLEdit;
   CEdit   m_sellLimitExpEdit;  // Expiration input for Sell Limit
   CButton m_sellStopButton;
   CEdit   m_sellStopPriceEdit;
   CEdit   m_sellStopTPEdit;
   CEdit   m_sellStopSLEdit;
   CEdit   m_sellStopExpEdit;   // Expiration input for Sell Stop

   // Section 3: All Order Operations
   CButton m_closeAllButton;
   CButton m_closeProfitButton;
   CButton m_closeLossButton;
   CButton m_closeBuyButton;
   CButton m_closeSellButton;
   CButton m_deleteAllOrdersButton;
   CButton m_deleteLimitOrdersButton;
   CButton m_deleteStopOrdersButton;
   CButton m_deleteStopLimitOrdersButton;
   CButton m_resetButton;

   //--- Helper: Create a text label using
   bool CreateLabelEx(CLabel &label, int x, int y, int height, string label_name, string text, color clr)
   {
      string unique_name = m_name + label_name;
      if(!label.Create(m_chart, unique_name, m_subwin, x, y, x, y+height))
         return false;
      if(!Add(label))
         return false;
      if(!label.Text(text))
         return false;
      label.Color(clr);
      return true;
   }

   //--- Helper: Create and add a button control
   bool CreateButton(CButton &button, string name, int x, int y, int w = BUTTON_WIDTH, int h = BUTTON_HEIGHT, color clr = clrWhite)
   {
      if(!button.Create(m_chart, name, m_subwin, x, y, x+w, y+h))
         return false;
      button.Text(name);
      button.Color(clr);
      if(!Add(button))
         return false;
      return true;
   }

   //--- Helper: Create and add an edit control
   bool CreateEdit(CEdit &edit, string name, int x, int y, int w = EDIT_WIDTH, int h = EDIT_HEIGHT)
   {
      if(!edit.Create(m_chart, name, m_subwin, x, y, x+w, y+h))
         return false;
      if(!Add(edit))
         return false;
      return true;
   }

   // Event handler declarations
   virtual void OnClickBuy();
   virtual void OnClickSell();
   virtual void OnClickBuyLimit();
   virtual void OnClickBuyStop();
   virtual void OnClickSellLimit();
   virtual void OnClickSellStop();
   virtual void OnClickCloseAll();
   virtual void OnClickCloseProfit();
   virtual void OnClickCloseLoss();
   virtual void OnClickCloseBuy();
   virtual void OnClickCloseSell();
   virtual void OnClickDeleteAllOrders();
   virtual void OnClickDeleteLimitOrders();
   virtual void OnClickDeleteStopOrders();
   virtual void OnClickDeleteStopLimitOrders();
   virtual void OnClickReset();

   // Validation helpers for market orders
   bool ValidateBuyParameters(double volume, double tp, double sl, double ask);
   bool ValidateSellParameters(double volume, double tp, double sl, double bid);

public:
   CTradeManagementPanel();
   ~CTradeManagementPanel();
   virtual bool Create(const long chart, const string name, const int subwin,
                         const int x1, const int y1, const int x2, const int y2);
   virtual bool OnEvent(const int id, const long &lparam, const double &dparam, const string &sparam);
   void Toggle();
};
3. Structuring the User Interface with Logical Sections
A well-organized interface makes all the difference. Instead of scattering buttons and input fields randomly, we divide the panel into three main sections.
- The first section is for quick market orders, where users can instantly buy or sell, set trade volume, and configure stop loss and take profit levels.
- The second section is dedicated to pending orders. Here, users can specify prices, expiration times, and order types such as Buy Limit or Sell Stop.
- The third section handles bulk actions like closing all trades, closing only profitable ones, or deleting pending orders. Keeping these features grouped together ensures the interface remains easy to navigate.
//+------------------------------------------------------------------+
//| Create the trade management panel                                |
//+------------------------------------------------------------------+
bool CTradeManagementPanel::Create(const long chart, const string name, const int subwin,
                                     const int x1, const int y1, const int x2, const int y2)
{
   // Save chart and subwin for later use.
   m_chart  = chart;
   m_subwin = subwin;

   if(!CAppDialog::Create(chart, name, subwin, x1, y1, x2, y2))
      return false;

   int curX = GAP;
   int curY = GAP;

   // Section 1: Quick Order Execution
   if(!CreateLabelEx(m_secQuickLabel, curX, curY-10, DEFAULT_LABEL_HEIGHT, "SecQuick", "Quick Order Execution:", clrBlack))
      return false;
   curY += DEFAULT_LABEL_HEIGHT + GAP;

   // Market order row:
   if(!CreateButton(m_buyButton, "Buy", curX, curY, BUTTON_WIDTH, BUTTON_HEIGHT, clrGreen))
      return false;
   int volX = curX + BUTTON_WIDTH + GAP;
   if(!CreateLabelEx(m_lotLabel, volX, curY - DEFAULT_LABEL_HEIGHT, DEFAULT_LABEL_HEIGHT, "Lot", "Lot Size:", clrBlack))
      return false;
   if(!CreateEdit(m_volumeEdit, "VolumeEdit", volX, curY, EDIT_WIDTH, EDIT_HEIGHT))
      return false;
   double minVolume = SymbolInfoDouble(Symbol(), SYMBOL_VOLUME_MIN);
   m_volumeEdit.Text(DoubleToString(minVolume, 2));
   int sellBtnX = volX + EDIT_WIDTH + GAP;
   if(!CreateButton(m_sellButton, "Sell", sellBtnX, curY, BUTTON_WIDTH, BUTTON_HEIGHT, clrRed))
      return false;
   curY += BUTTON_HEIGHT + GAP;

   // Next row: TP and SL for market orders
   if(!CreateEdit(m_tpEdit, "TPEdit", 4*curX+ GAP , curY, EDIT_WIDTH, EDIT_HEIGHT))
      return false;
   m_tpEdit.Text("0.00000");
   if(!CreateLabelEx(m_tpRightLabel, curX  + INPUT_LABEL_GAP, curY, DEFAULT_LABEL_HEIGHT, "TP", "TP:", clrBlack))
      return false;
   if(!CreateLabelEx(m_tpErrorLabel, curX, curY + DEFAULT_LABEL_HEIGHT, DEFAULT_LABEL_HEIGHT, "TPError", "", clrBlack))
      return false;
   int slX = 2*EDIT_WIDTH  ;
   if(!CreateEdit(m_slEdit, "SLEdit", slX + 4*curX, curY, EDIT_WIDTH, EDIT_HEIGHT))
      return false;
   m_slEdit.Text("0.00000");
   if(!CreateLabelEx(m_slRightLabel, slX  , curY, DEFAULT_LABEL_HEIGHT, "SL", "SL:", clrBlack))
      return false;
   if(!CreateLabelEx(m_slErrorLabel, slX, curY + DEFAULT_LABEL_HEIGHT, DEFAULT_LABEL_HEIGHT, "SLError", "", clrBlack))
      return false;
   curY += EDIT_HEIGHT + GAP*2;

   // Section 2: Pending Orders
   if(!CreateLabelEx(m_secPendingLabel, curX, curY, DEFAULT_LABEL_HEIGHT, "SecPend", "Pending Orders:", clrBlack))
      return false;
   curY += DEFAULT_LABEL_HEIGHT + GAP;

   // Column headers for pending orders (each label includes a colon)
   int headerX = curX + BUTTON_WIDTH + GAP;
   if(!CreateLabelEx(m_pendingPriceHeader, headerX, curY, DEFAULT_LABEL_HEIGHT, "PendPrice", "Price:", clrBlack))
      return false;
   if(!CreateLabelEx(m_pendingTPHeader, headerX + EDIT_WIDTH + GAP, curY, DEFAULT_LABEL_HEIGHT, "PendTP", "TP:", clrBlack))
      return false;
   if(!CreateLabelEx(m_pendingSLHeader, headerX + 2*(EDIT_WIDTH + GAP), curY, DEFAULT_LABEL_HEIGHT, "PendSL", "SL:", clrBlack))
      return false;
   if(!CreateLabelEx(m_pendingExpHeader, headerX + 3*(EDIT_WIDTH + GAP), curY, DEFAULT_LABEL_HEIGHT, "PendExp", "Expiration Date:", clrBlack))
      return false;
   curY += DEFAULT_LABEL_HEIGHT + GAP;

   // Prepare default expiration value as current day end time.
   datetime now = TimeCurrent();
   string exp_default = TimeToString(now, TIME_DATE) + " 23:59:59";

   // --- Buy Pending Orders ---
   // Buy Limit Order row:
   if(!CreateButton(m_buyLimitButton, "Buy Limit", curX, curY, BUTTON_WIDTH, BUTTON_HEIGHT, clrBlue))
      return false;
   int pendingX = curX + BUTTON_WIDTH + GAP;
   if(!CreateEdit(m_buyLimitPriceEdit, "BuyLimitPrice", pendingX, curY, EDIT_WIDTH, EDIT_HEIGHT))
      return false;
   string askStr = DoubleToString(SymbolInfoDouble(Symbol(), SYMBOL_ASK), 5);
   m_buyLimitPriceEdit.Text(askStr);
   int pending2X = pendingX + EDIT_WIDTH + GAP;
   if(!CreateEdit(m_buyLimitTPEdit, "BuyLimitTP", pending2X, curY, EDIT_WIDTH, EDIT_HEIGHT))
      return false;
   m_buyLimitTPEdit.Text("0.00000");
   int pending3X = pending2X + EDIT_WIDTH + GAP;
   if(!CreateEdit(m_buyLimitSLEdit, "BuyLimitSL", pending3X, curY, EDIT_WIDTH, EDIT_HEIGHT))
      return false;
   m_buyLimitSLEdit.Text("0.00000");
   int pending4X = pending3X + EDIT_WIDTH + GAP; // Double width for expiration input
   if(!CreateEdit(m_buyLimitExpEdit, "BuyLimitExp", pending4X, curY, 2*EDIT_WIDTH, EDIT_HEIGHT))
      return false;
   m_buyLimitExpEdit.Text(exp_default);
   curY += BUTTON_HEIGHT + GAP;

   // Buy Stop Order row:
   if(!CreateButton(m_buyStopButton, "Buy Stop", curX, curY, BUTTON_WIDTH, BUTTON_HEIGHT, clrBlue))
      return false;
   pendingX = curX + BUTTON_WIDTH + GAP;
   if(!CreateEdit(m_buyStopPriceEdit, "BuyStopPrice", pendingX, curY, EDIT_WIDTH, EDIT_HEIGHT))
      return false;
   m_buyStopPriceEdit.Text(askStr);
   pending2X = pendingX + EDIT_WIDTH + GAP;
   if(!CreateEdit(m_buyStopTPEdit, "BuyStopTP", pending2X, curY, EDIT_WIDTH, EDIT_HEIGHT))
      return false;
   m_buyStopTPEdit.Text("0.00000");
   pending3X = pending2X + EDIT_WIDTH + GAP;
   if(!CreateEdit(m_buyStopSLEdit, "BuyStopSL", pending3X, curY, EDIT_WIDTH, EDIT_HEIGHT))
      return false;
   m_buyStopSLEdit.Text("0.00000");
   pending4X = pending3X + EDIT_WIDTH + GAP;
   if(!CreateEdit(m_buyStopExpEdit, "BuyStopExp", pending4X, curY, 2*EDIT_WIDTH, EDIT_HEIGHT))
      return false;
   m_buyStopExpEdit.Text(exp_default);
   curY += BUTTON_HEIGHT + GAP;

   // --- Sell Pending Orders ---
   // Sell Limit Order row:
   if(!CreateButton(m_sellLimitButton, "Sell Limit", curX, curY, BUTTON_WIDTH, BUTTON_HEIGHT, clrRed))
      return false;
   pendingX = curX + BUTTON_WIDTH + GAP;
   if(!CreateEdit(m_sellLimitPriceEdit, "SellLimitPrice", pendingX, curY, EDIT_WIDTH, EDIT_HEIGHT))
      return false;
   string bidStr = DoubleToString(SymbolInfoDouble(Symbol(), SYMBOL_BID), 5);
   m_sellLimitPriceEdit.Text(bidStr);
   pending2X = pendingX + EDIT_WIDTH + GAP;
   if(!CreateEdit(m_sellLimitTPEdit, "SellLimitTP", pending2X, curY, EDIT_WIDTH, EDIT_HEIGHT))
      return false;
   m_sellLimitTPEdit.Text("0.00000");
   pending3X = pending2X + EDIT_WIDTH + GAP;
   if(!CreateEdit(m_sellLimitSLEdit, "SellLimitSL", pending3X, curY, EDIT_WIDTH, EDIT_HEIGHT))
      return false;
   m_sellLimitSLEdit.Text("0.00000");
   pending4X = pending3X + EDIT_WIDTH + GAP;
   if(!CreateEdit(m_sellLimitExpEdit, "SellLimitExp", pending4X, curY, 2*EDIT_WIDTH, EDIT_HEIGHT))
      return false;
   m_sellLimitExpEdit.Text(exp_default);
   curY += BUTTON_HEIGHT + GAP;

   // Sell Stop Order row:
   if(!CreateButton(m_sellStopButton, "Sell Stop", curX, curY, BUTTON_WIDTH, BUTTON_HEIGHT, clrRed))
      return false;
   pendingX = curX + BUTTON_WIDTH + GAP;
   if(!CreateEdit(m_sellStopPriceEdit, "SellStopPrice", pendingX, curY, EDIT_WIDTH, EDIT_HEIGHT))
      return false;
   m_sellStopPriceEdit.Text(bidStr);
   pending2X = pendingX + EDIT_WIDTH + GAP;
   if(!CreateEdit(m_sellStopTPEdit, "SellStopTP", pending2X, curY, EDIT_WIDTH, EDIT_HEIGHT))
      return false;
   m_sellStopTPEdit.Text("0.00000");
   pending3X = pending2X + EDIT_WIDTH + GAP;
   if(!CreateEdit(m_sellStopSLEdit, "SellStopSL", pending3X, curY, EDIT_WIDTH, EDIT_HEIGHT))
      return false;
   m_sellStopSLEdit.Text("0.00000");
   pending4X = pending3X + EDIT_WIDTH + GAP;
   if(!CreateEdit(m_sellStopExpEdit, "SellStopExp", pending4X, curY, 2*EDIT_WIDTH, EDIT_HEIGHT))
      return false;
   m_sellStopExpEdit.Text(exp_default);
   curY += BUTTON_HEIGHT + GAP;

   // Section 3: All Order Operations
   if(!CreateLabelEx(m_secAllOpsLabel, curX, curY, DEFAULT_LABEL_HEIGHT, "SecAllOps", "All Order Operations:", clrBlack))
      return false;
   curY += DEFAULT_LABEL_HEIGHT + GAP;

   int deleteX = curX + 2*BUTTON_WIDTH + 2*GAP;
   int deleteY = curY  ;
   CreateButton(m_closeAllButton, "Close All", curX, curY, BUTTON_WIDTH, BUTTON_HEIGHT, clrRed);
   CreateButton(m_closeProfitButton, "Close Profit", curX + BUTTON_WIDTH + GAP, curY, BUTTON_WIDTH, BUTTON_HEIGHT, clrGreen);
   CreateButton(m_deleteLimitOrdersButton, "Delete Limits", deleteX, curY, DELETE_BUTTON_WIDTH, BUTTON_HEIGHT, clrRed);
   curY += BUTTON_HEIGHT + GAP;

   CreateButton(m_closeLossButton, "Close Loss", curX, curY, BUTTON_WIDTH, BUTTON_HEIGHT, clrRed);
   CreateButton(m_closeBuyButton, "Close Buy", curX + BUTTON_WIDTH + GAP, curY, BUTTON_WIDTH, BUTTON_HEIGHT, clrGreen);
   CreateButton(m_deleteStopOrdersButton, "Delete Stops", deleteX, curY  , DELETE_BUTTON_WIDTH+10, BUTTON_HEIGHT, clrRed);
   CreateButton(m_resetButton, "Reset", deleteX+ 2*BUTTON_WIDTH-3*curX, curY, DELETE_BUTTON_WIDTH, 2*BUTTON_HEIGHT, clrRed);
   curY += BUTTON_HEIGHT + GAP;

   CreateButton(m_closeSellButton, "Close Sell", curX, curY, BUTTON_WIDTH, BUTTON_HEIGHT, clrBlue);
   CreateButton(m_deleteAllOrdersButton, "Delete All", curX + BUTTON_WIDTH + GAP, curY, BUTTON_WIDTH, BUTTON_HEIGHT, clrRed);
   CreateButton(m_deleteStopLimitOrdersButton, "Delete StopLimits", deleteX, curY , DELETE_BUTTON_WIDTH+10, BUTTON_HEIGHT, clrDarkRed);
   curY += BUTTON_HEIGHT + GAP;

   return true;
}
4. Automating UI Control Creation with Helper Functions
Manually placing every button and input field would make the code repetitive and harder to maintain. Instead, we write helper functions that handle control creation, positioning, and styling.
By centralizing this logic, we keep the UI code organized. If we decide to change the appearance of buttons or labels, we only need to update one function, instead of modifying dozens of lines across the codebase.
 //--- Helper: Create a text label using
   bool CreateLabelEx(CLabel &label, int x, int y, int height, string label_name, string text, color clr)
   {
      string unique_name = m_name + label_name;
      if(!label.Create(m_chart, unique_name, m_subwin, x, y, x, y+height))
         return false;
      if(!Add(label))
         return false;
      if(!label.Text(text))
         return false;
      label.Color(clr);
      return true;
   }

   //--- Helper: Create and add a button control
   bool CreateButton(CButton &button, string name, int x, int y, int w = BUTTON_WIDTH, int h = BUTTON_HEIGHT, color clr = clrWhite)
   {
      if(!button.Create(m_chart, name, m_subwin, x, y, x+w, y+h))
         return false;
      button.Text(name);
      button.Color(clr);
      if(!Add(button))
         return false;
      return true;
   }

   //--- Helper: Create and add an edit control
   bool CreateEdit(CEdit &edit, string name, int x, int y, int w = EDIT_WIDTH, int h = EDIT_HEIGHT)
   {
      if(!edit.Create(m_chart, name, m_subwin, x, y, x+w, y+h))
         return false;
      if(!Add(edit))
         return false;
      return true;
   }
5. Handling User Interactions Through a Central Event System
Once the UI is in place, we need a way to handle interactions. Instead of assigning separate functions to every button, we use a central event dispatcher.
This dispatcher listens for user actions, determines which control triggered the event, and calls the appropriate function. This keeps the event handling clean and organized. Clicking a button to place a trade will send the input data to the order execution logic, while clicking a reset button will clear the fields.
//+------------------------------------------------------------------+
//| Event handler                                                    |
//+------------------------------------------------------------------+
bool CTradeManagementPanel::OnEvent(const int id, const long &lparam, const double &dparam, const string &sparam)
{
   if(id == CHARTEVENT_OBJECT_CLICK)
   {
      if(sparam == m_buyButton.Name())            OnClickBuy();
      else if(sparam == m_sellButton.Name())        OnClickSell();
      else if(sparam == m_buyLimitButton.Name())    OnClickBuyLimit();
      else if(sparam == m_buyStopButton.Name())     OnClickBuyStop();
      else if(sparam == m_sellLimitButton.Name())   OnClickSellLimit();
      else if(sparam == m_sellStopButton.Name())    OnClickSellStop();
      else if(sparam == m_closeAllButton.Name())    OnClickCloseAll();
      else if(sparam == m_closeProfitButton.Name()) OnClickCloseProfit();
      else if(sparam == m_closeLossButton.Name())   OnClickCloseLoss();
      else if(sparam == m_closeBuyButton.Name())    OnClickCloseBuy();
      else if(sparam == m_closeSellButton.Name())   OnClickCloseSell();
      else if(sparam == m_deleteAllOrdersButton.Name())  OnClickDeleteAllOrders();
      else if(sparam == m_deleteLimitOrdersButton.Name()) OnClickDeleteLimitOrders();
      else if(sparam == m_deleteStopOrdersButton.Name())   OnClickDeleteStopOrders();
      else if(sparam == m_deleteStopLimitOrdersButton.Name()) OnClickDeleteStopLimitOrders();
      else if(sparam == m_resetButton.Name())       OnClickReset(); // Handle reset button click
   }
   return true;
}
6. Validating and Executing Market Orders
Before executing a trade, the system verifies the input to prevent errors. It checks if the trade volume is within acceptable limits and if stop loss and take profit values are set correctly relative to the market price.
If the input is valid, the trade execution object processes the order. Otherwise, the system alerts the user and prevents a faulty trade from being placed. This validation step is crucial for avoiding costly mistakes and ensuring the panel functions reliably.
//+------------------------------------------------------------------+
//| Validate Buy order parameters (Market orders)                    |
//+------------------------------------------------------------------+
bool CTradeManagementPanel::ValidateBuyParameters(double volume, double tp, double sl, double ask)
{
   bool valid = true;
   m_tpErrorLabel.Text("");
   m_slErrorLabel.Text("");
   if(volume <= 0)
   {
      m_tpErrorLabel.Text("Invalid volume");
      m_tpErrorLabel.Color(clrRed);
      valid = false;
   }
   if(tp != 0 && tp <= ask)
   {
      m_tpErrorLabel.Text("Invalid TP");
      m_tpErrorLabel.Color(clrRed);
      valid = false;
   }
   if(sl != 0 && sl >= ask)
   {
      m_slErrorLabel.Text("Invalid SL");
      m_slErrorLabel.Color(clrRed);
      valid = false;
   }
   return valid;
}

//+------------------------------------------------------------------+
//| Validate Sell order parameters (Market orders)                   |
//+------------------------------------------------------------------+
bool CTradeManagementPanel::ValidateSellParameters(double volume, double tp, double sl, double bid)
{
   bool valid = true;
   m_tpErrorLabel.Text("");
   m_slErrorLabel.Text("");
   if(volume <= 0)
   {
      m_tpErrorLabel.Text("Invalid volume");
      m_tpErrorLabel.Color(clrRed);
      valid = false;
   }
   if(tp != 0 && tp >= bid)
   {
      m_tpErrorLabel.Text("Invalid TP");
      m_tpErrorLabel.Color(clrRed);
      valid = false;
   }
   if(sl != 0 && sl <= bid)
   {
      m_slErrorLabel.Text("Invalid SL");
      m_slErrorLabel.Color(clrRed);
      valid = false;
   }
   return valid;
}
7. Managing Pending Orders with Additional Parameters
Pending orders require more settings than market orders. Users need to specify an entry price and an expiration time, so we extend our validation functions to handle these inputs.
A helper function interprets expiration settings, whether the user wants a fixed time or a "Good Till Canceled" option. This structure ensures that pending orders follow proper rules before being submitted.
//+------------------------------------------------------------------+
//| Helper: Parse expiration input                                   |
//+------------------------------------------------------------------+
void ParseExpiration(string sExp, ENUM_ORDER_TYPE_TIME &type_time, datetime &expiration)
{
   if(StringCompare(StringToUpper(sExp), "GTC") == 0)
   {
      type_time = ORDER_TIME_GTC;
      expiration = 0;
   }
   else
   {
      type_time = ORDER_TIME_SPECIFIED;
      expiration = StringToTime(sExp);
   }
}

//+------------------------------------------------------------------+
//| Button click handlers - Pending Orders                           |
//+------------------------------------------------------------------+
void CTradeManagementPanel::OnClickBuyLimit()
{
   double price  = StringToDouble(m_buyLimitPriceEdit.Text());
   double tp     = StringToDouble(m_buyLimitTPEdit.Text());
   double sl     = StringToDouble(m_buyLimitSLEdit.Text());
   double volume = StringToDouble(m_volumeEdit.Text());
   string sExp   = m_buyLimitExpEdit.Text();
   ENUM_ORDER_TYPE_TIME type_time;
   datetime expiration;
   ParseExpiration(sExp, type_time, expiration);
   m_trade.BuyLimit(volume, price, Symbol(), sl, tp, type_time, expiration, "");
}

void CTradeManagementPanel::OnClickBuyStop()
{
   double price  = StringToDouble(m_buyStopPriceEdit.Text());
   double tp     = StringToDouble(m_buyStopTPEdit.Text());
   double sl     = StringToDouble(m_buyStopSLEdit.Text());
   double volume = StringToDouble(m_volumeEdit.Text());
   string sExp   = m_buyStopExpEdit.Text();
   ENUM_ORDER_TYPE_TIME type_time;
   datetime expiration;
   ParseExpiration(sExp, type_time, expiration);
   m_trade.BuyStop(volume, price, Symbol(), sl, tp, type_time, expiration, "");
}

void CTradeManagementPanel::OnClickSellLimit()
{
   double price  = StringToDouble(m_sellLimitPriceEdit.Text());
   double tp     = StringToDouble(m_sellLimitTPEdit.Text());
   double sl     = StringToDouble(m_sellLimitSLEdit.Text());
   double volume = StringToDouble(m_volumeEdit.Text());
   string sExp   = m_sellLimitExpEdit.Text();
   ENUM_ORDER_TYPE_TIME type_time;
   datetime expiration;
   ParseExpiration(sExp, type_time, expiration);
   m_trade.SellLimit(volume, price, Symbol(), sl, tp, type_time, expiration, "");
}

void CTradeManagementPanel::OnClickSellStop()
{
   double price  = StringToDouble(m_sellStopPriceEdit.Text());
   double tp     = StringToDouble(m_sellStopTPEdit.Text());
   double sl     = StringToDouble(m_sellStopSLEdit.Text());
   double volume = StringToDouble(m_volumeEdit.Text());
   string sExp   = m_sellStopExpEdit.Text();
   ENUM_ORDER_TYPE_TIME type_time;
   datetime expiration;
   ParseExpiration(sExp, type_time, expiration);
   m_trade.SellStop(volume, price, Symbol(), sl, tp, type_time, expiration, "");
}
8. Implementing Bulk Order Operations for Efficient Trade Management
Managing multiple trades manually can be tedious, so we include features that allow users to apply actions to several orders at once.
Users can close all trades, close only profitable or losing ones, or delete pending orders. The event handlers for these actions loop through open positions and apply the requested operation efficiently. This makes managing multiple orders much faster and easier.
//+------------------------------------------------------------------+
//| Button click handlers - All Order Operations                     |
//+------------------------------------------------------------------+
void CTradeManagementPanel::OnClickCloseAll()
{
   for(int i = PositionsTotal()-1; i >= 0; i--)
      m_trade.PositionClose(PositionGetTicket(i));
}

void CTradeManagementPanel::OnClickCloseProfit()
{
   for(int i = PositionsTotal()-1; i >= 0; i--)
      if(PositionGetDouble(POSITION_PROFIT) > 0)
         m_trade.PositionClose(PositionGetTicket(i));
}

void CTradeManagementPanel::OnClickCloseLoss()
{
   for(int i = PositionsTotal()-1; i >= 0; i--)
      if(PositionGetDouble(POSITION_PROFIT) < 0)
         m_trade.PositionClose(PositionGetTicket(i));
}

void CTradeManagementPanel::OnClickCloseBuy()
{
   for(int i = PositionsTotal()-1; i >= 0; i--)
      if(PositionGetInteger(POSITION_TYPE)==POSITION_TYPE_BUY)
         m_trade.PositionClose(PositionGetTicket(i));
}

void CTradeManagementPanel::OnClickCloseSell()
{
   for(int i = PositionsTotal()-1; i >= 0; i--)
      if(PositionGetInteger(POSITION_TYPE)==POSITION_TYPE_SELL)
         m_trade.PositionClose(PositionGetTicket(i));
}

void CTradeManagementPanel::OnClickDeleteAllOrders()
{
   for(int i = OrdersTotal()-1; i >= 0; i--)
      m_trade.OrderDelete(OrderGetTicket(i));
}

void CTradeManagementPanel::OnClickDeleteLimitOrders()
{
   for(int i = OrdersTotal()-1; i >= 0; i--)
      if(OrderGetInteger(ORDER_TYPE)==ORDER_TYPE_BUY_LIMIT ||
         OrderGetInteger(ORDER_TYPE)==ORDER_TYPE_SELL_LIMIT)
         m_trade.OrderDelete(OrderGetTicket(i));
}

void CTradeManagementPanel::OnClickDeleteStopOrders()
{
   for(int i = OrdersTotal()-1; i >= 0; i--)
      if(OrderGetInteger(ORDER_TYPE)==ORDER_TYPE_BUY_STOP ||
         OrderGetInteger(ORDER_TYPE)==ORDER_TYPE_SELL_STOP)
         m_trade.OrderDelete(OrderGetTicket(i));
}

void CTradeManagementPanel::OnClickDeleteStopLimitOrders()
{
   for(int i = OrdersTotal()-1; i >= 0; i--)
      if(OrderGetInteger(ORDER_TYPE)==ORDER_TYPE_BUY_STOP_LIMIT ||
         OrderGetInteger(ORDER_TYPE)==ORDER_TYPE_SELL_STOP_LIMIT)
         m_trade.OrderDelete(OrderGetTicket(i));
}
9. Adding Reset and Visibility Controls for Better Usability
To improve the user experience, we added two small but useful features. The first is a reset button that clears all input fields, bringing the panel back to its default state. This is helpful when users want to start over after making changes.
The second feature is a visibility toggle that allows users to show or hide the panel. This keeps the workspace uncluttered while still making the panel easily accessible when needed.
//+------------------------------------------------------------------+
//| Reset all input fields to default values                         |
//+------------------------------------------------------------------+
void CTradeManagementPanel::OnClickReset()
{
   // Reset volume to minimum allowed
   double minVolume = SymbolInfoDouble(Symbol(), SYMBOL_VOLUME_MIN);
   m_volumeEdit.Text(DoubleToString(minVolume, 2));

   // Reset TP and SL for market orders
   m_tpEdit.Text("0.00000");
   m_slEdit.Text("0.00000");

   // Reset pending order prices to current ASK/BID
   double ask = SymbolInfoDouble(Symbol(), SYMBOL_ASK);
   double bid = SymbolInfoDouble(Symbol(), SYMBOL_BID);
   m_buyLimitPriceEdit.Text(DoubleToString(ask, 5));
   m_buyStopPriceEdit.Text(DoubleToString(ask, 5));
   m_sellLimitPriceEdit.Text(DoubleToString(bid, 5));
   m_sellStopPriceEdit.Text(DoubleToString(bid, 5));

   // Reset pending order TP/SL to 0
   m_buyLimitTPEdit.Text("0.00000");
   m_buyLimitSLEdit.Text("0.00000");
   m_buyStopTPEdit.Text("0.00000");
   m_buyStopSLEdit.Text("0.00000");
   m_sellLimitTPEdit.Text("0.00000");
   m_sellLimitSLEdit.Text("0.00000");
   m_sellStopTPEdit.Text("0.00000");
   m_sellStopSLEdit.Text("0.00000");

   // Reset expiration dates to current day's end
   datetime now = TimeCurrent();
   string exp_default = TimeToString(now, TIME_DATE) + " 23:59:59";
   m_buyLimitExpEdit.Text(exp_default);
   m_buyStopExpEdit.Text(exp_default);
   m_sellLimitExpEdit.Text(exp_default);
   m_sellStopExpEdit.Text(exp_default);

   // Clear error messages
   m_tpErrorLabel.Text("");
   m_slErrorLabel.Text("");
}
I have attached the full source code below this article, which you can download. In the next section, I will guide you through a step-by-step process on how to integrate the Trade Management Panel class with the main program.
Integration with (New_Admin_Panel)
1. Including Trade Management header into the New_Admin_Panel system
First, we bring in the TradeManagementPanel by including its header file. This makes everything we need for trade execution and management available inside our admin panel. Simple, but essential.
#include <TradeManagementPanel.mqh>
2. Setting Up a Trade Panel Instance
We need the trade panel to be accessible throughout the EA, so we define it as a global pointer. This way, we can check if it’s already created and interact with it when needed.
CTradeManagementPanel *g_tradePanel = NULL; 3. Adding a Trade Management Button
Users need a way to open the trade panel, so we added a dedicated button inside the admin home panel. We use a helper function to ensure consistency in layout and styling. This button sits right on the interface, ready to launch the trade panel when clicked.
CButton g_tradeMgmtButton;
4. Making the Trade Panel Clickable
Now, here’s where it gets interesting. We created a function that manages the trade panel’s lifecycle.
- If the trade panel doesn’t exist, we create it.
- If it’s already there, we just toggle it on or off.
void HandleTradeManagement()
{
   if(g_tradePanel == NULL)
   {
      g_tradePanel = new CTradeManagementPanel();
      if(!g_tradePanel.Create(g_chart_id, "TradeManagementPanel", g_subwin, 310, 20, 310+565, 20+510))
      {
         delete g_tradePanel;
         g_tradePanel = NULL;
         Print("Failed to create Trade Management Panel");
         return;
      }
   }
   g_tradePanel.Toggle();
   ChartRedraw();
}
With this setup, users get instant access to trade management at the click of a button.
5. Hooking Trade Management into Events
Next, we make sure the trade panel responds to user actions. Inside the event handler, we forward interactions to the panel if it's open. This ensures the panel reacts in real time—whether it's executing orders, adjusting stop-losses, or closing trades.
if(g_tradePanel != NULL && g_tradePanel.IsVisible())
   return g_tradePanel.OnEvent(id, lparam, dparam, sparam);
6. Cleaning Up When the EA Shuts Down
When the EA is removed, we need to free up memory and prevent leaks. That means properly destroying the trade panel.
if(g_tradePanel != NULL)
{
   g_tradePanel.Destroy(reason);
   delete g_tradePanel;
   g_tradePanel = NULL;
}
No leftover instances. No wasted resources. Just a clean shutdown. The complete source file for the New_Admin_Panel is attached below for download. You can follow the same procedure with a few modifications to integrate the Trade Management Panel into your own projects. In the next section, we will share the test results.
Testing
After successfully compiling the code, I launched it on the MetaTrader 5 platform. Below are illustrations showing the successful deployment of the Trade Management Panel from the Admin Home Panel. The Home Panel allows us to toggle the Trade Management Panel on and off, allowing us the flexibility to view the chart fully when needed. With the Trade Management Panel active, we can operate its controls directly on the chart while still observing price action—an advantage for scalp trading. See the image below.
Using the Trade Management Panel
Conclusion
The development of the Trade Management Panel class marks another milestone as we apply modularization to structure our code effectively, making large program components reusable across different projects. As we discussed earlier, this approach offers numerous benefits. We walked through the development process step by step, demonstrating how it’s done, and I’m sure there are valuable notes to take away.
I don’t claim to be perfect in this field—I’m continuously learning and improving. There may be mistakes that those more experienced can identify, and I welcome constructive feedback in the comments for everyone’s benefit. I truly appreciate the advantages this panel offers to those who find it useful.
I also want to acknowledge Omega J Msigwa for their contribution to the Codebase with the Informative Dashboard source code, which provided helpful insights during this development. Please don't hesitate to expand and modify the attached code to sharpen your MQL5 skills and create even more powerful tools.
| File | Description |
|---|---|
| TradeManagementPanel.mqh | Class header source code providing a graphical interface for executing, managing, and modifying trades efficiently within the New_Admin_Panel EA. It can also be integrated with other EAs. |
| New_Admin_Panel.mq5 | The New_Admin_Panel EA source code serves as a centralized interface for managing trade execution, communications, analytics, and other administrative functions when compiled to run within the trading platform. |
Warning: All rights to these materials are reserved by MetaQuotes Ltd. Copying or reprinting of these materials in whole or in part is prohibited.
This article was written by a user of the site and reflects their personal views. MetaQuotes Ltd is not responsible for the accuracy of the information presented, nor for any consequences resulting from the use of the solutions, strategies or recommendations described.

- Free trading apps
- Over 8,000 signals for copying
- Economic news for exploring financial markets
You agree to website policy and terms of use