
监视多币种的交易信号 (第二部分) : 应用程序可视部分的实现

内容目录
概述
在上一阶段,我们开发了多币种交易信号监控器的通用结构。 在这一部分当中,我们将按顺序逐步实现应用程序配置初始化相关的阶段,并将创建构成界面的基本元素交互。
设置步骤 1:品种
根据应用程序结构,在首次启动期间应用程序设置的第一步即创建一个选择品种的界面,之后会搜索依此创建的交易信号。 在上一篇文章的末尾,我们创建了一个应用程序框架,现继续在此基础上操作。 我们继续开发应用程序。 首先,我们将定义实现此应用程序部分所需的主要元素组:
- 应用程序窗口。
- 快速选择品种。
- 输入字段分组。
- 品种分组的“保存”和“加载”按钮。
- 所有可用品种的完整列表呈现为复选框,文本标签表示品种名称。
- “Next” 按钮将切换到设置的第二步:时间帧选择。
早前创建的文件结构如下所示:
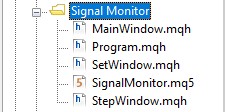
图例 1 应用程序文件结构。
首先,打开 SignalMonitor.mq5 应用程序文件,并在其中添加输入参数。 在 MetaTrader 5 终端中直接运行该应用程序时,您能够设置参数。 另外,声明先前所创建 CProgram 类的实例,并初始化一些变量。 如下编辑文件:
//+------------------------------------------------------------------+
//|                                                SignalMonitor.mq5 |
//|                                Copyright 2019, Alexander Fedosov |
//|                           https://www.mql5.com/en/users/alex2356 |
//+------------------------------------------------------------------+
#property copyright "Copyright 2019, Alexander Fedosov"
#property link      "https://www.mql5.com/en/users/alex2356"
#property version   "1.00"
//--- Include application class
#include "Program.mqh"
//+------------------------------------------------------------------+
//| Expert Advisor input parameters                                  |
//+------------------------------------------------------------------+
input int                  Inp_BaseFont      =  10;                  // Basic font
input color                Caption           =  C'0,130,225';        // Caption color
input color                Background        =  clrWhiteSmoke;       // Background color
//---
CProgram program;
ulong tick_counter;
//+------------------------------------------------------------------+
//| Expert initialization function                                   |
//+------------------------------------------------------------------+
int OnInit(void)
{
//---
   tick_counter=GetTickCount();
//--- Initialize class variables
   program.OnInitEvent();
   program.m_base_font_size=Inp_BaseFont;
   program.m_background=Background;
   program.m_caption=Caption;
//--- Set up the trading panel
   if(!program.CreateGUI())
   {
      Print(__FUNCTION__," > Failed to create graphical interface!");
      return(INIT_FAILED);
   }
//--- Initialization completed successfully
   return(INIT_SUCCEEDED);
}
//+------------------------------------------------------------------+
//| Expert deinitialization function                                 |
//+------------------------------------------------------------------+
void OnDeinit(const int reason)
{
   program.OnDeinitEvent(reason);
}
//+------------------------------------------------------------------+
//| Timer function                                                   |
//+------------------------------------------------------------------+
void OnTimer(void)
{
   program.OnTimerEvent();
}
//+------------------------------------------------------------------+
//| ChartEvent function                                              |
//+------------------------------------------------------------------+
void OnChartEvent(const int    id,
                  const long   &lparam,
                  const double &dparam,
                  const string &sparam)
{
   program.ChartEvent(id,lparam,dparam,sparam);
   //---
   if(id==CHARTEVENT_CUSTOM+ON_END_CREATE_GUI)
   {
      Print("End in ",GetTickCount()-tick_counter," ms");
   }
}
//+------------------------------------------------------------------+
从代码中可以看出,加入了三个输入参数:
- 字号。
- 应用程序窗口的标头颜色。
- 应用程序窗口和元素的背景色。
接着,声明 CProgram 的类实例,并命名为 program,和变量 tick_counter(仅用于显示有关应用程序启动时间的信息)。 进而,在 OnInit() 方法中,我们初始化类变量,把应用程序输入参数赋值给它们。 此外还要调用 CreateGUI() 基础方法,它将启动应用程序。
不过,若您尝试立即编译打开的文件,会收到编译错误,示意在 CProgram 类中找不到变量 m_base_font_size、m_background、m_caption 和 CreateGUI() 方法。 故此,打开 Program.mqh 文件,在 CProgram 类里实现它们。 首先,加入上述变量和方法,以及应用程序正确初始操作所需的其他方法。 所需元素加入后,CProgram 将会如下所示:
//+------------------------------------------------------------------+
//| Class for creating an application                                |
//+------------------------------------------------------------------+
class CProgram : public CWndEvents
{
public:
//---
   int               m_base_font_size;
//---
   string            m_base_font;
//---
   color             m_background;
   color             m_caption;
public:
   CProgram(void);
   ~CProgram(void);
   //--- Initialization/deinitialization
   void              OnInitEvent(void);
   void              OnDeinitEvent(const int reason);
   //--- Timer
   void              OnTimerEvent(void);
   //--- Chart event handler
   virtual void      OnEvent(const int id,const long &lparam,const double &dparam,const string &sparam);
   //--- Create the graphical interface of the program
   bool              CreateGUI(void);
};
创建界面的方法实现仍然为空:
//+------------------------------------------------------------------+
//| Creates the graphical interface of the program                   |
//+------------------------------------------------------------------+
bool CProgram::CreateGUI(void)
{
//---

//--- Finish the creation of GUI
   CWndEvents::CompletedGUI();
   return(true);
}
//+------------------------------------------------------------------+
请注意,我们还添加了 m_base_font 字符串型变量,该变量负责应用程序中的字体名称。 它是在我们的类构造函数中初始化:
//+------------------------------------------------------------------+
//| Constructor                                                      |
//+------------------------------------------------------------------+
CProgram::CProgram(void)
{
   m_base_font="Trebuchet MS";
}
现在,我们继续创建应用程序的第一个窗口。 为此目的,在类中声明新的 m_step_window 变量,该变量是 CWindow 类的实例。 还要声明创建第一个窗口的方法,并命名为 CreateStepWindow()。 这是它在类代码中的样子:
class CProgram : public CWndEvents
{
public:
//--- Application windows
   CWindow           m_step_window;
...
protected:
   //--- forms
   bool              CreateStepWindow(const string caption_text);
早前我们已经决定,初始启动时负责逐一配置的界面部分,其实现应位于 StepWindow.mqh 包含文件之中。 因此,打开它,并着手实现 CreateStepWindow() 方法:
#include "Program.mqh"
//+------------------------------------------------------------------+
//| Creates a form for the selection of symbols                      |
//+------------------------------------------------------------------+
bool CProgram::CreateStepWindow(const string text)
{
//--- Add the pointer to the window array
   CWndContainer::AddWindow(m_step_window);
//--- Properties
   m_step_window.XSize(600);
   m_step_window.YSize(200);
//--- Coordinates
   int x=int(ChartGetInteger(m_chart_id,CHART_WIDTH_IN_PIXELS)-m_step_window.XSize())/2;
   int y=10;
   m_step_window.CaptionHeight(22);
   m_step_window.IsMovable(true);
   m_step_window.CaptionColor(m_caption);
   m_step_window.CaptionColorLocked(m_caption);
   m_step_window.CaptionColorHover(m_caption);
   m_step_window.BackColor(m_background);
   m_step_window.FontSize(m_base_font_size);
   m_step_window.Font(m_base_font);
//--- Creating a form
   if(!m_step_window.CreateWindow(m_chart_id,m_subwin,text,x,y))
      return(false);
   //---
   return(true);
}
//+------------------------------------------------------------------+
不要忘了在 CreateGUI() 方法中添加以下内容:
//+------------------------------------------------------------------+
//| Creates the graphical interface of the program                   |
//+------------------------------------------------------------------+
bool CProgram::CreateGUI(void)
{
//--- Step 1-3
   if(!CreateStepWindow("Signal Monitor Step 1: Choose Symbols"))
      return(false);
//--- Finish the creation of GUI
   CWndEvents::CompletedGUI();
   return(true);
}
//+------------------------------------------------------------------+
如果操作顺序正确,则编译 SignalMonitor.mq5 文件并在终端中启动后,您将看到新创建的表单:
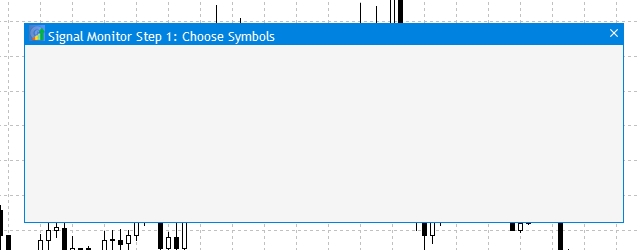
图例 2 应用程序的第一个窗口
所创建窗口的第一个元素内含一组按钮,这些按钮可令您在终端里快速选择预定义的品种集合:forex.all(所有外汇),forex.crosses(外汇交叉盘),forex.major(外汇直盘)。 在 Program.mqh 文件中,添加一个 CButton 类实例的数组,其维度是三,以及创建按钮的通用方法 CreateSymbolSet():
//+------------------------------------------------------------------+
//| Class for creating an application                                |
//+------------------------------------------------------------------+
class CProgram : public CWndEvents
{
public:
//--- Application windows
   CWindow           m_step_window;
//--- Simple buttons
   CButton           m_currency_set[3];
...
   //--- Buttons
   bool              CreateSymbolSet(CButton &button,string text,const int x_gap,const int y_gap);
现在打开 StepWindow.mqh 文件,并在该文件中添加上述方法的实现。
//+------------------------------------------------------------------+
//|                                                                  |
//+------------------------------------------------------------------+
bool CProgram::CreateSymbolSet(CButton &button,string text,const int x_gap,const int y_gap)
{
//---
   color baseclr=C'220,225,235';
   color pressed=C'55,160,250';
//--- Save the window pointer
   button.MainPointer(m_step_window);
//--- Set properties before creation
   button.TwoState(true);
   button.XSize(80);
   button.YSize(30);
   button.LabelXGap(19);
   button.LabelYGap(2);
   button.Font(m_base_font);
   button.FontSize(m_base_font_size);
   button.BackColor(baseclr);
   button.BackColorHover(baseclr);
   button.BackColorPressed(pressed);
   button.BorderColor(baseclr);
   button.BorderColorHover(baseclr);
   button.BorderColorPressed(pressed);
   button.LabelColor(clrBlack);
   button.LabelColorPressed(clrWhite);
   button.IsCenterText(true);
//--- Create a control
   if(!button.CreateButton(text,x_gap,y_gap))
      return(false);
//--- Add a pointer to element to the base
   CWndContainer::AddToElementsArray(0,button);
   return(true);
}
//+------------------------------------------------------------------+
现在,我们只需要在创建表单之后,在窗口基本方法 CreateStepWindow() 里调用该方法, 以不同坐标和文本标签值添加三个按钮:
...
//--- Creating a form
   if(!m_step_window.CreateWindow(m_chart_id,m_subwin,text,x,y))
      return(false);
//---
   if(!CreateSymbolSet(m_currency_set[0],"ALL",10,30))
      return(false);
   if(!CreateSymbolSet(m_currency_set[1],"Major",10+100,30))
      return(false);
   if(!CreateSymbolSet(m_currency_set[2],"Crosses",10+2*(100),30))
      return(false);
...
编译后,结果如下:
图例 3 添加快速选择品种分组的按钮。
接下来,添加一个输入字段保存所选品种分组的名称,可用两个按钮进行保存和加载:Save(保存)和 Load(加载)。 为此,添加一个创建输入字段的 CTextEdit 类实例,以及另外两个创建按钮的 CButton 类实例。由于保存和加载按钮只是名称不同,创建通用的 CreateButton1() 方法既可,然后在输入字段中将 CreateEditValue() 添加到 CProgram 类:
//+------------------------------------------------------------------+
//| Class for creating an application                                |
//+------------------------------------------------------------------+
class CProgram : public CWndEvents
{
public:
//--- Application windows
   CWindow           m_step_window;
//--- Simple buttons
   CButton           m_currency_set[3];
   CButton           m_load_button;
   CButton           m_save_button;
   //--- Input fields
   CTextEdit         m_text_edit;
...
   bool              CreateButton1(CButton &button,string text,const int x_gap,const int y_gap);
   //--- Input field
   bool              CreateEditValue(CTextEdit &text_edit,const int x_gap,const int y_gap);
返回 StepWindow.mqh文件,并在文件末尾添加所创建方法的实现。
//+------------------------------------------------------------------+
//|                                                                  |
//+------------------------------------------------------------------+
bool CProgram::CreateEditValue(CTextEdit &text_edit,const int x_gap,const int y_gap)
{
//--- Store the pointer to the main control
   text_edit.MainPointer(m_step_window);
//--- Properties
   text_edit.XSize(110);
   text_edit.YSize(24);
   text_edit.Font(m_base_font);
   text_edit.FontSize(m_base_font_size);
   text_edit.GetTextBoxPointer().XGap(1);
   text_edit.GetTextBoxPointer().XSize(110);
   text_edit.GetTextBoxPointer().DefaultTextColor(clrSilver);
   text_edit.GetTextBoxPointer().DefaultText("Template name");
//--- Create a control
   if(!text_edit.CreateTextEdit("",x_gap,y_gap))
      return(false);
//--- Add an object to the common array of object groups
   CWndContainer::AddToElementsArray(0,text_edit);
   return(true);
}
//+------------------------------------------------------------------+
//|                                                                  |
//+------------------------------------------------------------------+
bool CProgram::CreateButton1(CButton &button,string text,const int x_gap,const int y_gap)
{
//---
   color baseclr=C'70,180,70';
   color pressed=C'70,170,70';
//--- Save the window pointer
   button.MainPointer(m_step_window);
//--- Set properties before creation
   button.XSize(80);
   button.YSize(30);
   button.Font(m_base_font);
   button.FontSize(m_base_font_size);
   button.BackColor(baseclr);
   button.BackColorHover(baseclr);
   button.BackColorPressed(pressed);
   button.BorderColor(baseclr);
   button.BorderColorHover(baseclr);
   button.BorderColorPressed(pressed);
   button.LabelColor(clrWhite);
   button.LabelColorPressed(clrWhite);
   button.LabelColorHover(clrWhite);
   button.IsCenterText(true);
//--- Create a control
   if(!button.CreateButton(text,x_gap,y_gap))
      return(false);
//--- Add a pointer to element to the base
   CWndContainer::AddToElementsArray(0,button);
   return(true);
}
然后回到 CreateStepWindow() 类,在应用程序窗口中添加两个按钮和一个输入字段。
//---
   if(!CreateEditValue(m_text_edit,300,m_step_window.CaptionHeight()+10))
      return(false);
//---
   if(!CreateButton1(m_load_button,"Load(L)",m_step_window.XSize()-2*(80+10),m_step_window.CaptionHeight()+10))
      return(false);
   if(!CreateButton1(m_save_button,"Save(S)",m_step_window.XSize()-(80+10),m_step_window.CaptionHeight()+10))
      return(false);
再次编译 SignalMonitor.mq5 文件。 此为结果:
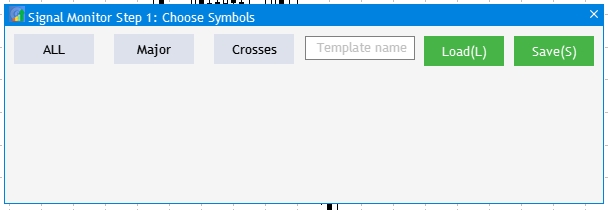
图例 4 为品种分组和“保存/加载”按钮添加一个输入字段。
现在,我们继续进行可视化,并能选择 MetaTrader 5 终端里当前帐户下的所有可用品种。 请注意,如果您显示所有可用品种,则应用程序窗口的高度可能会不足。 一个优秀的解决方案是根据数据自动调整窗口高度。 添加品种总数都相似:添加创建复选框 CCheckBox 的类实例数组,和创建它们的通用方法(因为它们只有名称不同)。
...
   //--- Checkboxes
   CCheckBox         m_checkbox[];
...
   //--- Checkboxes
   bool              CreateCheckBox(CCheckBox &checkbox,const int x_gap,const int y_gap,const string text);
未指定 m_checkbox[] 数组的维度,因为事先不知道终端当前所选帐户里有多少个品种。 因此,我们在 CProgram 类的私密部分中创建两个变量,并为它们分配可用品种总数和市场观察里中当前选定的品种数字。
private:
//---
   int               m_symbol_total;
   int               m_all_symbols;
在类构造函数中,为它们分配所需的值,并为 m_checkbox[] 数组设置相应的维度:
//+------------------------------------------------------------------+
//| Constructor                                                      |
//+------------------------------------------------------------------+
CProgram::CProgram(void)
{
   m_base_font="Trebuchet MS";
   m_symbol_total=SymbolsTotal(true);
   m_all_symbols=SymbolsTotal(false);
   ArrayResize(m_checkbox,m_all_symbols);
}
将此方法的实现添加到 StepWindow.mqh 文件的末尾:
//+------------------------------------------------------------------+
//|                                                                  |
//+------------------------------------------------------------------+
bool CProgram::CreateCheckBox(CCheckBox &checkbox,const int x_gap,const int y_gap,const string text)
{
//--- Store the pointer to the main control
   checkbox.MainPointer(m_step_window);
//--- Properties
   checkbox.GreenCheckBox(true);
   checkbox.IsPressed(false);
   checkbox.Font(m_base_font);
   checkbox.FontSize(m_base_font_size);
   checkbox.BackColor(m_background);
   checkbox.LabelColorHover(C'55,160,250');
//--- Create a control
   if(!checkbox.CreateCheckBox(text,x_gap,y_gap))
      return(false);
//--- Add a pointer to element to the base
   CWndContainer::AddToElementsArray(0,checkbox);
   return(true);
}
在 CreateStepWindow() 方法中添加复选框。 在下面的代码中,整个可用品种列表有 7 列。 另外,窗口高度根据得到的行数而变化。
   //--- Checkboxes
   int k=0;
   for(int j=0; j<=MathCeil(m_all_symbols/7); j++)
   {
      for(int i=0; i<7; i++)
      {
         if(k<m_all_symbols)
            if(!CreateCheckBox(m_checkbox[k],10+80*i,m_step_window.CaptionHeight()+70+j*25,SymbolName(k,false)))
               return(false);
         k++;
      }
   }
   m_step_window.ChangeWindowHeight(m_checkbox[m_all_symbols-1].YGap()+30+30);
复制结果:

图例 5 将所有可用品种加入复选框。
该应用程序部分的最后一个元素包括导航按钮,从而可在设置的环节之间进行切换。 可以轻松添加它们:添加两个名为 m_next_button 和 m_back_button 的 CButton 类实例,调用先前创建的 CreateButton1() 创建方法。 在 CreateStepWindow() 窗口创建方法中添加以下内容:
//---
   if(!CreateButton1(m_back_button,"Back",m_step_window.XSize()-2*(80+10),m_step_window.YSize()-(30+10)))
      return(false);
   if(!CreateButton1(m_next_button,"Next",m_step_window.XSize()-(80+10),m_step_window.YSize()-(30+10)))
      return(false);
现在,我们只需配置按钮的操作,就可以用这些按钮来选择预定义的品种集合。 转至 Program.mqh文件,找到 OnEvent() 并添加以下代码:
//+------------------------------------------------------------------+
//| Chart event handler                                              |
//+------------------------------------------------------------------+
void CProgram::OnEvent(const int id,const long &lparam,const double &dparam,const string &sparam)
{
//--- Pressing the button event
   if(id==CHARTEVENT_CUSTOM+ON_CLICK_BUTTON)
   {
      //--- All
      if(lparam==m_currency_set[0].Id() && m_currency_set[0].IsPressed())
      {
         m_currency_set[1].IsPressed(false);
         m_currency_set[2].IsPressed(false);
         m_currency_set[1].Update(true);
         m_currency_set[2].Update(true);
         //---
         for(int i=0; i<m_all_symbols; i++)
         {
            m_checkbox[i].IsPressed(true);
            m_checkbox[i].Update(true);
         }
      }
      //--- Majors
      else if(lparam==m_currency_set[1].Id() && m_currency_set[1].IsPressed())
      {
         m_currency_set[0].IsPressed(false);
         m_currency_set[2].IsPressed(false);
         m_currency_set[0].Update(true);
         m_currency_set[2].Update(true);
         //---
         string pairs[4]= {"EURUSD","GBPUSD","USDCHF","USDJPY"};
         //--- Clear the selection
         for(int i=0; i<m_all_symbols; i++)
         {
            m_checkbox[i].IsPressed(false);
            m_checkbox[i].Update(true);
         }
         //---
         for(int i=0; i<m_all_symbols; i++)
         {
            for(int j=0; j<4; j++)
               if(m_checkbox[i].LabelText()==pairs[j])
               {
                  m_checkbox[i].IsPressed(true);
                  m_checkbox[i].Update(true);
               }
         }
      }
      //--- Crosses
      else if(lparam==m_currency_set[2].Id() && m_currency_set[2].IsPressed())
      {
         m_currency_set[0].IsPressed(false);
         m_currency_set[1].IsPressed(false);
         m_currency_set[0].Update(true);
         m_currency_set[1].Update(true);
         //---
         string pairs[20]=
         {
            "EURUSD","GBPUSD","USDCHF","USDJPY","USDCAD","AUDUSD","AUDNZD","AUDCAD","AUDCHF","AUDJPY",
            "CHFJPY","EURGBP","EURAUD","EURCHF","EURJPY","EURCAD","EURNZD","GBPCHF","GBPJPY","CADCHF"
         };
         //--- Clear the selection
         for(int i=0; i<m_all_symbols; i++)
         {
            m_checkbox[i].IsPressed(false);
            m_checkbox[i].Update(true);
         }
         //---
         for(int i=0; i<m_all_symbols; i++)
         {
            for(int j=0; j<20; j++)
               if(m_checkbox[i].LabelText()==pairs[j])
               {
                  m_checkbox[i].IsPressed(true);
                  m_checkbox[i].Update(true);
               }
         }
      }
      //---
      if((lparam==m_currency_set[0].Id() && !m_currency_set[0].IsPressed())      ||
            (lparam==m_currency_set[1].Id() && !m_currency_set[1].IsPressed())   ||
            (lparam==m_currency_set[2].Id() && !m_currency_set[2].IsPressed())
        )
      {
         //--- Clear the selection
         for(int i=0; i<m_all_symbols; i++)
         {
            m_checkbox[i].IsPressed(false);
            m_checkbox[i].Update(true);
         }
      }
   }
}
实现思路如下:
- 单击 "ALL" 选择所有品种。
- 单击 "Major" 会清除先前的选择,并在终端中设置一组与 forex.major 对应的品种。
- 单击 “Crosss” 会清除先前的选择,并在终端中设置一组与 forex.crosss 对应的品种。
- 当三个按钮都未被按下时,所有选择都将被取消。
它是这样的:
图例 6 基本交互元素的实现。
若要完成可视化实现,需要加入两小段附加内容。 您可以在图例 5 中看到该窗口包含先前创建的 “Back(后退)” 按钮。 但这是第 1 步,因此不应有这样的按钮。 它应该被隐藏,仅在步骤 2 和 3 中才显示。 将以下行添加到 CreateGUI() 方法中:
bool CProgram::CreateGUI(void)
{
//--- Step 1-3
   if(!CreateStepWindow("Signal Monitor Step 1: Choose Symbols"))
      return(false);
//--- Finish the creation of GUI
   CWndEvents::CompletedGUI();
   m_back_button.Hide();
   return(true);
}
另外,我们需要监视用户的选择。 如果用户尚未选择至少一个品种,则不允许切换到步骤 2。 利用 “Back” 和 “Next” 按钮执行步骤之间的切换。 因此,若要解决该任务,需将三个新方法添加到 CProgram 类的私密部分。 该方法处理三个步骤中每一步选择的信息,从而执行应用程序的初始设置。 另外,添加 m_current_step 变量:单击 “Back/Next” 时,应用程序会知道我们当前在哪一步。
private:
//---
   int               m_symbol_total;
   int               m_all_symbols;
   int               m_current_step;
   //---
   void              ToStep_1(void);
   void              ToStep_2(void);
   void              ToStep_3(void);
之后,在类构造函数中为所创建的变量设置第一步的数值,即 1。 若要在三个配置步骤之间设置导航,则在 OnEvent() 中的按钮点击事件中添加以下代码:
      //--- Navigation
      if(lparam==m_back_button.Id())
      {
         //--- Return to Step 1
         if(m_current_step==2)
            ToStep_1();
         //--- Return to Step 2
         else if(m_current_step==3)
            ToStep_2();
      }
      //--- Go to Step 2
      if(lparam==m_next_button.Id())
      {
         //--- Go to Step 2
         if(m_current_step==1)
            ToStep_2();
         //--- Go to Step 3
         else if(m_current_step==2)
            ToStep_3();
      }
如果您在此步骤尝试编译项目,则编译器将返回以下错误:创建了三个方法,并已调用,但尚未实现:
function 'CProgram::ToStep_1' must have a body Program.mqh 60 22
为了修复此问题,需在 Program.mqh 文件中创建这些类的实现。 不过,对于 ToStep_1() 和 ToStep_3() 方法,暂时将其留空。 它们将在以后填补。 现在,我们对切换到第二步 ToStep_2() 的方法感兴趣。 添加检查,判断至少选择了一个品种:
//+------------------------------------------------------------------+
//| Go to Step 1                                                     |
//+------------------------------------------------------------------+
void CProgram::ToStep_1(void)
{
//---
}
//+------------------------------------------------------------------+
//| Go to Step 2                                                 |
//+------------------------------------------------------------------+
void CProgram::ToStep_2(void)
{
//--- Check whether at least one symbol is selected
   int cnt=0;
   for(int i=0; i<m_all_symbols; i++)
   {
      if(m_checkbox[i].IsPressed())
         cnt++;
   }
   if(cnt<1)
   {
      MessageBox("No symbols selected!","Warning");
      return;
   }
}
//+------------------------------------------------------------------+
//| Move to Step 3 3                                                 |
//+------------------------------------------------------------------+
void CProgram::ToStep_3(void)
{
//---
}
如果用户在未选择品种的情况下不小心按了下一步,则显示警告,示意至少应选择一个品种。
设置步骤 2:时间帧
在应用程序设置的第二步中,用户应选择搜索交易信号的时间帧。 我们在第一篇文章中提到了必需的 UI 元素:
- 一组快速选择时间帧的按钮。
- 复选框形式的时间帧列表。
- 返回到步骤 1 的 “Back(返回)”按钮。
我们借用步骤 1 可视化实现中的现有对象,并针对时间帧的选择进行调整。 转至我们最近正在编辑的 ToStep_2() 方法的主体,并为其添加其他功能。 首先,请记住在步骤 1 中选择的品种,并在 MetaTrader 5 的市场观察中显示它们:
//--- Set selected symbols in Market Watch
   for(int i=0; i<m_all_symbols; i++)
   {
      if(m_checkbox[i].IsPressed())
         SymbolSelect(m_checkbox[i].LabelText(),true);
      else
         SymbolSelect(m_checkbox[i].LabelText(),false);
   }
然后将步骤 1 的界面转换为第二个界面:
//--- Change header
   m_step_window.LabelText("Signal Monitor Step 2: Choose Timeframes");
   m_step_window.Update(true);
//--- Hide elements of Step 1
   for(int i=0; i<m_all_symbols; i++)
   {
      m_checkbox[i].IsLocked(false);
      m_checkbox[i].IsPressed(false);
      m_checkbox[i].Hide();
   }
   string names[3]= {"All","Junior","Senior"};
//--- Change names of selection buttons
   for(int i=0; i<3; i++)
   {
      m_currency_set[i].LabelText(names[i]);
      m_currency_set[i].IsPressed(false);
      if(m_current_step==3)
         m_currency_set[i].Show();
      m_currency_set[i].Update(true);
   }
//--- Hide block for working with templates
   m_text_edit.Hide();
   m_load_button.Hide();
   m_save_button.Hide();
//--- Show all timeframes
   string timeframe_names[21]=
   {
      "M1","M2","M3","M4","M5","M6","M10","M12","M15","M20","M30",
      "H1","H2","H3","H4","H6","H8","H12","D1","W1","MN"
   };
   for(int i=0; i<21; i++)
   {
      m_checkbox[i].LabelText(timeframe_names[i]);
      m_checkbox[i].Show();
      m_checkbox[i].Update(true);
   }
//--- Show Back button
   m_back_button.Show();
//---
   m_current_step=2;
实现十分简单。 最后,将数值 2 赋值给 m_current_step 变量(步骤 2)。 现在,我们需要修改界面,从而能够正确显示所选时间帧集合 “All(全部)”,“Junior(初级)”,“Senior(高级)”。 打开 Program.mqh,并在 OnEvent() 方法中修改代码。 在 “按钮单击” 事件部分中需要进行修改。 从对象的角度来看,步骤 1 和 2 中的快速选择按钮是相似的。 如此这般,必须在按钮单击事件中定义当前的设置步骤:
 //--- Step 1
      if(m_current_step==1)
      {
       ...
      }
      //--- Step 2
      else if(m_current_step==2)
      {
         //--- All
         if(lparam==m_currency_set[0].Id() && m_currency_set[0].IsPressed())
         {
            m_currency_set[1].IsPressed(false);
            m_currency_set[2].IsPressed(false);
            m_currency_set[1].Update(true);
            m_currency_set[2].Update(true);
            //---
            for(int i=0; i<21; i++)
            {
               m_checkbox[i].IsPressed(true);
               m_checkbox[i].Update(true);
            }
         }
         //--- Junior Timeframes
         else if(lparam==m_currency_set[1].Id() && m_currency_set[1].IsPressed())
         {
            m_currency_set[0].IsPressed(false);
            m_currency_set[2].IsPressed(false);
            m_currency_set[0].Update(true);
            m_currency_set[2].Update(true);
            //---
            string pairs[11]=
            {
               "M1","M2","M3","M4","M5","M6","M10","M12","M15","M20","M30"
            };
            //--- Clear the selection
            for(int i=0; i<21; i++)
            {
               m_checkbox[i].IsPressed(false);
               m_checkbox[i].Update(true);
            }
            //---
            for(int i=0; i<21; i++)
            {
               for(int j=0; j<11; j++)
                  if(m_checkbox[i].LabelText()==pairs[j])
                  {
                     m_checkbox[i].IsPressed(true);
                     m_checkbox[i].Update(true);
                  }
            }
         }
         //--- Senior Timeframes
         else if(lparam==m_currency_set[2].Id() && m_currency_set[2].IsPressed())
         {
            m_currency_set[0].IsPressed(false);
            m_currency_set[1].IsPressed(false);
            m_currency_set[0].Update(true);
            m_currency_set[1].Update(true);
            //---
            string pairs[10]=
            {
               "H1","H2","H3","H4","H6","H8","H12","D1","W1","MN"
            };
            //--- Clear the selection
            for(int i=0; i<m_all_symbols; i++)
            {
               m_checkbox[i].IsPressed(false);
               m_checkbox[i].Update(true);
            }
            //---
            for(int i=0; i<m_all_symbols; i++)
            {
               for(int j=0; j<10; j++)
                  if(m_checkbox[i].LabelText()==pairs[j])
                  {
                     m_checkbox[i].IsPressed(true);
                     m_checkbox[i].Update(true);
                  }
            }
         }
在设置的第二步中要实现的最后一个 UI 元素是 “Back(返回)”按钮,该按钮返回到步骤 1。 这是由已创建但仍为空的 ToStep_1() 完成的。 返回前一个界面,并设置前一个包装器,以便处理选择按钮单击事件。
//+------------------------------------------------------------------+
//|                                                                  |
//+------------------------------------------------------------------+
void CProgram::ToStep_1(void)
{
//--- Change header
   m_step_window.LabelText("Signal Monitor Step 1: Choose Symbols");
   m_step_window.Update(true);
//--- Hide the Back button
   m_back_button.Hide();
//--- Clear selection
   for(int i=0; i<21; i++)
   {
      m_checkbox[i].IsPressed(false);
      m_checkbox[i].Update(true);
   }
//--- Show elements of Step 1
   for(int i=0; i<m_all_symbols; i++)
   {
      m_checkbox[i].Show();
      m_checkbox[i].LabelText(SymbolName(i,false));
      m_checkbox[i].Update(true);
   }
   string names[3]= {"All","Majors","Crosses"};
//--- Change names of selection buttons
   for(int i=0; i<3; i++)
   {
      m_currency_set[i].IsPressed(false);
      m_currency_set[i].LabelText(names[i]);
      m_currency_set[i].Update(true);
   }
//--- Show block for working with templates
   m_text_edit.Show();
   m_load_button.Show();
   m_save_button.Show();
//--- Set the current setup step
   m_current_step=1;
}
现在编译项目。 如果一切正确,结果将如图例 7 所示。
图例 7 应用程序设置步骤 2 的实现。
设置步骤 3:添加信号
下一阶段是步骤 3:信号添加界面。 它非常简单,由一个信号添加按钮,和一个添加信号列表的标题组成。 打开 Program.mqh,并在 СProgram 中声明两个新变量:
   CButton           m_add_signal;
   //---
   CTextLabel        m_signal_header;
实现变量的方法:
   bool              CreateIconButton(CButton &button,string text,const int x_gap,const int y_gap);
   //--- Text label
   bool              CreateLabel(CTextLabel &text_label,const int x_gap,const int y_gap,string label_text);
在 StepWindow.mqh 文件的末尾添加其实现。
//+------------------------------------------------------------------+
//| Creates a button with an image                                   |
//+------------------------------------------------------------------+
#resource "\\Images\\EasyAndFastGUI\\Icons\\bmp16\\plus.bmp"
bool CProgram::CreateIconButton(CButton &button,string text,const int x_gap,const int y_gap)
{
//---
   color baseclr=C'70,180,70';
   color pressed=C'70,170,70';
//--- Save the window pointer
   button.MainPointer(m_step_window);
//--- Set properties before creation
   button.XSize(110);
   button.YSize(30);
   button.Font(m_base_font);
   button.FontSize(m_base_font_size);
   button.IconXGap(3);
   button.IconYGap(7);
   button.IconFile("Images\\EasyAndFastGUI\\Icons\\bmp16\\plus.bmp");
   button.BackColor(baseclr);
   button.BackColorHover(baseclr);
   button.BackColorPressed(pressed);
   button.BorderColor(baseclr);
   button.BorderColorHover(baseclr);
   button.BorderColorPressed(pressed);
   button.LabelColor(clrWhite);
   button.LabelColorPressed(clrWhite);
   button.LabelColorHover(clrWhite);
   button.IsCenterText(true);
//--- Create a control
   if(!button.CreateButton(text,x_gap,y_gap))
      return(false);
//--- Add a pointer to element to the base
   CWndContainer::AddToElementsArray(0,button);
   return(true);
}
//+------------------------------------------------------------------+
//| Creates the text label                                           |
//+------------------------------------------------------------------+
bool CProgram::CreateLabel(CTextLabel &text_label,const int x_gap,const int y_gap,string label_text)
{
//--- Save the window pointer
   text_label.MainPointer(m_step_window);
//---
   text_label.Font(m_base_font);
   text_label.FontSize(m_base_font_size);
   text_label.XSize(120);
   text_label.BackColor(m_background);
//--- Create the button
   if(!text_label.CreateTextLabel(label_text,x_gap,y_gap))
      return(false);
//--- Add a pointer to element to the base
   CWndContainer::AddToElementsArray(0,text_label);
   return(true);
}
//+------------------------------------------------------------------+
将以下内容添加到 CreateStepWindow() 窗口中,以便在应用程序启动时创建它们。
//---
   if(!CreateIconButton(m_add_signal,"Add Signal",10,30))
      return(false);
   if(!CreateLabel(m_signal_header,10,30+30+10,"Signal List"))
      return(false);
现在,启动时要禁止显示它们,即在第一步,调用 CreateGUI() 创建界面后立即执行,在方法主体末尾添加两行来隐藏这些元素
//+------------------------------------------------------------------+
//| Creates the graphical interface of the program                   |
//+------------------------------------------------------------------+
bool CProgram::CreateGUI(void)
{
//--- Step 1-3
   if(!CreateStepWindow("Signal Monitor Step 1: Choose Symbols"))
      return(false);
//--- Finish the creation of GUI
   CWndEvents::CompletedGUI();
   m_back_button.Hide();
   m_add_signal.Hide();
   m_signal_header.Hide();
   return(true);
}
现在,实现先前添加的 ToStep_3() 方法,该方法将清除前一步中的可视化元素,并显示我们创建的元素:
//+------------------------------------------------------------------+
//|                                                                  |
//+------------------------------------------------------------------+
void CProgram::ToStep_3(void)
{
//--- Check whether at least one timeframe is selected
   int cnt=0;
   for(int i=0; i<21; i++)
   {
      if(m_checkbox[i].IsPressed())
         cnt++;
   }
   if(cnt<1)
   {
      MessageBox("No timeframes selected!","Warning");
      return;
   }
//---
   m_step_window.LabelText("Signal Monitor Step 3: Create Signals");
   m_step_window.Update(true);
   m_next_button.LabelText("Create");
   m_next_button.Update(true);
//--- Hide elements of Step 2
   for(int i=0; i<21; i++)
   {
      if(i<3)
         m_currency_set[i].Hide();
      m_checkbox[i].Hide();
   }
//---
   m_add_signal.Show();
   m_signal_header.Show();
//---
   m_current_step=3;
}
再次编译该项目,并双击下一步按钮进入步骤 3。 不要忘记在前两个步骤中选择元素,否则应用程序不允许我们进入第三步。
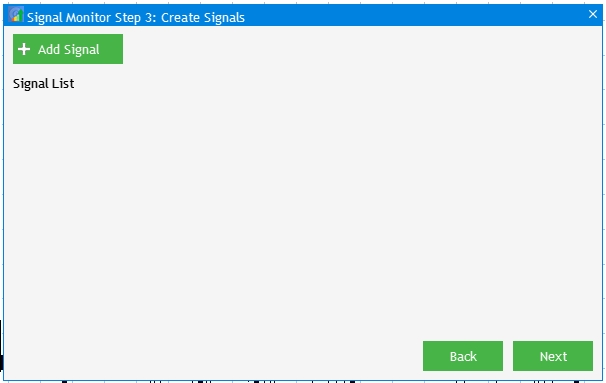
图例 8 实现应用程序设置的第 3 步。
交易信号创建和编辑窗口
与交易信号相关的可视组件位于 SetWindow.mqh 文件中,故此打开它。 现在,它仅包含 #include 命令行连接的包含文件 Program.mqh。 首先,创建一个单独的窗口,这将是创建和设置所有其他元素的基础。 打开 Program.mqh,并在类中声明 m_set_window 变量,该变量是 CWindow 类实例。 还要添加创建窗口的 CreateSetWindow() 方法:
   CWindow           m_set_window;

   bool              CreateSetWindow(const string caption_text);
之后,返回到 SetWindow.mqh,并实现所创建方法。
//+------------------------------------------------------------------+
//| Creates a window for creating and editing trading signals        |
//+------------------------------------------------------------------+
bool CProgram::CreateSetWindow(const string text)
{
//--- Add the pointer to the window array
   CWndContainer::AddWindow(m_set_window);
//--- Properties
   m_set_window.XSize(568);
   m_set_window.YSize(555);
//--- Coordinates
   int x=int(ChartGetInteger(m_chart_id,CHART_WIDTH_IN_PIXELS)-m_set_window.XSize())/2;
   int y=30;
//---
   m_set_window.CaptionHeight(22);
   m_set_window.IsMovable(true);
   m_set_window.CaptionColor(m_caption);
   m_set_window.CaptionColorLocked(m_caption);
   m_set_window.CaptionColorHover(m_caption);
   m_set_window.BackColor(m_background);
   m_set_window.FontSize(m_base_font_size);
   m_set_window.Font(m_base_font);
   m_set_window.WindowType(W_DIALOG);
//--- Creating a form
   if(!m_set_window.CreateWindow(m_chart_id,m_subwin,text,x,y))
      return(false);
   return(true);
}
//+------------------------------------------------------------------+
现在,我们将新创建的窗口,与已经可用的元素绑定在一起。 首先,在 CreateGUI() 界面创建中添加方法调用。 在第 3 步中单击 “Add Signal(添加信号)”按钮后,应打开窗口。
//+------------------------------------------------------------------+
//| Creates the graphical interface of the program                   |
//+------------------------------------------------------------------+
bool CProgram::CreateGUI(void)
{
//--- Step 1-3
   if(!CreateStepWindow("Signal Monitor Step 1: Choose Symbols"))
      return(false);
//--- Creation and editing window
   if(!CreateSetWindow("Signal Monitor Edit Signal"))
      return(false);
//--- Finish the creation of GUI
   CWndEvents::CompletedGUI();
   m_back_button.Hide();
   m_add_signal.Hide();
   m_signal_header.Hide();
   return(true);
}
在点击事件 OnEvent() 中:
      //--- Click on the "Add Signal" button
      if(lparam==m_add_signal.Id())
      {
         m_set_window.OpenWindow();
      }
编译项目并检查结果:在步骤 3 中点击“添加信号”后,将打开另一个创建和编辑窗口。
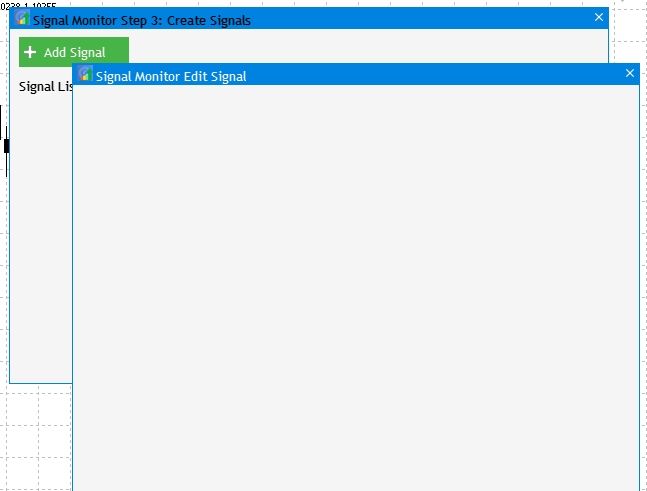
图例 9 交易信号创建和编辑窗口的实现。
第一个窗口元素将在交易信号生成时选择指标类型。 元素添加过程是相同的:创建一个类实例,并实现创建该实例的方法。
   //--- Drop-down menu
   CComboBox         m_indicator_type;
   //--- Creates a drop-down method
   bool              CreateIndicatorType(const int x_gap,const int y_gap);
方法实现将位于先前创建窗口的同一文件中。
//+------------------------------------------------------------------+
//| Creates a drop-down menu with indicator types                    |
//+------------------------------------------------------------------+
bool CProgram::CreateIndicatorType(const int x_gap,const int y_gap)
{
//--- Pass the object to the panel
   m_indicator_type.MainPointer(m_set_window);
//--- Array of the item values in the list view
   string pattern_names[7]=
   {
      "ATR","CCI","DeMarker","Force Ind","WPR","RSI","Momentum"
   };
//--- Set properties before creation
   m_indicator_type.XSize(200);
   m_indicator_type.YSize(26);
   m_indicator_type.LabelYGap(4);
   m_indicator_type.ItemsTotal(7);
   m_indicator_type.Font(m_base_font);
   m_indicator_type.FontSize(m_base_font_size);
   m_indicator_type.BackColor(m_background);
   m_indicator_type.GetButtonPointer().Font(m_base_font);
   m_indicator_type.GetButtonPointer().FontSize(m_base_font_size);
   m_indicator_type.GetButtonPointer().BackColor(clrWhite);
   m_indicator_type.GetButtonPointer().XGap(100);
   m_indicator_type.GetButtonPointer().XSize(100);
   m_indicator_type.GetListViewPointer().Font(m_base_font);
   m_indicator_type.GetListViewPointer().FontSize(m_base_font_size);
   m_indicator_type.GetListViewPointer().ItemYSize(26);
//--- Store the item values in the combo box list view
   for(int i=0; i<7; i++)
      m_indicator_type.SetValue(i,pattern_names[i]);
//--- Get the list pointer
   CListView *lv=m_indicator_type.GetListViewPointer();
//--- Set the list view properties
   lv.LightsHover(true);
   m_indicator_type.SelectItem(5);
//--- Create a control
   if(!m_indicator_type.CreateComboBox("Indicator Type",x_gap,y_gap))
      return(false);
//--- Add an object to the common array of object groups
   CWndContainer::AddToElementsArray(1,m_indicator_type);
   return(true);
}
此处仅有的补充是,在 CreateSetWindow() 方法主体的末尾,我们调用了一个 CreateIndicatorType() 方法创建指标类型的选项。
...
//--- Creating a form
   if(!m_set_window.CreateWindow(m_chart_id,m_subwin,text,x,y))
      return(false);
//--- Indicator type
   if(!CreateIndicatorType(10,22+10))
      return(false);
结果是 UI 元素,它允许从 7 种振荡器类型的标准指标里进行选择。
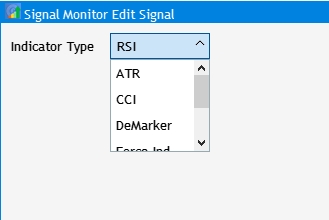
图例 10 选择指标类型的元素。
接下来,我们研究分为两部分的元素集合:指标设置和信号设置。 从标准集合中选择的所有指标均具有通用设置,例如周期和适用价格。 因此,第一板块需要以下内容:文本标签,周期输入字段,和选择指标计算所用价格的下拉菜单。 在 CProgram 类中添加所需的变量,及其创建方法。
//--- Text label
   CTextLabel        m_set_header[5];
//--- Input fields
   CTextEdit         m_period_edit;
//--- Drop-down menu
   CComboBox         m_applied_price;
...
   bool              CreateSetLabel(CTextLabel &text_label,const int x_gap,const int y_gap,string label_text);
   bool              CreatePeriodEdit(const int x_gap,const int y_gap);
   bool              CreateAppliedPrice(const int x_gap,const int y_gap);
实现添加的方法,并在 CreateSetWindow() 方法主体的末尾调用它们。 现在,我们添加一种机制,受益于该机制,所创建元素依据所选指标类型来更改相应的设置集。 为此,在 OnEvent() 中添加一个带有单击下拉菜单的事件,并为每个指标的参数设置一组单独的设定:
//--- Item selection in the combobox list
   if(id==CHARTEVENT_CUSTOM+ON_CLICK_COMBOBOX_ITEM)
   {
      int index=m_indicator_type.GetListViewPointer().SelectedItemIndex();
      switch(index)
      {
      case  0:
         m_period_edit.LabelText("ATR Period");
         m_applied_price.Hide();
         break;
      case  1:
         m_period_edit.LabelText("CCI Period");
         m_applied_price.Show();
         break;
      case  2:
         m_period_edit.LabelText("DeMarker Period");
         m_applied_price.Hide();
         break;
      case  3:
         m_period_edit.LabelText("Force Index Period");
         m_applied_price.Show();
         break;
      case  4:
         m_period_edit.LabelText("WPR Period");
         m_applied_price.Hide();
         break;
      case  5:
         m_period_edit.LabelText("RSI Period");
         m_applied_price.Show();
         break;
      case  6:
         m_period_edit.LabelText("Momentum Period");
         m_applied_price.Hide();
         break;
      default:
         m_period_edit.LabelText("RSI Period");
         m_applied_price.Hide();
         break;
      }
      m_period_edit.Update(true);
   }
编译项目并查看结果:
图例 11 指标设置的实现。
接下来,进入信号编辑的第二板块。 它由标题和八个设置组成:
- 信号规则。
- 信号模块中的文本标签值。
- 文本标签颜色。
- 背景用法和颜色。
- 边缘用法和颜色。
- 信号模块上方工具提示的用法、颜色和值。
- 图形标签的用法,及其在信号模块中的外观。
- 选择可用时间帧以便搜索给定信号。
为了给该板块添加标题,在 CreateSetWindow() 主体的末尾添加以下代码(我们之前已创建了一种可视化标题的方法,以其他参数值复用该方法):
//--- Signal settings
   if(!CreateSetLabel(m_set_header[1],10,22+10+4*(25+10),"2.Signal Settings"))
      return(false);
信号规则由两个元素组成:下拉菜单,和数字值输入字段。 在 CProgram 类里添加类实例和实现方法:
CTextEdit         m_rule_value;
CComboBox         m_rule_type;
...
bool              CreateRuleValue(const int x_gap,const int y_gap);
bool              CreateRule(const int x_gap,const int y_gap);
将其实现添加到 SetWindow.mqh 之中,并在 CreateSetWindow() 方法主体中调用它们。
   //--- Condition settings
   if(!CreateRuleValue(130,22+10+5*(25+10)))
      return(false);
   if(!CreateRule(10,22+10+5*(25+10)))
      return(false);
此外,以相同的方式添加每组设定。 这是 CreateSetWindow() 方法完整实现的模样:
//+------------------------------------------------------------------+
//| Creates a window for creating and editing trading signals        |
//+------------------------------------------------------------------+
bool CProgram::CreateSetWindow(const string text)
{
//--- Add the pointer to the window array
   CWndContainer::AddWindow(m_set_window);
//--- Properties
   m_set_window.XSize(568);
   m_set_window.YSize(575);
//--- Coordinates
   int x=int(ChartGetInteger(m_chart_id,CHART_WIDTH_IN_PIXELS)-m_set_window.XSize())/2;
   int y=30;
//---
   m_set_window.CaptionHeight(22);
   m_set_window.IsMovable(true);
   m_set_window.CaptionColor(m_caption);
   m_set_window.CaptionColorLocked(m_caption);
   m_set_window.CaptionColorHover(m_caption);
   m_set_window.BackColor(m_background);
   m_set_window.FontSize(m_base_font_size);
   m_set_window.Font(m_base_font);
   m_set_window.WindowType(W_DIALOG);
//--- Creating a form
   if(!m_set_window.CreateWindow(m_chart_id,m_subwin,text,x,y))
      return(false);
//--- Indicator type
   if(!CreateIndicatorType(10,22+10))
      return(false);
//--- Settings of the selected indicator
   if(!CreateSetLabel(m_set_header[0],10,22+10+26+10,"1.Indicator Settings"))
      return(false);
   if(!CreatePeriodEdit(10,22+10+2*(25+10)))
      return(false);
   if(!CreateAppliedPrice(10,22+10+3*(25+10)))
      return(false);
//--- Signal settings
   if(!CreateSetLabel(m_set_header[1],10,22+10+4*(25+10),"2.Signal Settings"))
      return(false);
//--- Condition settings
   if(!CreateRuleValue(130,22+10+5*(25+10)))
      return(false);
   if(!CreateRule(10,22+10+5*(25+10)))
      return(false);
//--- Label display settings
   if(!CreateSetLabel(m_set_header[2],10,22+10+6*(25+10),"Label"))
      return(false);
   if(!CreateButton2(m_label_button[0],"Value",100,22+7+6*(25+10)))
      return(false);
   if(!CreateButton2(m_label_button[1],"Text",100+80,22+7+6*(25+10)))
      return(false);
//--- Label color display settings
   if(!CreateColorButton(m_color_button[0],10,22+10+7*(25+10),"Label Color"))
      return(false);
   if(!CreateTextBox(180+80+10,22+7+6*(25+10)))
      return(false);
//---
   if(!CreateColorButton(m_color_button[1],25,22+10+8*(25+10),""))
      return(false);
   if(!CreateSetCheckBox(m_set_param[0],10,22+10+8*(25+10),"Use Background"))
      return(false);
   if(!CreateColorButton(m_color_button[2],25,22+10+9*(25+10),""))
      return(false);
   if(!CreateSetCheckBox(m_set_param[1],10,22+10+9*(25+10),"Use Border"))
      return(false);
   if(!CreateColorButton(m_color_button[3],25,22+10+10*(25+10),""))
      return(false);
   if(!CreateSetCheckBox(m_set_param[2],10,22+10+10*(25+10),"Use Tooltip"))
      return(false);
   if(!CreateTooltipText(240,22+10+10*(25+10)))
      return(false);
   if(!CreateSetCheckBox(m_set_param[3],10,22+10+11*(25+10),"Use Image"))
      return(false);
   if(!CreateImageSlider(125,22+10+11*(25+10)))
      return(false);
//--- Timeframe selection
   if(!CreateSetLabel(m_set_header[4],10,22+10+12*(25+10),"Timeframes"))
      return(false);
//---
   y=22+10+13*(25+10);
   int k=0;
   for(int i=0; i<21; i++)
   {
      if(i==11)
      {
         y=22+20+14*(25+10);
         k=0;
      }
      if(!CreateTfButton(m_tf_button[i],40*k+10,y))
         return(false);
      k++;
   }
   return(true);
}
附加的完整实现清单位于下面的附件中。 添加所有必需的部分之后,创建和编辑窗口如下所示:
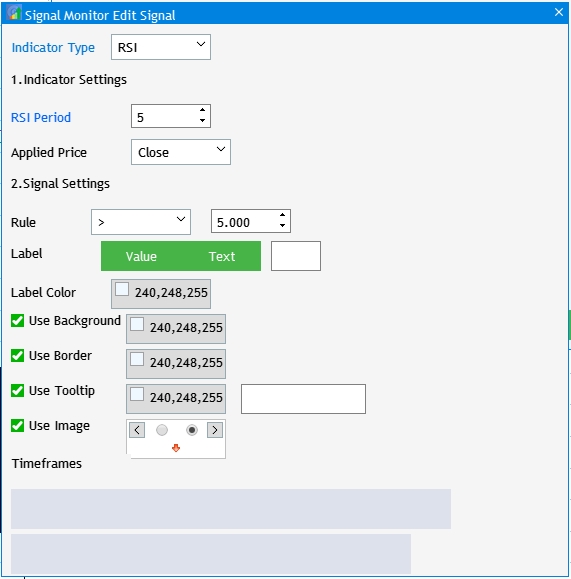
图例 12 信号编辑窗口的 UI 元素实现。
如您从图例所见,时间帧选择按钮为空。 我们还需要配置基本的元素交互:
- 时间帧按钮仅应显示步骤 2 中选择的数字。
- 选择 “Value” 按钮后,“Text” 按钮应变成未按下状态,并且文本标签输入字段应被隐藏。
- 单击颜色选择按钮应打开一个带有调色板的窗口。
- 取消选中时,调色板选择、工具提示输入字段和图形标签选择应处于未活动状态。
为了实现所选时间帧的输出,我们在基类的私密部分中创建 RebulidTimeframes() 方法,并实现此方法:
//+------------------------------------------------------------------+
//|                                                                  |
//+------------------------------------------------------------------+
void CProgram::RebuildTimeframes(void)
{
//--- Count the number of selected timeframes
   int cnt=0;
   for(int i=0; i<21; i++)
   {
      if(m_checkbox[i].IsPressed())
         cnt++;
   }
   ArrayResize(m_timeframes,cnt);
   cnt=0;
//--- Remember the selected timeframe to the array
   for(int i=0; i<21; i++)
   {
      if(m_checkbox[i].IsPressed())
      {
         m_timeframes[cnt]=m_checkbox[i].LabelText();
         cnt++;
      }
   }
//---
   for(int i=0; i<cnt; i++)
      m_tf_button[i].IsLocked(false);
//---
   for(int i=0; i<cnt; i++)
   {
      m_tf_button[i].LabelText(m_timeframes[i]);
      m_tf_button[i].Update(true);
   }
   //---
   for(int i=cnt; i<21; i++)
      m_tf_button[i].IsLocked(true);
}
现在,单击添加信号,将以下内容添加到调用编辑窗口的代码里。
      //--- Click on the "Add Signal" button
      if(lparam==m_add_signal.Id())
      {
         m_set_window.OpenWindow();
         if(m_set_window.IsAvailable())
            RebuildTimeframes();
      }
下一刻,我们进入与 “Value” 和 “Text” 按钮相关的交互设置。 在 OnEvent() 中添加以下代码:
//---
      if(lparam==m_label_button[0].Id())
      {
         if(m_label_button[0].IsPressed())
         {
            m_label_button[1].IsPressed(false);
            m_label_button[1].Update(true);
         }
         m_text_box.Hide();
      }
      if(lparam==m_label_button[1].Id())
      {
         if(m_label_button[1].IsPressed())
         {
            m_label_button[0].IsPressed(false);
            m_label_button[0].Update(true);
         }
         m_text_box.Show();
      }
此处满足以下条件:如果按下其中一个按钮,则另一个按钮应释放。 如果未按下 “Text”,则隐藏编辑字段。 此处还实现了单击调色板按钮。 我们有四个按钮,并声明了四个元素的数组,因此编写在循环中访问它们。
      //---
      for(int i=0; i<4; i++)
      {
         if(lparam==m_color_button[i].Id())
         {
            m_color_picker.ColorButtonPointer(m_color_button[i]);
            return;
         }
      }
最后的交互是当未选中复选框时,阻塞元素。 在 OnEvent() 中添加跟踪复选框点击,并实现交互。
//--- Click on the checkbox
   if(id==CHARTEVENT_CUSTOM+ON_CLICK_CHECKBOX)
   {
      //---
      for(int i=0; i<3; i++)
      {
         if(lparam==m_set_param[i].Id())
         {
            m_color_button[i+1].IsLocked(!m_set_param[i].IsPressed());
            if(m_set_param[2].IsPressed())
               m_tooltip_text.Show();
            else
               m_tooltip_text.Hide();
         }
      }
      //---
      if(lparam==m_set_param[3].Id())
         m_pictures_slider.IsLocked(!m_set_param[3].IsPressed());
   }
再次编译项目,并查看结果。
图例 13 信号编辑窗口 UI 元素交互的实现。
交易信号监控器
开发阶段的最后一步是为将来的交易信号监控器创建一个窗口。 我们还应考虑当前版本中已实现的那些基本设置。 在创建之前,我们设置一些任务,以便令读者理解创建元素之目的:
- 创建第一步中所选信号的文本标签的行。
- 创建在第二步中所选时间帧的文本标签的标题列。
- 根据所创建元素的行和列调整窗口大小。 一种自动调整大小。
为了创建时间帧和品种的文本标签,创建两个 CTextLabel 类实例的数组,并在 CProgram 类中为两个方法添加实现。
   CTextLabel        m_timeframe_label[];
   CTextLabel        m_symbol_label[];
   bool              CreateTimeframeLabel(CTextLabel &text_label,const int x_gap,const int y_gap,string label_text);
   bool              CreateSymbolLabel(CTextLabel &text_label,const int x_gap,const int y_gap,string label_text);
现在,在 MainWindow.mqh 文件中实现所创建方法:
//+------------------------------------------------------------------+
//| Creates the text label                                           |
//+------------------------------------------------------------------+
bool CProgram::CreateTimeframeLabel(CTextLabel &text_label,const int x_gap,const int y_gap,string label_text)
{
//--- Save the window pointer
   text_label.MainPointer(m_step_window);
//---
   text_label.Font(m_base_font);
   text_label.FontSize(m_base_font_size);
   text_label.XSize(40);
   text_label.BackColor(m_background);
//--- Create the button
   if(!text_label.CreateTextLabel(label_text,x_gap,y_gap))
      return(false);
//--- Add a pointer to element to the base
   CWndContainer::AddToElementsArray(0,text_label);
   return(true);
}
//+------------------------------------------------------------------+
//| Creates the text label                                           |
//+------------------------------------------------------------------+
bool CProgram::CreateSymbolLabel(CTextLabel &text_label,const int x_gap,const int y_gap,string label_text)
{
//--- Save the window pointer
   text_label.MainPointer(m_step_window);
//---
   text_label.Font(m_base_font);
   text_label.FontSize(m_base_font_size);
   text_label.XSize(100);
   text_label.BackColor(m_background);
//--- Create the button
   if(!text_label.CreateTextLabel(label_text,x_gap,y_gap))
      return(false);
//--- Add a pointer to element to the base
   CWndContainer::AddToElementsArray(0,text_label);
   return(true);
}
在继续进行窗口界面可视化之前,我们需要在私密部分中创建两个重要变量,以及两个方法:
   int               m_total_signals;
   string            m_symbols[];
   void              ToMonitor(void);
   void              AutoResize(const int x_size,const int y_size);
m_total_signals 变量检查是否创建了至少一个交易信号。 此检查需在创建监视器窗口之前执行。 m_symbols[] 数组将包含第一步设置中的一系列品种。 ToMonitor() 方法实现监视器界面的创建,而 AutoResize() 会根据所创建元素调整窗口大小。 此处是所声明方法的实现:
//+------------------------------------------------------------------+
//|                                                                  |
//+------------------------------------------------------------------+
void CProgram::ToMonitor(void)
{
//--- Check if there is at least one signal
   if(m_total_signals<1)
   {
      MessageBox("No signals created!","Warning");
      return;
   }
//--- Hide Step 3
   m_add_signal.Hide();
   m_signal_header.Hide();
   m_back_button.Hide();
   m_next_button.Hide();
//--- Change window header
   m_step_window.LabelText("Signal Monitor");
   m_step_window.Update(true);
//--- Symbols
   int sy=ArraySize(m_symbols);
   ArrayResize(m_symbol_label,sy);
   for(int i=0; i<sy; i++)
   {
      if(!CreateSymbolLabel(m_symbol_label[i],5,m_step_window.CaptionHeight()+25+i*25,m_symbols[i]))
         return;
      m_symbol_label[i].Update(true);
   }
//--- Timeframes
   int tf=ArraySize(m_timeframes);
   ArrayResize(m_timeframe_label,tf);
//---
   for(int i=0; i<tf; i++)
   {
      if(!CreateTimeframeLabel(m_timeframe_label[i],110+50*i,m_step_window.CaptionHeight()+3,m_timeframes[i]))
         return;
      m_timeframe_label[i].Update(true);
   }
//--- Resize window
   AutoResize(m_timeframe_label[tf-1].XGap()+m_timeframe_label[tf-1].XSize()+5,m_symbol_label[sy-1].YGap()+m_symbol_label[sy-1].YSize()+5);
}
如上面的代码所见,m_symbols 中的数据用于“品种”部分。 但这些数据尚未收集或准备。 我们来修复它。 进入 ToStep_2() 方法,并检查是否已选择了至少一个品种,记住第一步中选择的品种,并保存到我们的数组当中:
//--- Count the number of selected symbols
   ArrayResize(m_symbols,cnt);
   cnt=0;
//--- Remember the selected timeframe to the array
   for(int i=0; i<m_all_symbols; i++)
   {
      if(m_checkbox[i].IsPressed())
      {
         m_symbols[cnt]=m_checkbox[i].LabelText();
         cnt++;
      }
   }
现在,创建自动调整大小的方法。
//+------------------------------------------------------------------+
//|                                                                  |
//+------------------------------------------------------------------+
void CProgram::AutoResize(const int x_size,const int y_size)
{
   m_step_window.ChangeWindowWidth(x_size);
   m_step_window.ChangeWindowHeight(y_size);
}
在检查项目之前,m_total_signals 变量应在 CProgram 的构造函数里置零。另一个要点是 OnEvent() 方法中添加的按钮单击事件。
      //--- Navigation
      if(lparam==m_back_button.Id())
      {
         //--- Go back
         if(m_current_step==2)
            ToStep_1();
         //--- Return to Step 2
         else if(m_current_step==3)
            ToStep_2();
      }
      //--- Go forward
      if(lparam==m_next_button.Id())
      {
         //--- Go to Step 2
         if(m_current_step==1)
            ToStep_2();
         //--- Go to Step 3
         else if(m_current_step==2)
            ToStep_3();
         //--- Go to Monitor
         else if(m_current_step==3)
            ToMonitor();
      }
于此,单击跳转到下一步的按钮,加入调用所创建的 ToMonitor() 方法。在步骤 3中,此按钮称为 “Create(创建)”。 现在编译项目,并启动应用程序:
- 在第一步中选择 “Crosses(交叉盘)”。
- 在第二步中,选择 “Senior(高级)”。
- 在第三步中,单击 "Add Signal(添加信号)"。
- 之后,关闭信号创建窗口,然后单击 "Create(创建)”。
图例 14 基本监视器设置
在下一篇文章中,我们将研究一种算法的实现,该算法将在初次启动期间,依据创建的工作条件搜索已配置的交易信号。
结束语
附件档案包含所有列出的文件,这些文件位于相应的文件夹中。 为令其正常工作,您只需将 MQL5 文件夹保存到终端文件夹里。 若要打开 MQL5 文件夹所在的终端根目录,请在 MetaTrader 5 终端中按下 Ctrl+Shift+D 组合键,或利用关联菜单,如下图例 15 中所示。
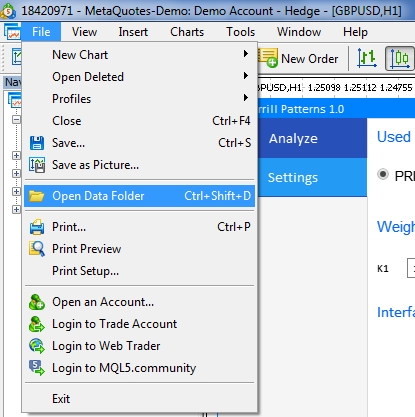
图例 15. 在 MetaTrader 5 终端根目录中打开 MQL5 文件夹
本文由MetaQuotes Ltd译自俄文
原文地址: https://www.mql5.com/ru/articles/7528
注意: MetaQuotes Ltd.将保留所有关于这些材料的权利。全部或部分复制或者转载这些材料将被禁止。
本文由网站的一位用户撰写,反映了他们的个人观点。MetaQuotes Ltd 不对所提供信息的准确性负责,也不对因使用所述解决方案、策略或建议而产生的任何后果负责。

这个监控器非常有用,我的经纪商有成千上万的符号。有什么办法能让我修改代码,将符号限制在我输入的符号内? 还有就是如何添加自定义信号......比如移动平均交叉信号。
未来部分