
トレードシグナルの多通貨監視(パート2):アプリケーションのビジュアル部分の実装

目次
- イントロダクション
- セットアップステップ 1: シンボル
- セットアップステップ 2: 時間枠
- セットアップステップ 3: シグナルを追加する
- トレーディングシグナル作成と編集ウィンドウ
- トレーディングシグナルモニター
- 結論
イントロダクション
前の段階では、多通貨トレードシグナルモニターの一般的な構造を開発しました。 このパートでは、初期アプリケーション構成に関連する段階を順次実装し、インタフェースを構成する要素の基本的な相互作用を作成します。
セットアップステップ 1: シンボル
アプリケーション構造によると、最初の起動時の最初のアプリケーションのセットアップステップは、作成されたトレードシグナルを検索するためにさらに使用するシンボルを選択するためのインターフェイスの作成を意味します。 前回の記事の最後に、このタスクのアプリケーション フレームワークを作成しました。 今回はアプリケーションの開発に進みましょう。 まず、このアプリケーションパーツの実装に必要な要素の主要なグループを定義します。
- アプリケーション ウィンドウ。
- シンボルのクイック選択。
- グループインプットフィールド。
- シンボル グループの [保存] ボタンと [読み込み] ボタン
- 使用可能なすべてのシンボルの完全なリストをチェックボックスとして、シンボル名のテキストラベルを付けます。
- 2 番目のセットアップステップに切り替える次のボタン、つまり、時間枠の選択です。
以前に作成したファイル構造は次のようになります。
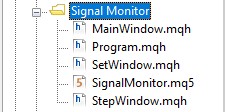
図1 アプリケーションファイルの構造
まず、SignalMonitor.mq5アプリケーションファイルを開き、インプットパラメータを追加します。 MetaTrader5ターミナルで直接アプリケーションを実行する際に、パラメータを設定することができます。 また、以前に作成したCProgramクラスのインスタンスを宣言し、変数の一部を初期化します。 ファイルを次のように編集します。
//+------------------------------------------------------------------+
//|                                                SignalMonitor.mq5 |
//|                                Copyright 2019, Alexander Fedosov |
//|                           https://www.mql5.com/en/users/alex2356 |
//+------------------------------------------------------------------+
#property copyright "Copyright 2019, Alexander Fedosov"
#property link      "https://www.mql5.com/en/users/alex2356"
#property version   "1.00"
//--- Include application class
#include "Program.mqh"
//+------------------------------------------------------------------+
//| Expert Advisor input parameters                                  |
//+------------------------------------------------------------------+
input int                  Inp_BaseFont      =  10;                  // Basic font
input color                Caption           =  C'0,130,225';        // Caption color
input color                Background        =  clrWhiteSmoke;       // Background color
//---
CProgram program;
ulong tick_counter;
//+------------------------------------------------------------------+
//| Expert initialization function                                   |
//+------------------------------------------------------------------+
int OnInit(void)
{
//---
   tick_counter=GetTickCount();
//--- Initialize class variables
   program.OnInitEvent();
   program.m_base_font_size=Inp_BaseFont;
   program.m_background=Background;
   program.m_caption=Caption;
//--- Set up the trading panel
   if(!program.CreateGUI())
   {
      Print(__FUNCTION__," > Failed to create graphical interface!");
      return(INIT_FAILED);
   }
//--- Initialization completed successfully
   return(INIT_SUCCEEDED);
}
//+------------------------------------------------------------------+
//| Expert deinitialization function                                 |
//+------------------------------------------------------------------+
void OnDeinit(const int reason)
{
   program.OnDeinitEvent(reason);
}
//+------------------------------------------------------------------+
//| Timer function                                                   |
//+------------------------------------------------------------------+
void OnTimer(void)
{
   program.OnTimerEvent();
}
//+------------------------------------------------------------------+
//| ChartEvent function                                              |
//+------------------------------------------------------------------+
void OnChartEvent(const int    id,
                  const long   &lparam,
                  const double &dparam,
                  const string &sparam)
{
   program.ChartEvent(id,lparam,dparam,sparam);
   //---
   if(id==CHARTEVENT_CUSTOM+ON_END_CREATE_GUI)
   {
      Print("End in ",GetTickCount()-tick_counter," ms");
   }
}
//+------------------------------------------------------------------+
コードからわかるように、3つのインプットパラメータが追加されました:
- フォント サイズ。
- アプリケーション ウィンドウのヘッダの色。
- アプリケーション ウィンドウと要素の背景色。
次に、CProgramクラス・インスタンスの名前付き program とtick_counter変数を宣言します (アプリケーションの起動時刻に情報を表示するためにのみ必要です)。 さらに、OnInit()メソッドでは、アプリケーションインプットパラメータの値を割り当てることによってクラス インスタンス変数を初期化します。 また、アプリを起動するCreateGUI()基本メソッドを呼び出します。
しかし、開いたファイルをコンパイルしようとすると、cProgramクラスで変数m_base_font_sizeが見つからないことを示すコンパイルエラーが表示され、m_background、m_caption 、CreateGUI() メソッドが見つからなかったことを示しています。 したがって、CProgramクラスを実装するには、Program.mqhファイルを開きます。 まず、上記の変数とメソッド、およびアプリケーションの正しい初期操作に必要な他のメソッドを追加します。 必要な要素を追加すると、CProgramは次のようになります。
//+------------------------------------------------------------------+
//| Class for creating an application                                |
//+------------------------------------------------------------------+
class CProgram : public CWndEvents
{
public:
//---
   int               m_base_font_size;
//---
   string            m_base_font;
//---
   color             m_background;
   color             m_caption;
public:
   CProgram(void);
   ~CProgram(void);
   //--- Initialization/deinitialization
   void              OnInitEvent(void);
   void              OnDeinitEvent(const int reason);
   //--- Timer
   void              OnTimerEvent(void);
   //--- Chart event handler
   virtual void      OnEvent(const int id,const long &lparam,const double &dparam,const string &sparam);
   //--- Create the graphical interface of the program
   bool              CreateGUI(void);
};
インターフェイスを作成するメソッドの実装はまだ空です。
//+------------------------------------------------------------------+
//| Creates the graphical interface of the program                   |
//+------------------------------------------------------------------+
bool CProgram::CreateGUI(void)
{
//---

//--- Finish the creation of GUI
   CWndEvents::CompletedGUI();
   return(true);
}
//+------------------------------------------------------------------+
また、アプリケーションのフォント名を担当する m_base_font 文字列変数も追加されています。 クラスコンストラクタで初期化されます。
//+------------------------------------------------------------------+
//| Constructor                                                      |
//+------------------------------------------------------------------+
CProgram::CProgram(void)
{
   m_base_font="Trebuchet MS";
}
では、アプリケーションの最初のウィンドウの作成に進みましょう。 このためには、クラスでCWindowクラスのインスタンスである新しい m_step_window 変数を宣言します。 また、最初のウィンドウを作成するメソッドを宣言し、その名前を CreateStepWindow()にします。 クラスコードの中で、次のようになります。
class CProgram : public CWndEvents
{
public:
//--- Application windows
   CWindow           m_step_window;
...
protected:
   //--- forms
   bool              CreateStepWindow(const string caption_text);
先ほど、初期起動のひとつひとつの構成を担当するインタフェース部分の実装は、StepWindow.mqhインクルードファイルに配置されることを決定しました。 そこで、CreateStepWindow()のメソッドの実装を開始します。
#include "Program.mqh"
//+------------------------------------------------------------------+
//| Creates a form for the selection of symbols                      |
//+------------------------------------------------------------------+
bool CProgram::CreateStepWindow(const string text)
{
//--- Add the pointer to the window array
   CWndContainer::AddWindow(m_step_window);
//--- Properties
   m_step_window.XSize(600);
   m_step_window.YSize(200);
//--- Coordinates
   int x=int(ChartGetInteger(m_chart_id,CHART_WIDTH_IN_PIXELS)-m_step_window.XSize())/2;
   int y=10;
   m_step_window.CaptionHeight(22);
   m_step_window.IsMovable(true);
   m_step_window.CaptionColor(m_caption);
   m_step_window.CaptionColorLocked(m_caption);
   m_step_window.CaptionColorHover(m_caption);
   m_step_window.BackColor(m_background);
   m_step_window.FontSize(m_base_font_size);
   m_step_window.Font(m_base_font);
//--- Creating a form
   if(!m_step_window.CreateWindow(m_chart_id,m_subwin,text,x,y))
      return(false);
   //---
   return(true);
}
//+------------------------------------------------------------------+
CreateGUI() メソッドに以下を追加することを忘れないでください。
//+------------------------------------------------------------------+
//| Creates the graphical interface of the program                   |
//+------------------------------------------------------------------+
bool CProgram::CreateGUI(void)
{
//--- Step 1-3
   if(!CreateStepWindow("Signal Monitor Step 1: Choose Symbols"))
      return(false);
//--- Finish the creation of GUI
   CWndEvents::CompletedGUI();
   return(true);
}
//+------------------------------------------------------------------+
一連のアクションが正しい場合は、SignalMonitor.mq5ファイルをコンパイルしてターミナルで起動した後に、新しく作成されたフォームが表示されます。
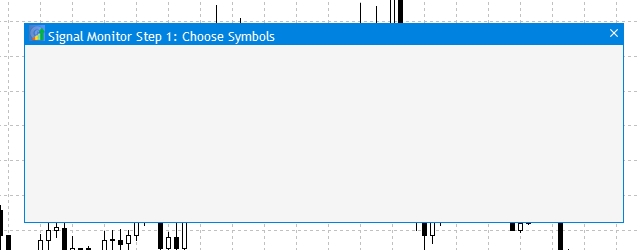
図2 アプリケーションの最初のウィンドウ
作成されたウィンドウの最初の要素には、ターミナルから事前定義されたシンボルセットのクイック選択を可能にするボタンのグループが含まれています: forex.all, forex.crosses, forex.major. Program.mqh ファイルで、CButtonクラスのインスタンスの配列を 3 次元に追加し、ボタンを作成するための汎用CreateSymbolSet()メソッドを追加します。
//+------------------------------------------------------------------+
//| Class for creating an application                                |
//+------------------------------------------------------------------+
class CProgram : public CWndEvents
{
public:
//--- Application windows
   CWindow           m_step_window;
//--- Simple buttons
   CButton           m_currency_set[3];
...
   //--- Buttons
   bool              CreateSymbolSet(CButton &button,string text,const int x_gap,const int y_gap);
次に、StepWindow.mqhファイルを開き、上記のメソッド実装を追加します。
//+------------------------------------------------------------------+
//|                                                                  |
//+------------------------------------------------------------------+
bool CProgram::CreateSymbolSet(CButton &button,string text,const int x_gap,const int y_gap)
{
//---
   color baseclr=C'220,225,235';
   color pressed=C'55,160,250';
//--- Save the window pointer
   button.MainPointer(m_step_window);
//--- Set properties before creation
   button.TwoState(true);
   button.XSize(80);
   button.YSize(30);
   button.LabelXGap(19);
   button.LabelYGap(2);
   button.Font(m_base_font);
   button.FontSize(m_base_font_size);
   button.BackColor(baseclr);
   button.BackColorHover(baseclr);
   button.BackColorPressed(pressed);
   button.BorderColor(baseclr);
   button.BorderColorHover(baseclr);
   button.BorderColorPressed(pressed);
   button.LabelColor(clrBlack);
   button.LabelColorPressed(clrWhite);
   button.IsCenterText(true);
//--- Create a control
   if(!button.CreateButton(text,x_gap,y_gap))
      return(false);
//--- Add a pointer to element to the base
   CWndContainer::AddToElementsArray(0,button);
   return(true);
}
//+------------------------------------------------------------------+
あとは、フォームを作成した後、ウィンドウの基本的なメソッドCreateStepWindow()で座標とテキストラベルの値が異なるこのメソッドを使用して、3 つのボタンを追加するだけです。
...
//--- Creating a form
   if(!m_step_window.CreateWindow(m_chart_id,m_subwin,text,x,y))
      return(false);
//---
   if(!CreateSymbolSet(m_currency_set[0],"ALL",10,30))
      return(false);
   if(!CreateSymbolSet(m_currency_set[1],"Major",10+100,30))
      return(false);
   if(!CreateSymbolSet(m_currency_set[2],"Crosses",10+2*(100),30))
      return(false);
...
コンパイル後の結果は次のようになります。
図3 シンボルグループの素早い選択のボタンを追加します。
次に、選択したシンボル グループの名前のインプットフィールドを追加します。 これを行うには、CTextEditインプットフィールドを作成するためのクラス インスタンスと、ボタンCButtonを作成するためのクラス インスタンスを 2 つ追加します。保存ボタンとロードボタンの名前は異なるため、汎用CreateButton1()メソッドを作成し、インプットフィールドにCreateEditValue()をCProgramクラスに追加します。
//+------------------------------------------------------------------+
//| Class for creating an application                                |
//+------------------------------------------------------------------+
class CProgram : public CWndEvents
{
public:
//--- Application windows
   CWindow           m_step_window;
//--- Simple buttons
   CButton           m_currency_set[3];
   CButton           m_load_button;
   CButton           m_save_button;
   //--- Input fields
   CTextEdit         m_text_edit;
...
   bool              CreateButton1(CButton &button,string text,const int x_gap,const int y_gap);
   //--- Input field
   bool              CreateEditValue(CTextEdit &text_edit,const int x_gap,const int y_gap);
StepWindow.mqh ファイルに戻り、作成したメソッドの実装をファイルのトレーリングストップに追加します。
//+------------------------------------------------------------------+
//|                                                                  |
//+------------------------------------------------------------------+
bool CProgram::CreateEditValue(CTextEdit &text_edit,const int x_gap,const int y_gap)
{
//--- Store the pointer to the main control
   text_edit.MainPointer(m_step_window);
//--- Properties
   text_edit.XSize(110);
   text_edit.YSize(24);
   text_edit.Font(m_base_font);
   text_edit.FontSize(m_base_font_size);
   text_edit.GetTextBoxPointer().XGap(1);
   text_edit.GetTextBoxPointer().XSize(110);
   text_edit.GetTextBoxPointer().DefaultTextColor(clrSilver);
   text_edit.GetTextBoxPointer().DefaultText("Template name");
//--- Create a control
   if(!text_edit.CreateTextEdit("",x_gap,y_gap))
      return(false);
//--- Add an object to the common array of object groups
   CWndContainer::AddToElementsArray(0,text_edit);
   return(true);
}
//+------------------------------------------------------------------+
//|                                                                  |
//+------------------------------------------------------------------+
bool CProgram::CreateButton1(CButton &button,string text,const int x_gap,const int y_gap)
{
//---
   color baseclr=C'70,180,70';
   color pressed=C'70,170,70';
//--- Save the window pointer
   button.MainPointer(m_step_window);
//--- Set properties before creation
   button.XSize(80);
   button.YSize(30);
   button.Font(m_base_font);
   button.FontSize(m_base_font_size);
   button.BackColor(baseclr);
   button.BackColorHover(baseclr);
   button.BackColorPressed(pressed);
   button.BorderColor(baseclr);
   button.BorderColorHover(baseclr);
   button.BorderColorPressed(pressed);
   button.LabelColor(clrWhite);
   button.LabelColorPressed(clrWhite);
   button.LabelColorHover(clrWhite);
   button.IsCenterText(true);
//--- Create a control
   if(!button.CreateButton(text,x_gap,y_gap))
      return(false);
//--- Add a pointer to element to the base
   CWndContainer::AddToElementsArray(0,button);
   return(true);
}
次にCreateStepWindow()クラスに戻り、アプリケーションウィンドウに 2 つのボタンとインプットフィールドを追加します。
//---
   if(!CreateEditValue(m_text_edit,300,m_step_window.CaptionHeight()+10))
      return(false);
//---
   if(!CreateButton1(m_load_button,"Load(L)",m_step_window.XSize()-2*(80+10),m_step_window.CaptionHeight()+10))
      return(false);
   if(!CreateButton1(m_save_button,"Save(S)",m_step_window.XSize()-(80+10),m_step_window.CaptionHeight()+10))
      return(false);
再度、SignalMonitor.mq5ファイルをコンパイルします。 結果は次のとおりです。
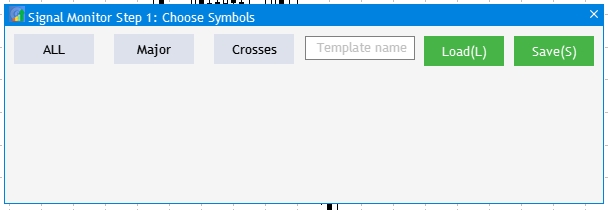
図4 シンボルグループとSave/Load(保存/読み込み)ボタンのインプットフィールドを追加します。
さて、MetaTrader5ターミナルで選択したアカウントで利用可能なすべてのシンボルを可視化し、選択できるすべてのシンボルを選択する関数に進みましょう。 使用可能なすべてのシンボルを表示する場合、アプリケーション ウィンドウの高さが十分ではありません。 優れた解決策は、データに応じてウィンドウの高さを自動的に調整できるようにすることです。 シンボルの総数を追加する方法は似ていますが、チェックボックス CCheckBoxを作成するためのクラスインスタンスの配列を追加し、作成するユニバーサルメソッドを追加します(名前が異なるだけであるため)。
...
   //--- Checkboxes
   CCheckBox         m_checkbox[];
...
   //--- Checkboxes
   bool              CreateCheckBox(CCheckBox &checkbox,const int x_gap,const int y_gap,const string text);
m_checkbox[] 配列の次元は、ターミナル内の選択したアカウントに存在するシンボルの数が事前にわからないため、指定されていません。 そこで、CProgramクラスのプライベート セクションに 2 つの変数を作成し、使用可能なシンボルの総数と、Market Watch で現在選択されているシンボルの数を割り当てます。
private:
//---
   int               m_symbol_total;
   int               m_all_symbols;
クラスコンストラクタで、必要な値を割り当て、適切な次元をm_checkbox[]配列に設定します。
//+------------------------------------------------------------------+
//| Constructor                                                      |
//+------------------------------------------------------------------+
CProgram::CProgram(void)
{
   m_base_font="Trebuchet MS";
   m_symbol_total=SymbolsTotal(true);
   m_all_symbols=SymbolsTotal(false);
   ArrayResize(m_checkbox,m_all_symbols);
}
次のメソッド実装を StepWindow.mqh ファイルのトレーリングストップに追加します。
//+------------------------------------------------------------------+
//|                                                                  |
//+------------------------------------------------------------------+
bool CProgram::CreateCheckBox(CCheckBox &checkbox,const int x_gap,const int y_gap,const string text)
{
//--- Store the pointer to the main control
   checkbox.MainPointer(m_step_window);
//--- Properties
   checkbox.GreenCheckBox(true);
   checkbox.IsPressed(false);
   checkbox.Font(m_base_font);
   checkbox.FontSize(m_base_font_size);
   checkbox.BackColor(m_background);
   checkbox.LabelColorHover(C'55,160,250');
//--- Create a control
   if(!checkbox.CreateCheckBox(text,x_gap,y_gap))
      return(false);
//--- Add a pointer to element to the base
   CWndContainer::AddToElementsArray(0,checkbox);
   return(true);
}
CreateStepWindow() にチェック ボックスを追加します。 以下のコードでは、使用可能なシンボルのリスト全体に 7 つの列があります。 さらに、ウィンドウの高さは、受信した行の数に応じて変更されます。
   //--- Checkboxes
   int k=0;
   for(int j=0; j<=MathCeil(m_all_symbols/7); j++)
   {
      for(int i=0; i<7; i++)
      {
         if(k<m_all_symbols)
            if(!CreateCheckBox(m_checkbox[k],10+80*i,m_step_window.CaptionHeight()+70+j*25,SymbolName(k,false)))
               return(false);
         k++;
      }
   }
   m_step_window.ChangeWindowHeight(m_checkbox[m_all_symbols-1].YGap()+30+30);
結果として得られた追加をコピーします。

図5 利用可能なすべてのシンボルを含むチェックボックスを追加します。
このアプリケーションパーツの直近の要素には、セットアップステップを切り替えるナビゲーションボタンがあります。 クラスは追加できます: m_next_buttonとm_back_buttonという名前の CButton クラスの 2 つのインスタンスを追加し、前に作成したCreateButton1()の作成メソッドを使用します。 CreateStepWindow() メソッドに次の項目を追加します。
//---
   if(!CreateButton1(m_back_button,"Back",m_step_window.XSize()-2*(80+10),m_step_window.YSize()-(30+10)))
      return(false);
   if(!CreateButton1(m_next_button,"Next",m_step_window.XSize()-(80+10),m_step_window.YSize()-(30+10)))
      return(false);
ここで、定義済みのシンボルセットを選択できるボタンの操作を設定するだけです。 Program.mqh ファイルに移動し、OnEvent()を見つけて、次のコードを追加します。
//+------------------------------------------------------------------+
//| Chart event handler                                              |
//+------------------------------------------------------------------+
void CProgram::OnEvent(const int id,const long &lparam,const double &dparam,const string &sparam)
{
//--- Pressing the button event
   if(id==CHARTEVENT_CUSTOM+ON_CLICK_BUTTON)
   {
      //--- All
      if(lparam==m_currency_set[0].Id() && m_currency_set[0].IsPressed())
      {
         m_currency_set[1].IsPressed(false);
         m_currency_set[2].IsPressed(false);
         m_currency_set[1].Update(true);
         m_currency_set[2].Update(true);
         //---
         for(int i=0; i<m_all_symbols; i++)
         {
            m_checkbox[i].IsPressed(true);
            m_checkbox[i].Update(true);
         }
      }
      //--- Majors
      else if(lparam==m_currency_set[1].Id() && m_currency_set[1].IsPressed())
      {
         m_currency_set[0].IsPressed(false);
         m_currency_set[2].IsPressed(false);
         m_currency_set[0].Update(true);
         m_currency_set[2].Update(true);
         //---
         string pairs[4]= {"EURUSD","GBPUSD","USDCHF","USDJPY"};
         //--- Clear the selection
         for(int i=0; i<m_all_symbols; i++)
         {
            m_checkbox[i].IsPressed(false);
            m_checkbox[i].Update(true);
         }
         //---
         for(int i=0; i<m_all_symbols; i++)
         {
            for(int j=0; j<4; j++)
               if(m_checkbox[i].LabelText()==pairs[j])
               {
                  m_checkbox[i].IsPressed(true);
                  m_checkbox[i].Update(true);
               }
         }
      }
      //--- Crosses
      else if(lparam==m_currency_set[2].Id() && m_currency_set[2].IsPressed())
      {
         m_currency_set[0].IsPressed(false);
         m_currency_set[1].IsPressed(false);
         m_currency_set[0].Update(true);
         m_currency_set[1].Update(true);
         //---
         string pairs[20]=
         {
            "EURUSD","GBPUSD","USDCHF","USDJPY","USDCAD","AUDUSD","AUDNZD","AUDCAD","AUDCHF","AUDJPY",
            "CHFJPY","EURGBP","EURAUD","EURCHF","EURJPY","EURCAD","EURNZD","GBPCHF","GBPJPY","CADCHF"
         };
         //--- Clear the selection
         for(int i=0; i<m_all_symbols; i++)
         {
            m_checkbox[i].IsPressed(false);
            m_checkbox[i].Update(true);
         }
         //---
         for(int i=0; i<m_all_symbols; i++)
         {
            for(int j=0; j<20; j++)
               if(m_checkbox[i].LabelText()==pairs[j])
               {
                  m_checkbox[i].IsPressed(true);
                  m_checkbox[i].Update(true);
               }
         }
      }
      //---
      if((lparam==m_currency_set[0].Id() && !m_currency_set[0].IsPressed())      ||
            (lparam==m_currency_set[1].Id() && !m_currency_set[1].IsPressed())   ||
            (lparam==m_currency_set[2].Id() && !m_currency_set[2].IsPressed())
        )
      {
         //--- Clear the selection
         for(int i=0; i<m_all_symbols; i++)
         {
            m_checkbox[i].IsPressed(false);
            m_checkbox[i].Update(true);
         }
      }
   }
}
この実装の考え方は次のとおりです。
- ALL をクリックすると、すべてのシンボルが選択されます。
- メジャー(Major)をクリックすると、以前の選択が削除され、ターミナルの forex.major に対応するシンボルのセットが設定されます。
- クロス(Cross)をクリックすると、前の選択が削除され、端子のcrosses.majorに対応するシンボルのセットが設定されます。
- 3 つのボタンがすべて押されていない場合、選択は取り消されます。
次のようになります。
図6 要素の基本的な相互作用の実装
視覚的な実装を完了するには、2 つの小さな追加が必要です。 図5 では、ウィンドウに以前に作成した [戻る] (Back)ボタンが含まれていることがわかります。 しかし、これはステップ1なので、そのようなボタンは存在しないはずです。 非表示にし、ステップ 2 と ステップ3 にのみ表示されます。 CreateGUI() メソッドに次の行を追加します。
bool CProgram::CreateGUI(void)
{
//--- Step 1-3
   if(!CreateStepWindow("Signal Monitor Step 1: Choose Symbols"))
      return(false);
//--- Finish the creation of GUI
   CWndEvents::CompletedGUI();
   m_back_button.Hide();
   return(true);
}
また、ユーザーの選択を監視する必要があります。 ユーザーが少なくとも 1 つのシンボルを選択していない場合は、ステップ 2 に切り替えできません。 ステップ間の切り替えは、「戻る」および「次へ」ボタンを使用して行います。 そのため、このタスクを解決するには、CProgram クラスのプライベート セクションに 3 つの新しいメソッドを追加します。 このメソッドは、3 つの各ステップで選択された情報を処理し、アプリケーションの初期設定を実行します。 また、m_current_step変数を追加します:Back / Nextをクリックすると、アプリは現在のステップになります。
private:
//---
   int               m_symbol_total;
   int               m_all_symbols;
   int               m_current_step;
   //---
   void              ToStep_1(void);
   void              ToStep_2(void);
   void              ToStep_3(void);
その後、クラスコンストラクタで、作成された変数の最初のステップの値、すなわち1を設定します。 3 つの構成ステップ間のナビゲーションを設定するには、OnEvent() のボタンクリックイベントに以下のコードを追加します。
      //--- Navigation
      if(lparam==m_back_button.Id())
      {
         //--- Return to Step 1
         if(m_current_step==2)
            ToStep_1();
         //--- Return to Step 2
         else if(m_current_step==3)
            ToStep_2();
      }
      //--- Go to Step 2
      if(lparam==m_next_button.Id())
      {
         //--- Go to Step 2
         if(m_current_step==1)
            ToStep_2();
         //--- Go to Step 3
         else if(m_current_step==2)
            ToStep_3();
      }
このステップでプロジェクトをコンパイルしようとすると、コンパイラは、3 つのメソッドが作成され、使用されているが実装が含まれていないというエラーを返します。
function 'CProgram::ToStep_1' must have a body Program.mqh 60 22
この問題を修正するには、クラスの実装を Program.mqh ファイルに作成します。 ただし、ToStep_1()メソッドとToStep_3()メソッドについては、ここでは空白のままにします。 これは後で埋められます。 次に、メソッドが第2ステップToStep_2()に切り替えることに興味があります。 少なくとも 1 つのシンボルが選択されているかどうかを確認します。
//+------------------------------------------------------------------+
//| Go to Step 1                                                     |
//+------------------------------------------------------------------+
void CProgram::ToStep_1(void)
{
//---
}
//+------------------------------------------------------------------+
//| Go to Step 2                                                 |
//+------------------------------------------------------------------+
void CProgram::ToStep_2(void)
{
//--- Check whether at least one symbol is selected
   int cnt=0;
   for(int i=0; i<m_all_symbols; i++)
   {
      if(m_checkbox[i].IsPressed())
         cnt++;
   }
   if(cnt<1)
   {
      MessageBox("No symbols selected!","Warning");
      return;
   }
}
//+------------------------------------------------------------------+
//| Move to Step 3 3                                                 |
//+------------------------------------------------------------------+
void CProgram::ToStep_3(void)
{
//---
}
ユーザーが誤ってシンボルを選択せずに [次へ] を押した場合は、少なくとも 1 つのシンボルを選択する必要があることを示すアラートが表示されます。
セットアップステップ 2: 時間枠
2番目のアプリケーションの設定ステップでは、ユーザーは、トレードシグナルが検索される時間枠を選択する必要があります。 最初の記事では、必要な UI 要素について説明しました。
- 時間枠の迅速な選択のボタンのグループ。
- チェックボックスの形での時間枠のリスト。
- ステップ 1 に戻るための [戻る] ボタン。
ステップ 1 のビジュアル実装から既存のオブジェクトを使用し、時間枠の選択に合わせて調整してみましょう。 最近編集した ToStep_2() メソッドの本文に移動し、追加関数を追加します。 まず、ステップ1でシンボルの選択を覚えて、MetaTrader5のマーケットウォッチで表示します。
//--- Set selected symbols in Market Watch
   for(int i=0; i<m_all_symbols; i++)
   {
      if(m_checkbox[i].IsPressed())
         SymbolSelect(m_checkbox[i].LabelText(),true);
      else
         SymbolSelect(m_checkbox[i].LabelText(),false);
   }
次に、ステップ 1 のインターフェイスを 2 番目のインターフェイスに変換します。
//--- Change header
   m_step_window.LabelText("Signal Monitor Step 2: Choose Timeframes");
   m_step_window.Update(true);
//--- Hide elements of Step 1
   for(int i=0; i<m_all_symbols; i++)
   {
      m_checkbox[i].IsLocked(false);
      m_checkbox[i].IsPressed(false);
      m_checkbox[i].Hide();
   }
   string names[3]= {"All","Junior","Senior"};
//--- Change names of selection buttons
   for(int i=0; i<3; i++)
   {
      m_currency_set[i].LabelText(names[i]);
      m_currency_set[i].IsPressed(false);
      if(m_current_step==3)
         m_currency_set[i].Show();
      m_currency_set[i].Update(true);
   }
//--- Hide block for working with templates
   m_text_edit.Hide();
   m_load_button.Hide();
   m_save_button.Hide();
//--- Show all timeframes
   string timeframe_names[21]=
   {
      "M1","M2","M3","M4","M5","M6","M10","M12","M15","M20","M30",
      "H1","H2","H3","H4","H6","H8","H12","D1","W1","MN"
   };
   for(int i=0; i<21; i++)
   {
      m_checkbox[i].LabelText(timeframe_names[i]);
      m_checkbox[i].Show();
      m_checkbox[i].Update(true);
   }
//--- Show Back button
   m_back_button.Show();
//---
   m_current_step=2;
この実装は簡単です。 最後に、値 2 を m_current_step 変数に割り当てます (ステップ 2)。 さて、変更されたインターフェイスによってすべて、ジュニア、シニア、選択した時間枠セットの正しい表示を提供する必要があります。 Program.mqh を開き、OnEvent()メソッドのコードを修正します。 "ボタンクリック"イベントセクションで変更が必要です。 オブジェクトの観点から見ると、ステップ 1 と 2 のクイック選択ボタンは似ています。 そのため、ボタンクリックイベントで現在の設定ステップを定義する必要があります。
 //--- Step 1
      if(m_current_step==1)
      {
       ...
      }
      //--- Step 2
      else if(m_current_step==2)
      {
         //--- All
         if(lparam==m_currency_set[0].Id() && m_currency_set[0].IsPressed())
         {
            m_currency_set[1].IsPressed(false);
            m_currency_set[2].IsPressed(false);
            m_currency_set[1].Update(true);
            m_currency_set[2].Update(true);
            //---
            for(int i=0; i<21; i++)
            {
               m_checkbox[i].IsPressed(true);
               m_checkbox[i].Update(true);
            }
         }
         //--- Junior Timeframes
         else if(lparam==m_currency_set[1].Id() && m_currency_set[1].IsPressed())
         {
            m_currency_set[0].IsPressed(false);
            m_currency_set[2].IsPressed(false);
            m_currency_set[0].Update(true);
            m_currency_set[2].Update(true);
            //---
            string pairs[11]=
            {
               "M1","M2","M3","M4","M5","M6","M10","M12","M15","M20","M30"
            };
            //--- Clear the selection
            for(int i=0; i<21; i++)
            {
               m_checkbox[i].IsPressed(false);
               m_checkbox[i].Update(true);
            }
            //---
            for(int i=0; i<21; i++)
            {
               for(int j=0; j<11; j++)
                  if(m_checkbox[i].LabelText()==pairs[j])
                  {
                     m_checkbox[i].IsPressed(true);
                     m_checkbox[i].Update(true);
                  }
            }
         }
         //--- Senior Timeframes
         else if(lparam==m_currency_set[2].Id() && m_currency_set[2].IsPressed())
         {
            m_currency_set[0].IsPressed(false);
            m_currency_set[1].IsPressed(false);
            m_currency_set[0].Update(true);
            m_currency_set[1].Update(true);
            //---
            string pairs[10]=
            {
               "H1","H2","H3","H4","H6","H8","H12","D1","W1","MN"
            };
            //--- Clear the selection
            for(int i=0; i<m_all_symbols; i++)
            {
               m_checkbox[i].IsPressed(false);
               m_checkbox[i].Update(true);
            }
            //---
            for(int i=0; i<m_all_symbols; i++)
            {
               for(int j=0; j<10; j++)
                  if(m_checkbox[i].LabelText()==pairs[j])
                  {
                     m_checkbox[i].IsPressed(true);
                     m_checkbox[i].Update(true);
                  }
            }
         }
2 番目のセットアップステップ内で最後に実装される UI 要素は、ステップ 1 に戻るボタンです。 作成されたが空のステップ ToStep_1() によって行われます。 前のインターフェイスを返し、選択ボタンのクリック イベントを処理するための前のラッパを設定します。
//+------------------------------------------------------------------+
//|                                                                  |
//+------------------------------------------------------------------+
void CProgram::ToStep_1(void)
{
//--- Change header
   m_step_window.LabelText("Signal Monitor Step 1: Choose Symbols");
   m_step_window.Update(true);
//--- Hide the Back button
   m_back_button.Hide();
//--- Clear selection
   for(int i=0; i<21; i++)
   {
      m_checkbox[i].IsPressed(false);
      m_checkbox[i].Update(true);
   }
//--- Show elements of Step 1
   for(int i=0; i<m_all_symbols; i++)
   {
      m_checkbox[i].Show();
      m_checkbox[i].LabelText(SymbolName(i,false));
      m_checkbox[i].Update(true);
   }
   string names[3]= {"All","Majors","Crosses"};
//--- Change names of selection buttons
   for(int i=0; i<3; i++)
   {
      m_currency_set[i].IsPressed(false);
      m_currency_set[i].LabelText(names[i]);
      m_currency_set[i].Update(true);
   }
//--- Show block for working with templates
   m_text_edit.Show();
   m_load_button.Show();
   m_save_button.Show();
//--- Set the current setup step
   m_current_step=1;
}
プロジェクトをコンパイルします。 すべてが正しく追加されれば、結果は図7のようになります。
図7 アプリケーション設定のステップ 2 の実装
セットアップステップ 3: シグナルを追加する
次の段階はステップ 3: インターフェイスを追加するシグナルです。 これは簡単で、追加されたシグナルのリストのボタンとヘッダを追加するシグナルで構成されています。 Program.mqh を開き、2 つの新しい変数をСProgramで宣言します。
   CButton           m_add_signal;
   //---
   CTextLabel        m_signal_header;
変数を実装するメソッド:
   bool              CreateIconButton(CButton &button,string text,const int x_gap,const int y_gap);
   //--- Text label
   bool              CreateLabel(CTextLabel &text_label,const int x_gap,const int y_gap,string label_text);
その実装を StepWindow.mqh ファイルのトレーリングストップに追加します。
//+------------------------------------------------------------------+
//| Creates a button with an image                                   |
//+------------------------------------------------------------------+
#resource "\\Images\\EasyAndFastGUI\\Icons\\bmp16\\plus.bmp"
bool CProgram::CreateIconButton(CButton &button,string text,const int x_gap,const int y_gap)
{
//---
   color baseclr=C'70,180,70';
   color pressed=C'70,170,70';
//--- Save the window pointer
   button.MainPointer(m_step_window);
//--- Set properties before creation
   button.XSize(110);
   button.YSize(30);
   button.Font(m_base_font);
   button.FontSize(m_base_font_size);
   button.IconXGap(3);
   button.IconYGap(7);
   button.IconFile("Images\\EasyAndFastGUI\\Icons\\bmp16\\plus.bmp");
   button.BackColor(baseclr);
   button.BackColorHover(baseclr);
   button.BackColorPressed(pressed);
   button.BorderColor(baseclr);
   button.BorderColorHover(baseclr);
   button.BorderColorPressed(pressed);
   button.LabelColor(clrWhite);
   button.LabelColorPressed(clrWhite);
   button.LabelColorHover(clrWhite);
   button.IsCenterText(true);
//--- Create a control
   if(!button.CreateButton(text,x_gap,y_gap))
      return(false);
//--- Add a pointer to element to the base
   CWndContainer::AddToElementsArray(0,button);
   return(true);
}
//+------------------------------------------------------------------+
//| Creates the text label                                           |
//+------------------------------------------------------------------+
bool CProgram::CreateLabel(CTextLabel &text_label,const int x_gap,const int y_gap,string label_text)
{
//--- Save the window pointer
   text_label.MainPointer(m_step_window);
//---
   text_label.Font(m_base_font);
   text_label.FontSize(m_base_font_size);
   text_label.XSize(120);
   text_label.BackColor(m_background);
//--- Create the button
   if(!text_label.CreateTextLabel(label_text,x_gap,y_gap))
      return(false);
//--- Add a pointer to element to the base
   CWndContainer::AddToElementsArray(0,text_label);
   return(true);
}
//+------------------------------------------------------------------+
アプリケーション起動時に作成されるように、次のコードをCreateStepWindow()ウィンドウに追加します。
//---
   if(!CreateIconButton(m_add_signal,"Add Signal",10,30))
      return(false);
   if(!CreateLabel(m_signal_header,10,30+30+10,"Signal List"))
      return(false);
さて、起動時に表示を無効にするには、即ち最初のステップで、CreateGUI()の呼び出しによってインターフェイス作成直後に、メソッド本体の最後に要素を隠す2行を追加します。
//+------------------------------------------------------------------+
//| Creates the graphical interface of the program                   |
//+------------------------------------------------------------------+
bool CProgram::CreateGUI(void)
{
//--- Step 1-3
   if(!CreateStepWindow("Signal Monitor Step 1: Choose Symbols"))
      return(false);
//--- Finish the creation of GUI
   CWndEvents::CompletedGUI();
   m_back_button.Hide();
   m_add_signal.Hide();
   m_signal_header.Hide();
   return(true);
}
次に、前のステップで視覚化をクリアし、作成した要素を表示する、以前に追加された ToStep_3() メソッドを実装します。
//+------------------------------------------------------------------+
//|                                                                  |
//+------------------------------------------------------------------+
void CProgram::ToStep_3(void)
{
//--- Check whether at least one timeframe is selected
   int cnt=0;
   for(int i=0; i<21; i++)
   {
      if(m_checkbox[i].IsPressed())
         cnt++;
   }
   if(cnt<1)
   {
      MessageBox("No timeframes selected!","Warning");
      return;
   }
//---
   m_step_window.LabelText("Signal Monitor Step 3: Create Signals");
   m_step_window.Update(true);
   m_next_button.LabelText("Create");
   m_next_button.Update(true);
//--- Hide elements of Step 2
   for(int i=0; i<21; i++)
   {
      if(i<3)
         m_currency_set[i].Hide();
      m_checkbox[i].Hide();
   }
//---
   m_add_signal.Show();
   m_signal_header.Show();
//---
   m_current_step=3;
}
もう一度プロジェクトをコンパイルし、次のボタンをダブルクリックしてステップ3に進みます。 最初の2つのステップで要素を選択することを忘れないでください、そうしなければアプリケーションは3番目のステップに行きません。
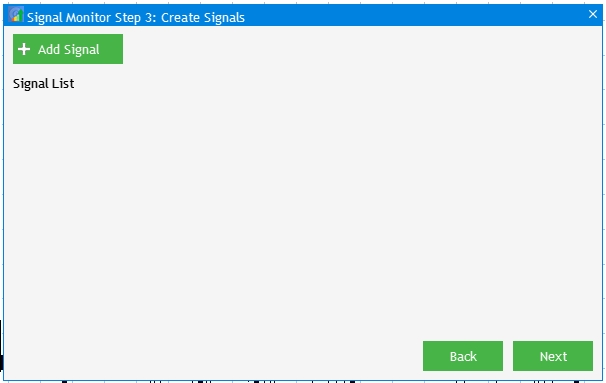
図8 アプリケーション設定のステップ3の実装
トレーディングシグナル作成と編集ウィンドウ
トレーディングシグナルの処理に関連するビジュアルコンポーネントはSetWindow.mqhファイルに配置されるため、開きます。 #includeコマンドラインを介して接続されたインクルードファイルProgram.mqhしかありません。 まず、他のすべての作成要素とセットアップ要素の基本となる別のウィンドウを作成します。 Program.mqhを開き、CWindowクラスのインスタンスであるm_set_window変数をクラスで宣言します。 また、ウィンドウを作成するためのCreateSetWindow()メソッドを追加します。
   CWindow           m_set_window;

   bool              CreateSetWindow(const string caption_text);
その後、SetWindow.mqhに戻り、作成したメソッドを実装します。
//+------------------------------------------------------------------+
//| Creates a window for creating and editing trading signals        |
//+------------------------------------------------------------------+
bool CProgram::CreateSetWindow(const string text)
{
//--- Add the pointer to the window array
   CWndContainer::AddWindow(m_set_window);
//--- Properties
   m_set_window.XSize(568);
   m_set_window.YSize(555);
//--- Coordinates
   int x=int(ChartGetInteger(m_chart_id,CHART_WIDTH_IN_PIXELS)-m_set_window.XSize())/2;
   int y=30;
//---
   m_set_window.CaptionHeight(22);
   m_set_window.IsMovable(true);
   m_set_window.CaptionColor(m_caption);
   m_set_window.CaptionColorLocked(m_caption);
   m_set_window.CaptionColorHover(m_caption);
   m_set_window.BackColor(m_background);
   m_set_window.FontSize(m_base_font_size);
   m_set_window.Font(m_base_font);
   m_set_window.WindowType(W_DIALOG);
//--- Creating a form
   if(!m_set_window.CreateWindow(m_chart_id,m_subwin,text,x,y))
      return(false);
   return(true);
}
//+------------------------------------------------------------------+
次に、新しく作成したウィンドウを既に使用可能な要素にバインドしましょう。 まず、CreateGUI()インターフェイスの作成でメソッド呼び出しを追加します。 このウィンドウは、ステップ 3 の "Add Signal" ボタンをクリックすると開きます。
//+------------------------------------------------------------------+
//| Creates the graphical interface of the program                   |
//+------------------------------------------------------------------+
bool CProgram::CreateGUI(void)
{
//--- Step 1-3
   if(!CreateStepWindow("Signal Monitor Step 1: Choose Symbols"))
      return(false);
//--- Creation and editing window
   if(!CreateSetWindow("Signal Monitor Edit Signal"))
      return(false);
//--- Finish the creation of GUI
   CWndEvents::CompletedGUI();
   m_back_button.Hide();
   m_add_signal.Hide();
   m_signal_header.Hide();
   return(true);
}
OnEvent()でのクリックイベント:
      //--- Click on the "Add Signal" button
      if(lparam==m_add_signal.Id())
      {
         m_set_window.OpenWindow();
      }
プロジェクトをコンパイルし、結果を確認します: ステップ 3 で "Add Signal" の時刻に追加の作成と編集ウィンドウが開きます。
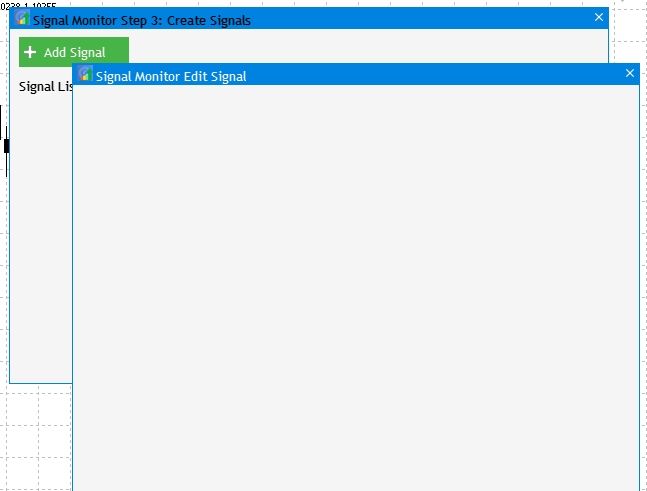
図9 トレードシグナル作成・編集ウィンドウの実装
最初のウィンドウ要素は、トレードシグナルの生成に使用するインジケータのタイプの選択です。 要素追加プロシージャは同じです: クラス インスタンスを作成し、インスタンスを実装するメソッドを作成します。
   //--- Drop-down menu
   CComboBox         m_indicator_type;
   //--- Creates a drop-down method
   bool              CreateIndicatorType(const int x_gap,const int y_gap);
このメソッドの実装は、以前に作成したウィンドウが作成されたのと同じファイルに配置されます。
//+------------------------------------------------------------------+
//| Creates a drop-down menu with indicator types                    |
//+------------------------------------------------------------------+
bool CProgram::CreateIndicatorType(const int x_gap,const int y_gap)
{
//--- Pass the object to the panel
   m_indicator_type.MainPointer(m_set_window);
//--- Array of the item values in the list view
   string pattern_names[7]=
   {
      "ATR","CCI","DeMarker","Force Ind","WPR","RSI","Momentum"
   };
//--- Set properties before creation
   m_indicator_type.XSize(200);
   m_indicator_type.YSize(26);
   m_indicator_type.LabelYGap(4);
   m_indicator_type.ItemsTotal(7);
   m_indicator_type.Font(m_base_font);
   m_indicator_type.FontSize(m_base_font_size);
   m_indicator_type.BackColor(m_background);
   m_indicator_type.GetButtonPointer().Font(m_base_font);
   m_indicator_type.GetButtonPointer().FontSize(m_base_font_size);
   m_indicator_type.GetButtonPointer().BackColor(clrWhite);
   m_indicator_type.GetButtonPointer().XGap(100);
   m_indicator_type.GetButtonPointer().XSize(100);
   m_indicator_type.GetListViewPointer().Font(m_base_font);
   m_indicator_type.GetListViewPointer().FontSize(m_base_font_size);
   m_indicator_type.GetListViewPointer().ItemYSize(26);
//--- Store the item values in the combo box list view
   for(int i=0; i<7; i++)
      m_indicator_type.SetValue(i,pattern_names[i]);
//--- Get the list pointer
   CListView *lv=m_indicator_type.GetListViewPointer();
//--- Set the list view properties
   lv.LightsHover(true);
   m_indicator_type.SelectItem(5);
//--- Create a control
   if(!m_indicator_type.CreateComboBox("Indicator Type",x_gap,y_gap))
      return(false);
//--- Add an object to the common array of object groups
   CWndContainer::AddToElementsArray(1,m_indicator_type);
   return(true);
}
ここでの唯一の追加は、CreateSetWindow()メソッド本体の最後に、インジケータ型選択オプションCreateIndicatorType()を作成するためのメソッドを呼び出すということです。
...
//--- Creating a form
   if(!m_set_window.CreateWindow(m_chart_id,m_subwin,text,x,y))
      return(false);
//--- Indicator type
   if(!CreateIndicatorType(10,22+10))
      return(false);
この結果は、オシレータタイプの7つの標準インジケータから選択できるUI要素です。
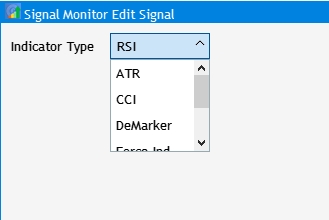
図10 インジケータタイプを選択するための要素。
次に、インジケータ設定とシグナル設定の 2 つのセクションにグループ化された要素のセットを考えてみましょう。 標準セットから選択されたすべてのインジケータには、期間や適用価格などの共通設定があります。 したがって、最初のセクションには、テキストラベル、期間インプットフィールド、およびインジケータ計算に使用する価格を選択するためのドロップダウンメニューが必要です。 必要な変数と作成メソッドを CProgram クラスに追加します。
//--- Text label
   CTextLabel        m_set_header[5];
//--- Input fields
   CTextEdit         m_period_edit;
//--- Drop-down menu
   CComboBox         m_applied_price;
...
   bool              CreateSetLabel(CTextLabel &text_label,const int x_gap,const int y_gap,string label_text);
   bool              CreatePeriodEdit(const int x_gap,const int y_gap);
   bool              CreateAppliedPrice(const int x_gap,const int y_gap);
追加されたメソッドを実装し、呼び出す、 CreateSetWindow()メソッドの本体のトレーリングストップです。 次に、作成された要素が選択したインジケータの種類に応じて使用可能な設定のセットを変更するメカニズムを追加してみましょう。 これを行うには、ドロップダウンメニュー項目をクリックするイベントを含むセクションをOnEvent()に追加し、各インジケータの設定の個々のセットを設定します。
//--- Item selection in the combobox list
   if(id==CHARTEVENT_CUSTOM+ON_CLICK_COMBOBOX_ITEM)
   {
      int index=m_indicator_type.GetListViewPointer().SelectedItemIndex();
      switch(index)
      {
      case  0:
         m_period_edit.LabelText("ATR Period");
         m_applied_price.Hide();
         break;
      case  1:
         m_period_edit.LabelText("CCI Period");
         m_applied_price.Show();
         break;
      case  2:
         m_period_edit.LabelText("DeMarker Period");
         m_applied_price.Hide();
         break;
      case  3:
         m_period_edit.LabelText("Force Index Period");
         m_applied_price.Show();
         break;
      case  4:
         m_period_edit.LabelText("WPR Period");
         m_applied_price.Hide();
         break;
      case  5:
         m_period_edit.LabelText("RSI Period");
         m_applied_price.Show();
         break;
      case  6:
         m_period_edit.LabelText("Momentum Period");
         m_applied_price.Hide();
         break;
      default:
         m_period_edit.LabelText("RSI Period");
         m_applied_price.Hide();
         break;
      }
      m_period_edit.Update(true);
   }
プロジェクトをコンパイルし、結果を表示します。
図11 インジケータ設定の実装
次に、シグナル編集の2番目のセクションに進みます。 ヘッダと 8 つの設定で構成されます。
- シグナルルール。
- シグナル ブロック内のテキスト ラベル値。
- テキスト ラベルの色。
- 背景と色。
- 縁取り法と色。
- シグナルブロックの上のツールチップ、色、値。
- グラフィックラベルの使用と、シグナルブロックでの外観。
- 特定のシグナルを検索するために利用可能な時間枠の選択。
このセクションのヘッダを追加するには、CreateSetWindow()本体の最後に次のコードを追加します (ヘッダを視覚化するメソッドを以前作成しました。
//--- Signal settings
   if(!CreateSetLabel(m_set_header[1],10,22+10+4*(25+10),"2.Signal Settings"))
      return(false);
シグナルルールは、ドロップダウンメニューと数値インプットフィールドの2つの要素で構成されます。 クラスインスタンスと実装メソッドを CProgram クラスに追加します。
CTextEdit         m_rule_value;
CComboBox         m_rule_type;
...
bool              CreateRuleValue(const int x_gap,const int y_gap);
bool              CreateRule(const int x_gap,const int y_gap);
その実装を SetWindow.mqh に追加します。CreateSetWindow()メソッドの本体です。
   //--- Condition settings
   if(!CreateRuleValue(130,22+10+5*(25+10)))
      return(false);
   if(!CreateRule(10,22+10+5*(25+10)))
      return(false);
また、各設定を同じ方法で追加します。 CreateSetWindow()メソッドの完全な実装は次のようになります。
//+------------------------------------------------------------------+
//| Creates a window for creating and editing trading signals        |
//+------------------------------------------------------------------+
bool CProgram::CreateSetWindow(const string text)
{
//--- Add the pointer to the window array
   CWndContainer::AddWindow(m_set_window);
//--- Properties
   m_set_window.XSize(568);
   m_set_window.YSize(575);
//--- Coordinates
   int x=int(ChartGetInteger(m_chart_id,CHART_WIDTH_IN_PIXELS)-m_set_window.XSize())/2;
   int y=30;
//---
   m_set_window.CaptionHeight(22);
   m_set_window.IsMovable(true);
   m_set_window.CaptionColor(m_caption);
   m_set_window.CaptionColorLocked(m_caption);
   m_set_window.CaptionColorHover(m_caption);
   m_set_window.BackColor(m_background);
   m_set_window.FontSize(m_base_font_size);
   m_set_window.Font(m_base_font);
   m_set_window.WindowType(W_DIALOG);
//--- Creating a form
   if(!m_set_window.CreateWindow(m_chart_id,m_subwin,text,x,y))
      return(false);
//--- Indicator type
   if(!CreateIndicatorType(10,22+10))
      return(false);
//--- Settings of the selected indicator
   if(!CreateSetLabel(m_set_header[0],10,22+10+26+10,"1.Indicator Settings"))
      return(false);
   if(!CreatePeriodEdit(10,22+10+2*(25+10)))
      return(false);
   if(!CreateAppliedPrice(10,22+10+3*(25+10)))
      return(false);
//--- Signal settings
   if(!CreateSetLabel(m_set_header[1],10,22+10+4*(25+10),"2.Signal Settings"))
      return(false);
//--- Condition settings
   if(!CreateRuleValue(130,22+10+5*(25+10)))
      return(false);
   if(!CreateRule(10,22+10+5*(25+10)))
      return(false);
//--- Label display settings
   if(!CreateSetLabel(m_set_header[2],10,22+10+6*(25+10),"Label"))
      return(false);
   if(!CreateButton2(m_label_button[0],"Value",100,22+7+6*(25+10)))
      return(false);
   if(!CreateButton2(m_label_button[1],"Text",100+80,22+7+6*(25+10)))
      return(false);
//--- Label color display settings
   if(!CreateColorButton(m_color_button[0],10,22+10+7*(25+10),"Label Color"))
      return(false);
   if(!CreateTextBox(180+80+10,22+7+6*(25+10)))
      return(false);
//---
   if(!CreateColorButton(m_color_button[1],25,22+10+8*(25+10),""))
      return(false);
   if(!CreateSetCheckBox(m_set_param[0],10,22+10+8*(25+10),"Use Background"))
      return(false);
   if(!CreateColorButton(m_color_button[2],25,22+10+9*(25+10),""))
      return(false);
   if(!CreateSetCheckBox(m_set_param[1],10,22+10+9*(25+10),"Use Border"))
      return(false);
   if(!CreateColorButton(m_color_button[3],25,22+10+10*(25+10),""))
      return(false);
   if(!CreateSetCheckBox(m_set_param[2],10,22+10+10*(25+10),"Use Tooltip"))
      return(false);
   if(!CreateTooltipText(240,22+10+10*(25+10)))
      return(false);
   if(!CreateSetCheckBox(m_set_param[3],10,22+10+11*(25+10),"Use Image"))
      return(false);
   if(!CreateImageSlider(125,22+10+11*(25+10)))
      return(false);
//--- Timeframe selection
   if(!CreateSetLabel(m_set_header[4],10,22+10+12*(25+10),"Timeframes"))
      return(false);
//---
   y=22+10+13*(25+10);
   int k=0;
   for(int i=0; i<21; i++)
   {
      if(i==11)
      {
         y=22+20+14*(25+10);
         k=0;
      }
      if(!CreateTfButton(m_tf_button[i],40*k+10,y))
         return(false);
      k++;
   }
   return(true);
}
追加の完全なリストとその実装は、以下の添付ファイルで入手できます。 必要なすべてのパーツを追加すると、作成および編集ウィンドウは次のようになります。
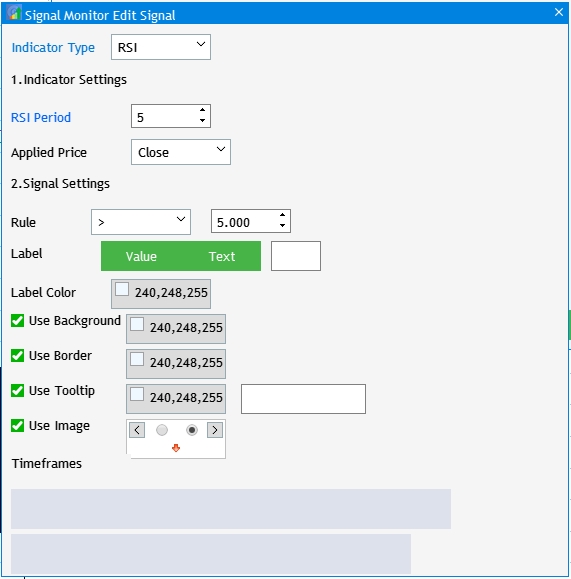
図12 シグナル編集ウィンドウのUI要素の実装
図のように、時間枠の選択ボタンは空です。 また、要素の基本的な相互作用を設定する必要があります。
- 時間枠のボタンには、ステップ 2 で選択した番号のみが表示されます。
- [値] ボタンを選択すると、[テキスト] ボタンが押されず、テキスト ラベルインプットフィールドが非表示になります。
- カラー選択ボタンをクリックすると、カラーパレットのあるウィンドウが開きます。
- オフにすると、パレットの選択、ツールチップインプットフィールド、およびグラフィック ラベル選択が無効になります。
選択した時間枠の出力を実装するには、基本クラスのプライベートセクションにRebulidTimeframes()メソッドを作成し、このメソッドを実装します。
//+------------------------------------------------------------------+
//|                                                                  |
//+------------------------------------------------------------------+
void CProgram::RebuildTimeframes(void)
{
//--- Count the number of selected timeframes
   int cnt=0;
   for(int i=0; i<21; i++)
   {
      if(m_checkbox[i].IsPressed())
         cnt++;
   }
   ArrayResize(m_timeframes,cnt);
   cnt=0;
//--- Remember the selected timeframe to the array
   for(int i=0; i<21; i++)
   {
      if(m_checkbox[i].IsPressed())
      {
         m_timeframes[cnt]=m_checkbox[i].LabelText();
         cnt++;
      }
   }
//---
   for(int i=0; i<cnt; i++)
      m_tf_button[i].IsLocked(false);
//---
   for(int i=0; i<cnt; i++)
   {
      m_tf_button[i].LabelText(m_timeframes[i]);
      m_tf_button[i].Update(true);
   }
   //---
   for(int i=cnt; i<21; i++)
      m_tf_button[i].IsLocked(true);
}
次に、Add Signal をクリックすると、編集ウィンドウを呼び出すコードに次のコードを追加します。
      //--- Click on the "Add Signal" button
      if(lparam==m_add_signal.Id())
      {
         m_set_window.OpenWindow();
         if(m_set_window.IsAvailable())
            RebuildTimeframes();
      }
値とテキストボタンの相互作用の設定に関連する次のモーメントに移りましょう。 OnEvent() で次のコードを追加します。
//---
      if(lparam==m_label_button[0].Id())
      {
         if(m_label_button[0].IsPressed())
         {
            m_label_button[1].IsPressed(false);
            m_label_button[1].Update(true);
         }
         m_text_box.Hide();
      }
      if(lparam==m_label_button[1].Id())
      {
         if(m_label_button[1].IsPressed())
         {
            m_label_button[0].IsPressed(false);
            m_label_button[0].Update(true);
         }
         m_text_box.Show();
      }
ここで、ボタンの 1 つが押された場合、もう 1 つのボタンを押さないという条件が満たされます。 [テキスト(Text)] が押されていない場合は、編集フィールドを非表示にします。 カラーパレットボタンのクリックもここで実装されています。 4つのボタンがあり、4つの要素の配列が宣言されているので、アクセスすることはループで書き込むことができます。
      //---
      for(int i=0; i<4; i++)
      {
         if(lparam==m_color_button[i].Id())
         {
            m_color_picker.ColorButtonPointer(m_color_button[i]);
            return;
         }
      }
直近のやり取りは、チェックボックスが押されていないときに要素をブロックすることです。 OnEvent()でチェックボックスクリックの追跡を追加し、相互作用を実装します。
//--- Click on the checkbox
   if(id==CHARTEVENT_CUSTOM+ON_CLICK_CHECKBOX)
   {
      //---
      for(int i=0; i<3; i++)
      {
         if(lparam==m_set_param[i].Id())
         {
            m_color_button[i+1].IsLocked(!m_set_param[i].IsPressed());
            if(m_set_param[2].IsPressed())
               m_tooltip_text.Show();
            else
               m_tooltip_text.Hide();
         }
      }
      //---
      if(lparam==m_set_param[3].Id())
         m_pictures_slider.IsLocked(!m_set_param[3].IsPressed());
   }
プロジェクトを再度コンパイルし、結果を表示します。
図13 シグナル編集ウィンドウのUI要素の相互作用の実装
トレーディングシグナルモニター
この開発段階の直近のステップは、未来のトレードシグナルモニターのウィンドウを作成することです。 また、現在のバージョンで既に実装されている基本設定も考慮する必要があります。 作成する前に、要素がどのような目的で作成されているかを読者が理解できるよう、タスクを設定しましょう。
- 最初のステップで選択したシグナルのテキストラベルを使用して行を作成します。
- 2 番目のステップで選択したタイムフレームのテキストラベルを使用して、見出し列を作成します。
- 作成した要素の行と列に合わせてウィンドウのサイズを変更します。 自動サイズ変更の一種。
タイムフレームとシンボルのテキストラベルの作成を可能にするには、CTextLabelクラスインスタンスの2つの配列を作成し、CProgramクラスに2つの実装メソッドを追加します。
   CTextLabel        m_timeframe_label[];
   CTextLabel        m_symbol_label[];
   bool              CreateTimeframeLabel(CTextLabel &text_label,const int x_gap,const int y_gap,string label_text);
   bool              CreateSymbolLabel(CTextLabel &text_label,const int x_gap,const int y_gap,string label_text);
次に、作成したメソッドを MainWindow.mqh ファイルに実装します。
//+------------------------------------------------------------------+
//| Creates the text label                                           |
//+------------------------------------------------------------------+
bool CProgram::CreateTimeframeLabel(CTextLabel &text_label,const int x_gap,const int y_gap,string label_text)
{
//--- Save the window pointer
   text_label.MainPointer(m_step_window);
//---
   text_label.Font(m_base_font);
   text_label.FontSize(m_base_font_size);
   text_label.XSize(40);
   text_label.BackColor(m_background);
//--- Create the button
   if(!text_label.CreateTextLabel(label_text,x_gap,y_gap))
      return(false);
//--- Add a pointer to element to the base
   CWndContainer::AddToElementsArray(0,text_label);
   return(true);
}
//+------------------------------------------------------------------+
//| Creates the text label                                           |
//+------------------------------------------------------------------+
bool CProgram::CreateSymbolLabel(CTextLabel &text_label,const int x_gap,const int y_gap,string label_text)
{
//--- Save the window pointer
   text_label.MainPointer(m_step_window);
//---
   text_label.Font(m_base_font);
   text_label.FontSize(m_base_font_size);
   text_label.XSize(100);
   text_label.BackColor(m_background);
//--- Create the button
   if(!text_label.CreateTextLabel(label_text,x_gap,y_gap))
      return(false);
//--- Add a pointer to element to the base
   CWndContainer::AddToElementsArray(0,text_label);
   return(true);
}
ウィンドウ インターフェイスの視覚化を進める前に、プライベート セクションに 2 つの重要な変数と 2 つのメソッドを作成する必要があります。
   int               m_total_signals;
   string            m_symbols[];
   void              ToMonitor(void);
   void              AutoResize(const int x_size,const int y_size);
少なくとも1つのトレードシグナルが作成されたか確認するには、m_total_signals変数が必要です。 このチェックは、モニター・ウィンドウを作成する前に実行されます。 m_symbols[]配列には、最初のセットアップステップから選択したシンボルが含まれます。 ToMonitor()メソッドはモニターインターフェイスの作成を実装し、AutoResize()は作成された要素に応じてサイズウィンドウを調整します。 宣言されたメソッドの実装は次のとおりです。
//+------------------------------------------------------------------+
//|                                                                  |
//+------------------------------------------------------------------+
void CProgram::ToMonitor(void)
{
//--- Check if there is at least one signal
   if(m_total_signals<1)
   {
      MessageBox("No signals created!","Warning");
      return;
   }
//--- Hide Step 3
   m_add_signal.Hide();
   m_signal_header.Hide();
   m_back_button.Hide();
   m_next_button.Hide();
//--- Change window header
   m_step_window.LabelText("Signal Monitor");
   m_step_window.Update(true);
//--- Symbols
   int sy=ArraySize(m_symbols);
   ArrayResize(m_symbol_label,sy);
   for(int i=0; i<sy; i++)
   {
      if(!CreateSymbolLabel(m_symbol_label[i],5,m_step_window.CaptionHeight()+25+i*25,m_symbols[i]))
         return;
      m_symbol_label[i].Update(true);
   }
//--- Timeframes
   int tf=ArraySize(m_timeframes);
   ArrayResize(m_timeframe_label,tf);
//---
   for(int i=0; i<tf; i++)
   {
      if(!CreateTimeframeLabel(m_timeframe_label[i],110+50*i,m_step_window.CaptionHeight()+3,m_timeframes[i]))
         return;
      m_timeframe_label[i].Update(true);
   }
//--- Resize window
   AutoResize(m_timeframe_label[tf-1].XGap()+m_timeframe_label[tf-1].XSize()+5,m_symbol_label[sy-1].YGap()+m_symbol_label[sy-1].YSize()+5);
}
上記のコードからわかるように、m_symbolsからのデータはシンボルセクション(Symbols)で使用します。 しかし、このデータは収集または準備されていません。 修正しましょう。 ToStep_2()メソッドに移動し、少なくとも 1 つのシンボルが選択されているかどうかを確認した後、配列の最初のステップで選択したシンボルを覚えておいてください。
//--- Count the number of selected symbols
   ArrayResize(m_symbols,cnt);
   cnt=0;
//--- Remember the selected timeframe to the array
   for(int i=0; i<m_all_symbols; i++)
   {
      if(m_checkbox[i].IsPressed())
      {
         m_symbols[cnt]=m_checkbox[i].LabelText();
         cnt++;
      }
   }
次に、自動サイズ変更方法を作成します。
//+------------------------------------------------------------------+
//|                                                                  |
//+------------------------------------------------------------------+
void CProgram::AutoResize(const int x_size,const int y_size)
{
   m_step_window.ChangeWindowWidth(x_size);
   m_step_window.ChangeWindowHeight(y_size);
}
プロジェクトをチェックする前に、CProgram のコンストラクタで m_total_signals 変数をゼロに設定します。 もう 1 つの重要なポイントは、ボタンクリックイベントでOnEvent()メソッドを追加することです。
      //--- Navigation
      if(lparam==m_back_button.Id())
      {
         //--- Go back
         if(m_current_step==2)
            ToStep_1();
         //--- Return to Step 2
         else if(m_current_step==3)
            ToStep_2();
      }
      //--- Go forward
      if(lparam==m_next_button.Id())
      {
         //--- Go to Step 2
         if(m_current_step==1)
            ToStep_2();
         //--- Go to Step 3
         else if(m_current_step==2)
            ToStep_3();
         //--- Go to Monitor
         else if(m_current_step==3)
            ToMonitor();
      }
ここでは、次のステップにジャンプするボタンをクリックすると、作成されたToMonitor()メソッドの呼び出しを追加します。このボタンは、ステップ 3 で "Create" と呼ばれます。 次に、プロジェクトをコンパイルし、アプリケーションを起動します。
- 最初のステップで[クロス/Crosses]を選択します。
- 2 番目のステップで、[Senior] を選択します。
- 3 番目のステップで、[シグナルの追加/Add Signal] をクリックします。
- その後、シグナル作成ウィンドウを閉じ、[作成/Create]をクリックします。
図14 基本的なモニタのセットアップ
次の記事では、最初の起動時に作成された動作条件で設定されたトレードシグナルを検索するアルゴリズムの実装を検討します。
結論
添付されたアーカイブには、一覧表示されているすべてのファイルが含まれます。 これをするには、MQL5 フォルダをターミナルフォルダに保存するだけです。 MQL5フォルダが置かれているターミナルルートディレクトリを開くには、MetaTrader5ターミナルでCtrl+Shift+Dキーの組み合わせを押すか、下図15に示すようにコンテキストメニューを使用します。
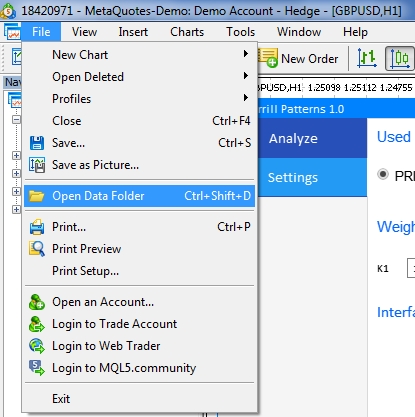
図15. MetaTrader5ターミナルルートでMQL5フォルダを開く
MetaQuotes Ltdによってロシア語から翻訳されました。
元の記事: https://www.mql5.com/ru/articles/7528
警告: これらの資料についてのすべての権利はMetaQuotes Ltd.が保有しています。これらの資料の全部または一部の複製や再プリントは禁じられています。
この記事はサイトのユーザーによって執筆されたものであり、著者の個人的な見解を反映しています。MetaQuotes Ltdは、提示された情報の正確性や、記載されているソリューション、戦略、または推奨事項の使用によって生じたいかなる結果についても責任を負いません。

- 無料取引アプリ
- 8千を超えるシグナルをコピー
- 金融ニュースで金融マーケットを探索
このモニターは非常に便利です。私のブローカーは何千ものシンボルを持っています。私が入力したものだけにシンボルを制限するためにコードを変更する方法はありますか? そしてもう一つは、カスタムシグナルを追加する方法です...移動平均クロスのように。
将来的には