
ソフトウェア開発とMQL5におけるデザインパターン(第2回):構造パターン
はじめに
ソフトウェア開発において非常に重要なトピックである「デザインパターン」についての新しい記事へようこそ。今回は他のタイプのデザインパターンをカバーします。以前の記事では生成デザインパターンについてお話しました。このタイプについてもっと知りたい方は、「ソフトウェア開発とMQL5におけるデザインパターン(第1回):生成パターン」をご覧ください。デザインパターンのトピックに初めて触れる方は、デザインパターンのトピック全般について学び、デザインパターンがソフトウェア開発においてどれほど有用であるかを知るために、この言及された記事を読むことをお勧めします。
ご自分のソフトウェア開発スキルを次のレベルに引き上げたいのであれば、デザインパターンについて学ぶことは不可欠です。これらのパターンは、車輪の再発明をする代わりに、特定の問題を解決するための即席の青写真を与えてくれます。
この記事では、引き続き構造デザインパターンを紹介し、クラスとして持っているものを使ってより大きな構造を形成するために、ソフトウェア開発の世界で構造デザインパターンがどのように役立つかを学びます。この記事の最も興味深い部分は、これらのパターンをMQL5プログラミング言語でどのように利用し、その恩恵を受けて、MetaTrader 5取引ターミナルを使用して取引分野で使用する効果的なソフトウェアをデザインする方法を学ぶことです。
以下のトピックを通して、構造型デザインパターンをカバーします。
この記事が、読者が非常に興味深いトピックを学ぶことによって開発やプログラミングのスキルを向上させるのに役立つことを願っています。オブジェクト指向プログラミング(OOP)のトピックについての知識は、デザインパターンのトピックを理解するのに大いに役立つでしょう。このトピックについてお読みになりたい場合は、私の以前の記事「MQL5オブジェクト指向プログラミング(OOP)について」をご覧ください。この文脈で役に立つことと思います。
構造パターン
このセクションでは、構造デザインパターンとは何か、その種類と構造を明らかにします。構造パターンは、より大きな構造を構築するためのコンポーネントとなるクラスやオブジェクトを構造化する方法に関係します。これらのパターンは、継承の概念を使ってインターフェイスと実装を組み合わせています。この継承の概念は、親クラスのプロパティを持つ、あるいは組み合わせたクラスを持つことを意味します。このパターンの必要性は、開発されたクラスを独立に動作させる必要がある場合に、より重要になります。
構造パターンには以下のような種類があります。
- Adapter:クラスのインターフェイスを変換することで、クライアントが期待する別のインターフェイスを取得するのに役立つ
- Bridge:抽象化とその実装を切り離すことで、独立に変化させることができる
- Composite:部分と全体の階層を表現するために、オブジェクトを木構造に構成できるようにし、加えて、構成によって、クライアントによる個人とオブジェクトのコンポジションの均一な扱いを可能にする
- Decorator:現在のオブジェクトに動的な方法でより多くの責任を付加するために使用することができ、機能を拡張するためにプロバイダーをサブクラス化する代わりに、柔軟な方法として使用することができる
- Facade:サブシステム内の一連のインターフェイスに対する統一されたインターフェイスが必要な場合に使用できる。上位レベルのインターフェイスを定義することでサブシステムを簡単に使用できるようにする
- Flyweight:共有を利用することで、大量のきめ細かいオブジェクトを効率的にサポートする
- Proxy:オブジェクトの代替やプレースホルダを取得することで、オブジェクトへのアクセスを制御する必要がある場合に使用できる
これらのパターンを、以下のようなアプローチ、あるいは以下のような質問に答えることでカバーしていきます。
- パターンの役割
- デザインパターンが解決する問題
- MQL5での使用方法
Adapter
このセクションでは、構造デザインパターンの種類を特定するために、最初の種類であるAdapterを特定することから始めます。このパターンを理解するためのキーワードは適応性です。単純なことですが、特定の状況で使用できるインターフェイスがあり、そのような状況でいくつかの更新が発生する場合、コードが新しい状況に適応して効果的に動作できるようにインターフェイスを更新することが不可欠になります。このパターンでできることは、今あるクラスのインターフェイスを、クライアントが期待するのと同じように使える別のものに変換することです。つまり、Adapterパターンを使えば、互換性のないインターフェイスを持つクラス同士を連携させることができます。このパターンは、インターフェイスにラッパーを与え、別のインターフェイスとして適応させて機能させるため、Wrapper(ラッパー)とも呼ばれます。
パターンの役割
すでに述べたように、このパターンは、デザインされたインターフェイスがドメイン固有のインターフェイスのアプリケーション要件と一致しない場合に、このクラスのインターフェイスを別のものに変換し、クラスが一緒に動作できるようにするために使うことができます。
以下の図は、Adapterデザインパターンの構造を表しています。
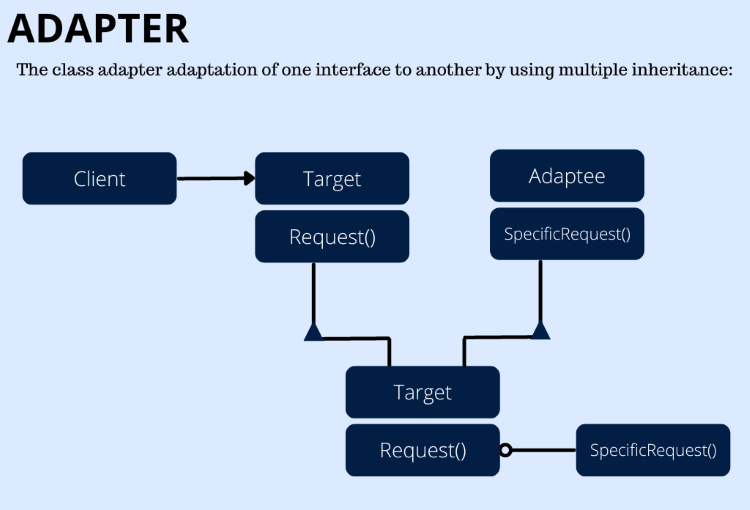
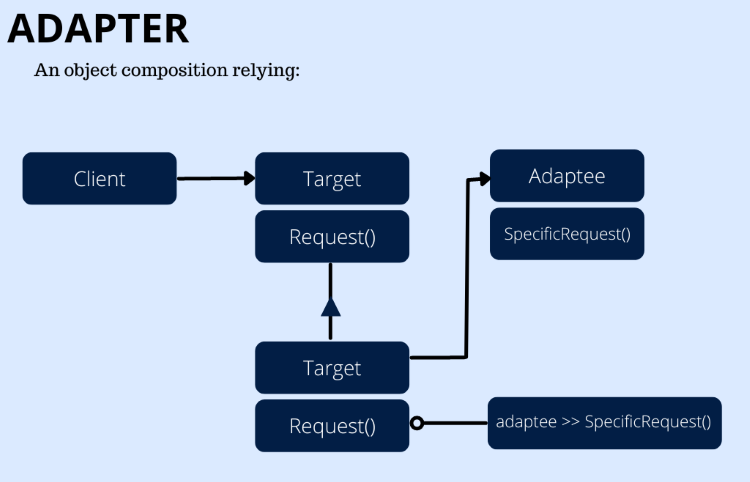
前の図でわかるように、プログラミング言語の多重継承サポートに基づいて、クラスAdapterとオブジェクトAdapterがあります。クライアントが使用する新しいインターフェイスのドメイン固有を識別するターゲット、ターゲットインターフェイスに適応するオブジェクトで参加するクライアント、適応させるために必要な既存のインターフェイス(古いもの)を識別するAdaptee、Adapteeインターフェイスをターゲットインターフェイスに適応させるAdapterがあります。
デザインパターンが解決する問題
- 必要なインターフェイスと一致しないインターフェイスを持つ既存のクラスを使用する
- 互換性のあるインターフェイスを持つクラスでも、互換性のないインターフェイスを持つクラスでも、関連性のないクラスと連携できる再利用可能なクラスを作成する
- 既存の多くのサブクラスを使用する必要がある場合、親クラスのインターフェイスを適応させる
MQL5での使用方法
このセクションでは、このパターン(AdapterClassとObjectClass)をMQL5プログラミング言語でどのように使用できるかを学びます。
namespace機能を使用して領域(AdapterClass)を宣言し、その中で関数、変数、クラスを定義します。
namespace AdapterClass interface機能を使用してTargetを宣言すると、後でクラスによって実装できる特定の機能を決定したり、クライアントが使用するドメイン固有の機能を定義したりできます。
interface Target
  {
   void Request();
  };
class機能を使用して、Adapteeを定義します。Adapteeは、1つのpublicメンバー(SpecificRequest())で適応可能であることが必要な既存のインターフェイスを定義します。
class Adaptee
  {
public:
   void              SpecificRequest();
  };
Adapteeによって要求が実行されたときにメッセージを出力します。
void Adaptee::SpecificRequest(void)
  {
   Print("A specific request is executing by the Adaptee");
  }
ターゲットとAdapteeを多重継承として継承するターゲットのインターフェイスにAdapteeのインターフェイスを適応させるAdapterクラスを宣言します。
class Adapter;
class AdapterAsTarget:public Target
  {
public:
   Adapter*          asAdaptee;
   void              Request();
  };
void AdapterAsTarget::Request()
  {
   printf("The Adapter requested Operation");
   asAdaptee.SpecificRequest();
  }
class Adapter:public Adaptee
  {
public:
   AdapterAsTarget*  asTarget;
                     Adapter();
                    ~Adapter();
  };
void Adapter::Adapter(void)
  {
   asTarget=new AdapterAsTarget;
   asTarget.asAdaptee=&this;
  }
void Adapter::~Adapter(void)
  {
   delete asTarget;
  }
Clientクラスを宣言します。
class Client
  {
public:
   string            Output();
   void              Run();
  };
string Client::Output()
  {
   return __FUNCTION__;
  }
Clientを実行します。
void Client::Run()
  {
   Adapter adapter;
   Target* target=adapter.asTarget;
   target.Request();
  }
MQL5のAdapterクラスの完全なコードは次のように1つのブロックになります。
namespace AdapterClass
{
interface Target
  {
   void Request();
  };
class Adaptee
  {
public:
   void              SpecificRequest();
  };
void Adaptee::SpecificRequest(void)
  {
   Print("A specific request is executing by the Adaptee");
  }
class Adapter;
class AdapterAsTarget:public Target
  {
public:
   Adapter*          asAdaptee;
   void              Request();
  };
void AdapterAsTarget::Request()
  {
   printf("The Adapter requested Operation");
   asAdaptee.SpecificRequest();
  }
class Adapter:public Adaptee
  {
public:
   AdapterAsTarget*  asTarget;
                     Adapter();
                    ~Adapter();
  };
void Adapter::Adapter(void)
  {
   asTarget=new AdapterAsTarget;
   asTarget.asAdaptee=&this;
  }
void Adapter::~Adapter(void)
  {
   delete asTarget;
  }
class Client
  {
public:
   string            Output();
   void              Run();
  };
string Client::Output()
  {
   return __FUNCTION__;
  }
void Client::Run()
  {
   Adapter adapter;
   Target* target=adapter.asTarget;
   target.Request();
  }
}
以下は、MQL5でオブジェクトAdapterを使用する方法です。
namespaceを使用して、AdapterObjectの関数、変数、クラスの宣言領域を作成します。
namespace AdapterObject interfaceを使用して、クライアントが使用するドメイン固有のターゲットを定義します。
interface Target
  {
   void Request();
  };
Adapteeクラスを作成し、適応させる必要のある既存のインターフェイスを定義します。
class Adaptee
  {
public:
   void              SpecificRequest();
  };
void Adaptee::SpecificRequest(void)
  {
   Print("The specific Request");
  }
class Adapter:public Target
  {
public:
   void              Request();
protected:
   Adaptee           adaptee;
  };
void Adapter::Request(void)
  {
   Print("The request of Operation requested");
   adaptee.SpecificRequest();
  }
Clientを宣言します。
class Client
  {
public:
   string            Output();
   void              Run();
  };
string Client::Output()
  {
   return __FUNCTION__;
  }
ClientがAdapterのインスタンスに対する操作を呼び出すときにクライアントを実行します。
void Client::Run()
  {
   Target* target=new Adapter;
   target.Request();
   delete target;
  }
完全なコードは次のように1つのブロックになります。
namespace AdapterObject
{
interface Target
  {
   void Request();
  };
class Adaptee
  {
public:
   void              SpecificRequest();
  };
void Adaptee::SpecificRequest(void)
  {
   Print("The specific Request");
  }
class Adapter:public Target
  {
public:
   void              Request();
protected:
   Adaptee           adaptee;
  };
void Adapter::Request(void)
  {
   Print("The request of Operation requested");
   adaptee.SpecificRequest();
  }
class Client
  {
public:
   string            Output();
   void              Run();
  };
string Client::Output()
  {
   return __FUNCTION__;
  }
void Client::Run()
  {
   Target* target=new Adapter;
   target.Request();
   delete target;
  }
}
Bridge
このセクションでは、構造パターンの1つであるBridgeデザインパターンについて説明します。このパターンを使用する主なアイデアは、抽象化とその実装を切り離す必要があるときに、そのどちらかに更新や変更があった場合に起こりうる将来の衝突を避けることです。HandleまたはBodyとも呼ばれます。
パターンの役割
Bridgeパターンは、多くの実装が可能な抽象化がある場合に使用されます。実装と抽象化を結びつける通常の継承を使用する代わりに、このパターンを使用することで、抽象化とその実装を切り離し、変更や更新時の問題を回避することができます。これは、再利用可能で、拡張可能で、簡単にテストできるクリーンなコードを作成するのに非常に便利です。
以下は、Bridgeデザインパターンの図です。
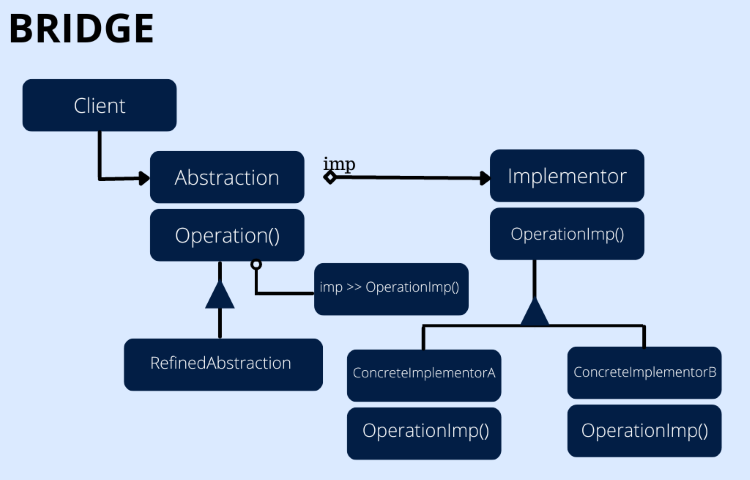
前の図でわかるように、このパターンには次のような参加者がいます。
- Abstraction:抽象化のインターフェイスを定義し、実装者型オブジェクトへの参照を保持
- RefinedAbstraction:抽象化インターフェイスを拡張
- Implementor:実装クラスのインターフェイスを識別
- ConcreteImplementor:実装者のインターフェイスを実装し、このインターフェイスの具象実装を特定
デザインパターンが解決する問題
Bridgeパターンは、次のような場合に使用できます。
- 抽象化と実装の間の連続的なリンクを避ける(このパターンは抽象化と実装を切り離すのに役立つため)
- 異なる抽象化と実装を組み合わせ、衝突することなくそれぞれを独立して拡張する
- 抽象化の実装に変更があった場合に、クライアントへの影響を避ける
- C++でクライアントから抽象化の実装を完全に隠す
MQL5での使用方法
このセクションでは、MQL5プログラミング言語でこのパターンをどのように使用し、そのメリットを得て効果的なソフトウェアを作成できるかを明らかにします。MQL5でBridgeパターンの構造をコード化する方法は次の通りです。
パターンの変数、関数、クラスを定義する宣言領域を作成します。
namespace Bridge クラスが実装する機能を決定するために、interfaceキーワードを使用してImplementorインターフェイスを作成します。
interface Implementor
  {
   void OperationImp();
  };
参加者としてpublicおよびprotectedメンバーを持つ抽象化クラスを作成し、実装者のオブジェクトへの参照を保持します。
class Abstraction
  {
public:
   virtual void      Operation();
                     Abstraction(Implementor*);
                     Abstraction();
                    ~Abstraction();
protected:
   Implementor*      implementor;
  };
void Abstraction::Abstraction(void) {}
void Abstraction::Abstraction(Implementor*i):implementor(i) {}
void Abstraction::~Abstraction()
  {
   delete implementor;
  }
void Abstraction::Operation()
  {
   implementor.OperationImp();
  }
参加者としてのRefinedAbstractionクラスを作成します。
class RefinedAbstraction:public Abstraction
  {
public:
                     RefinedAbstraction(Implementor*);
   void              Operation();
  };
void RefinedAbstraction::RefinedAbstraction(Implementor*i):Abstraction(i) {}
void RefinedAbstraction::Operation()
  {
   Abstraction::Operation();
  }
ConcreteImplementorAとBのクラスを作成します。
class ConcreteImplementorA:public Implementor
  {
public:
   void              OperationImp();
  };
void ConcreteImplementorA::OperationImp(void)
  {
   Print("The implementor A");
  }
class ConcreteImplementorB:public Implementor
  {
public:
   void              OperationImp();
  };
void ConcreteImplementorB::OperationImp(void)
  {
   Print("The implementor B");
  }
Clientクラスを作成します。
class Client
  {
public:
   string            Output();
   void              Run();
  };
string Client::Output(void)
  {
   return __FUNCTION__;
  }
Clientを実行します。
void Client::Run(void)
  {
   Abstraction* abstraction;
   abstraction=new RefinedAbstraction(new ConcreteImplementorA);
   abstraction.Operation();
   delete abstraction;
   abstraction=new RefinedAbstraction(new ConcreteImplementorB);
   abstraction.Operation();
   delete abstraction;
  }
以下のコードがBridgeパターン構造の完全なコードです。
namespace Bridge
{
interface Implementor
  {
   void OperationImp();
  };
class Abstraction
  {
public:
   virtual void      Operation();
                     Abstraction(Implementor*);
                     Abstraction();
                    ~Abstraction();
protected:
   Implementor*      implementor;
  };
void Abstraction::Abstraction(void) {}
void Abstraction::Abstraction(Implementor*i):implementor(i) {}
void Abstraction::~Abstraction()
  {
   delete implementor;
  }
void Abstraction::Operation()
  {
   implementor.OperationImp();
  }
class RefinedAbstraction:public Abstraction
  {
public:
                     RefinedAbstraction(Implementor*);
   void              Operation();
  };
void RefinedAbstraction::RefinedAbstraction(Implementor*i):Abstraction(i) {}
void RefinedAbstraction::Operation()
  {
   Abstraction::Operation();
  }
class ConcreteImplementorA:public Implementor
  {
public:
   void              OperationImp();
  };
void ConcreteImplementorA::OperationImp(void)
  {
   Print("The implementor A");
  }
class ConcreteImplementorB:public Implementor
  {
public:
   void              OperationImp();
  };
void ConcreteImplementorB::OperationImp(void)
  {
   Print("The implementor B");
  }
class Client
  {
public:
   string            Output();
   void              Run();
  };
string Client::Output(void)
  {
   return __FUNCTION__;
  }
void Client::Run(void)
  {
   Abstraction* abstraction;
   abstraction=new RefinedAbstraction(new ConcreteImplementorA);
   abstraction.Operation();
   delete abstraction;
   abstraction=new RefinedAbstraction(new ConcreteImplementorB);
   abstraction.Operation();
   delete abstraction;
  }
}
Composite
このセクションでは、もう1つの構造パターンであるCompositeパターンについて説明します。このパターンは、オブジェクトを構造として木にまとめるのに役立ち、個々のオブジェクトやコンポジションに対するクライアントからの均一な扱いを可能にします。
パターンの役割
前述したように、このCompositeパターンはオブジェクトを木構造にまとめる必要性に基づいており、木がこのパターンの主なキーとなります。コンポーネントがある場合、木構造から、このコンポーネントの下に操作のみをおこなうLeafと、子の追加、削除、呼び出しなどの操作をおこなうCompositeの2つがあることがわかります。
Compositeデザインパターンがどのようなものかを示す図を以下に示します。
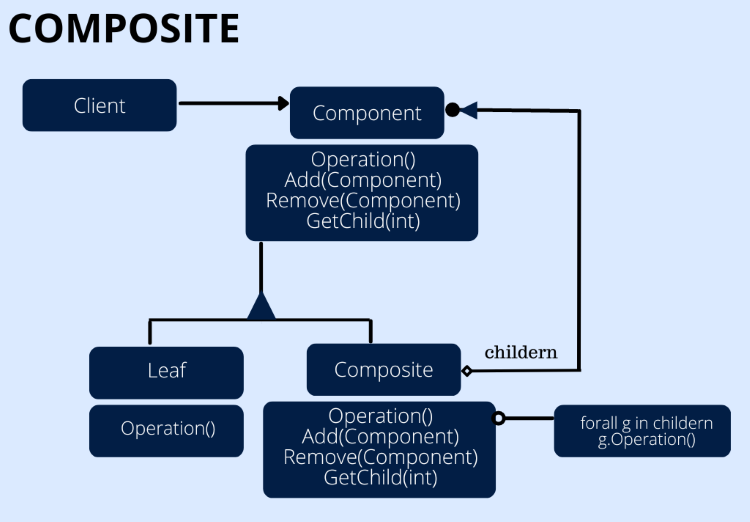
前の図でわかるように、このパターンには次のような参加者がいます。
- Component:オブジェクトのインターフェイスを宣言し、クラスに対してインターフェイスのデフォルト動作を実装し、そのために宣言されたインターフェイスのコンポーネントにアクセスして管理
- Leaf:コンポジション内のリーフのオブジェクトを表し、このリーフには子はなく、コンポジション内でプリミティブとみなされるオブジェクトの振る舞いを特定
- Composite:子コンポーネントを持つコンポーネントの振る舞いを特定し、コンポーネントの子コンポーネントを保存し、コンポーネントのインターフェイスに子コンポーネントのオペレーションを実装
- Client:コンポーネントインターフェイスを介して、クライアントはオブジェクトを操作
デザインパターンが解決する問題
Compositeパターンは、次が必要なときに使用できます。
- オブジェクト表現の部分-全体階層
- Composite内のすべてのオブジェクトは、クライアントによって統一的に扱われる
MQL5での使用方法
このセクションでは、MQL5でCompositeパターンをどのようにコード化するかを紹介します。
namespaceキーワードを使用して、すべての関数、変数、およびクラスを宣言するCompositeスペースまたは領域を作成します。
namespace Composite publicおよびprotectedメンバーを持つComponentクラスを作成し、コンポーネントの親にアクセスします。
class Component
  {
public:
   virtual void      Operation(void)=0;
   virtual void      Add(Component*)=0;
   virtual void      Remove(Component*)=0;
   virtual Component*   GetChild(int)=0;
                     Component(void);
                     Component(string);
protected:
   string            name;
  };
Component::Component(void) {}
Component::Component(string a_name):name(a_name) {}
Leafの追加と削除のユーザーエラーを定義し、Leafクラスを作成します。
#define ERR_INVALID_OPERATION_EXCEPTION   1
class Leaf:public Component
  {
public:
   void              Operation(void);
   void              Add(Component*);
   void              Remove(Component*);
   Component*        GetChild(int);
                     Leaf(string);
  };
void Leaf::Leaf(string a_name):Component(a_name) {}
void Leaf::Operation(void)
  {
   Print(name);
  }
void Leaf::Add(Component*)
  {
   SetUserError(ERR_INVALID_OPERATION_EXCEPTION);
  }
void Leaf::Remove(Component*)
  {
   SetUserError(ERR_INVALID_OPERATION_EXCEPTION);
  }
Component* Leaf::GetChild(int)
  {
   SetUserError(ERR_INVALID_OPERATION_EXCEPTION);
   return NULL;
  }
参加者としてのCompositeクラスを作成し、操作、コンポーネントの追加、削除、GetChild(int)をおこないます。
class Composite:public Component
  {
public:
   void              Operation(void);
   void              Add(Component*);
   void              Remove(Component*);
   Component*        GetChild(int);
                     Composite(string);
                    ~Composite(void);
protected:
   Component*        nodes[];
  };
Composite::Composite(string a_name):Component(a_name) {}
Composite::~Composite(void)
  {
   int total=ArraySize(nodes);
   for(int i=0; i<total; i++)
     {
      Component* i_node=nodes[i];
      if(CheckPointer(i_node)==1)
        {
         delete i_node;
        }
     }
  }
void Composite::Operation(void)
  {
   Print(name);
   int total=ArraySize(nodes);
   for(int i=0; i<total; i++)
     {
      nodes[i].Operation();
     }
  }
void Composite::Add(Component *src)
  {
   int size=ArraySize(nodes);
   ArrayResize(nodes,size+1);
   nodes[size]=src;
  }
void Composite::Remove(Component *src)
  {
   int find=-1;
   int total=ArraySize(nodes);
   for(int i=0; i<total; i++)
     {
      if(nodes[i]==src)
        {
         find=i;
         break;
        }
     }
   if(find>-1)
     {
      ArrayRemove(nodes,find,1);
     }
  }
Component* Composite::GetChild(int i)
  {
   return nodes[i];
  }
参加者としてのClientクラスを作成します。
class Client
  {
public:
   string            Output(void);
   void              Run(void);
  };
string Client::Output(void) {return __FUNCTION__;}
Clientを実行します。
void Client::Run(void)
  {
   Component* root=new Composite("root");
   Component* branch1=new Composite("The branch 1");
   Component* branch2=new Composite("The branch 2");
   Component* leaf1=new Leaf("The leaf 1");
   Component* leaf2=new Leaf("The leaf 2");
   root.Add(branch1);
   root.Add(branch2);
   branch1.Add(leaf1);
   branch1.Add(leaf2);
   branch2.Add(leaf2);
   branch2.Add(new Leaf("The leaf 3"));
   Print("The tree");
   root.Operation();
   root.Remove(branch1);
   Print("Removing one branch");
   root.Operation();
   delete root;
   delete branch1;
  }
Decorator
Decoratorパターンも構造デザインパターンの1つで、作成されたオブジェクトや既存のオブジェクトに対してより大きな構造を形成するために使用することができます。このパターンは、実行時に動的なメソッドでオブジェクトに機能、振る舞い、責任を追加するために使うことができます。なぜなら、柔軟なサブクラス化の代替手段を提供できるからです。 Wrapper(ラッパー)とも呼ばれます。
パターンの役割
前述のように、このパターンは、サブクラス化する代わりに、Wrapperとしてクラス全体に責務を追加することなく、個々のオブジェクトに責務を追加するのに役立ちます。
次の図は、Decoratorデザインパターンの構造を表しています。
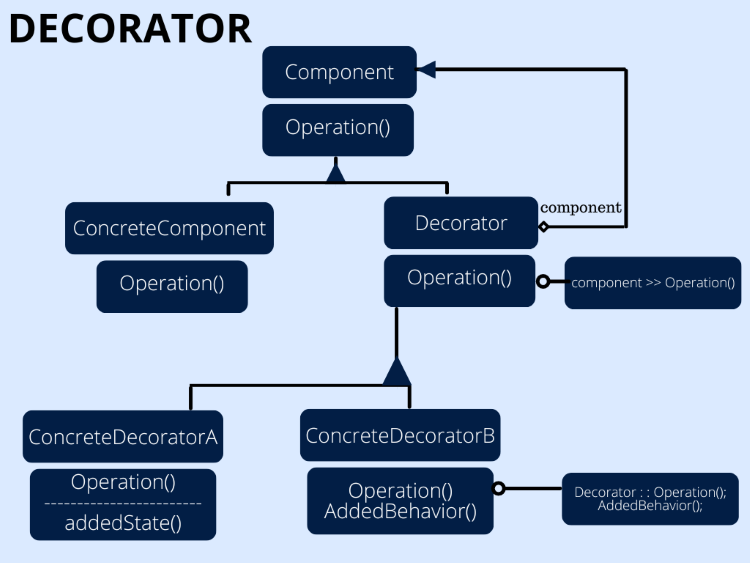
前の図でわかるように、このパターンには次のような参加者がいます。
- Component:オブジェクトのインターフェイスを識別し、動的な方法でオブジェクトに追加の役割を持たせる
- ConcreteComponent:追加責任を付加できるオブジェクトを特定する
- Decorator:コンポーネントのオブジェクトへの参照を保持し、コンポーネントのインターフェイスに適合するインターフェイスを特定できるようにする
- ConcreteDecorator:コンポーネントに責任を追加する
デザインパターンが解決する問題
Decoratorデザインパターンは、次が必要なときに使うことができます。
- 他のオブジェクトに影響を与えることなく、動的かつ透過的に個々のオブジェクトに責任を追加する
- オブジェクトから責任を取り除く
- エクステンションの場合、サブクラス化の方法を見つけるのが非現実的である
MQL5での使用方法
DecoratorパターンをMQL5でコード化し、作成したソフトウェアで使用する必要がある場合は、以下の手順でおこなうことになります。
Decoratorを宣言する領域を作り、その中で必要なものをすべて宣言します。
namespace Decorator オブジェクトのインターフェイスを定義するpublicメンバーを持つComponentクラスを作成します。
class Component
  {
public:
   virtual void      Operation(void)=0;
  };
参加者としてのDecoratorクラスを作成します。
class Decorator:public Component
  {
public:
   Component*        component;
   void              Operation(void);
  };
void Decorator::Operation(void)
  {
   if(CheckPointer(component)>0)
     {
      component.Operation();
     }
  }
参加者としてのConcreteComponentクラスを作成します。
class ConcreteComponent:public Component
  {
public:
   void              Operation(void);
  };
void ConcreteComponent::Operation(void)
  {
   Print("The concrete operation");
  }
ConcreteDecoratorAとBを作成します。
class ConcreteDecoratorA:public Decorator
  {
protected:
   string            added_state;
public:
                     ConcreteDecoratorA(void);
   void              Operation(void);
  };
ConcreteDecoratorA::ConcreteDecoratorA(void):
   added_state("The added state()")
  {
  }
void ConcreteDecoratorA::Operation(void)
  {
   Decorator::Operation();
   Print(added_state);
  }
class ConcreteDecoratorB:public Decorator
  {
public:
   void              AddedBehavior(void);
   void              Operation(void);
  };
void ConcreteDecoratorB::AddedBehavior(void)
  {
   Print("The added behavior()");
  }
void ConcreteDecoratorB::Operation(void)
  {
   Decorator::Operation();
   AddedBehavior();
  }
Clientクラスを作成します。
class Client
  {
public:
   string            Output(void);
   void              Run(void);
  };
string Client::Output(void)
  {
   return __FUNCTION__;
  }
Clientを実行します。
void Client::Run(void)
  {
   Component* component=new ConcreteComponent();
   Decorator* decorator_a=new ConcreteDecoratorA();
   Decorator* decorator_b=new ConcreteDecoratorB();
   decorator_a.component=component;
   decorator_b.component=decorator_a;
   decorator_b.Operation();
   delete component;
   delete decorator_a;
   delete decorator_b;
  }
完全なコードは次のように1つのブロックになります。
namespace Decorator
{
class Component
  {
public:
   virtual void      Operation(void)=0;
  };
class Decorator:public Component
  {
public:
   Component*        component;
   void              Operation(void);
  };
void Decorator::Operation(void)
  {
   if(CheckPointer(component)>0)
     {
      component.Operation();
     }
  }
class ConcreteComponent:public Component
  {
public:
   void              Operation(void);
  };
void ConcreteComponent::Operation(void)
  {
   Print("The concrete operation");
  }
class ConcreteDecoratorA:public Decorator
  {
protected:
   string            added_state;
public:
                     ConcreteDecoratorA(void);
   void              Operation(void);
  };
ConcreteDecoratorA::ConcreteDecoratorA(void):
   added_state("The added state()")
  {
  }
void ConcreteDecoratorA::Operation(void)
  {
   Decorator::Operation();
   Print(added_state);
  }
class ConcreteDecoratorB:public Decorator
  {
public:
   void              AddedBehavior(void);
   void              Operation(void);
  };
void ConcreteDecoratorB::AddedBehavior(void)
  {
   Print("The added behavior()");
  }
void ConcreteDecoratorB::Operation(void)
  {
   Decorator::Operation();
   AddedBehavior();
  }
class Client
  {
public:
   string            Output(void);
   void              Run(void);
  };
string Client::Output(void)
  {
   return __FUNCTION__;
  }
void Client::Run(void)
  {
   Component* component=new ConcreteComponent();
   Decorator* decorator_a=new ConcreteDecoratorA();
   Decorator* decorator_b=new ConcreteDecoratorB();
   decorator_a.component=component;
   decorator_b.component=decorator_a;
   decorator_b.Operation();
   delete component;
   delete decorator_a;
   delete decorator_b;
  }
}
Facade
Facadeは、ソフトウェア開発において他の大きな構造を作るために使用できる、もう1つの構造パターンです。サブシステムをよりスムーズかつ簡単に使用するために、より高いレベルのインターフェイスが特定されます。
パターンの役割
前述したように、Facadeはサブシステムの複雑さからクライアントを切り離す方法であり、lこれは、サブシステムのインターフェイスの集合に対して統一されたインターフェイスを提供するからです。つまり、クライアントは要求したものを得るためにこの統一インターフェイスと対話しますが、このインターフェイスはクライアントが要求したものを返すためにサブシステムと対話します。
Facadeデザインパターンの構造は、以下の図のようになります。
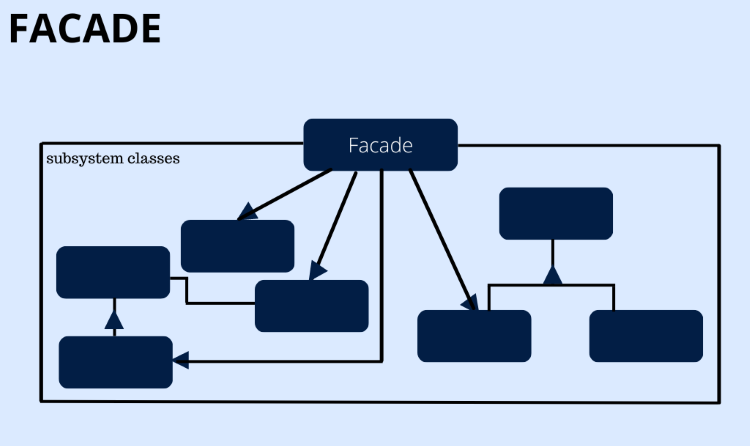
前の図でわかるように、このパターンには次のような参加者がいます。
- Facade:どのサブシステムが要求できるかを知っており、クライアントの要求をサブシステムの適切なオブジェクトに委譲
- サブシステムクラス:サブシステムの機能を実行し、Facadeから要求を受け取るとそれを処理する(Facadeへの参照は 持たない)
デザインパターンが解決する問題
このFacadeパターンは、次が必要なときに使うことができます。
- シンプルなインターフェイスを提供することで、サブシステムの複雑さを簡素化する
- サブシステムをクライアントや他のサブシステムから切り離し、クライアントと抽象化されたクラスの実装間の既存の依存関係を、サブシステムの独立性と移植性に変更する
- 各サブシステムレベルへのエントリーポイントを重ねることによって定義する
MQL5での使用方法
このセクションでは、MQL5でFacadeパターンを使用するコードを提供します。
namespaceを使って、必要なものを宣言するためのFacadeの空間を作ります。
namespace Facade SubSystemA、SubSystemB、SubSystemCクラスを宣言します。
class SubSystemA
  {
public:
   void              Operation(void);
  };
void SubSystemA::Operation(void)
  {
   Print("The operation of the subsystem A");
  }
class SubSystemB
  {
public:
   void              Operation(void);
  };
void SubSystemB::Operation(void)
  {
   Print("The operation of the subsystem B");
  }
class SubSystemC
  {
public:
   void              Operation(void);
  };
void SubSystemC::Operation(void)
  {
   Print("The operation of the subsystem C");
  }
Facadeクラスを宣言します。
class Facade
  {
public:
   void              Operation_A_B(void);
   void              Operation_B_C(void);
protected:
   SubSystemA        subsystem_a;
   SubSystemB        subsystem_b;
   SubSystemC        subsystem_c;
  };
void Facade::Operation_A_B(void)
  {
   Print("The facade of the operation of A & B");
   Print("The request of the facade of the subsystem A operation");
   subsystem_a.Operation();
   Print("The request of the facade of the subsystem B operation");
   subsystem_b.Operation();
  }
void Facade::Operation_B_C(void)
  {
   Print("The facade of the operation of B & C");
   Print("The request of the facade of the subsystem B operation");
   subsystem_b.Operation();
   Print("The request of the facade of the subsystem C operation");
   subsystem_c.Operation();
  }
Clientを宣言します。
class Client
  {
public:
   string            Output(void);
   void              Run(void);
  };
string Client::Output(void)
  {
   return __FUNCTION__;
  }
Clientを実行します。
void Client::Run(void)
  {
   Facade facade;
   Print("The request of client of the facade operation A & B");
   facade.Operation_A_B();
   Print("The request of client of the facade operation B & C");
   facade.Operation_B_C();
  }
完全なコードは次のように1つのブロックになります。
namespace Facade
{
class SubSystemA
  {
public:
   void              Operation(void);
  };
void SubSystemA::Operation(void)
  {
   Print("The operation of the subsystem A");
  }
class SubSystemB
  {
public:
   void              Operation(void);
  };
void SubSystemB::Operation(void)
  {
   Print("The operation of the subsystem B");
  }
class SubSystemC
  {
public:
   void              Operation(void);
  };
void SubSystemC::Operation(void)
  {
   Print("The operation of the subsystem C");
  }
class Facade
  {
public:
   void              Operation_A_B(void);
   void              Operation_B_C(void);
protected:
   SubSystemA        subsystem_a;
   SubSystemB        subsystem_b;
   SubSystemC        subsystem_c;
  };
void Facade::Operation_A_B(void)
  {
   Print("The facade of the operation of A & B");
   Print("The request of the facade of the subsystem A operation");
   subsystem_a.Operation();
   Print("The request of the facade of the subsystem B operation");
   subsystem_b.Operation();
  }
void Facade::Operation_B_C(void)
  {
   Print("The facade of the operation of B & C");
   Print("The request of the facade of the subsystem B operation");
   subsystem_b.Operation();
   Print("The request of the facade of the subsystem C operation");
   subsystem_c.Operation();
  }
class Client
  {
public:
   string            Output(void);
   void              Run(void);
  };
string Client::Output(void)
  {
   return __FUNCTION__;
  }
void Client::Run(void)
  {
   Facade facade;
   Print("The request of client of the facade operation A & B");
   facade.Operation_A_B();
   Print("The request of client of the facade operation B & C");
   facade.Operation_B_C();
  }
}
Flyweight
Flyweight構造パターンも、細かなオブジェクトが大量に存在する場合に有効なパターンです。
パターンの役割
前述したように、共有をサポートとして使用することで、メモリの面でも役立つことがあり、これがFlyweightと名付けられた理由です。
以下は、Flyweightのデザインパターンの構造を図にしたものです。
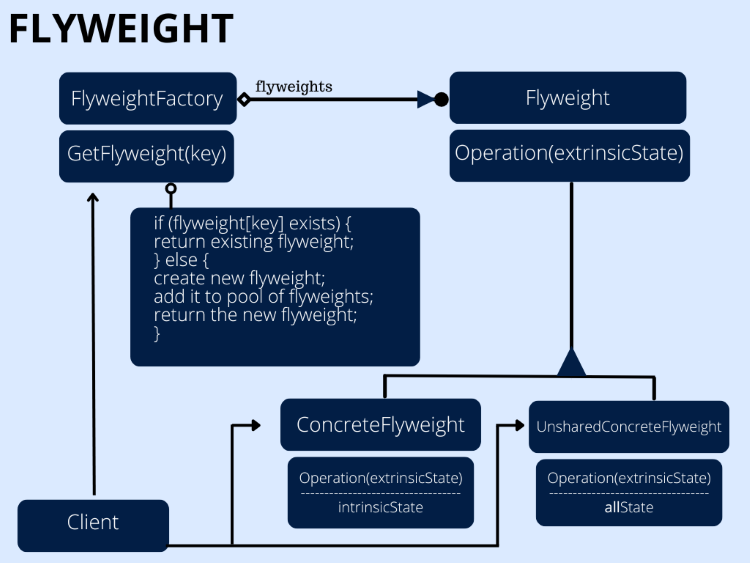
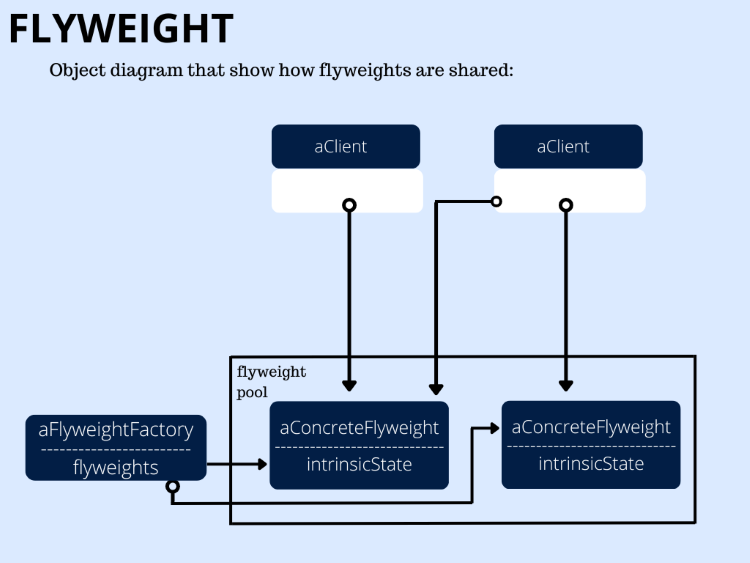
前の図でわかるように、このパターンには次のような参加者がいます。
- Flyweight
- ConcreteFlyweight
- UnsharedConcreteFlyweight
- FlyweightFactory
- Client
デザインパターンが解決する問題
このパターンは次のような場合に使用できます。
- アプリケーションで多数のオブジェクトが使用されている
- 高価な貯蔵コストを削減する必要がある
- オブジェクトの状態のほとんどを外在化できる
- 外在的な状態を取り除けば、多くのオブジェクトの集団が、相対的に少ない共有オブジェクトに置き換わる可能性がある
- 依存関係という点で、アプリケーションにとってオブジェクトのアイデンティティはそれほど重要でない
MQL5での使用方法
このパターンをMQL5でコード化したい場合は、以下のようにコードを作成します。
namespaceキーワードを使ってFlyweight空間を作成し、必要なものをすべて次のように宣言します。
namespace Flyweight interfaceキーワードを使ってFlyweightを宣言します。
interface Flyweight; protectedおよびpublicメンバを参加者として持つPairクラスを作成します。
class Pair
  {
protected:
   string            key;
   Flyweight*        value;
public:
                     Pair(void);
                     Pair(string,Flyweight*);
                    ~Pair(void);
   Flyweight*        Value(void);
   string            Key(void);
  };
Pair::Pair(void){}
Pair::Pair(string a_key,Flyweight *a_value):
   key(a_key),
   value(a_value){}
Pair::~Pair(void)
  {
   delete value;
  }
string Pair::Key(void)
  {
   return key;
  }
Flyweight* Pair::Value(void)
  {
   return value;
  }
Referenceクラスを作成し、コンストラクタとデコンストラクタを定義します。
class Reference
  {
protected:
   Pair*             pairs[];
public:
                     Reference(void);
                    ~Reference(void);
   void              Add(string,Flyweight*);
   bool              Has(string);
   Flyweight*        operator[](string);
protected:
   int               Find(string);
  };
Reference::Reference(void){}
Reference::~Reference(void)
  {
   int total=ArraySize(pairs);
   for(int i=0; i<total; i++)
     {
      Pair* ipair=pairs[i];
      if(CheckPointer(ipair))
        {
         delete ipair;
        }
     }
  }
int Reference::Find(string key)
  {
   int total=ArraySize(pairs);
   for(int i=0; i<total; i++)
     {
      Pair* ipair=pairs[i];
      if(ipair.Key()==key)
        {
         return i;
        }
     }
   return -1;
  }
bool Reference::Has(string key)
  {
   return (Find(key)>-1)?true:false;
  }
void Reference::Add(string key,Flyweight *value)
  {
   int size=ArraySize(pairs);
   ArrayResize(pairs,size+1);
   pairs[size]=new Pair(key,value);
  }
Flyweight* Reference::operator[](string key)
  {
   int find=Find(key);
   return (find>-1)?pairs[find].Value():NULL;
  }
Flyweightインターフェイスを宣言し、外部の状態に作用させます。
interface Flyweight
  {
   void Operation(int extrinsic_state);
  };
ConcreteFlyweightクラスを宣言します。
class ConcreteFlyweight:public Flyweight
  {
public:
   void              Operation(int extrinsic_state);
protected:
   int               intrinsic_state;
  };
void ConcreteFlyweight::Operation(int extrinsic_state)
  {
   intrinsic_state=extrinsic_state;
   printf("The intrinsic state - %d",intrinsic_state);
  }
UnsharedConcreteFlyweightクラスを宣言します。
class UnsharedConcreteFlyweight:public Flyweight
  {
protected:
   int               all_state;
public:
   void              Operation(int extrinsic_state);
  };
void UnsharedConcreteFlyweight::Operation(int extrinsic_state)
  {
   all_state=extrinsic_state;
   Print("all state - %d",all_state);
  }
FlyweightFactoryクラスを宣言します。
class FlyweightFactory
  {
protected:
   Reference        pool;
public:
                     FlyweightFactory(void);
   Flyweight*        Flyweight(string key);
  };
FlyweightFactory::FlyweightFactory(void)
  {
   pool.Add("1",new ConcreteFlyweight);
   pool.Add("2",new ConcreteFlyweight);
   pool.Add("3",new ConcreteFlyweight);
  }
Flyweight* FlyweightFactory::Flyweight(string key)
  {
   if(!pool.Has(key))
     {
      pool.Add(key,new ConcreteFlyweight());
     }
   return pool[key];
  }
Clientクラスを宣言します。
class Client
  {
public:
   string            Output();
   void              Run();
  };
string Client::Output(void)
  {
   return __FUNCTION__;
  }
Clientを実行します。
void Client::Run(void)
  {
   int extrinsic_state=7;
   Flyweight* flyweight;
   FlyweightFactory factory;
   flyweight=factory.Flyweight("1");
   flyweight.Operation(extrinsic_state);
   flyweight=factory.Flyweight("10");
   flyweight.Operation(extrinsic_state);
   flyweight=new UnsharedConcreteFlyweight();
   flyweight.Operation(extrinsic_state);
   delete flyweight;
  }
MQL5でFlyweightパターンをコード化するための完全なコードは次のように1つのブロックになります。
namespace Flyweight
{
interface Flyweight;
class Pair
  {
protected:
   string            key;
   Flyweight*        value;
public:
                     Pair(void);
                     Pair(string,Flyweight*);
                    ~Pair(void);
   Flyweight*        Value(void);
   string            Key(void);
  };
Pair::Pair(void){}
Pair::Pair(string a_key,Flyweight *a_value):
   key(a_key),
   value(a_value){}
Pair::~Pair(void)
  {
   delete value;
  }
string Pair::Key(void)
  {
   return key;
  }
Flyweight* Pair::Value(void)
  {
   return value;
  }
class Reference
  {
protected:
   Pair*             pairs[];
public:
                     Reference(void);
                    ~Reference(void);
   void              Add(string,Flyweight*);
   bool              Has(string);
   Flyweight*        operator[](string);
protected:
   int               Find(string);
  };
Reference::Reference(void){}
Reference::~Reference(void)
  {
   int total=ArraySize(pairs);
   for(int i=0; i<total; i++)
     {
      Pair* ipair=pairs[i];
      if(CheckPointer(ipair))
        {
         delete ipair;
        }
     }
  }
int Reference::Find(string key)
  {
   int total=ArraySize(pairs);
   for(int i=0; i<total; i++)
     {
      Pair* ipair=pairs[i];
      if(ipair.Key()==key)
        {
         return i;
        }
     }
   return -1;
  }
bool Reference::Has(string key)
  {
   return (Find(key)>-1)?true:false;
  }
void Reference::Add(string key,Flyweight *value)
  {
   int size=ArraySize(pairs);
   ArrayResize(pairs,size+1);
   pairs[size]=new Pair(key,value);
  }
Flyweight* Reference::operator[](string key)
  {
   int find=Find(key);
   return (find>-1)?pairs[find].Value():NULL;
  }
interface Flyweight
  {
   void Operation(int extrinsic_state);
  };
class ConcreteFlyweight:public Flyweight
  {
public:
   void              Operation(int extrinsic_state);
protected:
   int               intrinsic_state;
  };
void ConcreteFlyweight::Operation(int extrinsic_state)
  {
   intrinsic_state=extrinsic_state;
   Print("The intrinsic state - %d",intrinsic_state);
  }
class UnsharedConcreteFlyweight:public Flyweight
  {
protected:
   int               all_state;
public:
   void              Operation(int extrinsic_state);
  };
void UnsharedConcreteFlyweight::Operation(int extrinsic_state)
  {
   all_state=extrinsic_state;
   Print("all state - %d",all_state);
  }
class FlyweightFactory
  {
protected:
   Reference        pool;
public:
                     FlyweightFactory(void);
   Flyweight*        Flyweight(string key);
  };
FlyweightFactory::FlyweightFactory(void)
  {
   pool.Add("1",new ConcreteFlyweight);
   pool.Add("2",new ConcreteFlyweight);
   pool.Add("3",new ConcreteFlyweight);
  }
Flyweight* FlyweightFactory::Flyweight(string key)
  {
   if(!pool.Has(key))
     {
      pool.Add(key,new ConcreteFlyweight());
     }
   return pool[key];
  }
class Client
  {
public:
   string            Output();
   void              Run();
  };
string Client::Output(void)
  {
   return __FUNCTION__;
  }
void Client::Run(void)
  {
   int extrinsic_state=7;
   Flyweight* flyweight;
   FlyweightFactory factory;
   flyweight=factory.Flyweight("1");
   flyweight.Operation(extrinsic_state);
   flyweight=factory.Flyweight("10");
   flyweight.Operation(extrinsic_state);
   flyweight=new UnsharedConcreteFlyweight();
   flyweight.Operation(extrinsic_state);
   delete flyweight;
  }
}
Proxy
では、最後の構造デザインパターンであるProxyを特定しましょう。このパターンには、代表的な買い方という意味で多くの種類があります。一般的に言えるのは、Proxyは、このオブジェクトへのアクセスを完全に制御するために、別のオブジェクトの代替物やプレースホルダーを提示するために使うことができるということです。Surrogate(サロゲート)とも呼ばれます。
パターンの役割
このパターンもまた、オブジェクトへのアクセスを制御するサロゲートを提供します。
さて、次の図はProxyデザインパターンの構造です。
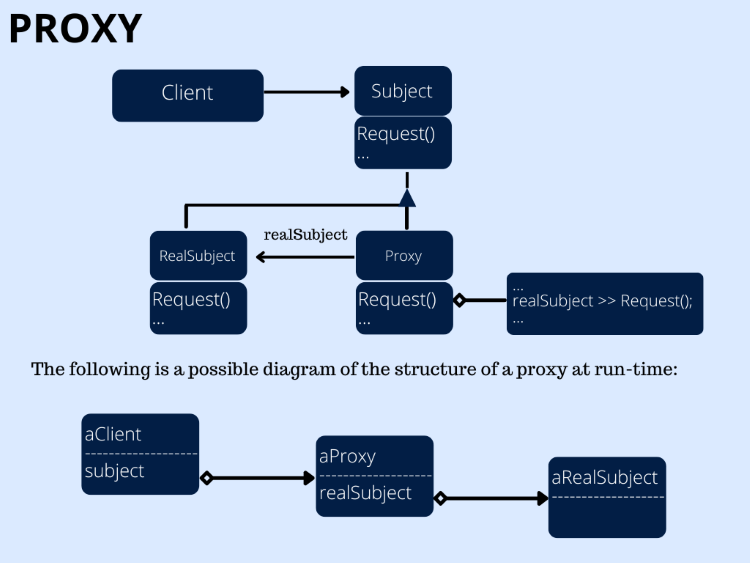
前の図でわかるように、このパターンには次のような参加者がいます。
- Proxy
- Subject
- Real subject
デザインパターンが解決する問題
Proxyを使用できる一般的な状況は以下の通りです。- 異なるアドレス空間にあるオブジェクトの局地的な表現が必要な場合に、それを提供するリモートProxyを使用
- オンデマンドで高価なオブジェクトが必要な場合に、これらのオブジェクトを生成する仮想Proxyを使用
- プライマリーオブジェクトや元のオブジェクトへのアクセスを制御する必要がある場合に、プロテクションProxyを使用
- 裸のポインタの代わりが必要な場合は、スマートリファレンスを使用
MQL5での使用方法
効果的なソフトウェアを作成するためにMQL5でProxyパターンをコード化する必要がある場合、以下の手順でおこなうことができます。
変数、関数、クラス、......など、Proxyの中で必要なものをすべて宣言します。
namespace Proxy 参加者としてのSubjectクラスを宣言します。
class Subject
  {
public:
   virtual void      Request(void)=0;
  };
RealSubjectクラスを作成します。
class RealSubject:public Subject
  {
public:
   void              Request(void);
  };
void RealSubject::Request(void)
  {
   Print("The real subject");
  }
参加者としてのProxyクラスを作成します。
class Proxy:public Subject
  {
protected:
   RealSubject*      real_subject;
public:
                    ~Proxy(void);
   void              Request(void);
  };
Proxy::~Proxy(void)
  {
   delete real_subject;
  }
void Proxy::Request(void)
  {
   if(!CheckPointer(real_subject))
     {
      real_subject=new RealSubject;
     }
   real_subject.Request();
  }
Clientクラスを宣言します。
class Client
  {
public:
   string            Output(void);
   void              Run(void);
  };
string Client::Output(void)
  {
   return __FUNCTION__;
  }
Clientを実行します。
void Client::Run(void)
  {
   Subject* subject=new Proxy;
   subject.Request();
   delete subject;
  }
完全なコードは次のように1つのブロックになります。
namespace Proxy
{
class Subject
  {
public:
   virtual void      Request(void)=0;
  };
class RealSubject:public Subject
  {
public:
   void              Request(void);
  };
void RealSubject::Request(void)
  {
   Print("The real subject");
  }
class Proxy:public Subject
  {
protected:
   RealSubject*      real_subject;
public:
                    ~Proxy(void);
   void              Request(void);
  };
Proxy::~Proxy(void)
  {
   delete real_subject;
  }
void Proxy::Request(void)
  {
   if(!CheckPointer(real_subject))
     {
      real_subject=new RealSubject;
     }
   real_subject.Request();
  }
class Client
  {
public:
   string            Output(void);
   void              Run(void);
  };
string Client::Output(void)
  {
   return __FUNCTION__;
  }
void Client::Run(void)
  {
   Subject* subject=new Proxy;
   subject.Request();
   delete subject;
  }
}
結論
この記事の最後に、構造デザインパターンのトピックについて簡単な紹介と情報を提供しました。この記事を通して、パターンとは何か、パターンが何をするのか、構造は何か、そのパターンがデザイン上の問題として何を解決するのかを特定することで、これらのパターンの各タイプを深く理解しました。再利用可能かつ拡張可能で簡単にテストできるクリーンなコードを作成する方法を理解するために、各種の構造パターンを特定しました。
次のような構造デザインパターンを特定しました。
- Adapter
- Bridge
- Composite
- Decorator
- Facade
- Flyweight
- Proxy
前編で述べたように、デザインパターンはソフトウェア開発者として学ぶべき非常に重要な事項です。なぜなら、デザインパターンは多くの時間を節約し、特定の問題や課題に対するあらかじめ決められた、テストされた、実用的な解決策を使用することで、車輪の再発明を避けることができるからです。
この重要なトピックについてもっと知るには、以下の資料を読むことをお勧めします。
- Design Patterns - Elements of Reusable Object-Oriented Software(Eric Gamma、Richard Helm、Ralph Johnson、John Vlissides著)
- Design Patterns for Dummies(Steve Holzner著)
- Head First Design Patterns (Eric Freeman、Elisabeth Robson、Bert Bates、Kathy Sierra著)
この記事が読者のソフトウェア開発分野での知識と意識に価値を与え、MQL5プログラミング言語によってより効果的なソフトウェアを開発するために役立つことを願っています。この記事が役に立ち、そこから価値を得て、さらに私の記事をお読みになりたい場合は、私の出版物のセクションをご覧ください。MQL5プログラミング言語に関する多くの記事を見つけることができます。また、RSI、MACD、ボリンジャーバンド、移動平均、ストキャスティクスなどのような最も人気のあるテクニカル指標に基づいて取引システムを作成する方法についての多くの記事を見つけることができます。ソフトウェア開発および取引において、読者がこれらから恩恵を受け、知識と成果を高めることを願っています。
MetaQuotes Ltdにより英語から翻訳されました。
元の記事: https://www.mql5.com/en/articles/13724
警告: これらの資料についてのすべての権利はMetaQuotes Ltd.が保有しています。これらの資料の全部または一部の複製や再プリントは禁じられています。
この記事はサイトのユーザーによって執筆されたものであり、著者の個人的な見解を反映しています。MetaQuotes Ltdは、提示された情報の正確性や、記載されているソリューション、戦略、または推奨事項の使用によって生じたいかなる結果についても責任を負いません。
 MQL5入門(第1部):アルゴリズム取引入門ガイド
 モデル解釈をマスターする:機械学習モデルからより深い洞察を得る
- 無料取引アプリ
- 8千を超えるシグナルをコピー
- 金融ニュースで金融マーケットを探索